AWS
Overview
AWS is the Amazon public cloud, offering a full range of services and features across the globe in various datacenters. AWS provides businesses with a flexible, highly scalable, and low-cost way to deliver a variety of services using open standard technologies as well as proprietary solutions. This section of documentation will help you get HPE Morpheus Enterprise and AWS connected to utilize the features below:
Features
Instance, Service, Infrastructure Provisioning & Synchronization
EKS Cluster Creation & Synchronization
HPE Morpheus Enterprise Kubernetes, Docker & KVM Cluster Creation
ELB Classic Load Balancer Creation & Synchronization
ELB Application Load Balancer (ALB) Creation & Synchronization
Security Group Creation & Synchronization
Security Group Rule Creation & Synchronization
Network Synchronization
VPC Creation & Synchronization
CloudFormation Provisioning & Resource Synchronization
Terraform Provisioning & Resource Synchronization
Pricing & Costing Synchronization
MetaData Tag Creation & Synchronization
S3 Bucket Creation & Synchronization
Route53 Automation & Synchronization
IAM Profile Synchronization and Assignment
RDS Support
Backups / Snapshots
Migrations
Auto Scaling
Remote Console (SSH & RDP)
Lifecycle Management and Resize
Restore from Snapshots
Elastic IP Assignment
Network Pools
Enhanced Invoice Costing
Requirements
- AWS IAM Security Credentials
Access Key Secret Key Sufficient User Privileges (see MinimumIAMPolicies section for more info)
- Security Group Configuration for Agent Install, Script Execution, and Remote Console Access
Typical Inbound ports open from HPE Morpheus Enterprise Appliance: 22, 5985, 3389 (22 & 3389 required for Console. 22 & 5985 required for agent-less comms)
Typical Outbound to HPE Morpheus Enterprise Appliance: 443 (Required for Agent install & comms)
Note
These are required for HPE Morpheus Enterprise agent install, communication, and remote console access for windows and linux. Other configurations, such as docker instances, will need the appropriate ports opened as well. Cloud-init Agent Install mode does not require incoming access for port 22.
- Network(s)
IP assignment required for Agent install, Script Execution, and Console if the HPE Morpheus Enterprise Appliance is not able to communicate with AWS instances private ip’s.
Adding an AWS Cloud
Navigate to Infrastructure > Clouds
Select + Create Cloud
Select AWS
Enter the following:
Cloud Configuration
- NAME
Name of the Cloud in HPE Morpheus Enterprise
- CODE
Unique code used for api/cli, automation and policies.
- LOCATION
Description field for adding notes on the cloud, such as location.
- VISIBILITY
For setting cloud permissions in a multi-tenant environment. Not applicable in single tenant environments.
- TENANT
If Visibility is set to Private, select the Tenant the Cloud resources will assigned to.
- ENABLED
When disabled, automatic Cloud sync is paused and the Cloud will not be selectable for provisioning.
- AUTOMATICALLY POWER ON VMS
When enabled, HPE Morpheus Enterprise will maintain the expected power state of managed VMs. HPE Morpheus Enterprise will power on any managed VMs in the Cloud that have been shut down for unknown reasons (not powered off by HPE Morpheus Enterprise) to ensure availability of services.
Note
When “AUTOMATICALLY POWER ON VMS” is enabled, the power state of managed VMs should be maintained in HPE Morpheus Enterprise. This setting is not applicable to discovered/unmanaged resources.
Details
- REGION
Select AWS Region for the Cloud. AWS Clouds may also be scoped to all regions.
- ACCESS KEY
Access Key ID from AWS IAM User Security Credentials.
- SECRET KEY
Secret Access Key associated with the Access Key ID.
- USE HOST IAM CREDENTIALS
Check to use use Host IAM Credentials
- ROLE ARN
Supports security token service (STS) to AssumeRole by entering an AWS Role ARN
- EXTERNAL ID
When required to AssumeRole, included the needed External ID
- INVENTORY
- Basic
HPE Morpheus Enterprise will sync information on all EC2 Instances in the selected VPC the IAM user has access to, including Name, IP Addresses, Platform Type, Power Status, and overall resources sizing for Storage, CPU and RAM, every 5 minutes. Inventoried EC2 Instances will appear as Unmanaged VM’s.
- Full
In addition to the information synced from Basic Inventory level, HPE Morpheus Enterprise will gather Resource Utilization metrics for Memory, Storage and CPU utilization per VM.
- Off
Existing EC2 Instances will not be inventoried
Note
Cloud Watch must be configured in AWS for HPE Morpheus Enterprise to collect Memory and Storage utilization metrics on inventoried EC2 instances.
- USE VPC
Specify if the target account is using EC2-VPC or EC2-Classic Platform. In almost all cases, VPC should be selected, and then select the target VPC from the synced available VPC’s list, or All VPC’s.
The AWS cloud is ready to be added to a group and saved. Additional configuration options available:
- IMAGE TRANSFER STORE
S3 bucket for Image transfers, required for migrations into AWS.
- EBS ENCRYPTION
Enable or disable encryption of EBS Volumes
- COSTING KEY
For Gov Cloud pricing only, key for standard managing cost account
- COSTING SECRET
For Gov Cloud pricing only, secret for standard managing cost account
Advanced Options
- DOMAIN
Specify a default domain for instances provisioned to this Cloud.
- SCALE PRIORITY
Only affects Docker Provisioning. Specifies the priority with which an instance will scale into the cloud. A lower priority number means this cloud integration will take scale precedence over other cloud integrations in the group.
- APPLIANCE URL
Alternate Appliance url for scenarios when the default Appliance URL (configured in admin > settings) is not reachable or resolvable for Instances provisioned in this cloud. The Appliance URL is used for Agent install and reporting.
- TIME ZONE
Configures the time zone on provisioned VM’s if necessary.
- DATACENTER ID
Used for differentiating pricing among multiple datacenters. Leave blank unless prices are properly configured.
- NETWORK MODE
Unmanaged or select a Network Integration (NSX, ACI etc)
- LOCAL FIREWALL
On or Off. Enable to managed Host and VM firewall/IP Table rules (linux only)
- SECURITY SERVER
Security Server setting is for Security Service Integrations such as ACI
- TRUST PROVIDER
Select Internal (Morpheus) or an existing Trust Provider Integration
- STORAGE MODE
Single Disk, LVM or Clustered
- BACKUP PROVIDER
Select a backup provider. Depending on the Cloud type and any currently-configured backup plugins you may select Internal Backups (Morpheus) or another configured backup solution
- REPLICATION PROVIDER
Sets the default Replication Provider for the Cloud. Select an existing Replication Provider Integration
- GUIDANCE
Enable Guidance recommendations on cloud resources.
- COSTING
Enable for HPE Morpheus Enterprise to sync Costing data from the Cloud provider, when available. For on-prem Clouds, enabling costing activates a costing service designed to mirror the live costing experience of public clouds, including invoicing with line items and real-time cost data (Operations > Costing > Invoices). If your organization utilizes reserved instances and you want to pull in related pricing data, some Cloud integrations include the option to select Costing and Reservations. If this is not relevant, select Costing to save money on additional calls to the Cloud provider’s costing API.
- DNS INTEGRATION
Records for instances provisioned in this cloud will be added to selected DNS integration.
- SERVICE REGISTRY
Services for instances provisioned in this cloud will be added to selected Service Registry integration.
- CONFIG MANAGEMENT
Select a Chef, Ansible or Puppet integration to be used with this Cloud.
- CMDB
Select CMDB Integration to automatically update selected CMDB.
- CMDB DISCOVERY
When checked, any automatically discovered (unmanaged) servers onboarded into HPE Morpheus Enterprise from this Cloud will also have CMDB records created for them.
- CHANGE MANAGEMENT
Select an existing Change Management Integration to set on the Cloud. ex: Cherwell
- AGENT INSTALL MODE
SSH / WINRM / Guest Execution: HPE Morpheus Enterprise will attempt to use SSH, WINRM or Guest Execution for Agent install.
Cloud Init / Unattend (when available): (DEFAULT) HPE Morpheus Enterprise will utilize Cloud-Init or Cloudbase-Init for agent install when provisioning images with Cloud-Init/Cloudbase-Init installed. HPE Morpheus Enterprise will fall back on SSH or WINRM if cloud-init is not installed on the provisioned image. Morpheus will also add Agent installation to Windows unattend.xml data when performing Guest Customizations or utilizing syspreped images.
- VDI GATEWAY
Set a VDI Gateway for outbound communication from the HPE Morpheus Enterprise Appliance to the vdi endpoints. VDI Gateways can be added in
/tools/vdi/gateways
CUSTOM LOGOS
When integrating a Cloud, it will appear by default throughout the UI with its standard logo (VMware logo for VMware Clouds, etc.). If desired, you may upload a custom logo that should appear instead. This might be useful for MSPs which might not want to reveal the Cloud type underlying its services. A dark mode version of the logo may also be uploaded if the standard logo doesn’t look right against the HPE Morpheus Enterprise dark mode theme. Checking USE DEFAULT CLOUD LOGOS allows the user to return to the standard logo for the Cloud type without deleting the custom uploaded logo.
INVENTORY OPTIONS
Inventory options allow you to set a default active or inactive state for certain discovered resources. The list of available resources to configure will vary based on the Cloud type and its supported resources. By default, all possible resources for the Cloud type will be discovered in an active state. Uncheck the box for some or all resources to discover them in an inactive state. The list of potential resources that may appear include:
Service Plans
Resource Pools
Networks
Security Groups
Datastores
Folders
Provisioning Command
- PROXY
Set a proxy for inbound communication from Instances to the HPE Morpheus Enterprise Appliance. Proxies can be added in the Infrastructure > Networks > Proxies tab.
- Bypass Proxy for Appliance URL
Enable to bypass proxy settings (if added) for HPE Morpheus Enterprise Agent communication to the Appliance URL.
- NO PROXY
Include a list of IP addresses or name servers to exclude from proxy traversal
- USER DATA (LINUX)
Add cloud-init user data. HPE Morpheus Enterprise 4.1.0 and earlier assumes bash syntax. HPE Morpheus Enterprise 4.1.1 and later supports all User Data formats. Refer to https://cloudinit.readthedocs.io/en/latest/topics/format.html for more information.
- KMS KEY ID
For specify an AWS KMS key for encrypting EBS Volumes when volume encryption is enabled
Provisioning and Keypairs
During provisioning, users do not need to create or select a keypair as you would do when provisioning directly from the AWS console. If needed, HPE Morpheus Enterprise will create an AWS keypair without input from the user. In the AWS console and in the HPE Morpheus Enterprise Keypairs Section (Infrastructure > Trust > Key Pairs) you will see these keypairs listed. HPE Morpheus Enterprise will also inventory other keypairs which are created in your integrated AWS clouds and these will be listed out in the HPE Morpheus Enterprise Keypairs section.
These created keypairs are not accessible to the user as you do not see them at creation time and they are encrypted as stored in the HPE Morpheus Enterprise database. To have access to the Instance after provisioning, the user should have his or her user created during provisioning. This is done by creating a Linux user in HPE Morpheus Enterprise User Settings and associating a keypair with the user. If you don’t currently have a keypair to use, HPE Morpheus Enterprise can generate one for you in the Keypairs section.
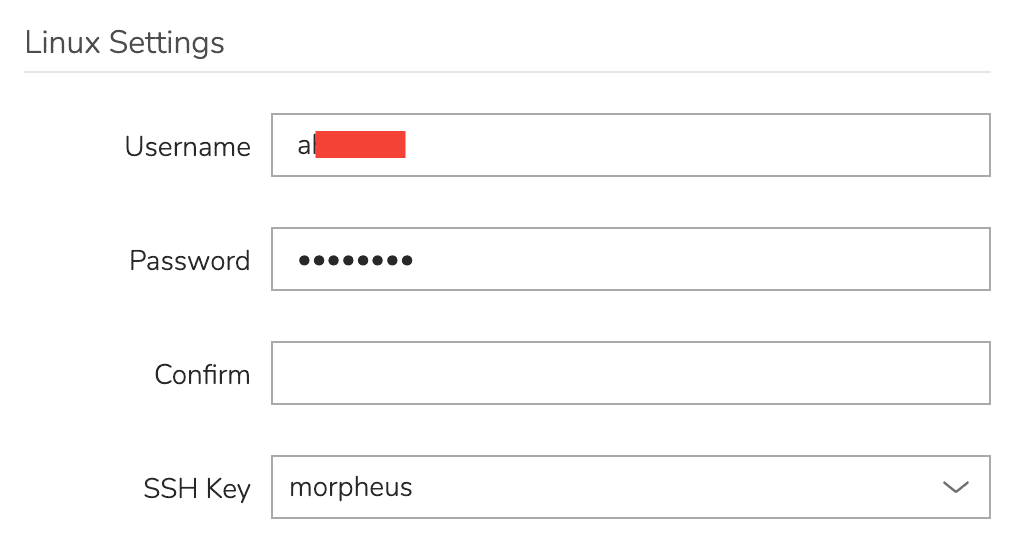
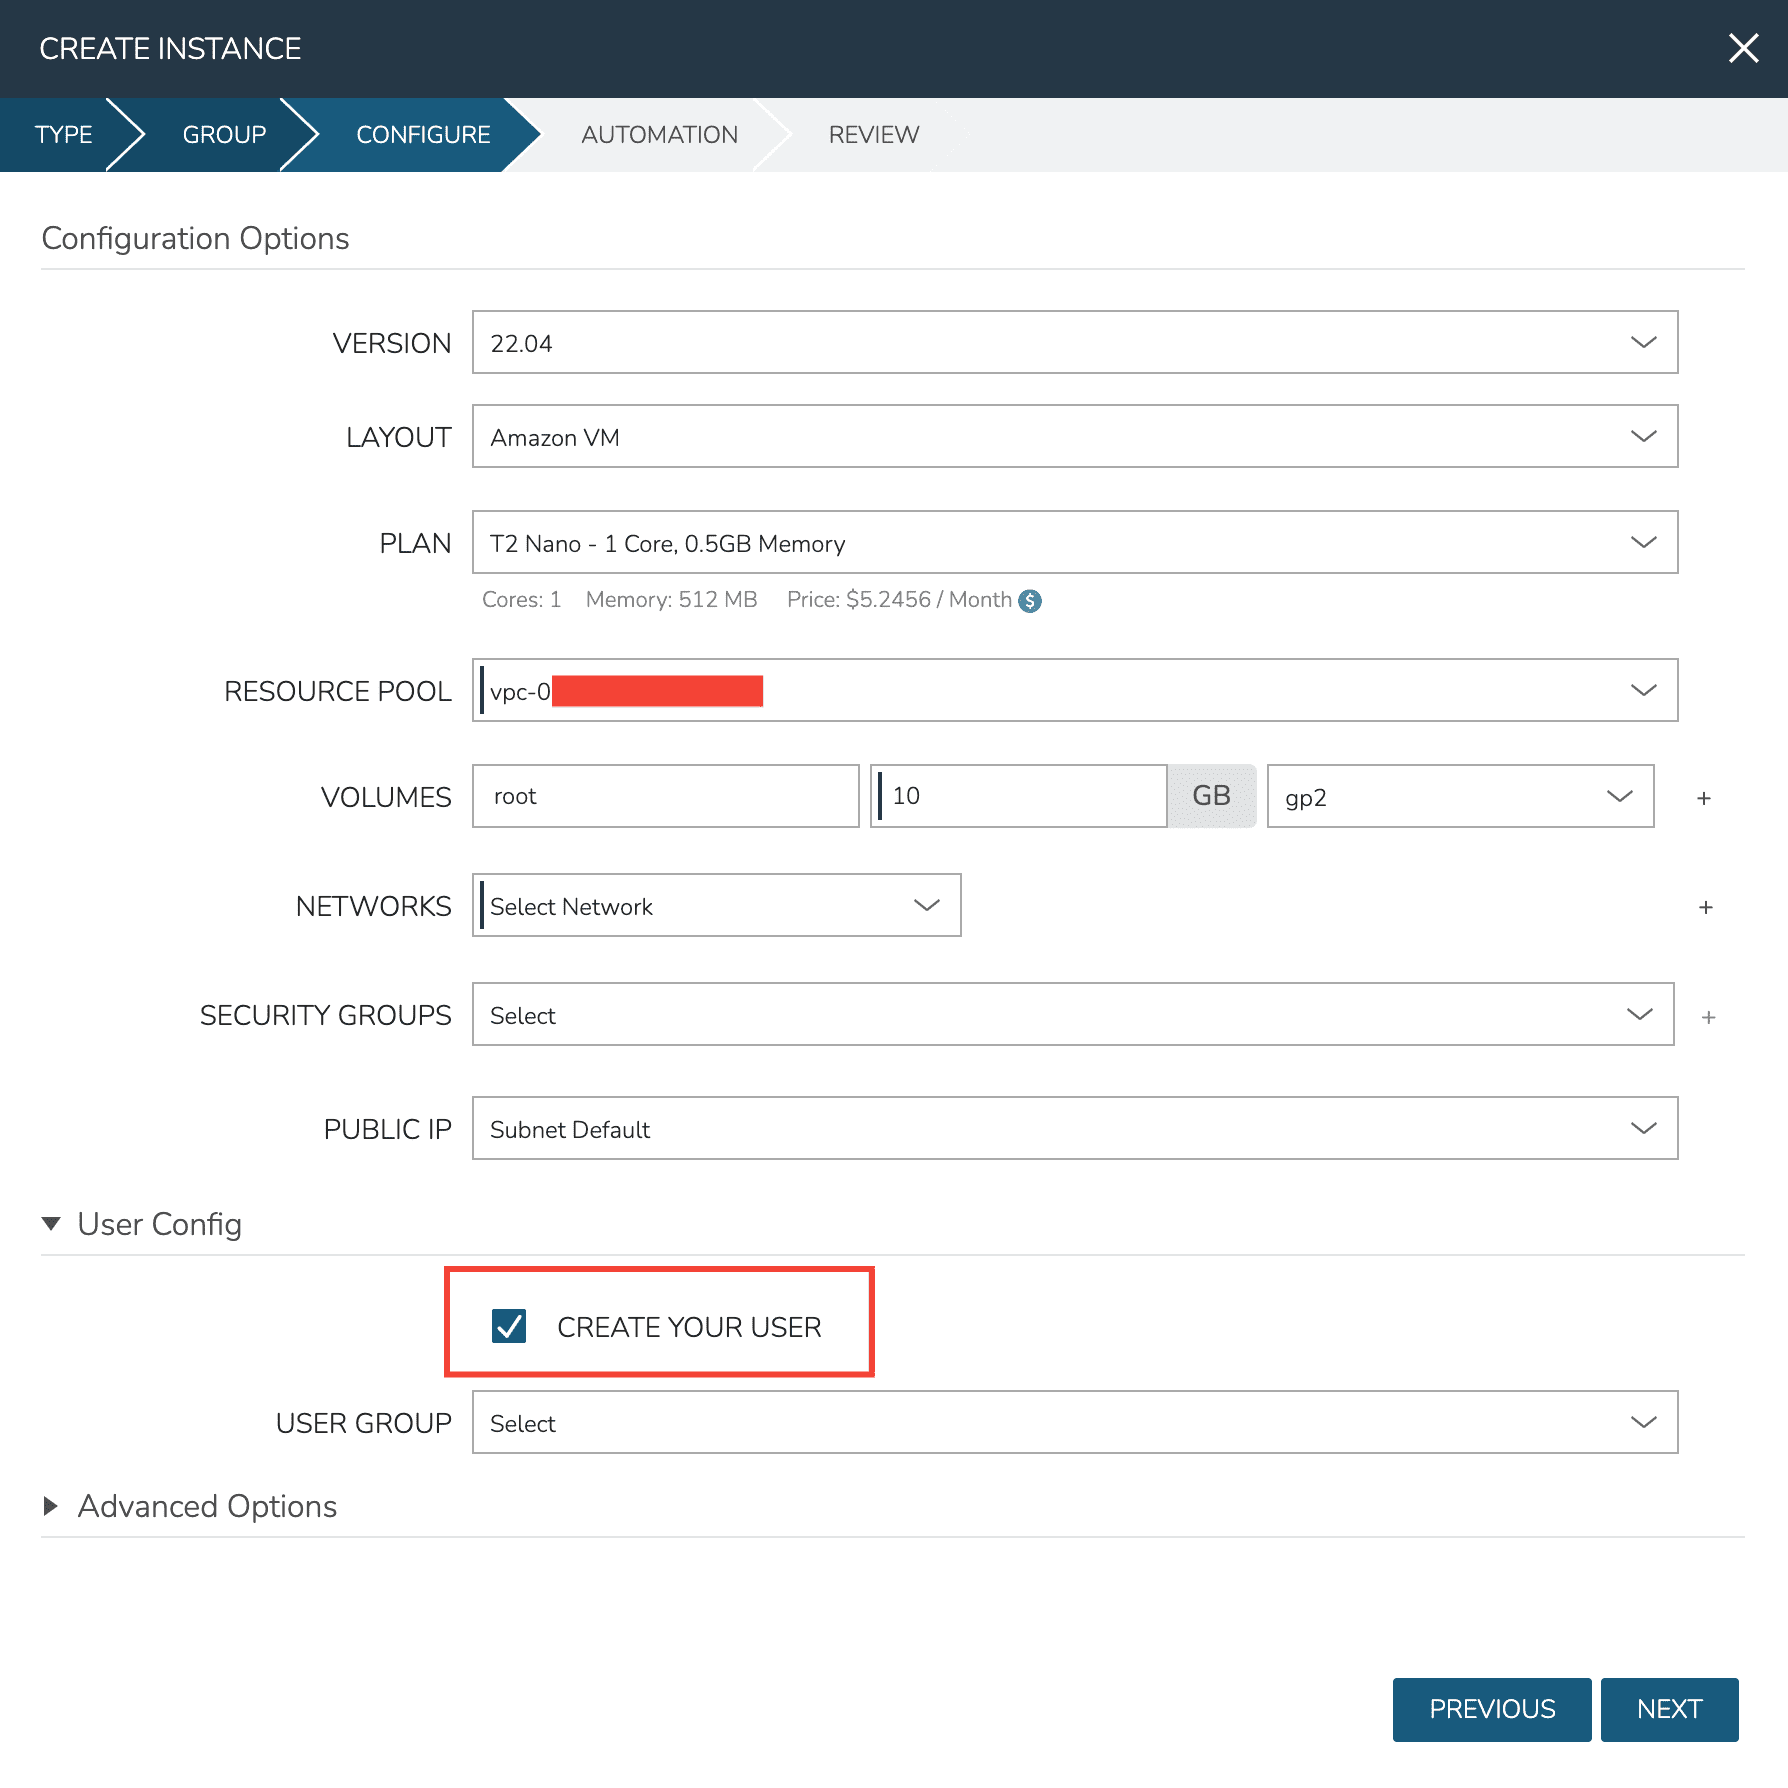
With your user set in HPE Morpheus Enterprise User Settings, ensure that your user is being created during Instance provisioning. On the CONFIGURE tab of the Instance provisioning wizard, mark the “CREATE YOUR USER” box. This is normally checked by default if a user is configured in HPE Morpheus Enterprise User Settings but you can confirm that here.
It’s worth noting that adding your user to the provisioned workload does not replace the keypair used by HPE Morpheus Enterprise during provisioning. Instead it adds the public key for your user to the authorized keys file on the workload which allows you to access it. You can confirm this by catting out the authorized key file on any of your HPE Morpheus Enterprise-provisioned workloads (~/.ssh/authorized_keys). You will at least see two keys, one for the HPE Morpheus Enterprise service user and one for your own user.
Note
In general it should not cause problems if HPE Morpheus Enterprise-generated keypairs are deleted from the AWS console or from the HPE Morpheus Enterprise keypairs section. You would not lose console access to the VM. If needed, however, HPE Morpheus Enterprise will create more keypairs and there is currently no functionality to automatically remove these keypairs. They can be safely ignored, generally speaking there is no need to manually delete them.
Enhanced Invoice Costing Configuration
AWS cloud integrations in HPE Morpheus Enterprise will sync highly-granular costing data through the use of AWS Costing & Utilization Reports (CUR). If desired, users can turn on costing in the HPE Morpheus Enterprise Cloud configuration without linking a CUR to use AWS Cost Explorer instead. HPE Morpheus Enterprise version 4.2.3 also simplified the way CUR reports can be selected or created in order to sync costing data. The section below discusses setting up enhanced costing through CUR reports both in 4.2.3 and versions prior. For additional details on setting up costing with AWS GovCloud, see the next section.
Note
Even with a costing report configured in the Cloud integration as described below, the COSTING value must also be set to “Costing and Reservations” in order for enhanced invoice data to be brought into HPE Morpheus Enterprise. Confirm this setting by editing the Amazon Cloud integration, and checking the COSTING value in the Advanced Options panel before continuing.
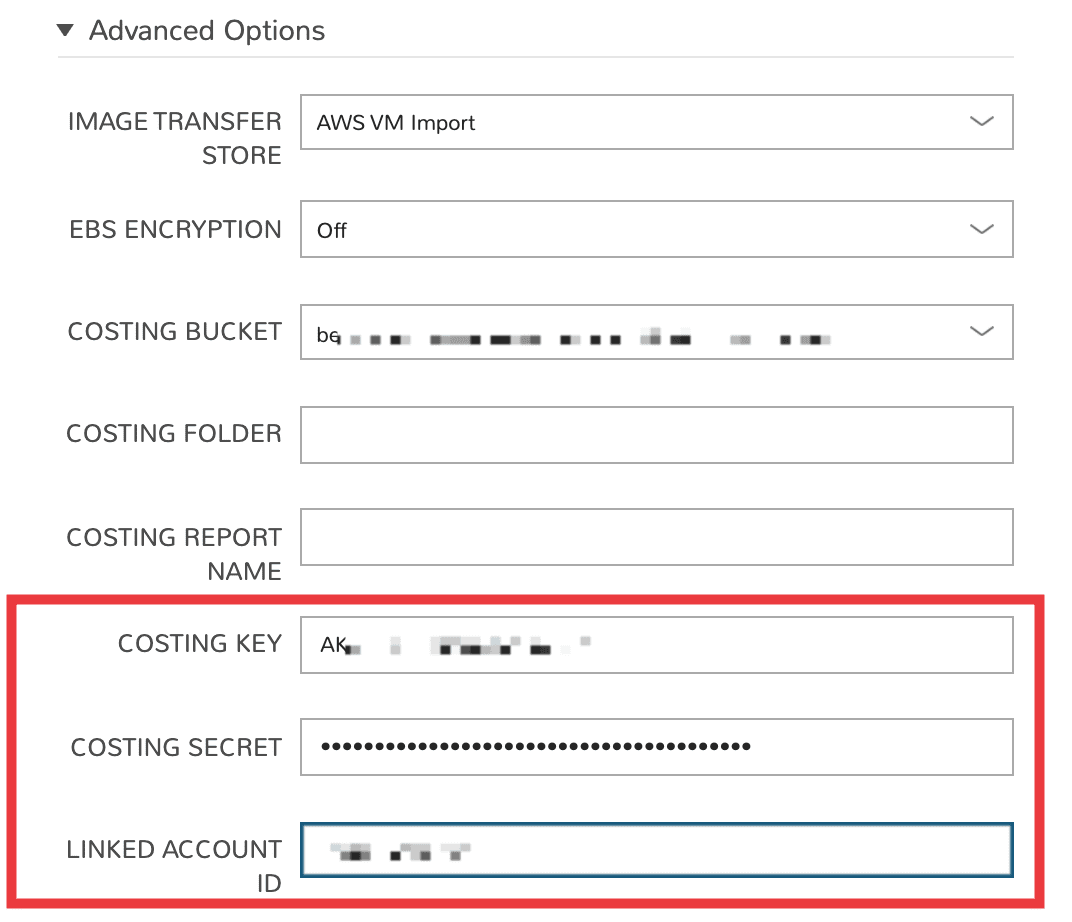
v4.2.3 and Above
In HPE Morpheus Enterprise 4.2.3+, edit the Amazon cloud integration or create a new Amazon Cloud to get started. On the Create/Edit Cloud modal, open the advanced options section. The relevant fields for configuring invoice costing are shown below:
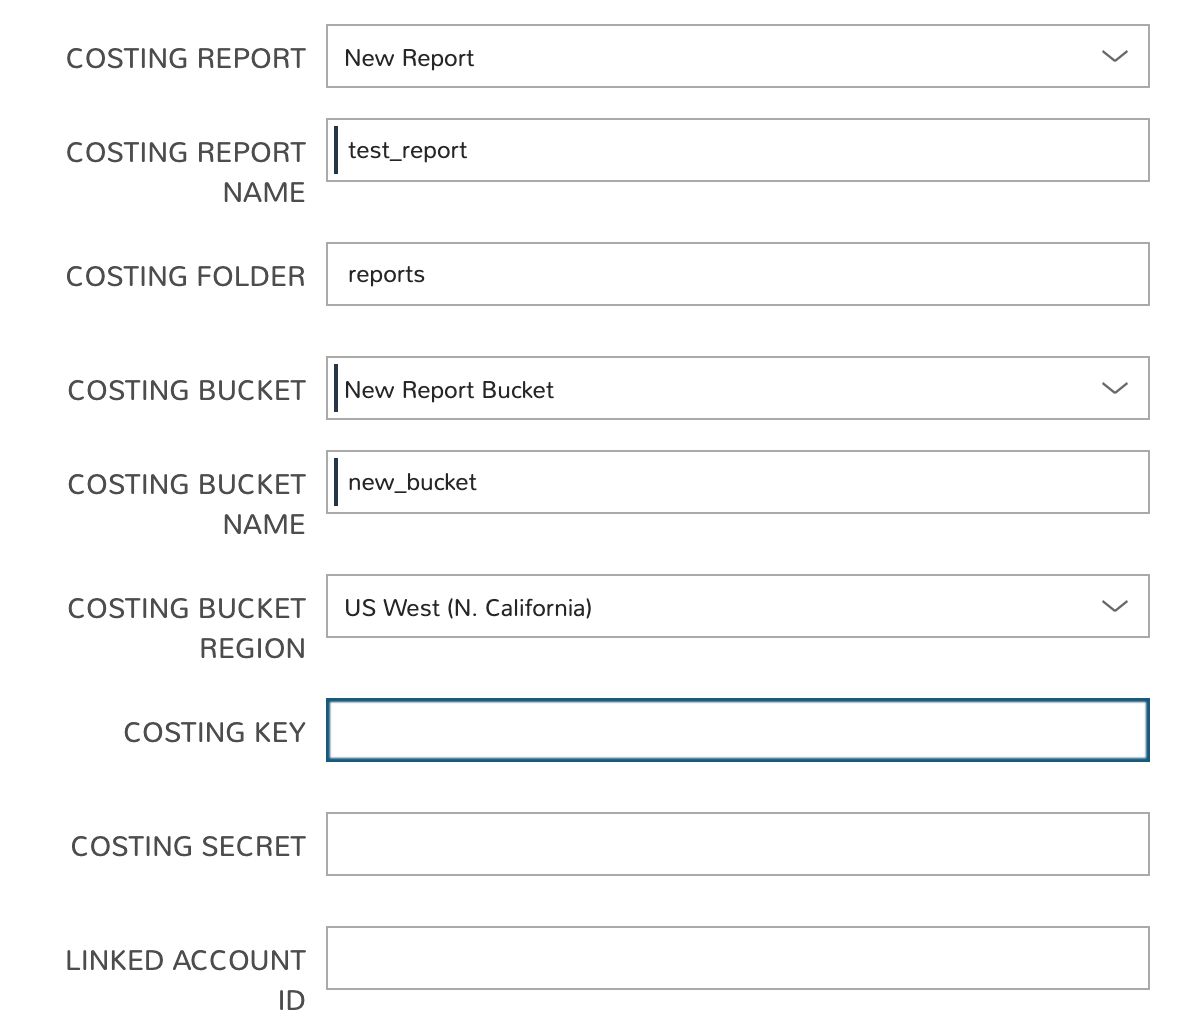
In the example case above, a new report and a new S3 bucket are created but HPE Morpheus Enterprise will also sync in buckets and reports that meet the required parameters if they already exist. For reports to be synced they must meet the requirements listed below:
Hourly time granularity
Include resource IDs
GZIP compression
CSV format
If you don’t currently have a report meeting those criteria, you can create one by selecting “New Report” from the REPORT NAME dropdown menu. A new S3 bucket can be created in similar fashion if needed. You may also want to review the section below on configuration for HPE Morpheus Enterprise 4.2.2 and below to note policies that will be applied to your selected bucket and Cost Explorer permissions required for the AWS cloud user associated with the HPE Morpheus Enterprise Cloud integration.
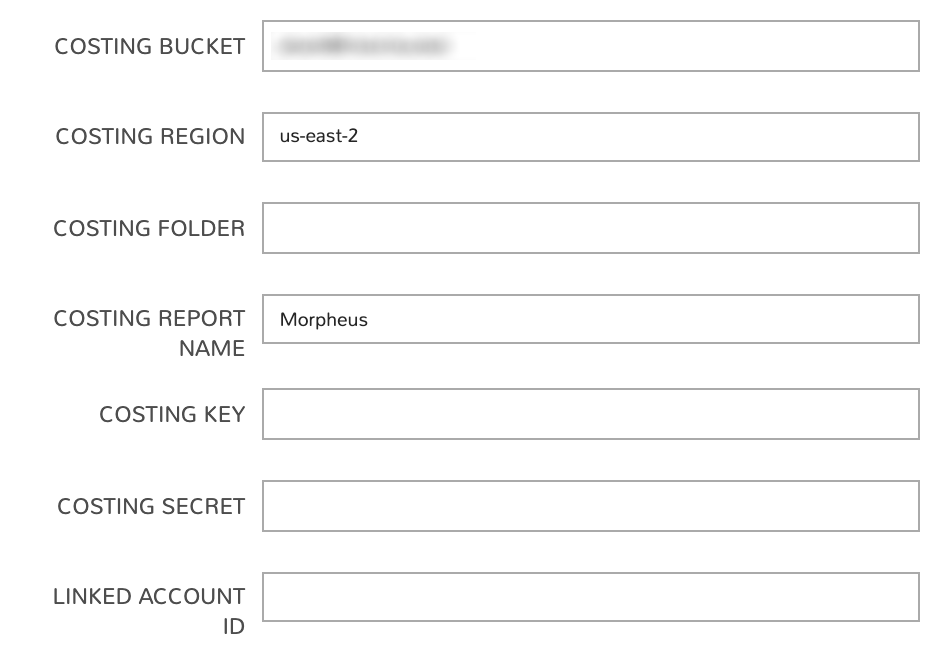
In the end, the following fields must be filled in order to complete the process:
COSTING BUCKET: The S3 bucket name
COSTING REGION: The region the bucket was created in
COSTING FOLDER: This is the report path prefix if you configured one earlier
COSTING REPORT NAME: The name given to your CUR report
COSTING KEY: If the IAM user for this AWS cloud integration does not have access to the S3 bucket with the CUR data, enter the AWS Key ID for an IAM user with access
COSTING SECRET: If the IAM user for this AWS cloud integration does not have access to the S3 bucket with the CUR data, enter the AWS Secret Key for the IAM account whose Key ID you entered in the previous field
LINKED ACCOUNT ID: If the IAM user for this AWS cloud integration does not have access to the S3 bucket with the CUR data, enter the AWS account number that the IAM user from the above step resides in
Note
If the AWS cloud account is a GovCloud account, enter the COSTING KEY, COSTING SECRET, and LINKED ACCOUNT ID for the master commercial account your GovCloud account is associated with.
Using the HPE Morpheus Enterprise interface to create a CUR, and optionally a new S3 bucket, the IAM user requires permissions in AWS to be successful. By default, only the root user will have access to billing (including CUR), but billing can be enabled for IAM users following Amazon’s documentation for Activating IAM Access. Once IAM access is activated, policies need to be assigned to the user being configured on the cloud in HPE Morpheus Enterprise. If the user is an administrator of the AWS account, no additional policies are needed. Below are some example policies needed for different scenarios:
Creating a new CUR and new S3 bucket Click to Expand/Hide
{
  "Version": "2012-10-17",
  "Statement": [
      {
          "Effect": "Allow",
          "Action": [
              "s3:PutBucketPolicy",
              "s3:CreateBucket",
              "s3:ListBucket",
              "s3:GetBucketPolicy",
              "cur:DescribeReportDefinitions",
              "cur:PutReportDefinition"
          ],
          "Resource": "*"
      }
  ]
}
Creating a new CUR and using an existing S3 bucket Click to Expand/Hide
{
  "Version": "2012-10-17",
  "Statement": [
      {
          "Effect": "Allow",
          "Action": [
              "s3:ListBucket",
              "s3:GetBucketPolicy",
              "cur:DescribeReportDefinitions",
              "cur:PutReportDefinition"
          ],
          "Resource": "*"
      }
  ]
}
Using an existing CUR Click to Expand/Hide
{
  "Version": "2012-10-17",
  "Statement": [
      {
          "Effect": "Allow",
          "Action": [
              "cur:DescribeReportDefinitions"
          ],
          "Resource": "*"
      }
  ]
}
Important
The user configured on the cloud will need access to the objects in the S3 bucket configured on the CUR. If creating the CUR via the HPE Morpheus Enterprise UI, this should be done automatically. If an existing CUR report or existing S3 bucket was selected, ensure the user has permissions to access the objects in the configured S3 bucket. Alternatively, the COSTING KEY and COSTING SECRET can be used to configure a different user that has access to the S3 bucket.
v4.2.2 and Below
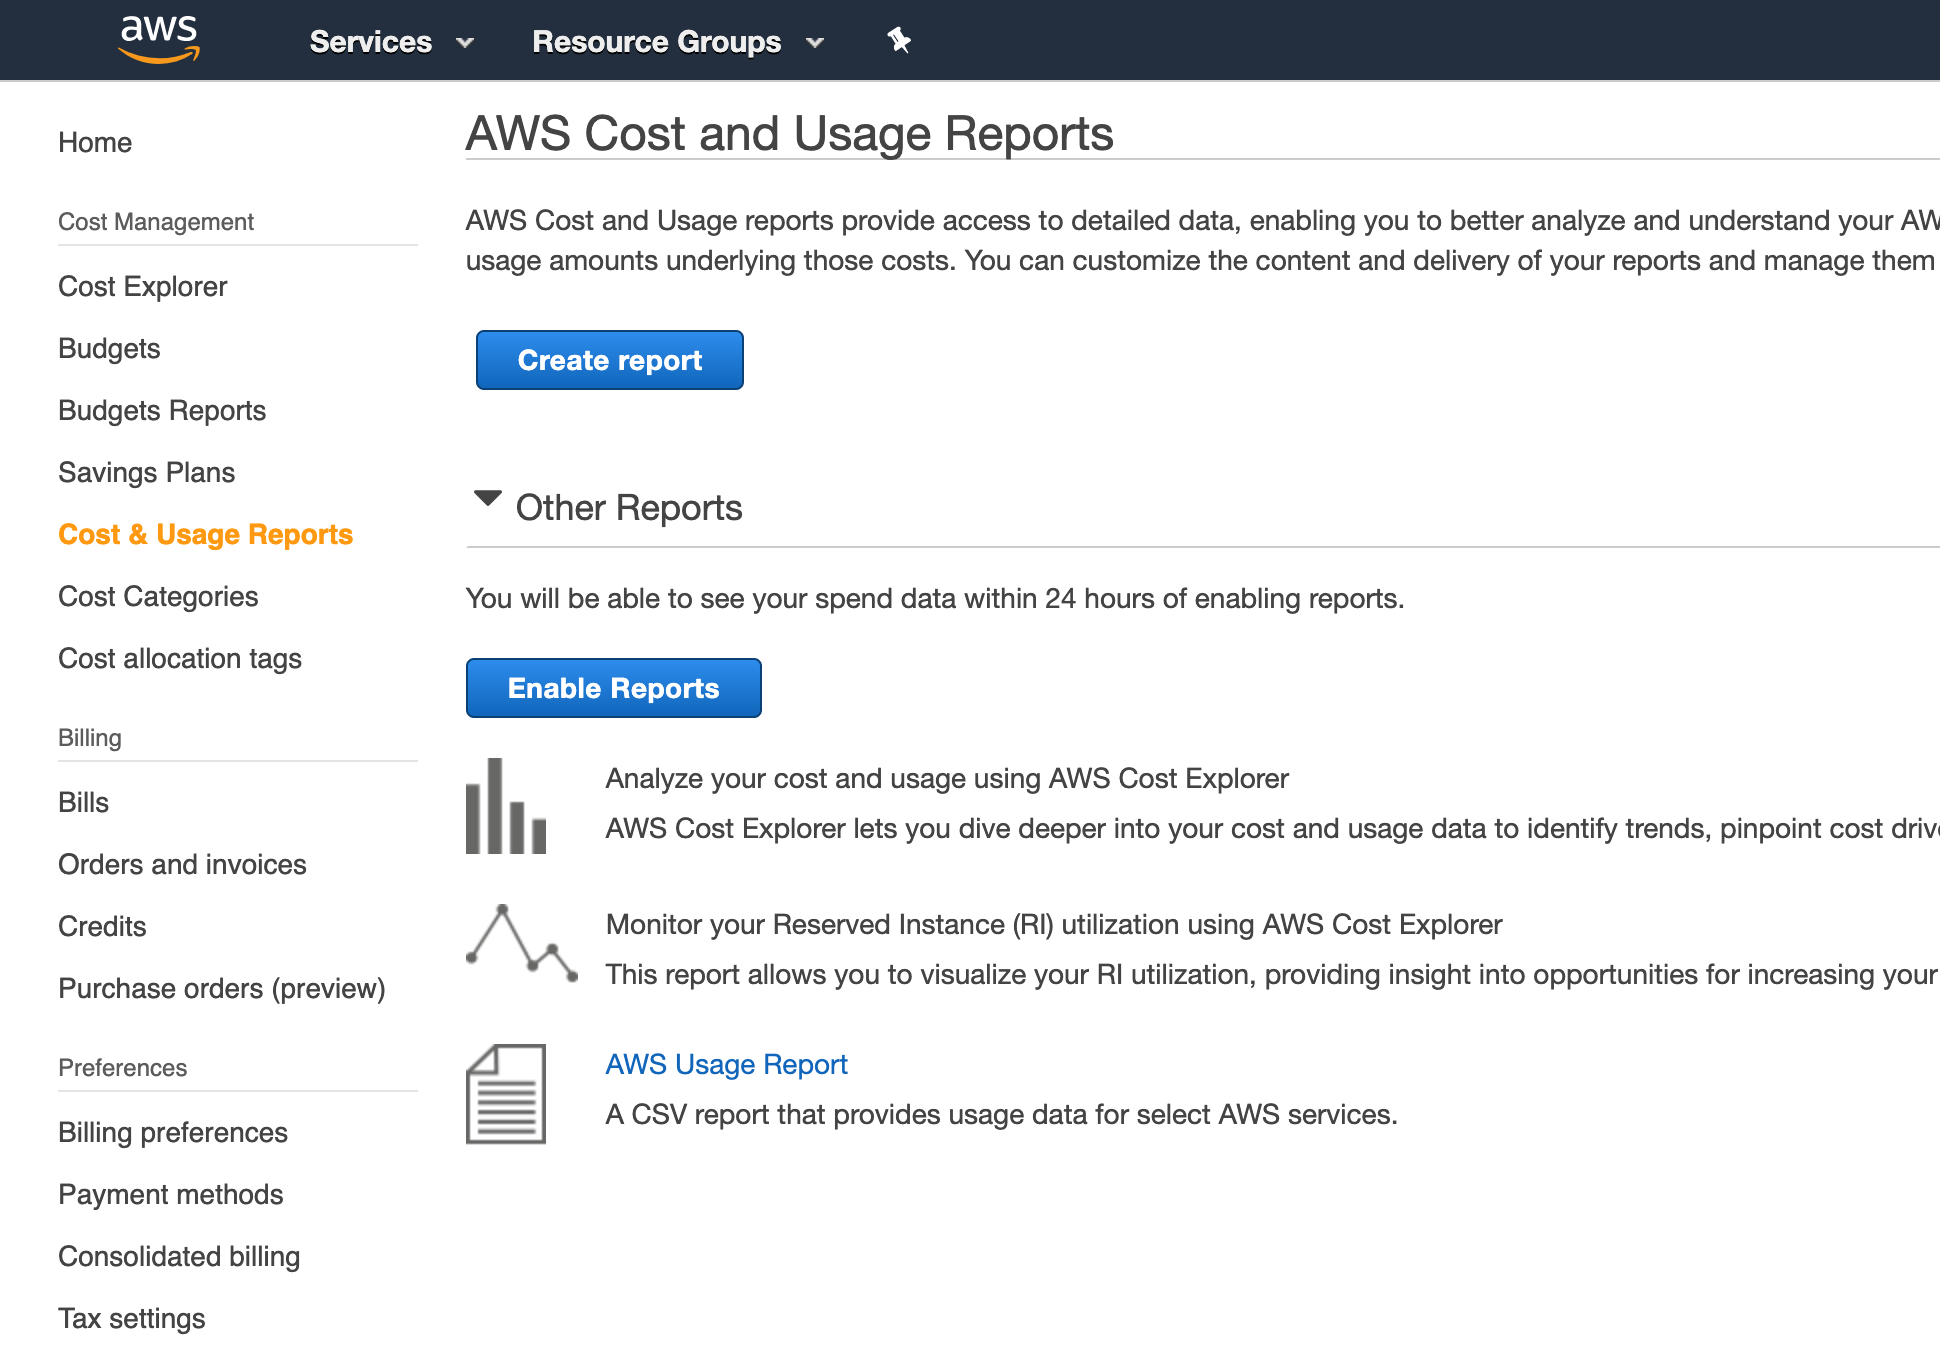
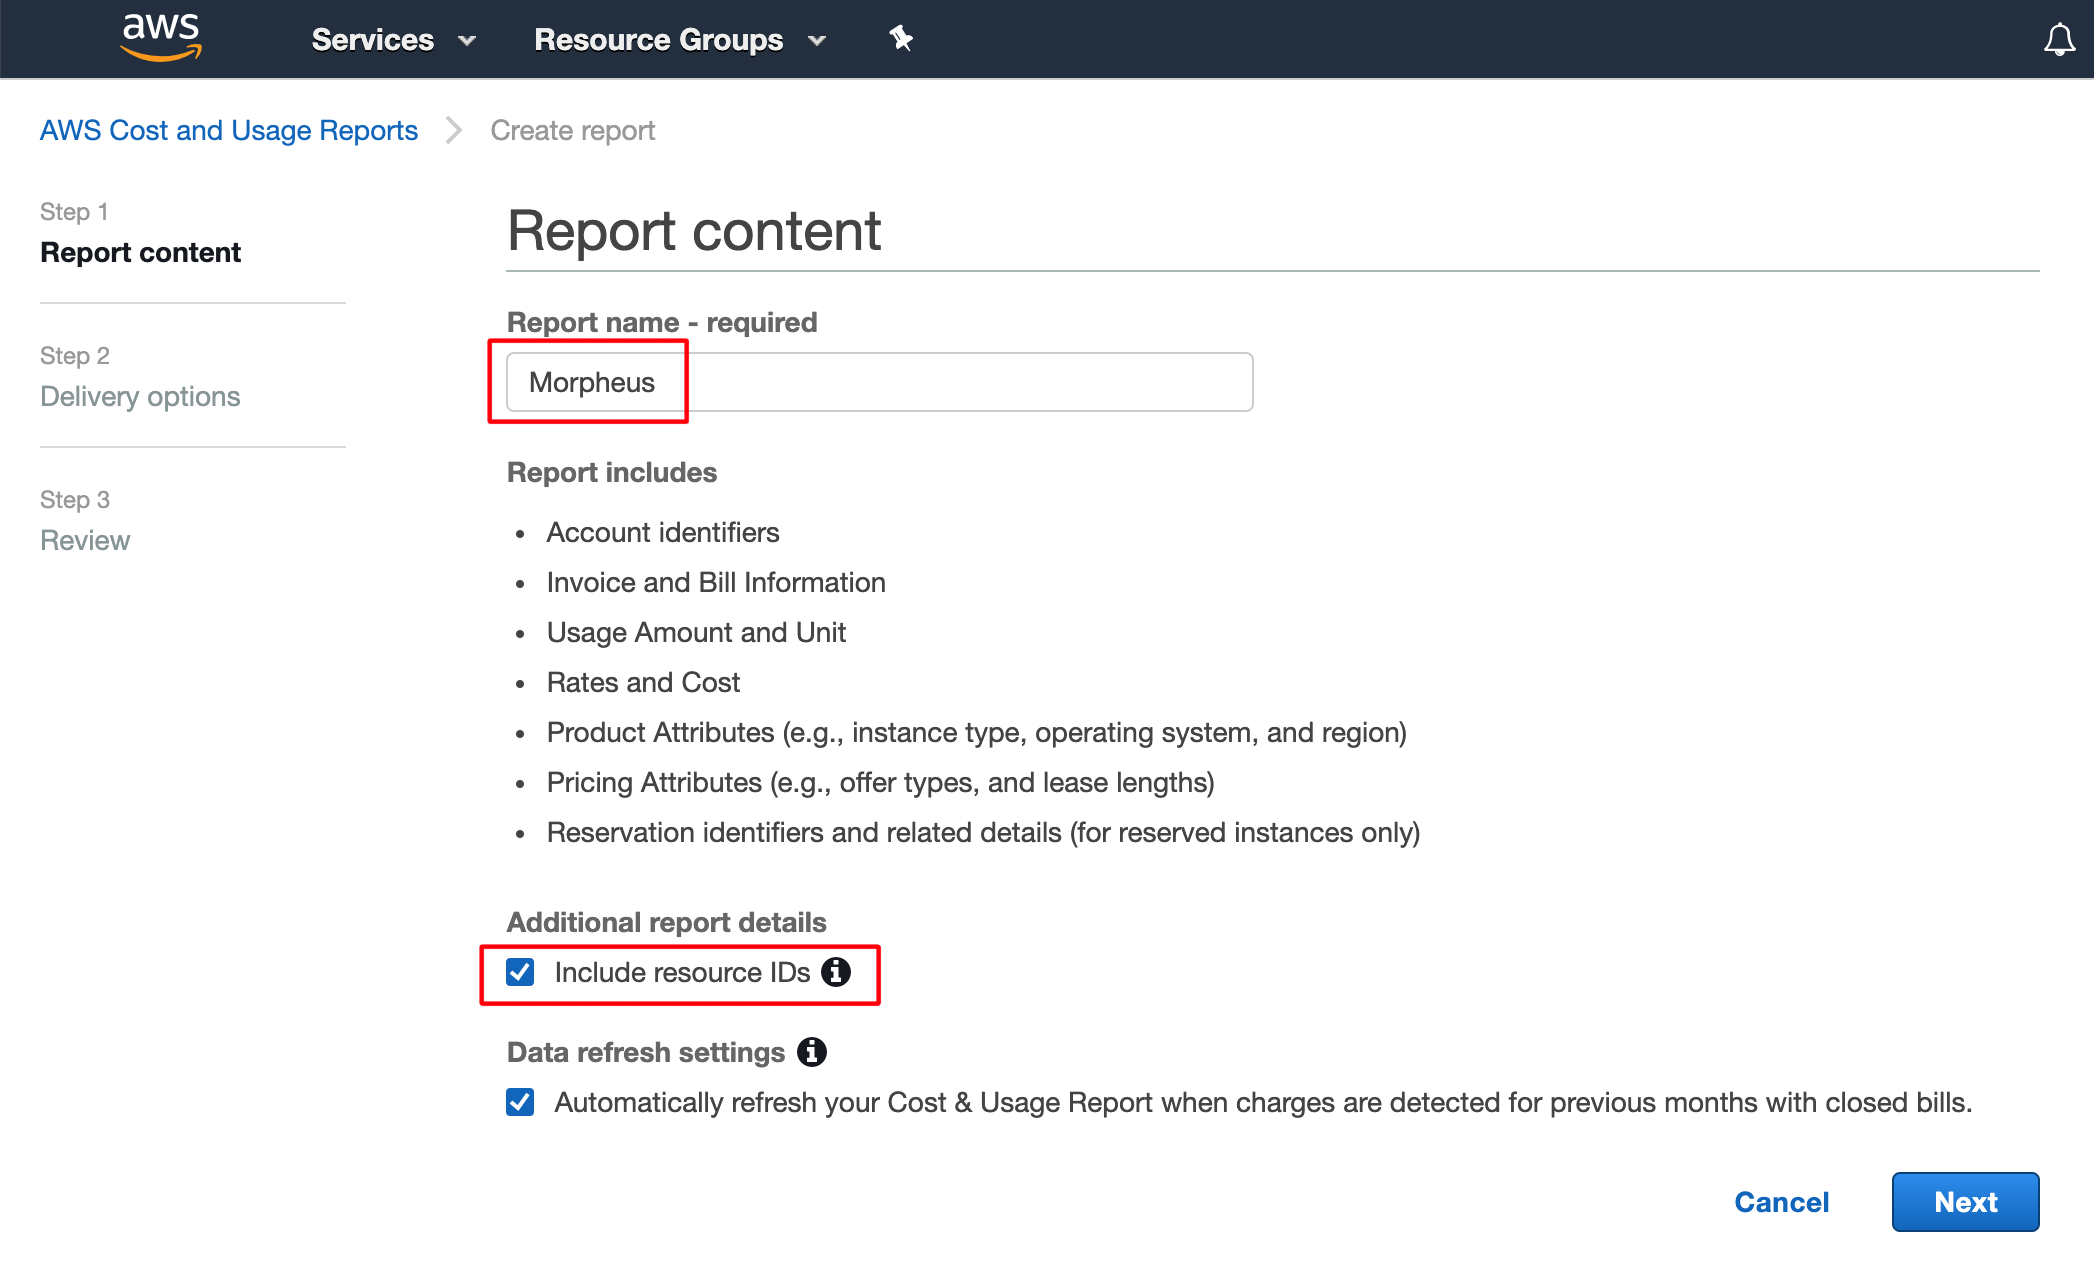
Begin by logging into the AWS Billing Console, then click Create report.
Include a name for your report and mark the box to “Include resource IDs”. HPE Morpheus Enterprise uses these resource IDs to map costs to various resources. Click Next.
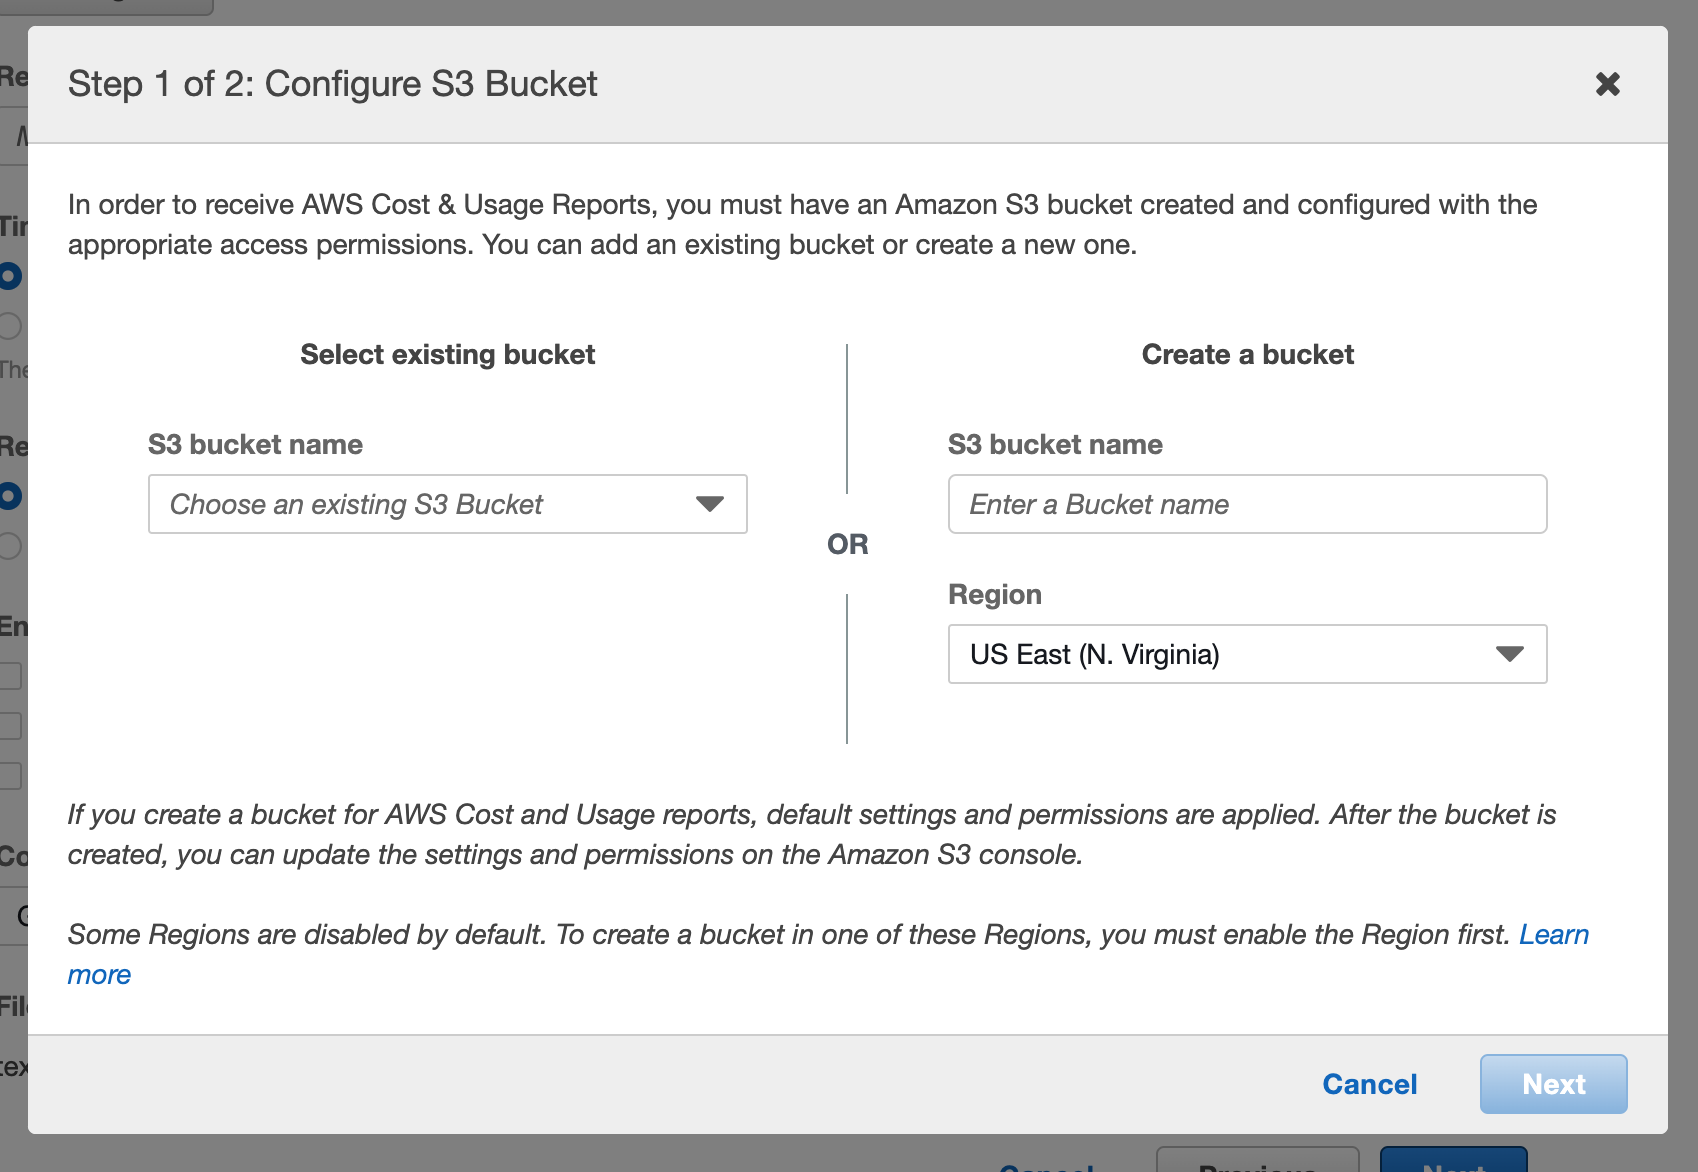
On the following page, begin by identifying an S3 bucket to house reports. Click Configure near the top of the page and select an existing bucket or create a new one.
After identifying the bucket, you must mark the box to accept the default policy being applied to the bucket. Click Save.
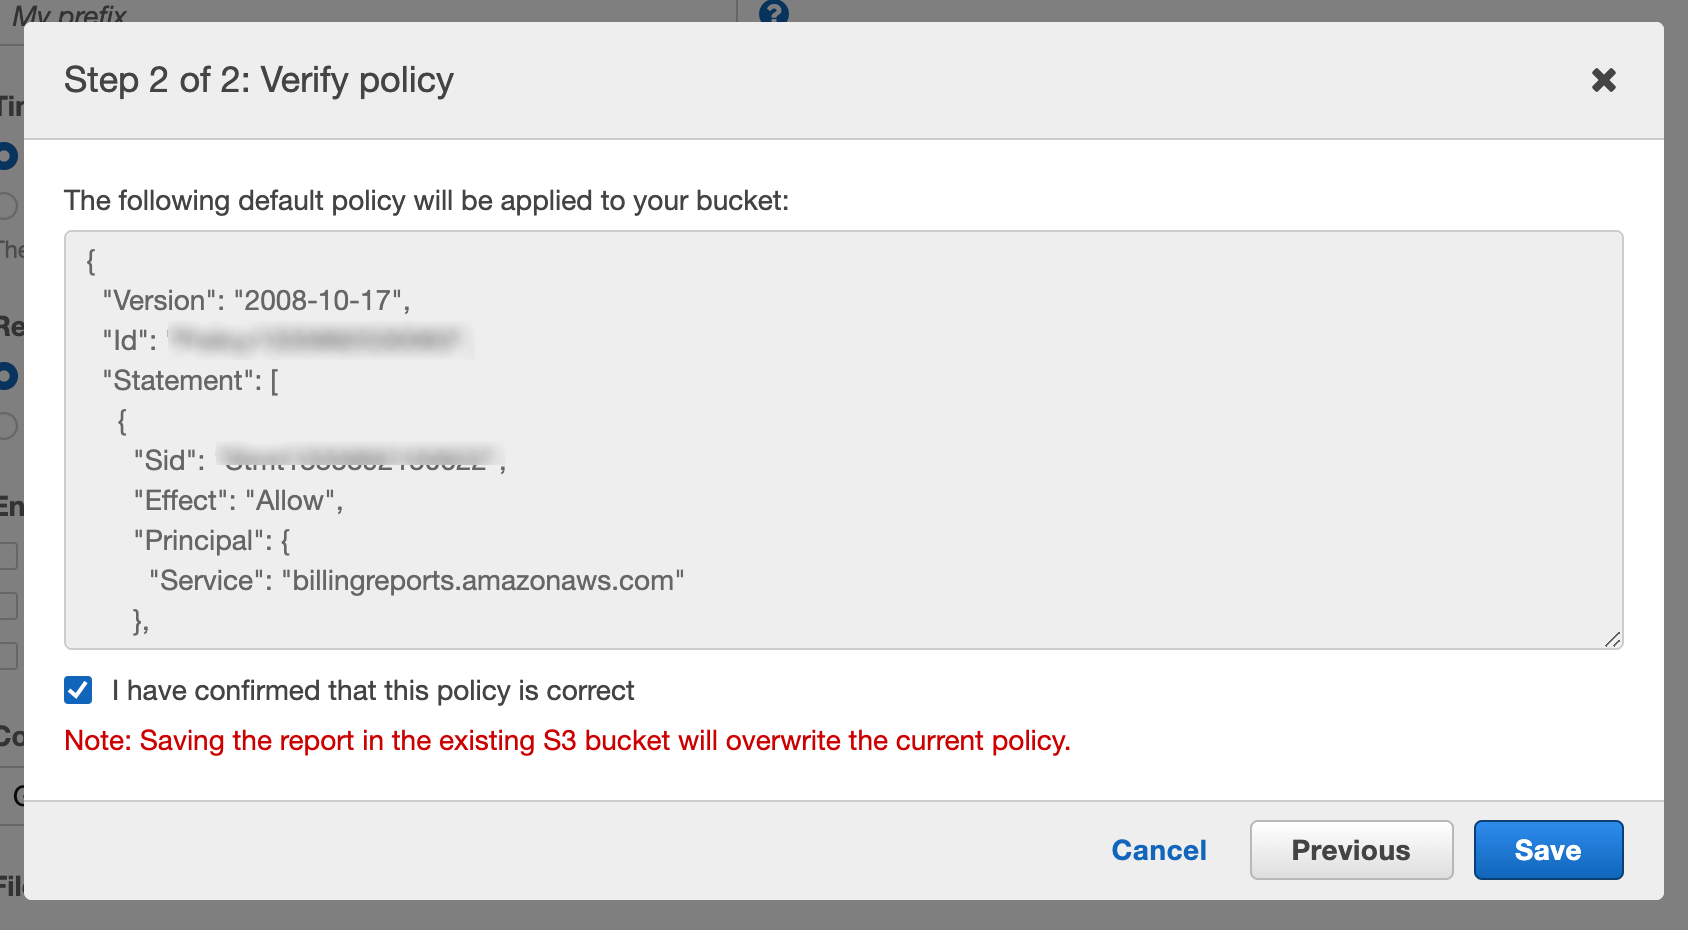
The default policy applied to the bucket is below:
{
  "Version": "2008-10-17",
  "Id": "SomeID",
  "Statement": [
    {
      "Sid": "SomeStmtID",
      "Effect": "Allow",
      "Principal": {
        "Service": "billingreports.amazonaws.com"
      },
      "Action": [
        "s3:GetBucketAcl",
        "s3:GetBucketPolicy"
      ],
      "Resource": "arn:aws:s3:::bucket-name"
    },
    {
      "Sid": "SomeStmtID",
      "Effect": "Allow",
      "Principal": {
        "Service": "billingreports.amazonaws.com"
      },
      "Action": [
        "s3:PutObject"
      ],
      "Resource": "arn:aws:s3:::bucket-name/*"
    }
  ]
}
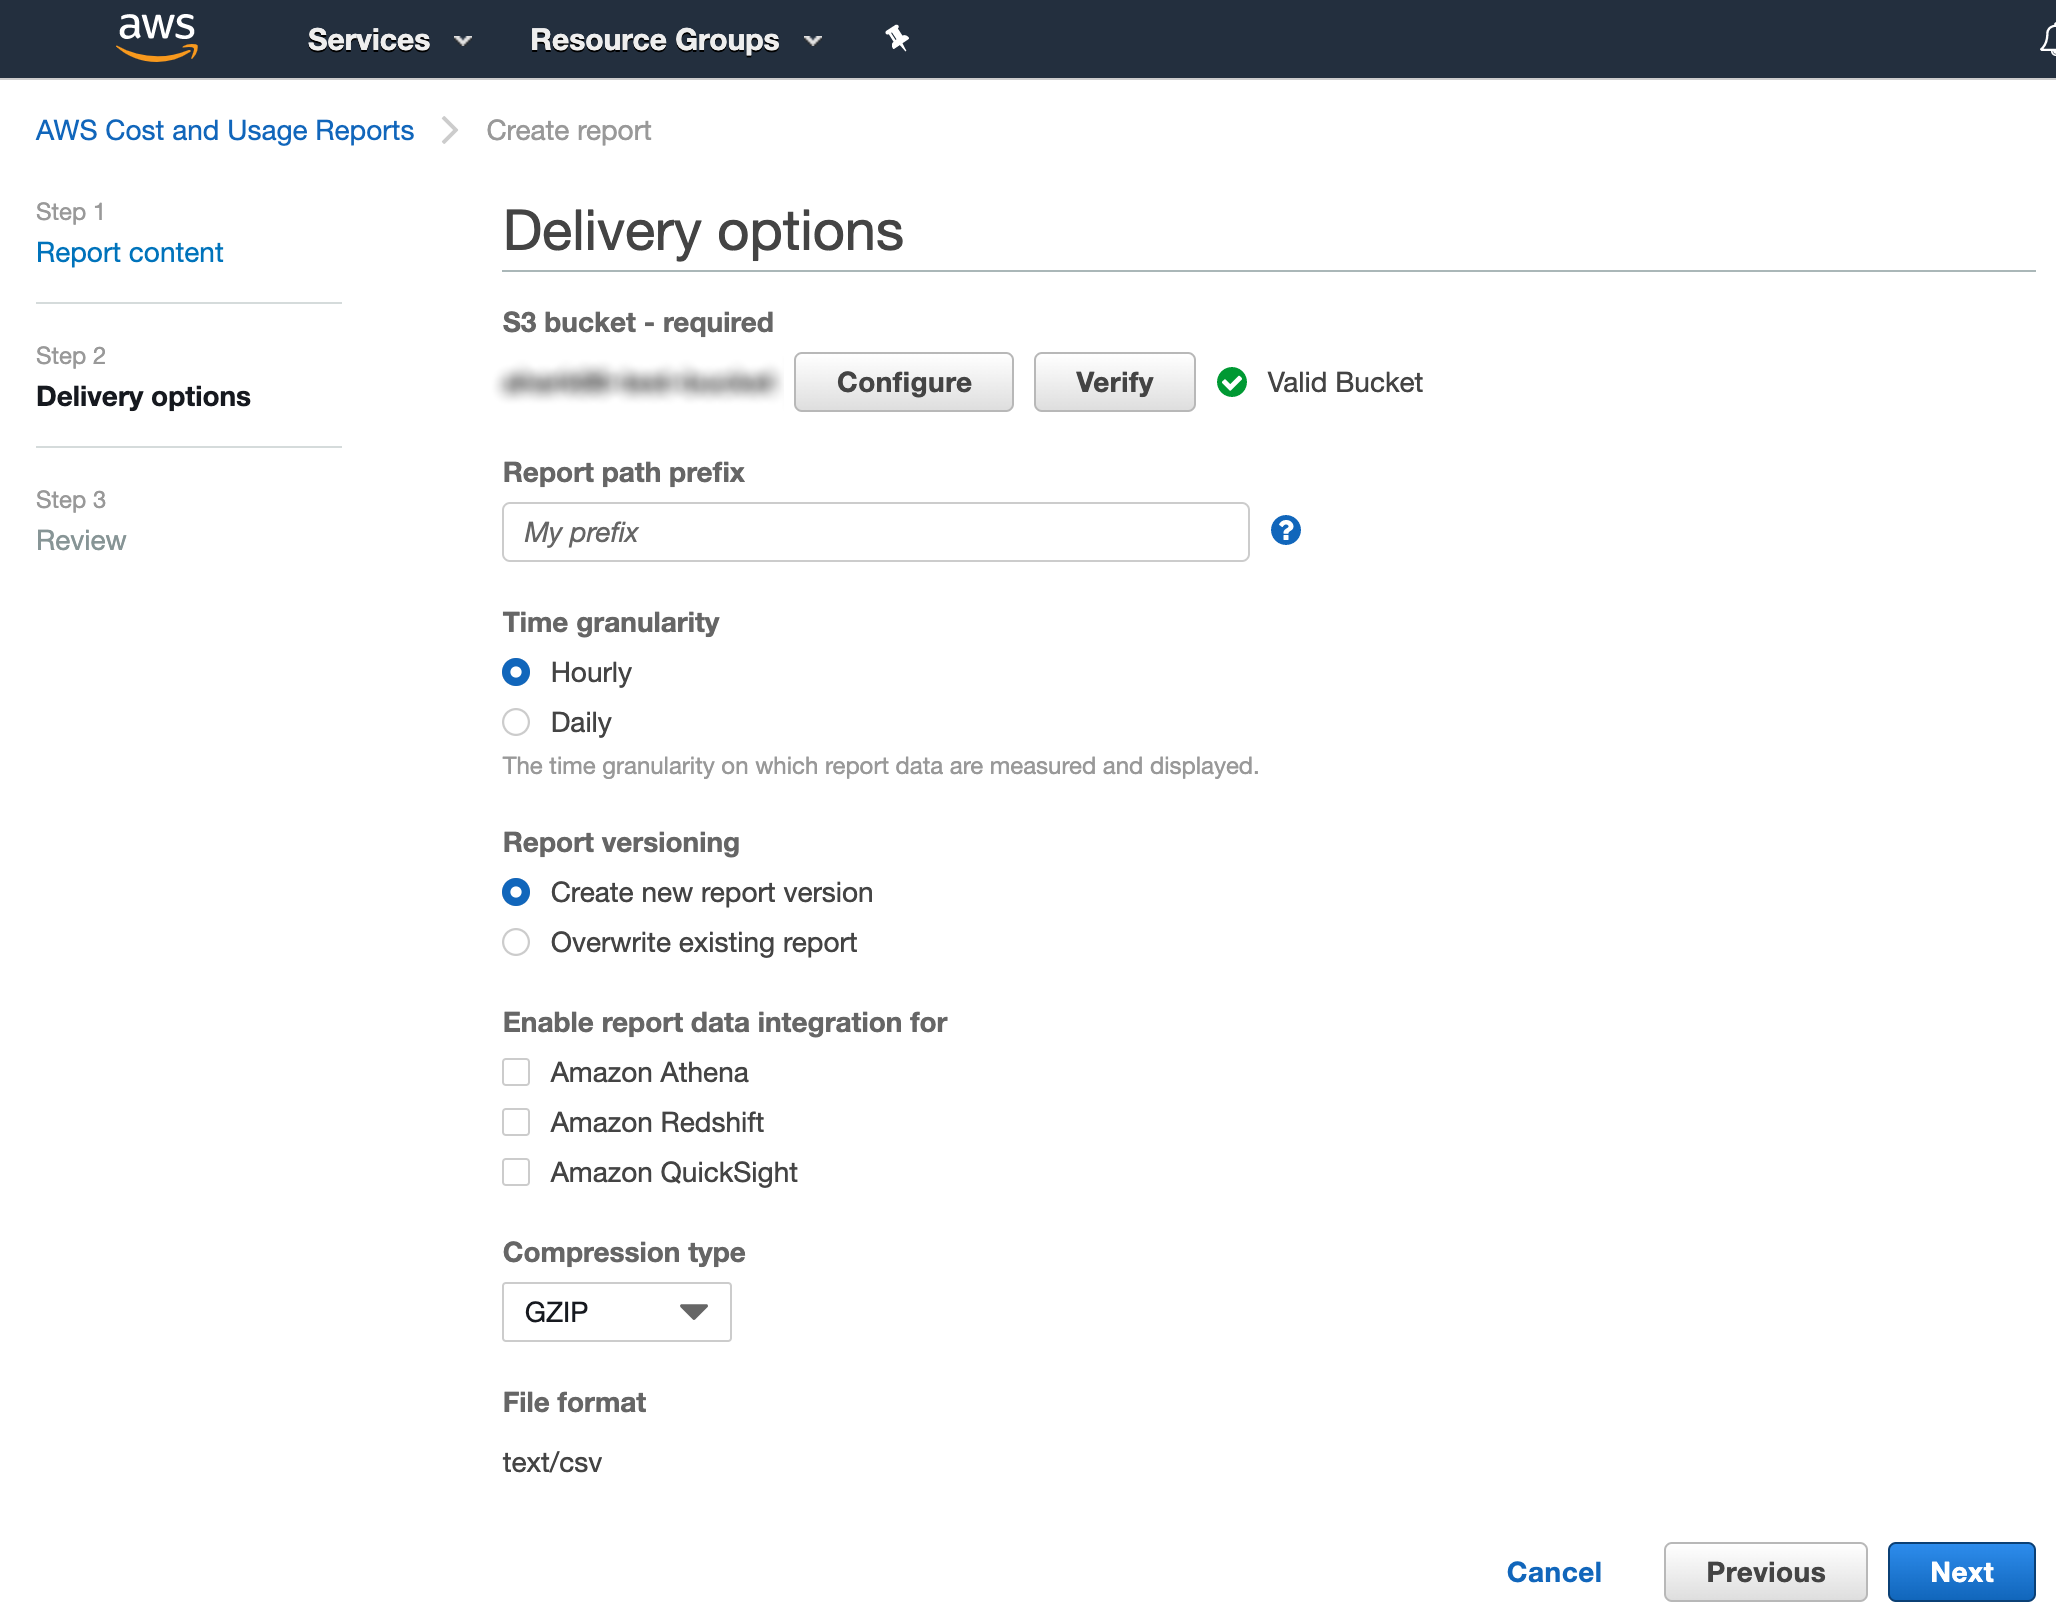
After choosing a bucket, accepting the default policy, and saving the change, you’re brought back to the report delivery page. By default, CUR reports are saved to a folder at the path my-report-name/date-folder. If this bucket already contains CUR reports, you may want to specify a prefix path in the “Report path prefix” field. Outside of this field, use the default values as shown in the screenshot below, then click Next.
On the following page, make your final review and click Review and Complete. Following this, you will see your newly configured report in the list of CUR report(s).
In addition, the AWS cloud user associated with the integration in HPE Morpheus Enterprise needs IAM policy permission to access Cost Explorer. Attach a policy like the one below to this cloud user:
{
  "Version": "2012-10-17",
  "Id": "SomeID",
  "Statement": [
    {
      "Sid": "SomeStmtID",
      "Effect": "Allow",
      "Action": [
        "ce:DescribeReportDefinitions",
        "ce:DescribeCostCategoryDefinition",
        "ce:ListCostCategoryDefinitions"
      ],
      "Resource": [
        "*"
      ]
    }
  ]
}
Note
If the Cost Explorer permissions are granted at the master account level, the user will see all costs for each member account; if granted at the member account, only the costs for that member account are available.
With the AWS console configuration steps complete, we can move back into HPE Morpheus Enterprise. Keep in mind it is only necessary to set up one AWS cloud for Costing since we process all records in the CUR report.
Once back in HPE Morpheus Enterprise, add or edit the relevant AWS cloud integration (Infrastructure > Clouds > + ADD OR click the pencil icon in the row for the chosen AWS integration). Expand the Advanced Options drawer and complete the following fields:
COSTING BUCKET: The S3 bucket name
COSTING REGION: The region the bucket was created in
COSTING FOLDER: This is the report path prefix if you configured one earlier
COSTING REPORT NAME: The name given to your CUR report
COSTING KEY: If the IAM user for this AWS cloud integration does not have access to the S3 bucket with the CUR data, enter the AWS Key ID for an IAM user with access
COSTING SECRET: If the IAM user for this AWS cloud integration does not have access to the S3 bucket with the CUR data, enter the AWS Secret Key for the IAM account whose Key ID you entered in the previous field
LINKED ACCOUNT ID: If the IAM user for this AWS cloud integration does not have access to the S3 bucket with the CUR data, enter the AWS account number that the IAM user from the above step resides in
Note
If the AWS cloud account is a GovCloud account, enter the COSTING KEY, COSTING SECRET, and LINKED ACCOUNT ID for the master commercial account your GovCloud account is associated with.
Save changes to your cloud integration.
Important
It may take as long as one hour for HPE Morpheus Enterprise to process the next CUR report.
Global (Costing Aggregator Only) (v5.5.1+)
Costing can be created for specific clouds individually, following the steps previously mentioned. If the same account is added multiple times, using different regions, the same CUR file is available to be selected (if the configured user has access). However, this can become a tedious process in needing to configure the CUR on each cloud added to HPE Morpheus Enterprise. However, HPE Morpheus Enterprise has a region of Global (Costing Aggregator Only), which can be chosen at the time of adding a cloud. This region is not designed for deploying workloads, it is here primarily for syncing costs. This means that the AWS account added as a cloud in HPE Morpheus Enterprise as a Global region can sync the cost for all the other regions of the same account added as clouds into HPE Morpheus Enterprise.
When using AWS Organizations, if the AWS account added as a global region is the management account (formerly known as master account) and consolidated billing is enabled, costs for all accounts can be sync’d using the Global region. This means when any AWS and/or regions in the organization are added as clouds in HPE Morpheus Enterprise, the appropriate costs are applied to them automatically. It does require that Costing is enabled on the cloud to see the costs but a Costing Report does not need to be chosen. This enables the use of one cloud added as Global to sync all costs and apply to all AWS clouds added in HPE Morpheus Enterprise.
Additionally, some costs in AWS are not region specific, for example the Global and No Region regions. These costs do not apply to the regions of the clouds added in HPE Morpheus Enterprise. With the Global region added as a cloud in HPE Morpheus Enterprise, you would be able to see these costs that are applicable to your accounts.
Costing and AWS GovCloud
AWS GovCloud delivers Amazon public cloud infrastructure and features in a way that complies with U.S. government standards for security. GovCloud accounts are applied for and must be associated with a pre-existing standard AWS account and the usage and billing data for the GovCloud account is rolled up into that of the standard AWS account. For that reason, Amazon recommends creating a new standard account solely to house the GovCloud account if usage and billing must be tracked separately.
Since GovCloud accounts do not have access to billing data directly, HPE Morpheus Enterprise must be able to access it through the associated standard account. You could do this by creating the HPE Morpheus Enterprise cloud integration through the standard account itself or by integrating the GovCloud account and supplying an Access Key and Secret Key for the standard account when configuring costing. When needed, add the additional credentials for the standard commercial account as described below:
Add a new AWS Cloud or edit an existing one
Expand the Advanced Options section
Complete the following fields in addition to other required fields needed to set up costing as described in the previous section:
COSTING KEY: The AWS Key ID for an IAM user with sufficient access who is associated with the standard commercial account
COSTING SECRET: The AWS Secret Key for an IAM user with sufficient access who is associated with the standard commercial account
LINKED ACCOUNT ID: The AWS account number for the standard commercial account in which the IAM user referenced in the prior bullets resides
Save the changes to the AWS Cloud integration
When credentials are configured correctly, you will be able to select an existing Costing and Usage Report (CUR) from the appropriate S3 bucket if it already exists. If not, you can create one directly from the add/edit AWS Cloud modal in HPE Morpheus Enterprise.
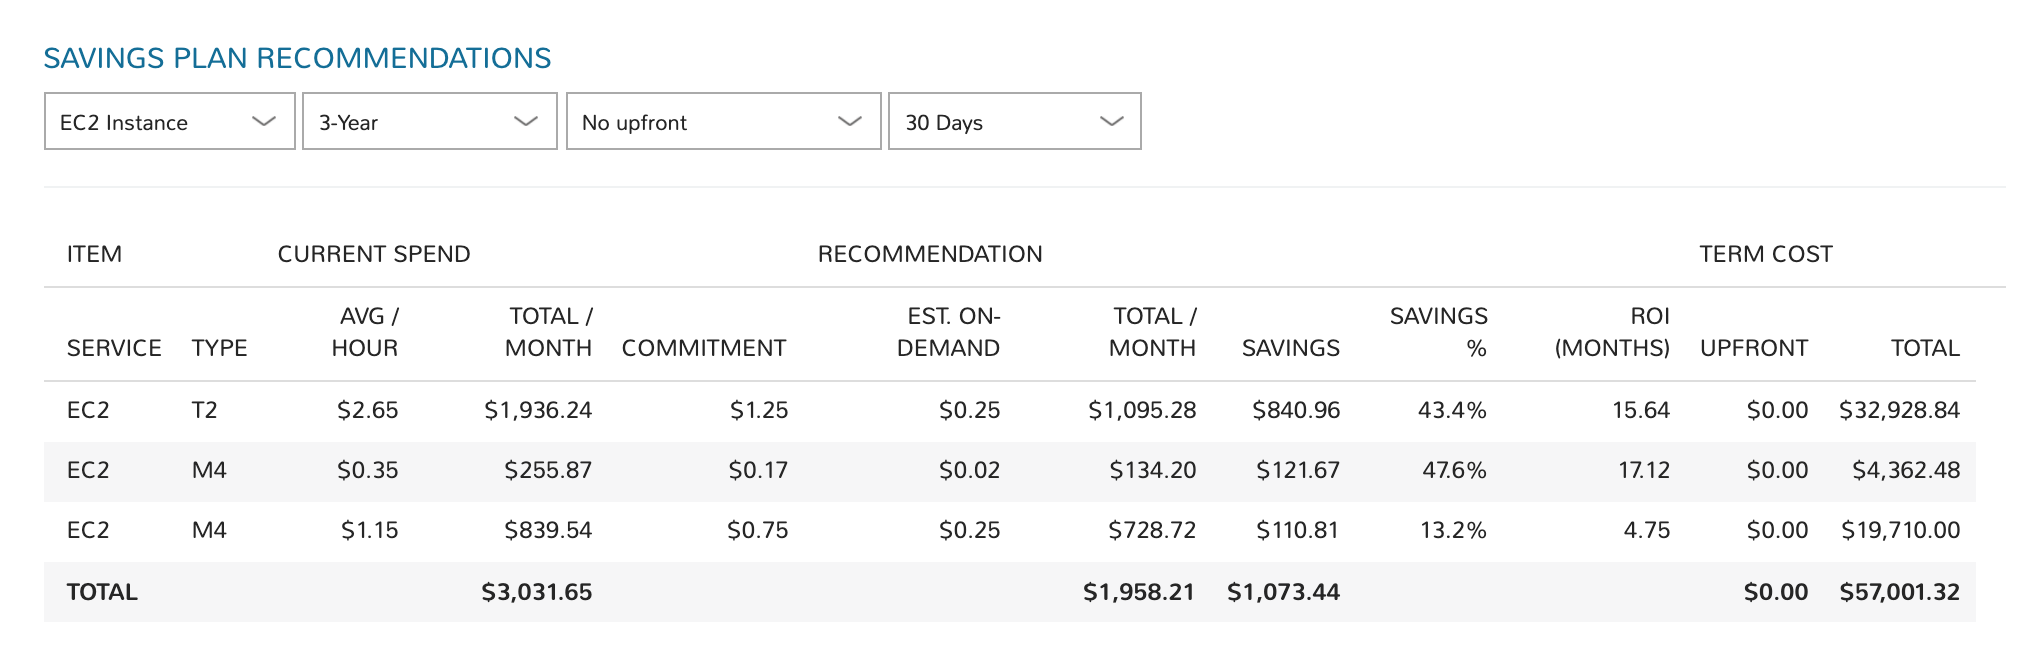
AWS Reserved Instances and Savings Plans
Amazon AWS public cloud offers Reserved Instances (RI) and Savings Plans, which allow organizations with consistent use patterns to reduce cloud spend significantly. HPE Morpheus Enterprise analyzes AWS cloud usage and spend, which allows it to make intelligent recommendations that can lead to significant savings. This data can be reviewed in the Reservation Recommendations and Savings Plan Recommendations tables on any AWS Cloud detail page (Infrastructure > Clouds > Selected Amazon Cloud).
Savings Plans potentially offer greater than 70% savings in exchange for a commitment to consistent usage levels for a 1- or 3-year term. HPE Morpheus Enterprise provides Savings Plan guidance based on learned analytics; allowing you to analyze Savings Plans based on different term commitments and upfront costs to choose the best savings plan.
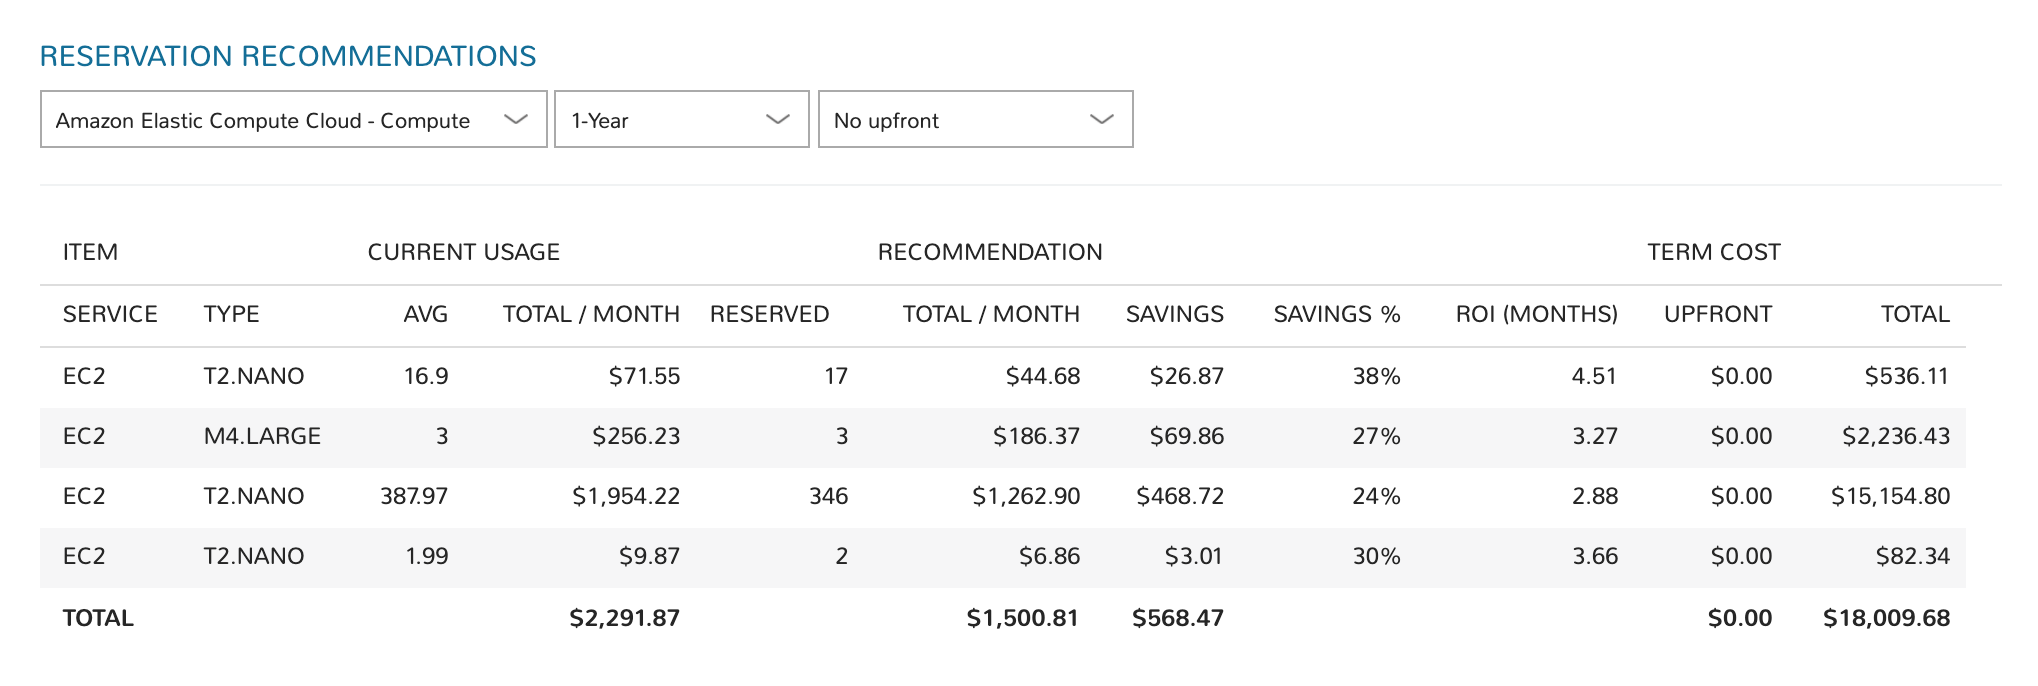
Reserved Instances (RI) provide a discounted hourly rate and optional capacity reservation for EC2 instances. AWS billing automatically applies your RI-discounted rate when the attributes of EC2 instance usage match attributes of an active RI. HPE Morpheus Enterprise provides RI guidance based on learned analytics.
To retrieve Reserved Instances and Savings Plans data, the user configured on the cloud will require access to Cost Explorer. Below is an example IAM policy with Cost Explorer access:
Cost Explorer Policy Click to Expand/Hide
{
  "Version": "2012-10-17",
  "Statement": [
      {
          "Effect": "Allow",
          "Action": [
              "ce:*"
          ],
          "Resource": "*"
      }
  ]
}
AWS IAM Permissions
Below are the AWS IAM Permissions required for HPE Morpheus Enterprise services.
autoscaling
"autoscaling:AttachInstances",
"autoscaling:AttachLoadBalancerTargetGroups",
"autoscaling:CreateAutoScalingGroup",
"autoscaling:DeleteAutoScalingGroup",
"autoscaling:DeleteLaunchConfiguration",
"autoscaling:DeletePolicy",
"autoscaling:DescribeAutoScalingGroups",
"autoscaling:DescribeLaunchConfigurations",
"autoscaling:DescribeLoadBalancers",
"autoscaling:DescribePolicies",
"autoscaling:DetachInstances",
"autoscaling:PutScalingPolicy",
"autoscaling:UpdateAutoScalingGroup",
cloudformation
"cloudformation:CreateStack",
"cloudformation:DeleteStack",
"cloudformation:DescribeStackEvents",
"cloudformation:DescribeStackResources",
"cloudformation:DescribeStacks",
"cloudformation:GetTemplate",
"cloudformation:UpdateStack",
"cloudformation:ValidateTemplate",
cloudwatch
"cloudwatch:DeleteAlarms",
"cloudwatch:DescribeAlarms",
"cloudwatch:GetMetricStatistics",
"cloudwatch:PutMetricAlarm",
costexplorer
"ce:*",
Cost and Usage Reports
"cur:DescribeReportDefinitions",
"cur:PutReportDefinition",
ec2
"ec2:AllocateAddress",
"ec2:AssignPrivateIpAddresses",
"ec2:AssociateAddress",
"ec2:AttachInternetGateway",
"ec2:AttachNetworkInterface",
"ec2:AttachVolume",
"ec2:AuthorizeSecurityGroupEgress",
"ec2:AuthorizeSecurityGroupIngress",
"ec2:CancelExportTask",
"ec2:CancelImportTask",
"ec2:CopyImage",
"ec2:CopySnapshot",
"ec2:CreateEgressOnlyInternetGateway",
"ec2:CreateImage",
"ec2:CreateInstanceExportTask",
"ec2:CreateInternetGateway",
"ec2:CreateKeyPair",
"ec2:CreateNatGateway",
"ec2:CreateNetworkAcl",
"ec2:CreateNetworkAclEntry",
"ec2:CreateNetworkInterface",
"ec2:CreateRoute",
"ec2:CreateSecurityGroup",
"ec2:CreateSnapshot",
"ec2:CreateSubnet",
"ec2:CreateTags",
"ec2:CreateVolume",
"ec2:CreateVpc",
"ec2:DeleteEgressOnlyInternetGateway",
"ec2:DeleteInternetGateway",
"ec2:DeleteKeyPair",
"ec2:DeleteNatGateway",
"ec2:DeleteNetworkAcl",
"ec2:DeleteNetworkAclEntry",
"ec2:DeleteNetworkInterface",
"ec2:DeleteRoute",
"ec2:DeleteSecurityGroup",
"ec2:DeleteSnapshot",
"ec2:DeleteSubnet",
"ec2:DeleteTags",
"ec2:DeleteVolume",
"ec2:DeleteVpc",
"ec2:DeregisterImage",
"ec2:DescribeAccountAttributes",
"ec2:DescribeAddresses",
"ec2:DescribeAvailabilityZones",
"ec2:DescribeClassicLinkInstances",
"ec2:DescribeClientVpnConnections",
"ec2:DescribeClientVpnEndpoints",
"ec2:DescribeConversionTasks",
"ec2:DescribeEgressOnlyInternetGateways",
"ec2:DescribeExportTasks",
"ec2:DescribeImageAttribute",
"ec2:DescribeImages",
"ec2:DescribeImportImageTasks",
"ec2:DescribeImportSnapshotTasks",
"ec2:DescribeInstances",
"ec2:DescribeInstanceStatus",
"ec2:DescribeInstanceTypes",
"ec2:DescribeInternetGateways",
"ec2:DescribeKeyPairs",
"ec2:DescribeNatGateways",
"ec2:DescribeNetworkAcls",
"ec2:DescribeNetworkInterfaceAttribute",
"ec2:DescribeNetworkInterfaces",
"ec2:DescribeRegions",
"ec2:DescribeRouteTables",
"ec2:DescribeSecurityGroupReferences",
"ec2:DescribeSecurityGroups",
"ec2:DescribeSnapshotAttribute",
"ec2:DescribeSnapshots",
"ec2:DescribeStaleSecurityGroups",
"ec2:DescribeSubnets",
"ec2:DescribeTags",
"ec2:DescribeTransitGateways",
"ec2:DescribeTransitGatewayVpcAttachments",
"ec2:DescribeVolumeAttribute",
"ec2:DescribeVolumes",
"ec2:DescribeVolumeStatus",
"ec2:DescribeVpcAttribute",
"ec2:DescribeVpcClassicLink",
"ec2:DescribeVpcClassicLinkDnsSupport",
"ec2:DescribeVpcEndpoints",
"ec2:DescribeVpcEndpointServices",
"ec2:DescribeVpcPeeringConnections",
"ec2:DescribeVpcs",
"ec2:DescribeVpnGateways",
"ec2:DetachInternetGateway",
"ec2:DetachNetworkInterface",
"ec2:DetachVolume",
"ec2:DisassociateAddress",
"ec2:GetPasswordData",
"ec2:ImportImage",
"ec2:ImportInstance",
"ec2:ImportKeyPair",
"ec2:ImportSnapshot",
"ec2:ImportVolume",
"ec2:ModifyImageAttribute",
"ec2:ModifyInstanceAttribute",
"ec2:ModifyNetworkInterfaceAttribute",
"ec2:ModifySnapshotAttribute",
"ec2:ModifySubnetAttribute",
"ec2:ModifyVolumeAttribute",
"ec2:RebootInstances",
"ec2:RegisterImage",
"ec2:ReleaseAddress",
"ec2:ReplaceNetworkAclAssociation",
"ec2:ReplaceNetworkAclEntry",
"ec2:ResetImageAttribute",
"ec2:ResetInstanceAttribute",
"ec2:ResetNetworkInterfaceAttribute",
"ec2:ResetSnapshotAttribute",
"ec2:RevokeSecurityGroupEgress",
"ec2:RevokeSecurityGroupIngress",
"ec2:RunInstances",
"ec2:StartInstances",
"ec2:StopInstances",
"ec2:TerminateInstances",
"ec2:UnassignPrivateIpAddresses",
"ec2:UpdateSecurityGroupRuleDescriptionsEgress",
eks
"eks:*",
elasticloadbalancing
"elasticloadbalancing:AddTags",
"elasticloadbalancing:ApplySecurityGroupsToLoadBalancer",
"elasticloadbalancing:AttachLoadBalancerToSubnets",
"elasticloadbalancing:CreateListener",
"elasticloadbalancing:CreateLoadBalancer",
"elasticloadbalancing:CreateRule",
"elasticloadbalancing:CreateTargetGroup",
"elasticloadbalancing:DeleteListener",
"elasticloadbalancing:DeleteLoadBalancer",
"elasticloadbalancing:DeleteRule",
"elasticloadbalancing:DeleteTargetGroup",
"elasticloadbalancing:DescribeLoadBalancers",
"elasticloadbalancing:DescribeRules",
"elasticloadbalancing:DescribeTargetGroups",
"elasticloadbalancing:ModifyListener",
"elasticloadbalancing:ModifyTargetGroupAttributes",
"elasticloadbalancing:RegisterTargets",
"elasticloadbalancing:SetSecurityGroups",
"elasticloadbalancing:SetSubnets",
elasticsearch
"es:DescribeElasticsearchDomains",
"es:ListDomainNames",
iam
"iam:ListGroups",
"iam:ListInstanceProfiles",
"iam:ListRoles",
kms
"kms:Decrypt",
"kms:GenerateDataKey",
rds
"rds:AddRoleToDBCluster",
"rds:AddTagsToResource",
"rds:ApplyPendingMaintenanceAction",
"rds:AuthorizeDBSecurityGroupIngress",
"rds:CopyDBClusterSnapshot",
"rds:CopyDBParameterGroup",
"rds:CopyDBSnapshot",
"rds:CreateDBCluster",
"rds:CreateDBClusterSnapshot",
"rds:CreateDBInstance",
"rds:CreateDBInstanceReadReplica",
"rds:CreateDBSecurityGroup",
"rds:CreateDBSnapshot",
"rds:DeleteDBCluster",
"rds:DeleteDBInstance",
"rds:DeleteDBSecurityGroup",
"rds:DeleteDBSnapshot",
"rds:DescribeAccountAttributes",
"rds:DescribeCertificates",
"rds:DescribeDBClusterParameterGroups",
"rds:DescribeDBClusterParameters",
"rds:DescribeDBClusters",
"rds:DescribeDBClusterSnapshotAttributes",
"rds:DescribeDBClusterSnapshots",
"rds:DescribeDBEngineVersions",
"rds:DescribeDBInstances",
"rds:DescribeDBLogFiles",
"rds:DescribeDBParameterGroups",
"rds:DescribeDBParameters",
"rds:DescribeDBSecurityGroups",
"rds:DescribeDBSnapshotAttributes",
"rds:DescribeDBSnapshots",
"rds:DescribeDBSubnetGroups",
"rds:DescribeEngineDefaultClusterParameters",
"rds:DescribeEngineDefaultParameters",
"rds:DescribeEventCategories",
"rds:DescribeEvents",
"rds:DescribeOptionGroupOptions",
"rds:DescribeOptionGroups",
"rds:DescribeOrderableDBInstanceOptions",
"rds:ListTagsForResource",
"rds:ModifyDBCluster",
"rds:ModifyDBClusterParameterGroup",
"rds:ModifyDBClusterSnapshotAttribute",
"rds:ModifyDBInstance",
"rds:ModifyDBParameterGroup",
"rds:ModifyDBSnapshotAttribute",
"rds:PromoteReadReplica",
"rds:RebootDBInstance",
"rds:RemoveTagsFromResource",
"rds:RestoreDBClusterFromSnapshot",
"rds:RestoreDBClusterToPointInTime",
"rds:RestoreDBInstanceFromDBSnapshot",
"rds:RestoreDBInstanceToPointInTime",
"rds:RevokeDBSecurityGroupIngress",
"rds:StartDBInstance",
"rds:StopDBInstance",
route53
"route53:ChangeResourceRecordSets",
"route53:GetHostedZone",
"route53:ListHostedZones",
"route53:ListResourceRecordSets",
s3
"s3:AbortMultipartUpload",
"s3:CreateBucket",
"s3:DeleteBucket",
"s3:DeleteObject",
"s3:DeleteObjectVersion",
"s3:GetBucketLocation",
"s3:GetBucketPolicy",
"s3:GetObject",
"s3:GetObjectVersion",
"s3:ListAllMyBuckets",
"s3:ListBucket",
"s3:ListBucketMultipartUploads",
"s3:ListBucketVersions",
"s3:ListMultipartUploadParts",
"s3:PutBucketPolicy",
"s3:PutObject",
Systems Manager
"ssm:GetParameters",