Azure Active Directory SSO (SAML)
Azure Active Directory Single Sign-on can be added as a Identity Source in Morpheus using the SAML Identity Source Type. The Azure AD SSO configuration is slightly different than other SAML providers, and this guide will assist in adding a Azure AD SSO Identity Source.
Create Azure Enterprise Application
Login to the Azure Portal
Navigate to:
Azure Active Directory > Enterprise ApplicationsClick the
+ New applicationbutton at the topClick the
+ Create your own applicationbutton at the topEnsure
Integrate any other application you don't find in the gallery (Non-gallery)is selected and enter a name for the app. Common examples are:MorpheusSSOClick the
Createbutton at the bottom and wait for it to completeOnce created, you’ll be in the
Overviewof the application created. Navigate to theSingle sign-onsection from the left paneChoose
SAMLas the Single sign-on methodCopy both the
Login URLandLogout URLin Step 4, we’ll need these in some of the next stepsBefore we can continue configuring the application, the configuration needs to be generated in Morpheus for more data
Create an Azure AD SAML Integration in Morpheus
Azure requires inputting the Identifier (Entity ID) and Reply URL (Assertion Consumer Service URL) in the Azure SSO configuration before it provides the Endpoints and Certificate
necessary to add the Integration into Morpheus. In order to get the Identifier (Entity ID) and Reply URL (Assertion Consumer Service URL) to input into Azure SSO configuration,
we need to create a Azure AD SAML SSO integration in Morpheus first.
To add the integration:
Login to Morpheus
Navigate to Administration > Tenants
Click a tenant hyperlink
Click the IDENTITY SOURCES button in the Tenant detail page
Click the + ADD IDENTITY SOURCE button
Select
Azure AD SAML SSOfrom theTYPEdropdownAdd
Name
(Optional) Description
Paste the
Login URLcopied from Azure into theLOGIN REDIRECT URLfieldPaste the
Logout URLcopied from Azure into theSAML LOGOUT REDIRECT URLfield
This is the minimum information needed for now, which will let us generate the details needed from Morpheus. We’ll return to this configuration page later to enter more information.
Click the SAVE CHANGES button
Important
Setting SAML REQUEST to “No Signature” and SAML RESPONSE to “Do Not Validate Assertion Signature” is allowed but not recommended for security reasons.
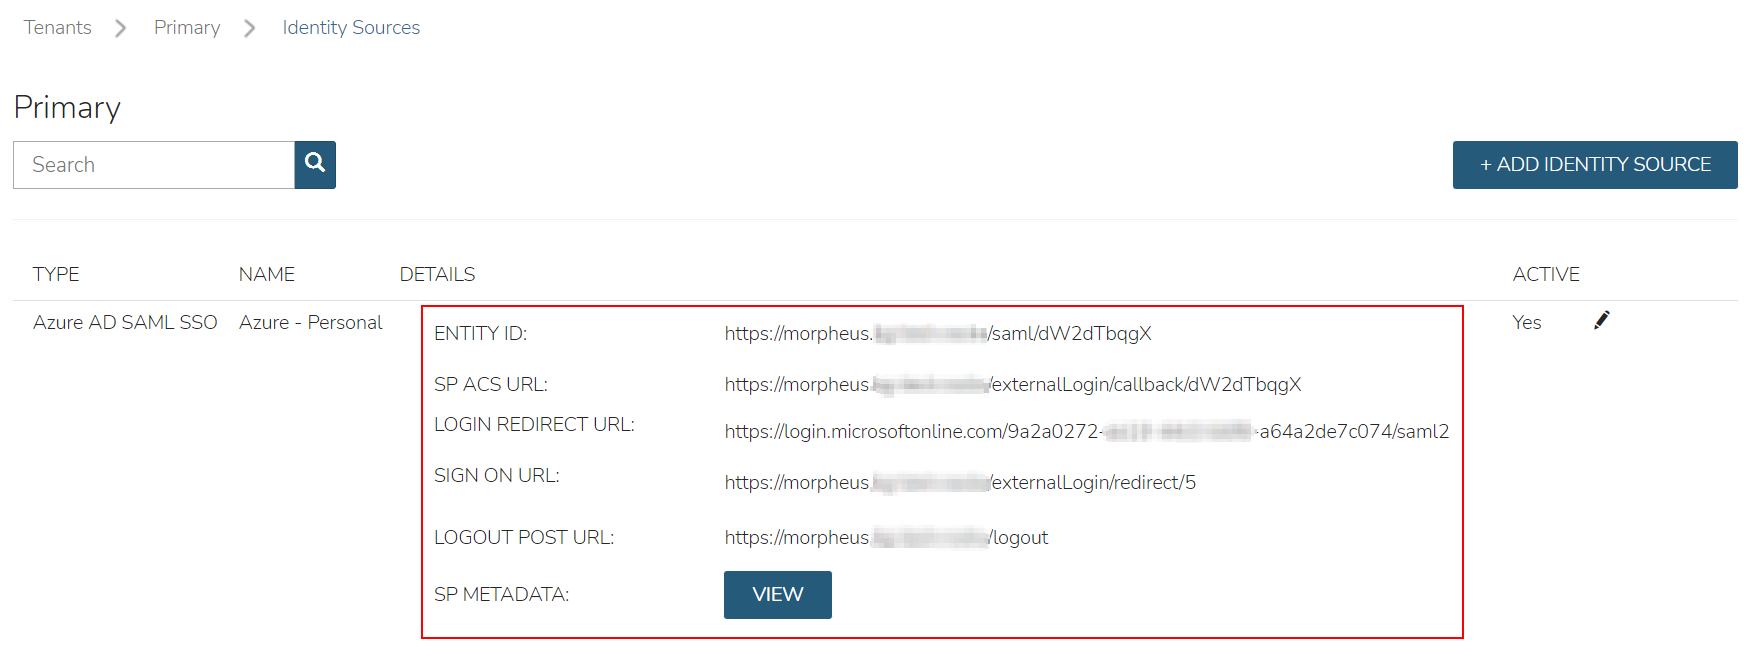
Upon saving, the Entity ID (Identifier (Entity ID)) and SP ACS URL (Reply URL (Assertion Consumer Service URL)) will be provide in the Identity Source list view. Copy these for use in Azure SSO configuration.
Configure Azure Enterprise Application
This guide assumes an Azure AD Enterprise Application has already been created. Please refer to documentation above, if this has not already been configured.
Navigate to:
Azure Active Directory > Enterprise Applications > Single sign-onChoose
SAMLas the Single sign-on methodOn Step 1 (
Basic SAML Configuration), click theEditbutton and enter the following:- Identifier (Entity ID)
Enter the
Entity IDURL from the Morpheus Identity Source Integration above
- Reply URL (Assertion Consumer Service URL)
Enter the
SP ACS URLfrom the Morpheus Identity Source Integration above
- Logout URL
Enter the following format:
https://yourUrl/login/If this is a sub tenant, the format may instead be the following:https://yourUrl/login/account/1The login URL can be found under IDENTITY SOURCES in the tenant
On Step 2 (
Attributes and Claims), click theEditbuttonClick the
Add a group claimbutton at the topChoose
All groupsand ensureGroup IDis selected for theSource attributedropdownNote
You can also choose
Security groups, which ever makes more sense for the organizationClose the pane and return to the Enterprise Application in the
Single sign-onsectionOn Step 3 (
SAML Certificates), click theDownloadlink next toCertificate (Base64)andFederation Metadata XMLNote
The files will download, keep them available for later configuation in Morpheus
Navigate to
Users and Groupsin the left paneClick the
Add user/groupbuttonAdd Azure groups to this application that will be able to login to Morpheus
Note
Note the object ID for each of these groups, as they will be used later when configuring Morpheus to map the group to roles
Once groups have been added, click the
Assignbutton at the bottom
Configure the Azure AD SAML Integration in Morpheus
Login to Morpheus using
Username and Password, as usualNavigate to Administration > Tenants
Click a tenant hyperlink
Select IDENTITY SOURCES in the Tenant detail page
Click the pencil (edit) next to the integration created previously
Ensure the
SAML REQUESTfield is set toSelf SignedNote
A custom RSA signature can be used here if needed, if required by the orgnaization
Ensure the
SAML RESPONSEfield is set toValidate Assertion SignatureNote
With this setting, if the assertion signature ever changes in the Azure Enterprise Application, this would need to be updated to match
Edit/view the downloaded
Federation Metadata XML(.xmlextension) file from the previous sectionNote
It is recommended to use
Microsoft Edge, or another browser, to view the contentsIn the
Federation Metadata XMLfile, locate the<X509Certificate> </X509Certificate>under the<Signature>section. Copy the entire contents between the<X509Certificate>and</X509Certificate>, it is very longPaste the value copied from the
Federation Metadata XMLfile into thePublic Key (Optional)box, below theSAML RESPONSEdropdown
Configure Role Mappings
Role mappings will map Azure AD Groups to Morpheus Roles. Azure AD users will be assigned Roles in Morpheus upon signing in based on their Group Membership in Azure AD.
Important
Use an Azure Groups Object ID, not Group name, when entering Role Mappings. Example: 7626a4a2-b388-4d9b-a228-72ce9a33bd4b
- DEFAULT ROLE
Role a Azure AD user will be assigned by default upon signing in to Morpheus using this Identity Source.
- REQUIRED AZURE AD GROUP OBJECT ID
Object ID of Azure AD Group a user must be a member of to be authorized to sign in to Morpheus. Users not belonging to this Group will not be authorized to login to Morpheus. This field is optional, and if left blank, any user from the Azure AD App will be able to sign in to Morpheus and will be assigned the Default Role if no Role Mappings match AD Group membership.
- GROUP ASSERTION ATTRIBUTE NAME
Enter
http://schemas.microsoft.com/ws/2008/06/identity/claims/groupsfor Azure AD SSO- Additional Role Mappings
The existing Roles in Morpheus will be listed. To map a Morpheus Role to an Azure AD Group, enter the Object ID of the desired Azure AD Group in the Role Attribute Value field for the corresponding Morpheus Role.
Important
Use an Azure Groups Object ID, not Group name, when entering Role Mappings. Example: 7626a4a2-b388-4d9b-a228-72ce9a33bd4b
- ENABLE ROLE MAPPING PERMISSION
When selected, Tenant users with appropriate rights to view and edit Roles will have the ability to set role mapping for the Identity Source integration. This allows the Tenant user to edit only the role mappings without viewing or potentially editing the Identity Source configuration.
- MANUAL ROLE ASSIGNMENT
When selected, administrators can manually edit Roles for users created through this identity source integration from the user detail page (Administration > Users > Selected user).
Note
For more on Identity Source role mapping permissions, see the associated guide in our KnowledgeBase.
Once populated, select SAVE CHANGES and the SAML identity source integration will be added. The Identity Source can be edited anytime to deactivate or change Role Mappings or other values.
Note
If Role mappings are edited after Azure AD SSO users have signed into Morpheus, currently logged in users will need to log out of Morpheus for the new Role mappings to take effect, when applicable.
Under the
Role Azure Group Mappingssecton, verify theDEFAULT ROLEdropdown has the role in Morpheus selected that all users will be assigned by defaultIt is recommended that this role contains no permissions, which ensures that anyone who authenticates gets no access
Under the
Role Azure Group Mappingssecton, you will see role names listed. Next to these are text boxes withAssertion Attribute Mappingsinside. Enter group object IDs from Azure into these text boxes. This will map the Azure AD groups to specific roles in MorpheusFinally, click
Save Changesat the bottom of the page
Here is an example of the configuration above:

Azure Group Lookups
When a user in azure ad has more that 150 group attributes, Azure does not include the group claims in the SAML response, and Morpheus is required to query Microsoft Graph to obtain the users group attribute values. When there are users that are members of more that 150 groups, populate the Azure Group Lookups section in order for those users to be able to use the Azure AD SAML SSO integration, otherwise no groups will be obtained and proper role mappings cannot occur.
- AZURE TENANT ID
Add Azure AD Tenant ID if user group membership will exceed 150. See Copy Directory (tenant) and Application (client) IDs for information on obtaining an Azure AD Tenant ID
- AZURE APP ID
Add Azure AD Application (Client) ID if user group membership will exceed 150. See Copy Directory (tenant) and Application (client) IDs for information on obtaining an Azure AD Application (Client) ID
- AZURE APP SECRET
Add Azure Application (Client) Secret if user group membership will exceed 150. See Generate a Client Secret for information on creating an Azure Application (Client) Secret
- ROLE LINK ATTRIBUTE NAME
default: http://schemas.microsoft.com/claims/groups.link. This is not normally changed.
Logging Into Morpheus with Azure AD SAML
Navigate to the Morpheus URL
A new button will appear to allow sign-in using Azure AD SAML, with the same name as the integration. Click the button .. image:: /images/integration_guides/identity_sources/azure_ad_saml/sign_in_page.png
- width
30%
Sign-in with your Microsoft/Azure account .. image:: /images/integration_guides/identity_sources/azure_ad_saml/ms_signin.png
- width
20%
Note
If no local users other than the System Admin have been created, “USERNAME AND PASSWORD” option will not be displayed, only the SAML option.