Blueprints
Overview
The Blueprints section is used to compose provisioning catalogs. The Blueprints section is composed of:
Instance Types
Layouts
Node Types
App Blueprints
Catalog Items
Cluster Layouts
Additionally, items from Options and Templates sections are incorporated to call in custom options for users, IaaS spec files, scripts, and more. See Options and Templates within Morpheus Library for more information on creating or sourcing the items below from version control. In some cases, they may need to be pre-existing for the most efficient creation of Blueprints.
Inputs
Option Lists
File Templates
Scripts
Spec Templates
Blueprint Development Overview
When provisioning, the User selects an INSTANCE TYPE from the provisioning wizard. At this stage, we can present custom INPUTS to the User which alter deployment in ways the administrator predetermines. Based on the selected Cloud technology and Version, the User is presented with applicable LAYOUTS selections. LAYOUTS can take advantage of Workflows which automate Tasks and can utilize a wide range of DevOps automation technologies. One or more NODE TYPES is associated with the LAYOUT. NODE TYPES are the bridge between LAYOUTS and Images. NODE TYPES can also take advantage of File Templates for custom configuration and Scripts which can be queued to run at any stage of the Instance lifecycle.
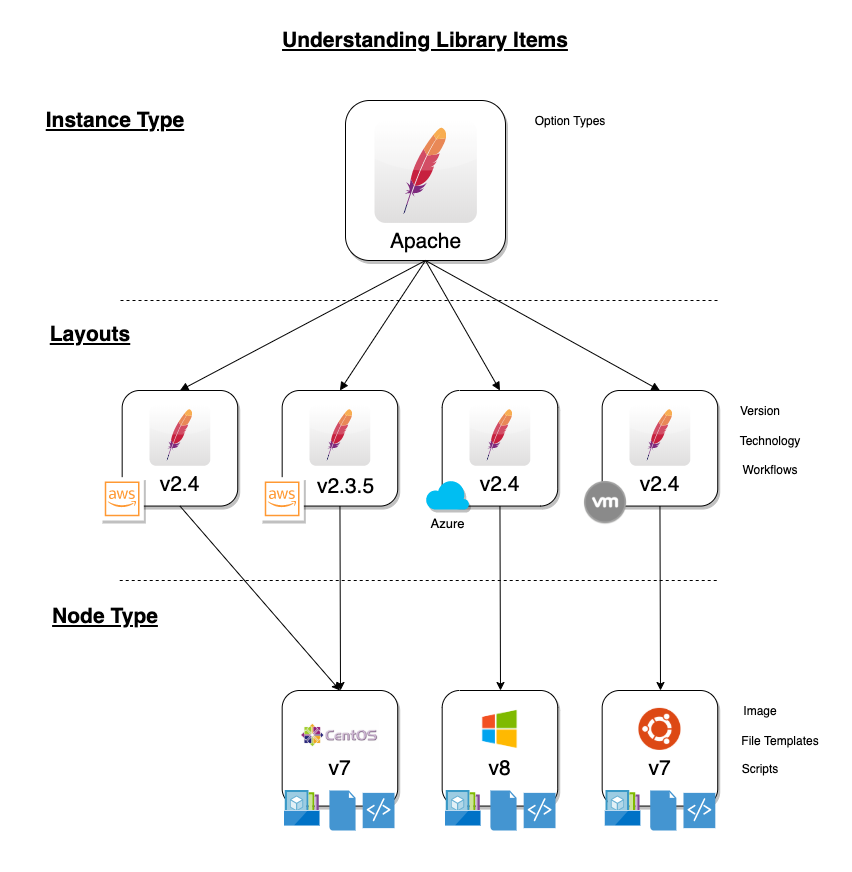
Instance Types
Adding an Instance Type creates a new Library item category. Multiple Layouts can be added to an Instance Type and these Layouts can have different Nodes attached. The Instance provisioning wizard will present the Layout options compatible with the selected Cloud. If Cloud selection is turned off, all Layouts will be presented for all Cloud types accessible by the User.
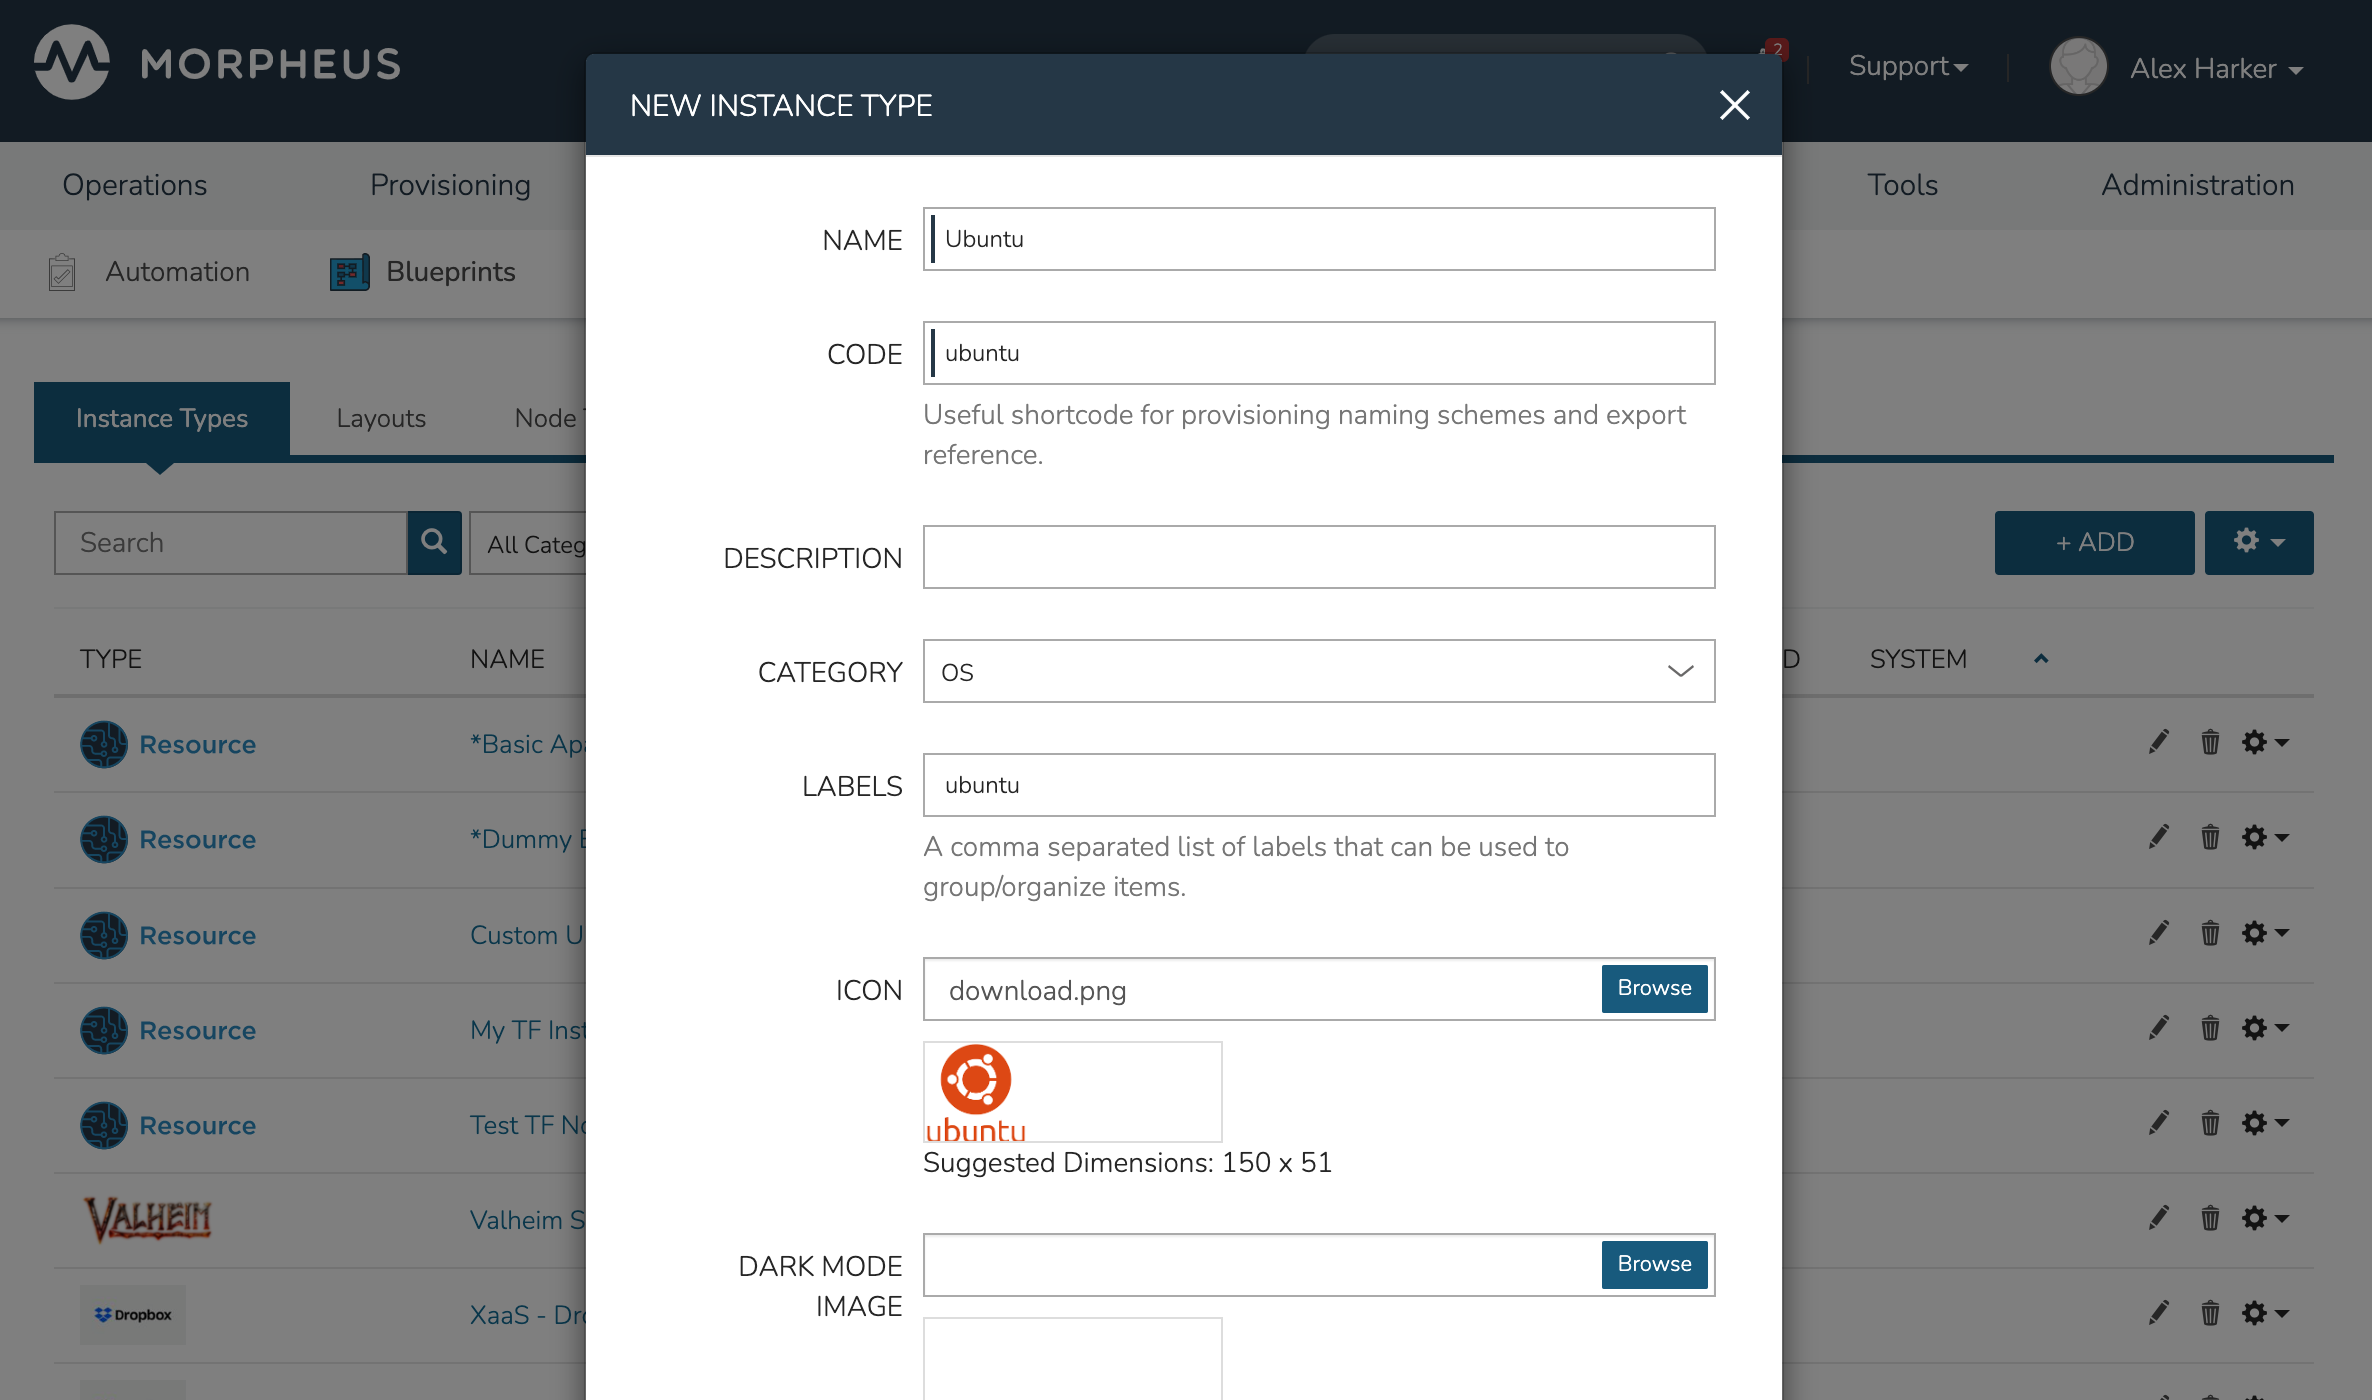
- Name
Name of the Instance Type in the provisioning Library
- Code
A useful shortcode for provisioning naming schemes and export reference
- Description
The description of the Instance Type shown in the Provisioning Library. (255 characters max)
- Category
For filtering in Instance sections and provisioning wizard
Web
SQL
NoSQL
Apps
Network
Messaging
Cache
OS
Cloud
Utility
- Icon
An identifiable icon to display in-line with your Instance Type in the provisioning wizard (Suggested dimensions: 150 x 51)
- Visibility
Private: Only accessible by assigned Accounts/Tenants
Public: Accessible by all Accounts/Tenants
- Inputs
Custom options presented to the user at provision time, Inputs are also created and stored in Morpheus Library
- Price Sets
Associate a Price Set with the Instance Type, Price sets are created in Administration > Plans & Pricing > Price Sets. Price Sets which are added to Instance Types become additive with any pricing which may apply on the Service Plan. For example, a “fixed” Price Set of $1000/month has been associated with the Instance Type. If this Instance Type is provisioned to an Amazon AWS Cloud, the additional fixed price would be computed along with any Price which is pre-existing on the AWS Service Plan
Instance Type Price Sets Demo
- Environment Prefix
Used for exportable environment variables when tying Instance Types together in App contexts. If not specified, a name will be generated
- Environment Variables
Name and value pairs for environment variables to be loaded on initialization
- Enable Settings
Allows for attachment of modifiable file templates to Node Types in a settings tab of the Instance after deployment
- Enable Scaling (Horizontal)
Enables load balancer assignment and auto-scaling features
- Support Deployments
Enables deployment features (Requires a data volume be configured on each version. Files will be copied into this location)
Upon saving, this Instance Type will be available in the provisioning catalog, per User Role access. However, we still need to add Layouts to the Instance Type, and prior to creating a Layout, we will add a Node Type.
Layouts
Layouts are attached to Instance Types. A Layout can only be attached to a single Instance Type and a single Technology. An Instance Type can have one or many Layouts attached to it, allowing for a single Instance Type to work with any Technology type. Node Types are added to Layouts. A Layout can have one or many node types attached to it. Node types can be shared across Layouts of matching Technology types.
Important
Once an Instance Type is defined on a Layout and saved, the Instance Type setting and Technology selections on the Layout cannot be changed.
Layout List View
The default page for Layouts is the Layout list view. Select + ADD to create a new Layout. Layouts can also be created from an Instance Type detail page.
The following fields are displayed for each Layout:
INSTANCE TYPE: Select the Instance Type to associate with the Layout. This attribute is automatically set and not shown when creating the Layout from an Instance Type detail page
NAME: Links to the Layout detail page
VERSION
DISPLAY ORDER: Determines the Layout display order in the provisioning wizard when adding an Instance of the associated Instance Type
DESCRIPTION
Note
The order of Layouts given when an Instance Type is being provisioned is in high-to-low order of the Layout Display Order property. Bear in mind this is reversed from how Service Plans are ordered, which is in low-to-high order based on the Display Order value.
The Actions menu in each row reveals the following options:
Permissions: Scope the Layout to Group(s) to narrow the list of available groups for a chosen Instance Type at provision time
Edit: Edit the Layout
Delete: Delete the Layout
Note
A Layout that is in use cannot be deleted.
Available Filters:
Technology: Display Layouts by selected Cloud technology
Instance Type: Display Layouts by the associated Instance Type
Layout Detail View
The Layout Detail view shows details on the Layout including Name, Short Name, Version, and Category. It also lists all associated Node Types.
Select a Layout Name from the list page or Instance Type detail page to get to a Layout detail page.
Layout Configuration Options
- Instance Type
Select the Instance Type to add to the new Layout. Custom Instance Types must already be created and one Layout cannot be added to multiple instance types. The Instance Type also cannot be changed after creation.
Note
Layouts cannot be added to Morpheus pre-defined Instance Types
- Name
The name the Layout presents as in the Configuration Options dropdown of the provisioning wizard
- Version
The version number or name for the Layout. Layouts in an Instance Type with the same version will all show under the Configuration Options dropdown when that version is selected while provisioning
- Description
Description of the Layout, viewable on the Layout list view
- Creatable
When checked, this Layout will be selectable at provision time for the associated Instance Type (assuming the Layout is otherwise compatible with provisioning conditions). Instance Types with no Creatable Layouts will not be selectable from the provisioning wizard
- Technology
Technology determines which Cloud this layout will be available for and which Node Types can be added to it
- Minimum Memory
Defines the minimum amount of memory required for this Layout. Only Service Plans that meet the defined memory minimum will be available during provisioning when this Layout is selected. Custom memory values must also meet this minimum. Entering a minimum memory value of zero (the default value) indicates no minimum. This minimum memory value will override any Virtual Image minimum memory requirements
- Workflow
Select a Workflow which will be associated as the Provisioning Workflow for Instances provisioned using this Layout. If a Workflow is defined, it is not shown to the user at provision time and will be run in addition to any Workflows set on the Instance Type, in Workflows Policies, defined in App Blueprints, or selected manually at provision time.
- Supports Convert to Managed
Enabled to allow users to select this layout when converting a Discovered workload to Managed
- Enable Scaling (Horizontal)
Enables Instances with this layout to use scaling features
- Environment Variables
Custom environment variables to be added to the Instance when provisioned
- Inputs
Search for and select one or multiple Inputs to add to the Layout. Inputs (except for Hidden Inputs) will appear in Provisioning, App, Blueprint, and Cloning wizards when this layout is selected
- Nodes
Single or multiple nodes can be added to a Layout by searching for and selecting the Node(s)
- Price Sets
Associate a Price Set with the Layout, Price Sets are created in Administration > Plans & Pricing > Price Sets. Price Sets which are added to Layouts become additive with any pricing which may apply on the Service Plan. For example, a “fixed” Price Set of $1000/month has been associated with the Layout. If this Layout is provisioned to an Amazon AWS Cloud, the additional fixed price would be computed along with any Price which is pre-existing on the AWS Service Plan
Layout Price Sets Demo
Node Types
Node Types are the link between Images and Layouts.
Node Type Configuration Options
The following fields are for all Technology types:
- Name
Name of the Node Type in Morpheus
- Short Name
The short name is a lowercase name with no spaces used for display in your container list
- Version
Version for the Node Type. Examples: 7.5, 2012 R2, latest
- Technology
Select associated Technology. This will filter the available configuration options, images and which Layouts the Node Type can be added to
- Environment Variables
Add pre-set environment variables to the Node Type
- Category
Node Types of differing categories within the same Layout can have differing sizing
Technology-Specific Options
The Options fields will change depending on the Technology option selected. For VM provisioning technology options, select an image from the VM Image dropdown. This list is populated from the Morpheus Virtual Images section and will include images uploaded into Morpheus as well as synced images from added clouds.
Note
Amazon and Azure Marketplace Images can be added in the Virtual Images section for use as Node Types in custom library items.
Docker Options
For Docker, type in the name and version of the Docker Image, then select the integrated registry.
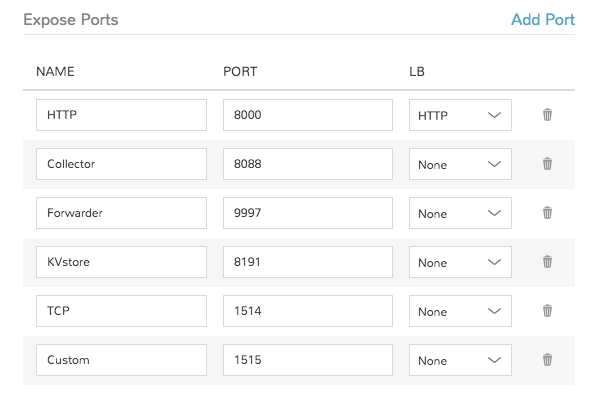
- Service Ports
To open ports on the node, enter the name and port to expose. The Load Balancer HTTP, HTTPS, or TCP setting is required when attaching to Load Balancers.
Defining an Exposed port will also create a hyperlink(s) on the container location (IP) in the VM or Container section of the associated Instance detail page.
- Scripts
Search for and select one or multiple scripts to be executed when the Node Type is provisioned
- File Templates
Search for and select one or multiple File Templates to be written when the Node Type is provisioned
Example port configuration:
VMware Options
Morpheus supports VMware-specific configurations related to Node Types targeted for VMware vCenter Clouds. Setting the TECHNOLOGY field on the Node Type to “VMware” reveals these fields.
vApp Properties
Some VMware images may expect the user to provide values for vApp properties related to server configuration. Morpheus allows the user to set values for vApp properties on the Node Type, which can be static values or even Morpheus variables such as if we wanted to provide the next available IP address from a Morpheus IP pool or source a password from Morpheus Cypher. Consider the following example workflow for examining an OVA image, uploading it to Morpheus as a Virtual Image, and setting vApp properties on the Node Type.
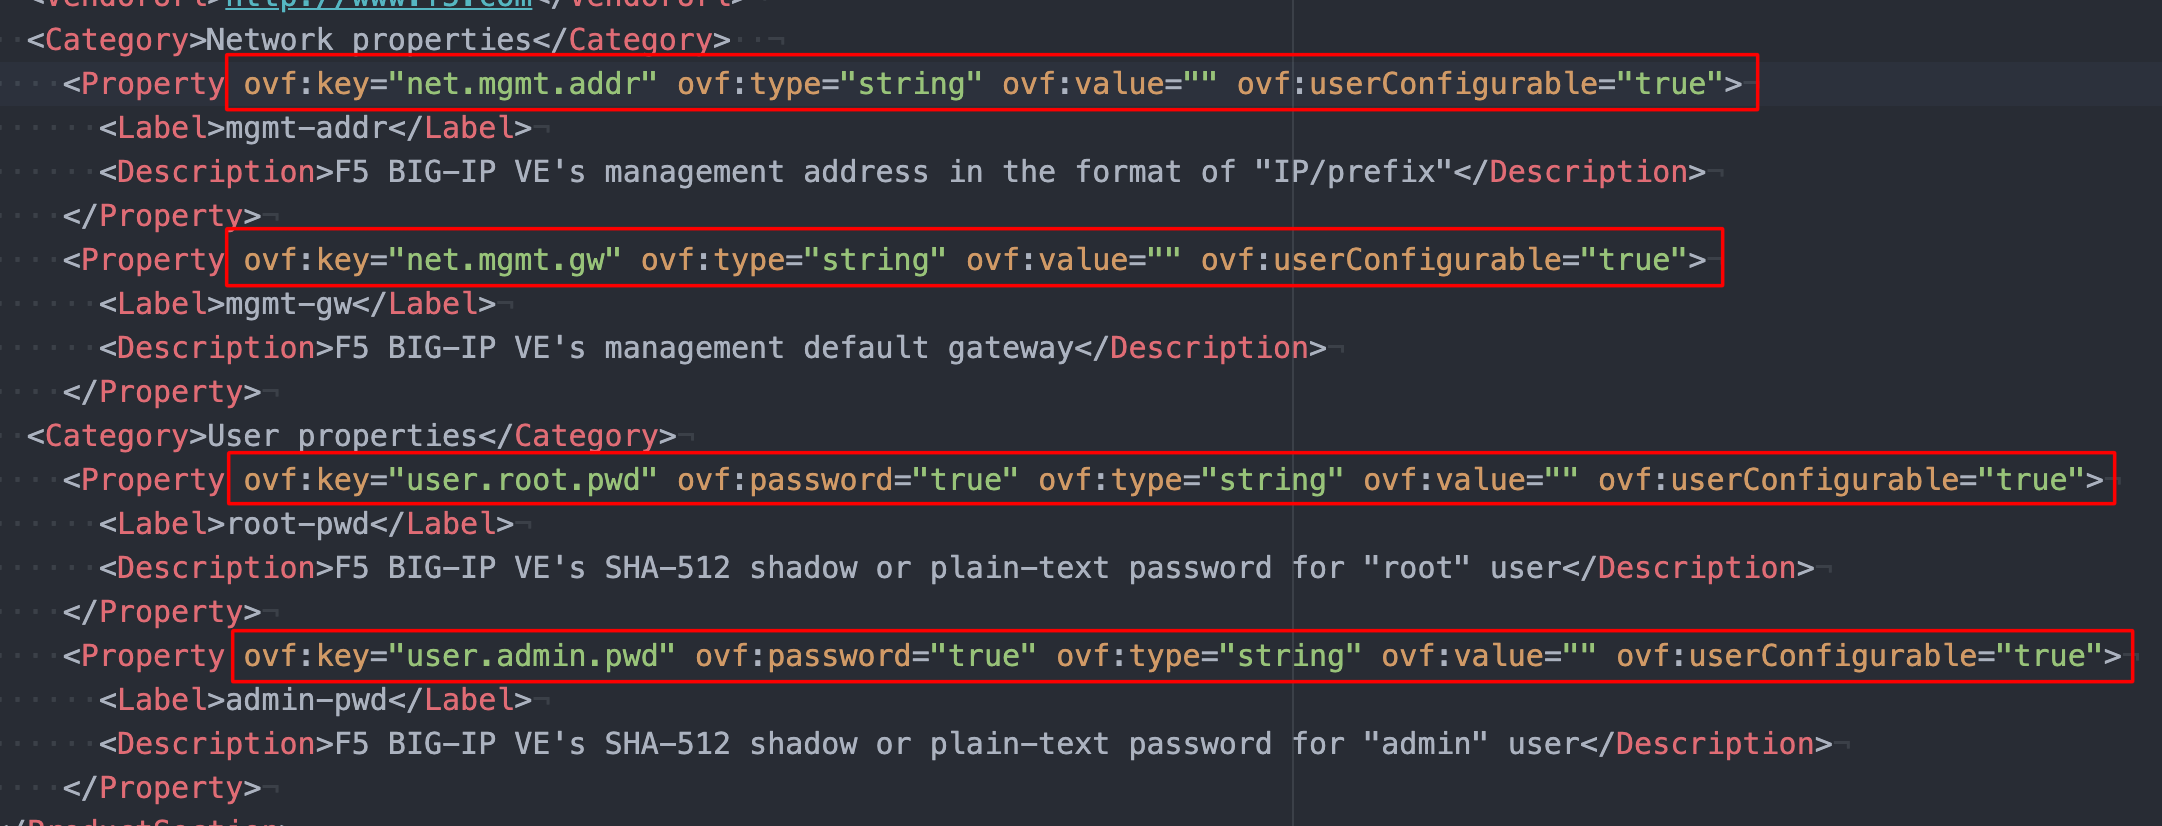
If you have an OVA that doesn’t have the properties laid out in a visible format, you can unzip it and inspect the OVF file to help set the vApp properties in Morpheus. For example, take a look at the screenshot below from an OVF file associated with an F5 image. There are four vApp properties I wish to set related to network and user configuration. The userConfigurable property should be toggled to true for any that may be set to false. The key is identified by the key property and, if desired, default values can be set via the value property. Save any changes to the OVF file.
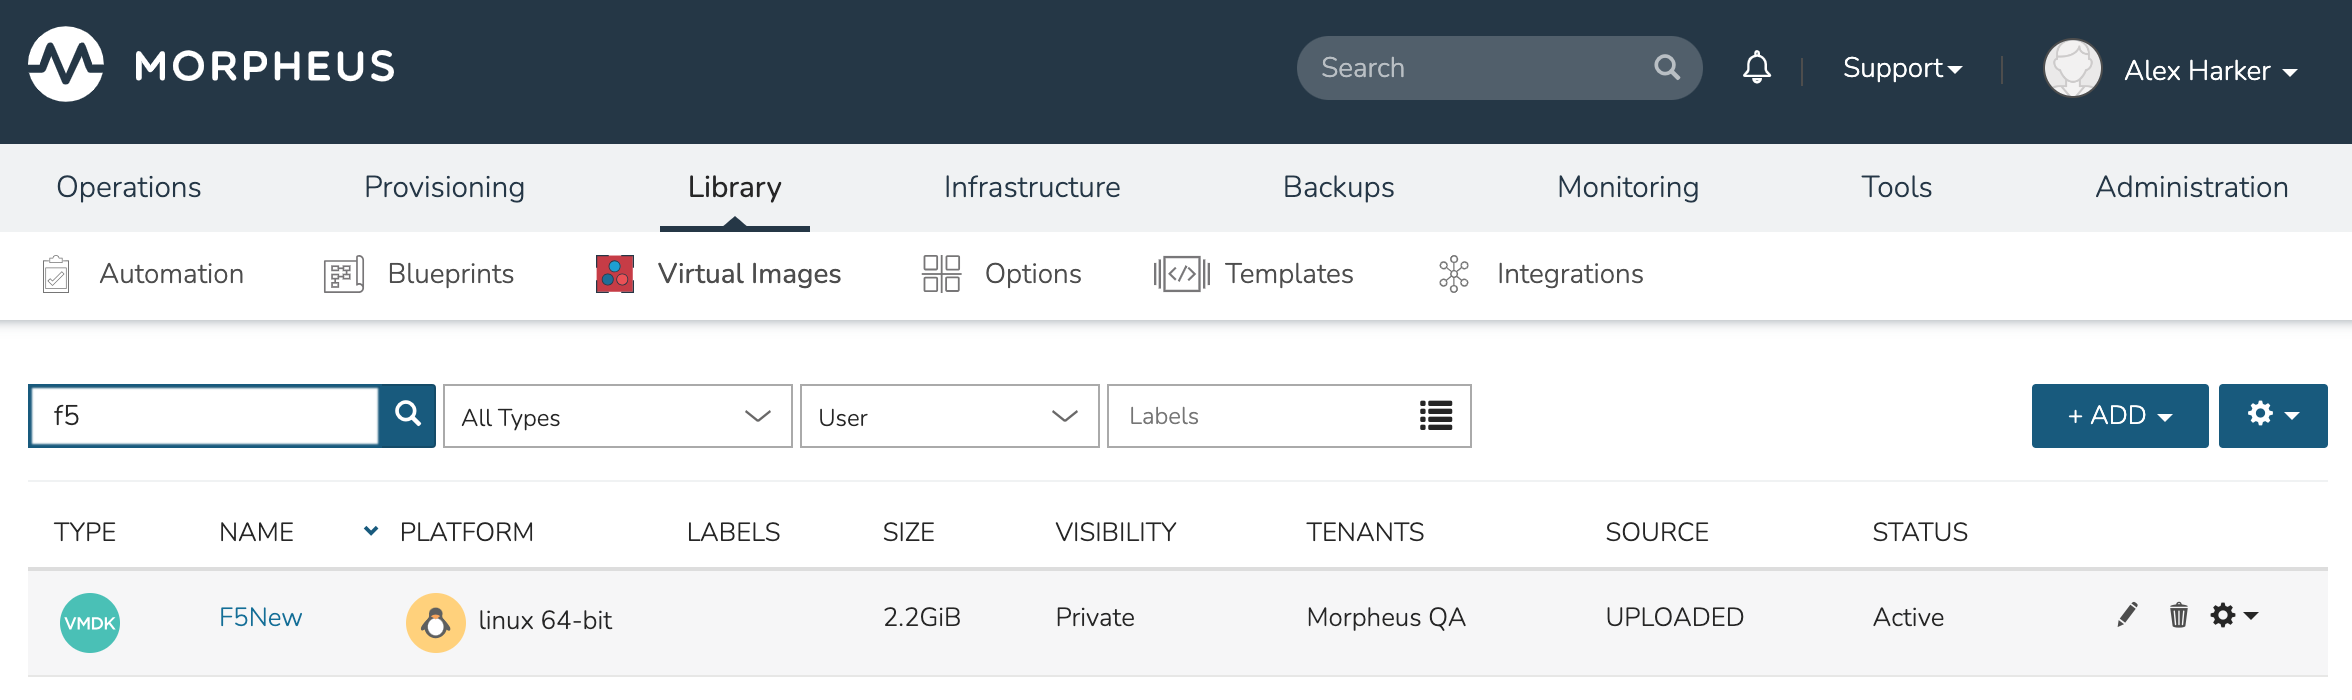
With changes saved, the image can be uploaded to Morpheus as a Virtual Image from which we can create and configure a Node Type. Below you can see the Virtual Image uploaded and revealed on the Virtual Images list page.
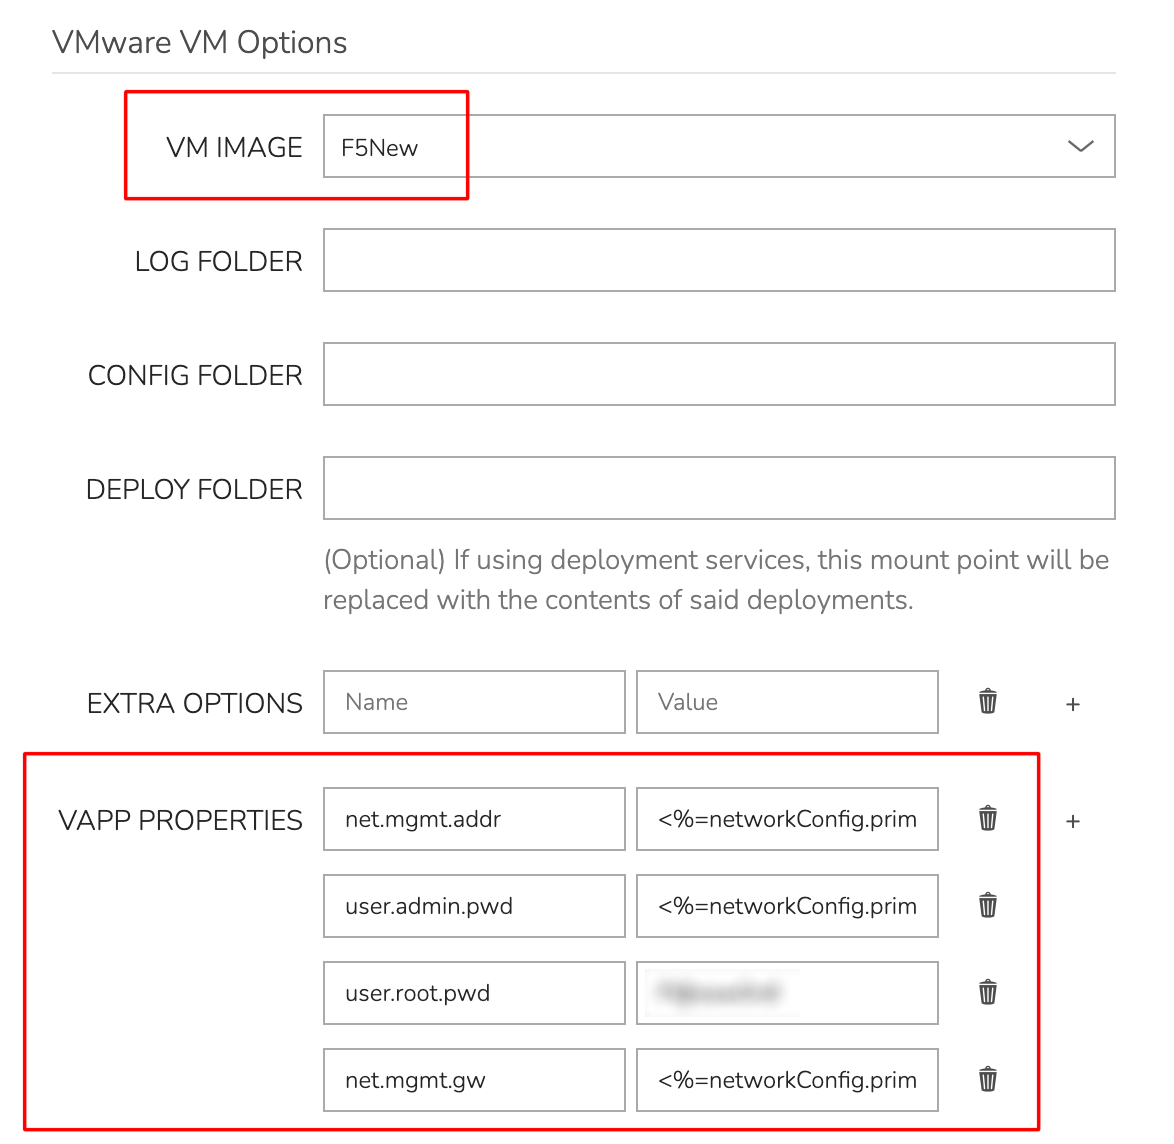
Next, create a new Node Type. After setting the TECHNOLOGY value to “VMware” the fields related to vApp Property configuration will be revealed. Select the uploaded Virtual Image as the “VM IMAGE” and set the key/value pairs in VAPP PROPERTIES. In this case, I’ve dynamically loaded the values using Morpheus variables.
The rest of the process is the same as building out any other Morpheus library item. House the Node Type within a Layout and the Layout within an Instance Type. It should then be provisionable as any other Instance Type.
Extra Options
When VMware Technology Type is selected, EXTRA OPTIONS will be available in the VMware VM Options section. These allow defining Advance vmx-file parameters during provisioning.
Some Example include:
tools.setinfo.sizeLimit : 1048576
vmci0.unrestricted : FALSE
isolation.tools.diskWiper.disable : TRUE
Note
Not all parameters can be set using extra config parameters. A sample reference list can be found at http://www.sanbarrow.com/vmx/vmx-advanced.html#vmx
Important
Use caution when setting Extra Options. Malformed config files can break provisioning. Troubleshooting issues related to Extra Options defined are beyond the scope of Morpheus product support.
App Blueprints
App Blueprints support a vast array of providers and configurations with programmatic markup or Infrastructure as Code capabilities. Blueprints configs can be manually added or scoped to a git repo. Morpheus blueprints allows for full automation configuration, locked fields, tiered boots, and linked tiers with exported evars. All blueprints have permission settings for controlling group and tenant access.
- App Blueprint Types
Morpheus
Terraform
ARM (Azure)
CloudFormation (AWS)
Kubernetes
Helm
Catalog Items
The Self Service catalog (Library > Blueprints > Catalog Items) is where administrators can create easily-deployable items for consumption by users operating under the “Service Catalog” Persona in Morpheus. Catalog items can be fully-configured Morpheus Instances or Blueprints, complete with user input through Morpheus Inputs, automation Workflows, and more. The catalog items are presented in a simplified interface for ease of deployment without sacrificing configurability for administrators. All available catalog items are built in the Self Service area and users will see relevant items in their catalogs based on Role permissions.
Note
For more on Personas and using the Service Catalog persona, see the Personas sections of our documentation.
Access is granted to the Self Service section through the Library: Catalog Items Role permission. Users with Read rights can view the catalog while users with full rights can create and edit catalog items. Users without any rights to Self Service will not be able to access the page at all.
Additionally, a user’s Role determines access to the standard and/or service catalog persona and which service catalog items are available for a user under the service catalog persona. See the Roles section of Morpheus documentation for more information on administering Roles.
Viewing the Self Service Catalog
The complete Self Service catalog can be viewed by clicking on Catalog from the Provisioning menu. The complete list of items available for the Self Service catalog are shown here but users working in the Service Catalog Persona will see only those allowed based on their user role. In addition to the name and type of each catalog item, we can also see a description and whether not the catalog item is featured or active. Featured items are given special visibility in the Service Catalog Persona and inactive items will not appear as provisioning options.
Building Catalog Instances
Note
API usage for Catalog Items with Forms is not yet supported. If planning to use the API or CLI to order Catalog Items you should not use Forms on Catalog Items until it is supported.
An Instance in Morpheus is a set of one or more containers or virtual machines that correlate to a single, horizontally-scalable entity or service suite. From the Self Service section, we can pre-configure Morpheus Instances and present them to users viewing the Service Catalog Persona for one-click deployment.
From the Catalog Items List Page (Library > Blueprints > Catalog Items), click ADD. From the dropdown menu, select Instance. The modal window will appear to configure and add a new catalog Instance.

Configure the following:
NAME: A friendly name for the catalog item in Morpheus
CODE: An optional shortcode for coded naming schemes or programmatic reference
DESCRIPTION: An optional description identifying the catalog item
CATEGORY: Select an existing category or enter a new one. When provisioning from the catelog, items can be filtered by category
ENABLED: When checked, this catalog item will be available for provisioning
LABELS: A comma-separated list of descriptive strings which can be used to categorize the Catalog Item. The Catalog Items list view page can be filtered by labels to make them easier to find
ENABLED: When marked, this Catalog Item will be available from the provisioning Catalog view
DISABLE AUTO PRICE: When marked, price estimates are no longer refreshed with every field change at the time this Catalog Item is ordered. For some workloads with heavy Configuration-phase Tasks this may improve performance of the order page
FEATURED: When checked, this catalog item will be given special visibility in the Service Catalog Persona view
ALLOW QUANTITY: When checked, an additional field is added to the order page allowing users to order multiple copies. If this option is enabled, ensure your configuration supports that flexibility (such as when IP or load balancer details are specified)
VISIBILITY: Set to private to keep the catalog item available only to users in the current Tenant. Master Tenant administrators may set catalog items to public to make them viewable and usable by Subtenant users
LOGO: Select or upload a logo to be associated with this catalog item
DARK LOGO: If desired, set an alternate logo for use when the dark theme is applied to the Morpheus appliance
CONFIG: Enter, view, or edit Instance config here. Click CONFIGURE to build a base configuration through the Morpheus Instance wizard. After configuration through the Instance wizard, you may need to overwrite some static values in the Instance JSON body with calls to custom Input values. This allows your users to easily set the Instance Plan, Group, name, tags, or anything else they may need to control. Dynamic inputs are passed with the following syntax: “<%= customOptions.fieldName %>” where fieldName is the Field Name value set on the Input
CONTENT: Optionally include documentation content for this Catalog Item. Markdown-formatted text is accepted and displayed appropriately when the item is ordered from the Service Catalog. A new Catalog Item-type Wiki entry will also be added containing this information
FORM TYPE: Choose whether a Form or individual Inputs should be used to set the user options at provisioning time. See Forms documentation for complete details on creating Forms.
FORM: If the Form Type of “Form” is selected, choose the pre-existing Form which should be associated with the Catalog Item
INPUTS: If the Form Type of “Inputs” is selected, choose the pre-existing Inputs which should be associated with the Catalog Item
Using Forms with Catalog Items
Note
API usage for Catalog Items with Forms is not yet supported. If planning to use the API or CLI to order Catalog Items you should not use Forms on Catalog Items until it is supported.
Using Forms provides a number of advantages over using Inputs. Once the Form is selected, Morpheus helpfully provides a sidebar which contains all variables that can be consumed in the Instance config from the Form:
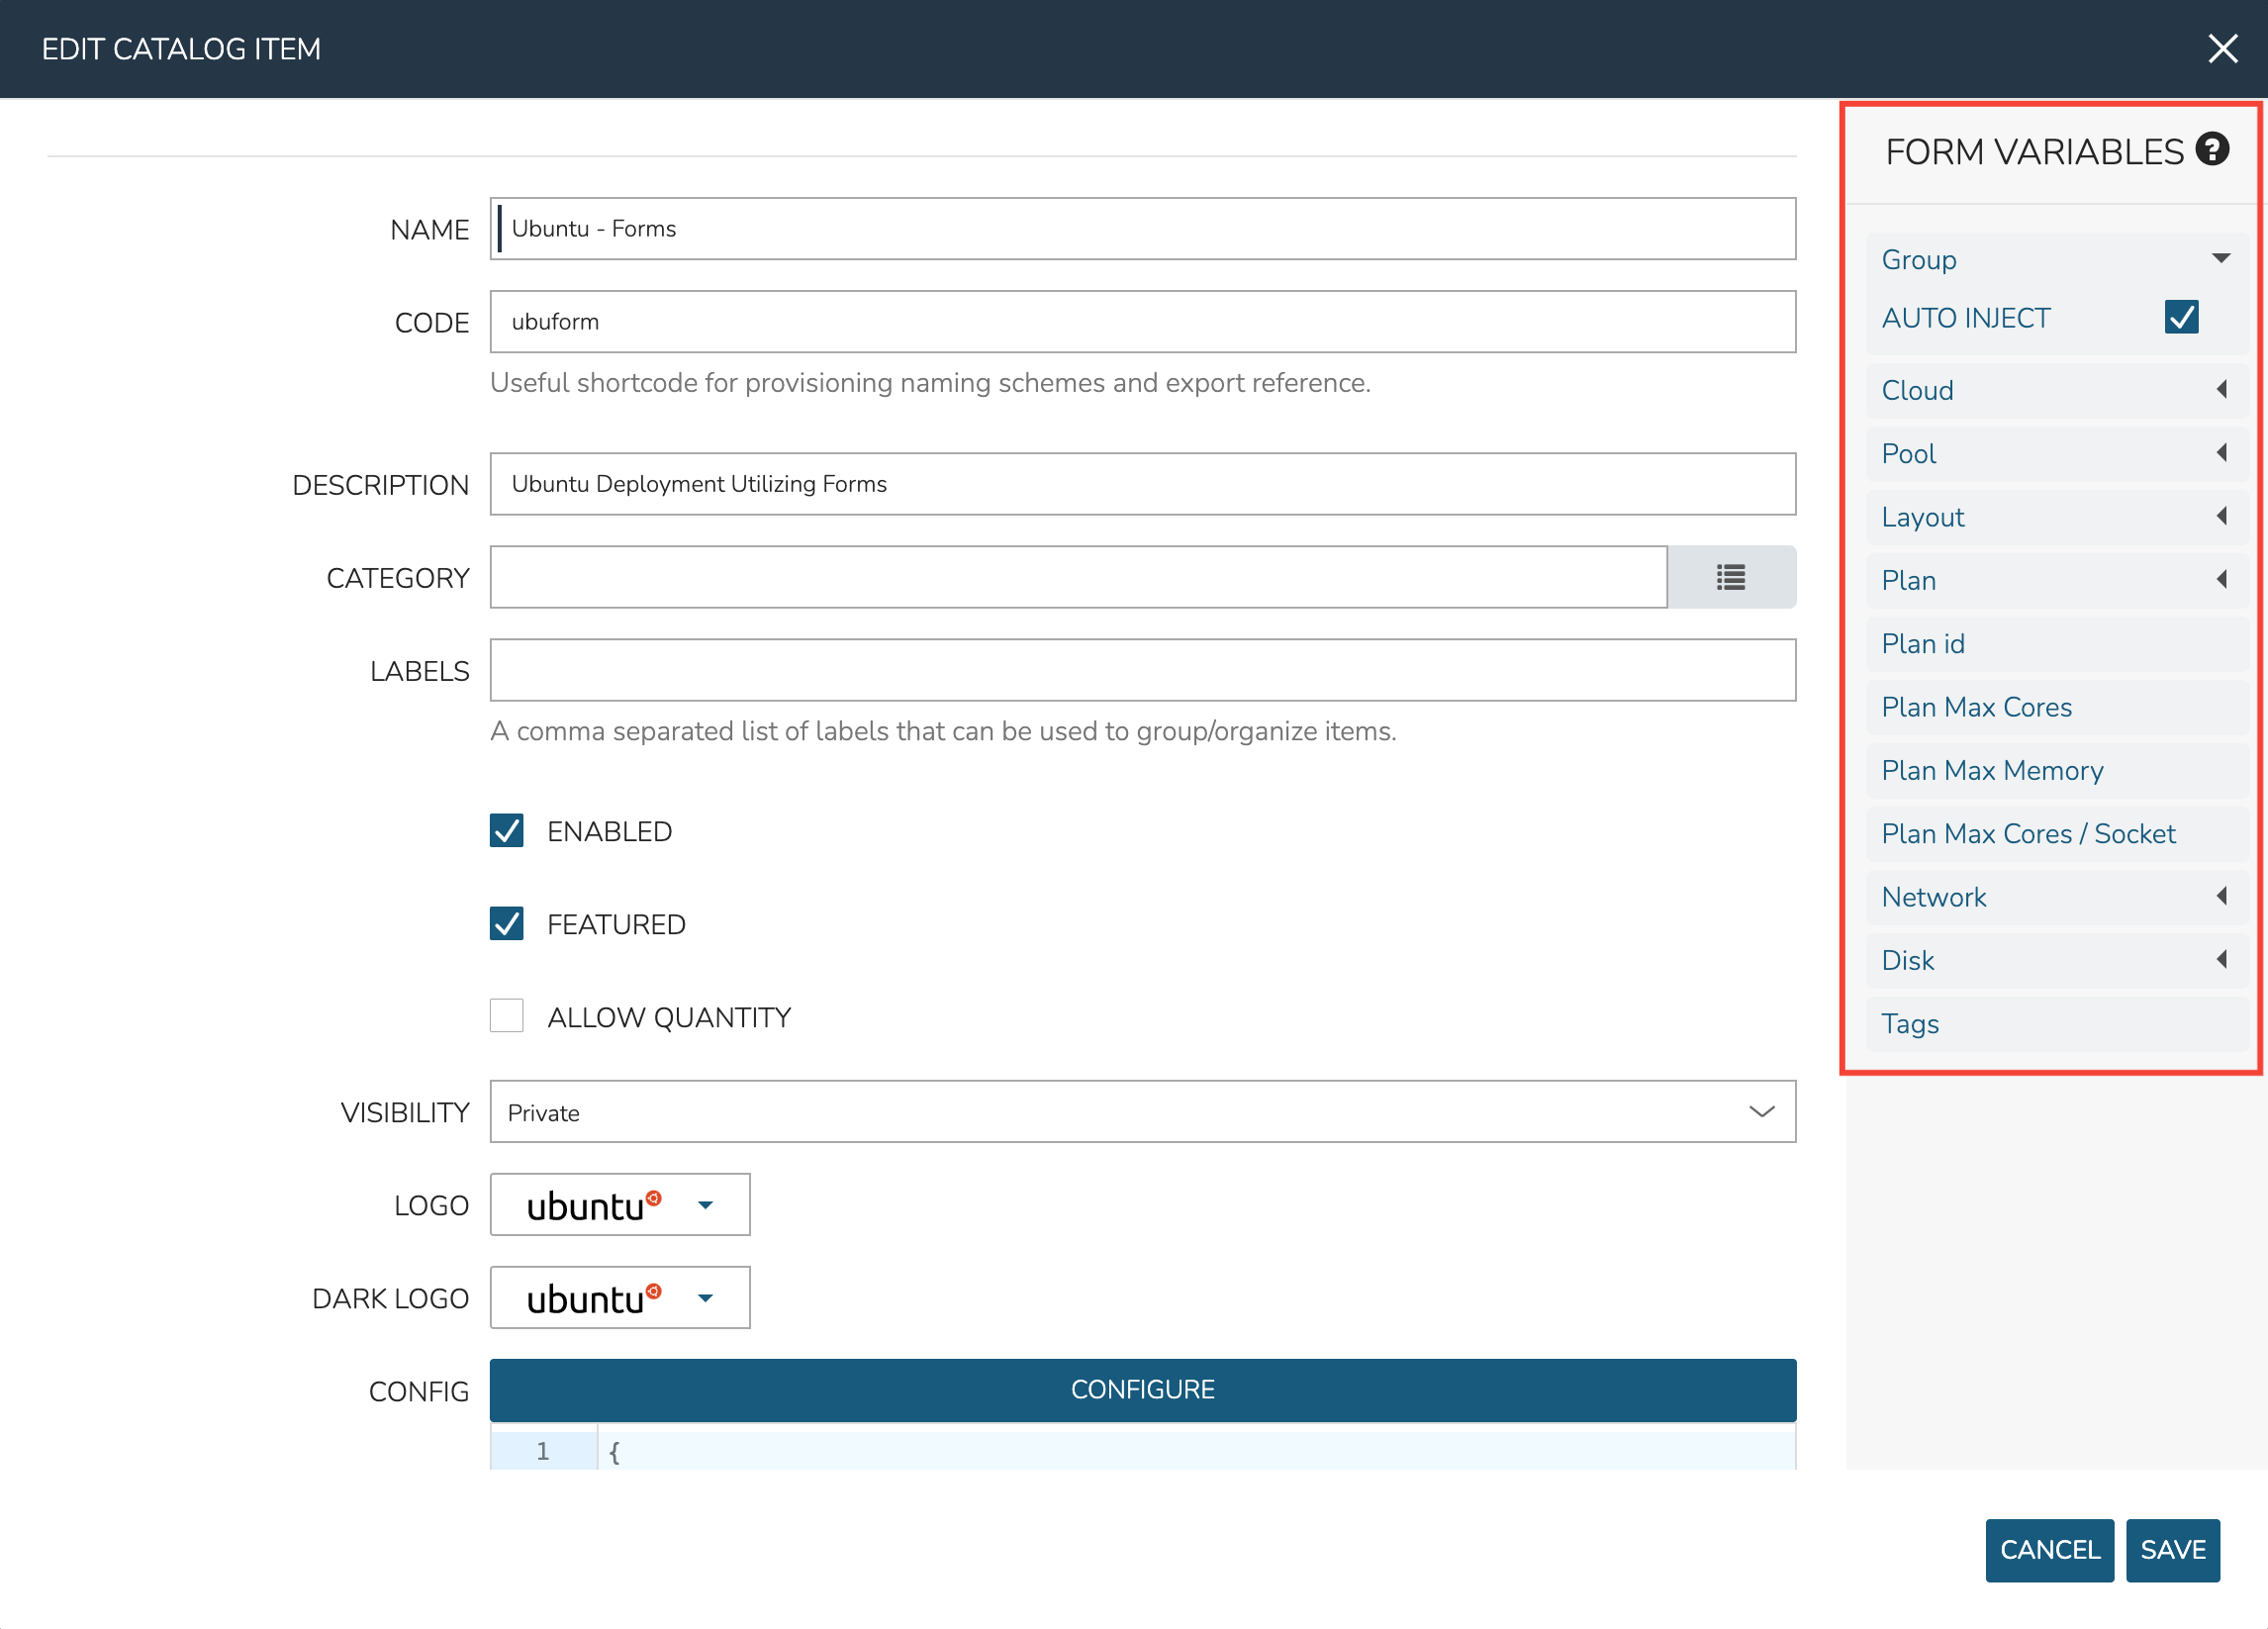
Many Form Inputs are designed to auto-inject themselves into the Instance config, you can see in the screenshot above that “AUTO INJECT” is checked. For variables that auto-inject, you do not need to override any static configuration with a variable call in order to consume that form value. In most cases, you should leave auto-inject turned on but the option is available to disable it for more advanced situations such as if you wanted to code custom logic into the variable call.
Other types of Form Inputs do not auto-inject and, for these, you must override any static configuration in the Instance config with a variable call. For these situations, Morpheus helpfully provides the results of all variables so you can be sure you’re injecting the proper call. Click on the question mark (?) button immediately to the right of the “FORM VARIABLES” header to see a list of available variables and an example resolved variable. Variable tiles may be dragged from the sidebar into the CONFIG text area and a properly-formatted variable call will be inserted.

As an example, see the configuration for an Ubuntu server in the expandable section below. You’ll notice in the configuration that a VMware Cloud, a specific Group, a specific Plan, and other static configurations are set. Since the Group, Cloud, Plan and other variables are able to be automatically injected, the user may select a different Group, Cloud, Plan, etc. from the form at provision time. The creator of the Catalog Item does not need to override those static configurations with variable calls.
Example Catalog Item Config
{
  "hostName": "${userInitials}-${cloudCode}-${type}-${sequence}",
  "metadata": "<%=customOptions.targetTags%>",
  "backup": {
    "backupRepository": 40,
    "veeamManagedServer": "",
    "jobSchedule": 2,
    "createBackup": true,
    "jobAction": "new",
    "jobRetentionCount": "3",
    "providerBackupType": 12,
    "target": 37006
  },
  "instance": {
    "userGroup": {
      "id": ""
    },
    "tags": "Forms,Test"
  },
  "defaultExpandAdvanced": false,
  "volumes": [
    {
      "maxIOPS": null,
      "displayOrder": 0,
      "unitNumber": "0",
      "minStorage": 5368709120,
      "configurableIOPS": false,
      "uuid": "a6781cc1-31ca-406b-aea0-e33ea1a18b7f",
      "controllerMountPoint": "2200223:0:4:0",
      "internalId": "[ESXi-DC2-QA-LUN01] Morpheus Ubuntu 22.04 20230307/Morpheus Ubuntu 22.04 20230307.vmdk",
      "id": 5255832,
      "datastoreId": "autoCluster",
      "maxStorage": 26843545600,
      "volumeCustomizable": true,
      "readonlyName": false,
      "controllerId": 2200223,
      "externalId": "2000",
      "virtualImageId": 1418543,
      "vId": 1418543,
      "size": 25,
      "name": "root",
      "planResizable": true,
      "rootVolume": true,
      "storageType": 1,
      "typeId": 1,
      "resizeable": true,
      "uniqueId": null
    }
  ],
  "type": "ubuntu",
  "ports": [
    {
      "code": "ubuntu.22",
      "visible": true,
      "internalPort": 22,
      "loadBalancePort": null,
      "loadBalanceProtocol": null,
      "sortOrder": 1,
      "name": "SSH",
      "id": 7,
      "shortName": "ssh",
      "externalPort": 22,
      "loadBalance": false
    }
  ],
  "version": "22.04",
  "hideLock": true,
  "cloud": {
    "name": "QA VMware",
    "id": 26324
  },
  "layout": {
    "code": "vmware-ubuntu-22.04-single",
    "id": 2608414
  },
  "showScale": false,
  "environment": "2",
  "networkInterfaces": [
    {
      "ipMode": "",
      "primaryInterface": true,
      "showNetworkPoolLabel": true,
      "showNetworkDhcpLabel": false,
      "network": {
        "idName": "VLAN0002 - Internal Server",
        "pool": {
          "name": "10.32.20.0 /22",
          "id": 18823
        },
        "id": "network-173431",
        "hasPool": false
      },
      "networkInterfaceTypeId": 4,
      "networkInterfaceTypeIdName": "VMXNET 3"
    }
  ],
  "copies": 1,
  "loadBalancer": [],
  "name": "${userInitials}-${cloudCode}-${type}-${sequence}",
  "storageControllers": [
    {
      "editable": false,
      "typeName": "IDE",
      "maxDevices": 2,
      "displayOrder": 0,
      "active": true,
      "unitNumber": null,
      "reservedUnitNumber": -1,
      "busNumber": "0",
      "removable": false,
      "name": "IDE 0",
      "typeId": 2,
      "id": 1729031,
      "category": "ide"
    },
    {
      "editable": false,
      "typeName": "IDE",
      "maxDevices": 2,
      "displayOrder": 1,
      "active": true,
      "unitNumber": null,
      "reservedUnitNumber": -1,
      "busNumber": "1",
      "removable": false,
      "name": "IDE 1",
      "typeId": 2,
      "id": 1729032,
      "category": "ide"
    },
    {
      "editable": false,
      "typeName": "SCSI LSI Logic Parallel",
      "maxDevices": 15,
      "displayOrder": 2,
      "active": true,
      "unitNumber": null,
      "reservedUnitNumber": 7,
      "busNumber": "0",
      "removable": false,
      "name": "SCSI 0",
      "typeId": 4,
      "id": 1729030,
      "category": "scsi"
    }
  ],
  "config": {
    "poolProviderType": null,
    "isVpcSelectable": true,
    "smbiosAssetTag": null,
    "isEC2": false,
    "resourcePoolId": "pool-139625",
    "hostId": null,
    "createUser": true,
    "nestedVirtualization": null,
    "vmwareFolderId": "group-v80",
    "noAgent": false
  },
  "plan": {
    "code": "vm-8192",
    "id": 149
  },
  "group": {
    "name": "All Clouds",
    "id": "2"
  }
}
Once done, click SAVE CHANGES
Building Catalog Blueprints
Note
API usage for Catalog Items with Forms is not yet supported. If planning to use the API or CLI to order Catalog Items you should not use Forms on Catalog Items until it is supported.
Morpheus Blueprints allow for full multi-tier application deployment. In the Self Service catalog, user can create catalog items based on pre-existing App Blueprints. If new Blueprints need to be created for the Service Catalog, see other sections of Morpheus docs on building App Blueprints of various supported types. Just like with catalog Instances, we can pre-configure Blueprints and present them to users viewing the Service Catalog Persona view for easy, one-click deployment.
From the Catalog Items List Page (Library > Blueprints > Catalog Items), click ADD. From the dropdown menu, select Blueprint. The modal window will appear to configure and add a new catalog Blueprint.
Configure the following:
NAME: A friendly name for the catalog item in Morpheus
CODE: An optional shortcode for coded naming schemes or programmatic reference
DESCRIPTION: An optional description identifying the catalog item
CATEGORY: Select an existing category or enter a new one. When provisioning from the catelog, items can be filtered by category
LABELS: A comma-separated list of descriptive strings which can be used to categorize the Catalog Item. The Catalog Items list view page can be filtered by labels to make them easier to find
ENABLED: When checked, this catalog item will be available for provisioning
DISABLE AUTO PRICE: When marked, price estimates are no longer refreshed with every field change at the time this Catalog Item is ordered. For some workloads with heavy Configuration-phase Tasks this may improve performance of the order page
FEATURED: When checked, this catalog item will be given special visibility in the Service Catalog Persona view
ALLOW QUANTITY: When checked, an additional field is added to the order page allowing users to order multiple copies. If this option is enabled, ensure your configuration supports that flexibility (such as when IP or load balancer details are specified)
VISIBILITY: Set to private to keep the catalog item available only to users in the current Tenant. Master Tenant administrators may set catalog items to public to make them viewable and usable by Subtenant users
LOGO: Select or upload a logo to be associated with this catalog item
DARK LOGO: If desired, set an alternate logo for use when the dark theme is applied to the Morpheus appliance
CONFIGURE: Click CONFIGURE to use the familiar App provisioning wizard to tie Blueprint and App deployment configuration to the Catalog Item
APP SPEC: Inject App spec here for any fields required to provision an App from your Blueprint. You may also inject any overrides to the existing Blueprint spec that are desired. App Spec configuration must be YAML, a simple example that names the App and sets the Group and Cloud is included below:
#Example App Spec

name: '<%= customOption.appName %>'
group:
  name: Dev Group
environment: Dev
tiers:
  Web:
    instances:
      - instance:
          type: nginx
          cloud: Dev AWS
  App:
    instances:
      - instance:
          type: apache
          cloud: Dev AWS
CONTENT: Optionally include documentation content for this Catalog Item. Markdown-formatted text is accepted and displayed appropriately when the item is ordered from the Service Catalog. A new Catalog Item-type Wiki entry will also be added containing this information.
Note
App spec custom option variables should be single quoted in YAML:
cloud: '<%= customOption.cloud %>'. Additionally, not all variables are available here as many are unknown until provisioning. Users may use any custom Input values (customOption) as well as name or hostname values which are resolved as part of naming policy evaluation.FORM TYPE: Choose whether a Form or individual Inputs should be used to set the user options at provisioning time. See Forms documentation for complete details on creating Forms.
FORM: If the Form Type of “Form” is selected, choose the pre-existing Form which should be associated with the Catalog Item
INPUTS: If the Form Type of “Inputs” is selected, choose the pre-existing Inputs which should be associated with the Catalog Item
Tip
There are a number of advantages to using Forms over Inputs. See the section above on using Forms with Catalog Items for a complete description on how they are used and the advantages to using them.
Once done, click SAVE CHANGES
Building Catalog Workflows
Note
API usage for Catalog Items with Forms is not yet supported. If planning to use the API or CLI to order Catalog Items you should not use Forms on Catalog Items until it is supported.
From the Catalog Items List Page (Library > Blueprints > Catalog Items), click ADD. From the dropdown menu, select Workflow. The modal window will appear to configure and add a new catalog Workflow.
Configure the following:
NAME: A friendly name for the catalog item in Morpheus
CODE: An optional shortcode for coded naming schemes or programmatic reference
DESCRIPTION: An optional description identifying the catalog item
CATEGORY: Select an existing category or enter a new one. When provisioning from the catelog, items can be filtered by category
LABELS: A comma-separated list of descriptive strings which can be used to categorize the Catalog Item. The Catalog Items list view page can be filtered by labels to make them easier to find
ENABLED: When checked, this Workflow item will be available for selection in the Service Catalog
DISABLE AUTO PRICE: When marked, price estimates are no longer refreshed with every field change at the time this Catalog Item is ordered. For some workloads with heavy Configuration-phase Tasks this may improve performance of the order page
FEATURED: When checked, this catalog item will be given special visibility in the Service Catalog Persona view
VISIBILITY: Set to private to keep the catalog item available only to users in the current Tenant. Master Tenant administrators may set catalog items to public to make them viewable and usable by Subtenant users
LOGO: Select or upload a logo to be associated with this catalog item
DARK LOGO: If desired, set an alternate logo for use when the dark theme is applied to the Morpheus appliance
WORKFLOW: Select an existing Workflow to be associated with this Catalog Item, new Workflows are created in Library > Automation
CONTEXT: Optionally restrict users to a specific target context, Instance, Server, or None
CONFIG: Enter an optional custom config JSON body. See Workflows documentation for a formatting example
CONTENT: Optionally include documentation content for this Catalog Item. Markdown-formatted text is accepted and displayed appropriately when the item is ordered from the Service Catalog. A new Catalog Item-type Wiki entry will also be added containing this information.
FORM TYPE: Choose whether a Form or individual Inputs should be used to set the user options at provisioning time. See Forms documentation for complete details on creating Forms.
FORM: If the Form Type of “Form” is selected, choose the pre-existing Form which should be associated with the Catalog Item
INPUTS: If the Form Type of “Inputs” is selected, choose the pre-existing Inputs which should be associated with the Catalog Item
Tip
There are a number of advantages to using Forms over Inputs. See the section above on using Forms with Catalog Items for a complete description on how they are used and the advantages to using them.
Once done, click SAVE CHANGES
Editing and Deleting from the Self Service Catalog
Once created, Service Catalog items can be edited or deleted from the Catalog Items list view (Library > Blueprints > Catalog Items). Click the pencil icon in the relevant row to edit the Service Catalog item or the trash can icon to delete it. Alternatively, Service Catalog items can be made inactive to remove them as provisioning options rather than deleting them.
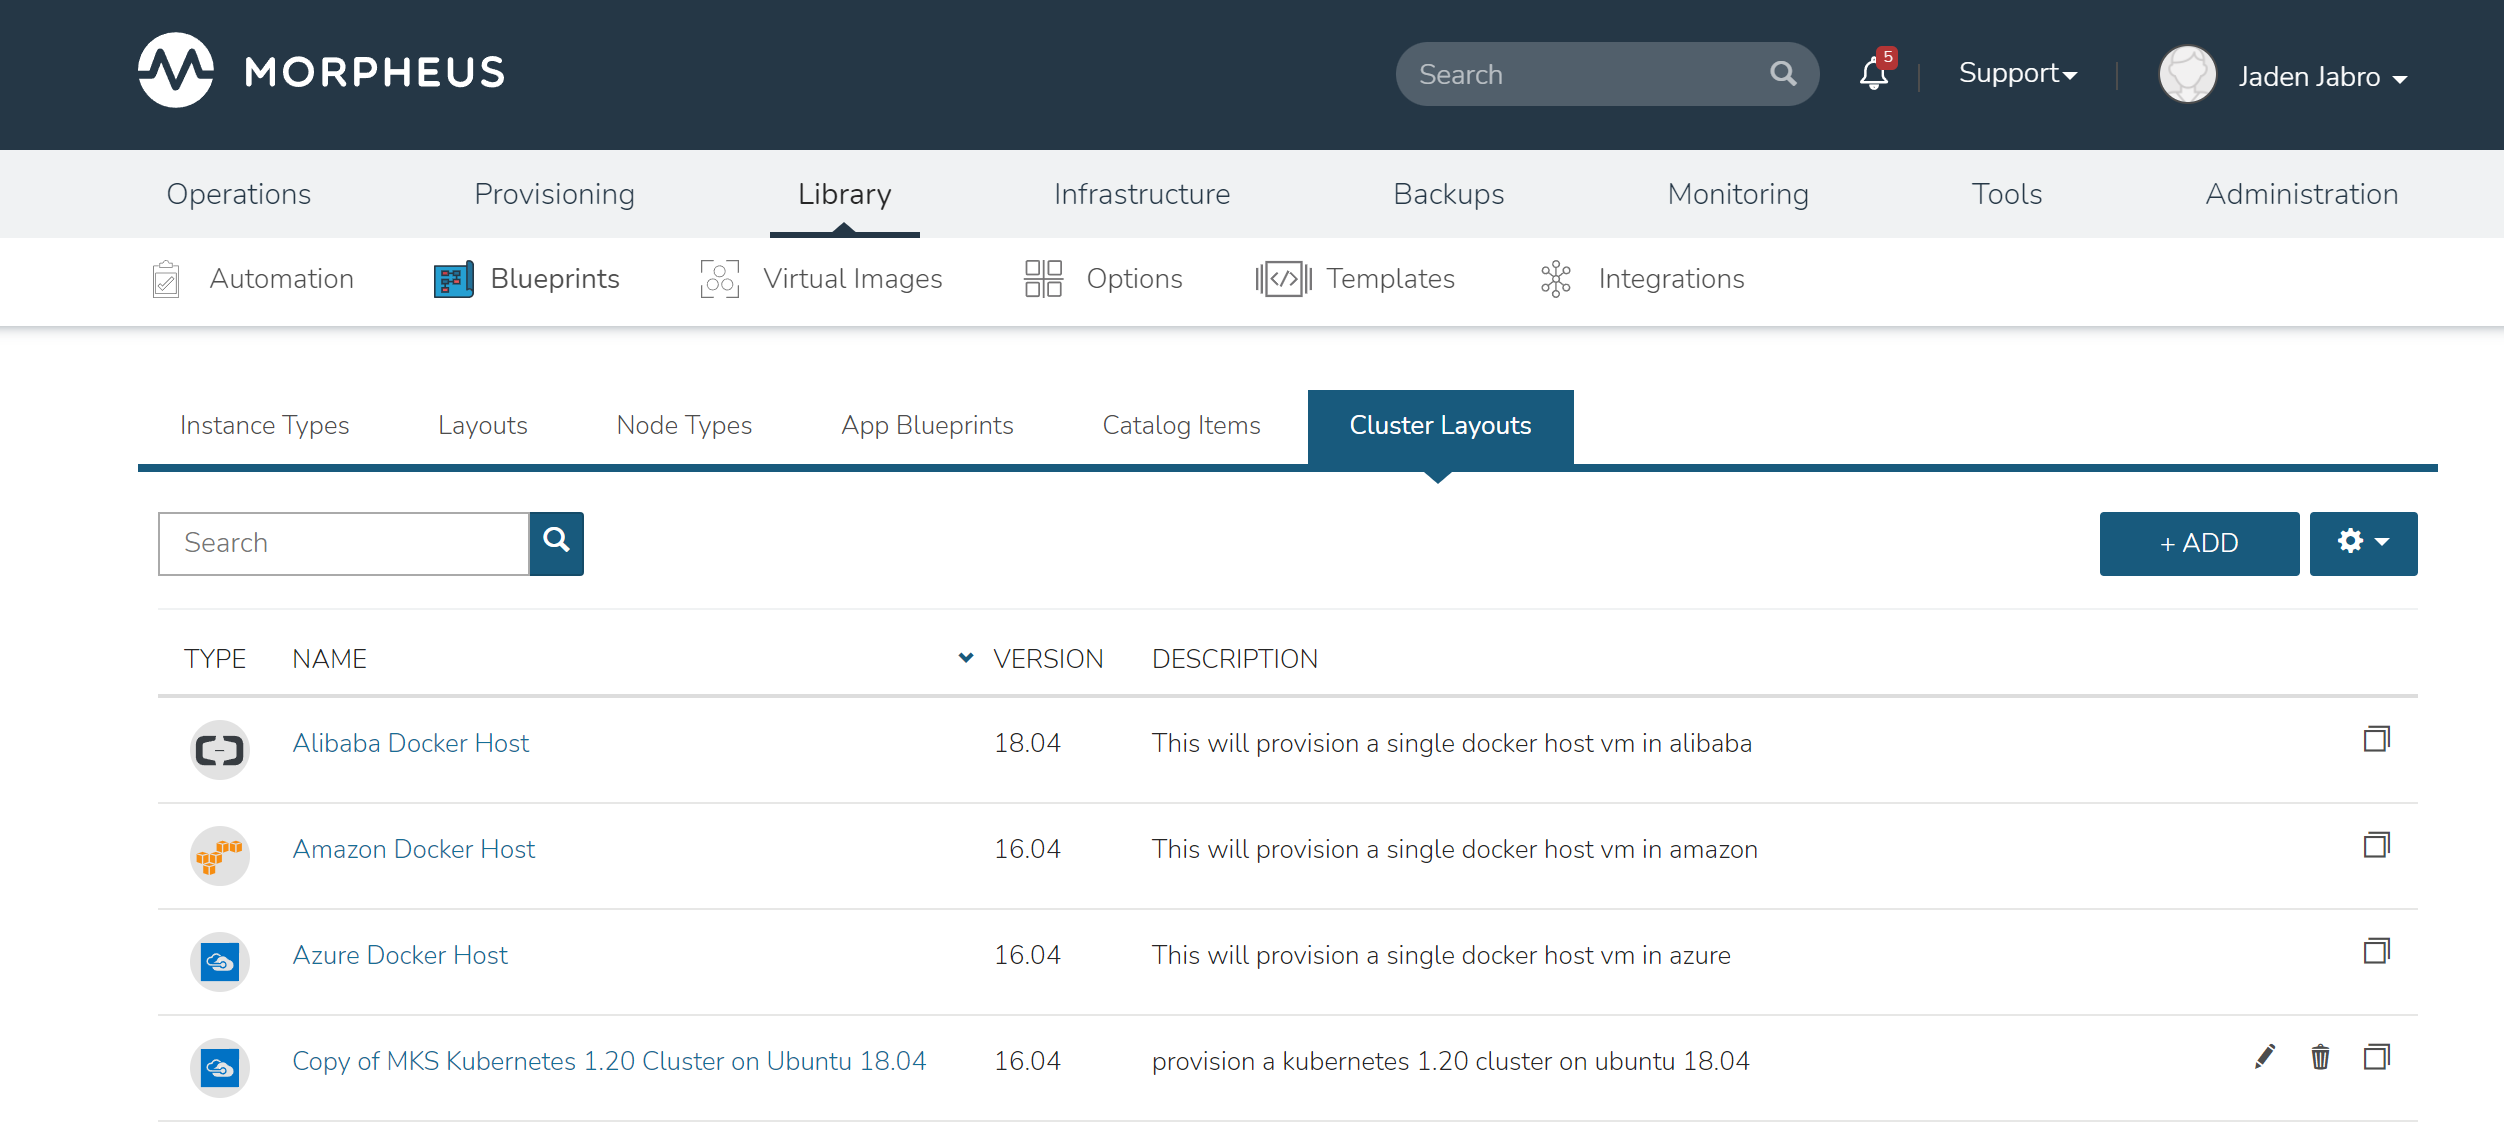
Cluster Layouts
Morpheus includes many different types of Cluster Layouts out-of-the-box which support a number of provisioning technologies. Many of these Morpheus-provided Cluster Layouts may also be cloned for use in creating custom layouts. Edit or delete user-created Cluster Layouts using the pencil (✎) or trash can (🗑) icons next to the desired layout on the Cluster Layouts list page. See the next section for an
Note
Morpheus now syncs available (non-preview) AKS k8s versions daily. Existing synced versions that are no longer supported by Azure are automatically disabled. The table below includes available AKS versions at time of v7.0.1 release.
List of Default System Cluster Layouts
NAME
CODE
DESCRIPTION
Kubernetes 1.20.7 Cluster AKS
kubernetes-azure-aks-1.20.7
This provisions a single kubernetes master in Azure
Kubernetes 1.20.5 Cluster AKS
kubernetes-azure-aks-1.20.5
This provisions a single kubernetes master in Azure
Kubernetes 1.19.11 Cluster AKS
kubernetes-azure-aks-1.19.11
This provisions a single kubernetes master in Azure
Kubernetes 1.19.9 Cluster AKS
kubernetes-azure-aks-1.19.9
This provisions a single kubernetes master in Azure
Kubernetes 1.18.19 Cluster AKS
kubernetes-azure-aks-1.18.19
This provisions a single kubernetes master in Azure
Kubernetes 1.18.17 Cluster AKS
kubernetes-azure-aks-1.18.17
This provisions a single kubernetes master in Azure
MKS Kubernetes 1.20 Cluster on Ubuntu 18.04
kubernetes-1.20.2-ubuntu-18.04.5-xen-amd64-single
provision a kubernetes 1.20 cluster on ubuntu 18.04 in xen
MKS Kubernetes 1.20 Cluster on Ubuntu 18.04
kubernetes-1.20.2-ubuntu-18.04.5-scvmm-amd64-single
provision a kubernetes 1.20 cluster on ubuntu 18.04 in scvmm
MKS Kubernetes 1.20 Cluster on Ubuntu 18.04
kubernetes-1.20.2-ubuntu-18.04.5-opentelekom-amd64-single
provision a kubernetes 1.20 cluster on ubuntu 18.04 in opentelekom
MKS Kubernetes 1.20 Cluster on Ubuntu 18.04
kubernetes-1.20.2-ubuntu-18.04.5-nutanix-amd64-single
provision a kubernetes 1.20 cluster on ubuntu 18.04
MKS Kubernetes 1.20 Cluster on Ubuntu 18.04
kubernetes-1.20.2-ubuntu-18.04.5-morpheus-amd64-single
provision a kubernetes 1.20 cluster on ubuntu 18.04 in manual
External Kubernetes 1.20
kubernetes-external-1.20
Connect to an external kubernetes cluster.
MKS Kubernetes 1.20 Cluster on Ubuntu 18.04
kubernetes-1.20.2-ubuntu-18.04.5-hyperv-amd64-single
provision a kubernetes 1.20 cluster on ubuntu 18.04 in hyperv
MKS Kubernetes 1.20 Cluster on Ubuntu 18.04
kubernetes-1.20.2-ubuntu-18.04.5-huawei-amd64-single
provision a kubernetes 1.20 cluster on ubuntu 18.04 in Huawei
MKS Kubernetes 1.20 Cluster on Ubuntu 18.04
kubernetes-1.20.2-ubuntu-18.04.5-openstack-amd64-single
provision a kubernetes 1.20 cluster on ubuntu 18.04 in Openstack
MKS Kubernetes 1.20 Cluster on Ubuntu 18.04
kubernetes-1.20.2-ubuntu-18.04.5-google-amd64-single
provision a kubernetes 1.20 cluster on ubuntu 18.04
MKS Kubernetes 1.20 Cluster on Ubuntu 18.04
kubernetes-1.20.2-ubuntu-18.04.5-amazon-amd64-single
provision a kubernetes 1.20 cluster on ubuntu 18.04
Copy of MKS Kubernetes 1.20 Cluster on Ubuntu 18.04
ffc21dc1-feb7-4c02-ae90-204fd080c23d
provision a kubernetes 1.20 cluster on ubuntu 18.04 in vmware
Docker Cluster on Ubuntu 18.04
docker-ubuntu-18.04.2-fusion-amd64-single
provision a docker cluster on ubuntu 18.04 in fusion
MKS Kubernetes 1.20 Cluster on Ubuntu 18.04
kubernetes-1.20.2-ubuntu-18.04.5-vmware-amd64-single
provision a kubernetes 1.20 cluster on ubuntu 18.04 in vmware
MKS Kubernetes 1.20 Cluster on Ubuntu 18.04
kubernetes-1.20.2-ubuntu-18.04.5-fusion-amd64-single
provision a kubernetes 1.20 cluster on ubuntu 18.04 in fusion
Kubernetes 1.17 Cluster EKS
kubernetes-amazon-eks-1.17
This will provision a single kubernetes master in amazon with weave and openebs
Kubernetes 1.17 HA Cluster on Ubuntu 16.04, Weave, OpenEBS
kubernetes-1.17-xen-ubuntu-16.04-cluster-weave-openebs
This will provision a single kubernetes master in xen with weave and openebs
Kubernetes 1.17 Cluster on Ubuntu 16.04, Weave, OpenEBS
kubernetes-xen-1.17-ubuntu-16.04-single
This will provision a single kubernetes master in xen with weave and openebs
Kubernetes 1.17 HA Cluster on Ubuntu 18.04, Weave, OpenEBS
kubernetes-scvmm-ubuntu-18.04-cluster-weave-openebs
This will provision a single kubernetes master in scvmm with weave and openebs
Kubernetes 1.17 Cluster on Ubuntu 18.04, Weave, OpenEBS
kubernetes-scvmm-ubuntu-18.04-single
This will provision a single kubernetes master in scvmm with weave and openebs
Kubernetes 1.17 HA Cluster on Ubuntu 16.04, Weave, OpenEBS
kubernetes-openstack-ubuntu-18.04-cluster-weave-openebs
This will provision a single kubernetes master in openstack with weave and openebs
Kubernetes 1.17 Cluster on Ubuntu 16.04, Weave, OpenEBS
kubernetes-openstack-ubuntu-18.04-single
This will provision a single kubernetes master in openstack with weave and openebs
Kubernetes 1.17 Cluster on Ubuntu 18.04, Weave, OpenEBS
kubernetes-opentelekom-ubuntu-18.04-single
This will provision a single kubernetes master in opentelekom with weave and openebs
Kubernetes 1.17 HA Cluster on Ubuntu 18.04, Weave, OpenEBS
kubernetes-nutanix-ubuntu-18.04-cluster-weave-openebs
This will provision a single kubernetes master in nutanix with weave and openebs
Kubernetes 1.17 HA Cluster on Linux, Weave, OpenEBS
kubernetes-1.17-morpheus-linux-cluster-weave-openebs
This will provision a kubernetes cluster with weave and openebs
Kubernetes 1.17 Cluster on Linux, Weave, OpenEBS
kubernetes-1.17-morpheus-linux-single
This will provision a single kubernetes master with weave and openebs
Kubernetes 1.17 HA Cluster on Ubuntu 18.04, Weave, OpenEBS
kubernetes-hyperv-ubuntu-18.04-cluster-weave-openebs
This will provision a single kubernetes master in hyperv with weave and openebs
Kubernetes 1.17 Cluster on Ubuntu 18.04, Weave, OpenEBS
kubernetes-hyperv-ubuntu-18.04-single
This will provision a single kubernetes master in hyperv with weave and openebs
Kubernetes 1.17 HA Cluster on Ubuntu 18.04, Weave, OpenEBS
kubernetes-huawei-ubuntu-18.04-cluster-weave-openebs
This will provision a single kubernetes master in huawei with weave and openebs
Kubernetes 1.17 Cluster on Ubuntu 18.04, Weave, OpenEBS
kubernetes-huawei-ubuntu-18.04-single
This will provision a single kubernetes master in huawei with weave and openebs
Kubernetes 1.17 HA Cluster on Ubuntu 16.04, Weave, OpenEBS
kubernetes-google-ubuntu-18.04-cluster-weave-openebs
This will provision a single kubernetes master in google with weave and openebs
Kubernetes 1.17 Cluster on Ubuntu 16.04, Weave, OpenEBS
kubernetes-google-ubuntu-18.04-single
This will provision a single kubernetes master in google with weave and openebs
Kubernetes 1.17 HA Cluster on Ubuntu 18.04, Weave, OpenEBS
kubernetes-esxi-ubuntu-18.04-cluster-weave-openebs
This will provision a single kubernetes master in esxi with weave and openebs
Kubernetes 1.17 Cluster on Ubuntu 18.04, Weave, OpenEBS
kubernetes-esxi-ubuntu-18.04-single
This will provision a single kubernetes master in esxi with weave and openebs
Kubernetes 1.17 HA Cluster on Ubuntu 18.04, Weave, OpenEBS
kubernetes-digitalOcean-ubuntu-18.04-cluster-weave-openebs
This will provision a single kubernetes master in digitalOcean with weave and openebs
Kubernetes 1.17 Cluster on Ubuntu 18.04, Weave, OpenEBS
kubernetes-digitalOcean-ubuntu-18.04-single
This will provision a single kubernetes master in digitalOcean with weave and openebs
Kubernetes 1.17 HA Cluster on Ubuntu 18.04, Weave, OpenEBS
kubernetes-azure-ubuntu-18.04-cluster-weave-openebs
This will provision a single kubernetes master in azure with weave and openebs
Kubernetes 1.17 Cluster on Ubuntu 18.04, Weave, OpenEBS
kubernetes-azure-ubuntu-18.04-single
This will provision a single kubernetes master in azure with weave and openebs
Kubernetes 1.17 HA Cluster on Ubuntu 18.04, Weave, OpenEBS
kubernetes-amazon-ubuntu-18.04-cluster-weave-openebs
This will provision a single kubernetes master in amazon with weave and openebs
Kubernetes 1.17 Cluster on Ubuntu 18.04, Weave, OpenEBS
kubernetes-amazon-ubuntu-18.04-single
This will provision a single kubernetes master in amazon with weave and openebs
Kubernetes 1.17 Cluster on Ubuntu 18.04, Weave, OpenEBS
kubernetes-alibaba-ubuntu-18.04-single
This will provision a single kubernetes master in alibaba with weave and openebs
Kubernetes 1.17 HA Cluster on Ubuntu 18.04, Weave, OpenEBS
kubernetes-vmware-ubuntu-18.04-cluster-weave-openebs
This will provision a single kubernetes master in vmware with weave and openebs
Kubernetes 1.17 Cluster on Ubuntu 18.04, Weave, OpenEBS
kubernetes-vmware-ubuntu-18.04-single
This will provision a single kubernetes master in vmware with weave and openebs
Copy of Kubernetes 1.14 Cluster on Ubuntu 16.04, Weave, OpenEBS
6441b891-a61d-4f0b-a7ff-19c81d2ffd51
This will provision a single kubernetes master in vmware with weave and openebs
Kubernetes 1.17 Cluster on Ubuntu 18.04, Weave, OpenEBS
kubernetes-1.17-fusion-ubuntu-18.04-single
This will provision a single kubernetes master in fusion with weave and openebs
Kubernetes 1.16 Cluster on Ubuntu 18.04, Weave, OpenEBS
kubernetes-1.16-fusion-ubuntu-18.04-single
This will provision a single kubernetes master in fusion with weave and openebs
Kubernetes 1.15 Cluster on Ubuntu 18.04, Weave, OpenEBS
kubernetes-1.15-fusion-ubuntu-18.04-single
This will provision a single kubernetes master in fusion with weave and openebs
External Kubernetes 1.17 Cluster
kubernetes-external-1.17
This will allow access to an external kubernetes cluster
External Kubernetes 1.16 Cluster
kubernetes-external-1.16
This will allow access to an external kubernetes cluster
External Kubernetes 1.15 Cluster
kubernetes-external-1.15
This will allow access to an external kubernetes cluster
External Kubernetes 1.14 Cluster
kubernetes-external-1.14
This will allow access to an external kubernetes cluster
KVM on Ubuntu 16.04
kvm-vmware-ubuntu-16.04-single
This will provision a single kvm host vm in vmware
Morpheus KVM and Container Cluster
morpheus-kvm-combo-cluster
This will add a KVM and container host
VMware Docker CentOS 7.5
docker-vmware-centos-7.5-single
This will provision a single docker host vm in vmware
Oracle Cloud Docker Host
docker-oraclecloud-ubuntu-16.04-single
This will provision a single docker host vm in oraclecloud
Morpheus Kubernetes Manual Cluster
morpheus-kubernetes-manual-cluster
This will create a kubernetes manual (self-managed) cluster
Alibaba Docker Host
docker-alibaba-ubuntu-16.04-single
This will provision a single docker host vm in alibaba
SCVMM Docker Host
docker-scvmm-ubuntu-16.04-single
This will provision a single docker host vm in scvmm
KVM on Ubuntu 16.04
kvm-fusion-ubuntu-16.04-single
This will provision a single kvm host vm in fusion
UpCloud Docker Host
docker-upcloud-ubuntu-16.04-single
This will provision a single docker host vm in upcloud
Morpheus KVM Ubuntu Cluster
morpheus-kvm-ubuntu-cluster
This will add a KVM Ubuntu host
Morpheus KVM CentOS Cluster
morpheus-kvm-centos-cluster
This will add a KVM CentOS host
Azure Docker Host
docker-azure-ubuntu-16.04-single
This will provision a single docker host vm in azure
KVM on CentOS 7.5
kvm-vmware-centos-7.5-single
This will provision a single kvm host vm in vmware
KVM on CentOS 7.5
kvm-fusion-centos-7.5-single
This will provision a single kvm host vm in fusion
Kubernetes 1.14 HA Cluster on Ubuntu 16.04, Weave, OpenEBS
kubernetes-bluemix-ubuntu-16.04-cluster-weave-openebs
This will provision a single kubernetes master in bluemix with weave and openebs
Kubernetes 1.14 Cluster on Ubuntu 16.04, Weave, OpenEBS
kubernetes-bluemix-ubuntu-16.04-single
This will provision a single kubernetes master in bluemix with weave and openebs
Kubernetes 1.17 HA Cluster on Ubuntu 16.04, Weave, OpenEBS
kubernetes-vcd-ubuntu-16.04-cluster-weave-openebs
This will provision a single kubernetes master in vcd with weave and openebs
Kubernetes 1.17 Cluster on Ubuntu 16.04, Weave, OpenEBS
kubernetes-vcd-ubuntu-16.04-single
This will provision a single kubernetes master in vcd with weave and openebs
VCD Docker Host
docker-vcd-ubuntu-16.04-single
This will provision a single docker host vm in vcd
Kubernetes 1.14 HA Cluster on Ubuntu 16.04, Weave, OpenEBS
kubernetes-softlayer-ubuntu-16.04-cluster-weave-openebs
This will provision a single kubernetes master in softlayer with weave and openebs
Kubernetes 1.14 Cluster on Ubuntu 16.04, Weave, OpenEBS
kubernetes-softlayer-ubuntu-16.04-single
This will provision a single kubernetes master in softlayer with weave and openebs
SoftLayer Docker Host
docker-softlayer-ubuntu-16.04-single
This will provision a single docker host vm in softlayer
Open Telekom Docker Host
docker-opentelekom-ubuntu-16.04-single
This will provision a single docker host vm in opentelekom
Huawei Docker Host
docker-huawei-ubuntu-16.04-single
This will provision a single docker host vm in huawei
Google Docker Host
docker-google-ubuntu-16.04-single
This will provision a single docker host vm in google
ESXi Docker Host
docker-esxi-ubuntu-16.04-single
This will provision a single docker host vm in esxi
IBM Docker Host
docker-bluemix-ubuntu-16.04-single
This will provision a single docker host vm in bluemix
Xen Docker Host
docker-xen-ubuntu-16.04-single
This will provision a single docker host vm in xen
Digital Ocean Docker Host
docker-digitalOcean-ubuntu-16.04-single
This will provision a single docker host vm in digitalOcean
Hyper-V Docker Host
docker-hyperv-ubuntu-16.04-single
This will provision a single docker host vm in hyperv
Docker on Linux
manual-linux-docker-morpheus-single
This will add a single docker host
Kubernetes Cluster 1.14 on Ubuntu 16.04, Weave, OpenEBS
kubernetes-morpheus-ubuntu-16.04-cluster-weave-openebs
This will provision a kubernetes cluster with weave and openebs
Kubernetes 1.14 on Ubuntu 16.04, Weave, OpenEBS
kubernetes-morpheus-ubuntu-16.04-single
This will provision a single kubernetes master with weave and openebs
Docker on Bare Metal
docker-morpheus-metal-ubuntu-16.04-single
This will provision a single docker host
Docker on Ubuntu 16.04
docker-morpheus-ubuntu-16.04-single
This will provision a single docker host
Amazon Docker Host
docker-amazon-ubuntu-16.04-single
This will provision a single docker host vm in amazon
OpenStack Docker Host
docker-openstack-ubuntu-16.04-single
This will provision a single docker host vm in openstack
Nutanix Docker Ubuntu 16.04
docker-nutanix-ubuntu-16.04-single
This will provision a single docker host vm in nutanix
VMware Docker Ubuntu 16.04
docker-vmware-ubuntu-16.04-single
This will provision a single docker host vm in vmware
Kubernetes 1.14 HA Cluster on Ubuntu 16.04, Weave, OpenEBS
kubernetes-fusion-ubuntu-16.04-cluster-weave-openebs
This will provision a single kubernetes master in fusion with weave and openebs
Kubernetes 1.14 Cluster on Ubuntu 16.04, Weave, OpenEBS
kubernetes-fusion-ubuntu-16.04-single
This will provision a single kubernetes master in fusion with weave and openebs
Docker on Ubuntu 16.04
docker-fusion-ubuntu-16.04-single
This will provision a single docker host vm in fusion
Creating Custom Cluster Layouts
Custer Layouts can be built for an infinite number of use cases and targeting a wide range of configurations or provisioning technologies. However, it still may help to see an example Cluster Layout created. In this section, we’ll create an example Cluster Layout which provisions a Kubernetes Cluster to a VMware vCenter Cloud containing a master node and three worker nodes. We’ll build out two Node Types to embed in the Cluster, one master and one worker. Within the Node Types, we will embed Script Templates needed to configure the nodes as they are provisioned and allow the workers to join the cluster. Script Templates can be configured to execute at various phases of the lifecycle of the node, similar to a Provisioning Workflow, so Morpheus can orchestrate the whole process.
Creating Script Templates
We’ll first start by creating the necessary Script Templates. In this example, I’ll use a generic prep script that both the master and worker nodes will utilize and then I’ll create three additional scripts (two for the master node and one for the worker nodes) to accomplish various Kubernetes cluster setup tasks (kubeadm init, creating Role Bindings, joining workers to the cluster, etc.). I’ll briefly describe each here and step through the process of creating the Script Template objects in Morpheus.
To begin a new Script Template, navigate to Library > Templates > Script Templates and click + ADD. All of the scripts used in this example will be “Bash” type, run as user “root” and with SUDO marked.
The first script to add will be a prep script that both the master and worker nodes will use. This script turns swap off, installs containerd, runs updates, sets network config, and installs kubelet, kubeadm, and kubectl. Set this script to run in the PreProvision phase. The complete script, named “k8sprep” in my example can be viewed below:
k8sprep Script Template
function wait_for_dpkg() {
  FRONT_END_LOCK_FILE=/var/lib/dpkg/lock-frontend
  DPKG_LOCK_FILE=/var/lib/apt/lists/lock

  echo "checking for dpkq lock existence..."
  if [ -e "$DPKG_LOCK_FILE" ]; then
    while fuser $DPKG_LOCK_FILE >/dev/null 2>&1 ; do
      echo "Waiting for lock $DPKG_LOCK_FILE..."
      sleep 1
    done
  fi
  echo "checking for dpkq lock-frontend existence..."
  if [ -e "$FRONT_END_LOCK_FILE" ]; then
    while fuser $FRONT_END_LOCK_FILE >/dev/null 2>&1 ; do
      echo "Waiting for lock $FRONT_END_LOCK_FILE..."
      sleep 1
    done
    echo "force removing lock $FRONT_END_LOCK_FILE"
    sudo rm $FRONT_END_LOCK_FILE
    sleep 5
  fi
}
  # Swap must be turned off see https://kubernetes.io/docs/setup/production-environment/tools/kubeadm/install-kubeadm/
sudo swapoff -a ; sudo sed -i '/ swap / s/^/#/' /etc/fstab
  # Install containerd packages from Debian sse: https://docs.docker.com/engine/install/ubuntu/
wait_for_dpkg
sudo apt-get update
sudo apt-get install ca-certificates curl gnupg lsb-release -y
sudo mkdir -m 0755 -p /etc/apt/keyrings
sudo curl -fsSL https://download.docker.com/linux/ubuntu/gpg | sudo gpg --dearmor -o /etc/apt/keyrings/docker.gpg
sudo mkdir -m 0755 -p /etc/apt/keyrings
sudo curl -fsSL https://download.docker.com/linux/ubuntu/gpg | sudo gpg --dearmor -o /etc/apt/keyrings/docker.gpgsudo
echo   "deb [arch=$(dpkg --print-architecture) signed-by=/etc/apt/keyrings/docker.gpg] https://download.docker.com/linux/ubuntu \
$(lsb_release -cs) stable" | sudo tee /etc/apt/sources.list.d/docker.list > /dev/null
sudo apt-get update
  # the Docker documentation advises to install the whole Docker runtime environment but containerd.io is sufficient
sudo apt-get install containerd.io -y
  # Prepare the necessary network config see: https://kubernetes.io/docs/setup/production-environment/container-runtimes/
sudo cat <<EOF | sudo tee /etc/modules-load.d/k8s.conf
overlay
br_netfilter
EOF
sudo modprobe overlay
sudo modprobe br_netfilter
sudo cat <<EOF | sudo tee /etc/sysctl.d/k8s.conf
net.bridge.bridge-nf-call-iptables  = 1
net.bridge.bridge-nf-call-ip6tables = 1
net.ipv4.ip_forward                 = 1
EOF
  # Apply sysctl params without reboot
sudo sysctl --system
  # Install kubeadm follwing the K8s documentation: https://kubernetes.io/docs/setup/production-environment/tools/kubeadm/install-kubeadm/
sudo apt-get install -y apt-transport-https ca-certificates curl
sudo curl -fsSL  https://packages.cloud.google.com/apt/doc/apt-key.gpg|sudo gpg --dearmor -o /etc/apt/trusted.gpg.d/k8s.gpg
sudo echo "deb https://apt.kubernetes.io/ kubernetes-xenial main" | sudo tee /etc/apt/sources.list.d/kubernetes.list
sudo apt-get update
sudo apt-get -y install -y kubelet=1.26.1-00 kubeadm=1.26.1-00 kubectl=1.26.1-00

sudo apt-mark hold kubelet kubeadm kubectl
  # see https://github.com/etcd-io/etcd/issues/13670
cat << EOF | sudo tee /etc/containerd/config.toml
version = 2
  [plugins]
  [plugins."io.containerd.grpc.v1.cri"]
   [plugins."io.containerd.grpc.v1.cri".containerd]
      [plugins."io.containerd.grpc.v1.cri".containerd.runtimes]
        [plugins."io.containerd.grpc.v1.cri".containerd.runtimes.runc]
          runtime_type = "io.containerd.runc.v2"
          [plugins."io.containerd.grpc.v1.cri".containerd.runtimes.runc.options]
            SystemdCgroup = true
EOF
sudo systemctl restart containerd
Next we’ll add a script called “kubeadm-init” in this example which will create and configure some working directories, set the kubeadm config yaml, and run kubeadm init. Set this script to run in the PreProvision phase as well. The complete script can be viewed below:
kubeadm-init Script Template
mkdir -p <%=morpheus.morpheusHome%>/kube
mkdir -p <%=morpheus.morpheusHome%>/kube/working
mkdir -p <%=morpheus.morpheusHome%>/.kube
sudo chown <%=morpheus.morpheusUser%>:<%=morpheus.morpheusUser%> <%=morpheus.morpheusHome%>/kube
sudo chown <%=morpheus.morpheusUser%>:<%=morpheus.morpheusUser%> <%=morpheus.morpheusHome%>/kube/working
cat <<EOF | sudo tee <%=morpheus.morpheusHome%>/kube/working/kubeadm-config.yaml
# kubeadm-config.yaml
kind: ClusterConfiguration
apiVersion: kubeadm.k8s.io/v1beta3
kubernetesVersion: v1.26.1
networking:
  serviceSubnet: "10.96.0.0/16"
  podSubnet: "10.244.0.0/24"
  dnsDomain: "cluster.local"
apiServer:
  extraArgs:
    authorization-mode: "Node,RBAC"
clusterName: "example-cluster"
---
kind: KubeletConfiguration
apiVersion: kubelet.config.k8s.io/v1beta1
cgroupDriver: systemd
EOF
sudo kubeadm init --config <%=morpheus.morpheusHome%>/kube/working/kubeadm-config.yaml
sudo cp -i /etc/kubernetes/admin.conf <%=morpheus.morpheusHome%>/.kube/config &&
sudo chown <%=morpheus.morpheusUser%>:<%=morpheus.morpheusUser%> <%=morpheus.morpheusHome%>/.kube/config
Lastly, we’ll add a setup script for the Kubernetes master node called “k8s-master-setup” for this example. This script creates the service account and role bindings. Set this script to run in the PostProvision phase and view the complete script below:
k8s-master-setup Script Template
#create a service account
cd <%=morpheus.morpheusHome%>
#kubectl -n kube-system create sa morpheus
kubectl create sa morpheus
cat <<EOF | tee <%=morpheus.morpheusHome%>/kube/morpheus-sa.yaml
apiVersion: v1
kind: Secret
metadata:
  name: morpheus-token
  annotations:
    kubernetes.io/service-account.name: morpheus
type: kubernetes.io/service-account-token
EOF
kubectl create clusterrolebinding serviceaccounts-cluster-admin --clusterrole=cluster-admin --group=system:serviceaccounts
kubectl create -f <%=morpheus.morpheusHome%>/kube/morpheus-sa.yaml
kubectl apply -f https://raw.githubusercontent.com/projectcalico/calico/v3.25.0/manifests/calico.yaml
The three scripts we’ve just created will prepare the master node for our cluster. We now need an additional script that will prepare the worker nodes and join them to the cluster. The worker nodes will also use the “k8s-prep” script we added in the very first step which you’ll see in the next step when we create the node types.
Add a fourth script which I’ve called “k8s-join” for this example. This script takes advantage of a special joinCommand variable as you’ll see when you view the full script. If you want to see exactly what this does later, you can create a new Bash script Task that echoes out that variable and run it against an existing Kubernetes worker node VM (echo "<%=morpheus.kubernetes.joinCommand%>"). Set this script to run in the PostProvision phase and view the full script below:
k8s-join Script Template
sudo <%=morpheus.kubernetes.joinCommand%>
This completes the needed Script Templates which we will set on two new Node Types in the next step. Continue on to the next section.
Creating Node Types
With the Script Templates created we now need to make two new Node Types, one for the master node and one for the worker nodes. In this example case, we don’t need to add a new Virtual Image because we can use one of the preinstalled system images for Ubuntu on VMware vCenter which will work fine. Node Types are created in Library > Blueprints > Node Types. Once there, click + ADD. Within the modal for the new Node Type, configure the following:
NAME: Provide a name for the Node Type, can be anything to denote this is the master node
SHORT NAME: A shortened version of the name without any spaces
VERSION: The version number you wish to apply for this particular Node Type which is useful if you iterate on your Node Types at any point
TECHNOLOGY: For this example case, VMware. Once set, additional options will appear
VM IMAGE: A pre-installed Ubuntu system image will work
SCRIPTS: Using the typeahead field, set the “k8sprep”, “kubeadm-init” and “k8s-master-setup” Script Templates (you may have called them something different)
Finally, click SAVE CHANGES.
Repeat the process to create a second Node Type. The second time around, use the following configurations:
NAME: Provide a name for the Node Type, can be anything to denote this is the worker node
SHORT NAME: A shortened version of the name without any spaces
VERSION: The version number you wish to apply for this particular Node Type which is useful if you iterate on your Node Types at any point
TECHNOLOGY: For this example case, VMware. Once set, additional options will appear
VM IMAGE: A pre-installed Ubuntu system image will work
SCRIPTS: Using the typeahead field, set the “k8sprep” and “k8s-join” Script Templates (you may have called them something different)
Once done, click SAVE CHANGES to save the second Node Type. With the pieces in place, we are now ready to create the Cluster Layout object itself. Continue on to the next section.
Creating a Cluster Layout
At this point we can create the Cluster Layout object in Morpheus and attach the Node Types we’ve just created (which themselves have our Script Templates applied). Cluster Layouts are created in Library > Blueprints > Cluster Layouts. Click + ADD and configure the following:
NAME: Provide a name for the Cluster Layout, can be anything to denote this is a Kubernetes cluster
VERSION: The version number you wish to apply to this Cluster Layout which is useful if you later iterate on this Cluster Layout
CLUSTER TYPE: Kubernetes Cluster
TECHNOLOGY: VMware
MINIMUM MEMORY: 4096 MB
INPUTS: Use the typeahead field to add configured Inputs to the Cluster Layout
MASTER NODES: Use the typeahead field to find the Kubernetes master Node Type we just created
WORKER NODES: Use the typeahead field to find the Kubernetes worker Node Type we just created. Set the “Count” value to three (3) since we wish to have three worker nodes in this cluster
CLUSTER PACKAGES: Use the typeahead field to add configued Cluster Packages to the Cluster Layout. Cluster Packages are created in the Templates section
SPEC TEMPLATES: Use the typeahead field to add Spec Templates to the Cluster Layout
Click SAVE CHANGES to save the Cluster Layout.
Testing and Wrap-Up
At this point we are finished and we have a viable Kubernetes cluster that we can deploy with just one click. To add a new managed cluster to this Morpheus environment, navigate to Infrastructure > Clusters. To provision a cluster from the layout we just created, click + ADD CLUSTER and select “Kubernetes Cluster” from the dropdown menu. Make the appropriate selections to target the new cluster to an existing VMware vCenter Cloud and complete the wizard. Once complete, the new cluster will be visible on your clusters list page and from there you can drill into the detail page to view relevant details about the cluster including monitoring metrics, current workloads, and more.