VMware vCenter
Overview
VMware is a very common cloud integration choice supported by Morpheus . They have provided a top notch virtualization solution and one might argue pioneered the virtualization space altogether. As such, many companies utilize this technology and all the features that come with it, so Morpheus covers a broad feature set in vCenter.
Features
Virtual Machine Provisioning
Backups / Snapshots
Resource Groups
Datastores and DRS Clusters
Distributed Switches
Datacenter / Cluster scoping
Brownfield VM management and migration
VMware to VMware migrations
VMDK/OVF image conversion support
Hypervisor Remote Console
Periodic Synchronization
Veeam Backup Integration
Lifecycle Management and Resize
Metadata tag sync
On top of all these features, Morpheus also adds additional features to VMware that do not exist out of the box to make it easier to manage in multitenant environments as well as hybrid cloud environments:
Cloud-Init Support
VHD to VMDK Image Conversion
QCOW2 to VMDK Image Conversion
Multitenancy resource allocation
Virtual Image management (Blueprints)
Auto-scaling and recovery
Getting Started
To get started with VMware, simply start by adding a Cloud in the Infrastructure > Clouds section.
To start adding a VMware cloud there will be some things you will need:
- vCenter API Url
Typically this is the url to the vCenter web client with a
/sdkin the path- Username/Password
A set of credentials with high level access to VMware (ensure the account has Datacenter level access)
Once these fields are entered, some selections will start pre-populating. A cloud integration is scoped to a specific data center, and can optionally be scoped down to a single cluster or even a single resource pool. If the drop downs do not populate, please verify the api url is resolvable, morpheus has access to vCenter on 443, and the provided credentials are correct and the user has sufficient permissions.
Another cool feature provided with the cloud integration is optional Resource Pool scoping. One can choose to allow the cloud to provision into All Resource Pools or a singular Resource Pool. When choosing All, these Resource Pools can be managed from a sub-account and visibility perspective via the Cloud Detail page (multi-tenancy).
The VMware cloud integration provides a few additional options including allowing users to make host selections or keeping that aspect hidden such that the best host is automatically chosen for the requested provision.
The RPC Mode feature can be configured to allow Morpheus to install its agent on the Guest operating system via either SSH/WinRM or Vmware Tools Guest Process feature. The VMware tools Guest Execution API can be tricky so it is recommended to use SSH/WinRM if possible. However, if it is not possible for the Appliance to have outbound access to all networks in which VMs are being provisioned to the SSH/WinRM ports (22, 5985 respectively) then Guest Execution is the only option.
The Use VNC console option on the VMware cloud requires special configuration on each ESXI host but allowed hypervisor level remote console support. (See the Advanced Section for details)
When following this add cloud wizard an option will be presented to create a group or add to an existing group. These groups can be given provisioning permission via role based access control. It is normally recommended that groups are organized such that one cloud exists in one group unless the networks are setup such that internal routing is possible between the clouds. This is very useful for bursting, or hybrid cloud configurations.
Windows Provisioning Tips
By default when provisioning windows templates, Morpheus performs guest customizations which initiates a sysprep. This resets the Administrator user and password. Morpheus will set the Administrator password from Administration > Settings > Provisioning > Windows Settings > Password.
Users can also set the username on an image as Administrator and enter a different password if unique passwords are required per image.
Guest customizations are required when assigning static IP’s manually or using IP pools. They can be disabled per virtual image advanced settings under Library > Virtual Images > Edit Image > Advanced > Uncheck “Force Guest Customization” if using DHCP. However the SID will not be changed from the source template. In addition, new VM’s will not be able to join a domain that had already been joined by the source template or any other VM’s with that SID.
Existing Instances
Morpheus provides several features regarding pulling in existing virtual machines and servers in an environment. Most cloud options contain a checkbox titled ‘Inventory Existing Instances’. When this option is selected, all VMs found within the specified scope of the cloud integration will be scanned periodically and Virtual Machines will be synced into Morpheus. Users may also choose to onboard only virtual machines that are running within specific Resource Pools. Once the vCenter Cloud is integrated, navigate to the detail page for the specific Cloud (select it from the list at Infrastructure > Clouds). From the Resources tab, locate the Pools section. Click ACTIONS > Edit next to a selected Resource Pool. If INVENTORY is checked, Morpheus will automatically onboard virtual machines from that Resource Pool.
By default these virtual machines are considered ‘unmanaged’ and do not appear in the Provisioning > Instances area but rather Infrastructure > Compute > Virtual Machines. However, a few features are provided with regards to unmanaged instances. They can be assigned to various accounts if using a multitenant master account, however it may be best suited to instead assign the ‘Resource Pool’ to an account and optionally move all servers with regards to that pool (more on this later).
A server can also be made into a managed server. During this process remote access is requested and an agent install is performed on the guest operating system. This allows for guest operations regarding log acquisition and stats. If the agent install fails, a server will still be marked as managed and an Instance will be created in Provisioning, however certain features will not function. This includes stats collection and logs.
Note
All Cloud data is resynchronized on a 5 minute interval. This includes Datastores, Resource Pools, Networks, Blueprints, and Virtual Machines.
Service Plans
A default set of Service Plans are created in Morpheus for the VMware provisioning engine. These Service Plans can be considered akin to AWS Flavors or Openstack Flavors. They provide a means to set predefined tiers on memory, storage, cores, and cpu. Price tables can also be applied to these so estimated cost per virtual machine can be tracked as well as pricing for customers. By default, these options are fixed sizes but can be configured for dynamic sizing. A service plan can be configured to allow a custom user entry for memory, storage, or cpu. To configure this, simply edit an existing Service Plan tied to VMware or create a new one. These all can be easily managed from the Admin > Plans & Pricing section.
Virtual Images / Blueprints
Morpheus will automatically take an inventory of all blueprints configured in vCenter and present them as options during provisioning. However, in order for Morpheus to properly provision these virtual machines and provide accurate stats and health of these virtual machines, an agent must be installed during virtual machine startup. This means remote access needs to be granted at the guest operating system level to Morpheus . To properly configure these virtual images, find the relevant images in Library > Virtual Images and edit the entry. On this form, a few options are presented. The first is a check box asking whether or not cloud-init is enabled. If cloud-init is enabled, simply provide the default OS username configured (for Ubuntu the username is ubuntu and for CentOS the username is centos). For those looking to add cloud-init to existing blueprints Morpheus requires no special configuration and can use the default cloud.cfg settings.
A global cloud-init username/password can also be configured per account as well as a keypair via the Admin->Provisioning settings section. The great benefit of utilizing cloud-init is default blueprints do not need common credential sets thereby increasing provisioning security.
Windows systems do not typically support cloud-init. So simply turn this checkbox off and provide the Administrator credentials. It should be noted that these credentials are encrypted in the database. If using WinRM for the RPC Mode instead of VMware tools, a Local or Domain Administrator account credential set can be provided instead.
Snapshots
Morpheus allows the ability to create a snapshot of a VM in VMware vCenter. From the instance detail page, simply select Actions > Create Snapshot to begin creation of a new Snapshot. Existing snapshots can be viewed in the BACKUPS tab on the instance detail page. Snapshots taken in vCenter will sync into Morpheus every five minutes. To revert to a previous snapshot, click on the revert icon located on the right side of the Snapshot. Snapshots can be deleted by clicking on the trash can icon.
Note
Access to Snapshots can be limited or removed entirely for specific user roles as needed. To edit a role’s Snapshots permissions, go to Administration > Roles > (Your selected role) > Snapshots. Users can be given Full, Read-only, or No access.
Tagging and Metadata
As of Morpheus version 4.1.0, tagging support is included for vCenter in addition to the other clouds that have already supported it in past versions. Tags will sync to vCenter from Morpheus and existing tags are also inventoried from vCenter into Morpheus.
Note
This feature requires a minimum API version of vCenter 6.5. The API version can be edited by navigating to ‘Infrastructure > Clouds’ and clicking the edit (pencil) button in the row for the relevant cloud. The field is labeled ‘VERSION’.
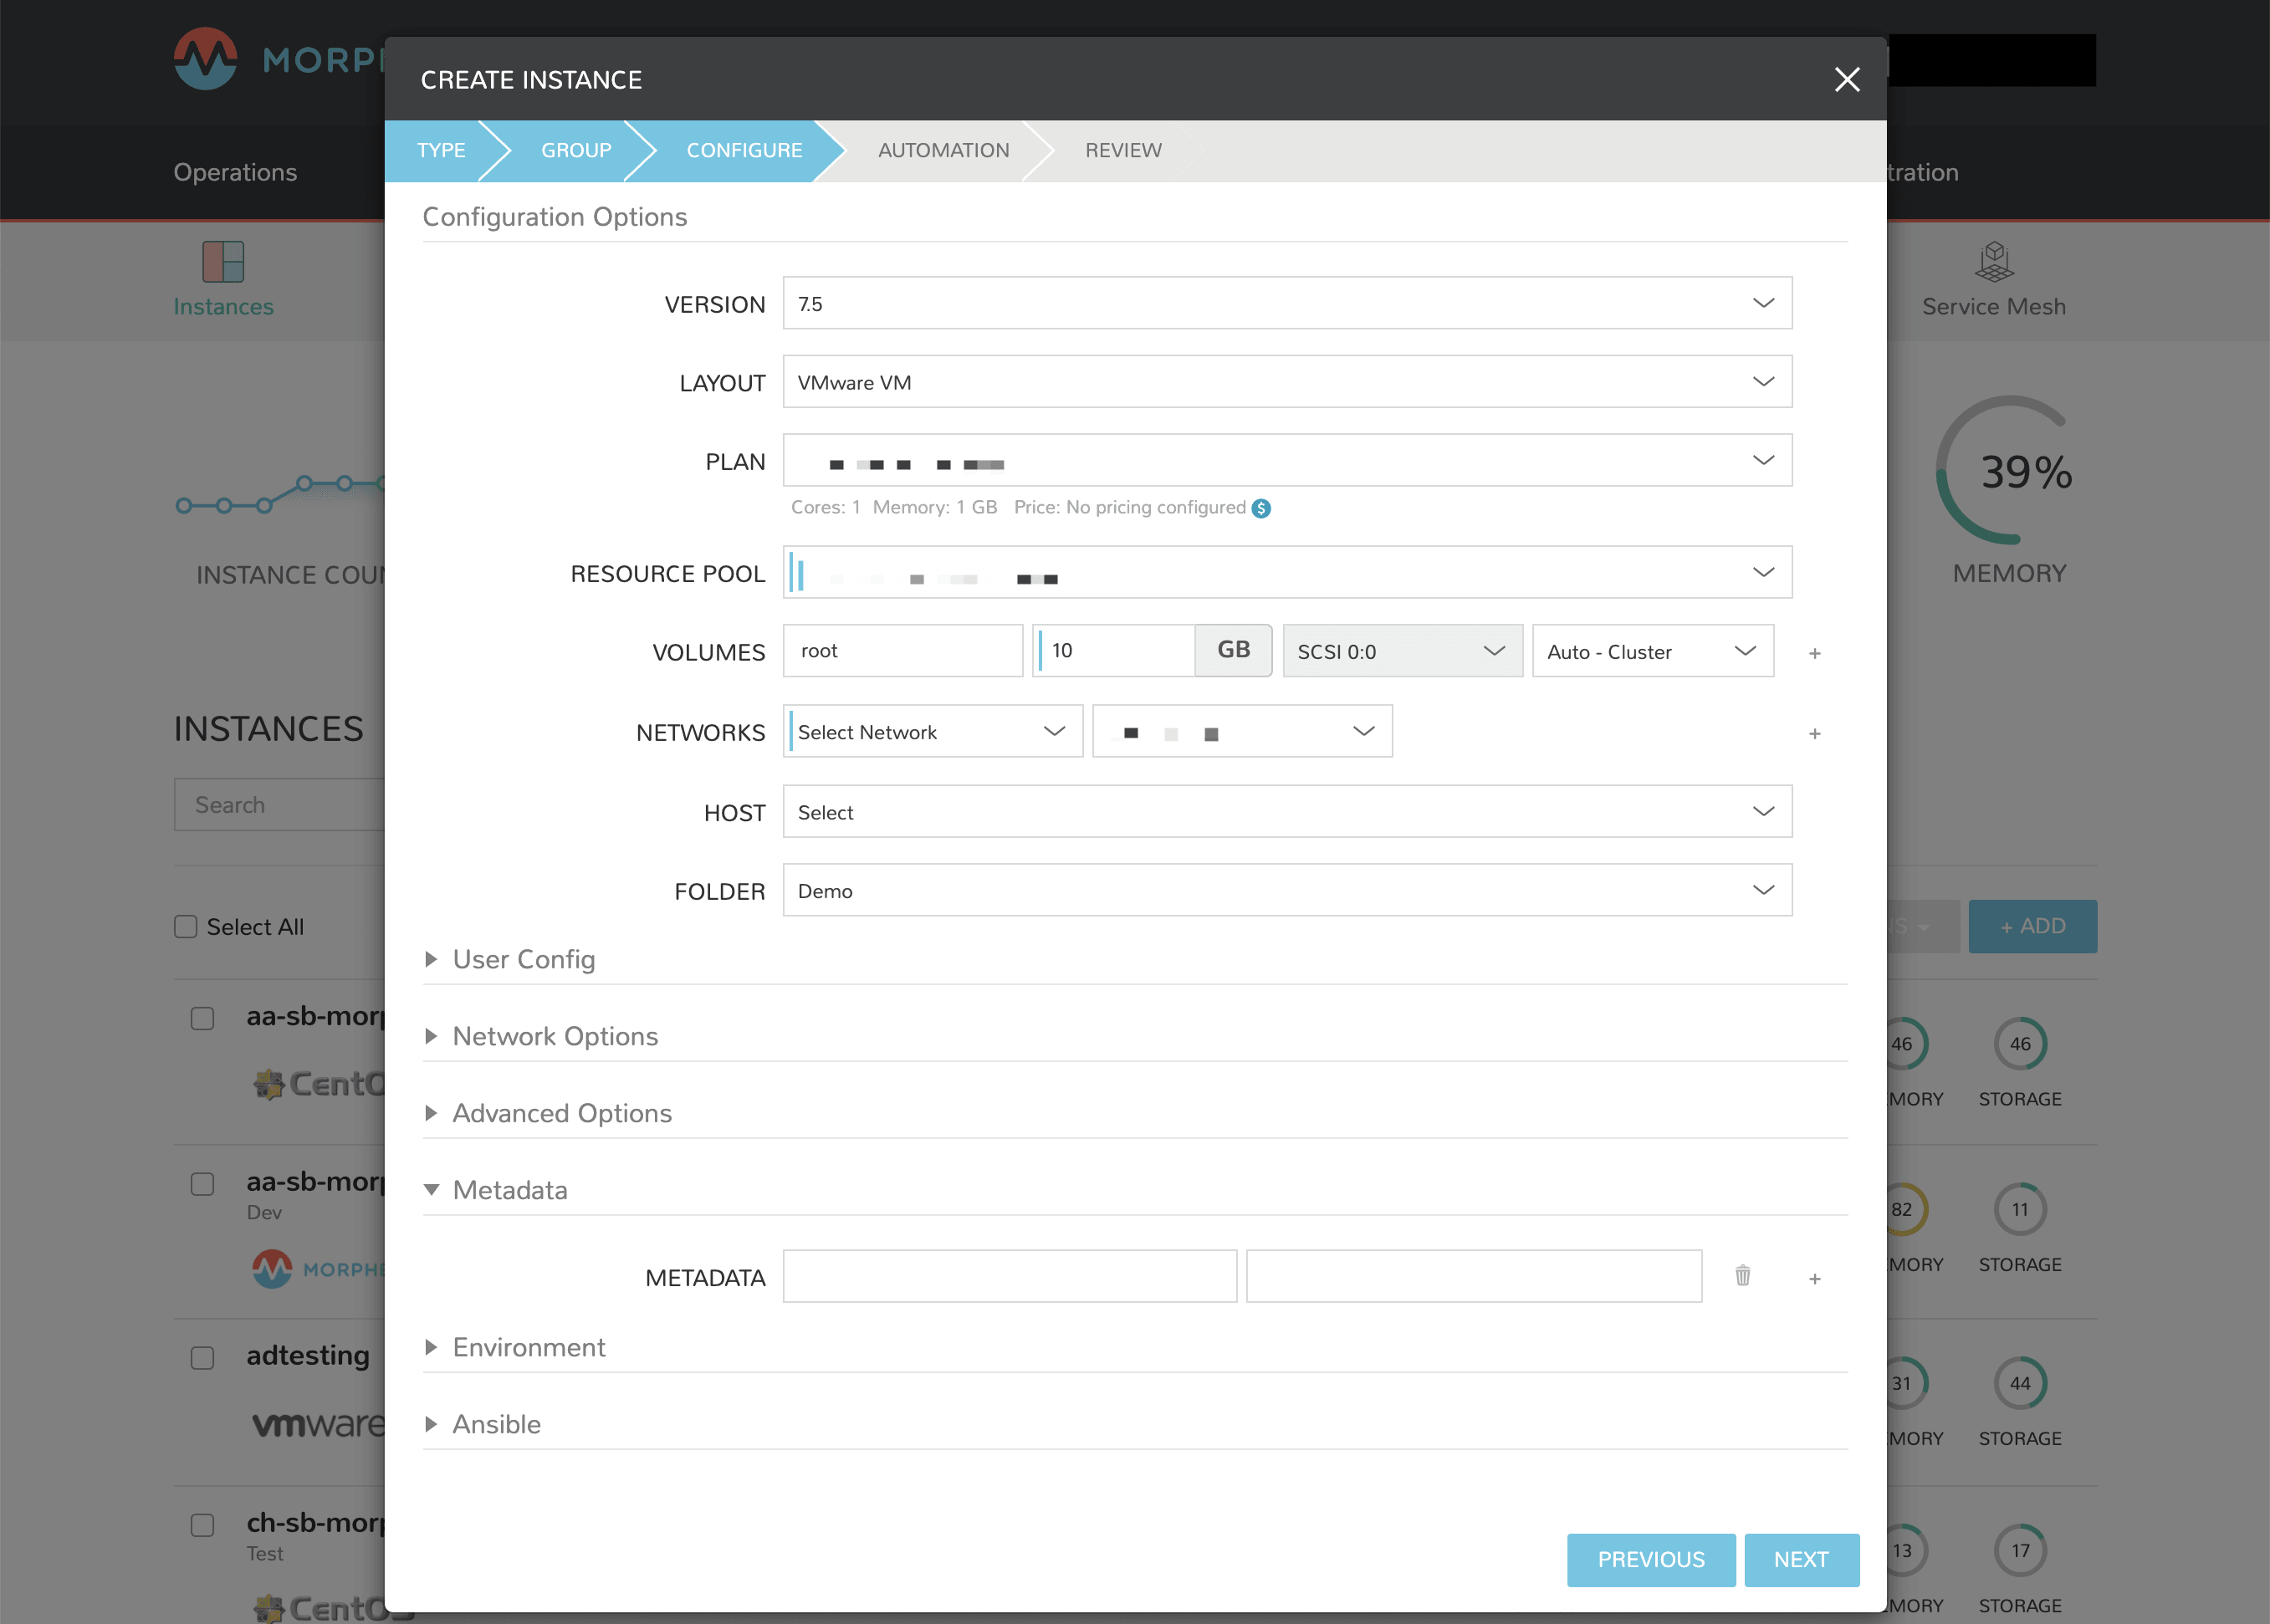
Tags can be created on-demand when provisioning from the ‘CONFIGURE’ tab of the ‘CREATE INSTANCE’ wizard (Provisioning > Instances). Within the ‘Metadata’ drawer, you will see sets of fields to enter key/value pairs. On creation of the instance, this metadata will be synced into vCenter.
‘Inputs’ from your library can also be exported as metadata for use with vCenter. When adding or editing a new Input (Library > Options > Inputs), simply mark the box labeled ‘EXPORT AS METADATA’. The ‘FIELD NAME’ becomes the tag category in VMWare.
Docker
So far this document has covered how to add the VMware cloud integration and has enabled users the ability to provision virtual machine based instances via the Add Instance catalog in Provisioning. Another great feature provided by Morpheus out of the box is the ability to use Docker containers and even support multiple containers per Docker host. To do this a Docker Host must first be provisioned into VMware (multiple are needed when dealing with horizontal scaling scenarios).
To provision a Docker Host simply navigate to the Clusters tab of the Cloud detail page or Infrastructure > Clusters section. From there, click + ADD CLUSTER to add a VMware Docker Host. This host will show up in the Hosts tab next to other ESXi servers that were inventoried by the VMware cloud integration. Morpheus views a Docker host just like any other Hypervisor with the caveat being that it is used for running containerized images instead of virtualized ones. Once a Docker Host is successfully provisioned a green checkmark will appear to the right of the host marking it as available for use. In the event of a failure click into the relevant host that failed and an error explaining the failure will be displayed in red at the top.
Some common error scenarios include network connectivity. For a Docker Host to function properly, it must be able to resolve the Morpheus appliance url which can be configured in Administration > Settings. If it is unable to resolve and negotiate with the appliance than the agent installation will fail and provisioning instructions will not be able to be issued to the host.
Multitenancy
A very common scenario for Managed Service Providers is the need to provide access to VMware resources on a customer by customer basis. With VMware several administrative features have been added to ensure customer resources are properly scoped and isolated. For VMware it is possible to assign specific Networks, Datastores, and Resource Pools to customer accounts or even set the public visibility of certain resources, therefore allowing all sub accounts access to the resource.
Advanced
There are several advanced features provided within Morpheus that can leverage some cool aspects of VMware. One of these features is Remote Console support directly to the hypervisor. To enable this feature a few prerequisites must be met. First, the Morpheus appliance must have network access to the ESXi hosts within VCenter. Secondly, firewall settings need to be adjusted on each ESXi host. This can be done in VSphere under firewall configuration on the host. Simply check the gdbserver option, which will open up the necessary ports (starting at 5900 range).
Important
Hypervisor Console for vCenter 6.5 requires Morpheus v3.2.0+
Now that the ESXi hosts are ready to utilize remote console, simply edit the cloud in Morpheus via Infrastructure > Clouds. Check the option that says Enable Hypervisor Console. It is important to note that currently this functionality only works for newly provisioned vm’s provisioned directly via Morpheus. This should change soon however.
It is also possible to import vm snapshots for backup or conversion purposes from VCenter and also an ESXi host. However, this does require that the ESXi host license has an enterprise level license as it will not allow the appliance to download a virtual image if it is not a paid VMware license.
VMware Permissions
When integrating VMware vCenter with Morpheus, users must supply credentials for a vCenter account and Morpheus will only have access privileges equal to the integrated account. Many users will choose to use a vCenter administrator account so that Morpheus can freely do any function in vCenter without worrying about hitting access limits. Others, for security reasons, may want to restrict Morpheus only to the minimum permissions it needs to perform its functions. Follow the guide in this section to configure a user with minimal permissions and associate it with the appropriate usage levels before using it to create a Morpheus Cloud integration.
Create vCenter Users and Roles
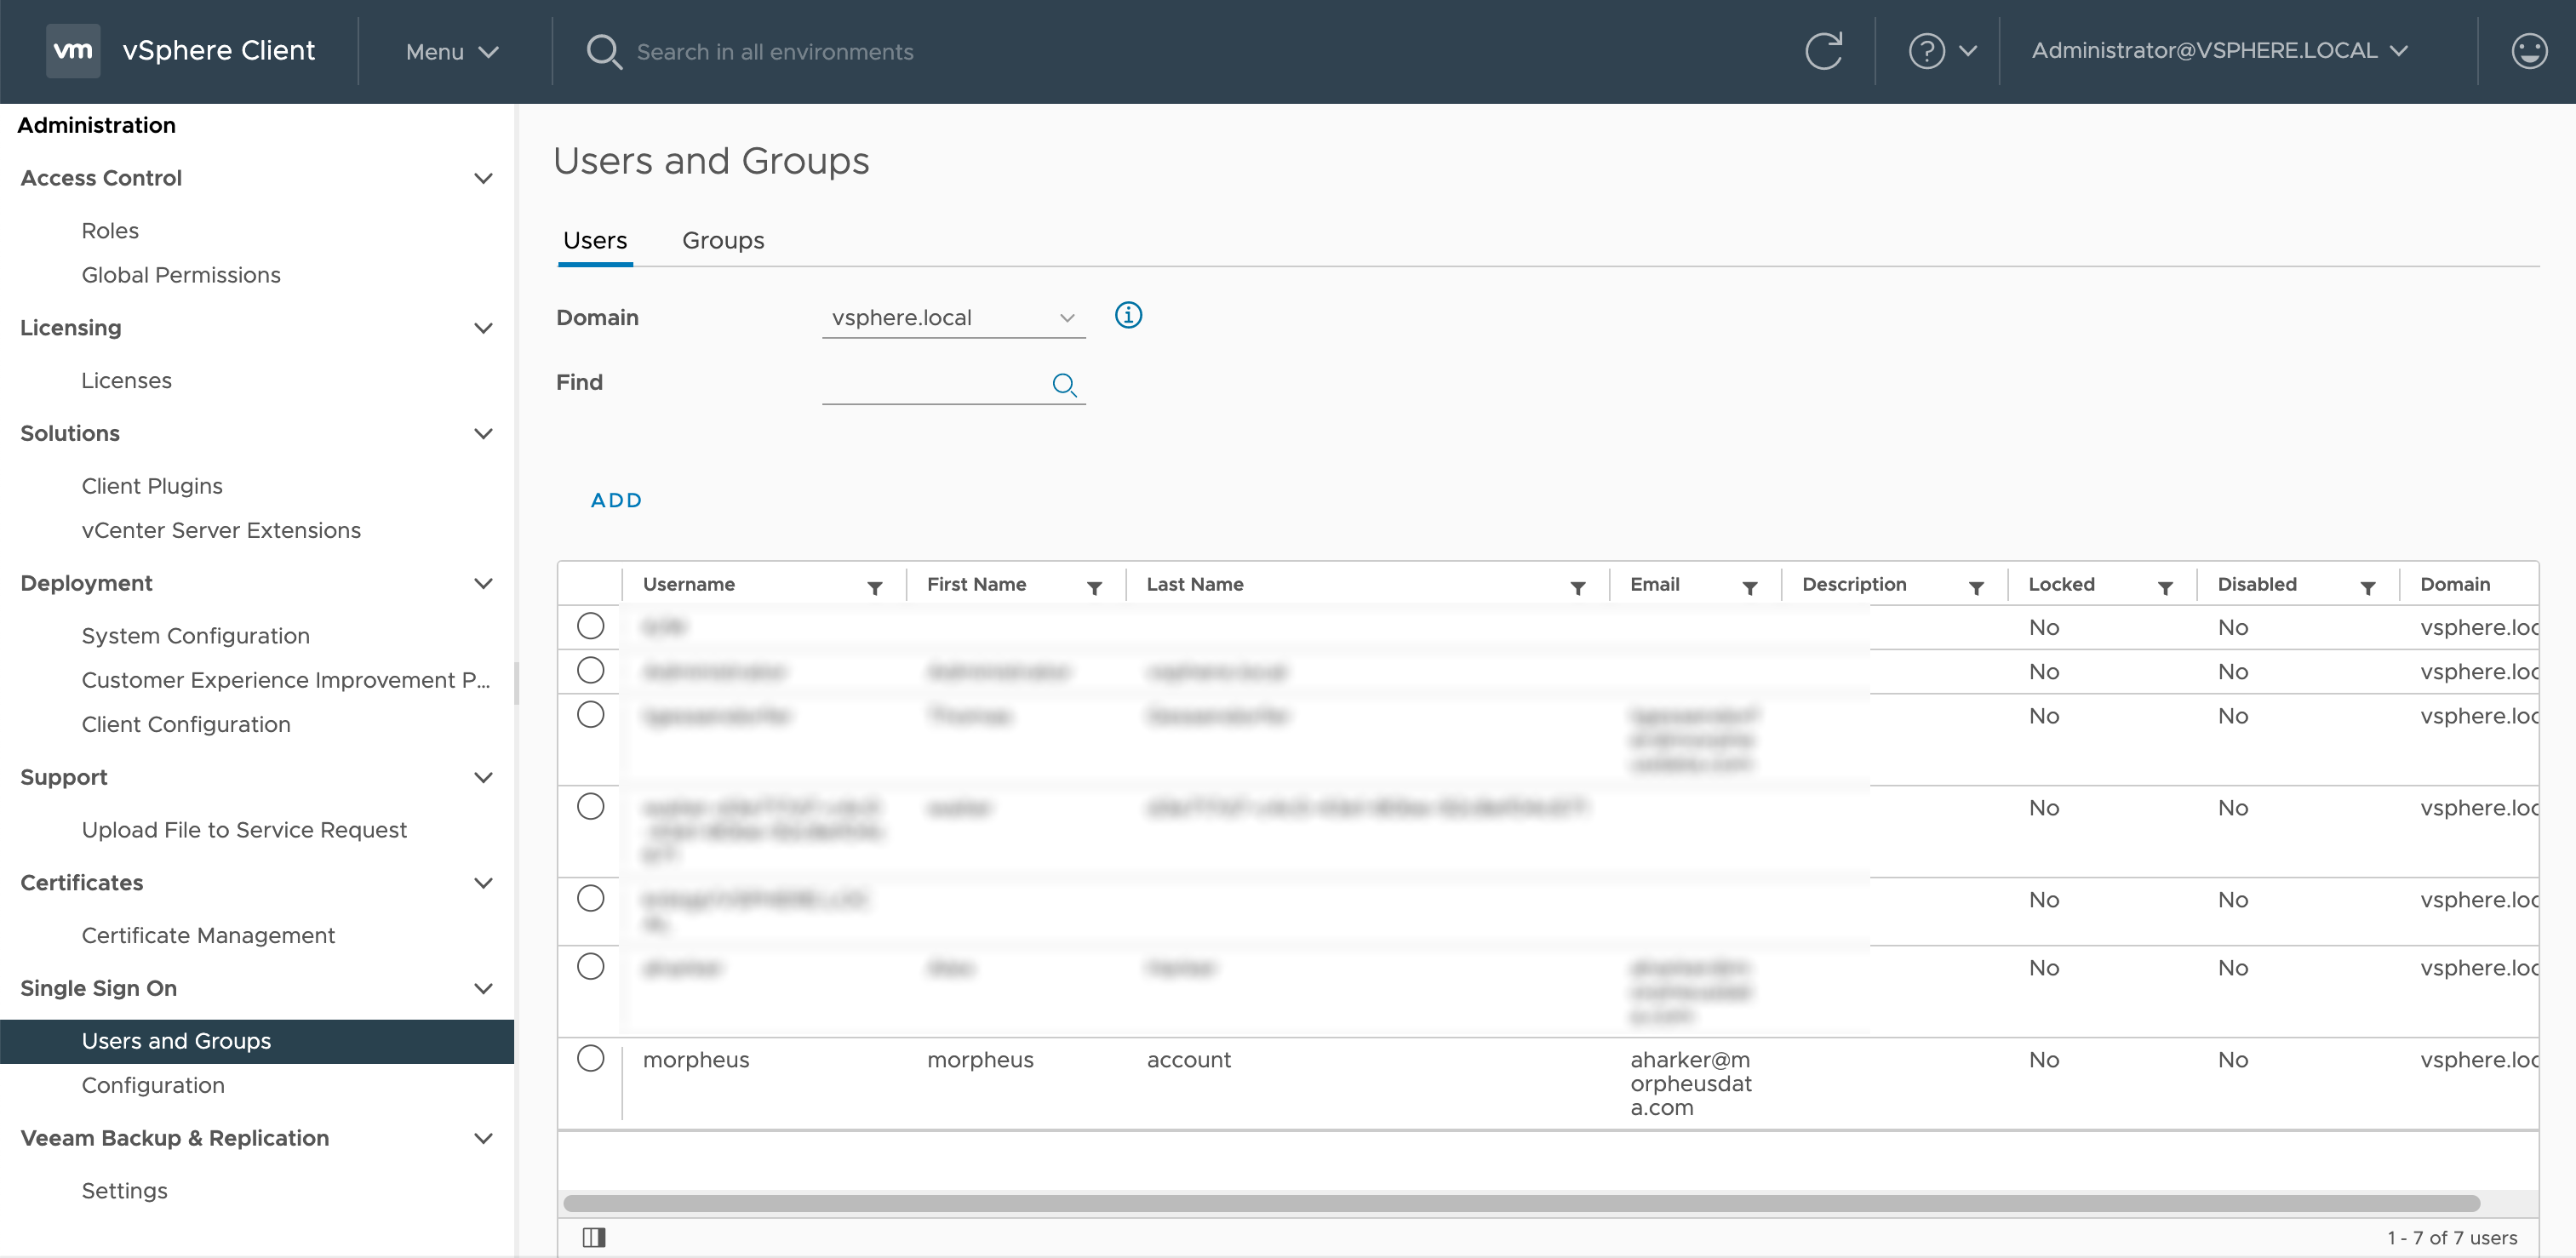
For this example, I’ve added a new local user to be my Morpheus integration user (Menu > Administration > Users and Groups) but any existing user, whether locally-created or sourced from an identity integration (like Active Directory), works fine.
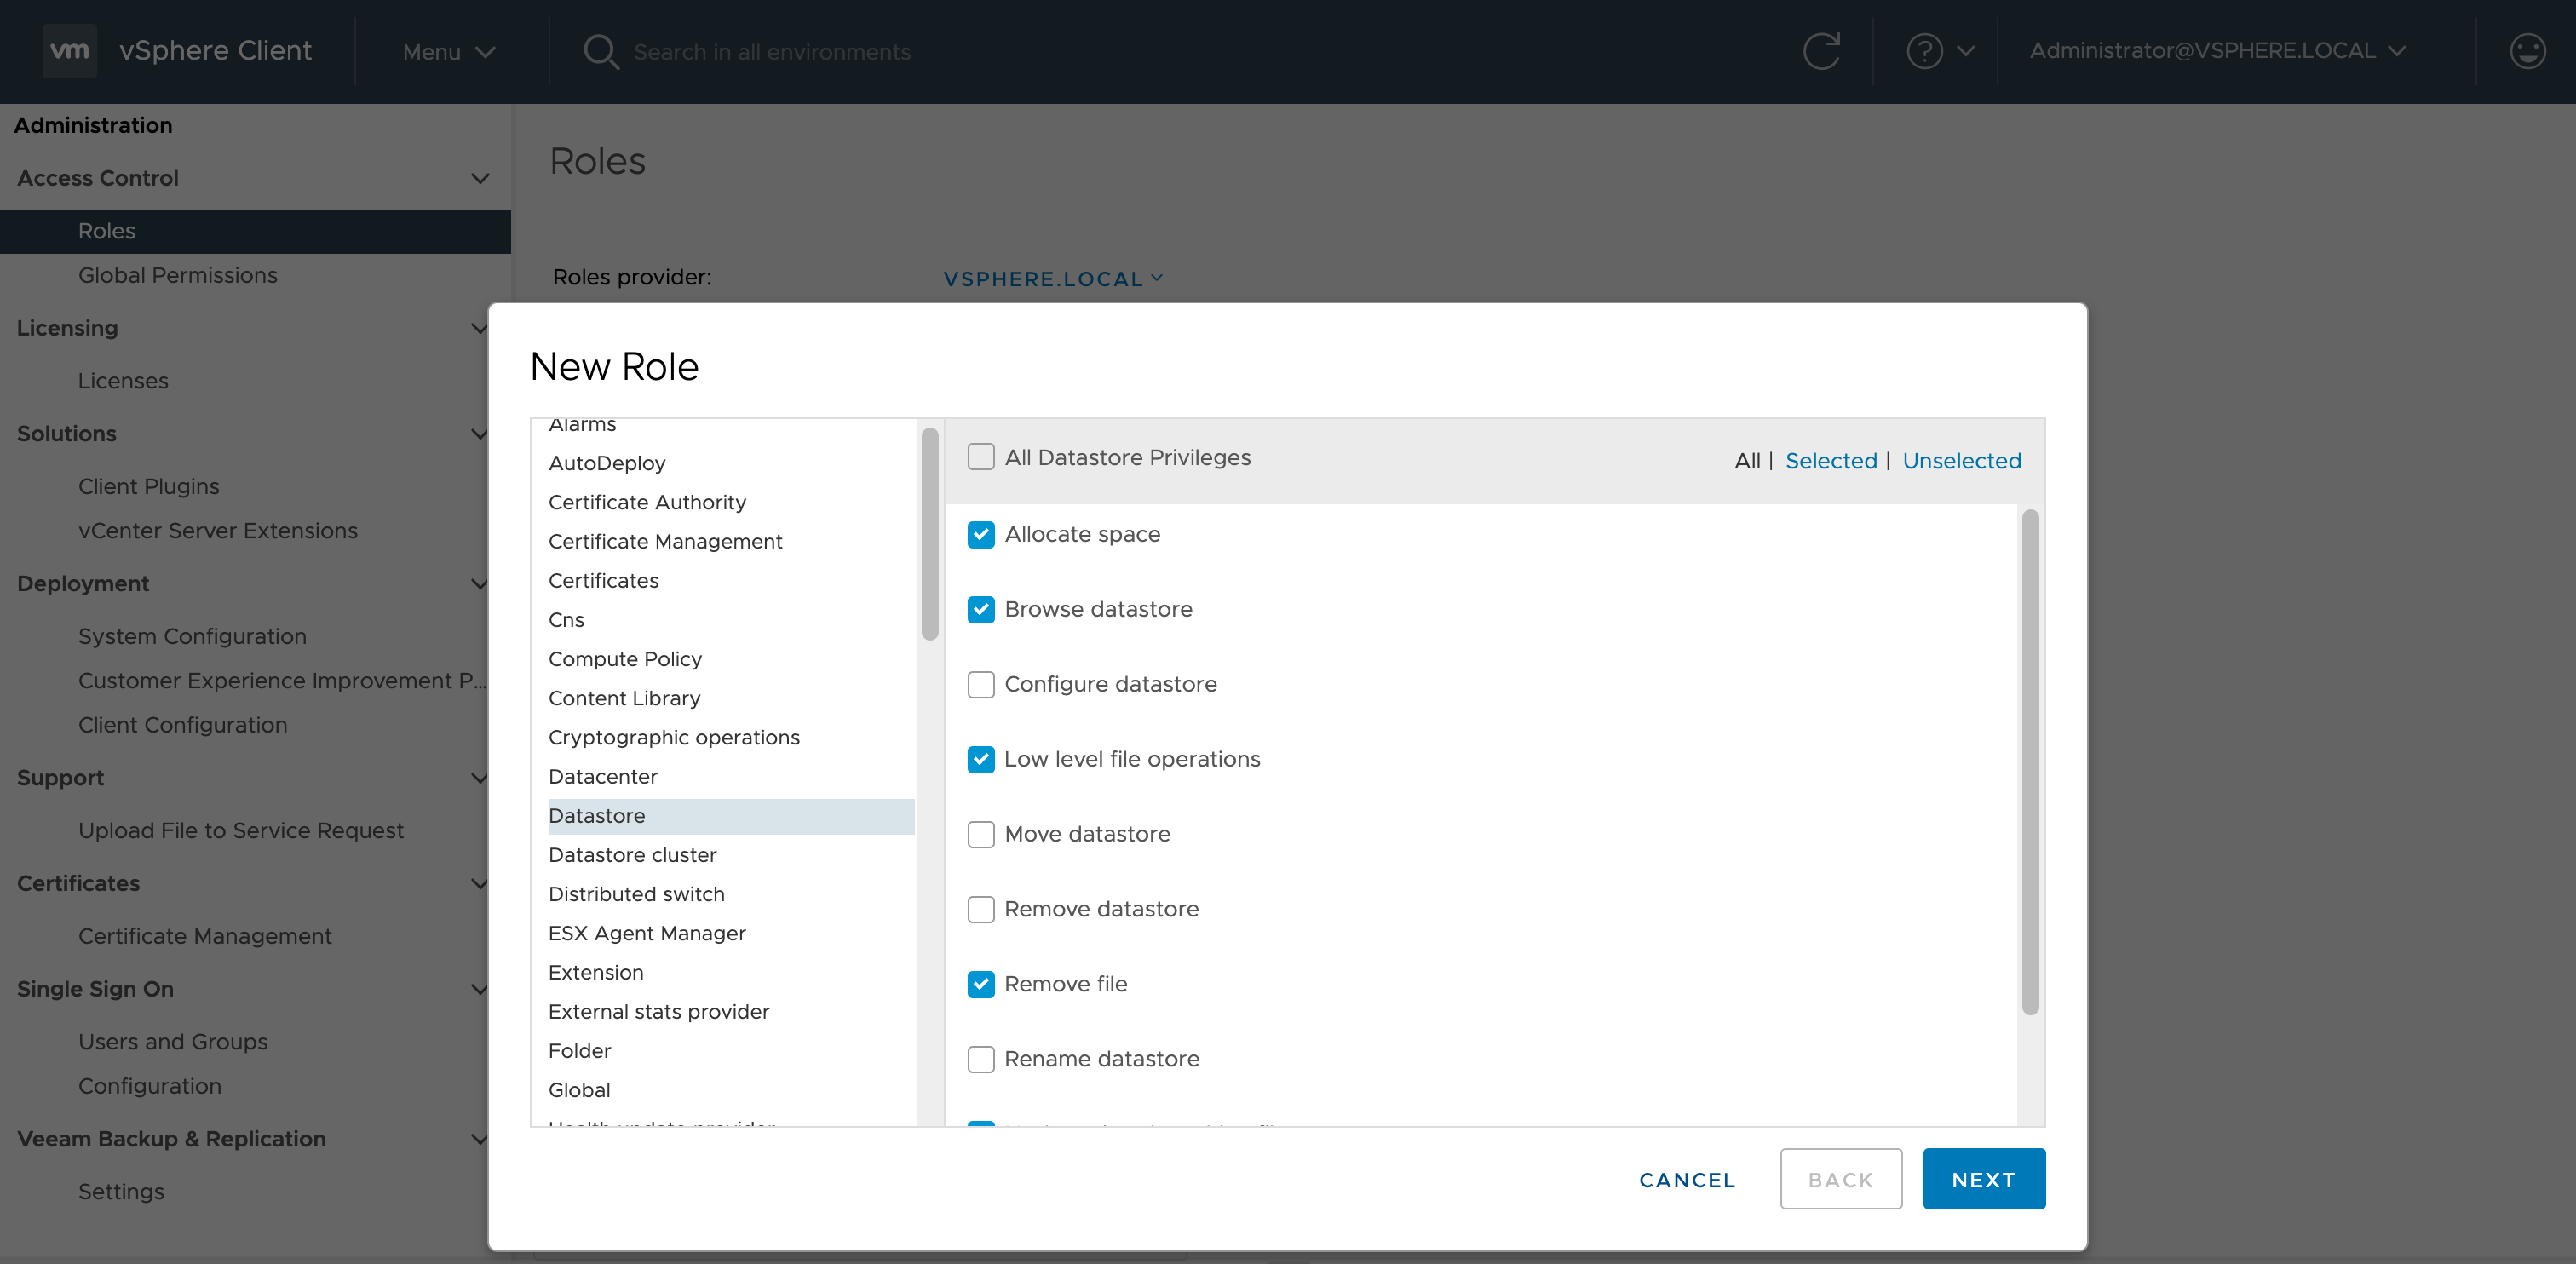
The next step is to create a Role (Menu > Administration > Roles). You can edit an existing Role to be sure it has the correct privileges, I’ve opted to create a new role and assign the correct privileges. Below the screenshot, take note of the complete set of required privileges. Once all privileges are set, name the Role (if it’s a new one) and click Finish.
Privileges
- Content Library
All Content Library privileges
- Datastore/Datastore Cluster
Allocate Space
Browse Datastore
Low Level file Operations
Remove File
Update virtual machine files
Update virtual machine metadata
- Distributed Switch
Port configuration operation
Port setting operation
- Global
Log Event
Manage custom attributes
Set custom attribute
- Network
Assign Network
Configure
Remove
- Resource
Apply recommendation
Assign vApp to resource pool
Assign virtual machine to resource pool
Migrate powered off virtual machine
Migrate powered on virtual machine
- Scheduled task
Create tasks
Modify task
Remove task
Run task
- Tasks
Create task
Update task
- Virtual Machine
Configuration (all)
Guest Operations (all)
Interaction (all)
Inventory (all)
Provisioning (all)
Service configuration (all)
Snapshot management (all)
vSphere Replication (all)
- vApp
Clone
Export
Import
- vSphere Tagging
Assign or Unassign vSphere Tag
Create vSphere Tag
Create vSphere Tag Category
Delete vSphere Tag
Delete vSphere Tag Category
Edit vSphere Tag
Edit vSphere Tag Category
Modify UsedBy Field For Category
Modify UsedBy Field For Tag
privilege.InventoryService.Tagging.CreateScope.label
privilege.InventoryService.Tagging.DeleteScope.label
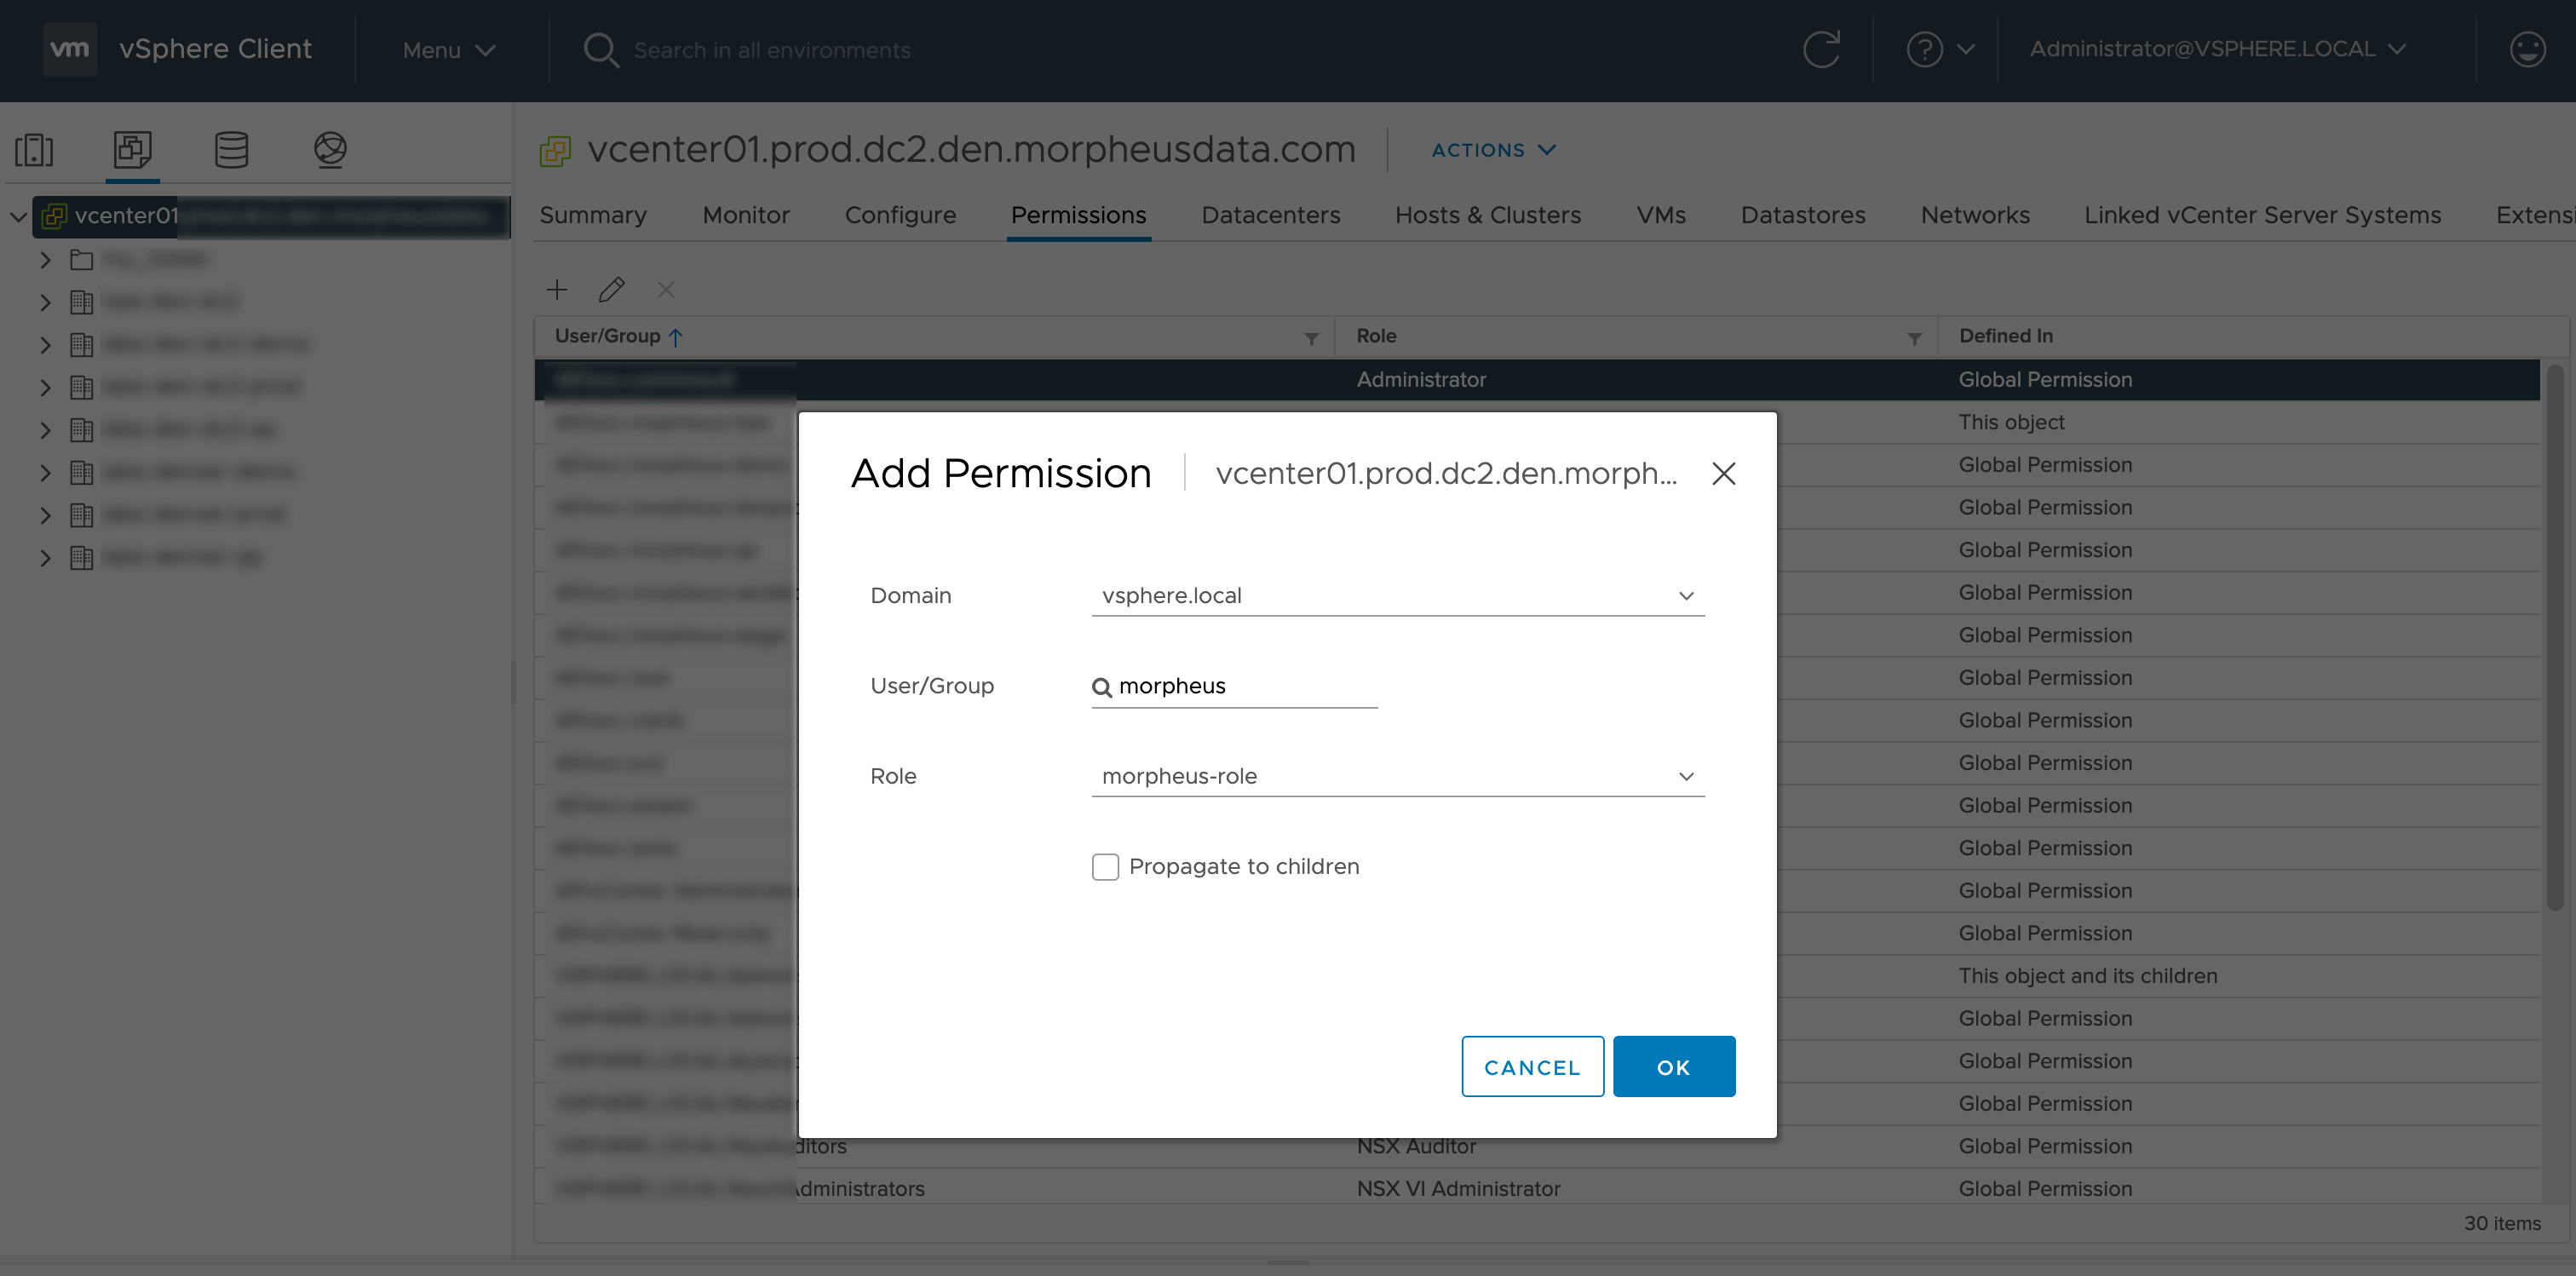
With the User and Role created, add permissions to associate the User and Role to the appropriate usage constructs. Navigate to the usage construct you wish to work with, navigate to the permissions tab, click the plus (+) button. In the screenshot below, I’m adding the permission for the vCenter usage construct. The complete list of usages and whether or not to mark the propagation box is below the image.
Note
For organization and security purposes, permissions can also be added to folders. This allows Morpheus to see the folders and onboard any resources within them (if desired). Once the vCenter Cloud integration has been created in Morpheus, you can view folders from the Cloud Detail Page (Infrastructure > Clouds > Selected Cloud > Resources Tab). By editing the folder here (Actions > Edit), folders can be set as the “Default” and/or the “Image Target”. When a folder is set as Default, this folder is pre-selected when provisioning new Instances into the Cloud. When a folder is set as the Image Target, Morpheus will look into this folder to onboard VMware images into Morpheus.
Usage
- vCenter
Non-Propagating
- Datacenter
Non-Propagating
- Cluster
Non-Propagating
- Host
Non-Propagating
- Datastore/Datastore Cluster
Propagating
After completing the above steps, all VMware Cloud functionality should be available in Morpheus without running into permissions errors.
Creating a Morpheus VMware Image
Morpheus comes out of the box with a default set of blueprints for use in many modern deployment scenarios. These consist mostly of base operating system images with a few additional adjustments. These adjustments typically include the addition of cloud-init (which is highly recommended to be used in most environments, but not mandatory). However, in many on-premise deployments there are custom image requirements as well as networking requirements. This guide will go over how to create a VMware Images for use within Morpheus.
Note
A Morpheus appliance may have many vCenter Clouds tied to any number of vCenter appliances. If the same images need to be available to multiple vCenter Clouds, you will need to download the OVF from one vCenter and upload it into the others. At that point you can make multiple Morpheus Node Types from the images and it will be available to all needed vCenter Clouds. This is a vCenter limitation but one which may not be obvious when provisioning via Morpheus.
Creating a Windows Image
Supported Versions
2008R2, 2012, 2012R2, 2016, 2019, 2022
Image Preparation
Create a new machine in VMware vCenter and install a base version of your preferred Windows build. The smaller the VMDK drive, typically the faster you can clone and deploy. Utilizing Morpheus, provisioning and post deploy scripts can expand drives to desired sizing.
Ensure VMware Tools is installed on the operating system.
Apply any service packs / updates to the operating system.
Configure WinRM to allow remote management and open the firewall. This is optional if using VMware Tools RPC mode for agent install and Morpheus Agent for guest exec. To enable this, under local computer Administrator, open a command prompt and run
winrm quickconfig
Install .Net at least 4.5.2
Ensure Windows Firewall will allow WinRM connections.
Shutdown the virtual machine and convert to a template.
Note
WinRM is not required and is used as a fallback when using vmtools guest exec and customizations
Note
Morpheus will sysprep images based on the “Force Guest Customizations” flag under the Virtual Image’s settings when using DHCP. Ensure a sysprep has not been performed on the template if this flag is enabled or if using Static IPs/IP Pools when provisioning, which will always use Guest Customizations and trigger a sysprep.
Creating a CentOS/RHEL 7 Image
Create a new virtual machine in VMware vCenter and install a base version of your preferred Linux distro build. If you are using cloud init as part of your image you will need to ensure your virtual machine has a cdrom.
Before installing the operating system setup a single
extorxfspartition without a swap disk (This is so that growpart can extend the disk. growpart currently does not support lvm)Install the distro and apply any updates to the operating system and security updates
Install cloud-init using command
yum install cloud-initInstall cloud-utils-growpart using command
yum install cloud-utils-growpartInstall open-vm-tools using command
yum install open-vm-toolsInstall git by running
yum install gitInstall epel-release repo using command
yum install epel-releaseselinux set to permissive (enforced can cause problems with cloud-init)
sudo vi /etc/selinux/config
Cloud-Init
To get started with a base CentOS image we first install cloud-init. This is a relatively simple process using yum:
yum -y install epel-release
yum -y install git wget ntp curl cloud-init dracut-modules-growroot
rpm -qa kernel | sed 's/^kernel-//'  | xargs -I {} dracut -f /boot/initramfs-{}.img {}
There are two parts to this yum installation. We are first ensuring some core dependencies are installed for automation as well as cloud-init. git for example is installed for use by ansible playbook automation down the line and is therefore optional if not using ansible. The dracut-modules-growroot is responsible for resizing the root partition upon first boot to match the virtual disk size that was potentially adjusted during provisioning.
A great benefit to using cloud-init is credentials don’t have to be locked into the blueprint. It is advisable, within Morpheus , to configure the default cloud-init user that gets created when the vm boots automatically by cloud-init. This is located in Administration > Settings > Provisioning, within the Cloud-Init Settings section.
Network Interfaces
A slightly annoying change with centOS 7 is that the network interfaces have changed naming convention. You may notice when running ifconfig that the primary network interface is set to something like ens2344 or some other random number. This naming is dynamic typically by hardware id and we don’t want this to fluctuate when provisioning the blueprint in various VMware environments. Fortunately, there is a way to turn this functionality off and restore the interface back to eth0.
Firstly we need to adjust our bootloader to disable interface naming like this.
sed -i -e 's/quiet/quiet net.ifnames=0 biosdevname=0/' /etc/default/grub
grub2-mkconfig -o /boot/grub2/grub.cfg
The above command adds a few arguments to the kernel args list (namely net.ifnames=0 and biosdevname=0. It may be useful to view the /etc/default/grub file and ensure these settings were indeed applied.
The next step is to adjust the network-scripts in centOS. we need to ensure we have a file called /etc/sysconfig/network-scripts/ifcfg-eth0
Below is a script that we run on our packer builds to prepare the machines network configuration files.
export iface_file=$(basename "$(find /etc/sysconfig/network-scripts/ -name 'ifcfg*' -not -name 'ifcfg-lo' | head -n 1)")
export iface_name=${iface_file:6}
echo $iface_file
echo $iface_name
sudo mv /etc/sysconfig/network-scripts/$iface_file /etc/sysconfig/network-scripts/ifcfg-eth0
sudo sed -i -e "s/$iface_name/eth0/" /etc/sysconfig/network-scripts/ifcfg-eth0
sudo bash -c 'echo NM_CONTROLLED=\"no\" >> /etc/sysconfig/network-scripts/ifcfg-eth0'
This script tries to ensure there is a new ifcfg-eth0 config created to replace the old ens config file. Please do verify this config exists after running. If it does not you will have to be sure to build one on your own.
TYPE=Ethernet
DEVICE=eth0
NAME=eth0
ONBOOT=yes
NM_CONTROLLED="no"
BOOTPROTO="dhcp"
DEFROUTE=yes
Creating a CentOS/RHEL 8 Image
Create a new virtual machine in VMware vCenter and install a base version of your preferred Linux build. You must be running ESXi 6.7 Update 2 or later.
Prepare The New CentOS 8/RHEL8 Image
Install epel-release:
yum -y install epel-release(This step is not necessary for RHEL)Install git, wget, curl, cloud-init, cloud-utils-gropart, and open-vm-tools:
yum -y install git wget curl cloud-init cloud-utils-growpart open-vm-toolsUpdate:
yum -y updateFinally run:
rpm -qa kernel | sed 's/^kernel-//' | xargs -I {} dracut -f /boot/initramfs-{}.img {}
SELinux Settings
If allowed by your internal IT policies, set SELinux to permissive to avoid potential issues with cloud-init down the road.
Edit the following:
vi /etc/selinux/configMake the following change:
setenforce 0
Network Interfaces
Run the following to rename the network NIC. Values inside angle brackets should be filled in with the appropriate value for your environment (ex. <varname>):
sed -i -e 's/quiet/quiet net.ifnames=0 biosdevname=0/' /etc/default/grubgrub2-mkconfig -o /boot/grub2/grub.cfg(location may be different, could be located at /boot/efi/EFI/centos/grub.cfg)ifdown <orginal-nic>mv /etc/sysconfig/network-scripts/<orginal-nic> /etc/sysconfig/network-scripts/ifcfg-eth0(this changes name/device to eth0)Edit
ifcfg-eth0and change the NAME toeth0bash -c 'echo NM_CONTROLLED=\"no\" >> /etc/sysconfig/network-scripts/ifcfg-eth0'ip link set <orginal-nic> downip link set <orginal-nic> name eth0ip link set eth0 upifup eth0
Final VMWare Tasks
Detach any install media
Shutdown the VM
Convert the VM to template on the Morpheus side
Refresh the Morpheus Cloud to allow the new template to sync
Creating an Ubuntu 20.04 Image
Download the Ubuntu 20.04 ISO from Canonical, and upload the base image to vCetner. Then, create a new virtual machine in vCenter.
Note
Since we’ll include cloud-init with our image, we will need to ensure the virtual machine has a cdrom. Select the Ubuntu 20.04 ISO we just downloaded from the CD/DVD drive dropdown menu when creating the new virtual machine.
Before installing the operating system, set up a single ext partition without a swap disk. Then, continue on installing Ubuntu making the following selections during the setup process:
Update to the latest installer if a later version is available
Use the entire disk and deselect the option to set up the disk as an LVM group
Configure an account and set a password
Opt to install OpenSSH Server
Other optional packages aren’t needed for this basic Ubuntu image
Complete the installation process and reboot the machine. Update the package list and apply any upgrades:
apt-get update
apt-get upgrade
Change the network interface to eth0 by editing /etc/default/grub. The line GRUB_CMDLINE_LINUX="" should be edited to GRUB_CMDLINE_LINUX="net.ifnames=0 biosdevname=0".
Update GRUB:
update-grub
Update the 70-persistent-net.rules file:
cat << EOF > /etc/udev/rules.d/70-persistent-net.rules
SUBSYSTEM=="net", ACTION=="add", DRIVERS=="?*", ATTR{dev_id}=="0x0", ATTR{type}=="1", NAME="eth0"
EOF
Remove subiquity-disable-cloudinit-networking.cfg as cloud-init will skip network configuration if it’s present:
rm -f /etc/cloud/cloud.cfg.d/subiquity-disable-cloudinit-networking.cfg
Update 99-pve.cfg:
cat << EOF > /etc/cloud/cloud.cfg.d/99-pve.cfg
datasource_list: [ConfigDrive, NoCloud]
EOF
Remove Netplan files, they will not be regenerated if they exist:
rm -f /etc/netplan/00-installer-config.yaml
rm -f /etc/netplan/50-cloud-init.yaml
Run cloud-init clean:
cloud-init clean
Next, reboot the system and confirm the network interface is labeled eth0 once the machine comes back up. Then, clear BASH history for root. The history entry has a copy in the memory and it will flush back to the file when you log out. You can avoid this with the following command:
cat /dev/null > ~/.bash_history && history -c && exit
Shutdown the system:
shutdown -h now
Convert the VM to a template in vCenter before moving back to Morpheus to onboard the image and use it to begin building your provisioning library.
Gotchas
SELinux can cause issues with cloud-init when in enforced mode. It may be advisable to set this to permissive unless it is mandatory within your organization to use an enforced SELinux configuration. If that is the case please see the documentation for the cloud_init_t security policies.
Network Manager will also prevent the required restart of the Network Service when assigning static IP’s. Disable Network Manager when possible or Static IP assignment may not work until the Network Service is restarted manually.
A Note on Proxies
Proxy configurations are known to vary in some organizations and makes building a base blueprint a little more difficult. In order to fully configure proxies a few environment variables must be set in the /etc/environment file (This can be done automatically in a default user-data script for cloud-init as well in edit cloud).
http_proxy="http://myproxyaddress:8080"
https_proxy="http://myproxyaddress:8080"
ftp_proxy="http://myproxyaddress:8080"
no_proxy=127.0.0.1,localhost,applianceUrl
https_no_proxy=127.0.0.1,localhost,applianceUrl
Important
It is very important to properly set the no_proxy list (applianceUrl) should be replaced with the actual appliance url. In future releases, morpheus plans to automatically take care of this.
Note
If using cloud-init agent install mode these settings need to be set in the custom Cloud-Init User data section of “Edit Cloud” or “Edit Virtual Image”
Important
If using this virtual machine as a docker host, proxy settings must also be configured in the docker config. See Docker guides for instructions on how to properly set this. If necessary this can be wrapped in a task automation workflow for your own use.