Google Cloud Platform (GCP)
Integration Features
Provisioning Virtual Machines
Network tagging
Private and Local Images
Google VM Snapshots
Brownfield Inventory
Costing
Right-sizing
Shared Network Support
Requirements for Integration with HPE Morpheus Enterprise
To integrate HPE Morpheus Enterprise with Google Cloud Platform, you will need the following. APIs are enabled in “APIs & Services” and must be enabled for all projects or the selected project (depending on your GCP Cloud integration settings). The next section contains more detailed steps for enabling API in the GCP web console.
The Compute Engine API enabled
The Cloud Resource Manager API enabled
The Cloud Billing API
The Identity and Access Management (IAM) API enabled
The BigQuery API enabled
The BigQuery Data Transfer API enabled
The Kubernetes Engine API enabled (required to provision GKE clusters)
Credentials for an IAM service account with Owner or Compute Admin role permissions
The private key and client email for the service account
This integration guide goes through the process of configuring your account and obtaining the information necessary to integrate with HPE Morpheus Enterprise. Continue to the next section for a detailed look at enabling the APIs mentioned above.
Enabling the Required APIs
In order to take full advantage of the HPE Morpheus Enterprise integration with Google Cloud, a number of APIs must be enabled within the GCP web console. It’s recommended that you enable all of the APIs listed in the preceding section regardless of the HPE Morpheus Enterprise feature set you intend to use. This will ensure you do not run into problems down the road stemming from a lack of access which may take time to diagnose.
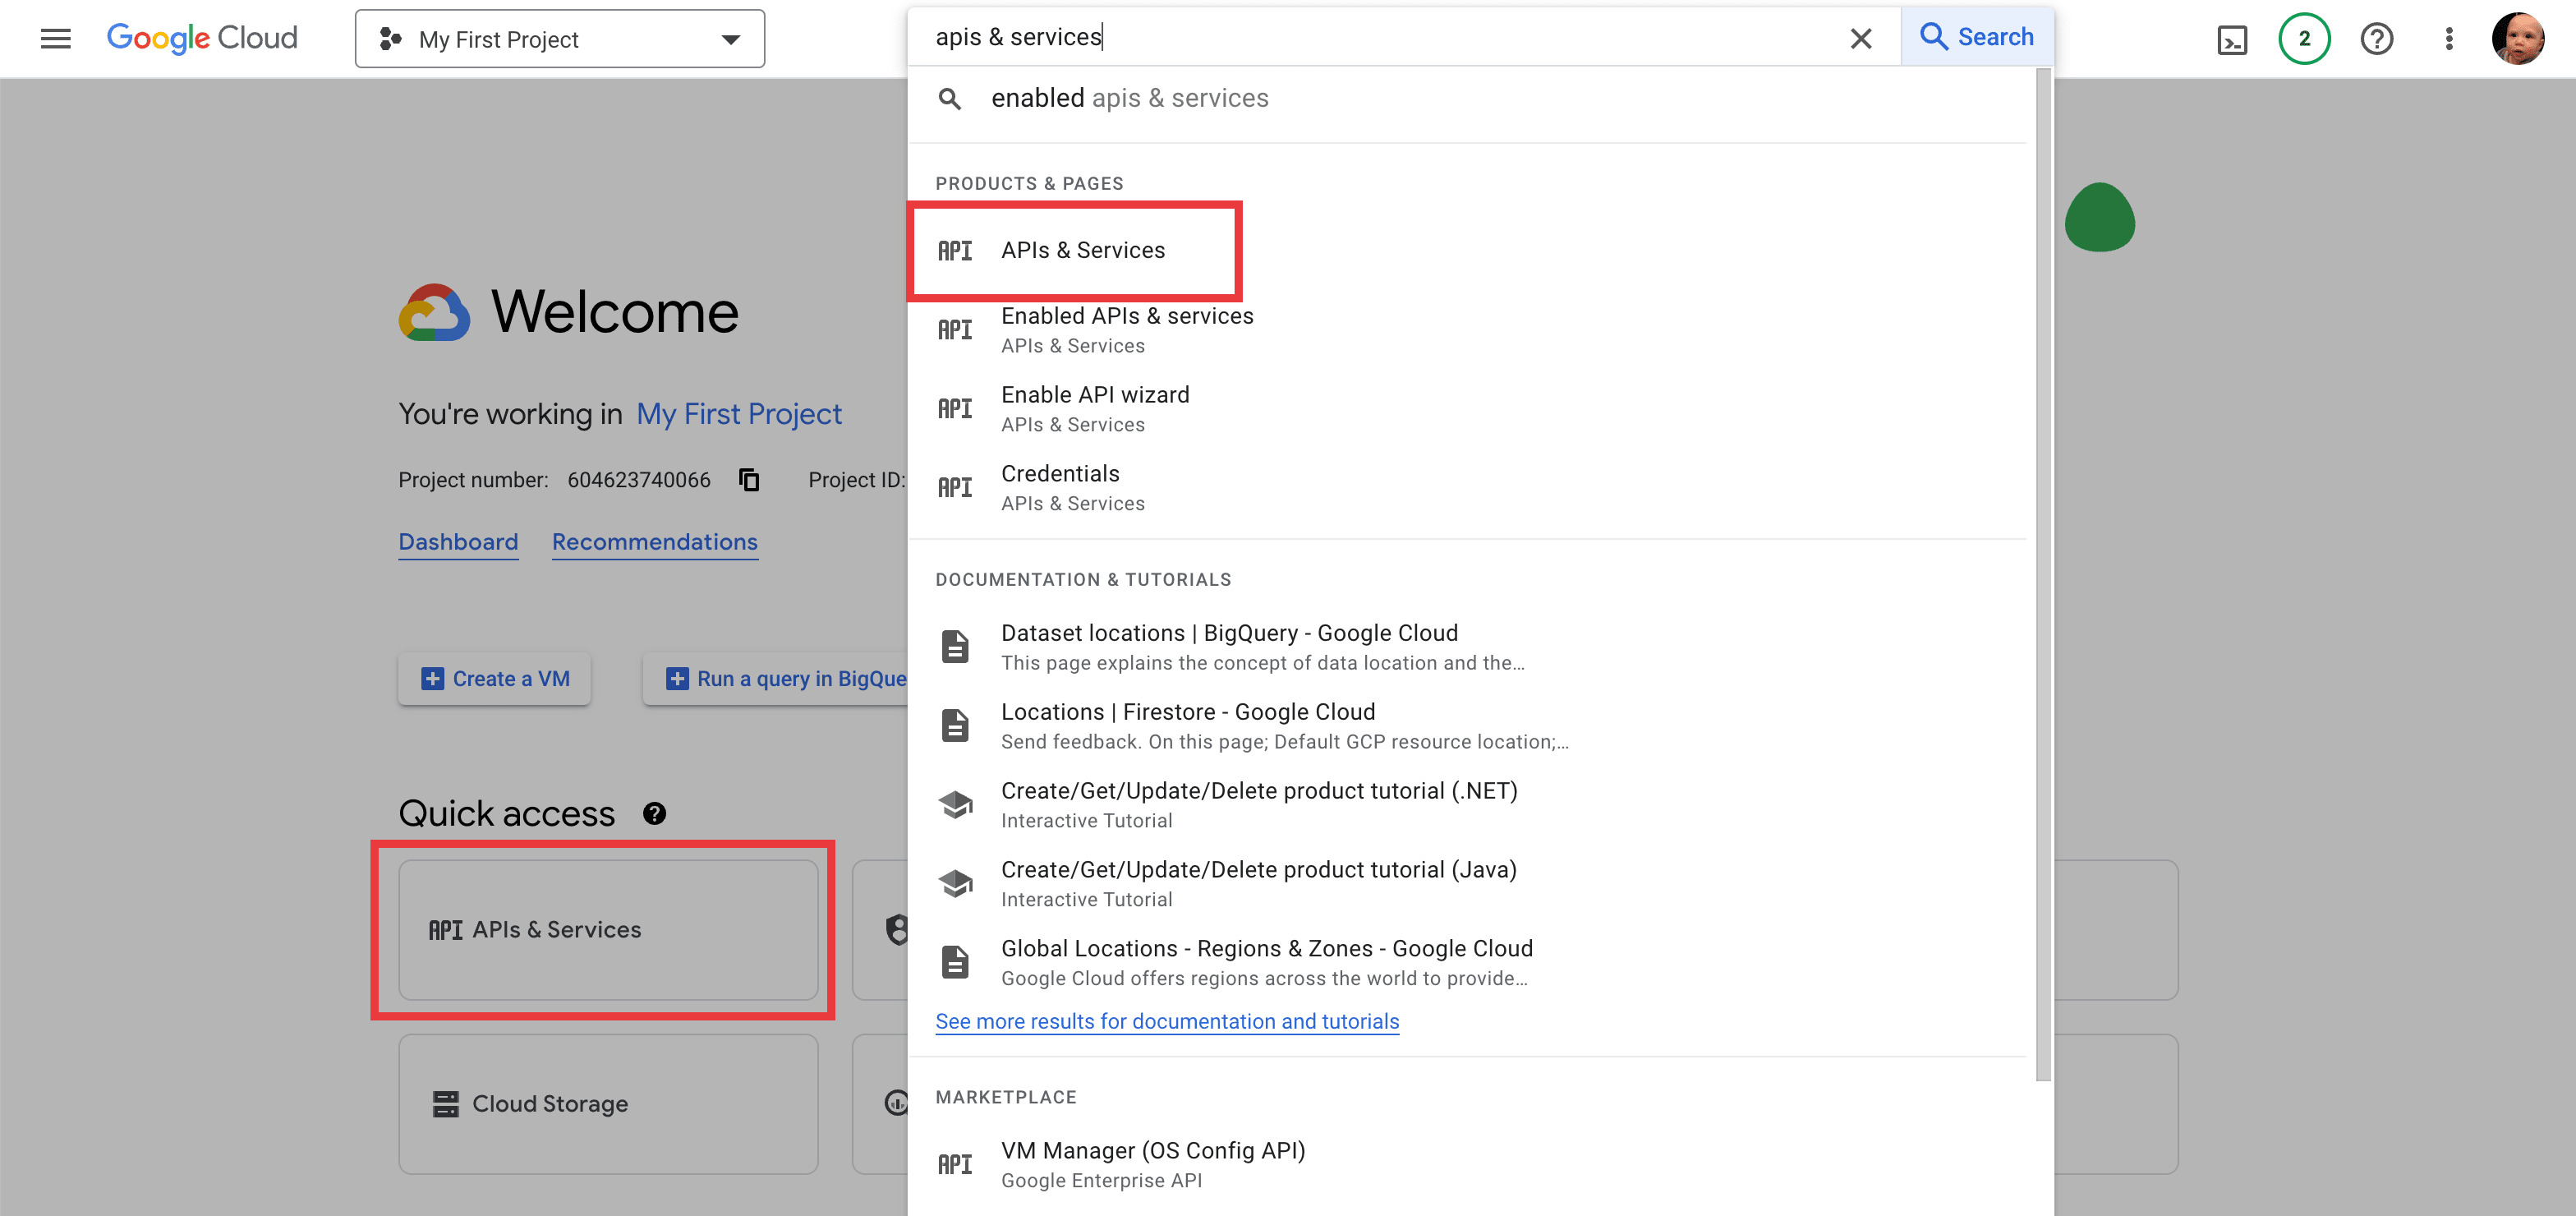
Log into the Google Cloud web console and navigate to the APIs and Services page. You may find this in the Quick access area of the welcome page or you can search for it as shown in the screenshot below.
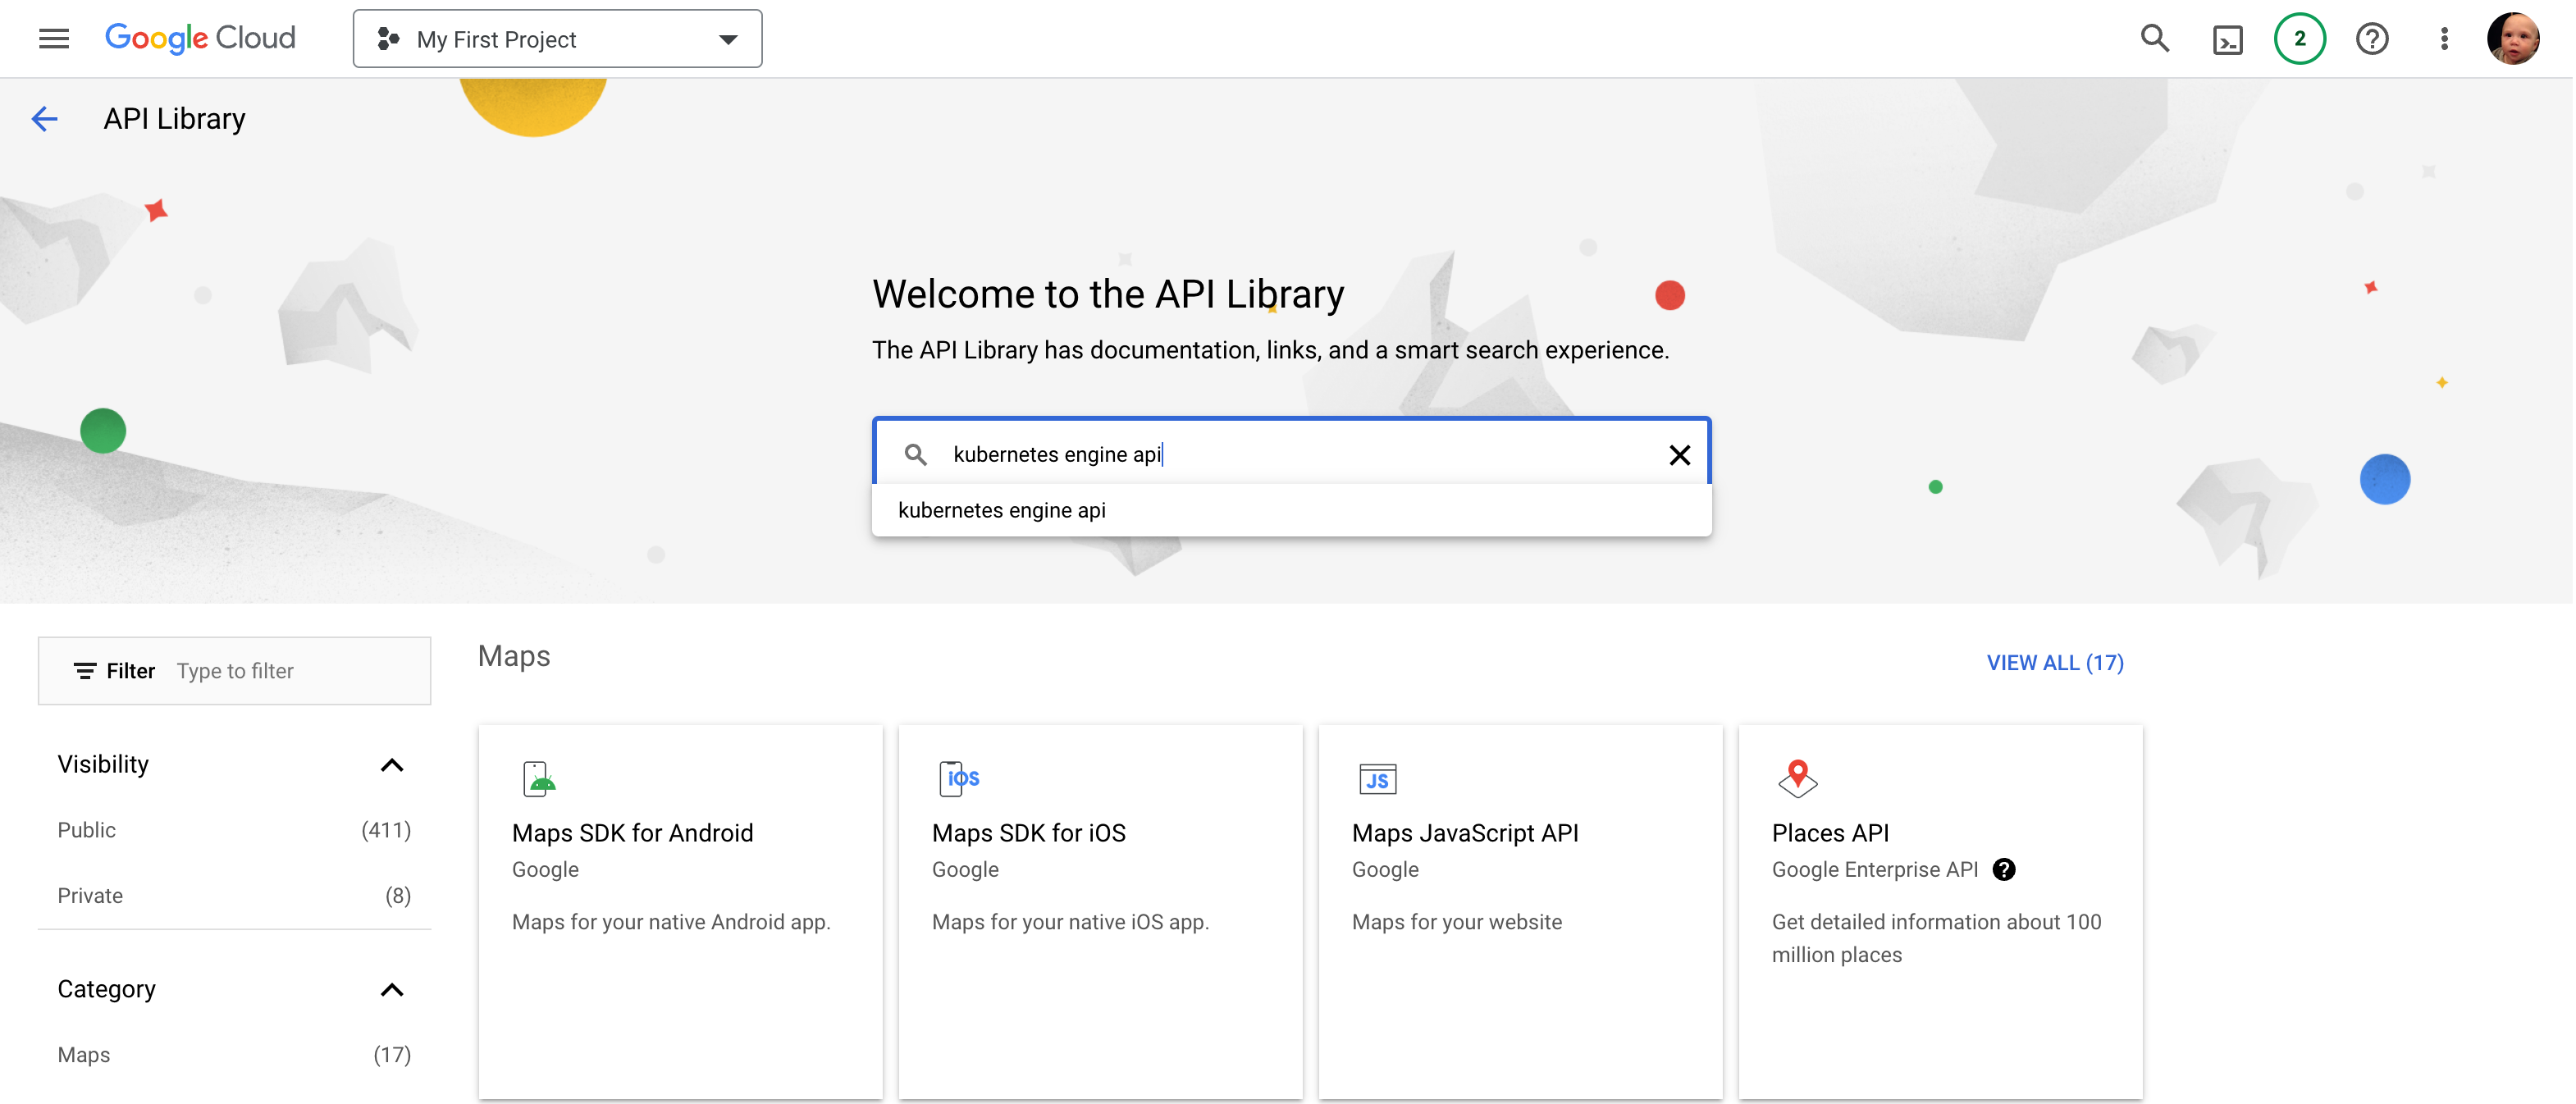
From the APIs and Services page, a list of enabled APIs and some details about your usage are shown. To enable new APIs, click + ENABLE APIS & SERVICES near the top of the window. Now on the API library page, search for the API you wish to enable. Here I’ve searched for the Kubernetes Engine API.
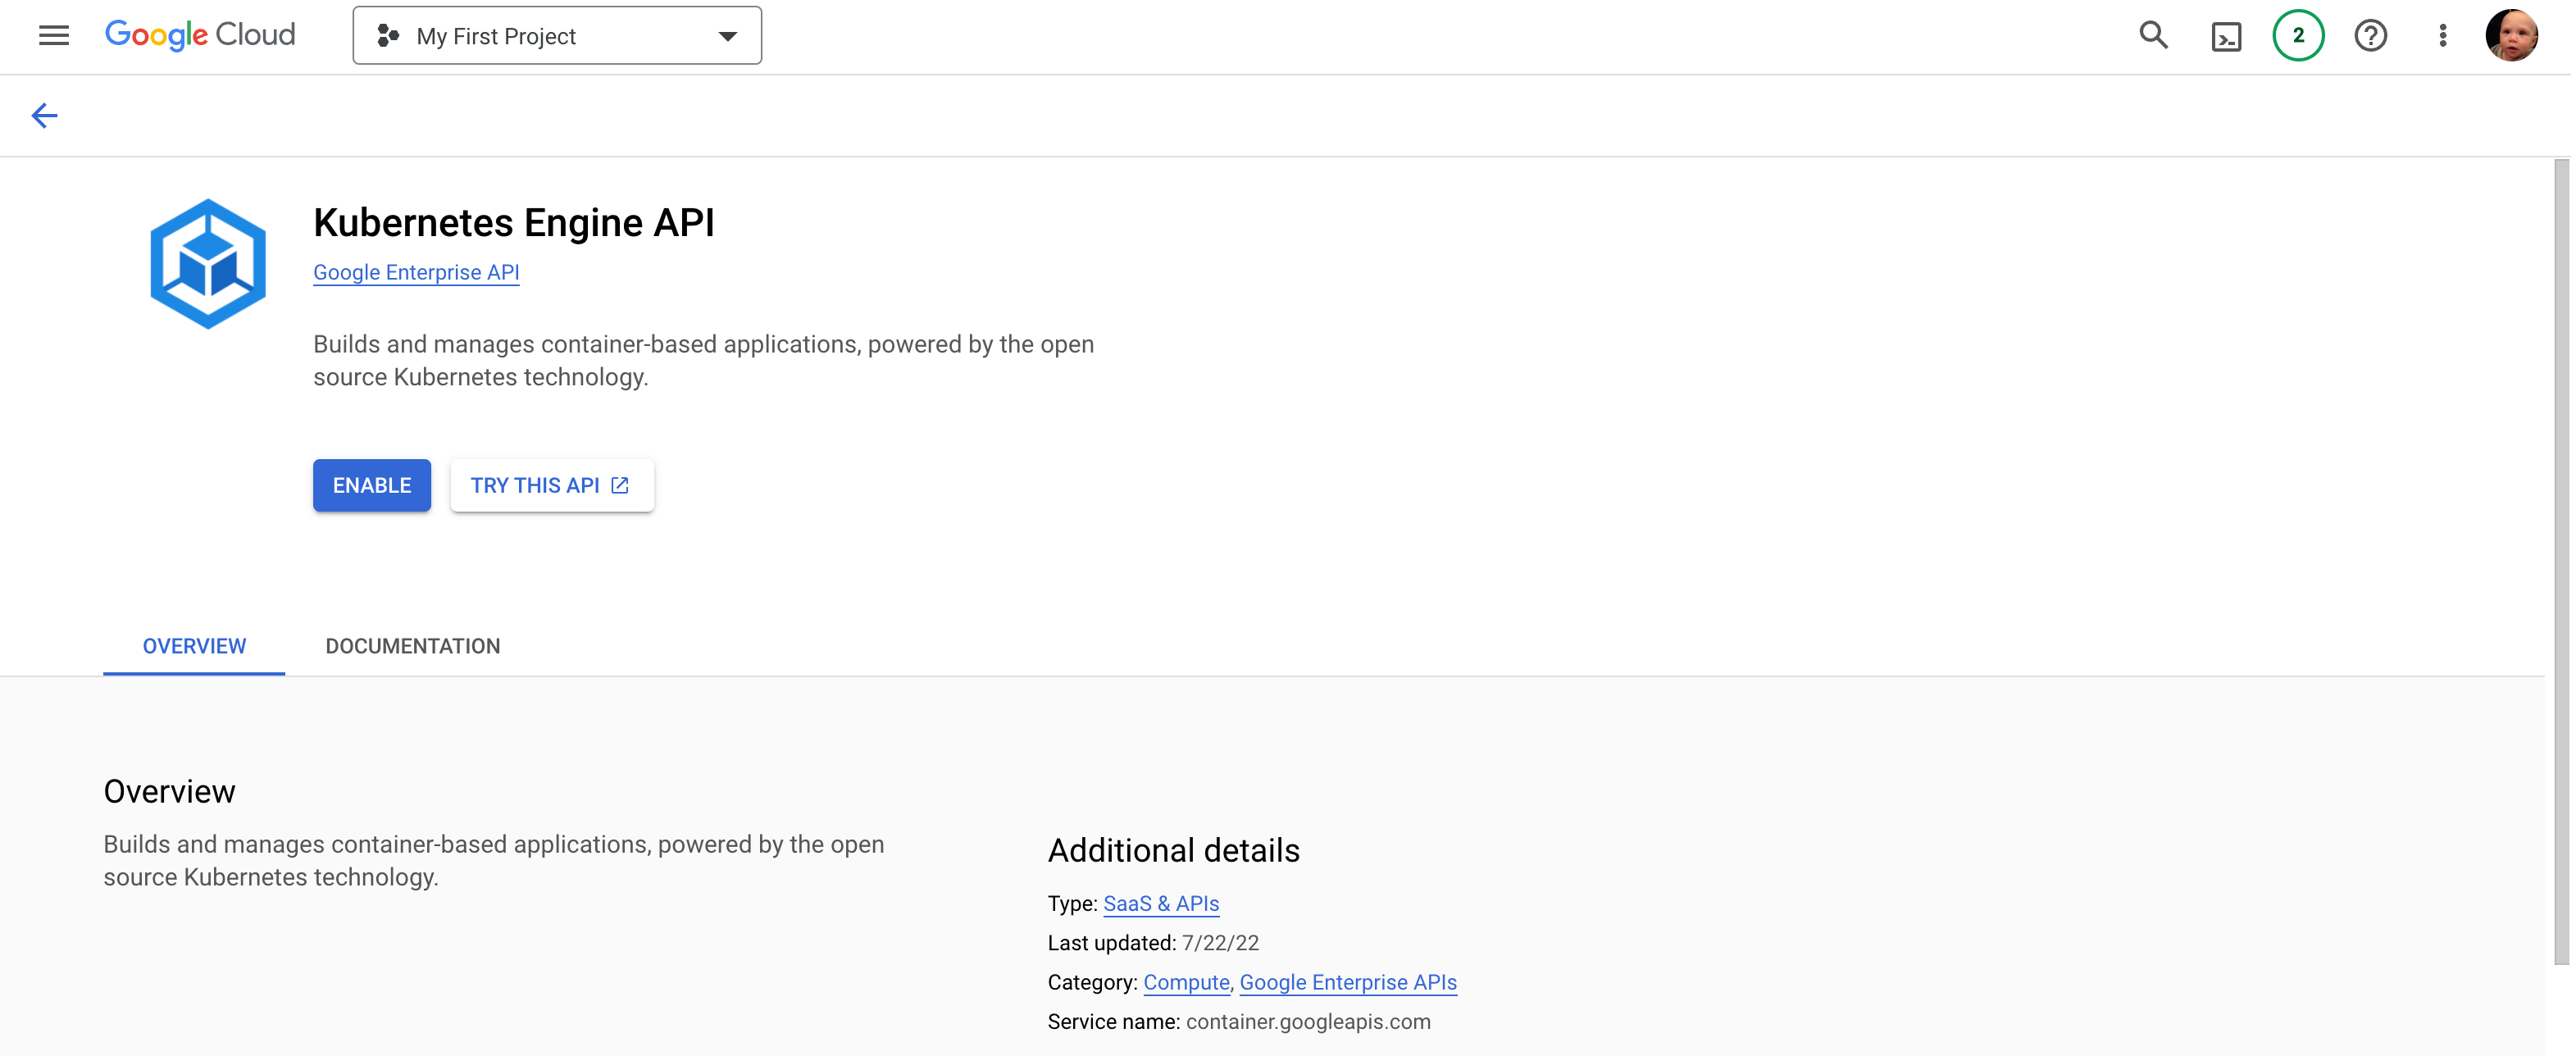
From the search results, click on the API you wish to enable to view its detail page. Click ENABLE. Once successfully enabled, the button will change to a MANAGE button. It may take a few moments for the API to be fully enabled. You may also be prompted to enable the Cloud Billing API or create an association with a Billing Account when enabling APIs. Go ahead and do so if prompted.
Repeat this process until all required APIs (listed in the previous section) are enabled.
Creating a Service Account
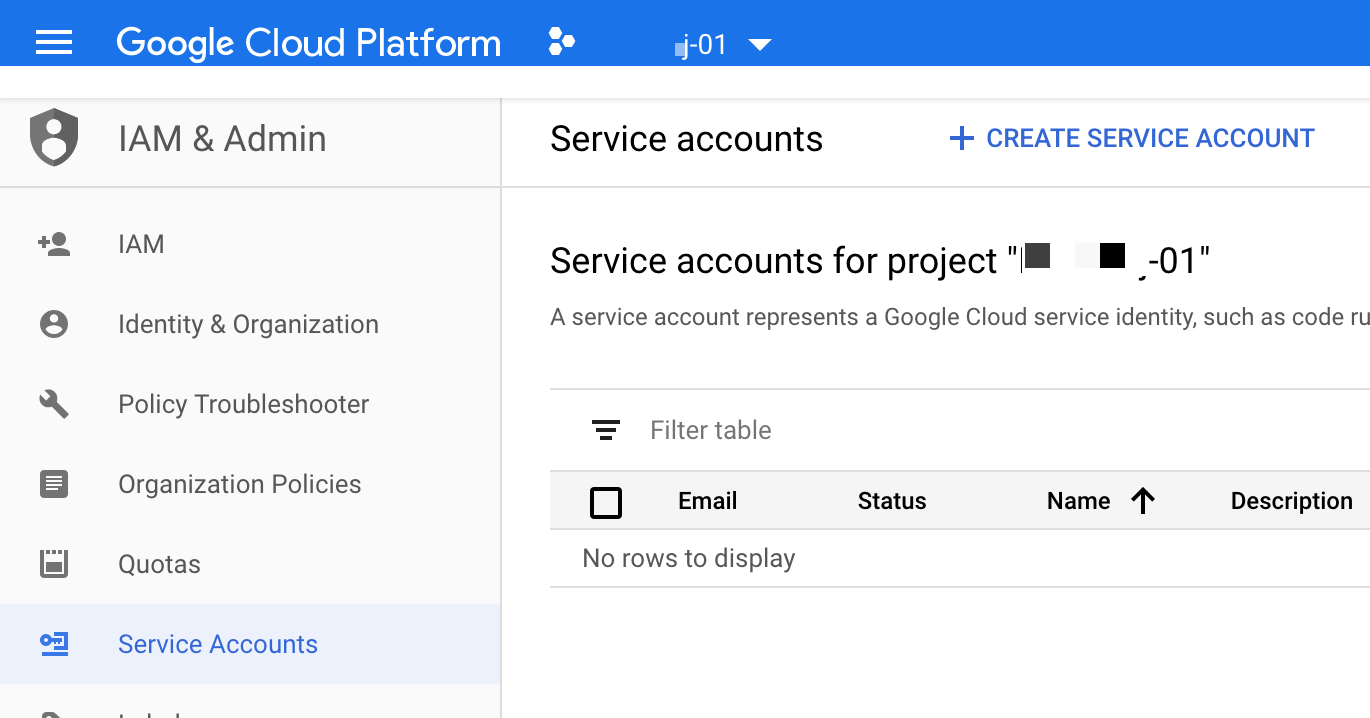
From anywhere in the GCP web console, search for “service accounts” in the global search bar at the top of the window
Click on the Service Accounts page (within the IAM & Admin stack)
A list of existing service accounts within the selected Project is shown (if any)
To create a new one, click + CREATE SERVICE ACCOUNT
Enter at least a name for your new service and click CREATE AND CONTINUE
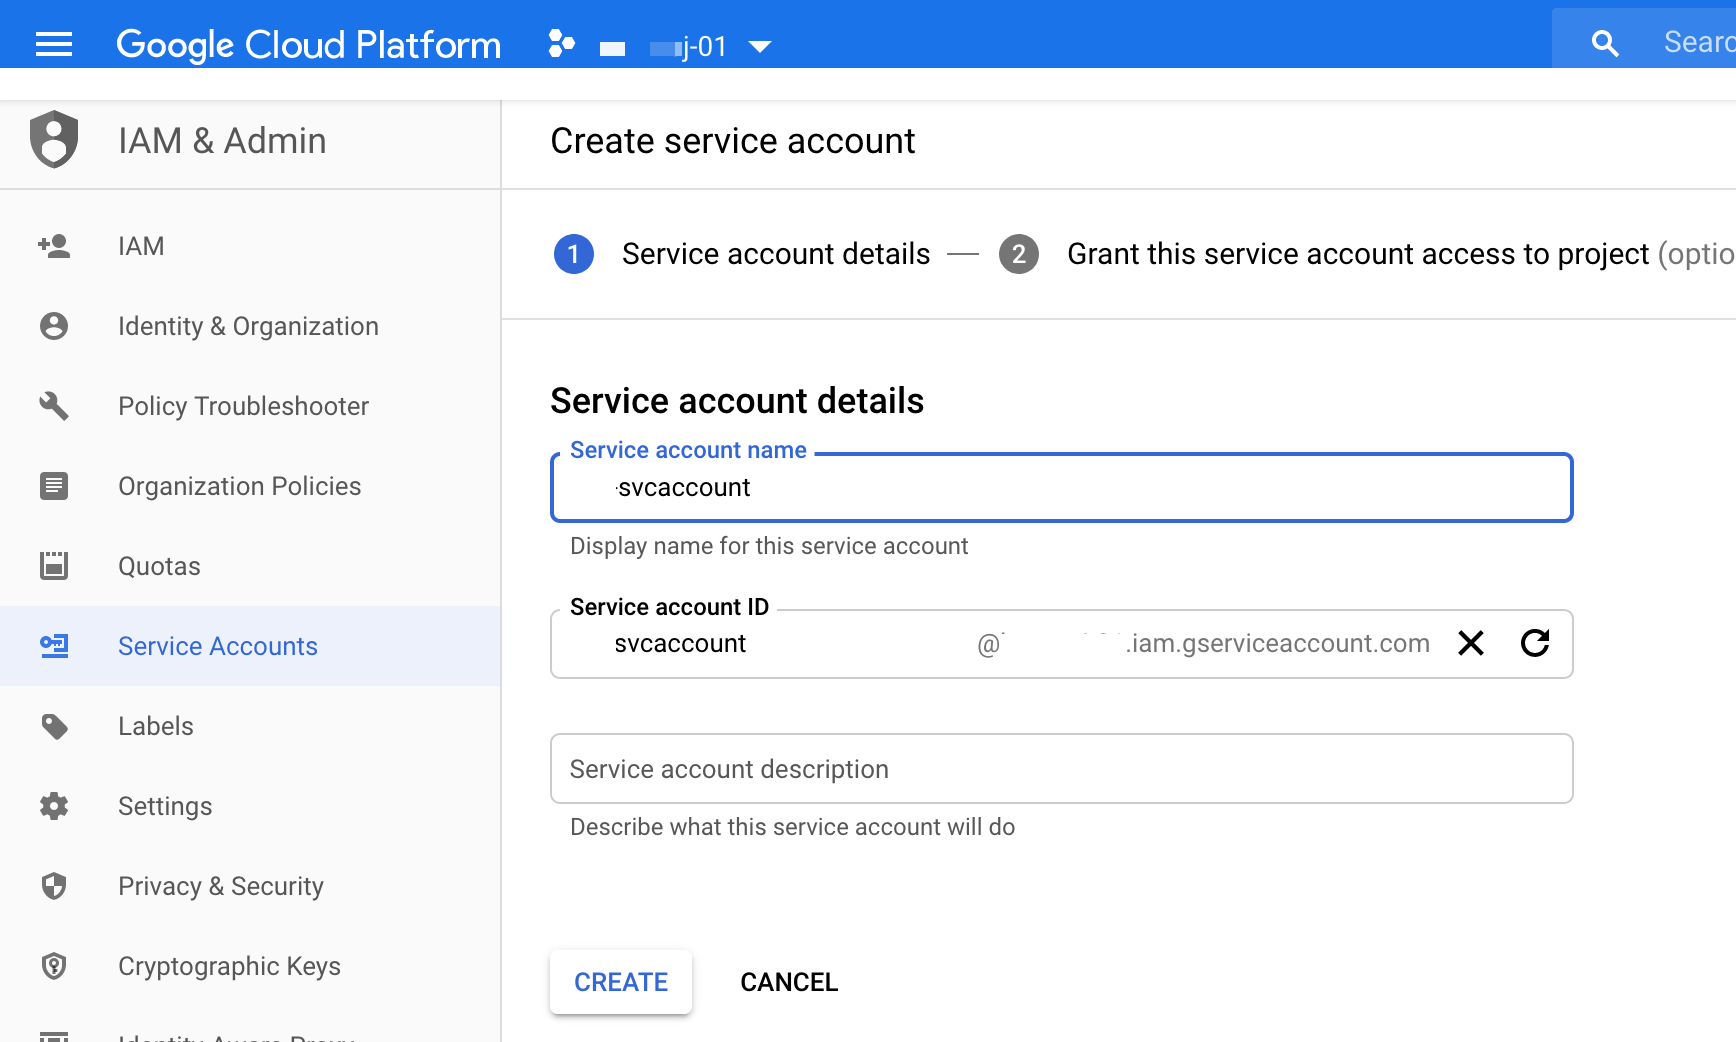
After creating the service account, you’ll be prompted to set a role for the account. In order to fully integrate with HPE Morpheus Enterprise, you must use an account in the Owner role or the Compute Admin role
Click CONTINUE
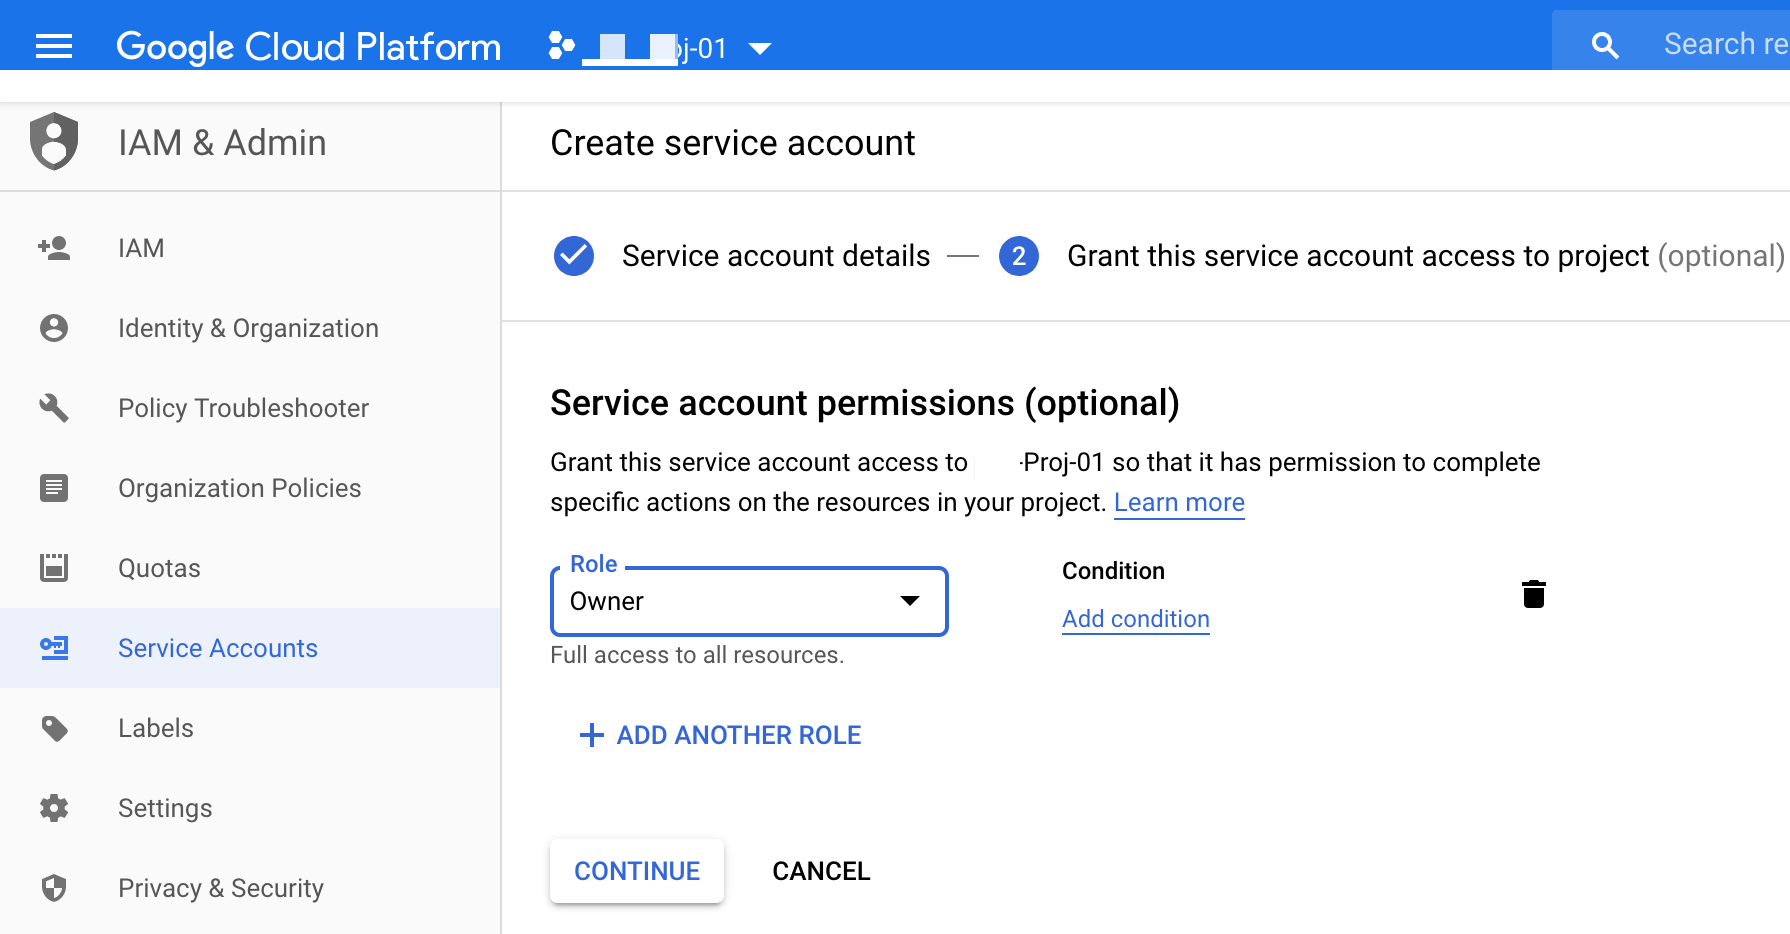
Following creation of the service account, you’ll be taken back to the list of existing service accounts
Generating Keys and Integrating with HPE Morpheus Enterprise
From the list of service accounts, click the ellipsis button (…) to the right of a selected account
Click “Manage Keys”
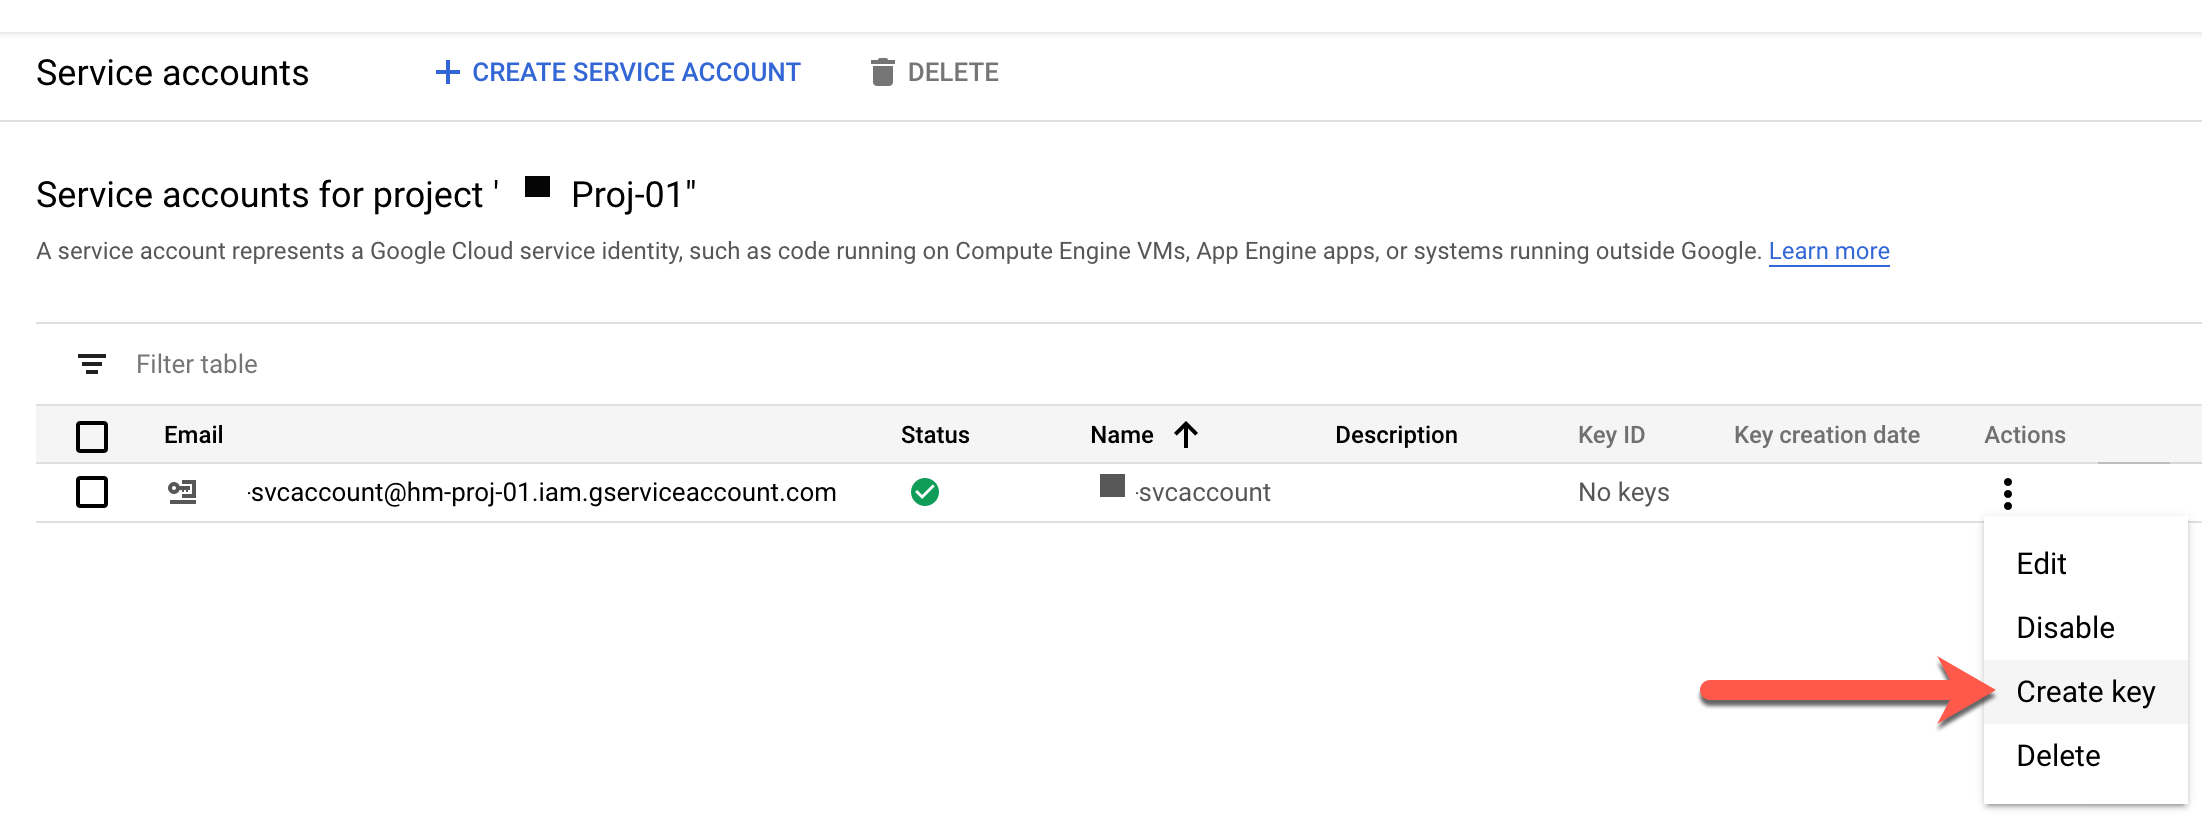
On the Keys page, click “Add Key” and then “Create New Key”
Select JSON format and click CREATE
A JSON-formatted document will be downloaded, this document contains the Project ID, private key, and client email values needed to complete the integration process in the next step
Add a GCP Cloud
Note
The JSON-formatted document downloaded when creating a key for your service account contains all of the required values for completing the integration. Consult the above section on generating keys if needed.
Navigate to Infrastructure > Clouds
Select + CREATE CLOUD, select Google Cloud, and then click NEXT.
Enter the following into the Create Cloud modal:
Cloud Configuration
- NAME
Name of the Cloud in HPE Morpheus Enterprise
- CODE
Unique code used for api/cli, automation and policies.
- LOCATION
Description field for adding notes on the cloud, such as location.
- VISIBILITY
For setting cloud permissions in a multi-tenant environment. Not applicable in single tenant environments.
- TENANT
If Visibility is set to Private, select the Tenant the Cloud resources will assigned to.
- ENABLED
When disabled, automatic Cloud sync is paused and the Cloud will not be selectable for provisioning.
- AUTOMATICALLY POWER ON VMS
When enabled, HPE Morpheus Enterprise will maintain the expected power state of managed VMs. HPE Morpheus Enterprise will power on any managed VMs in the Cloud that have been shut down for unknown reasons (not powered off by HPE Morpheus Enterprise) to ensure availability of services.
Note
When “AUTOMATICALLY POWER ON VMS” is enabled, the power state of managed VMs should be maintained in HPE Morpheus Enterprise. This setting is not applicable to discovered/unmanaged resources.
Details
- PRIVATE KEY
The service account private key. Paste in the entire value between (but not including) the quotation marks in your downloaded JSON document, formatted like the following example:
-----BEGIN PRIVATE KEY-----(your_key)-----END PRIVATE KEY------ CLIENT EMAIL
The service account client email, ex: morpheus@morpheus.iam.gserviceaccount.com
- PROJECT ID
Projects will auto-populate upon successful entry of the private key and client email. You can opt to scope the GCP integration to a single Project or select “All” to instead select the Project from the Resource Pool dropdown at provision time
- REGION
Regions will auto-populate upon successful entry of the private key and client email. Select the appropriate region for this Cloud, if applicable. You can also opt to scope the GCP integration to all regions to allow users to select from any region at provision time
- INVENTORY EXISTING INSTANCES
If checked, existing GCP resources will be inventoried and appear as unmanaged virtual machines in HPE Morpheus Enterprise.
If advanced options are not needed, click NEXT to advance to the Group selection page. Otherwise, continue on with this guide and review advanced or provisioning options.
Advanced Options
- DOMAIN
Specify a default domain for instances provisioned to this Cloud.
- SCALE PRIORITY
Only affects Docker Provisioning. Specifies the priority with which an instance will scale into the cloud. A lower priority number means this cloud integration will take scale precedence over other cloud integrations in the group.
- APPLIANCE URL
Alternate Appliance url for scenarios when the default Appliance URL (configured in admin > settings) is not reachable or resolvable for Instances provisioned in this cloud. The Appliance URL is used for Agent install and reporting.
- TIME ZONE
Configures the time zone on provisioned VM’s if necessary.
- DATACENTER ID
Used for differentiating pricing among multiple datacenters. Leave blank unless prices are properly configured.
- NETWORK MODE
Unmanaged or select a Network Integration (NSX, ACI etc)
- LOCAL FIREWALL
On or Off. Enable to managed Host and VM firewall/IP Table rules (linux only)
- SECURITY SERVER
Security Server setting is for Security Service Integrations such as ACI
- TRUST PROVIDER
Select Internal (Morpheus) or an existing Trust Provider Integration
- STORAGE MODE
Single Disk, LVM or Clustered
- BACKUP PROVIDER
Select a backup provider. Depending on the Cloud type and any currently-configured backup plugins you may select Internal Backups (Morpheus) or another configured backup solution
- REPLICATION PROVIDER
Sets the default Replication Provider for the Cloud. Select an existing Replication Provider Integration
- GUIDANCE
Enable Guidance recommendations on cloud resources.
- COSTING
Enable for HPE Morpheus Enterprise to sync Costing data from the Cloud provider, when available. For on-prem Clouds, enabling costing activates a costing service designed to mirror the live costing experience of public clouds, including invoicing with line items and real-time cost data (Operations > Costing > Invoices). If your organization utilizes reserved instances and you want to pull in related pricing data, some Cloud integrations include the option to select Costing and Reservations. If this is not relevant, select Costing to save money on additional calls to the Cloud provider’s costing API.
- DNS INTEGRATION
Records for instances provisioned in this cloud will be added to selected DNS integration.
- SERVICE REGISTRY
Services for instances provisioned in this cloud will be added to selected Service Registry integration.
- CONFIG MANAGEMENT
Select a Chef, Ansible or Puppet integration to be used with this Cloud.
- CMDB
Select CMDB Integration to automatically update selected CMDB.
- CMDB DISCOVERY
When checked, any automatically discovered (unmanaged) servers onboarded into HPE Morpheus Enterprise from this Cloud will also have CMDB records created for them.
- CHANGE MANAGEMENT
Select an existing Change Management Integration to set on the Cloud. ex: Cherwell
- AGENT INSTALL MODE
SSH / WINRM / Guest Execution: HPE Morpheus Enterprise will attempt to use SSH, WINRM or Guest Execution for Agent install.
Cloud Init / Unattend (when available): (DEFAULT) HPE Morpheus Enterprise will utilize Cloud-Init or Cloudbase-Init for agent install when provisioning images with Cloud-Init/Cloudbase-Init installed. HPE Morpheus Enterprise will fall back on SSH or WINRM if cloud-init is not installed on the provisioned image. Morpheus will also add Agent installation to Windows unattend.xml data when performing Guest Customizations or utilizing syspreped images.
- VDI GATEWAY
Set a VDI Gateway for outbound communication from the HPE Morpheus Enterprise Appliance to the vdi endpoints. VDI Gateways can be added in
/tools/vdi/gateways
CUSTOM LOGOS
When integrating a Cloud, it will appear by default throughout the UI with its standard logo (VMware logo for VMware Clouds, etc.). If desired, you may upload a custom logo that should appear instead. This might be useful for MSPs which might not want to reveal the Cloud type underlying its services. A dark mode version of the logo may also be uploaded if the standard logo doesn’t look right against the HPE Morpheus Enterprise dark mode theme. Checking USE DEFAULT CLOUD LOGOS allows the user to return to the standard logo for the Cloud type without deleting the custom uploaded logo.
INVENTORY OPTIONS
Inventory options allow you to set a default active or inactive state for certain discovered resources. The list of available resources to configure will vary based on the Cloud type and its supported resources. By default, all possible resources for the Cloud type will be discovered in an active state. Uncheck the box for some or all resources to discover them in an inactive state. The list of potential resources that may appear include:
Service Plans
Resource Pools
Networks
Security Groups
Datastores
Folders
Provisioning Command
- PROXY
Set a proxy for inbound communication from Instances to the HPE Morpheus Enterprise Appliance. Proxies can be added in the Infrastructure > Networks > Proxies tab.
- Bypass Proxy for Appliance URL
Enable to bypass proxy settings (if added) for HPE Morpheus Enterprise Agent communication to the Appliance URL.
- NO PROXY
Include a list of IP addresses or name servers to exclude from proxy traversal
- USER DATA (LINUX)
Add cloud-init user data. HPE Morpheus Enterprise 4.1.0 and earlier assumes bash syntax. HPE Morpheus Enterprise 4.1.1 and later supports all User Data formats. Refer to https://cloudinit.readthedocs.io/en/latest/topics/format.html for more information.
After reviewing all options, click NEXT to advance to the Group selection page. Following Group selection, click COMPLETE to finish the integration process. If you’ve opted to inventory existing Instances, they will be viewable in HPE Morpheus Enterprise shortly. At this point, you are ready to provision new resources in Google Cloud Platform as needed!
Important
If you experience difficulties adding a GCP Cloud, review the above guide and ensure you’ve met all requirements for completing the integration. For example, if the Compute Engine API is not enabled, HPE Morpheus Enterprise will not accept credentials entered on the Create Cloud modal. If you repeatedly run into problems completing the integration process, review the above guide in its entirely and double check that each step is completed and your account meets all configuration requirements.
Create a GCP Project
On initial integration, HPE Morpheus Enterprise will sync Projects and allow you to scope the integration to a specific Project or to scope the integration to all Projects. As time goes on, additional Projects are continually synced and can be managed from within the Resources tab on the Cloud detail page (Infrastructure > Clouds > Selected GCP Cloud). Within the Resources tab, users can edit some Project settings as well as delete Projects if needed.
To create a new GCP Project:
Click + ADD RESOURCE POOL
Enter a name value for the new Project
Mark the “DEFAULT” box if you’d prefer newly provisioned Instances default to the new Project
Enter a Project ID and ensure it meets the listed validation requirements
Set a Parent value if the new Project should exist underneath a parent organization
Finally, select a billing account
Click SAVE CHANGES
After a few minutes, the new Project will be ready on the GCP side and HPE Morpheus Enterprise will be ready to provision new resources into it.
Enabling Live Costing for GCP
GCP costing is done at the Billing Account level. Each Billing Account can be linked to one or more GCP Projects. All projects which are linked to the Billing Account will have their costing data available to HPE Morpheus Enterprise but if the GCP Cloud has been scoped to only one Project, HPE Morpheus Enterprise will ingest costing data only for that Project. Users can view the Billing Account linked to a particular project by clicking on the hamburger menu (main menu button in the far upper-left of the console window) and selecting billing. A pop-up window will give users the option to navigate to the Billing Account which is linked to the currently-selected Project.
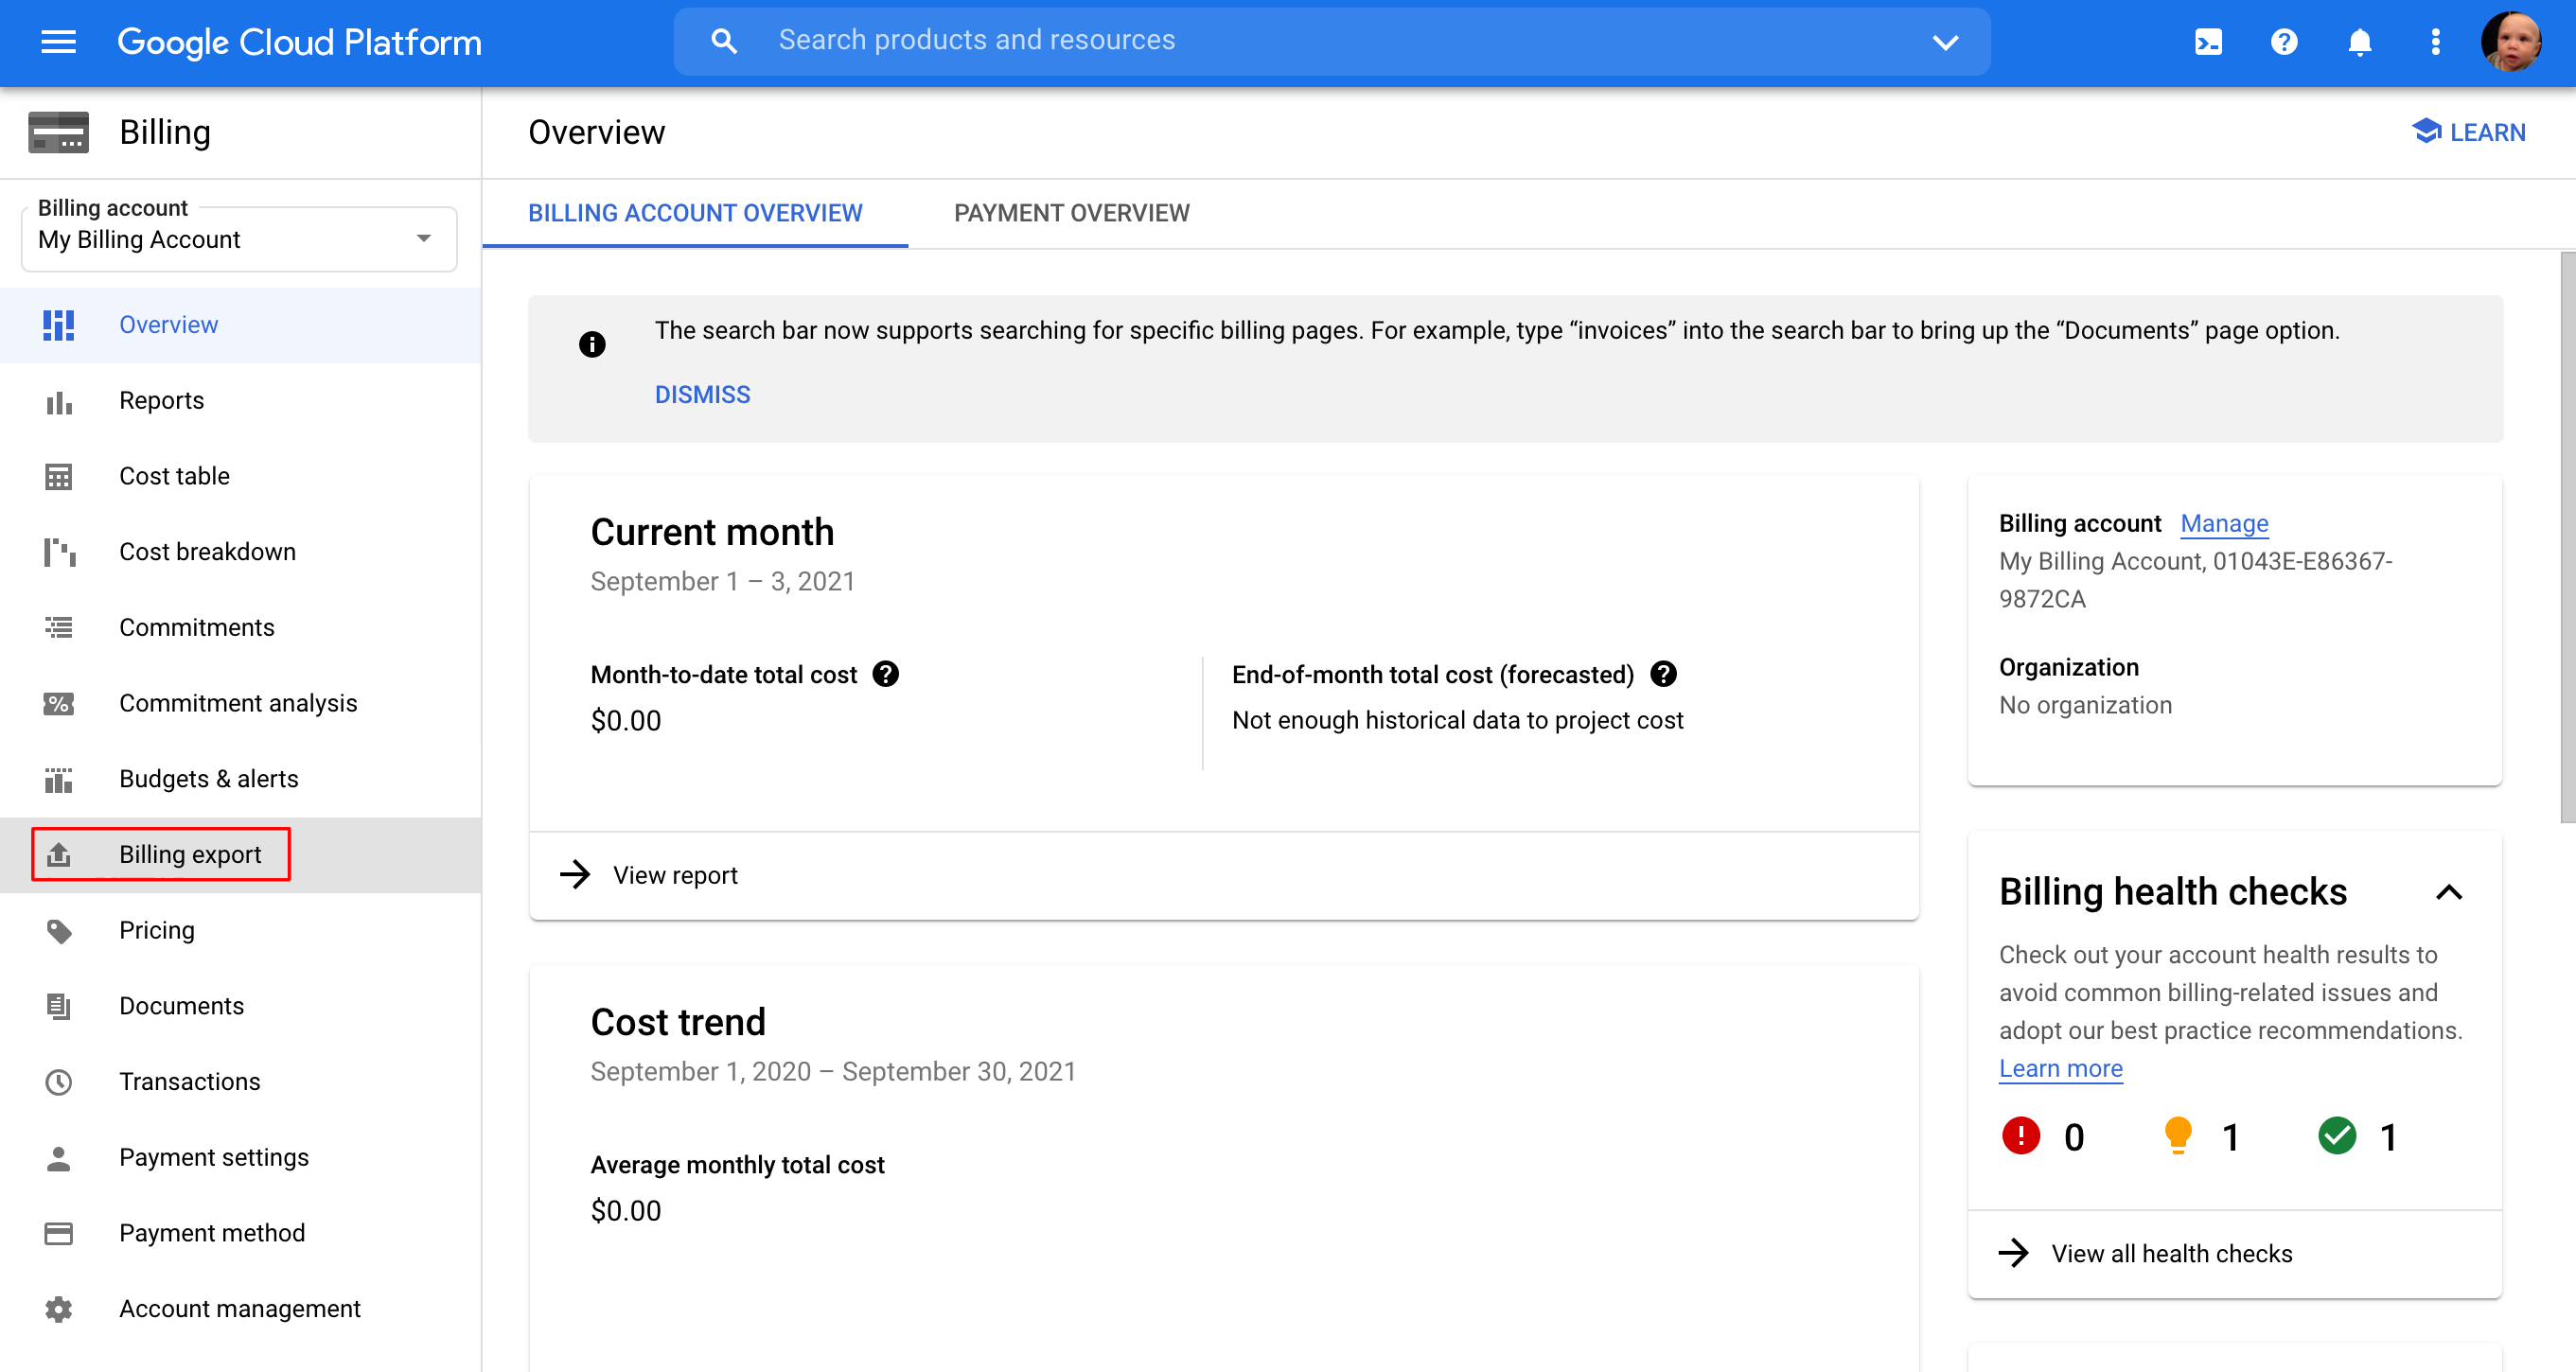
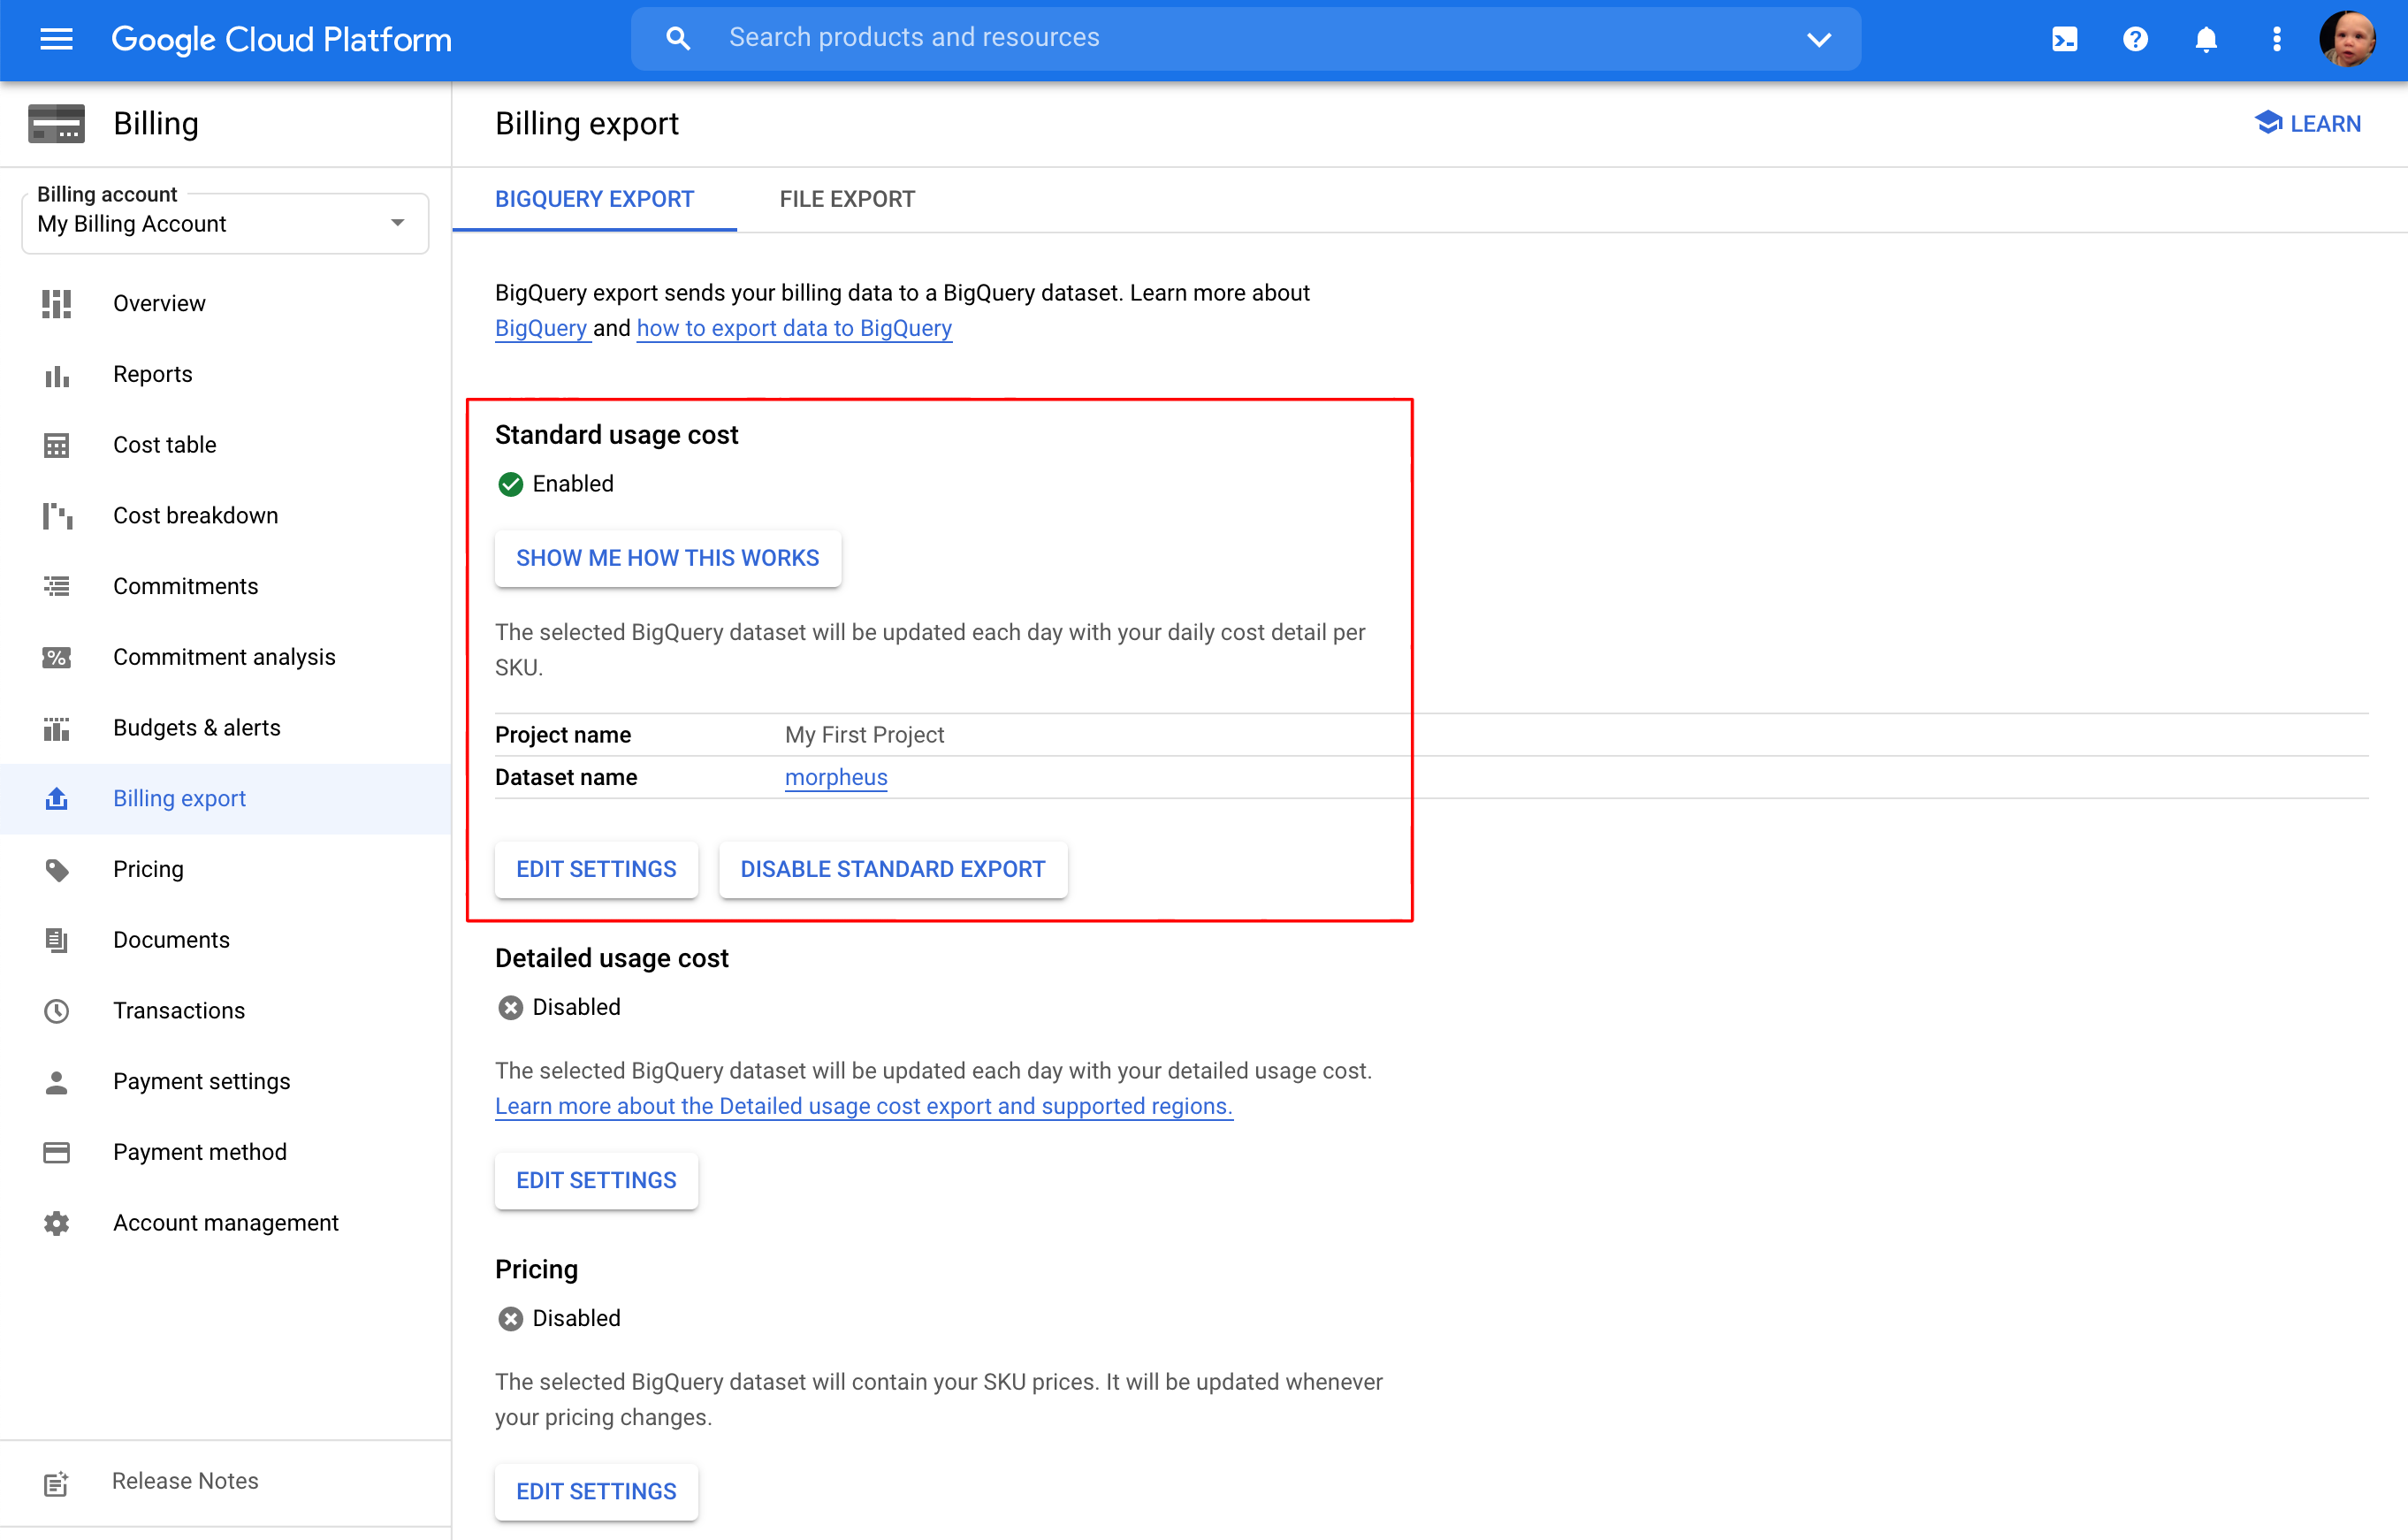
Within the Billing Account, Standard Usage Cost must be enabled for HPE Morpheus Enterprise to access costing data. From the page for the appropriate Billing Account, click on Billing Export and then click “Edit Settings” under the “Standard usage cost heading”. Specify a project and create a dataset or specify an existing one. In doing this, you’re specifying a location for the dataset which will be for the entire billing account and not just for the Project the dataset resides in.
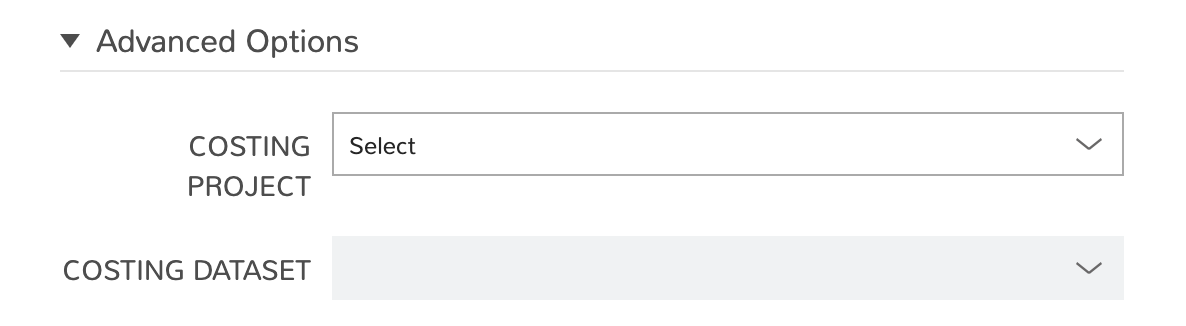
With configuration in the GCP console completed, we can now enable cost onboarding from the HPE Morpheus Enterprise side. Add or edit an existing GCP Cloud (Infrastructure > Clouds). Within the Advanced Options section, note the COSTING PROJECT and COSTING DATASET fields. When selecting a Project, associated datasets (if any) will automatically be loaded into the dropdown in the next field for selection. Additionally, the COSTING field should be set to “Sync Costing” rather than “Off”. Recall from the previous paragraph that this is merely pointing to the Project that houses the appropriate dataset. If your GCP Cloud in HPE Morpheus Enterprise is configured for all Projects, all costing data will be consumed for the Projects linked to the associated Billing Account (assuming those Projects have billing enabled). If the GCP Cloud in HPE Morpheus Enterprise is scoped to just one Project, only billing data for that Project will be onboarded. For this reason, the selected Costing Project can be (but is not necessarily) the Project to which the HPE Morpheus Enterprise Cloud is scoped.
Windows Images
HPE Morpheus Enterprise can add custom metatdata that will be injected into the unattend conf by GCP during provisioning. This is required for customizations including setting the Windows Administrator password during provisioning. GCP Windows Images must be syspreped using the GCESysprep command prior to image creation, and must have platform/os set on the Virtul Image record in HPE Morpheus Enterprise after image sync for successful customization and Agent Installation.
GCP Windows Requirements
GCP Windows Images must be syspreped using the
GCESysprepcommand prior to Image creation in GCP. Refer to Googles “creating-windows-os-image” doc.Once the Image is synced into Morpheus, the Platform (Windows, Windows 2016 etc) must be set on the HPE Morpheus Enterprise Virtual Image record, otherwise linux is assumed and the metadata will not be generated correctly.
The Global Windows “Administrator” password must be set in HPE Morpheus Enterprise under
/admin/provisioning/settings> Windows Settings > Administrator Password, or Administrator and password defined on the HPE Morpheus Enterprise Virtual Image record.Be aware the unattend configuration during startup after sysprep delays causes a reboot and a prolonged finalization process during provisioning, and console/rdp may not be available during this time as windows is configuring.
Note
Some Google provided Windows Images have slow startups that cause the Morpheus Agent service to not start within the default 30 second service startup timeframe, including after initial reboot after sysprep/unattend configuration. This can be adjusted by running New-ItemProperty -Path "HKLM:\SYSTEM\CurrentControlSet\Control\" -Name "ServicesPipeTimeout" -PropertyType DWORD -Value 180000 in powershell on the Windows Image.
Important
Failure to use a GCP Windows Image that has not been sysprepped using GCESysprep will cause Agent Installation, Automation, and Console issues as HPE Morpheus Enterprise will not be able to set user credentials and authenticate.