Jobs
Jobs are for scheduled execution of Automation Tasks and Workflows. Jobs can be set to execute on a schedule, at one specific point in time, and/or execute manually (on-demand). Jobs are linked to existing Tasks or Workflows, and allow for custom configuration options. Jobs can be associated with Instances, Servers, or have no association, such as a job for an SSH task.
Jobs allow for scheduled execution of nearly anything as Tasks Types include Bash, Powershell, HTTP/API, Ansible, Chef, Puppet, Groovy, Python, jRuby, Javascript, and library scripts and templates, which can be configured for resource, remote, or local execution targets. If you need something to execute on a schedule, HPE Morpheus Enterprise Jobs can deliver.
Jobs are configured in the JOBS tab, and the JOB EXECUTIONS tab contains Job execution history with result output.
Jobs
Required Role Permissions Click to Expand/Hide
Provisioning: Jobs
None: Cannot access Provisioning > Jobs > Jobs tab
Read: Can access Provisioning > Jobs > Jobs tab but cannot create, edit, or delete Jobs
Full: Full permissions to create, view, edit, and delete Jobs
Provisioning: Job Executions
None: Cannot access Provisioning > Jobs > Job Executions tab
Read: Can access and view Provisioning > Jobs > Job Executions tab including job execution history, status, and Job output
Creating Jobs
Note
Jobs require existing Tasks or Workflows. See the appropriate section of HPE Morpheus Enterprise docs for more on creating Tasks and Workflows.
To create a new Job:
Navigate to Provisioning > Jobs
Select + ADD
Enter the following
NAME: Name of the Job in HPE Morpheus Enterprise
JOB TYPE: A Task Job will execute a selected Task, a Workflow Job will execute a selected Workflow
ENABLED: When checked, the Job will run as scheduled
Select NEXT
Configure the Job
- Task Jobs
TASK: Select target Task. If relevant to the Task, Input fields will be presented
- SCHEDULE:
Manual: Job is not scheduled but can be executed from Provisioning > Jobs and selecting Actions > Execute
Date And Time: Job will be executed at one specific point in time and not again (unless rescheduled or executed manually)
Schedule: Select a configured Execution Schedule. Execution Schedules are created in Library > Automation > Execute Scheduling
Note
HPE Morpheus Enterprise provides two default execution schedules,
Daily at MidnightandWeekly on Sunday at Midnight. Any additional schedules were created by a User. Additional schedules can be added in Library > Automation > Execute SchedulingINCLUDE POWER STATE: Select All, On, or Off. The default configuration is “All” and indicates the Job will run on all relevant Instances or servers at the proper schedule time. Selecting “On” or “Off” indicates the Job should only run against targets specifically having either an on or off power state
CONTEXT TYPE: Server or Instance
CONTEXT SERVER/INSTANCE: Select the Server or Instance you wish to target with the Job
RUN NOW: When checked, the Job will execute on save regardless of
SCHEDULEsetting.
- Workflow Jobs
WORKFLOW: Select target Workflow. If relevant to the Workflow, Input fields will be presented
- SCHEDULE:
Manual: Job is not scheduled but can be executed from Provisioning > Jobs and selecting
Actions > ExecuteDate And Time: Job will be executed at one specific point in time and not again (unless rescheduled or executed manually)
Schedule: Select a configured Execution Schedule. Execution Schedules are created in Library > Automation > Execute Scheduling
Note
HPE Morpheus Enterprise provides two default execution schedules,
Daily at MidnightandWeekly on Sunday at Midnight. Any additional schedules were created by a User. Additional schedules can be added in Library > Automation > Execute Scheduling
INCLUDE POWER STATE: Select All, On, or Off. The default configuration is “All” and indicates the Job will run on all relevant Instances or servers at the proper schedule time. Selecting “On” or “Off” indicates the Job should only run against targets specifically having either an on or off power state
CONTEXT TYPE: Server or Instance
CONTEXT SERVER/INSTANCE: Select the Server or Instance you wish to target with the Job
RUN NOW: When checked, the Job will execute on save regardless of
SCHEDULEsetting.
Select NEXT
Select COMPLETE
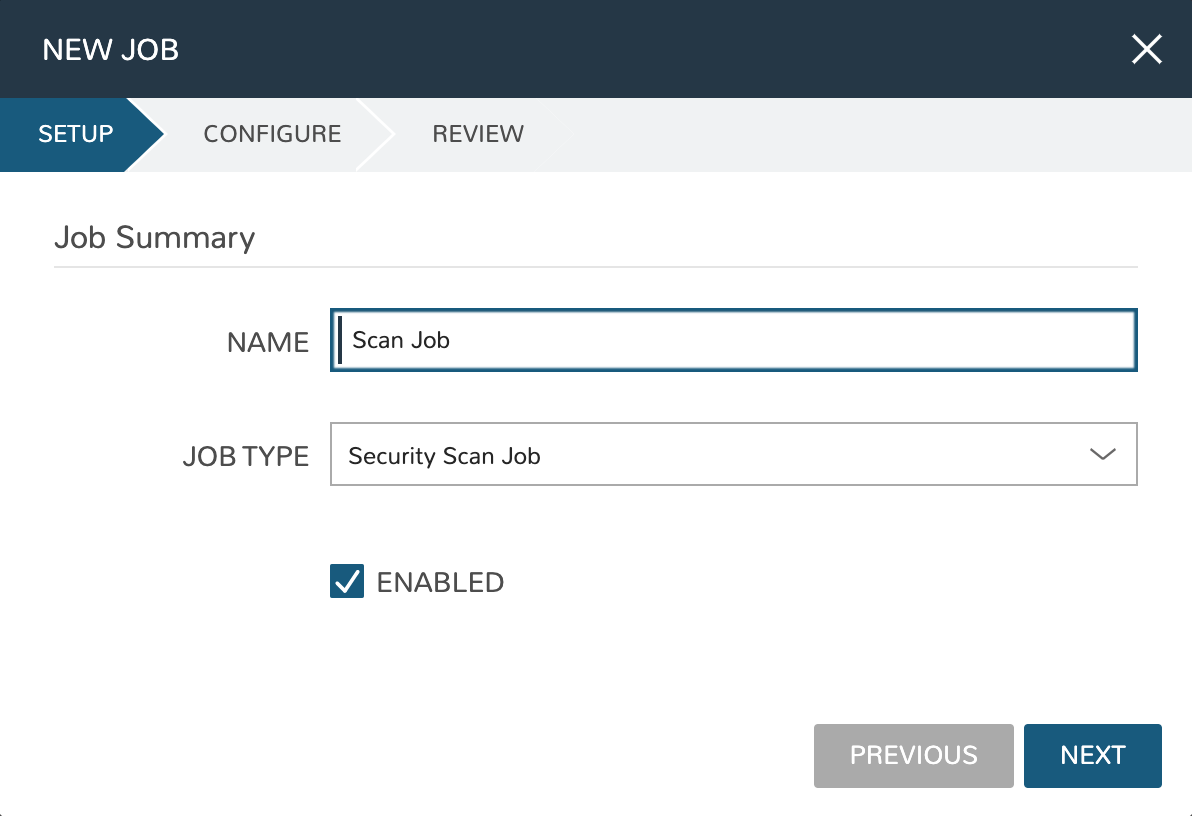
Creating and Running Security Scan Jobs
Security Scan Jobs allow users to create and schedule SCAP program (Security Content Automation Program) scans for groups of managed systems. These Jobs can call in existing SCAP packages and checklists, which are used to scan the targeted systems on-demand or on a scheduled basis. Historical data for these scans is saved in the Job Execution list and in the software section of server detail pages. Detailed scan reports can also be viewed for each system as needed once the scan is complete. See the SCAP documentation on the NIST website for information on developing your own scanning procedures.
Note
Creating and editing Security Scan Jobs requires the “Security: Scanning” Role permission set to Full. Viewing Security Scan Jobs and seeing the results for scanned servers requires at least a Read-level permission.
Add a new Security Scan Job
Note
New security scan packages are added in HPE Morpheus Enterprise Library rather than here in the Jobs section. Ensure you have uploaded the desired security package in Library > Templates > Security Packages before proceeding with new security Job creation.
Navigate to Provisioning > Jobs > Jobs Tab
Click +ADD
Set the Job type to “Security Scan Job” and provide a friendly name for the Job
Click NEXT
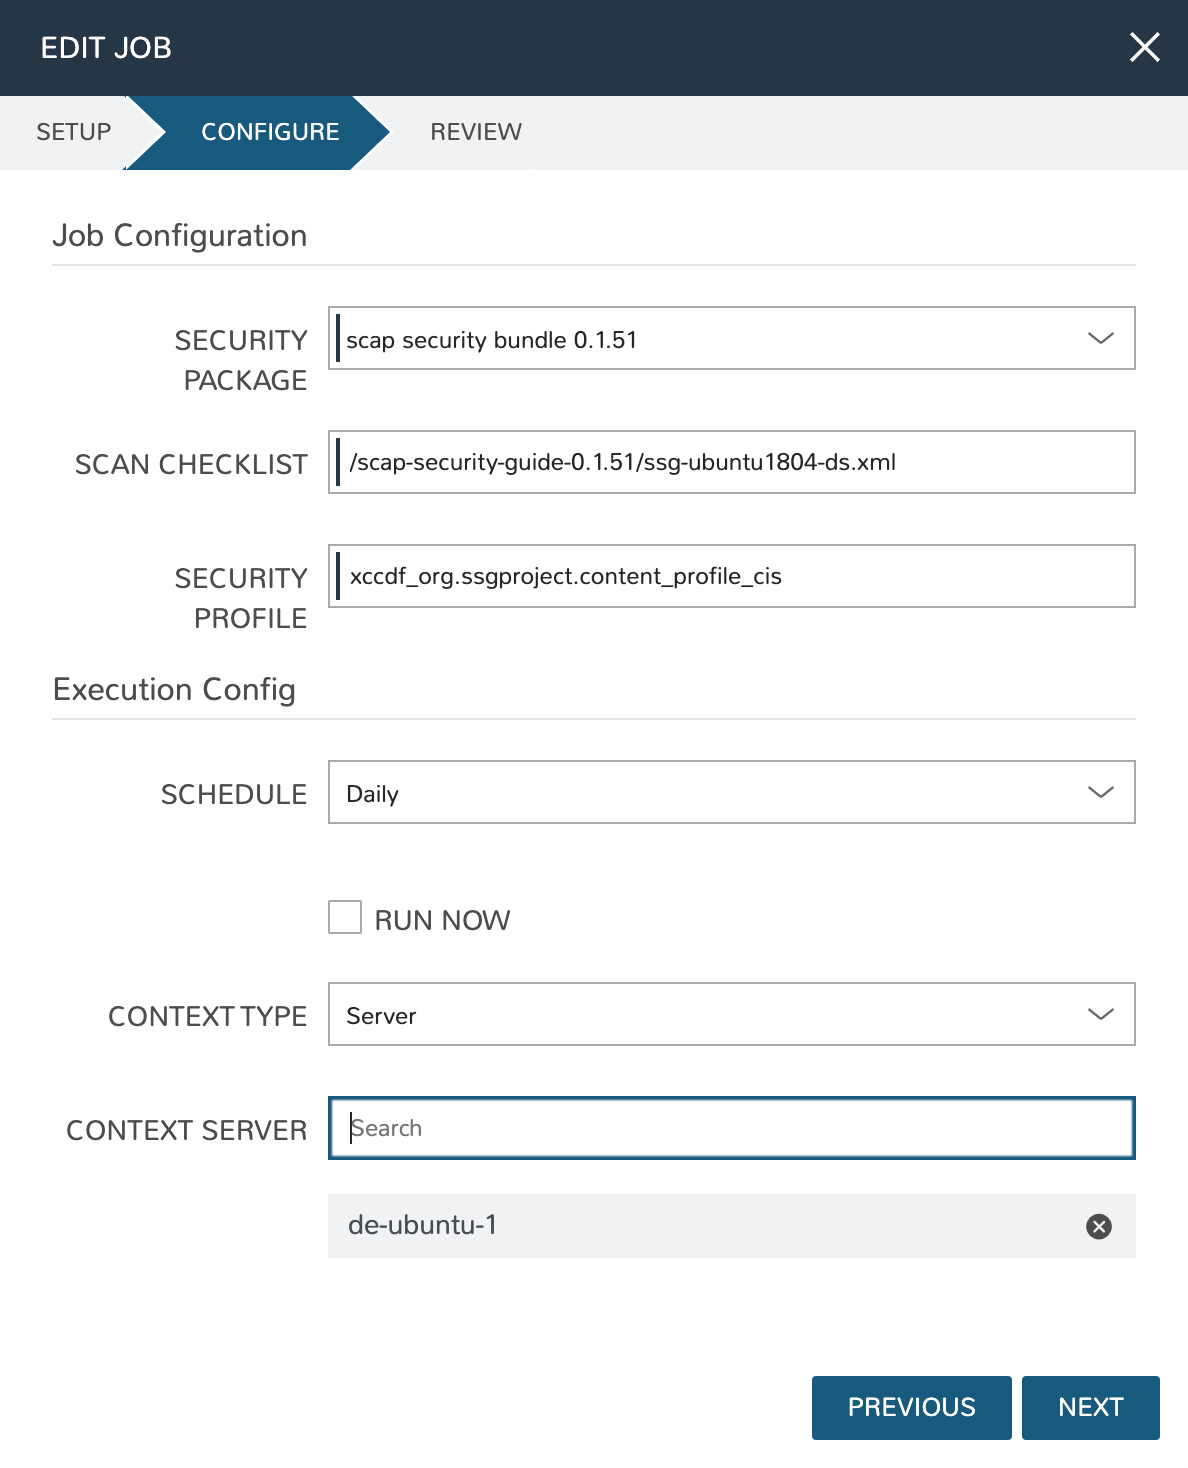
Select a security package, see the previous section to add a new one
Enter your Scan Checklist (XML document) and Security Profile (XCCDF document), more information on these can be found in the SCAP documentation linked above
Set a schedule or leave as Manual to only run this scan on-demand (new execution schedules can be created in Library > Automation if needed)
Set a specific power state target if desired. This indicates whether the Job should run against workloads having any power state, just an “on” power state, or just an “off” power state
Set the context, can be Instance or Server. Select as many Instances or Servers as needed for this scanning run
Click NEXT
After final review, click COMPLETE
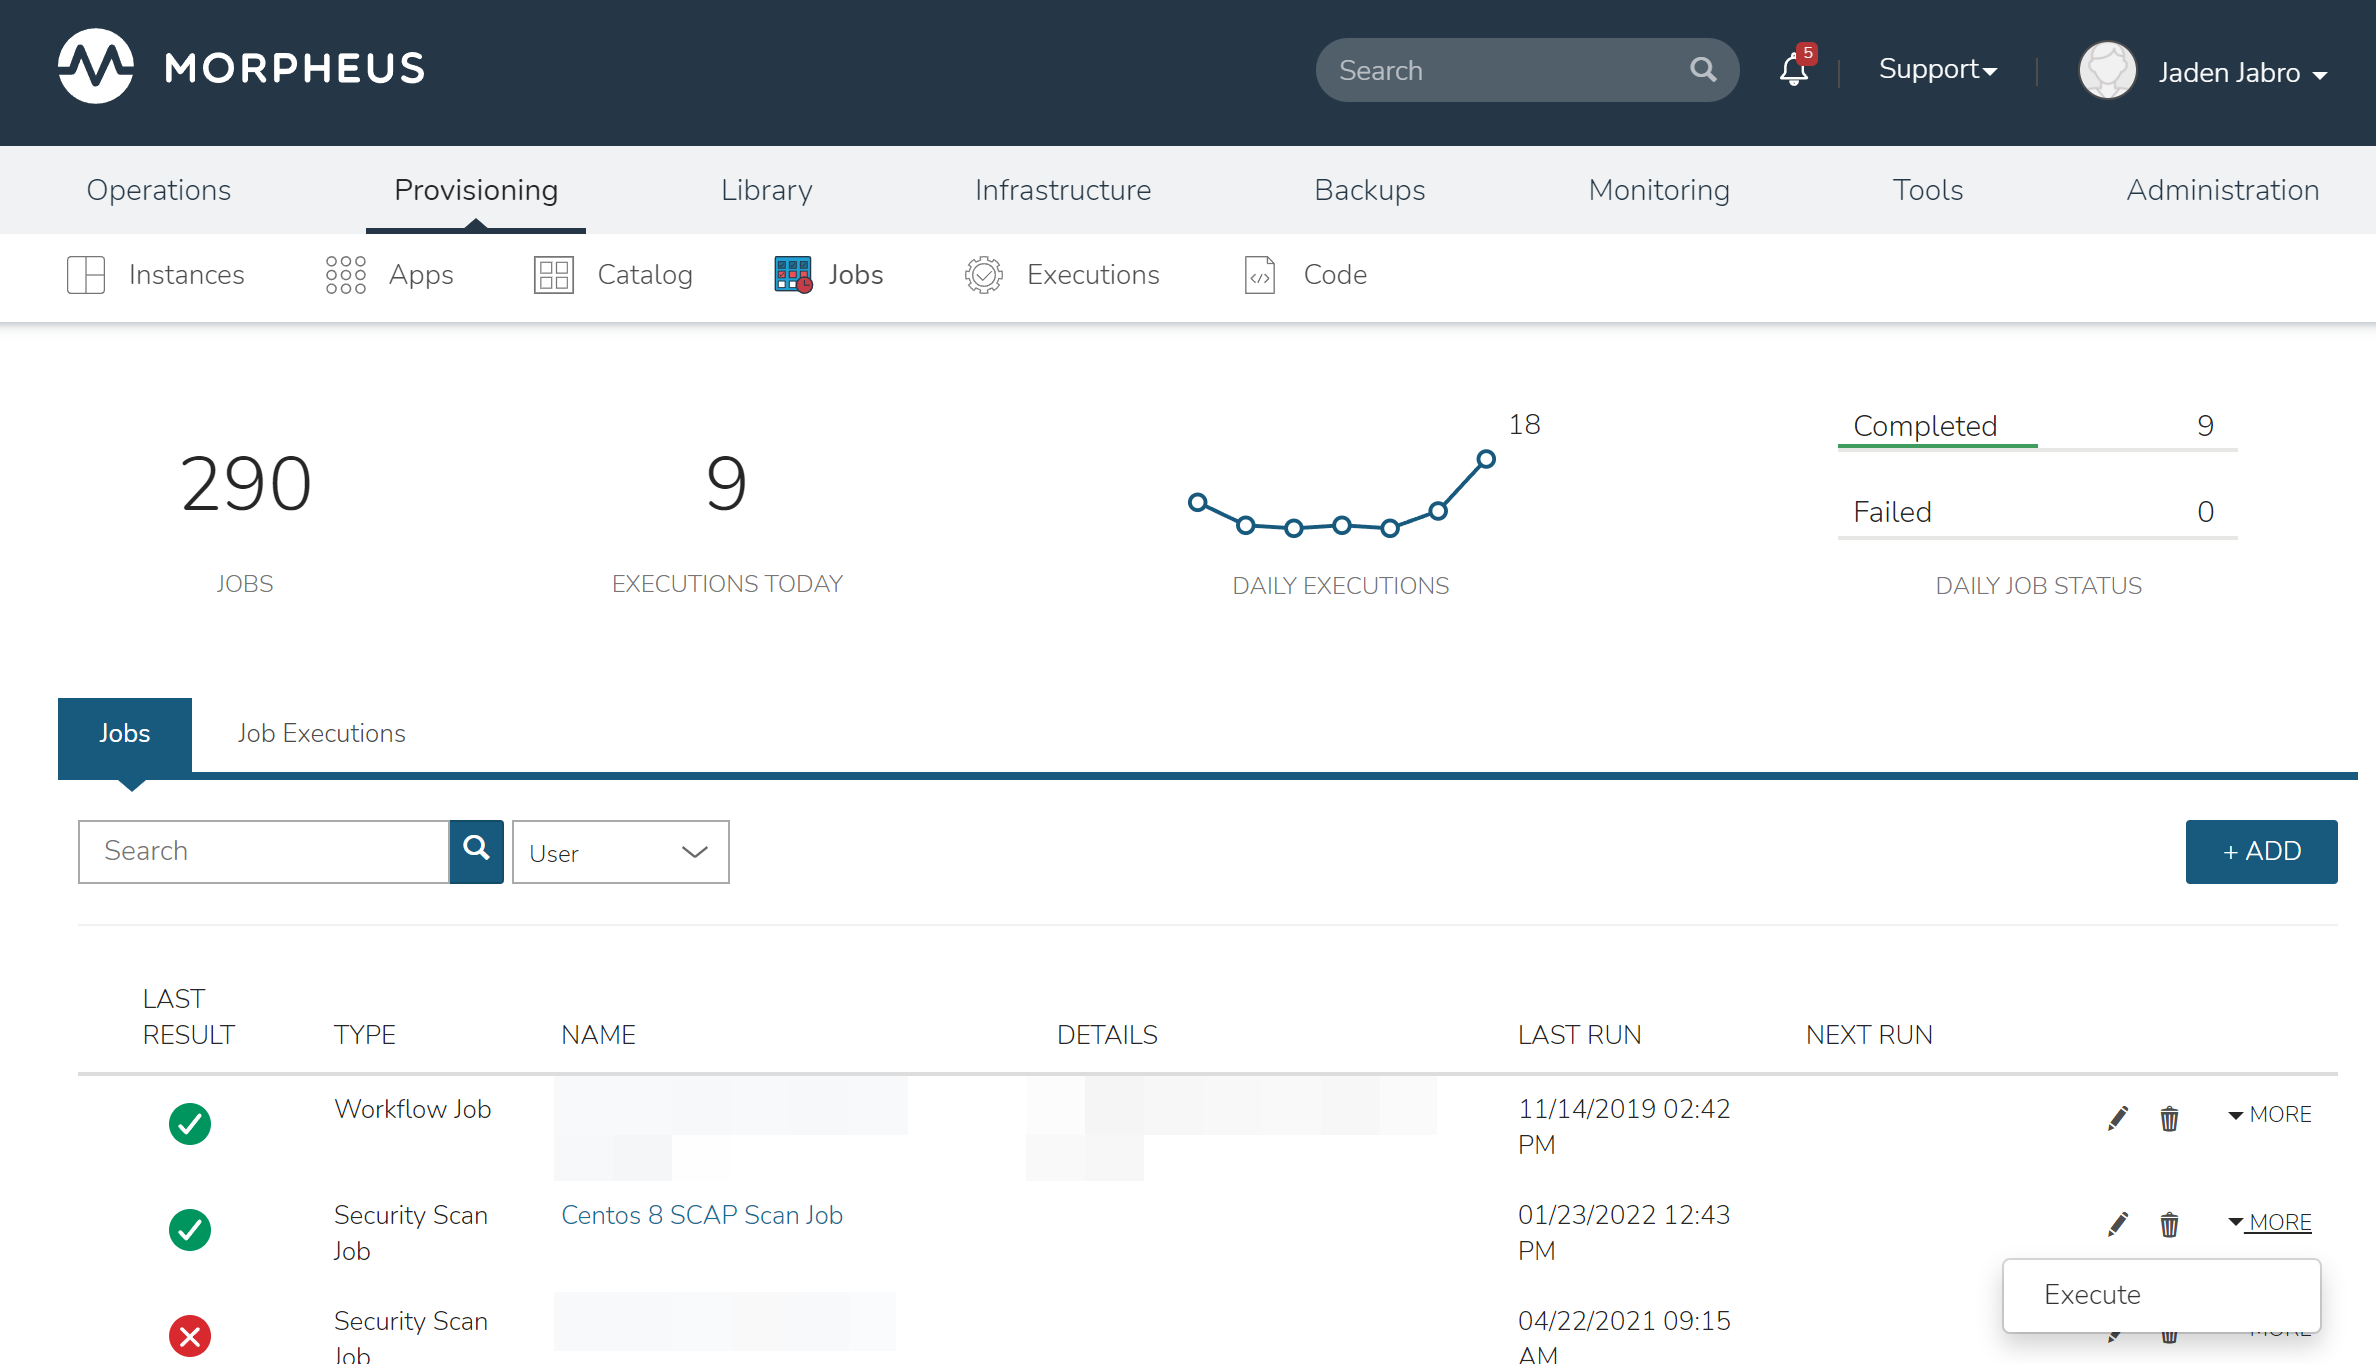
Running Security Scan Jobs
Once created, Security Scan Jobs will run based on the configured schedule. They can also be run on-demand when needed:
Navigate to Provisioning > Jobs > Jobs Tab
Click MORE
Click “Execute”
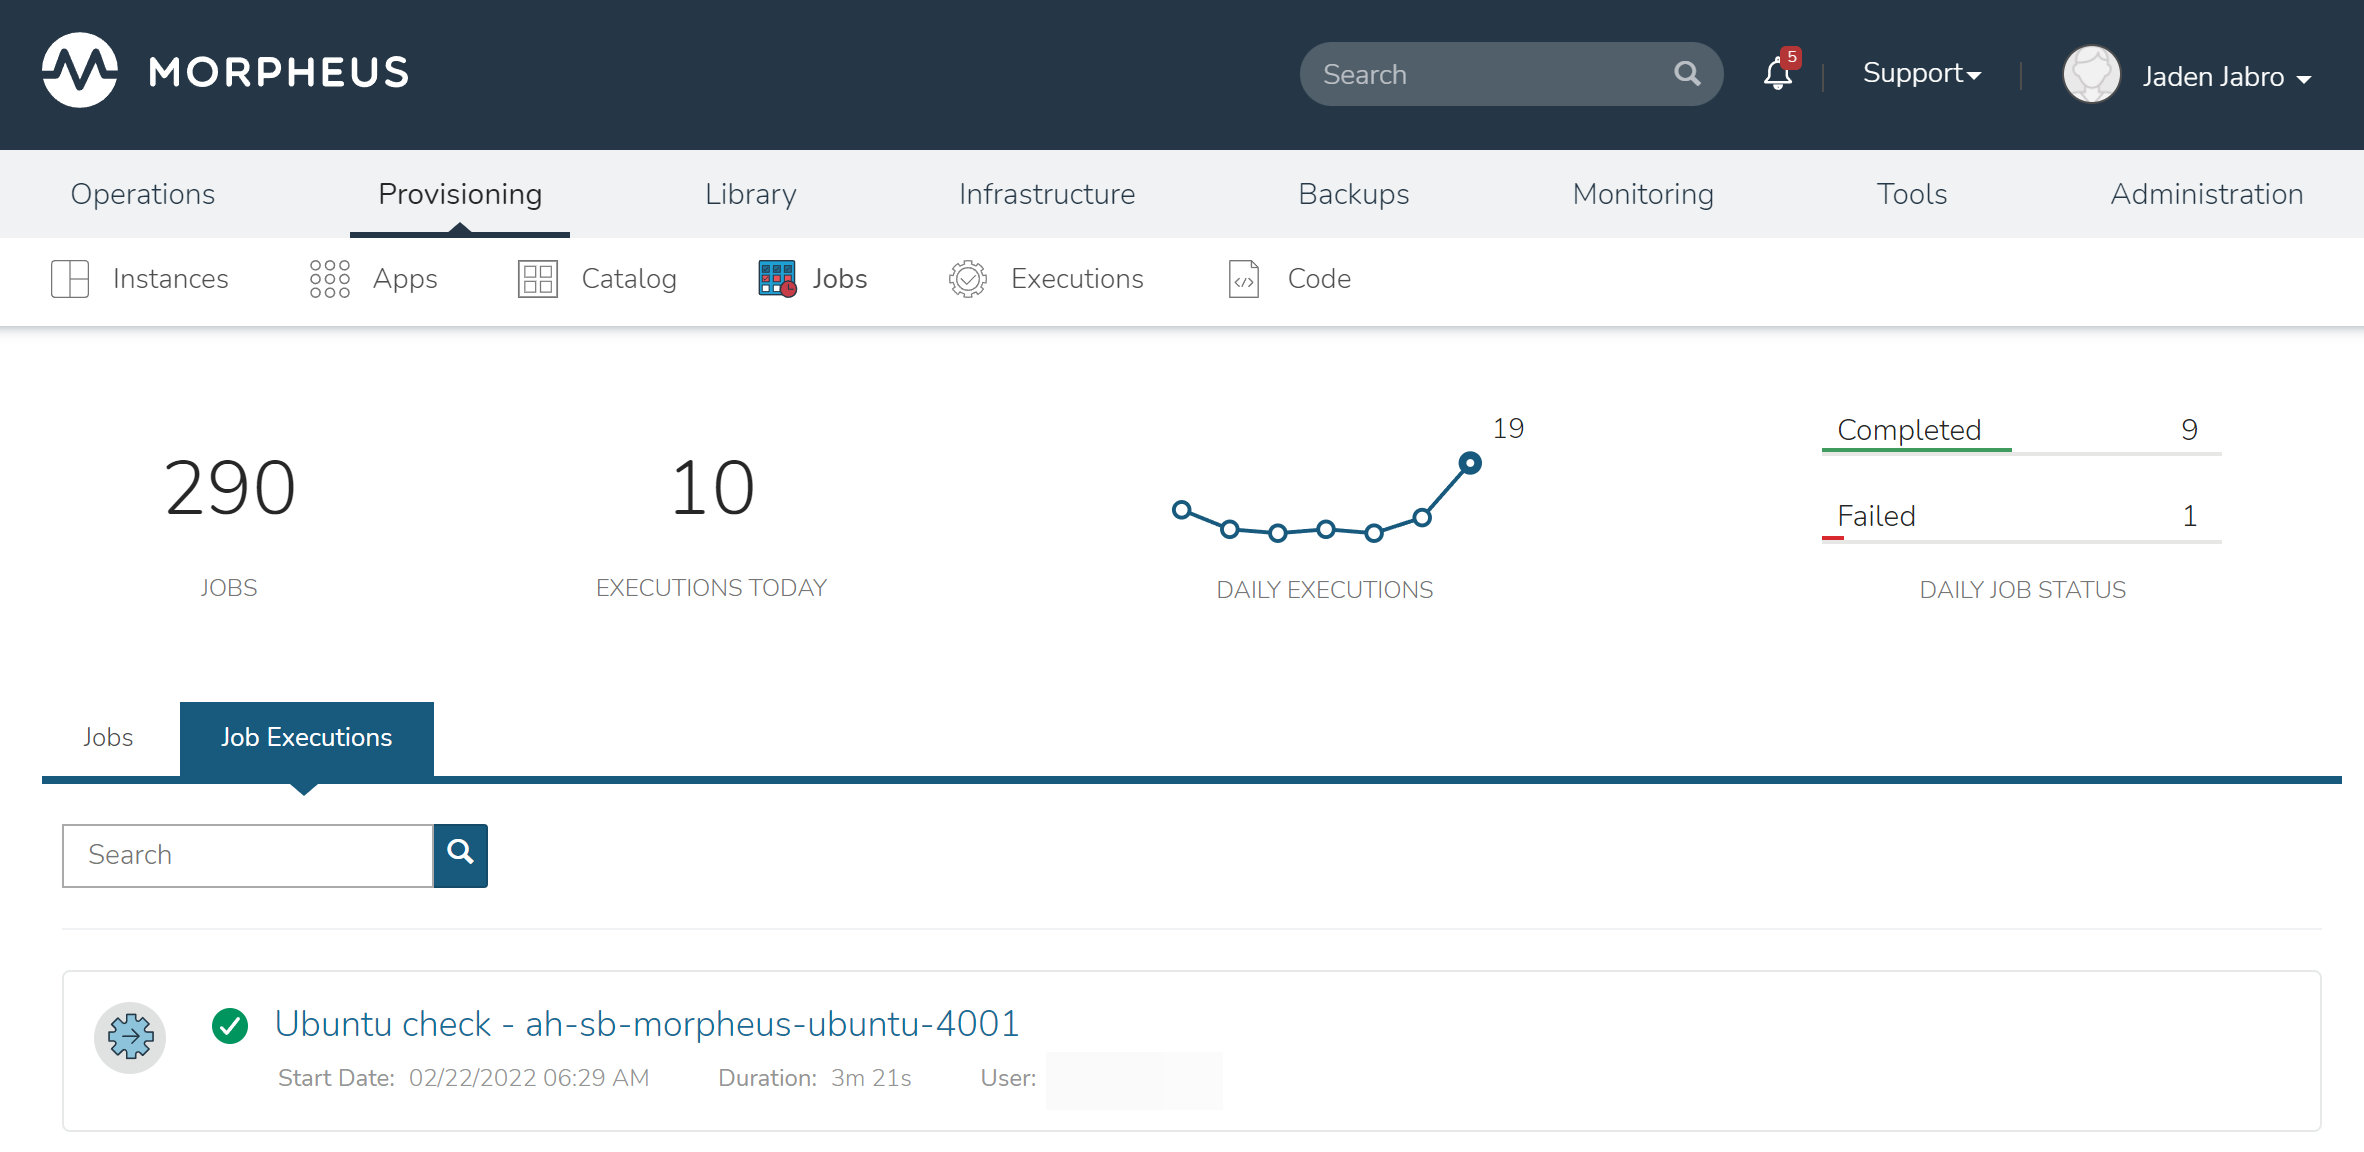
Viewing Completed Security Scan Jobs
To view a list of completed Security Scan Jobs (and Jobs of other types):
Navigate to Provisioning > Jobs > Job Executions Tab
Additional details can be viewed by clicking (i)
To view scan results for specific servers:
Navigate to the server detail page (Infrastructure > Hosts > Virtual Machines tab > Selected server)
Click on the Software tab part way down the page, then click on the Security subtab
High level details on previous scans is viewable here
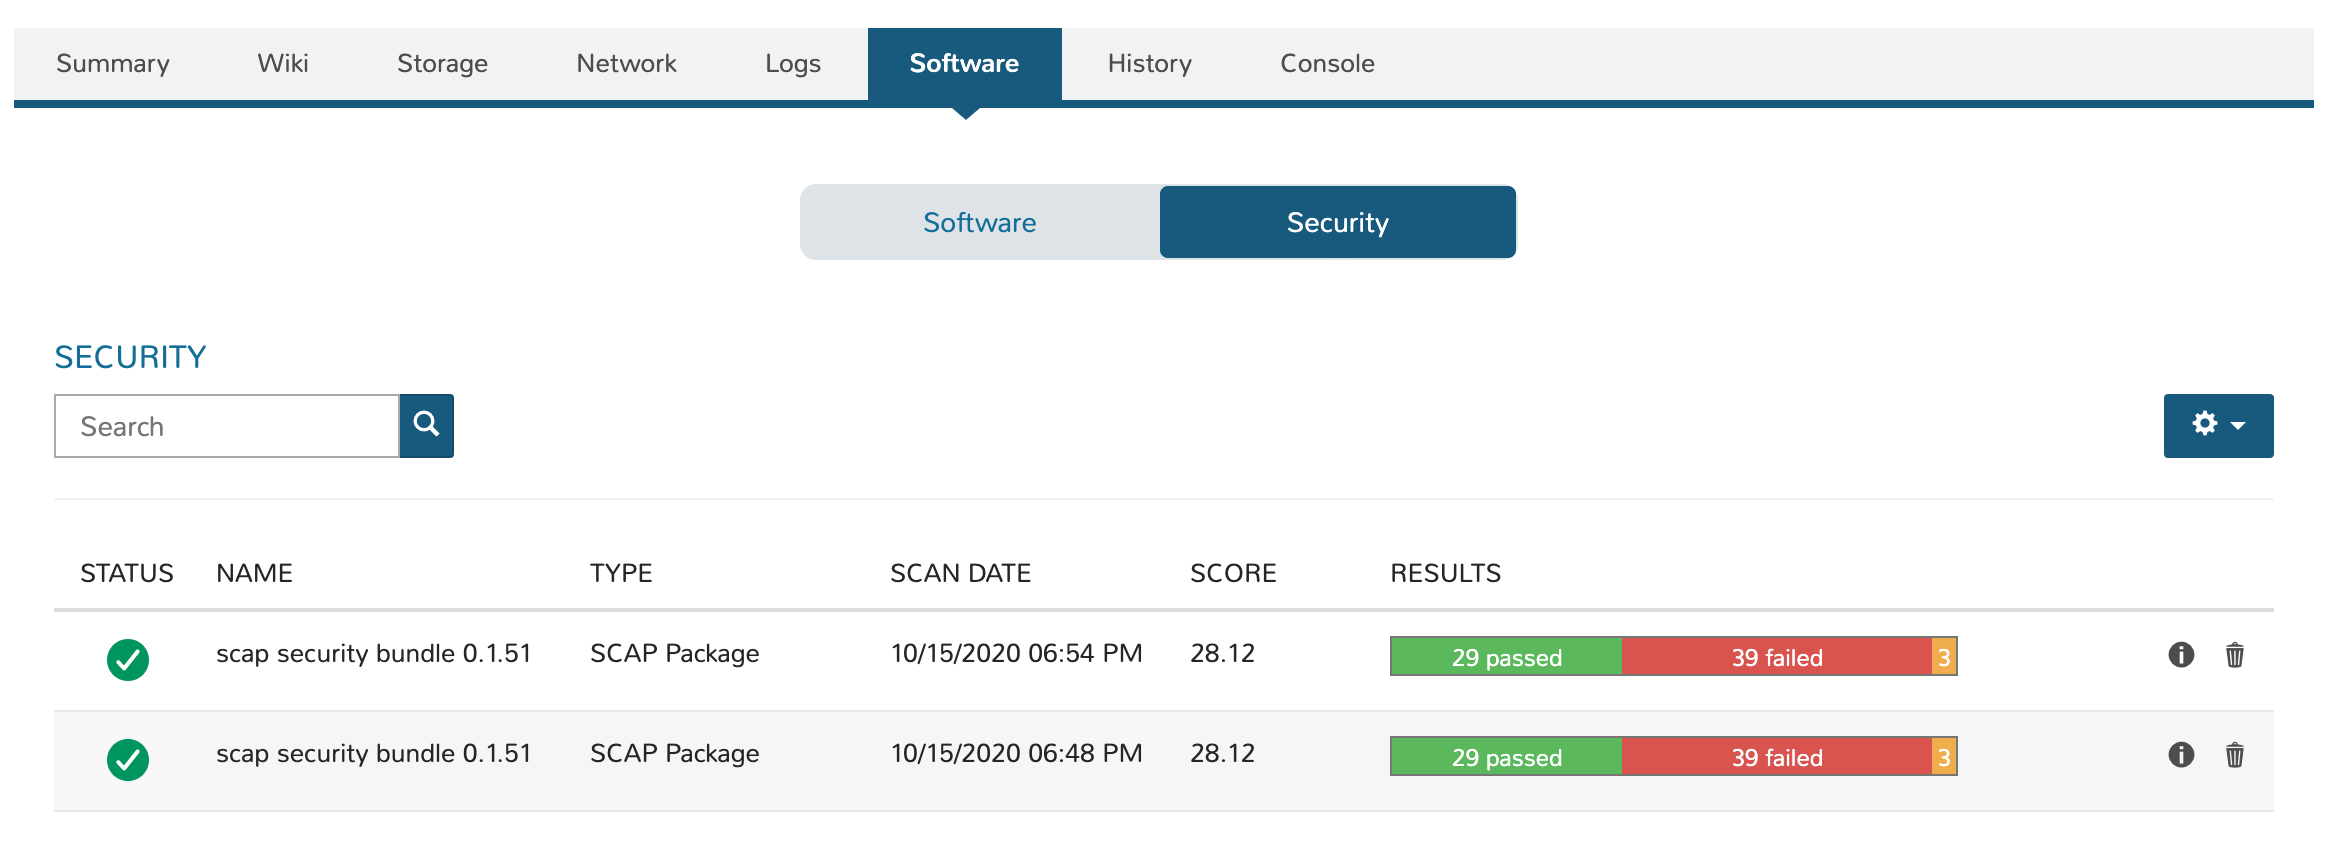
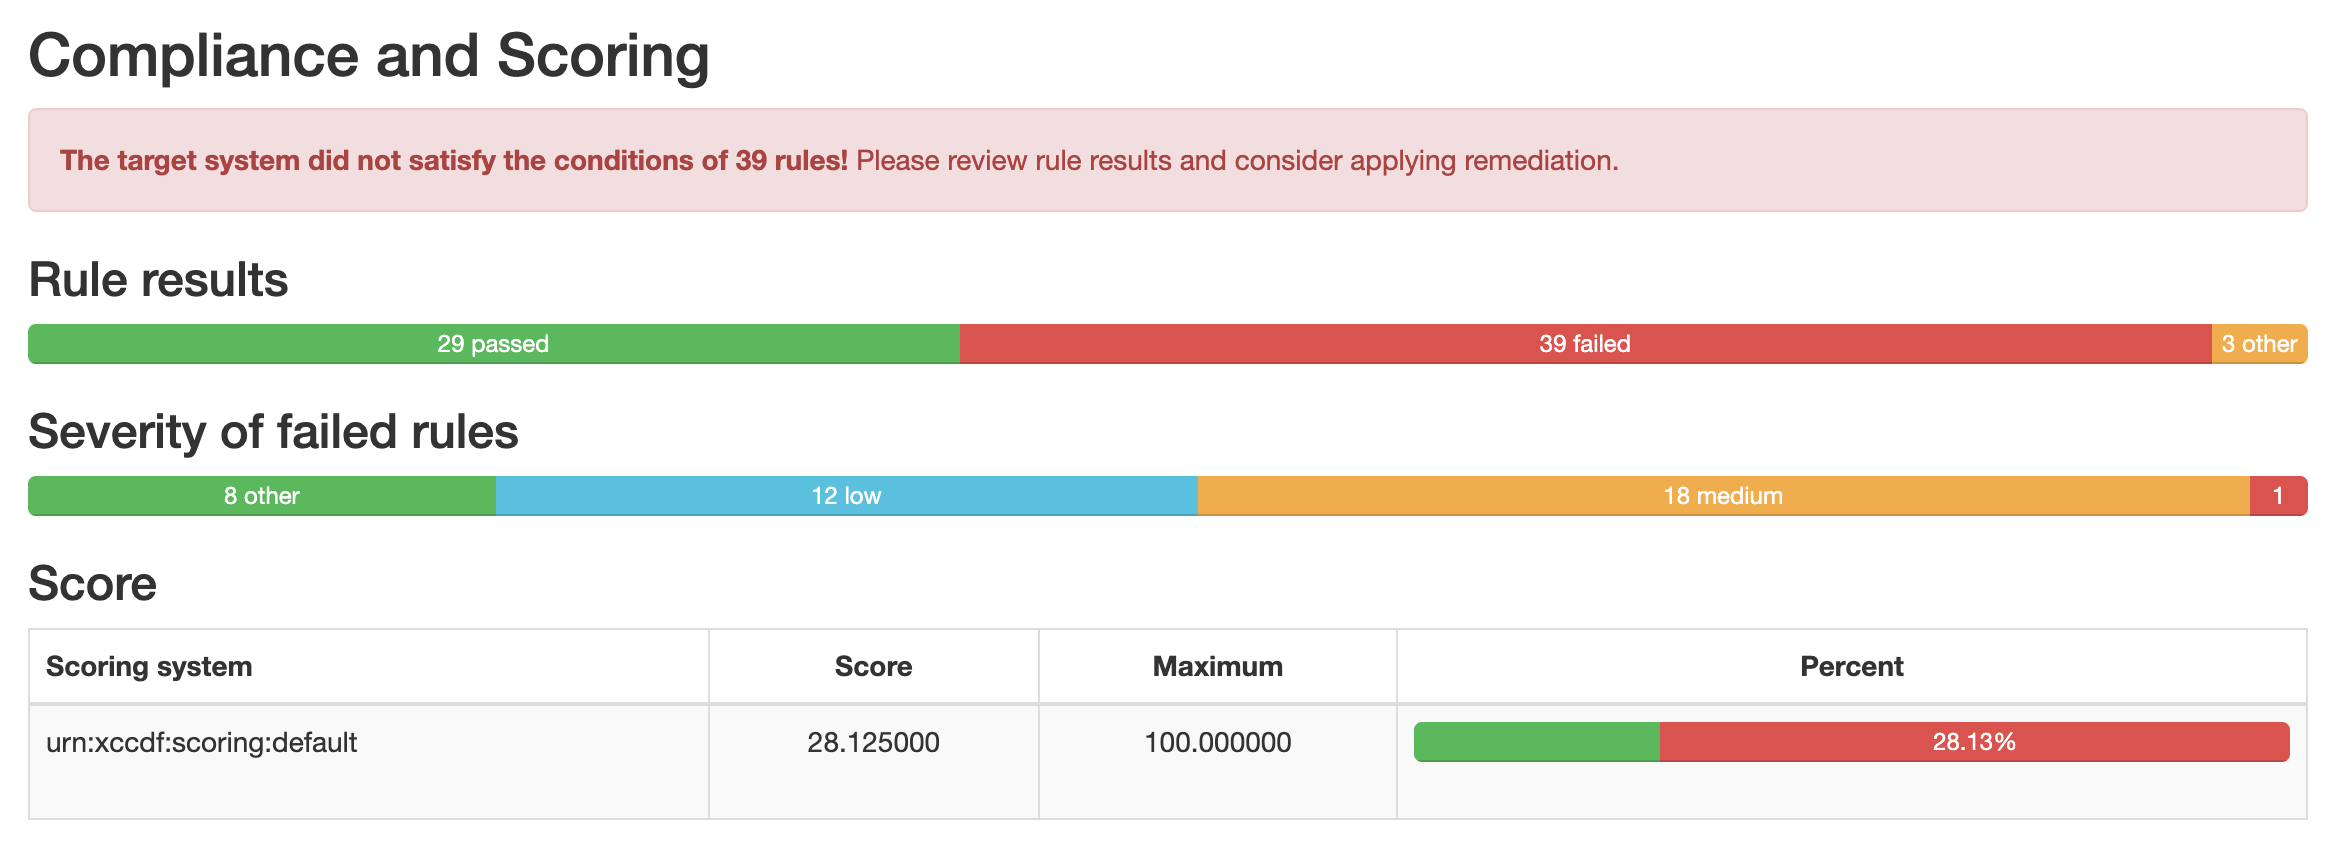
To view the full report, click (i)
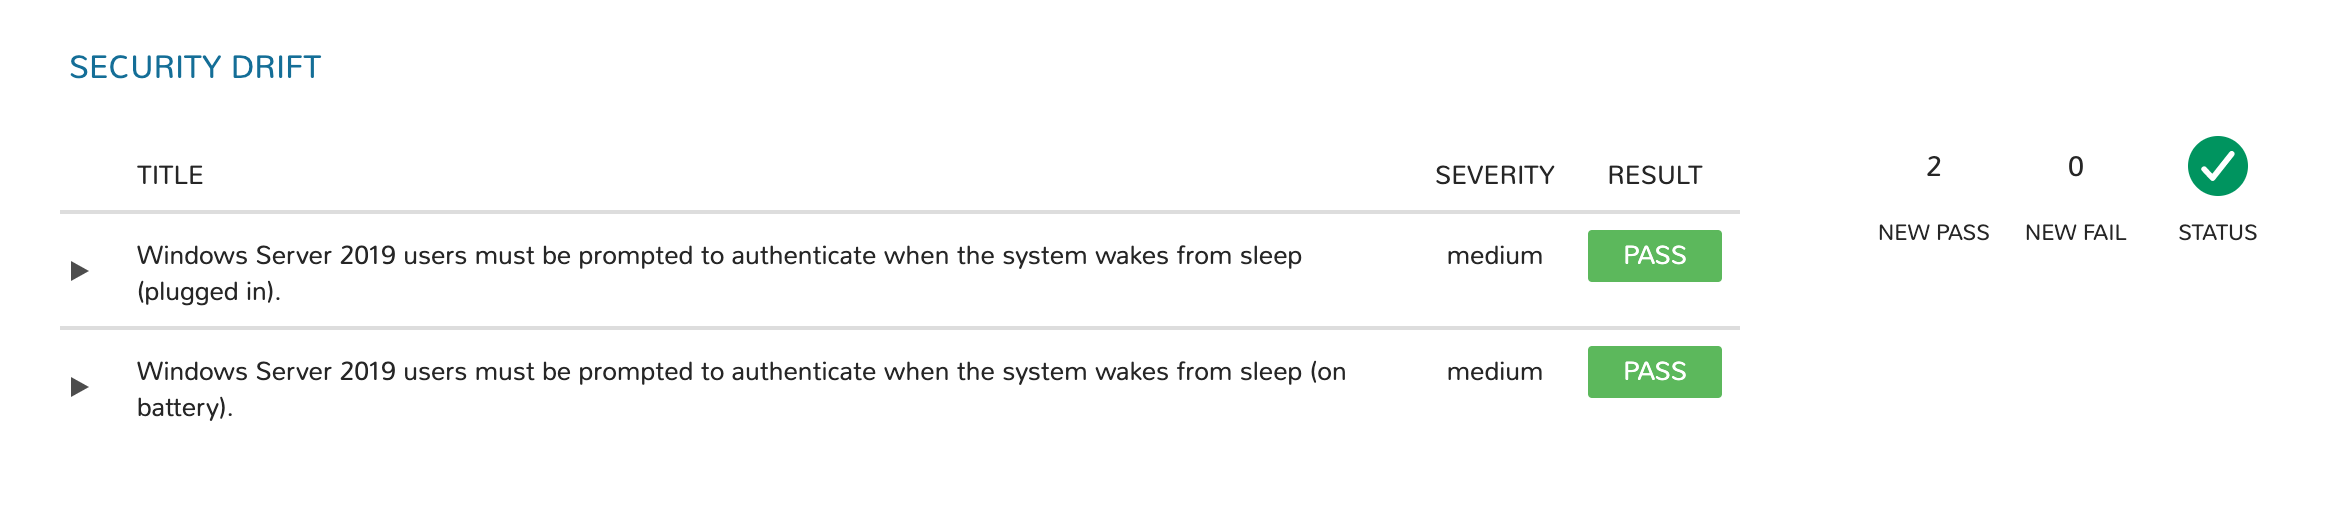
Security Drift
In addition to tracking the scan results over time as described in the previous section, HPE Morpheus Enterprise also provides detail into the change from the most recent scan to the one prior. This information is displayed in the Software tab (and Security subtab) of the detail page for the virtual machine (accessed from the associated Instance detail page or at Infrastructure > Hosts > Virtual Machines). The information surfaced by this view is listed below. If there is no change, you’ll simply see a “No Drift” message.
Title: The criteria for the test that has newly passed or failed
Severity: The severity level for the indicated security requirement
Result: The indicator for whether this test has newly passed or failed
New Pass: The number of tests that have newly passed compared to the prior scan
New Fail: The number of tests that have newly failed compared to the prior scan
Status: An indicator of the change in security posture since the prior scan. A net gain in test failures will yield a negative status indicator while net gains in passed tests (or no change) will yield a positive status indicator
Job Executions
Required Role Permissions Click to Expand/Hide
Access and capabilities for the Job Executions section is determined by the following role permissions:
- Role: Feature Access:
Provisioning: Job Executions None: Cannot access Provisioning: Job Executions section
Read: Can access Provisioning: Job Executions section
The Job Executions tab contains execution history of completed Jobs, including any process outputs and error messages. Information included in the Job Executions list includes:
Execution Status Icon
Job Name - Task Name - Result Error Message: The title of each execution includes the Job Name, Task or Workflow name (for Task and Workflow job types), and execution result error messages (when applicable) separated by hyphens (-). The title also links to the Job Execution detail page
Start Date: The date and time the Job Execution kicked off. When expanded, the start date and time of each individual Task are also shown
Duration: The time taken for the Job to complete. When expanded, the time to complete each individual Task is also shown
User: The user who executed or scheduled the Job
Additional details and actions are available per execution:
Select an execution name to go to the Job Execution Detail page
Select the ⌃ icon at the end of the row to expand the execution and view additional details, including task process output
Select the 📋 icon to copy process output to local clipboard
Select the ⌄ icon at the end of an expanded to to collapse additional execution details