SAML Integration
Overview
The HPE Morpheus Enterprise SAML identity source integration allows customers to add user SSO to HPE Morpheus Enterprise, authenticated by external login SAML providers.
Adding a SAML Integration
To add a SAML integration:
Navigate to Administration > Tenants
Select a tenant.
Select IDENTITY SOURCES in the Tenant detail page
Select + ADD IDENTITY SOURCE.
Select SAML SSO from the TYPE field
Add a Name and optional Description for the SAML integration
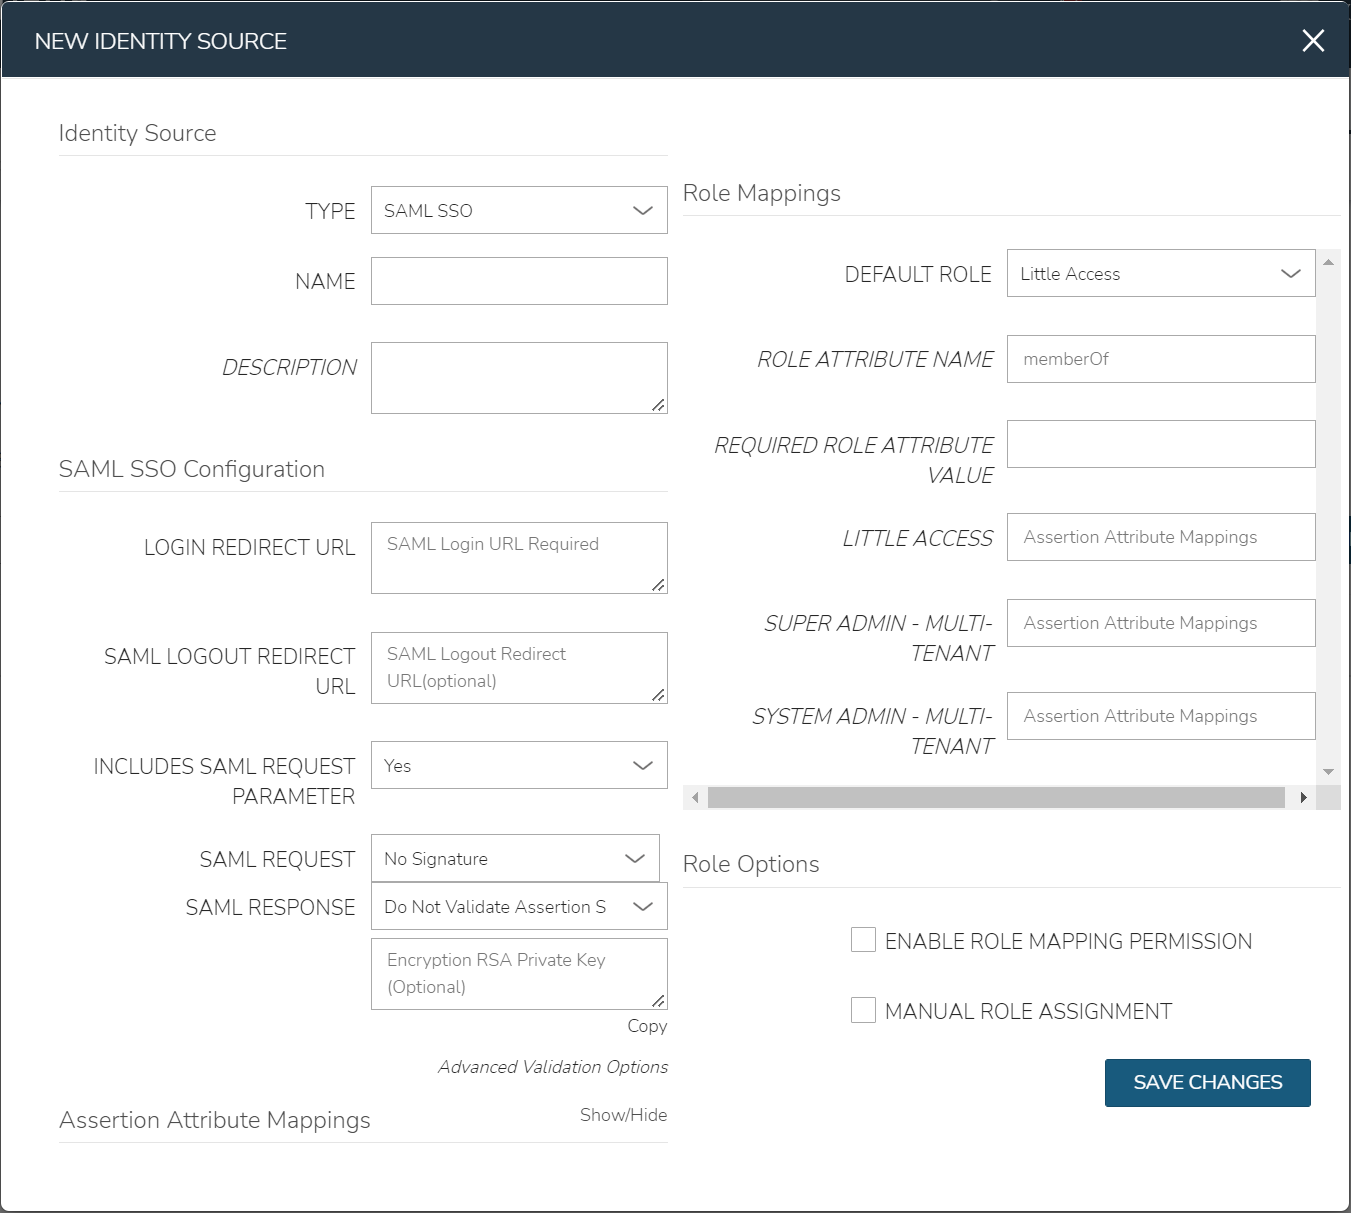
There are 4 sections with fields that need to be populated depending on the desired configuration:
SAML Configuration
Role Mappings
Role Options
Assertion Attribute Mappings
SAML Configuration
- LOGIN REDIRECT URL
This is the SAML endpoint HPE Morpheus Enterprise will redirect to when a user signs into HPE Morpheus Enterprise via SAML
- SAML LOGOUT REDIRECT URL
The URL HPE Morpheus Enterprise will POST to when a SAML user logs out of HPE Morpheus Enterprise
- INCLUDES SAML REQUEST PARAMETER
Yes (recommended) - the AuthN request will be sent via the ?SAMLRequest= parameter in the URL (GET)
No - the AuthN request will be submitted in the body of the request (POST)
Note
The SAML SP documentation should mention which binding to use but GET is most common
- SAML REQUEST
No Signature - No signature is used on the SAML request
Self Signed - A self-signed X.509 Certificate is gentered after clicking SAVE CHANGES. This signature value can be used by the SAML SP to verify the authenticity of the request
Custom RSA Signature - Import a custom RSA Private Key and respective X.509 Certificate. This signature value can be used by the SAML SP to verify the authenticity of the request
- SAML RESPONSE
Do Not Validate Assertion Signature - The SAML response signature from the SAML SP will not be validated
Validate Assertion Signature - The SAML reponse signature from the SAML SP will be validated. Enter the SAML SP X.509 certificate in the Public Key field. This must be in PEM format
Important
Setting SAML REQUEST to “No Signature” and SAML RESPONSE to “Do Not Validate Assertion Signature” is allowed but not recommended for security reasons.
Role Mappings
- DEFAULT ROLE
Role any SAML user will be assigned by default
- ROLE ATTRIBUTE NAME
The name of the attribute/assertion field that will map to HPE Morpheus Enterprise roles, such a MemberOf
- REQUIRED ROLE ATTRIBUTE VALUE
Attribute/assertion value that a user must be assigned/a member of to be authorized, such as group or role in the SAML SP. This is obtained from the attribute/assertion defined in the ROLE ATTRIBUTE NAME field
- <HPE Morpheus Enterprise ROLE NAME>
Additional roles that can be mapped to a user, which will add to the DEFAULT ROLE. Attribute value that a user must be assigned/a member of to be authorized, such as group or role in the SAML SP. This is obtained from the attribute/assertion defined in the ROLE ATTRIBUTE NAME field
Note
For more on Identity Source role mapping permissions, see the associated guide in our KnowledgeBase.
Role Options
- ENABLE ROLE MAPPING PERMISSION
When selected, Tenant users with appropriate rights to view and edit Roles will have the ability to set role mapping for the Identity Source integration. This allows the Tenant user to edit only the role mappings without viewing or potentially editing the Identity Source configuration.
- MANUAL ROLE ASSIGNMENT
When selected, administrators can manually edit Roles for users created through this identity source integration from the user detail page (Administration > Users > Selected user).
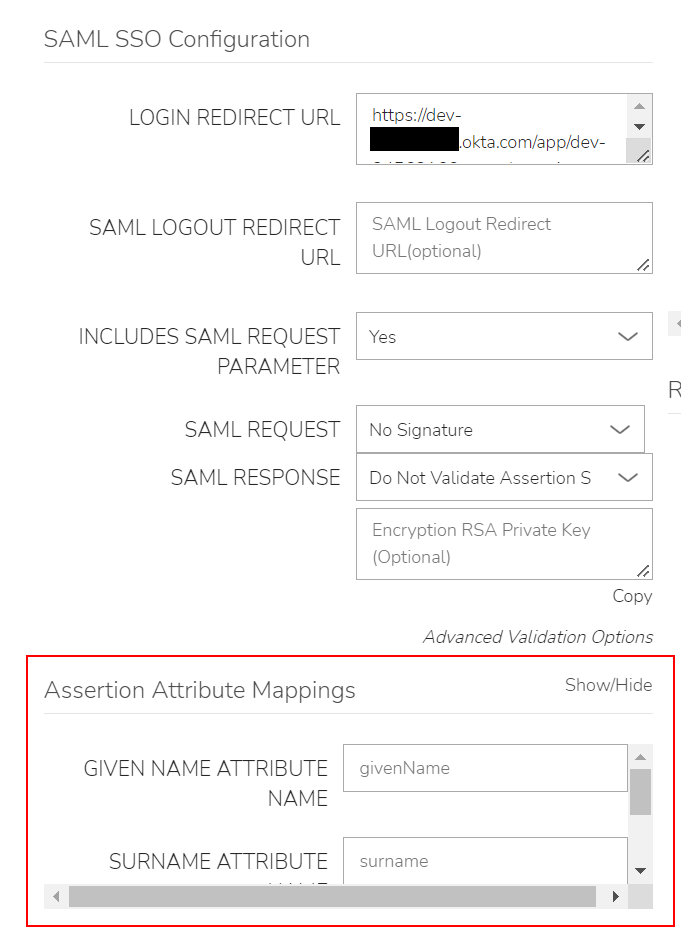
Assertion Attribute Mappings
- GIVEN NAME ATTRIBUTE NAME
SAML SP field value to map to HPE Morpheus Enterprise user First Name
- SURNAME ATTRIBUTE NAME
SAML SP field value to map to HPE Morpheus Enterprise user Last Name
- EMAIL ATTRIBUTE
SAML SP field value to map to HPE Morpheus Enterprise user email address
Once populated, select SAVE CHANGES and the SAML identity source integration will be added.
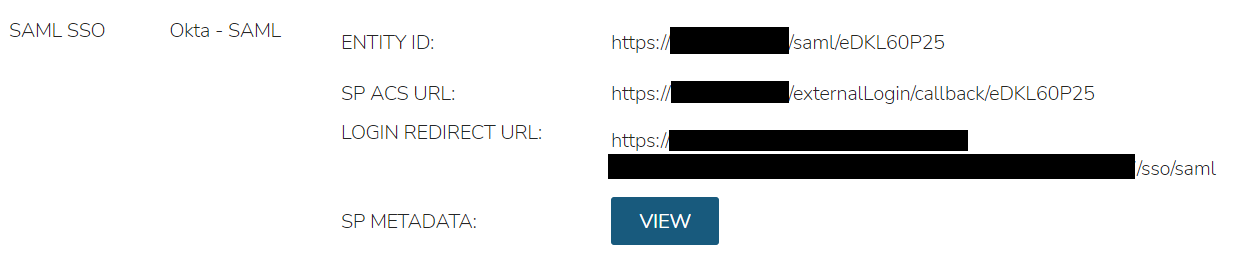
In the Identity Sources section, important information for configuration of the SAML integration is provided. Use the SP ENTITY ID and SP ACS URL for configuration on the external login SAML provider side.
Note
In some cases, the SAML provider may need these values before providing the LOGIN REDIRECT URL and other values. When creating the integration, the NAME and LOGIN REDIRECT URL can contain any values, then selecting SAVE CHANGES will generate the above values. The NAME and LOGIN REDIRECT URL can be edited later, once the SAML configuration is created in the SAML provider.
ENTITY ID
SP ACS URL
LOGIN REDIRECT URL
SP METADATA
Sample Metadata code output:
<?xml version="1.0" encoding="UTF-8" standalone="yes"?><EntityDescriptor entityID="https://someip.com/saml/eDKL60P25" xmlns="urn:oasis:names:tc:SAML:2.0:metadata"><SPSSODescriptor AuthnRequestsSigned="false" WantAssertionsSigned="true" protocolSupportEnumeration="urn:oasis:names:tc:SAML:2.0:protocol"><NameIDFormat>urn:oasis:names:tc:SAML:1.1:nameid-format:unspecified</NameIDFormat><AssertionConsumerService index="0" isDefault="true" Binding="urn:oasis:names:tc:SAML:2.0:bindings:HTTP-POST" Location="https://someip.com/externalLogin/callback/eDKL60P25"/></SPSSODescriptor></EntityDescriptor>
Note
Different SAML providers will have different field names and requirements. An Okta SAML Dev environment was used for the example integration in this article.
Okta SAML SSO
For Okta SAML integration, the following fields are mapped:
LOGIN REDIRECT URL : Identity Provider Single Sign-On URL
ENTITY ID: Audience URI (SP Entity ID)
SP ACS URL: Single sign on URL
Onelogin SAML SSO
For Onelogin SAML integration, the following fields are mapped:
LOGIN REDIRECT URL : SAML 2.0 Endpoint (HTTP)
SAML LOGOUT REDIRECT URL : SLO Endpoint (HTTP)
SIGNING PUBLIC KEY : X.509 Certificate
ENTITY ID: ACS (Consumer) URL Validator
SP ACS URL: ACS (Consumer) URL