Blueprints
Overview
The Blueprints section is used to compose provisioning catalogs. The Blueprints section is composed of:
Instance Types
Layouts
Node Types
App Blueprints
Catalog Items
Cluster Layouts
Additionally, items from Options and Templates sections are incorporated to call in custom options for users, IaaS spec files, scripts, and more. See Options and Templates within Morpheus Library for more information on creating or sourcing the items below from version control. In some cases, they may need to be pre-existing for the most efficient creation of Blueprints.
Inputs
Option Lists
File Templates
Scripts
Spec Templates
Blueprint Development Overview
When provisioning, the User selects an INSTANCE TYPE from the provisioning wizard. At this stage, we can present custom INPUTS to the User which alter deployment in ways the administrator predetermines. Based on the selected Cloud technology and Version, the User is presented with applicable LAYOUTS selections. LAYOUTS can take advantage of Workflows which automate Tasks and can utilize a wide range of DevOps automation technologies. One or more NODE TYPES is associated with the LAYOUT. NODE TYPES are the bridge between LAYOUTS and Images. NODE TYPES can also take advantage of File Templates for custom configuration and Scripts which can be queued to run at any stage of the Instance lifecycle.
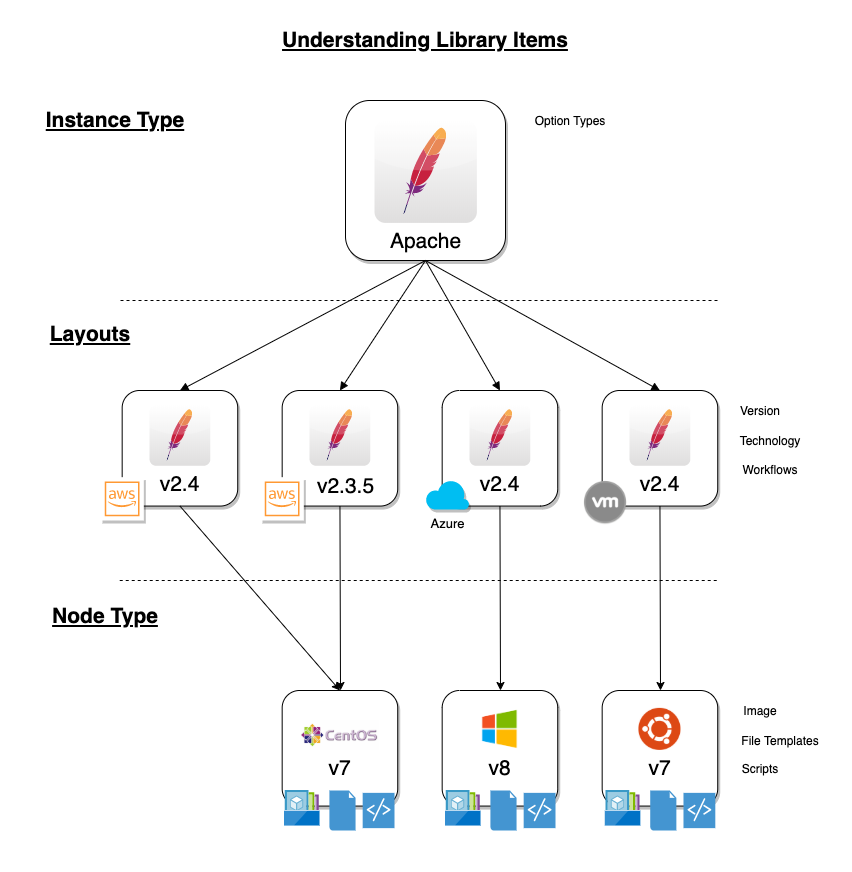
Instance Types
Adding an Instance Type creates a new Library item category. Multiple Layouts can be added to an Instance Type and these Layouts can have different Nodes attached. The Instance provisioning wizard will present the Layout options compatible with the selected Cloud. If Cloud selection is turned off, all Layouts will be presented for all Cloud types accessible by the User.
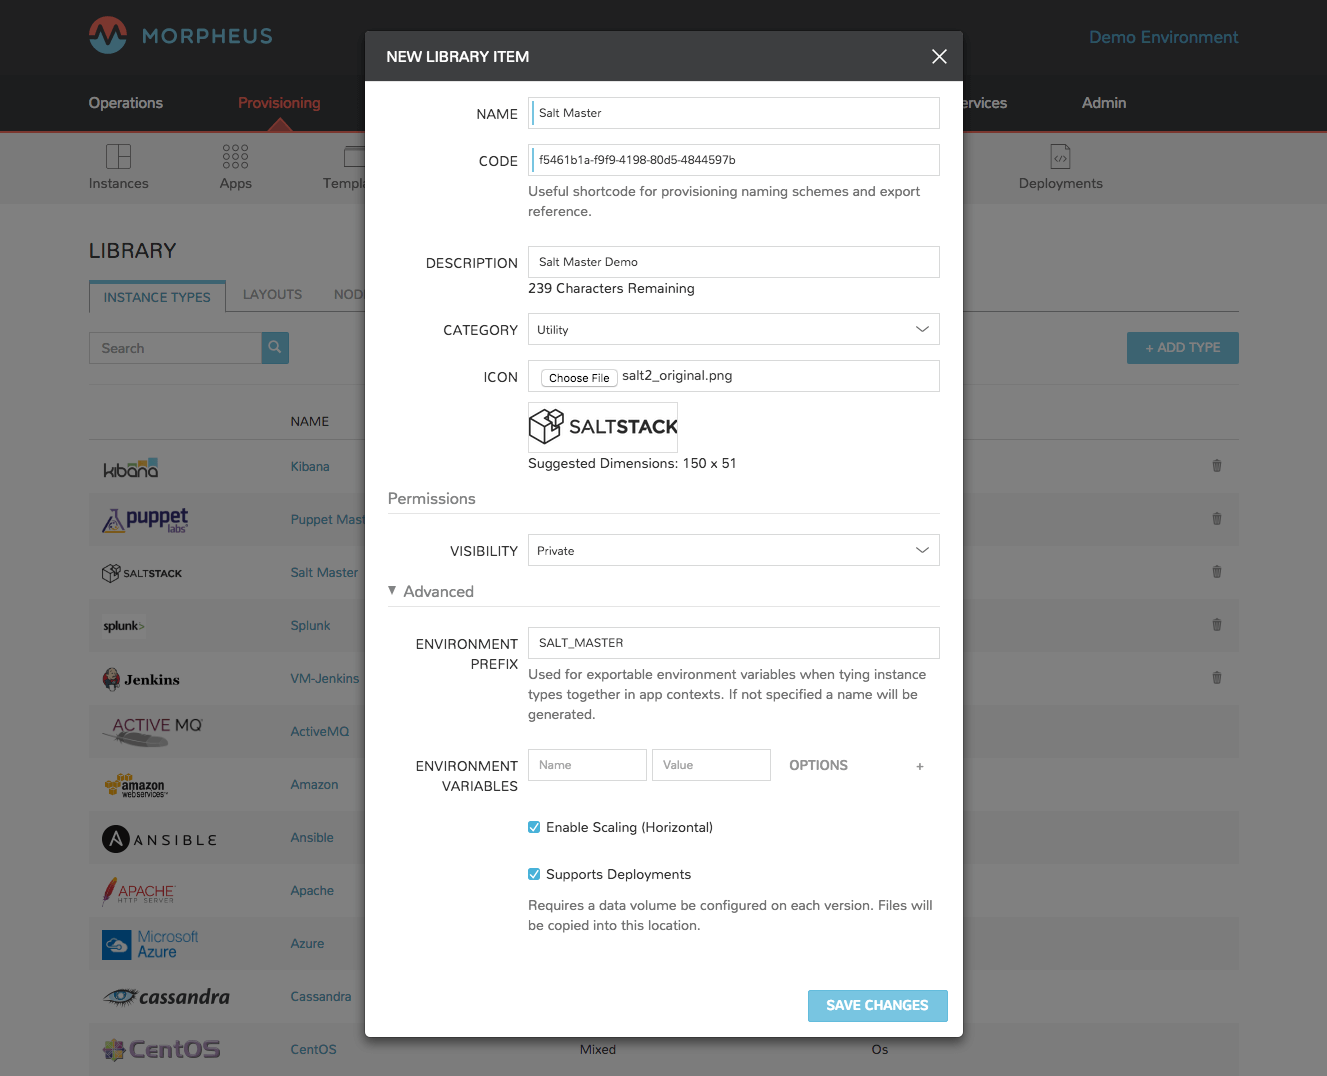
- Name
Name of the Instance Type in the provisioning Library
- Code
A useful shortcode for provisioning naming schemes and export reference
- Description
The description of the Instance Type shown in the Provisioning Library. (255 characters max)
- Category
For filtering in Instance sections and provisioning wizard
Web
SQL
NoSQL
Apps
Network
Messaging
Cache
OS
Cloud
Utility
- Icon
An identifiable icon to display in-line with your Instance Type in the provisioning wizard (Suggested dimensions: 150 x 51)
- Visibility
Private: Only accessible by assigned Accounts/Tenants
Public: Accessible by all Accounts/Tenants
- Inputs
Custom options presented to the user at provision time, Inputs are also created and stored in Morpheus Library
- Environment Prefix
Used for exportable environment variables when tying Instance Types together in App contexts. If not specified, a name will be generated
- Environment Variables
Name and value pairs for environment variables to be loaded on initialization
- Enable Settings
Allows for attachment of modifiable file templates to Node Types in a settings tab of the Instance after deployment
- Enable Scaling (Horizontal)
Enables load balancer assignment and auto-scaling features
- Support Deployments
Enables deployment features (Requires a data volume be configured on each version. Files will be copied into this location)
Upon saving, this Instance Type will be available in the provisioning catalog, per User Role access. However, we still need to add Layouts to the Instance Type, and prior to creating a Layout, we will add a Node Type.
Layouts
Layouts are attached to Instance Types. A Layout can only be attached to a single Instance Type and a single Technology. An Instance Type can have one or many Layouts attached to it, allowing for a single Instance Type to work with any Technology type. Node Types are added to Layouts. A Layout can have one or many node types attached to it. Node types can be shared across Layouts of matching Technology types.
Important
Once an Instance Type is defined on a Layout and saved, the Instance Type setting and Technology selections on the Layout cannot be changed.
Layout List View
The default page for Layouts is the Layout list view. Select + ADD to create a new Layout. Layouts can also be created from an Instance Type detail page.
The following fields are displayed for each Layout:
NAME: Links to the Layout detail page
VERSION
INSTANCE TYPE: Links to the associated Instance Type
DESCRIPTION
The Actions menu in each row reveals the following options:
Permissions: Scope the Layout to Group(s) to narrow the list of available groups for a chosen Instance Type at provision time
Edit: Edit the Layout
Delete: Delete the Layout
Note
A Layout that is in use cannot be deleted.
Available Filters:
Technology: Display Layouts by selected Cloud technology
Instance Type: Display Layouts by the associated Instance Type
Layout Detail View
The Layout Detail view shows details on the Layout including Name, Short Name, Version, and Category. It also lists all associated Node Types.
Select a Layout Name from the list page or Instance Type detail page to get to a Layout detail page.
Layout Configuration Options
- Instance Type
Select the Instance Type to add to the new Layout. Custom Instance Types must already be created and one Layout cannot be added to multiple instance types. The Instance Type also cannot be changed after creation.
Note
Layouts cannot be added to Morpheus pre-defined Instance Types
- Name
The name the Layout presents as in the Configuration Options dropdown of the provisioning wizard
- Version
The version number or name for the Layout. Layouts in an Instance Type with the same version will all show under the Configuration Options dropdown when that version is selected while provisioning
- Description
Description of the Layout, viewable on the Layout list view
- Creatable
When checked, this Layout will be selectable at provision time for the associated Instance Type (assuming the Layout is otherwise compatible with provisioning conditions). Instance Types with no Creatable Layouts will not be selectable from the provisioning wizard
- Technology
Technology determines which Cloud this layout will be available for and which Node Types can be added to it
- Minimum Memory
Defines the minimum amount of memory required for this Layout. Only Service Plans that meet the defined memory minimum will be available during provisioning when this Layout is selected. Custom memory values must also meet this minimum. Entering a minimum memory value of zero (the default value) indicates no minimum. This minimum memory value will override any Virtual Image minimum memory requirements
- Workflow
Select a Workflow which will be associated as the Provisioning Workflow for Instances provisioned using this Layout. If a Workflow is defined, it is not shown to the user at provision time and will be run in addition to any Workflows set on the Instance Type, in Workflows Policies, defined in App Blueprints, or selected manually at provision time.
- Supports Convert to Managed
Enabled to allow users to select this layout when converting a Discovered workload to Managed
- Enable Scaling (Horizontal)
Enables Instances with this layout to use scaling features
- Environment Variables
Custom environment variables to be added to the Instance when provisioned
- Inputs
Search for and select one or multiple Inputs to add to the Layout. Inputs (except for Hidden Inputs) will appear in Provisioning, App, Blueprint, and Cloning wizards when this layout is selected
- Nodes
Single or multiple nodes can be added to a Layout by searching for and selecting the Node(s)
Node Types
Node Types are the link between Images and Layouts.
Node Type Configuration Options
The following fields are for all Technology types:
- Name
Name of the Node Type in Morpheus
- Short Name
The short name is a lowercase name with no spaces used for display in your container list
- Version
Version for the Node Type. Examples: 7.5, 2012 R2, latest
- Technology
Select associated Technology. This will filter the available configuration options, images and which Layouts the Node Type can be added to
- Environment Variables
Add pre-set environment variables to the Node Type
- Category
Node Types of differing categories within the same Layout can have differing sizing
Technology-Specific Options
The Options fields will change depending on the Technology option selected. For VM provisioning technology options, select an image from the VM Image dropdown. This list is populated from the Morpheus Virtual Images section and will include images uploaded into Morpheus as well as synced images from added clouds.
Note
Amazon and Azure Marketplace Images can be added in the Virtual Images section for use as Node Types in custom library items.
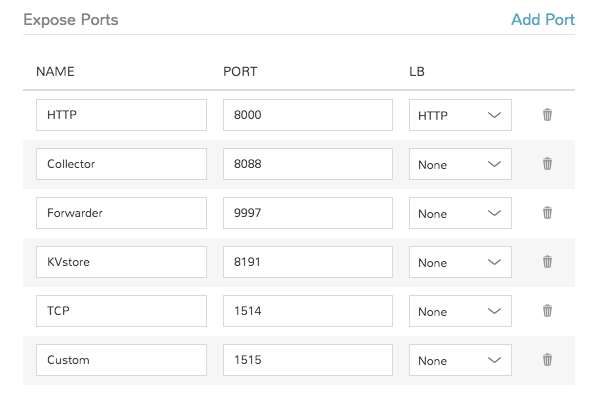
Docker Options
For Docker, type in the name and version of the Docker Image, then select the integrated registry.
- Service Ports
To open ports on the node, enter the name and port to expose. The Load Balancer HTTP, HTTPS, or TCP setting is required when attaching to Load Balancers.
Defining an Exposed port will also create a hyperlink(s) on the container location (IP) in the VM or Container section of the associated Instance detail page.
- Scripts
Search for and select one or multiple scripts to be executed when the Node Type is provisioned
- File Templates
Search for and select one or multiple File Templates to be written when the Node Type is provisioned
Example port configuration:
VMware Options
When VMware Technology Type is selected, EXTRA OPTIONS will be available in the VMware VM Options section. These allow defining Advance vmx-file parameters during provisioning.
Some Example include:
tools.setinfo.sizeLimit : 1048576
vmci0.unrestricted : FALSE
isolation.tools.diskWiper.disable : TRUE
Note
Not all parameters can be set using extra config parameters. A sample reference list can be found at http://www.sanbarrow.com/vmx/vmx-advanced.html#vmx
Important
Use caution when setting Extra Options. Malformed config files can break provisioning. Troubleshooting issues related to Extra Options defined are beyond the scope of Morpheus product support.
App Blueprint Overview
App Blueprints support a vast array of providers and configurations with programmatic markup or Infrastructure as Code capabilities. Blueprints configs can be manually added or scoped to a git repo. Morpheus blueprints allows for full automation configuration, locked fields, tiered boots, and linked tiers with exported evars. All blueprints have permission settings for controlling group and tenant access.
App Blueprint Types
Morpheus
Terraform
ARM (Azure)
CloudFormation (AWS)
Kubernetes
Helm
Morpheus Blueprints
Morpheus App Blueprints allow pre-configured full multi-tier application deployments for multiple environments. Blueprints can be provisioned from the Provisioning > Apps section and can be fully configured for one click provisioning. Blueprints can be built within the Builder section or by code in the Raw section. Blueprints can also be exported as YAML or JSON and created with the Morpheus API and CLI.
A unique capability of the YAML/JSON based Morpheus blueprint structure is the ability to have multiple configurations per instance being provisioned within the app blueprint. This can be a scoped configuration that acts as overrides based on selected cloud, group, and/or environment the app is being provisioned in as a target. For example. maybe the “development” environment doesn’t need as many horizontally scaled nodes as the “production” environment. Another great aspect of this configuration markup is a blueprint can be defined as a hybrid cloud blueprint. This makes the app blueprint structure very powerful and in some ways better than alternative infrastructure as code orchestrators. For Example, ARM is locked into Azure, while CloudFormation is locked into AWS. Even Terraform does not allow a tf file to expand its bounds beyond a specific provider type.
Basic Blueprint Structure
In a Morpheus App Blueprint there are a few structural concepts to be aware of. Firstly there is a concept of a Tier. A Tier is a grouping of instances within an app blueprint. Tiers can be used for a variety of things including sequenced booting of instances or even properly creating endpoint groups and security group contexts in network security tools like Cisco ACI. An example of a Tier structure might be a Web tier and a Database tier. These tiers can also be marked as connected such that network communication rules can appropriately be defined. A basic 2 Tier blueprint skeleton might look something like this:
name: Tier Example
type: morpheus
tiers:
  Web:
    linkedTiers:
      - Database
    tier:
      bootOrder: 1
    instances:
  Database:
    tier:
      bootOrder: 0
    instances:
This example has defined 2 tiers as yaml properties under the tiers object. They are called Web and Database. A Tier can optionally define its connected tiers which are bi-directional even though only one tier has to define them. This is the linkedTiers array and simply lists the connected tiers by tier name. A Boot Order can also optionally be defined under a nested {"tier": {"bootOrder": 1}} object structure.
Configuration Scopes
Another capability of Morpheus App Blueprint structure is its configuration scoping. This allows properties to be overridden based on the apps target environment or even target group and cloud. For example. Maybe we want to use a larger plan size in production vs. development
An example of that can be done using “environments” overrides.
name: Simple Nginx
type: morpheus
tiers:
  Web:
    instances:
      - instance:
          type: docker
          name: Sample Nginx
        clouds:
          AWS Cali:
            instance:
              layout:
                code: docker-1.7-single
            config:
              dockerImageVersion: latest
              dockerRegistryId: ''
              dockerImage: nginx
            plan:
              code: container-128
         environments:
           Production:
             groups:
               All Clouds Demo:
                 clouds:
                   AWS Cali:
                     plan:
                       code: container-256
Note the new environments object. The object graph of the morpheus blueprint structure gets merged and flattened at provision time based on the scope of the configurations provided as well as the users target cloud, group, and environment selection. In the Above example, a selective override was done for the AWS Cali cloud when using a Production Environment and deploying to the group All Clouds Demo. This specific example changes the plan to a larger size. Scoped configurations have various levels of precedence. Cloud is the lowest level of precedence. a cloud configuration in a group is the next level higher and finally an environment configuration in a group in a cloud is the highest level of scoped precedence.
Getting Started
To get started, it may be best to look at a simple App Blueprint configuration. Docker templates are less complex than virtual machine based templates so lets look at a Blueprint that deploys a single Nginx container to a target cloud:
name: Simple Nginx
type: morpheus
tiers:
  Web:
    linkedTiers: []
    instances:
      - instance:
          type: docker
          name: Sample Nginx
        clouds:
          AWS Cali:
            instance:
              layout:
                code: docker-1.7-single
                id: 206
            volumes:
              - rootVolume: true
                name: root
                size: 1
            backup:
              createBackup: false
            config:
              dockerImageVersion: latest
              dockerRegistryId: ''
              dockerImage: nginx
            plan:
              id: 68
              code: container-128
            ports:
              - name: HTTP
                port: 80
                lb: HTTP
Theres some useful things to look at in the above docker example. One is there are different objects based on the different available configuration options for the target provision type. These options are actually data driven and can be extracted from the Inputs api in the morpheus api doc. That is a useful resource to look at while building morpheus blueprints or by using the morpheus-cli which provides prompts for helping build custom morpheus app blueprints.
Creating Morpheus App Blueprints
Navigate to Library > Blueprints > App Blueprints
Select + ADD
Enter a NAME for the Blueprint and select NEXT
Optionally add a Description, Category, and Image for the Blueprint.
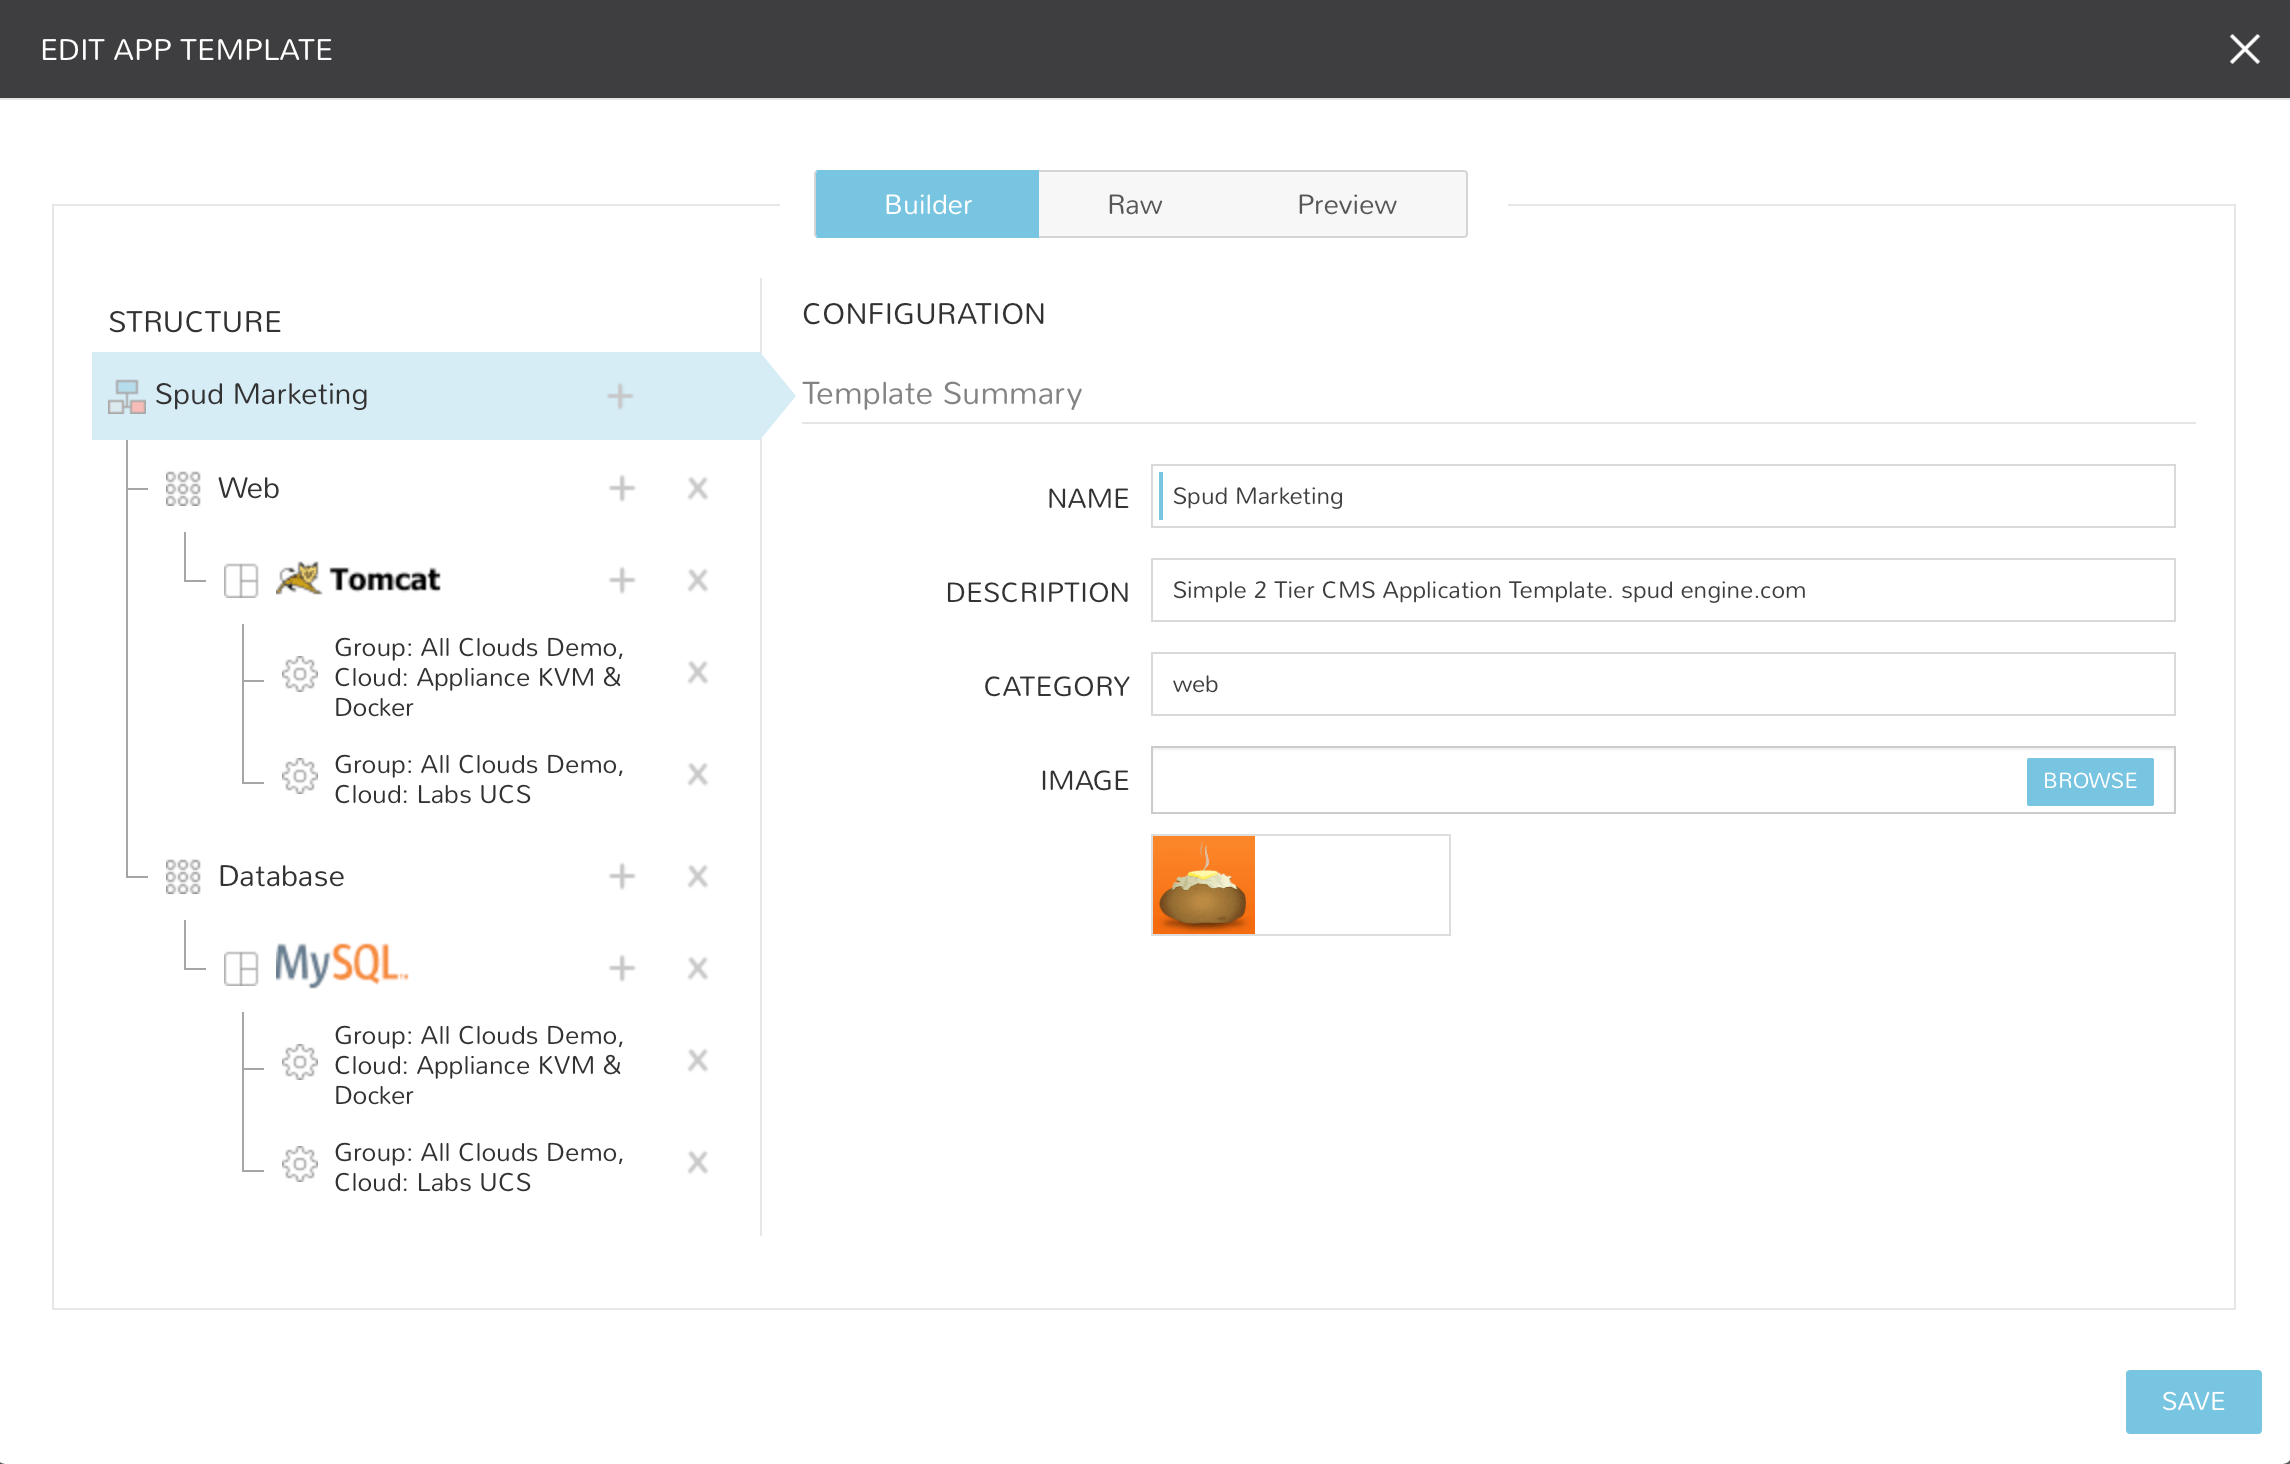
Add Tiers
In the STRUCTURE section, select + to add a Tier
Select or enter a Tier Name.
Select the Tier to set Boot Order, rename, or once multiple Tiers are added, connect the Tier to other Tiers.
Add Instances to Tiers
In the STRUCTURE section, select + in a Tier to add an Instance
Select an Instance Type
Optionally add a name for the Instance. Instances with blank names will automatically be named based off the App name.
Tip
You can use the variable ${app.name} in your instance naming convention to reference the name of the application you’re deploying.
Add Configurations to Instances
In the STRUCTURE section, select + in an Instance to add a Configuration
Select at least one option from Group, Cloud or Environment.
Select
ADD CONFIGto create the configurationPopulate the Configuration
Configurations can be fully partially or populated
Fields can be locked or hidden by selecting the Lock icon next to the Field. Locking prevents the field from being editable when provisioning an App using the Blueprint while hidden fields are not revealed to the user at all
ALLOW EXISTING INSTANCE will allow users to add existing Instances to the App when using the blueprint
Save
Once all desired Tiers, Instances and Configurations are added, select Save. The Blueprint will be created, can be edited after saving, and will available in the Apps section for provisioning.
Note
Blueprints are not provisioned when created. To provision a Blueprint, use Provisioning > Apps.
RAW
Blueprints can be create, edited or Exported in the RAW section when creating or editing a blueprint.
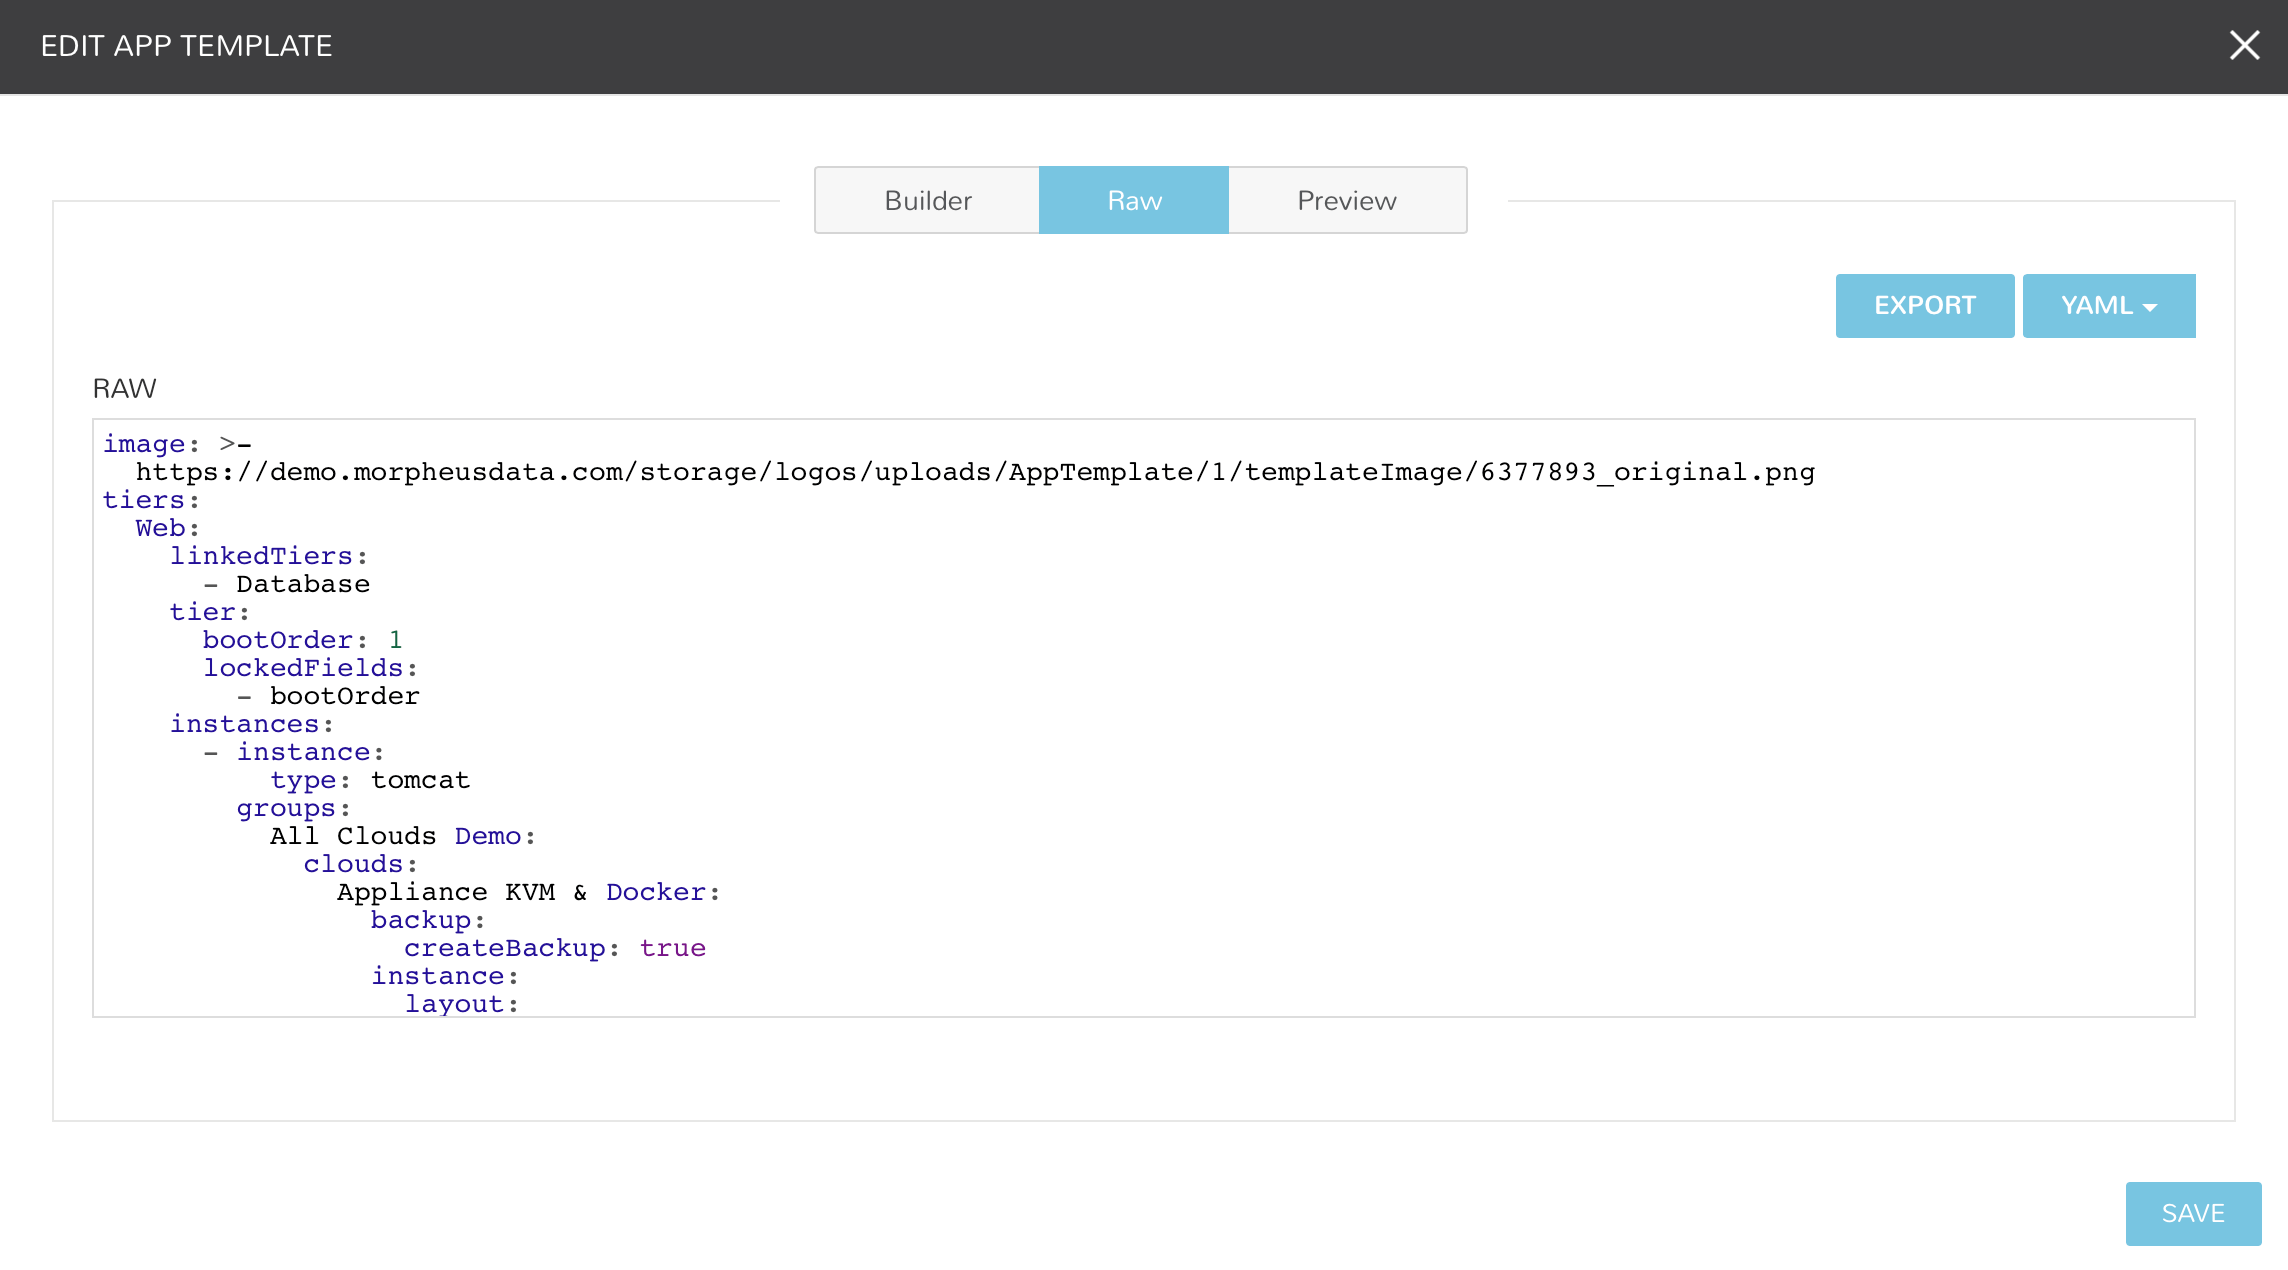
To Export a Blueprint as JSON or YAML:
Navigate to Library > Blueprints > App Blueprints
Edit an existing App by clicking on the pencil icon
On the Edit Blueprint modal, select the Raw tab
Select YAML or JSON from the dropdown in the top right
Click the Export button
Select the configurations to include in the export by selecting or deselecting configurations as needed. Selected configurations will be highlighted
Click the DOWNLOAD CONFIGURATION button
The Blueprint export file will be downloaded to your computer as
{app_name}-config.json or {app_name}-config.yaml
Preview
In the APP BLUEPRINT modal, select the Preview section to display a graphical representation of your Blueprint Tiers, Instances and Tier Connections.
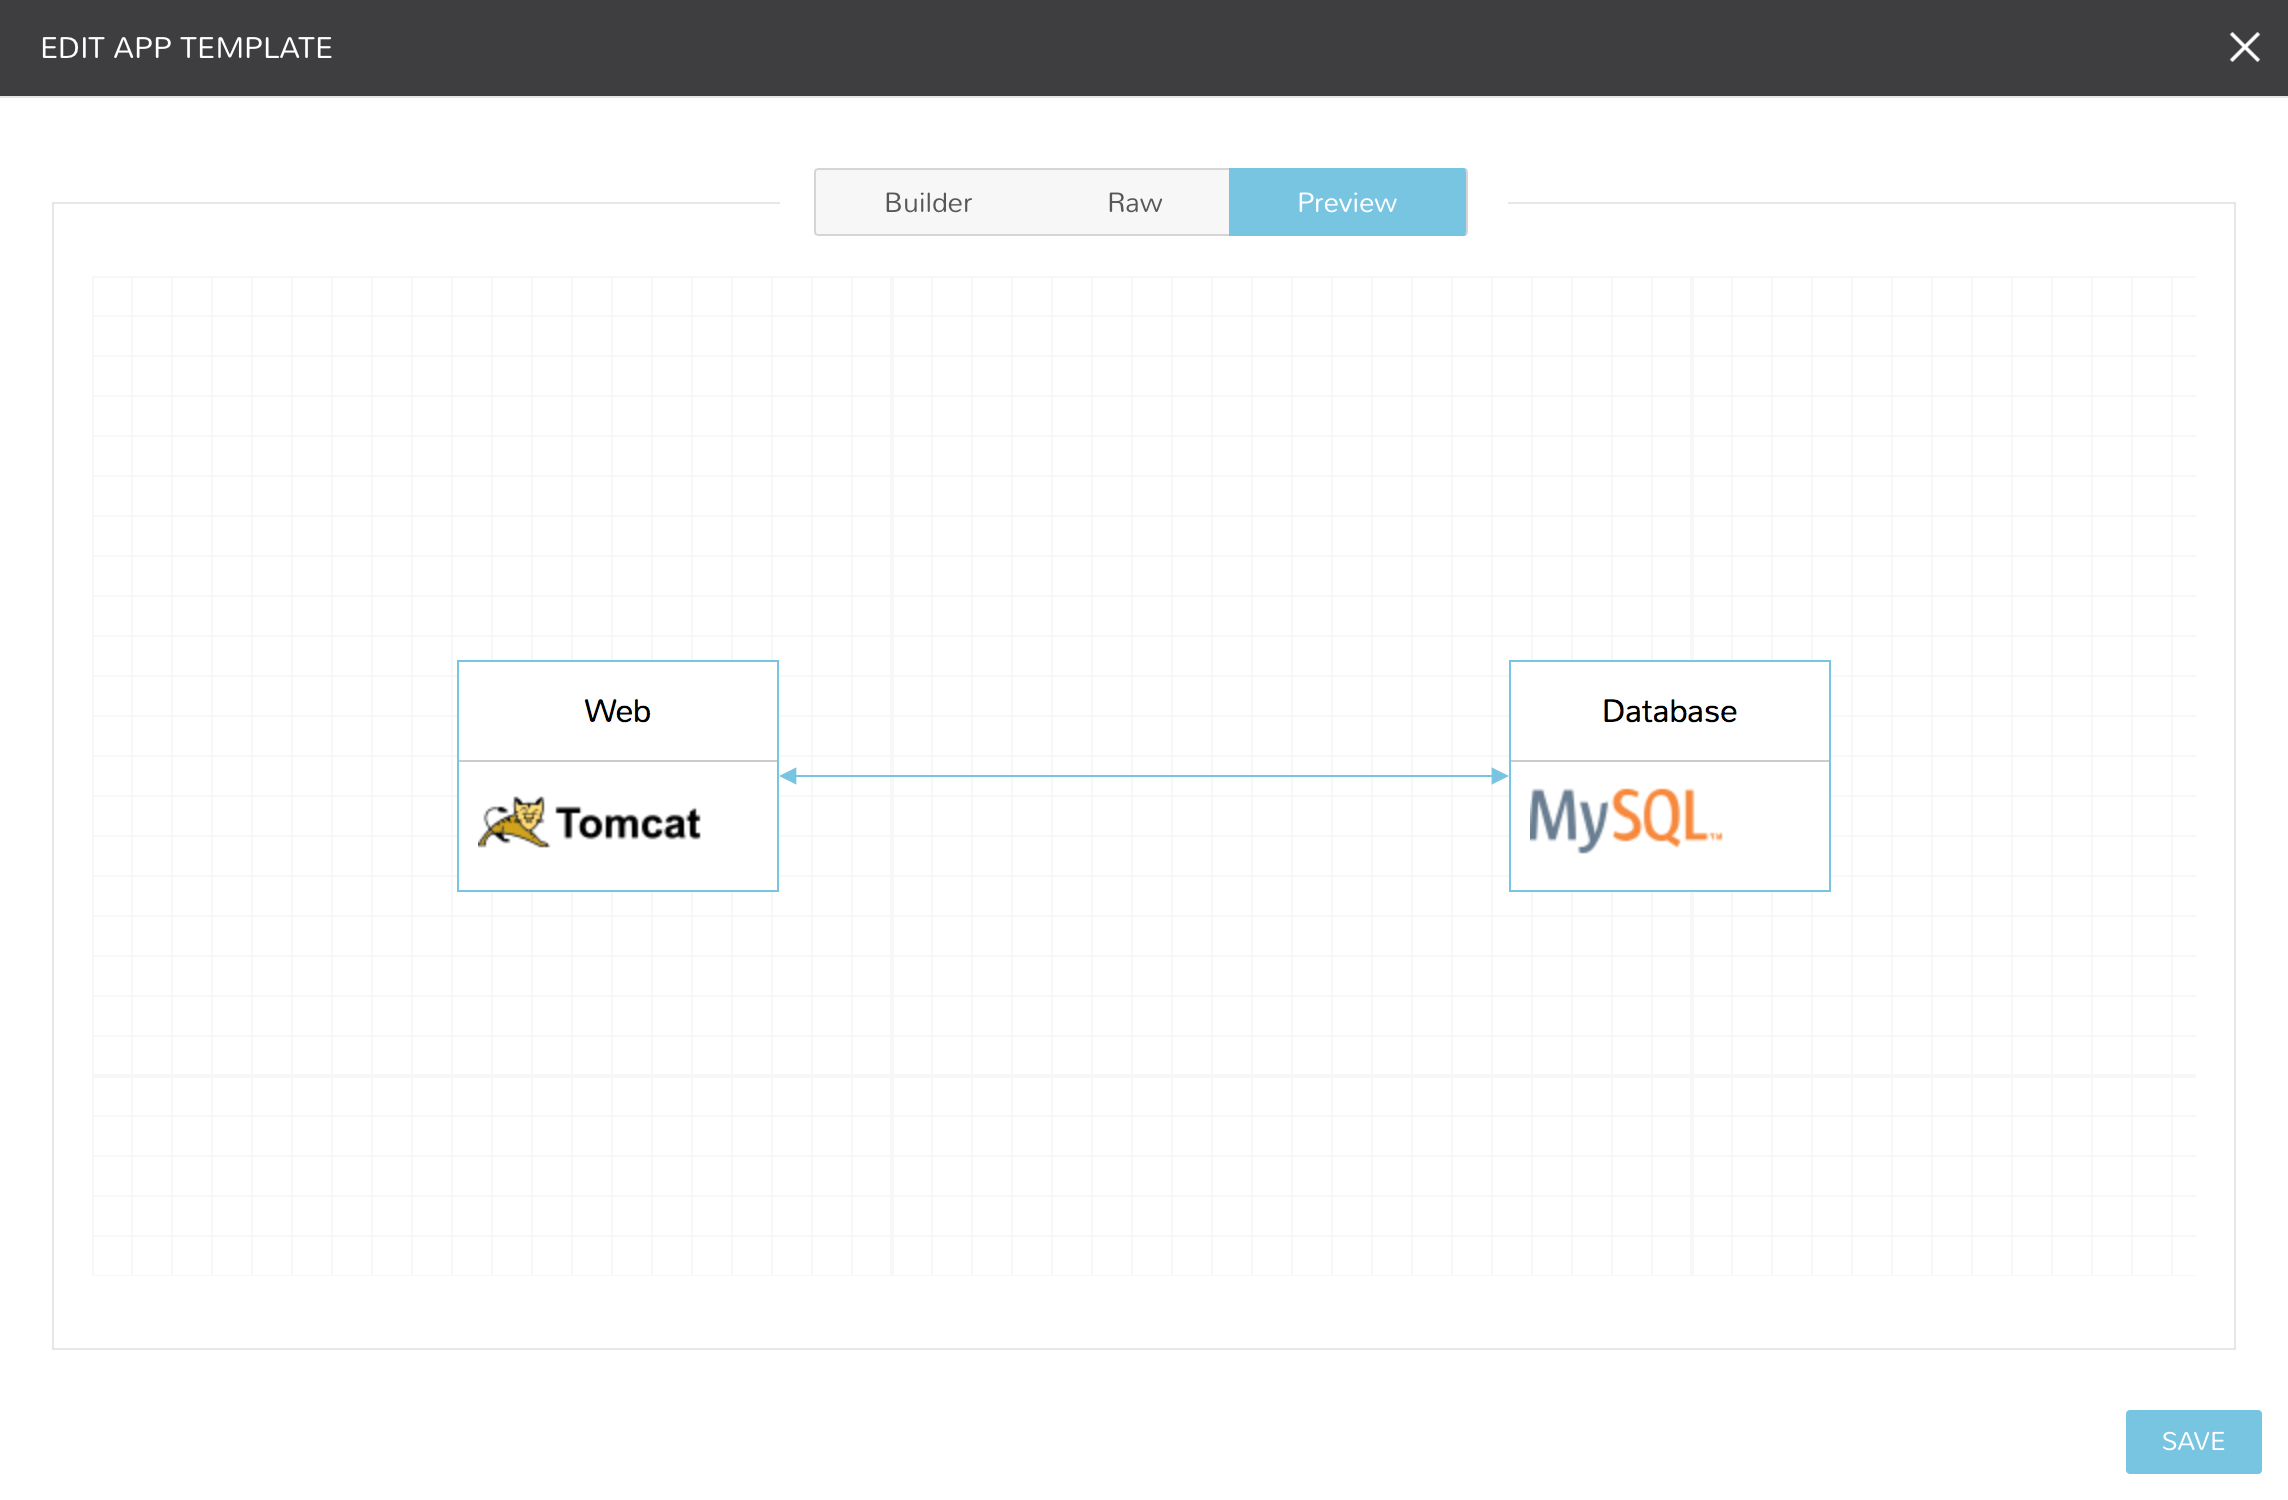
Important
When Tiers are connected, the Instances in a Tier will import the evars from Instances in connected Tiers, and if Morpheus is managing the Instance Firewalls, communication between the Instances will be facilitated based on the Instances port configurations.
Provisioning
To provision a Blueprint, navigate to Provisioning > Apps and select the Blueprint when creating an App. See the App section of Morpheus docs for more on provisioning Apps.
Terraform Blueprints
Terraform Blueprints are one way that Terraform can be integrated and leveraged with Morpheus, with the other being the Morpheus Terraform provider which is not discussed in this section. Morpheus and Terraform are complimentary technologies which together can increase efficiency and simplify automation across cloud environments. For more on this relationship, see our whitepaper on how Morpheus and Terraform are better together.
Currently, Morpheus supports provisioning Apps based on Terraform Blueprints to VMware, Amazon, Azure, and Oracle Clouds with additional Cloud support coming in future releases. On first attempt to provision a Terraform App, Morpheus will automatically install Terraform. It is possible in some operating system configurations for this automated installation process to fail, requiring you to install Terraform manually. If needed, manual installation instructions and guidance are provided here.
To create a new Terraform Blueprint, navigate to Library > Blueprints > App Blueprints. Click + ADD.
On the Name tab of the New Blueprint modal, enter a name for your new Blueprint. In the Type dropdown menu, select Terraform. NEXT

In the Blueprint Summary section, complete the following fields as needed:
NAME: Enter a name for this Blueprint as it will appear in the Morpheus Blueprints list
DESCRIPTION: An optional description field for your Blueprint
CATEGORY: An optional category tag for your Blueprint, such as web, utility, or app
IMAGE: An optional image icon to more easily identify your Blueprint from a list. If no image is uploaded, a default image will be used
The Terraform Configuration section is where the Terraform template file (.tf) is added or linked to the Blueprint. Using a Config Type of “Terraform (.tf)” or “Terraform JSON (.tf.json)”, you can write or paste your configuration directly into the new Blueprint. Alternatively, you can pull in config files from an integrated Git repository using the “Git Repository” Config type.
In the Terraform Configuration section, complete the following fields as needed when entering your configuration directly into the new Blueprint:
CONFIG TYPE: “Terraform (.tf)” or “Terraform JSON (.tf.json)” to create or paste configuration directly into the new Blueprint
CONFIG: Enter your configuration here
TFVAR SECRET: Select an existing TFVar-formatted Cypher. See the Cyphers section or Morpheus docs for more information on Cyphers
OPTIONS: Enter any additional options, such as a variable definition
In the Terraform Configuration section, complete the following fields as needed when syncing in configuration from a Git repository:
CONFIG TYPE: “Git Repository”
SCM INTEGRATION: If a pre-existing SCM integration is selected here, the available selections in the “Repository” dropdown menu will be filtered to show only those associated with the chosen SCM integration
REPOSITORY: Select the repository in which your configuration resides
BRANCH OR TAG: The branch in which your configuration resides
WORKING PATH: The path to your configuration files
CONFIG: Your selected config file
TFVAR SECRET: Select an existing TFVar-formatted Cypher. See the Cyphers section of Morpheus docs for more information on Cyphers
OPTIONS: Enter any additional options, such as a variable definition
Once finished, click COMPLETE.
Your new Terraform Blueprint is now saved and should be visible in the list of Blueprints. Blueprints are deployed in the Provisioning > Apps section of Morpheus. See the Apps section of Morpheus docs for more information on that process.
ARM Blueprints
ARM Blueprints provide a simple and repeatable way of deploying infrastructure-as-code to Azure Clouds. Objects and properties are defined in a JSON file and are provisionable on-demand in |ProApp|
To create a new ARM Blueprint, navigate to Library > Blueprints > App Blueprints. Click + ADD.
On the Name tab of the New Blueprint modal, enter a name for your new Blueprint. In the Type dropdown menu, select ARM. NEXT
In the Blueprint Summary section, complete the following fields as needed:
NAME: Enter a name for this Blueprint as it will appear in the Morpheus Blueprints list
DESCRIPTION: An optional description field for your Blueprint
CATEGORY: An optional category tag for your Blueprint, such as web, utility, or app
IMAGE: An optional image icon to more easily identify your Blueprint from a list. If no image is uploaded, a default image will be used
The ARM template itself is defined in the ARM Configuration section. Using the Config Type dropdown menu, we can opt to write or paste JSON configuration directly into this modal, or we can choose to bring in a JSON which we’re keeping under version control in a Git repository.
Depending on whether we need the Morpheus Agent installed and/or cloud-init enabled, mark the following boxes in the next section:
INSTALL AGENT
CLOUD INIT ENABLED
If writing or pasting your configuration JSON directly into the modal, fill out the following fields:
OS TYPE: Identify the resources to be created as Linux or Windows
CONFIG TYPE: ARM Template JSON (.json)
CONFIG: Your JSON configuration template
If bringing in a template from a Git repository, fill out the following fields:
OS TYPE: Identify the resources to be created as Linux or Windows
CONFIG TYPE: “Git Repository”
SCM INTEGRATION: If a pre-existing SCM integration is selected here, the available selections in the “Repository” dropdown menu will be filtered to show only those associated with the chosen SCM integration
REPOSITORY: Select the repository in which your configuration resides
BRANCH OR TAG: The branch in which your configuration resides
WORKING PATH: The path to your configuration files
CONFIG: Your selected config file
Once finished, click COMPLETE.
Your new ARM Blueprint is now saved and should be visible in the list of Blueprints. Blueprints are deployed in the Provisioning > Apps section of Morpheus. See the Apps section of Morpheus docs for more information on that process.
CloudFormation Blueprints
CloudFormation Blueprints consume new or existing CloudFormation templates to create easily-deployable application stacks. CloudFormation templates in Morpheus are JSON or YAML-formatted text documents that declare all relevant AWS resources needed for the provisioned application. They can be created directly in the New Blueprint modal or pulled in from existing Git repositories.
If needed, Amazon has educational resources available for getting started with CloudFormation. They can be found in the AWS CloudFormation documentation.
To create a new CloudFormation Blueprint, navigate to Library > Blueprints > App Blueprints. Click + ADD.
On the Name tab of the New Blueprint modal, enter a name for your new Blueprint. In the Type dropdown menu, select CloudFormation. Click NEXT
In the Blueprint Summary section, complete the following fields as needed:
NAME: Enter a name for this Blueprint as it will appear in the Morpheus Blueprints list
DESCRIPTION: An optional description field for your Blueprint
CATEGORY: An optional category tag for your Blueprint, such as web, utility, or app
IMAGE: An optional image icon to more easily identify your Blueprint from a list. If no image is uploaded, a default image will be used
Depending on whether we need the Morpheus Agent installed and/or cloud-init enabled, mark the following boxes in the next section:
INSTALL AGENT
CLOUD INIT ENABLED
In some cases, you must explicitly acknowledge that your template contains certain capabilities in order for the application to successfully be deployed. There is more information on this in Amazon’s documentation here. If any of the following capabilities are contained in your application, acknowledge them by marking any of the following boxes that apply:
CAPABILITY_IAM
CAPABILITY_NAMED_IAM
CAPABILITY_AUTO_EXPAND
Continuing on with the CloudFormation Configuration section, complete the following fields as needed when entering your configuration directly into the new Blueprint:
CONFIG TYPE: “CloudFormation Template JSON (.json)”
CONFIG TYPE: “CloudFormation Template YAML (.yaml)”
CONFIG: Enter your configuration here
In the CloudFormation Configuration section, complete the following fields as needed when syncing in configuration from a Git repository:
CONFIG TYPE: “Git Repository”
SCM INTEGRATION: If a pre-existing SCM integration is selected here, the available selections in the “Repository” dropdown menu will be filtered to show only those associated with the chosen SCM integration
REPOSITORY: Select the repository in which your configuration resides
BRANCH OR TAG: The branch in which your configuration resides
WORKING PATH: The path to your configuration files
CONFIG: Your selected config file
Once finished, click COMPLETE.
Your new CloudFormation Blueprint is now saved and should be visible in the list of Blueprints. Blueprints are deployed in the Provisioning > Apps section of Morpheus. See the Apps section of Morpheus docs for more information on that process.
Kubernetes Blueprints
Morpheus allows you to store Kubernetes configuration YAML files for easy deployment on-demand. Kubernetes Blueprints can be built by pulling in Kubernetes spec stored as a Morpheus Spec Template object, those tracked under version control in a Git repository, or you can write them directly in the New Blueprint modal.
To create a new Kubernetes Blueprint, navigate to Library > Blueprints > App Blueprints. Click + ADD.
On the Name tab of the New Blueprint modal, enter a name for your new Blueprint. In the Type dropdown menu, select Kubernetes. NEXT
In the Cluster Summary section, complete the following fields as needed:
NAME: Enter a name for this Blueprint as it will appear in the Morpheus Blueprints list
DESCRIPTION: An optional description field for your Blueprint
CATEGORY: An optional category tag for your Blueprint, such as web, utility, or app
IMAGE: An optional image icon to more easily identify your Blueprint from a list. If no image is uploaded, a default image will be used
Complete the Kubernetes Configuration section as follows depending on your Config Type selection.
To consume a Morpheus Spec Template containing Kubernetes spec:
CONFIG TYPE: “Kubernetes Spec”
SPEC TEMPLATE: Use the typeahead field to locate the desired Spec Template
To draft or paste configuration directly in the New Blueprint modal:
CONFIG TYPE: “Kubernetes Yaml Spec”
CONFIG: Enter your YAML configuration template here
To consume YAML configuration files tracked in a Git repository:
CONFIG TYPE: “Git Repository”
SCM INTEGRATION: If a pre-existing SCM integration is selected here, the available selections in the “Repository” dropdown menu will be filtered to show only those associated with the chosen SCM integration
REPOSITORY: Select the repository in which your configuration resides
BRANCH OR TAG: The branch in which your configuration resides
WORKING PATH: The path to your configuration files
CONFIG: Your selected config file
Once finished, click COMPLETE.
Your new Kubernetes Blueprint is now saved and should be visible in the list of Blueprints. Blueprints are deployed in the Provisioning > Apps section of Morpheus. See the Apps section of Morpheus docs for more information on that process.
Helm Blueprints
If you’re using Helm Charts to manage Kubernetes applications, Morpheus allows you to bring them in from a Git repository as a Blueprint. The selected repository must be integrated with Morpheus before creating the Blueprint.
To create a new Helm Blueprint, navigate to Library > Blueprints > App Blueprints. Click + ADD.
On the Name tab of the New Blueprint modal, enter a name for your new Blueprint. In the Type dropdown menu, select Helm. Click guilabel:NEXT.
In the Blueprint Summary section, complete the following fields as needed:
NAME: Enter a name for this Blueprint as it will appear in the Morpheus Blueprints list
DESCRIPTION: An optional description field for your Blueprint
CATEGORY: An optional category tag for your Blueprint, such as web, utility, or app
IMAGE: An optional image icon to more easily identify your Blueprint from a list. If no image is uploaded, a default image will be used
In the Helm Configuration section, complete the following fields as needed to sync in configuration from a Git repository:
CONFIG TYPE: “Git Repository”
SCM INTEGRATION: If a pre-existing SCM integration is selected here, the available selections in the “Repository” dropdown menu will be filtered to show only those associated with the chosen SCM integration
REPOSITORY: Select the repository in which your configuration resides
BRANCH OR TAG: The branch in which your configuration resides
CHART PATH: The path to the folder within the repository containing your configuration files, enter “./” if this is the top level folder within the repository
CONFIG: Config files within your selected folder are displayed here for confirmation
Once finished, click COMPLETE.
Your new Helm Blueprint is now saved and should be visible in the list of Blueprints. Blueprints are deployed in the Provisioning > Apps section of Morpheus. See the Apps section of Morpheus docs for more information on that process.
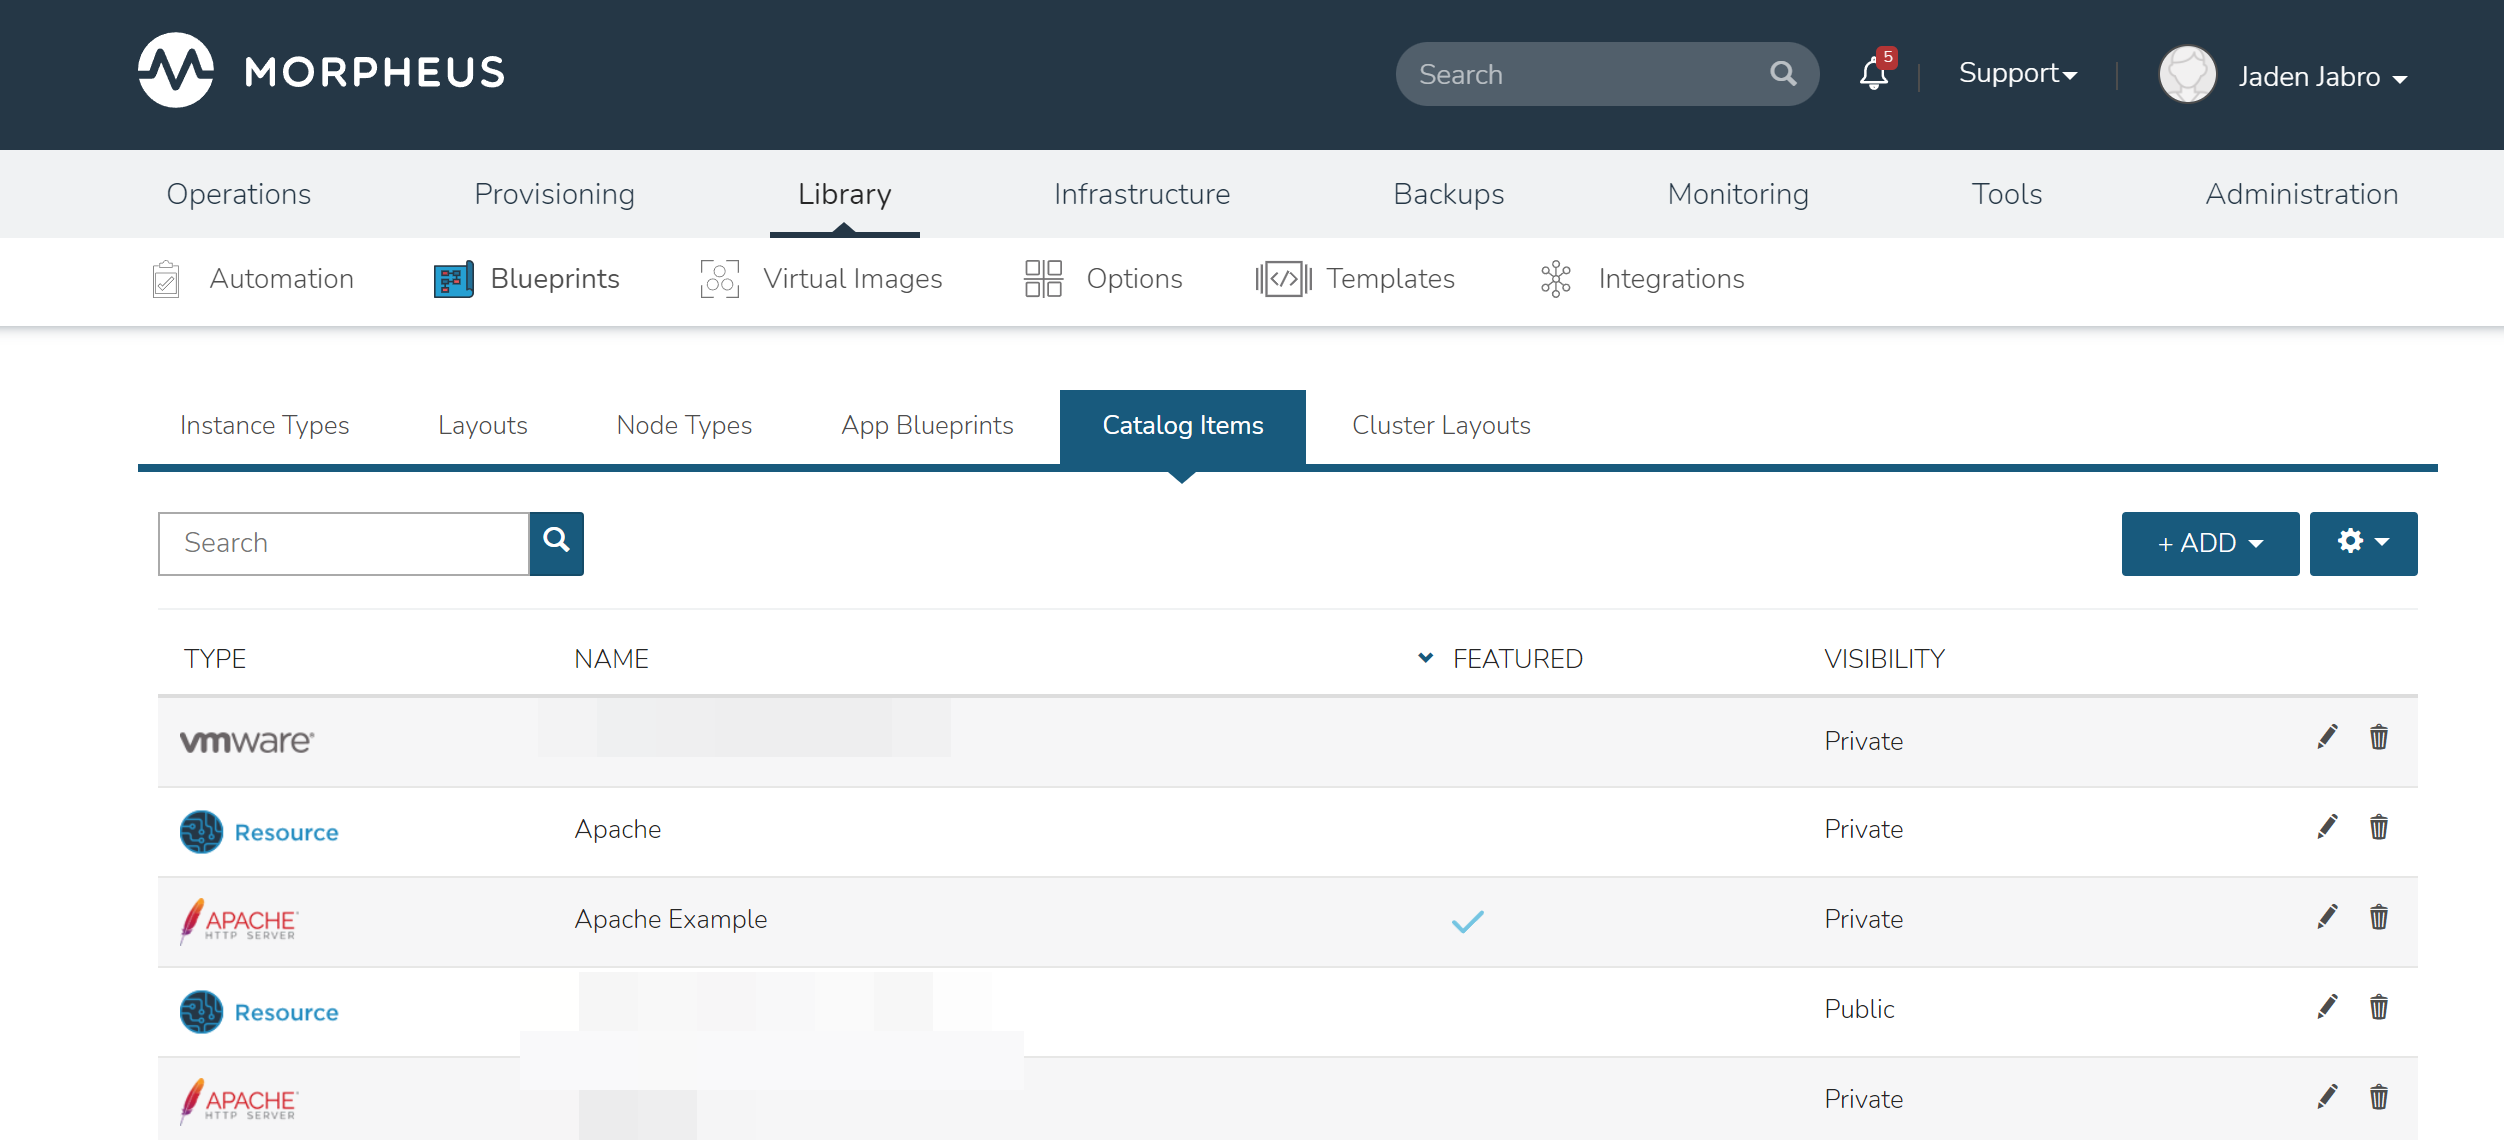
Catalog Items
The Self Service catalog (Library > Blueprints > Catalog Items) is where administrators can create easily-deployable items for consumption by users operating under the “Service Catalog” Persona in Morpheus. Catalog items can be fully-configured Morpheus Instances or Blueprints, complete with user input through Morpheus Inputs, automation Workflows, and more. The catalog items are presented in a simplified interface for ease of deployment without sacrificing configurability for administrators. All available catalog items are built in the Self Service area and users will see relevant items in their catalogs based on Role permissions.
Note
For more on Personas and using the Service Catalog persona, see the Personas sections of our documentation.
Access is granted to the Self Service section through the Tools: Self Service Role permission. Users with Read rights can view the catalog while users with full rights can create and edit catalog items. Users without any rights to Self Service will not be able to access the page at all.
Additionally, a user’s Role determines access to the standard and/or service catalog persona and which service catalog items are available for a user under the service catalog persona. See the Roles section of Morpheus documentation for more information on administering Roles.
Viewing the Self Service Catalog
The complete Self Service catalog can be viewed by clicking on Self Service from the Tools menu. The complete list of items available for the Self Service catalog are shown here but users working in the Service Catalog Persona will see only those allowed based on their user role. In addition to the name and type of each catalog item, we can also see a description and whether not the catalog item is featured or active. Featured items are given special visibility in the Service Catalog Persona and inactive items will not appear as provisioning options.
Building Catalog Instances
An Instance in Morpheus is a set of one or more containers or virutal machines that correlate to a single, horizontally-scalable entity or service suite. From the Self Service section, we can pre-configure Morpheus Instances and present them to users viewing the Service Catalog Persona for one-click deployment.
From the Catalog Items List Page (Library > Blueprints > Catalog Items), click ADD. From the dropdown menu, select Instance. The modal window will appear to configure and add a new catalog Instance.

Configure the following:
NAME: A friendly name for the catalog item in Morpheus
DESCRIPTION: An optional description identifying the catalog item
ENABLED: When checked, this catalog item will be available for provisioning
FEATURED: When checked, this catalog item will be given special visibility in the Service Catalog Persona view
VISIBILITY: Set to private to keep the catalog item available only to users in the current Tenant. Master Tenant administrators may set catalog items to public to make them viewable and usable by Subtenant users
LOGO: Select or upload a logo to be associated with this catalog item
CONFIG: Enter, view, or edit Instance config here. Click CONFIGURATION WIZARD to build a base configuration through the Morpheus Instance wizard. Following configuration through the Instance wizard, you may need to overwrite some static values in the configuration with calls to custom Input values. This allows your users to easily set the Instance Plan, Group, name, tags, or anything else they may need to control. Dynamic inputs are passed with the following syntax: “<%= customOptions.fieldName %>” where fieldName is the Field Name value set on the Input
CONTENT: Optionally include documentation content for this Catalog Item. Markdown-formatted text is accepted and displayed appropriately when the item is ordered from the Service Catalog. A new Catalog Item-type Wiki entry will also be added containing this information
INPUTS: If desired, select Inputs to present users with mandatory or optional selections prior to provisioning
As an example, see the configuration for an Apache server on AWS which lets users set the Morpheus infrastructure Group and plan size for the VM:
Example Catalog Item Config
{
  "group": {
    "id": "<%= customOptions.fgroups %>"
  },
  "cloud": {
    "id": 12,
    "name": "AWS"
  },
  "type": "apache",
  "instance": {
    "userGroup": {
      "id": ""
    },
    "expireDays": "2",
    "shutdownDays": "1"
  },
  "name": "${userInitials.toUpperCase()}DM${type.take(3).toUpperCase()}${sequence+1000}",
  "config": {
    "createUser": false,
    "isEC2": false,
    "isVpcSelectable": false,
    "resourcePoolId": 129,
    "provisionServerId": null,
    "customOptions": {
      "code": "cloud.code"
    },
    "poolProviderType": null,
    "noAgent": false,
    "availabilityId": null,
    "securityId": null,
    "publicIpType": "subnet",
    "instanceProfile": null
  },
  "volumes": [
    {
      "index": 0,
      "rootVolume": true,
      "name": "data",
      "maxStorage": 10737418240,
      "volumeCustomizable": true,
      "hasDatastore": false,
      "readonlyName": false,
      "customMaxStorage": false,
      "size": 10,
      "vId": 45,
      "storageType": 6,
      "maxIOPS": null
    }
  ],
  "hostName": "${userInitials.toUpperCase()}DM${type.take(3).toUpperCase()}${sequence+1000}",
  "configEnabled": true,
  "layout": {
    "id": 49,
    "code": "apache-amazon-2.4-single"
  },
  "plan": {
     "id": "<%= customOptions.fplans %>"
  },
  "version": "2.4",
  "networkInterfaces": [
    {
      "primaryInterface": true,
      "network": {
        "id": "networkGroup-2",
        "idName": "Demo Preferred"
      },
      "showNetworkPoolLabel": true,
      "showNetworkDhcpLabel": false
    }
  ],
  "templateParameter": null,
  "securityGroups": [
    {
      "id": "sg-f38fb296"
    }
  ],
  "backup": {
    "createBackup": true,
    "jobAction": "new",
    "jobRetentionCount": "1",
    "providerBackupType": -1
  },
  "loadBalancer": [
    {
      "internalPort": 80,
      "externalPort": 80,
      "loadBalancePort": null,
      "loadBalanceProtocol": "http",
      "externalAddressCheck": false,
      "protocol": "http",
      "balanceMode": "leastconnections",
      "vipPort": 80,
      "vipHostname": "bpdmapa1008.localdomain",
      "name": "${userInitials.toUpperCase()}DM${type.take(3).toUpperCase()}${sequence+1000}",
      "vipName": "${userInitials.toUpperCase()}DM${type.take(3).toUpperCase()}${sequence+1000}-load-balancer",
      "id": ""
    },
    {
      "internalPort": 443,
      "externalPort": 443,
      "loadBalancePort": null,
      "loadBalanceProtocol": "https",
      "externalAddressCheck": false,
      "protocol": "https",
      "balanceMode": "leastconnections",
      "vipPort": 443,
      "vipHostname": "bpdmapa1008.localdomain",
      "name": "${userInitials.toUpperCase()}DM${type.take(3).toUpperCase()}${sequence+1000}",
      "vipName": "${userInitials.toUpperCase()}DM${type.take(3).toUpperCase()}${sequence+1000}-load-balancer",
      "id": ""
    }
  ],
  "hideLock": true,
  "hasNetworks": true,
  "displayNetworks": [
    {
      "groupName": "Demo Preferred",
      "ipMode": "Network Default"
    }
  ],
  "copies": 1,
  "showScale": false,
  "volumesDisplay": [
    {
      "storage": "gp2",
      "name": "data",
      "controller": null,
      "datastore": null,
      "displayOrder": null,
      "size": 10,
      "mountPoint": null
    }
  ]
}
Once done, click SAVE CHANGES
Tip
Building catalog items through the configuration wizard is similar to the typical provisioning process for Instances in Morpheus. For more details on selections available in the configuration wizard, take a look at other sections of Morpheus docs on provisioning Instances.
Building Catalog Blueprints
Morpheus Blueprints allow for full multi-tier application deployment. In the Self Service catalog, user can create catalog items based on pre-existing App Blueprints. If new Blueprints need to be created for the Service Catalog, see other sections of Morpheus docs on building App Blueprints of various supported types. Just like with catalog Instances, we can pre-configure Blueprints and present them to users viewing the Service Catalog Persona view for easy, one-click deployment.
From the Catalog Items List Page (Library > Blueprints > Catalog Items), click ADD. From the dropdown menu, select Blueprint. The modal window will appear to configure and add a new catalog Blueprint.
Configure the following:
NAME: A friendly name for the catalog item in Morpheus
DESCRIPTION: An optional description identifying the catalog item
ENABLED: When checked, this catalog item will be available for provisioning
FEATURED: When checked, this catalog item will be given special visibility in the Service Catalog Persona view
VISIBILITY: Set to private to keep the catalog item available only to users in the current Tenant. Master Tenant administrators may set catalog items to public to make them viewable and usable by Subtenant users
LOGO: Select or upload a logo to be associated with this catalog item
CONFIGURE: Click CONFIGURE to use the familiar App provisioning wizard to tie Blueprint and App deployment configuration to the Catalog Item
APP SPEC: Inject App spec here for any fields required to provision an App from your Blueprint. You may also inject any overrides to the existing Blueprint spec that are desired. App Spec configuration must be YAML, a simple example that names the App and sets the Group and Cloud is included below:
#Example App Spec

name: '<%= customOption.appName %>'
group:
  name: Dev Group
environment: Dev
tiers:
  Web:
    instances:
      - instance:
          type: nginx
          cloud: Dev AWS
  App:
    instances:
      - instance:
          type: apache
          cloud: Dev AWS
CONTENT: Optionally include documentation content for this Catalog Item. Markdown-formatted text is accepted and displayed appropriately when the item is ordered from the Service Catalog. A new Catalog Item-type Wiki entry will also be added containing this information.
INPUTS: If desired, select Inputs to present users with mandatory or optional selections prior to provisioning
Note
App spec custom option variables should be single quoted in YAML:
cloud: '<%= customOption.cloud %>'
Once done, click SAVE CHANGES
Building Catalog Workflows
From the Catalog Items List Page (Library > Blueprints > Catalog Items), click ADD. From the dropdown menu, select Workflow. The modal window will appear to configure and add a new catalog Workflow.
Configure the following:
NAME: A friendly name for the catalog item in Morpheus
DESCRIPTION: An optional description identifying the catalog item
ENABLED: When checked, this Workflow item will be available for selection in the Service Catalog
FEATURED: When checked, this catalog item will be given special visibility in the Service Catalog Persona view
VISIBILITY: Set to private to keep the catalog item available only to users in the current Tenant. Master Tenant administrators may set catalog items to public to make them viewable and usable by Subtenant users
LOGO: Select or upload a logo to be associated with this catalog item
WORKFLOW: Select an existing Workflow to be associated with this Catalog Item, new Workflows are created in Library > Automation
CONTEXT TYPE: Optionally restrict users to a specific target context, Instance, Server, or None
CONTENT: Optionally include documentation content for this Catalog Item. Markdown-formatted text is accepted and displayed appropriately when the item is ordered from the Service Catalog. A new Catalog Item-type Wiki entry will also be added containing this information.
Once done, click SAVE CHANGES
Editing and Deleting from the Self Service Catalog
Once created, Service Catalog items can be edited or deleted from the Catalog Items list view (Library > Blueprints > Catalog Items). Click the pencil icon in the relevant row to edit the Service Catalog item or the trash can icon to delete it. Alternatively, Service Catalog items can be made inactive to remove them as provisioning options rather than deleting them.
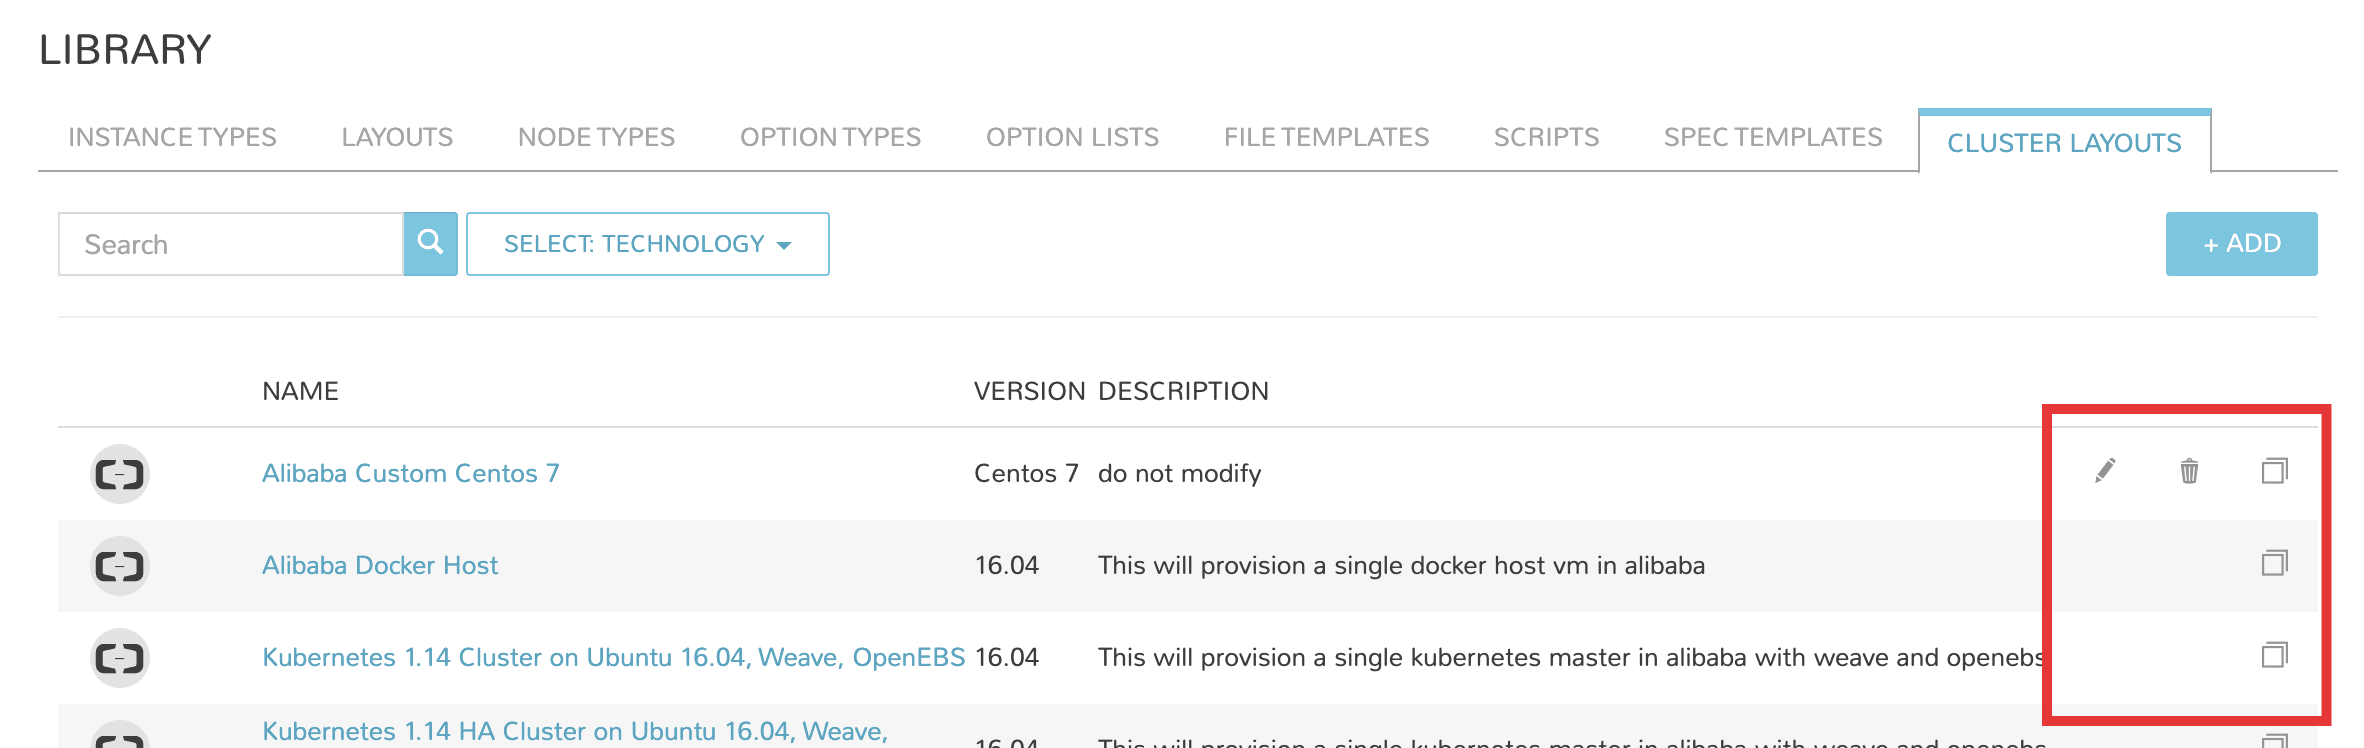
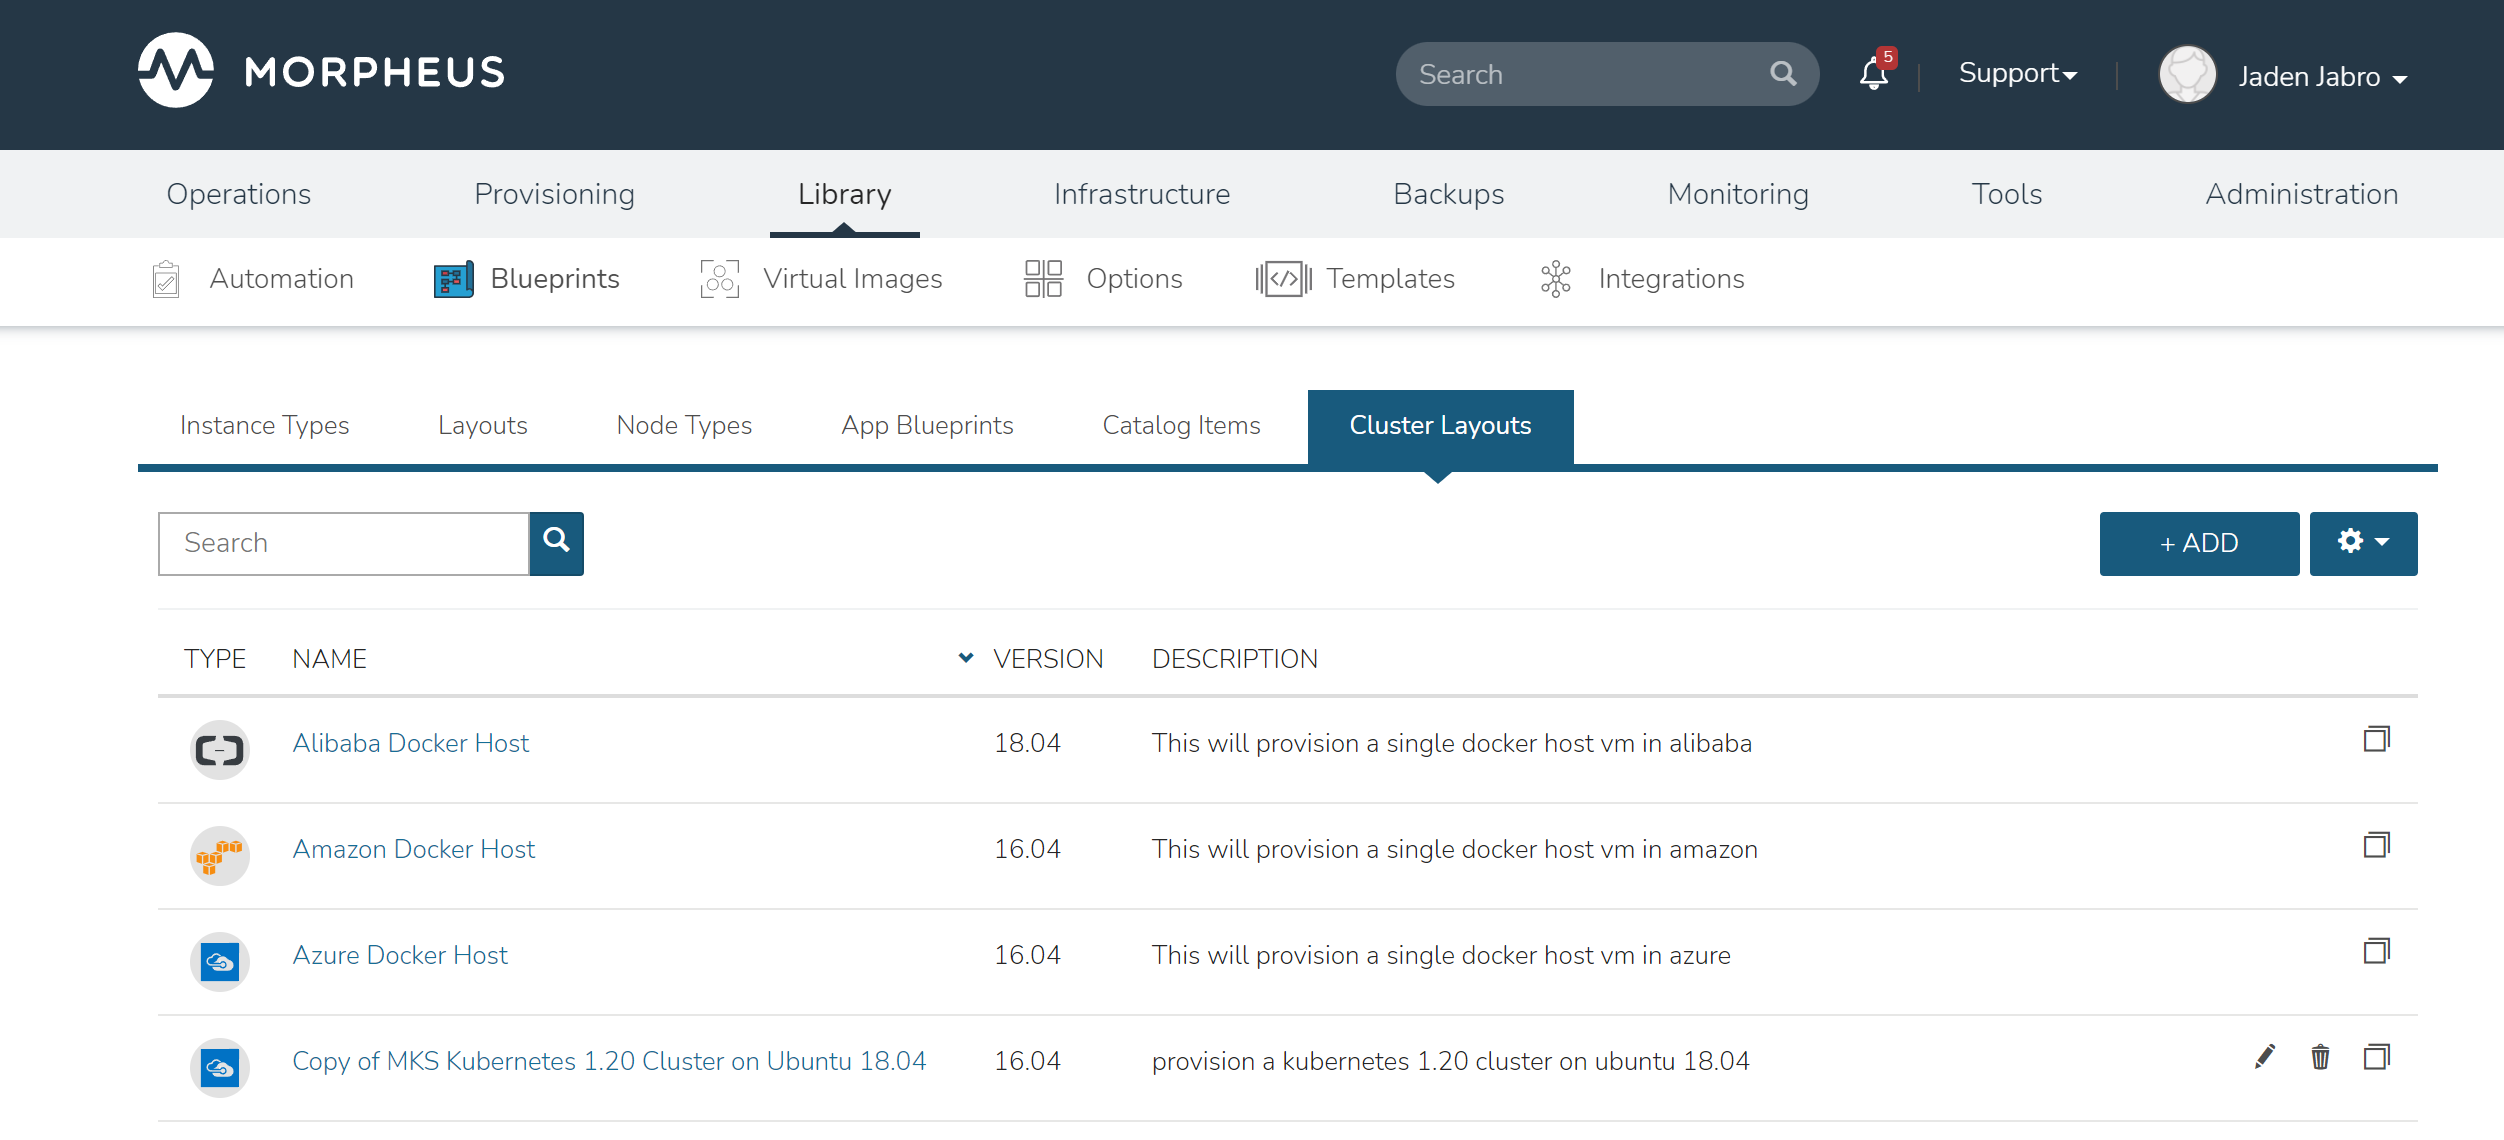
Cluster Layouts
Note
Morpheus now syncs available (non-preview) AKS k8s versions daily. Existing synced versions that are no longer supported by Azure are automatically disabled. The table below includes available AKS versions at time of v5.5.0 release.
Users can add new cluster layouts using the +ADD button. Morpheus-provided cluster layouts can be cloned for use in creating custom layouts. Custom cluster layouts can also be deleted or edited from the list view using the pencil or trash can icons.
Morpheus provided Cluster Layouts:
NAME |
CODE |
DESCRIPTION |
|---|---|---|
Kubernetes 1.20.7 Cluster AKS |
kubernetes-azure-aks-1.20.7 |
This provisions a single kubernetes master in Azure |
Kubernetes 1.20.5 Cluster AKS |
kubernetes-azure-aks-1.20.5 |
This provisions a single kubernetes master in Azure |
Kubernetes 1.19.11 Cluster AKS |
kubernetes-azure-aks-1.19.11 |
This provisions a single kubernetes master in Azure |
Kubernetes 1.19.9 Cluster AKS |
kubernetes-azure-aks-1.19.9 |
This provisions a single kubernetes master in Azure |
Kubernetes 1.18.19 Cluster AKS |
kubernetes-azure-aks-1.18.19 |
This provisions a single kubernetes master in Azure |
Kubernetes 1.18.17 Cluster AKS |
kubernetes-azure-aks-1.18.17 |
This provisions a single kubernetes master in Azure |
MKS Kubernetes 1.20 Cluster on Ubuntu 18.04 |
kubernetes-1.20.2-ubuntu-18.04.5-xen-amd64-single |
provision a kubernetes 1.20 cluster on ubuntu 18.04 in xen |
MKS Kubernetes 1.20 Cluster on Ubuntu 18.04 |
kubernetes-1.20.2-ubuntu-18.04.5-scvmm-amd64-single |
provision a kubernetes 1.20 cluster on ubuntu 18.04 in scvmm |
MKS Kubernetes 1.20 Cluster on Ubuntu 18.04 |
kubernetes-1.20.2-ubuntu-18.04.5-opentelekom-amd64-single |
provision a kubernetes 1.20 cluster on ubuntu 18.04 in opentelekom |
MKS Kubernetes 1.20 Cluster on Ubuntu 18.04 |
kubernetes-1.20.2-ubuntu-18.04.5-nutanix-amd64-single |
provision a kubernetes 1.20 cluster on ubuntu 18.04 |
MKS Kubernetes 1.20 Cluster on Ubuntu 18.04 |
kubernetes-1.20.2-ubuntu-18.04.5-morpheus-amd64-single |
provision a kubernetes 1.20 cluster on ubuntu 18.04 in manual |
External Kubernetes 1.20 |
kubernetes-external-1.20 |
Connect to an external kubernetes cluster. |
MKS Kubernetes 1.20 Cluster on Ubuntu 18.04 |
kubernetes-1.20.2-ubuntu-18.04.5-hyperv-amd64-single |
provision a kubernetes 1.20 cluster on ubuntu 18.04 in hyperv |
MKS Kubernetes 1.20 Cluster on Ubuntu 18.04 |
kubernetes-1.20.2-ubuntu-18.04.5-huawei-amd64-single |
provision a kubernetes 1.20 cluster on ubuntu 18.04 in Huawei |
MKS Kubernetes 1.20 Cluster on Ubuntu 18.04 |
kubernetes-1.20.2-ubuntu-18.04.5-openstack-amd64-single |
provision a kubernetes 1.20 cluster on ubuntu 18.04 in Openstack |
MKS Kubernetes 1.20 Cluster on Ubuntu 18.04 |
kubernetes-1.20.2-ubuntu-18.04.5-google-amd64-single |
provision a kubernetes 1.20 cluster on ubuntu 18.04 |
MKS Kubernetes 1.20 Cluster on Ubuntu 18.04 |
kubernetes-1.20.2-ubuntu-18.04.5-amazon-amd64-single |
provision a kubernetes 1.20 cluster on ubuntu 18.04 |
Copy of MKS Kubernetes 1.20 Cluster on Ubuntu 18.04 |
ffc21dc1-feb7-4c02-ae90-204fd080c23d |
provision a kubernetes 1.20 cluster on ubuntu 18.04 in vmware |
Docker Cluster on Ubuntu 18.04 |
docker-ubuntu-18.04.2-fusion-amd64-single |
provision a docker cluster on ubuntu 18.04 in fusion |
MKS Kubernetes 1.20 Cluster on Ubuntu 18.04 |
kubernetes-1.20.2-ubuntu-18.04.5-vmware-amd64-single |
provision a kubernetes 1.20 cluster on ubuntu 18.04 in vmware |
MKS Kubernetes 1.20 Cluster on Ubuntu 18.04 |
kubernetes-1.20.2-ubuntu-18.04.5-fusion-amd64-single |
provision a kubernetes 1.20 cluster on ubuntu 18.04 in fusion |
Kubernetes 1.17 Cluster EKS |
kubernetes-amazon-eks-1.17 |
This will provision a single kubernetes master in amazon with weave and openebs |
Kubernetes 1.17 HA Cluster on Ubuntu 16.04, Weave, OpenEBS |
kubernetes-1.17-xen-ubuntu-16.04-cluster-weave-openebs |
This will provision a single kubernetes master in xen with weave and openebs |
Kubernetes 1.17 Cluster on Ubuntu 16.04, Weave, OpenEBS |
kubernetes-xen-1.17-ubuntu-16.04-single |
This will provision a single kubernetes master in xen with weave and openebs |
Kubernetes 1.17 HA Cluster on Ubuntu 18.04, Weave, OpenEBS |
kubernetes-scvmm-ubuntu-18.04-cluster-weave-openebs |
This will provision a single kubernetes master in scvmm with weave and openebs |
Kubernetes 1.17 Cluster on Ubuntu 18.04, Weave, OpenEBS |
kubernetes-scvmm-ubuntu-18.04-single |
This will provision a single kubernetes master in scvmm with weave and openebs |
Kubernetes 1.17 HA Cluster on Ubuntu 16.04, Weave, OpenEBS |
kubernetes-openstack-ubuntu-18.04-cluster-weave-openebs |
This will provision a single kubernetes master in openstack with weave and openebs |
Kubernetes 1.17 Cluster on Ubuntu 16.04, Weave, OpenEBS |
kubernetes-openstack-ubuntu-18.04-single |
This will provision a single kubernetes master in openstack with weave and openebs |
Kubernetes 1.17 Cluster on Ubuntu 18.04, Weave, OpenEBS |
kubernetes-opentelekom-ubuntu-18.04-single |
This will provision a single kubernetes master in opentelekom with weave and openebs |
Kubernetes 1.17 HA Cluster on Ubuntu 18.04, Weave, OpenEBS |
kubernetes-nutanix-ubuntu-18.04-cluster-weave-openebs |
This will provision a single kubernetes master in nutanix with weave and openebs |
Kubernetes 1.17 HA Cluster on Linux, Weave, OpenEBS |
kubernetes-1.17-morpheus-linux-cluster-weave-openebs |
This will provision a kubernetes cluster with weave and openebs |
Kubernetes 1.17 Cluster on Linux, Weave, OpenEBS |
kubernetes-1.17-morpheus-linux-single |
This will provision a single kubernetes master with weave and openebs |
Kubernetes 1.17 HA Cluster on Ubuntu 18.04, Weave, OpenEBS |
kubernetes-hyperv-ubuntu-18.04-cluster-weave-openebs |
This will provision a single kubernetes master in hyperv with weave and openebs |
Kubernetes 1.17 Cluster on Ubuntu 18.04, Weave, OpenEBS |
kubernetes-hyperv-ubuntu-18.04-single |
This will provision a single kubernetes master in hyperv with weave and openebs |
Kubernetes 1.17 HA Cluster on Ubuntu 18.04, Weave, OpenEBS |
kubernetes-huawei-ubuntu-18.04-cluster-weave-openebs |
This will provision a single kubernetes master in huawei with weave and openebs |
Kubernetes 1.17 Cluster on Ubuntu 18.04, Weave, OpenEBS |
kubernetes-huawei-ubuntu-18.04-single |
This will provision a single kubernetes master in huawei with weave and openebs |
Kubernetes 1.17 HA Cluster on Ubuntu 16.04, Weave, OpenEBS |
kubernetes-google-ubuntu-18.04-cluster-weave-openebs |
This will provision a single kubernetes master in google with weave and openebs |
Kubernetes 1.17 Cluster on Ubuntu 16.04, Weave, OpenEBS |
kubernetes-google-ubuntu-18.04-single |
This will provision a single kubernetes master in google with weave and openebs |
Kubernetes 1.17 HA Cluster on Ubuntu 18.04, Weave, OpenEBS |
kubernetes-esxi-ubuntu-18.04-cluster-weave-openebs |
This will provision a single kubernetes master in esxi with weave and openebs |
Kubernetes 1.17 Cluster on Ubuntu 18.04, Weave, OpenEBS |
kubernetes-esxi-ubuntu-18.04-single |
This will provision a single kubernetes master in esxi with weave and openebs |
Kubernetes 1.17 HA Cluster on Ubuntu 18.04, Weave, OpenEBS |
kubernetes-digitalOcean-ubuntu-18.04-cluster-weave-openebs |
This will provision a single kubernetes master in digitalOcean with weave and openebs |
Kubernetes 1.17 Cluster on Ubuntu 18.04, Weave, OpenEBS |
kubernetes-digitalOcean-ubuntu-18.04-single |
This will provision a single kubernetes master in digitalOcean with weave and openebs |
Kubernetes 1.17 HA Cluster on Ubuntu 18.04, Weave, OpenEBS |
kubernetes-azure-ubuntu-18.04-cluster-weave-openebs |
This will provision a single kubernetes master in azure with weave and openebs |
Kubernetes 1.17 Cluster on Ubuntu 18.04, Weave, OpenEBS |
kubernetes-azure-ubuntu-18.04-single |
This will provision a single kubernetes master in azure with weave and openebs |
Kubernetes 1.17 HA Cluster on Ubuntu 18.04, Weave, OpenEBS |
kubernetes-amazon-ubuntu-18.04-cluster-weave-openebs |
This will provision a single kubernetes master in amazon with weave and openebs |
Kubernetes 1.17 Cluster on Ubuntu 18.04, Weave, OpenEBS |
kubernetes-amazon-ubuntu-18.04-single |
This will provision a single kubernetes master in amazon with weave and openebs |
Kubernetes 1.17 Cluster on Ubuntu 18.04, Weave, OpenEBS |
kubernetes-alibaba-ubuntu-18.04-single |
This will provision a single kubernetes master in alibaba with weave and openebs |
Kubernetes 1.17 HA Cluster on Ubuntu 18.04, Weave, OpenEBS |
kubernetes-vmware-ubuntu-18.04-cluster-weave-openebs |
This will provision a single kubernetes master in vmware with weave and openebs |
Kubernetes 1.17 Cluster on Ubuntu 18.04, Weave, OpenEBS |
kubernetes-vmware-ubuntu-18.04-single |
This will provision a single kubernetes master in vmware with weave and openebs |
Copy of Kubernetes 1.14 Cluster on Ubuntu 16.04, Weave, OpenEBS |
6441b891-a61d-4f0b-a7ff-19c81d2ffd51 |
This will provision a single kubernetes master in vmware with weave and openebs |
Kubernetes 1.17 Cluster on Ubuntu 18.04, Weave, OpenEBS |
kubernetes-1.17-fusion-ubuntu-18.04-single |
This will provision a single kubernetes master in fusion with weave and openebs |
Kubernetes 1.16 Cluster on Ubuntu 18.04, Weave, OpenEBS |
kubernetes-1.16-fusion-ubuntu-18.04-single |
This will provision a single kubernetes master in fusion with weave and openebs |
Kubernetes 1.15 Cluster on Ubuntu 18.04, Weave, OpenEBS |
kubernetes-1.15-fusion-ubuntu-18.04-single |
This will provision a single kubernetes master in fusion with weave and openebs |
External Kubernetes 1.17 Cluster |
kubernetes-external-1.17 |
This will allow access to an external kubernetes cluster |
External Kubernetes 1.16 Cluster |
kubernetes-external-1.16 |
This will allow access to an external kubernetes cluster |
External Kubernetes 1.15 Cluster |
kubernetes-external-1.15 |
This will allow access to an external kubernetes cluster |
External Kubernetes 1.14 Cluster |
kubernetes-external-1.14 |
This will allow access to an external kubernetes cluster |
KVM on Ubuntu 16.04 |
kvm-vmware-ubuntu-16.04-single |
This will provision a single kvm host vm in vmware |
Morpheus KVM and Container Cluster |
morpheus-kvm-combo-cluster |
This will add a KVM and container host |
VMware Docker CentOS 7.5 |
docker-vmware-centos-7.5-single |
This will provision a single docker host vm in vmware |
Oracle Cloud Docker Host |
docker-oraclecloud-ubuntu-16.04-single |
This will provision a single docker host vm in oraclecloud |
Morpheus Kubernetes Manual Cluster |
morpheus-kubernetes-manual-cluster |
This will create a kubernetes manual (self-managed) cluster |
Alibaba Docker Host |
docker-alibaba-ubuntu-16.04-single |
This will provision a single docker host vm in alibaba |
SCVMM Docker Host |
docker-scvmm-ubuntu-16.04-single |
This will provision a single docker host vm in scvmm |
KVM on Ubuntu 16.04 |
kvm-fusion-ubuntu-16.04-single |
This will provision a single kvm host vm in fusion |
UpCloud Docker Host |
docker-upcloud-ubuntu-16.04-single |
This will provision a single docker host vm in upcloud |
Morpheus KVM Ubuntu Cluster |
morpheus-kvm-ubuntu-cluster |
This will add a KVM Ubuntu host |
Morpheus KVM CentOS Cluster |
morpheus-kvm-centos-cluster |
This will add a KVM CentOS host |
Azure Docker Host |
docker-azure-ubuntu-16.04-single |
This will provision a single docker host vm in azure |
KVM on CentOS 7.5 |
kvm-vmware-centos-7.5-single |
This will provision a single kvm host vm in vmware |
KVM on CentOS 7.5 |
kvm-fusion-centos-7.5-single |
This will provision a single kvm host vm in fusion |
Kubernetes 1.14 HA Cluster on Ubuntu 16.04, Weave, OpenEBS |
kubernetes-bluemix-ubuntu-16.04-cluster-weave-openebs |
This will provision a single kubernetes master in bluemix with weave and openebs |
Kubernetes 1.14 Cluster on Ubuntu 16.04, Weave, OpenEBS |
kubernetes-bluemix-ubuntu-16.04-single |
This will provision a single kubernetes master in bluemix with weave and openebs |
Kubernetes 1.17 HA Cluster on Ubuntu 16.04, Weave, OpenEBS |
kubernetes-vcd-ubuntu-16.04-cluster-weave-openebs |
This will provision a single kubernetes master in vcd with weave and openebs |
Kubernetes 1.17 Cluster on Ubuntu 16.04, Weave, OpenEBS |
kubernetes-vcd-ubuntu-16.04-single |
This will provision a single kubernetes master in vcd with weave and openebs |
VCD Docker Host |
docker-vcd-ubuntu-16.04-single |
This will provision a single docker host vm in vcd |
Kubernetes 1.14 HA Cluster on Ubuntu 16.04, Weave, OpenEBS |
kubernetes-softlayer-ubuntu-16.04-cluster-weave-openebs |
This will provision a single kubernetes master in softlayer with weave and openebs |
Kubernetes 1.14 Cluster on Ubuntu 16.04, Weave, OpenEBS |
kubernetes-softlayer-ubuntu-16.04-single |
This will provision a single kubernetes master in softlayer with weave and openebs |
SoftLayer Docker Host |
docker-softlayer-ubuntu-16.04-single |
This will provision a single docker host vm in softlayer |
Open Telekom Docker Host |
docker-opentelekom-ubuntu-16.04-single |
This will provision a single docker host vm in opentelekom |
Huawei Docker Host |
docker-huawei-ubuntu-16.04-single |
This will provision a single docker host vm in huawei |
Google Docker Host |
docker-google-ubuntu-16.04-single |
This will provision a single docker host vm in google |
ESXi Docker Host |
docker-esxi-ubuntu-16.04-single |
This will provision a single docker host vm in esxi |
IBM Docker Host |
docker-bluemix-ubuntu-16.04-single |
This will provision a single docker host vm in bluemix |
Xen Docker Host |
docker-xen-ubuntu-16.04-single |
This will provision a single docker host vm in xen |
Digital Ocean Docker Host |
docker-digitalOcean-ubuntu-16.04-single |
This will provision a single docker host vm in digitalOcean |
Hyper-V Docker Host |
docker-hyperv-ubuntu-16.04-single |
This will provision a single docker host vm in hyperv |
Docker on Linux |
manual-linux-docker-morpheus-single |
This will add a single docker host |
Kubernetes Cluster 1.14 on Ubuntu 16.04, Weave, OpenEBS |
kubernetes-morpheus-ubuntu-16.04-cluster-weave-openebs |
This will provision a kubernetes cluster with weave and openebs |
Kubernetes 1.14 on Ubuntu 16.04, Weave, OpenEBS |
kubernetes-morpheus-ubuntu-16.04-single |
This will provision a single kubernetes master with weave and openebs |
Docker on Bare Metal |
docker-morpheus-metal-ubuntu-16.04-single |
This will provision a single docker host |
Docker on Ubuntu 16.04 |
docker-morpheus-ubuntu-16.04-single |
This will provision a single docker host |
Amazon Docker Host |
docker-amazon-ubuntu-16.04-single |
This will provision a single docker host vm in amazon |
OpenStack Docker Host |
docker-openstack-ubuntu-16.04-single |
This will provision a single docker host vm in openstack |
Nutanix Docker Ubuntu 16.04 |
docker-nutanix-ubuntu-16.04-single |
This will provision a single docker host vm in nutanix |
VMware Docker Ubuntu 16.04 |
docker-vmware-ubuntu-16.04-single |
This will provision a single docker host vm in vmware |
Kubernetes 1.14 HA Cluster on Ubuntu 16.04, Weave, OpenEBS |
kubernetes-fusion-ubuntu-16.04-cluster-weave-openebs |
This will provision a single kubernetes master in fusion with weave and openebs |
Kubernetes 1.14 Cluster on Ubuntu 16.04, Weave, OpenEBS |
kubernetes-fusion-ubuntu-16.04-single |
This will provision a single kubernetes master in fusion with weave and openebs |
Docker on Ubuntu 16.04 |
docker-fusion-ubuntu-16.04-single |
This will provision a single docker host vm in fusion |
Users can add new cluster layouts using the +ADD button. Morpheus-provided cluster layouts can be cloned for use in creating custom layouts. Custom cluster layouts can also be deleted or edited from the list view using the pencil or trash can icons.