Full HA Install
Full HA Install Overview
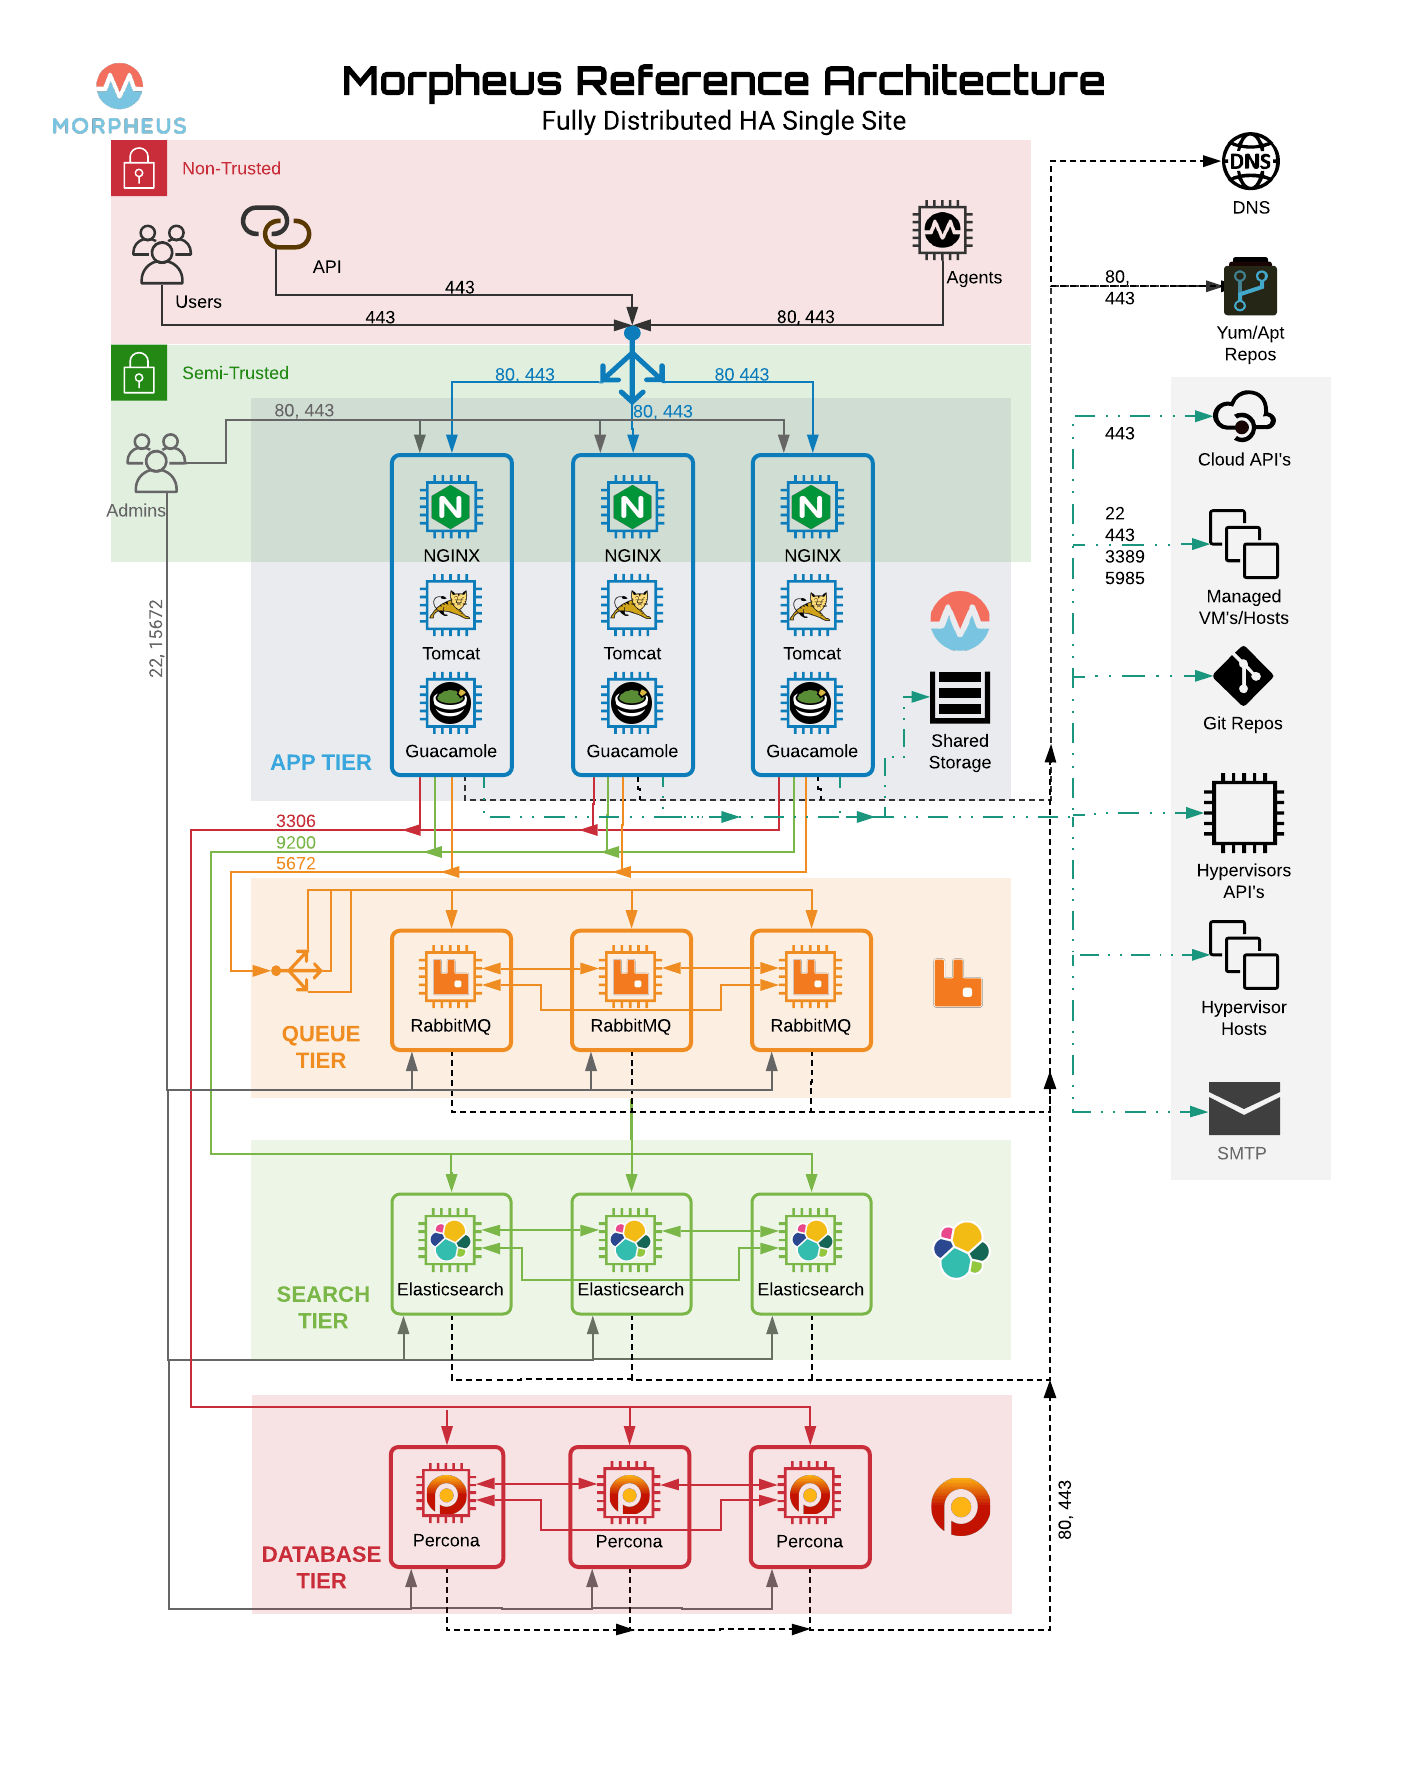
- App Host(s) with Distributed Services (Full HA)
Application tier is installed on one or more hosts. All UI hosts point to externalized Transactional Database, Non-Transactional Database, and Message Tiers. The reconfigure process installs only Application services.
Minimum Nodes
For Full High-Availability configurations, RabbitMQ, Elasticsearch and mySQL(Galera/Percona) must be configured in minimum 3 Node Clusters, and 2 or more App Nodes are required.
Note
VM requirements assume local services. VM count requirements are not applicable when using hosted services such as AWS RDS mySQL.
- Minimum 11 Nodes
2+ Application Hosts
3 Node RabbitMQ Cluster
3 Node Elasticsearch Cluster
3 Node Galera/Percona Cluster
Important
Asynchronous Active/Active and Active/Passive Database configurations are not supported for HA configurations. A minimum 3 node mySQL Cluster with synchronous multi-master replication is required for Database Clusters. Morpheus recommends Percona XtraDB Clusters with synchronous multi-master replication. Asynchronous Active/Passive can be used but is not considered an HA configuration.
Important
For Clusters with more than 3 Nodes, always use an odd number of nodes (3,5,7 etc) to ensure Quorum.
Port Requirements
Service |
Source |
Destination |
Port(s) |
Morpheus |
Application Node |
mySQL |
3306 |
Morpheus |
Application Node |
Elasticsearch |
9200 |
Morpheus |
Application Node |
RabbitMQ |
5672/5671(SSL) |
Morpheus |
Application Node |
YUM or APT |
443 |
Elasticsearch |
Elasticsearch |
Elasticsearch |
9300 |
mySQL |
mySQL |
mySQL |
4444,4567,4568 |
RabbitMQ |
RabbitMQ |
RabbitMQ |
4369,25672 |
Agents |
Managed Instances |
Application Node |
443 |
Web Interface |
Internal Clients |
Application Node |
443 |
Source |
Destination |
Port |
Protocol |
For |
|---|---|---|---|---|
Application Tier |
Messaging Tier |
5672 |
TCP |
AMQP non-TLS connections |
Application Tier |
Messaging Tier |
5671 |
TCP |
AMQPS TLS enabled connections |
Messaging Tier |
Messaging Tier |
25672 |
TCP |
Inter-node and CLI tool communication |
Administrator Web Browser |
RabbitMQ Server Management |
15672 |
TCP |
Management plugin |
Administrator Web Browser |
RabbitMQ Server Management |
15671 |
TCP |
Management plugin SSL |
Messaging Tier Cluster Node |
Messaging Tier Cluster Nodes |
4369 |
TCP |
erlang epmd peer discovery service used by RabbitMQ nodes and CLI tools |
Default Locations
Morpheus follows several install location conventions. Below is a list of system defaults for convenient management:
Installation Location:
/opt/morpheusLog Location:
/var/log/morpheusMorpheus-UI:
/var/log/morpheus/morpheus-uiNGINX:
/var/log/morpheus/nginxCheck Server:
/var/log/morpheus/check-server
User-defined install/config:
/etc/morpheus/morpheus.rb
CentOS/RHEL Percona XtraDB Cluster with TLS
Out of the box Morpheus uses MySQL but Morpheus supports any mySQL-compliant database. There are many ways to set up a highly available, MySQL dialect-based database. One which has found favor with many of our customers is Percona’s XtraDB Cluster. Percona’s product is based off of Galera’s WSREP Clustering, which is also supported.
Important
Currently, you must use a v5.7-compatible version of MySQL/Percona. Complete compatibility information is available in the Compatibility and Breaking Changes page. Additional configuration for Percona Clusters with TLS enabled is required. Refer to CentOS/RHEL Percona XtraDB Cluster with TLS Configuration in our full HA docs for details.
Installation and configuration of Percona XtraDB Cluster on CentOS/RHEL 8 with TLS enabled for all communication. Refer to Debian/Ubuntu Percona XtraDB Cluster with TLS for Debian/Ubuntu.
Important
This is a sample configuration only. Customer configurations and requirements will vary.
Additional information can be found here:
Requirements
Storage Requirements
30 GB storage minimum for each database node. This should be monitored and increased if the Morpheus database requires more space.
After database installation ensure that the minimum storage requirement is available for the mysql tmpdir. By default mysql will write temporary files in “/tmp”. The mysql tmpdir configuration can be modified using the following steps for each database node:
Create the new directory.
mkdir /path/to/mysql/tmp/directory
chown -R mysql:mysql /path/to/mysql/tmp/directory
Edit /etc/my.cnf.
[mysqld]
tmpdir=/path/to/mysql/tmp/directory
Important
Failing to provide sufficient storage to the mysql tmpdir can result in failed database migrations and Morpheus upgrades.
Current Operating System (OS) support can be found here:
Percona requires the following TCP ports for the cluster nodes. Please create the appropriate firewall rules on your Percona nodes.
3306
4444
4567
4568
[root]# firewall-cmd --add-port={3306/tcp,4444/tcp,4567/tcp,4568/tcp}
The following OS repositories are required, in addition to the Percona repositories:
rhel-8-for-x86_64-baseos-rpms
rhel-8-for-x86_64-appstream-rpms
Configure SElinux
Percona recommends setting SELinux from enforcing to permissive to eliminate interference. Run the following to set SELinux to permissive on each database node:
[root]# setenforce 0
[root]# sed -i 's/SELINUX=enforcing/SELINUX=permissive/g' /etc/selinux/config
If enforcing is required by the organization, SELinux rules can be added to ensure interference is eliminated. To allow Percona XtraDB Cluster functionality when SELinux is Enforcing, run the following on each database Node:
Install SELinux utilities
[root]# yum install -y policycoreutils-python.x86_64
Configure Percona ports for SELinux:
[root]# semanage port -m -t mysqld_port_t -p tcp 4444
[root]# semanage port -m -t mysqld_port_t -p tcp 4567
[root]# semanage port -a -t mysqld_port_t -p tcp 4568
Create the policy file PXC.te
[root]# vi PXC.te
module PXC 1.0;
require {
        type unconfined_t;
        type mysqld_t;
        type unconfined_service_t;
        type tmp_t;
        type sysctl_net_t;
        type kernel_t;
        type mysqld_safe_t;
        class process { getattr setpgid };
        class unix_stream_socket connectto;
        class system module_request;
        class file { getattr open read write };
        class dir search;
  }

  #============= mysqld_t ==============

 allow mysqld_t kernel_t:system module_request;
 allow mysqld_t self:process { getattr setpgid };
 allow mysqld_t self:unix_stream_socket connectto;
 allow mysqld_t sysctl_net_t:dir search;
 allow mysqld_t sysctl_net_t:file { getattr open read };
 allow mysqld_t tmp_t:file write;
Compile and load the SELinux policy
[root]# checkmodule -M -m -o PXC.mod PXC.te
[root]# semodule_package -o PXC.pp -m PXC.mod
[root]# semodule -i PXC.pp
Add Percona Repo
Additional information can be found here:
percona-release Repository Locations
Add the Percona repo to your Linux Distro.
[root]# yum install -y https://repo.percona.com/yum/percona-release-latest.noarch.rpm
[root]# percona-release setup pxc-57
The below commands will clean the repos and update the server.
[root]# yum clean all
[root]# yum update -y --skip-broken
Installing Percona XtraDB Cluster
Install the Percona XtraDB Cluster software and it’s dependences on each database node.
[root]# yum install -y Percona-XtraDB-Cluster-57
Enable the mysql service so that the service starts at boot on each database node.
[root]# systemctl enable mysql
Start mysql on each database node.
[root]# systemctl start mysql
From Node 01, log into the mysql server and set a new root password. To get the temporary root mysql password you will need to run the below command. The command will print the password to the screen. Copy the password and use it when logging in.
[root]# grep 'temporary password' /var/log/mysqld.log
[root]# mysql -u root -p
   password: `enter password copied above`
Change the root user password to the mysql DB. Note that the database from Node 1 will be replicated to all other nodes, changing the password on the additional nodes is not required.
mysql> ALTER USER 'root'@'localhost' IDENTIFIED BY 'rootPassword';
Create the sstuser user, grant the permissions, and exit mysql.
mysql> CREATE USER 'sstuser'@'localhost' IDENTIFIED BY 'sstUserPassword';
Note
The sstuser and password will be used in the /etc/my.cnf configuration.
mysql> GRANT RELOAD, LOCK TABLES, PROCESS, REPLICATION CLIENT ON *.* TO 'sstuser'@'localhost';

mysql> FLUSH PRIVILEGES;

mysql> exit
Bye
Stop the mysql service on all nodes
[root]# systemctl stop mysql
Once the service is stopped on all nodes move onto the next step.
Add [mysqld] to my.cnf in /etc/
Add the following to
/etc/my.cnf. Thewsrep_node_nameandwsrep_node_addressfields must to be unique on each of the nodes. Thewsrep_sst_authfield should match the SST username and password created previously.DB Node 1
[root]# vi /etc/my.cnf

[mysqld]
pxc_encrypt_cluster_traffic=ON
max_connections = 451
max_allowed_packet = 256M

wsrep_provider=/usr/lib64/galera3/libgalera_smm.so
wsrep_provider_options="cert.optimistic_pa=NO"
wsrep_certification_rules='OPTIMIZED'

wsrep_cluster_name=morpheusdb-cluster
wsrep_cluster_address=gcomm://192.168.101.01,192.168.101.02,192.168.101.03

wsrep_node_name=morpheus-db-node01
wsrep_node_address=192.168.101.01

wsrep_sst_method=xtrabackup-v2
wsrep_sst_auth=sstuser:sstUserPassword
pxc_strict_mode=PERMISSIVE
wsrep_sync_wait=2

skip-log-bin
default_storage_engine=InnoDB
innodb_autoinc_lock_mode=2
character-set-server=utf8
default_time_zone="+00:00"
DB Node 2
[root]# vi /etc/my.cnf

[mysqld]
pxc_encrypt_cluster_traffic=ON
max_connections = 451
max_allowed_packet = 256M

wsrep_provider=/usr/lib64/galera3/libgalera_smm.so
wsrep_provider_options="cert.optimistic_pa=NO"
wsrep_certification_rules='OPTIMIZED'

wsrep_cluster_name=morpheusdb-cluster
wsrep_cluster_address=gcomm://192.168.101.01,192.168.101.02,192.168.101.03

wsrep_node_name=morpheus-db-node02
wsrep_node_address=192.168.101.02

wsrep_sst_method=xtrabackup-v2
wsrep_sst_auth=sstuser:sstUserPassword
pxc_strict_mode=PERMISSIVE
wsrep_sync_wait=2

skip-log-bin
default_storage_engine=InnoDB
innodb_autoinc_lock_mode=2
character-set-server=utf8
default_time_zone="+00:00"
DB Node 3
[root]# vi /etc/my.cnf

[mysqld]
pxc_encrypt_cluster_traffic=ON
max_connections = 451
max_allowed_packet = 256M

wsrep_provider=/usr/lib64/galera3/libgalera_smm.so
wsrep_provider_options="cert.optimistic_pa=NO"
wsrep_certification_rules='OPTIMIZED'

wsrep_cluster_name=morpheusdb-cluster
wsrep_cluster_address=gcomm://192.168.101.01,192.168.101.02,192.168.101.03

wsrep_node_name=morpheus-db-node03
wsrep_node_address=192.168.101.03

wsrep_sst_method=xtrabackup-v2
wsrep_sst_auth=sstuser:sstUserPassword
pxc_strict_mode=PERMISSIVE
wsrep_sync_wait=2

skip-log-bin
default_storage_engine=InnoDB
innodb_autoinc_lock_mode=2
character-set-server=utf8
default_time_zone="+00:00"
Note
The default setting on Morpheus app nodes for
max_activedatabase connections is 150. For this example we are settingmax_connections = 451to account for 3 maximum simultaneous Morpheus app node connections. Ifmax_activeis configured higher on the app nodes, or the number of app nodes is not 3, adjust accordingly for your configuration.Save
/etc/my.cnf
Bootstrap Node 01
Important
Ensure mysql.service is stopped prior to bootstrap.
To bootstrap the first node in the cluster run the below command.
systemctl start [email protected]
Note
The mysql service will start during the bootstrap.
Note
Startup failures are commonly caused by misconfigured
/etc/my.cnffiles. Also verifysafe_to_bootstrapis set to1on Node 01 in/var/lib/mysql/grastate.dat.
Configure Morpheus Database and User
Create the Database you will be using with Morpheus. Login to mysql on Node 01:
[root]# mysql -u root -p
  password: `enter root password`

mysql> CREATE DATABASE morpheus CHARACTER SET utf8 COLLATE utf8_general_ci;

mysql> show databases;
Next create your Morpheus database user. This is the user the Morpheus app nodes will auth with mysql.
mysql> CREATE USER 'morpheusDbUser'@'%' IDENTIFIED BY 'morpheusDbUserPassword';
Next Grant your new Morpheus user permissions.
mysql> GRANT ALL PRIVILEGES ON *.* TO 'morpheusDbUser'@'%' IDENTIFIED BY 'morpheusDbUserPassword';

mysql> FLUSH PRIVILEGES;
Important
If you grant privileges to the morpheusDbUser to only the morpheusdb database, you will also need to GRANT SELECT, PROCESS, SHOW DATABASES, SUPER ON PRIVILEGES to the morpheusDbUser on . for the Appliance Health service.
mysql> exit
Copy SSL Files to other nodes
During initialization of Node 01 the required pem files will be generated in /var/lib/mysql. The ca.pem, server-cert.pem and server-key.pem files need to match on all nodes in the cluster.
Copy the following files from Node 01 to the same path (default is /var/lib/mysql) on Node 02 and Node 03:
From Node 01
[root]# scp /var/lib/mysql/ca.pem [email protected]:/root
[root]# scp /var/lib/mysql/server-cert.pem [email protected]:/root
[root]# scp /var/lib/mysql/server-key.pem [email protected]:/root

[root]# scp /var/lib/mysql/ca.pem [email protected]:/root
[root]# scp /var/lib/mysql/server-cert.pem [email protected]:/root
[root]# scp /var/lib/mysql/server-key.pem [email protected]:/root
From Node 02 and Node 03
[root]# cp /root/ca.pem /var/lib/mysql/
[root]# cp /root/server-cert.pem /var/lib/mysql/
[root]# cp /root/server-key.pem /var/lib/mysql/
Important
Ensure all 3 files match on all 3 nodes, including path, owner and permissions.
Note
The generated certificate is self-signed. Consult Percona documentation for [mysqld] and SSL file configuration when providing your own.
Start the Remaining Nodes
Start mysql on Node 02 and Node 03
[root]# systemctl start mysql
The services will automatically join the cluster using the sstuser we created earlier.
Note
Startup failures are commonly caused by misconfigured /etc/my.cnf files.
Verify Configuration
Verify SELinux is not rejecting any db cluster communication by running the below on all db nodes:
[root@allDbNodes]# grep -i denied /var/log/audit/audit.log | grep mysqld_t
If there are any results, address the source or update the SELinux Policy to resolve.
Update SELinux if necessary
[root@allDbNodes]# rm -f PXC.*
[root@allDbNodes]# grep -i denied /var/log/audit/audit.log | grep mysqld_t | audit2allow -M PXC
[root@allDbNodes]# semodule -i PXC.pp
To verify all nodes joined the cluster, on any db node login to mysql and run
show status like 'wsrep%';[root@anyDbNode]# mysql -u root -p mysql> show status like 'wsrep%';
Verify
wsrep_cluster_sizeis3andwsrep_incoming_addresseslists all 3 node ip addresses.From all Morpheus app nodes, verify that you can login to all 3 database nodes
[root@allAppNodes] cd /opt/morpheus/embedded/bin/
[root@appNode01]# ./mysql -h 192.168.101.01 -u morpheusDbUser -p
[root@appNode02]# ./mysql -h 192.168.101.02 -u morpheusDbUser -p
[root@appNode03]# ./mysql -h 192.168.101.03 -u morpheusDbUser -p
If you are unable to login to mysql from an app node, ensure credentials are correct, privileges have been granted, mysql is running, and ports are open.
To validate network accessibility, use telnet to verify app node can reach db nodes on 3306: telnet 192.168.101.01 3306
RabbitMQ Cluster
An HA deployment will also include a Highly Available RabbitMQ. This can be achieved through RabbitMQ’s HA-Mirrored Queues on at least 3, independent nodes. To accomplish this we recommend following Pivotal’s documentation on RabbitMQ here: https://www.rabbitmq.com/ha.html and https://www.rabbitmq.com/clustering.html
Install RabbitMQ on the 3 nodes and create a cluster.
Note
For the most up to date RPM package we recommend using this link: :link: https://www.rabbitmq.com/install-rpm.html#downloads
Important
Morpheus connects to AMQP over 5672 or 5671(SSL) and 61613 or 61614(SSL)
RabbitMQ Installation and Configuration
Important
This is a sample configuration only. Customer configurations and requirements will vary.
RabbitMQ requires Erlang to be installed, the exact version will depend on which version of RabbitMQ you’re installing on your queue-tier nodes. Click the link below to expand a compatibility table for RabbitMQ and Erlang. Note that Morpheus is compatible with RabbitMQ 3.5.x and higher, however, versions 3.7.x and earlier have reached their end of life and RabbitMQ does not encourage their use. If needed, a compatibility table for these sunsetted versions is in RabbitMQ documentation.
RabbitMQ/Erlang Compatibility Table
RabbitMQ Version |
Minimum Required Erlang/OTP |
Maximum Supported Erlang/OTP |
|---|---|---|
3.9.x |
23.2 |
24.x |
3.8.16 - 3.8.19 |
23.2 |
24.x |
3.8.9 - 3.8.15 |
22.3 |
23.x |
3.8.4 - 3.8.8 |
21.3 |
23.x |
3.8.0 - 3.8.3 |
21.3 |
22.x |
Install epel-release and erlang
yum install epel-release
yum install erlang
Install RabbitMQ on all 3 Nodes
wget https://dl.bintray.com/rabbitmq/rabbitmq-server-rpm/rabbitmq-server-3.6.12-1.el7.noarch.rpm

rpm --import https://www.rabbitmq.com/rabbitmq-release-signing-key.asc

yum -y install rabbitmq-server-3.6.12-1.el7.noarch.rpm

chkconfig rabbitmq-server on

rabbitmq-server -detached
Copy the erlang.cookie from Node 1
cat /var/lib/rabbitmq/.erlang.cookie# Copy the .erlang.cookie value
Overwrite
/var/lib/rabbitmq/.erlang.cookieon Nodes 2 & 3 with value from Node 1 and change its permissions using the follow commands:chown rabbitmq:rabbitmq /var/lib/rabbitmq/* chmod 400 /var/lib/rabbitmq/.erlang.cookie
Edit
/etc/hostsfile on all 3 nodes to refer to shortnames of the other nodesExample for node 1 (adjust for nodes 2 and 3):
vi /etc/hosts

 10.30.20.101 rabbit-2
 10.30.20.102 rabbit-3
Run the following commands on Node 2 and on Node 3 to join them to the Cluster:
rabbitmqctl stop
rabbitmq-server -detached
rabbitmqctl stop_app
rabbitmqctl join_cluster rabbit@<<node 1 shortname>>
rabbitmqctl start_app
On Node 1, create vhost and add Admin user for Morpheus
rabbitmqctl add_vhost morpheus
rabbitmqctl add_user <<admin username>> <<password>>
rabbitmqctl set_permissions -p morpheus <<admin username>> ".*" ".*" ".*"
rabbitmqctl set_user_tags <<admin username>> administrator
On All Nodes, enable stomp and management plugins:
rabbitmq-plugins enable rabbitmq_stomp
rabbitmq-plugins enable rabbitmq_management
On Node 1, add the required Rabbitmq Policies. The policies will propagate to all nodes.
rabbitmqctl set_policy -p morpheus --apply-to queues --priority 2 statCommands "statCommands.*" '{"expires":1800000, "ha-mode":"all"}'
rabbitmqctl set_policy -p morpheus --apply-to queues --priority 2 morpheusAgentActions "morpheusAgentActions.*" '{"expires":1800000, "ha-mode":"all"}'
rabbitmqctl set_policy -p morpheus --apply-to queues --priority 2 monitorJobs "monitorJobs.*" '{"expires":1800000, "ha-mode":"all"}'
rabbitmqctl set_policy -p morpheus --apply-to all --priority 1 ha ".*" '{"ha-mode":"all"}'
Elasticsearch
Sample Install of 3 node Elasticsearch Cluster on CentOS 7
Important
This is a sample configuration only. Customer configurations and requirements will vary.
Important
Morpheus v4.1.2+ requires Elasticsearch v7.x.
Requirements
Three Existing CentOS 7+ nodes accessible to the Morpheus Appliance
Install Java on each node
You can install the latest OpenJDK with the command:
sudo yum install java-1.8.0-openjdk.x86_64
To verify your JRE is installed and can be used, run the command:
java -versionThe result should look like this:
Output of java -version
openjdk version "1.8.0_65"
OpenJDK Runtime Environment (build 1.8.0_65-b17)
OpenJDK 64-Bit Server VM (build 25.65-b01, mixed mode)
Install Elasticsearch 7.x
Important
This is an example Elasticsearch Upgrade for reference only, and is not indicative of the upgrade procedure for every environment/user/customer/configuration.
On each ES node run the following to install Elasticsearch.
rpm --import https://artifacts.elastic.co/GPG-KEY-elasticsearch
wget https://artifacts.elastic.co/downloads/elasticsearch/elasticsearch-7.6.2-x86_64.rpmsudo rpm -Uhv elasticsearch-7.6.2-x86_64.rpm
If necessary, update permissions for the specified log and data paths
sudo chown -R elasticsearch:elasticsearch /var/log/elasticsearch/
sudo chown -R elasticsearch:elasticsearch /usr/share/elasticsearch/
Edit
/etc/elasticsearch/elasticsearch.ymland update each node configuration accordingly. Please note several attributes differ in 7.x from 5.x.Node 1 Example (customer configurations will vary)
sudo vi /etc/elasticsearch/elasticsearch.yml

      #Sample elasticsearch.yml config. Adjusting values in elasticsearch.yml for each node in the cluster.
      #Note: Sample only, user configurations and requirements will vary.

      node.name: "es-node-01" ##unique name of this node
      network.host: 10.30.22.152 ##ip of this node
      http.port: 9200
      discovery.seed_hosts: ["10.30.22.152","10.30.22.153","10.30.22.154"] ## add all cluster node ip's
      cluster.initial_master_nodes: ["10.30.22.152","10.30.22.153","10.30.22.154"] ## add all cluster node ip's
      path.logs: /var/log/elasticsearch ## Or your preferred location.
      path.data: /usr/share/elasticsearch/ ## Or your preferred location.
      discovery.zen.minimum_master_nodes: 2
Node 2 Example (customer configurations will vary)
sudo vi /etc/elasticsearch/elasticsearch.yml

      #Sample elasticsearch.yml config. Adjusting values in elasticsearch.yml for each node in the cluster.
      #Note: Sample only, user configurations and requirements will vary.

      node.name: "es-node-02" ##unique name of this node
      network.host: 10.30.22.153 ##ip of this node
      http.port: 9200
      discovery.seed_hosts: ["10.30.22.152","10.30.22.153","10.30.22.154"] ## add all cluster node ip's
      cluster.initial_master_nodes: ["10.30.22.152","10.30.22.153","10.30.22.154"] ## add all cluster node ip's
      path.logs: /var/log/elasticsearch ## Or your preferred location.
      path.data: /usr/share/elasticsearch/ ## Or your preferred location.
      discovery.zen.minimum_master_nodes: 2
Node 3 Example (customer configurations will vary)
sudo vi /etc/elasticsearch/elasticsearch.yml

      #Sample elasticsearch.yml config. Adjusting values in elasticsearch.yml for each node in the cluster.
      #Note: Sample only, user configurations and requirements will vary.

      node.name: "es-node-03" ##unique name of this node
      network.host: 10.30.22.154 ##ip of this node
      http.port: 9200
      discovery.seed_hosts: ["10.30.22.152","10.30.22.153","10.30.22.154"] ## add all cluster node ip's
      cluster.initial_master_nodes: ["10.30.22.152","10.30.22.153","10.30.22.154"] ## add all cluster node ip's
      path.logs: /var/log/elasticsearch ## Or your preferred location.
      path.data: /usr/share/elasticsearch/ ## Or your preferred location.
      discovery.zen.minimum_master_nodes: 2
Save elasticsearch.yml
Start Elasticsearch on each node.
sudo service elasticsearch start
Verify cluster health
curl http://localhost:9200/_cluster/health

or

curl http://node_ip:9200/_cluster/health
Application Tier
Morpheus configuration is controlled by a configuration file located at /etc/morpheus/morpheus.rb. This file is read when you run morpheus-ctl reconfigure after installing the appliance package. Each section is tied to a deployment tier: database is mysql, message queue is rabbitmq, search index is elasticsearch. There are no entries for the web and application tiers since those are part of the core application server where the configuration file resides.
Download and install the Morpheus Appliance Package
Next we must install the package onto the machine and configure the morpheus services:
sudo rpm -i morpheus-appliance-x.x.x-1.x86_64.rpm
After installing and prior to reconfiguring, edit the
morpheus.rbfilesudo vi /etc/morpheus/morpheus.rb
Change the values to match your configured services:
Note
The values below are examples. Update hosts, ports, usernames and password with your specifications. Only include entries for services you wish to externalize.
mysql['enable'] = false
mysql['host'] = {'10.30.20.139' => 3306, '10.30.20.153' => 3306, '10.30.20.196' => 3306}
mysql['morpheus_db'] = 'morpheusdb'
mysql['morpheus_db_user'] = 'dbuser'
mysql['morpheus_password'] = 'dbuserpassword'
rabbitmq['enable'] = false
rabbitmq['vhost'] = 'morpheus'
rabbitmq['queue_user'] = 'lbuser'
rabbitmq['queue_user_password'] = 'lbuserpassword'
rabbitmq['host'] = 'rabbitvip'
rabbitmq['port'] = '5672'
rabbitmq['heartbeat'] = 50
elasticsearch['enable'] = false
elasticsearch['cluster'] = 'esclustername'
elasticsearch['es_hosts'] = {'10.30.20.91' => 9200, '10.30.20.149' => 9200, '10.30.20.165' => 9200}
elasticsearch['use_tls'] = true
elasticsearch['auth_user'] = 'morpheus-user'
elasticsearch['auth_password'] = 'xxxxxxxxxxxxxxxx'
Reconfigure Morpheus
sudo morpheus-ctl reconfigure
Shared Storage
For configurations with 2 or more Applications Nodes, Shared Storage is required between the app nodes. Local Storage File Shares will need to be copied to a shared file system so all assets are available on all App nodes.
Assets
White label images
Uploaded virtual images
Deploy uploads
Ansible Plays
Terraform
Morpheus backups
Tip
Backups, deployments and virtual image storage locations can be overridden within the Morpheus-ui. You can find more information on storage here: Storage
To copy the morpheus-ui directory to the shared storage follow the below steps:
SSH into the Appliance
sudo su (or login as root)
cd into
/var/opt/morpheus/Backup morpheus-ui directory by running the command below. This will create a new directory in
/var/opt/morpheus/called morpheus-ui-bkp and copy the contents of morpheus-ui into the new directorycp -r morpheus-ui morpheus-ui-bkp
Move morpheus-ui to your shared storage. Example below:
mv morpheus-ui /nfs/appliance-files/
Mount your shared storage volume to
/var/opt/morpheus/morpheus-ui. How you mount it is dependent on what kind of storage it is. If you mount the volume after the package install, but before the reconfigure, then you don’t need to copy anything to a backup.SSH into the second Appliance and then Backup morpheus-ui directory by running
cp -r morpheus-ui morpheus-ui-bkp
Tip
When adding additional nodes you will only need to run step 6 and 7
Important
NFS mounts require sync option when using Ansible integration with Morpheus Agent command bus execution enabled.
Load Balancer Configuration
For configurations with 2 or more Applications Nodes, a load balancer is recommended to ensure high availability (HA) from disruptions and upgrades. Below are the guidelines to configuring a load balancer for Morpheus but each configuration may differ based on the organization’s requirements.
Requirements
WebSockets enabled
Load Balance 443 (optionally redirect 80 to 443)
SSL Termination (Offload), Bridging, and Passthrough are supported
Round-Robin or least connection distribution
Persistence/sticky sessions configured
HTTPS monitor
https://ip_address/pingbody forMORPHEUS PINGor status of 200, for node operational health
Example configurations
Below are a few examples of configuring load balancers to meet the needs of a HA configuration. The examples assume SSL bridging will be used, which means an SSL (TLS) certificate is presented by the load balancer to clients and the load balancer will communicate with the backend nodes via a different (possibly same) certificate. This configuration is recommended because the Morpheus application nodes will create self-signed certificates and the load balancer will present a valid certificate to end users. Additionally, all communication will be encrypted. This reduces the overhead of maintaining the certificates on the Morpheus application nodes, as the load balancer can ignore invaild certs on the application nodes. However, the certificates on the Morpheus application nodes are not required to be self-signed, they can be replaced with other trusted certificates following the SSL Certificates documentation.
Tip
The list below is not meant to be a complete list for all load balancers. The provided examples are common deployments that can be used for reference. The settings mentioned in the examples list the primary settings that may need to be configured, other settings are based on the organization’s needs requirements and own configuration.
F5 BIG-IP
Monitor
Type: HTTPS
Send String: GET /ping
Receive String: MORPHEUS PING
Pool
Health Monitor: Select monitor created in the Monitor section
Load Balancing Method: Least Connections (member) is recommended (alternatively Round Robin)
Node Service Port: 443/HTTPS
Virtual Server
Type: Standard
Service Port: 443/HTTPS
Protocol: TCP
Protocol Profile (Client): tcp
Protocol Profile (Server): tcp
HTTP Profile (Client): http
HTTP Profile (Server): http
SSL Profile (Client): clientssl (or preferred profile with a trusted certificate)
SSL Profile (Server): serverssl
Source Address Translation: Auto Map
Default Persistence Profile: <Organization’s preference> (hash, source_addr, and cookie are popular)
AWS Application Load Balancer (ALB)
Target Group
Target Type: Instances
Protocol/Port: HTTPS/443
Health Check Protocol: HTTPS
Health check path: /ping
Load balancing algorithm: Least Outstanding Requests is recommended (alternatively Round Robin)
Stickiness Type: Load balancer generated cookie
Load Balancer
Security Group: Allow HTTPS/443 Inbound and Outbound
Listener: HTTPS:443 to the target group created in the Target Group section
Security Policy: ELBSecurityPolicy-2016-08