Terraform
Requirements
Role Access
In order to see the Terraform App Blueprint type option and create Terraform App Blueprints in Library > Blueprints > App Blueprints, the Morpheus user must have Role permissions for Provisioning: Blueprints - Terraform set to Full.
In order to provision Terraform Apps in Provisioning > Apps, the Morpheus user must have Role permissions for Provisioning: Blueprints - Terraform set to Provision or Full.
Existing Terraform Blueprints must be added before they can be provisioned from Provisioning > Apps.
In order to provision Terraform Apps, the user must have Role permissions for Provisioning: Apps set to Full.
Github/Git Repo
To use .tf files from a Git repo, a Git or Github integration needs to be configured in Administration > Integrations. If one is not configured, .tf or .tf.json files can be manually drafted in Morpheus and added to Terraform App Blueprints but they could not be sourced from version control repositories.
Supported App Provisioning Targets
VMware
Amazon AWS
Microsoft Azure
Google Cloud Platform (GCP)
Oracle Cloud
Note
Additional clouds are planned for later releases.
Terraform Installation
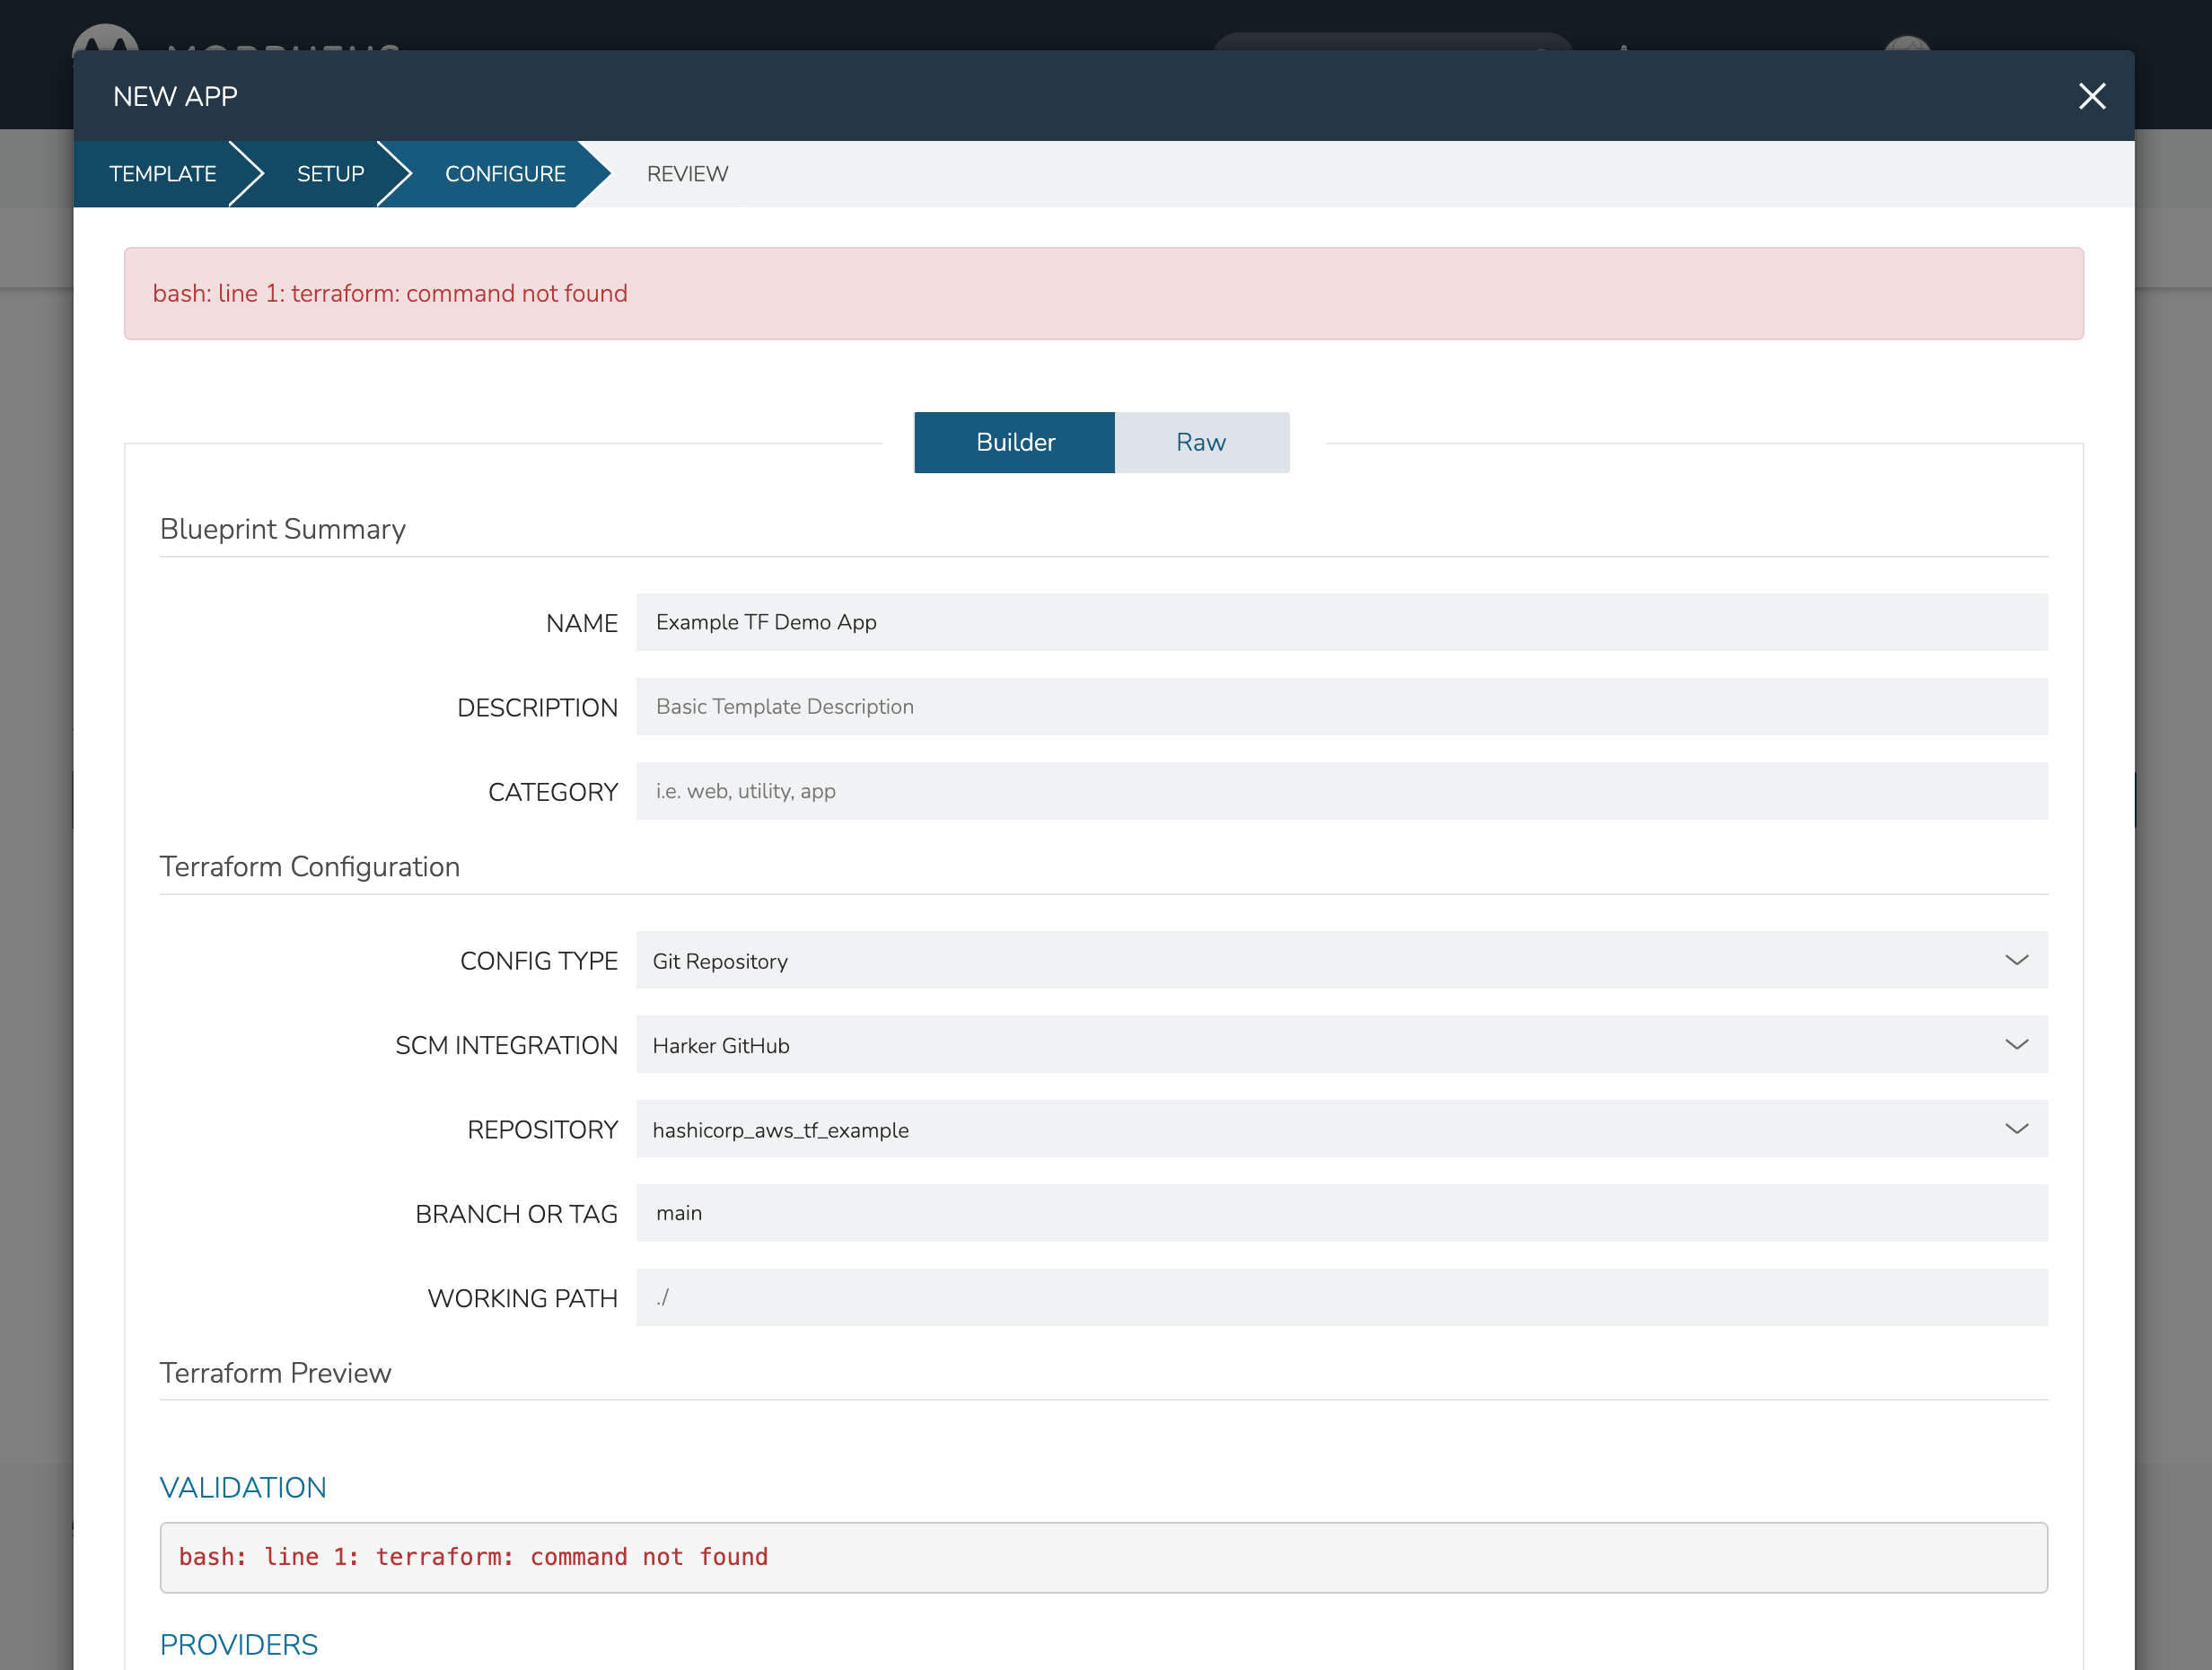
The first time you attempt to provision a Terraform App, you may come across an error indicating that Terraform is not installed:
bash: line 1: terraform: command not found
Command Not Found Error Screenshot
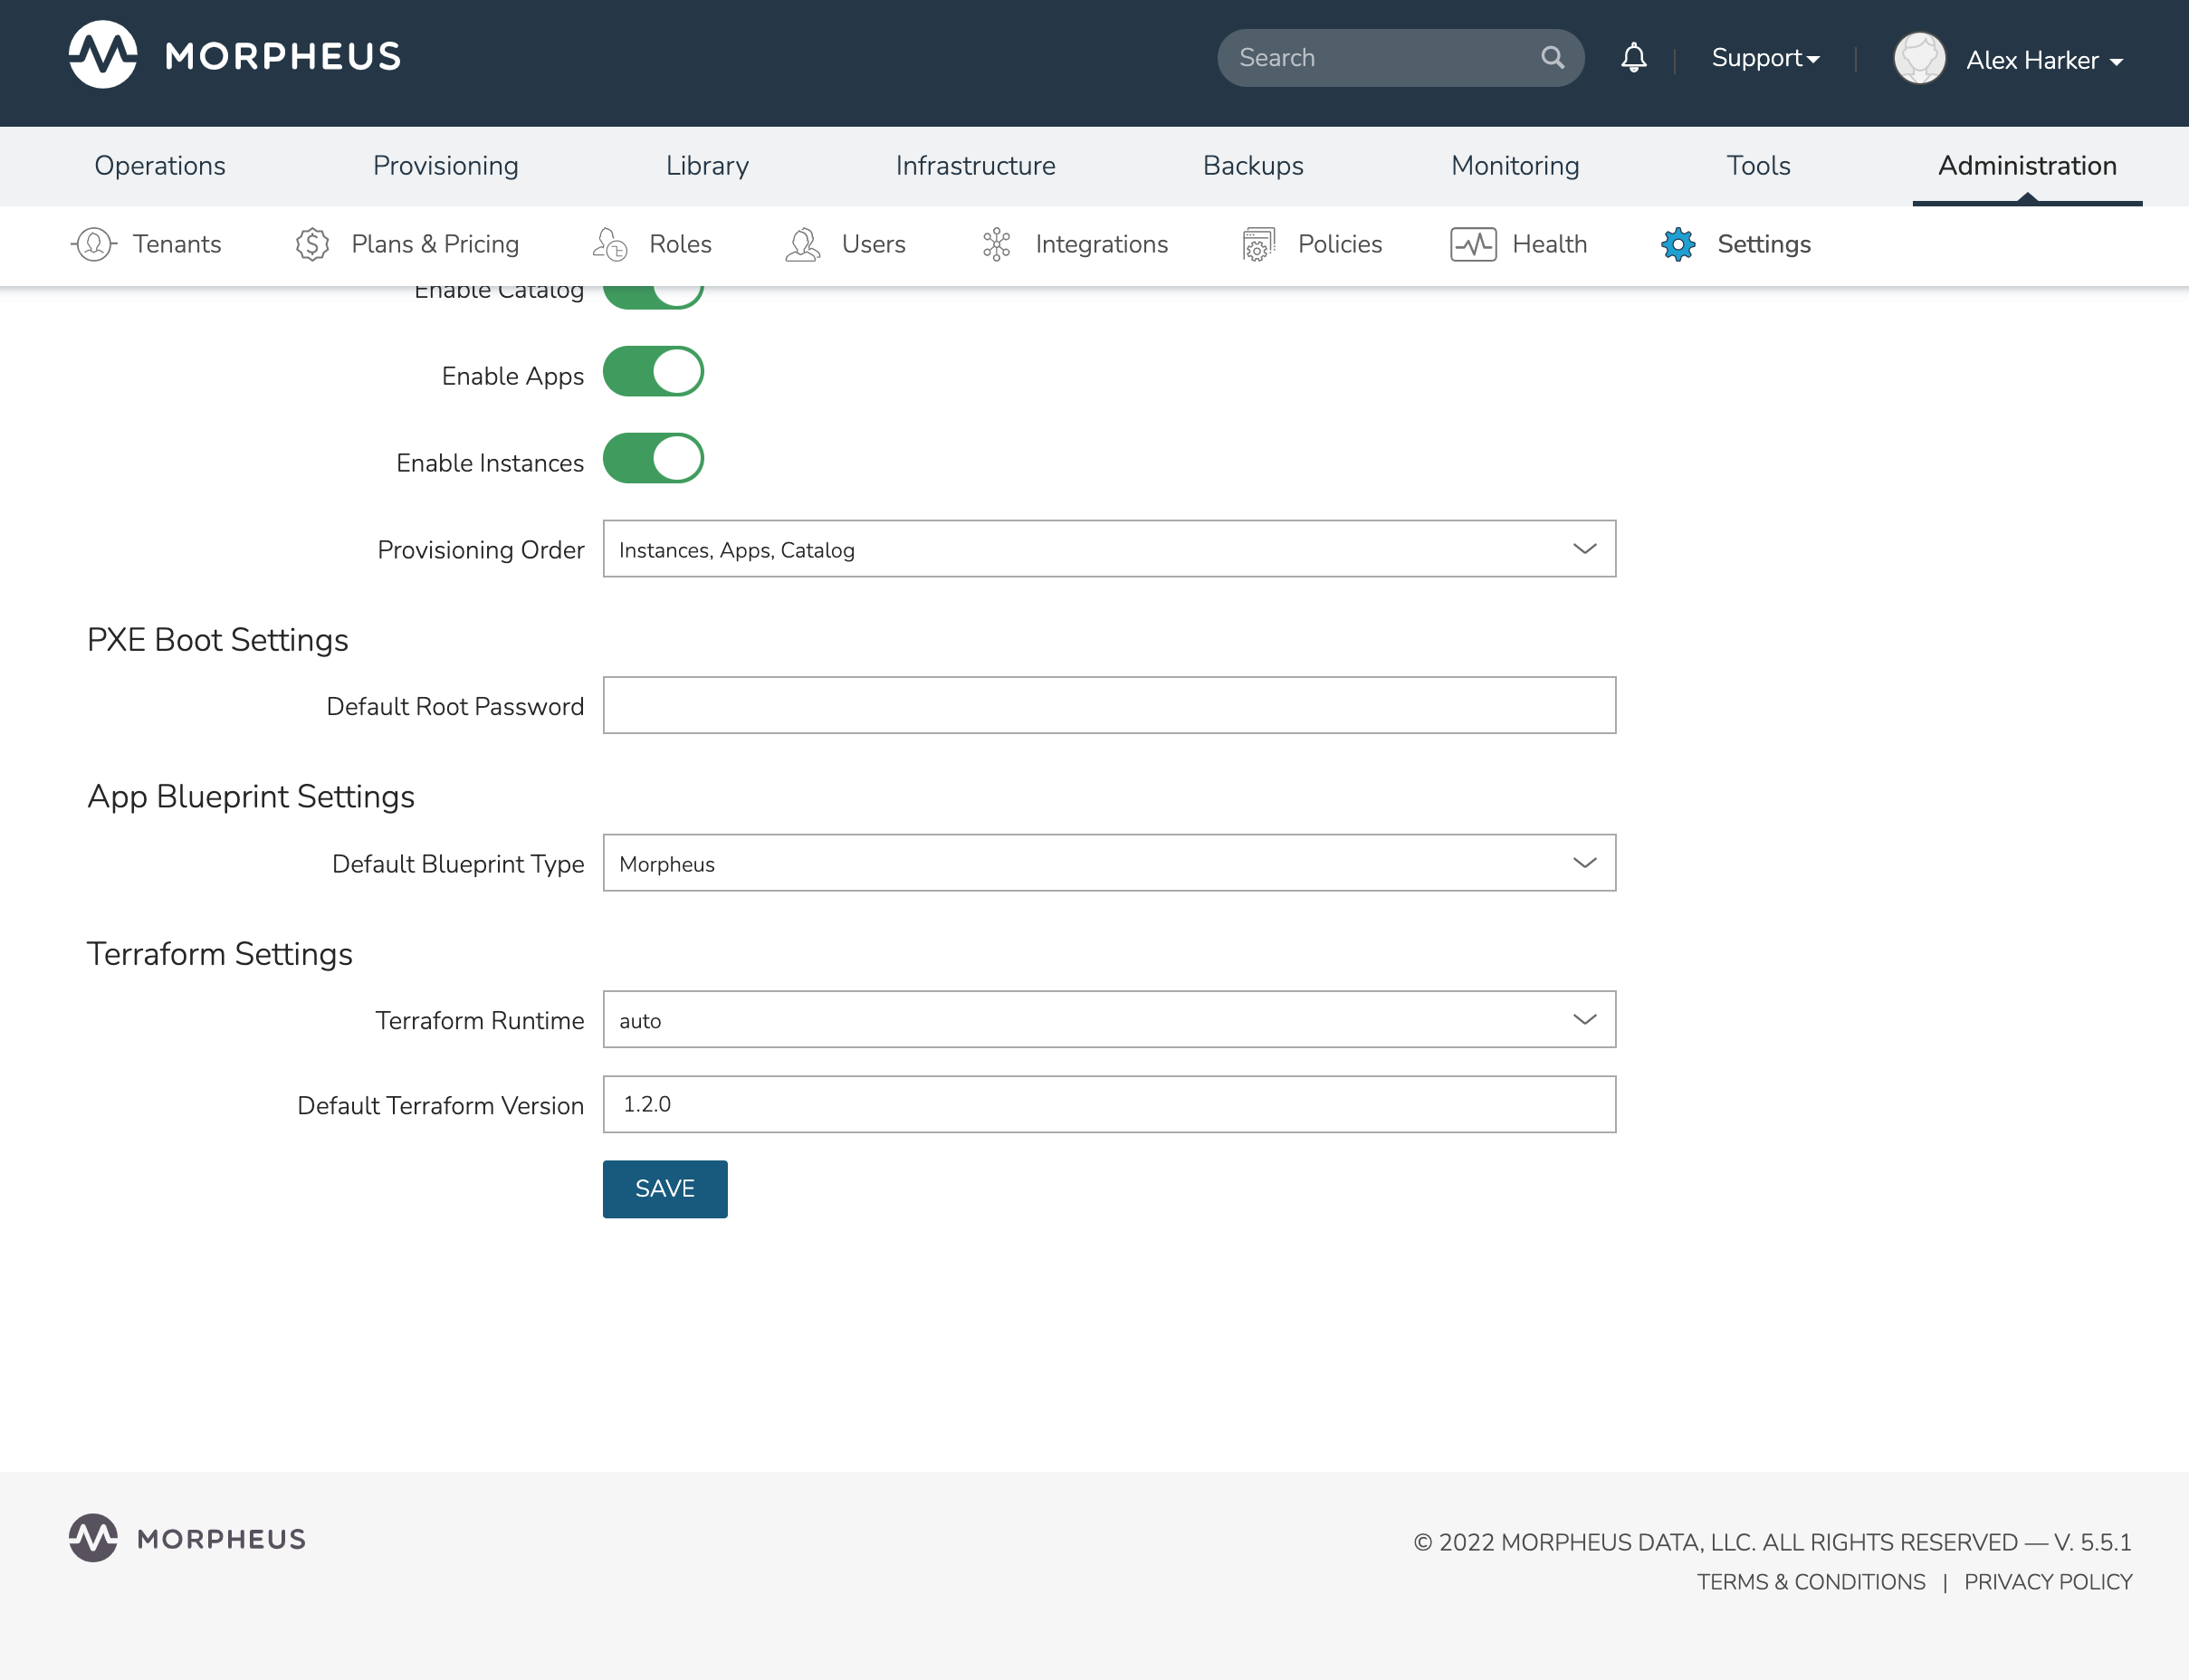
This likely means you’ve not yet configured Terraform Settings within Morpheus global settings. Navigate to Administration > Settings > Provisioning and scroll down to the Terraform Settings section. By default, the Terraform Runtime field is set to “Manual”. When set this way, Morpheus will attempt to use Terraform as installed on the appliance box and it may not be currently installed. To have Morpheus manage the Terraform installation process for you and manage Terraform versioning on a per-App basis, set the Terraform Runtime to “Auto”. You should also set the Default Terraform Version field as well. When a version is set on a Terraform Spec Template or Terraform App Blueprint, that version will supersede the default version indicated in global settings.
Configured Terraform Runtime Screenshot
Important
Morpheus appliances which do not have access to the Internet will need to leave Terraform Runtime settings on “Manual” and ensure Terraform is installed appropriately on the appliance. Install Terraform in the /usr/sbin/terraform directory and make sure it’s owned by the morpheus-local user.
Creating Terraform App Blueprints
In order to provision Terraform apps, Terraform App Blueprints must be created first.
Navigate to Library > Blueprints > App Blueprints
Select + ADD
Name the Blueprint and select Terraform type.
Note
In order to see the Terraform Blueprint type option, the Morpheus user must have Role permissions for Provisioning: Blueprints - Terraform set to Full.
Select NEXT
Configure the following:
- NAME
Friendly name for the App Blueprint in Morpheus
- DESCRIPTION
Description for your App Blueprint shown in the Apps list (optional)
- CATEGORY
A category for your App (optional)
- IMAGE
Add reference icon for your App Blueprint to make it more identifiable at provision time (optional)
CONFIG TYPE (select Terraform Specs, Terraform (.tf), Terraform.json, or Git Repository)
Terraform (.tf)
- CONFIG
Draft or paste in .tf content in the config text area. Variables will be presented as input fields during App provisioning, or auto-populated with matching values if contained in a selected TFVAR Secret file added to the Cypher service.
- TFVAR SECRET
Select an existing tfvar secret file stored in Morpheus Cypher service. This list is automatically filtered to show all Cypher entries which are currently stored at the “tfvar/*” Cypher mount point.
- VERSION
Specify a version required by your Terraform App (optional). If specified, the given version will supersede the global Terraform version specified in Morpheus global settings (Administration > Settings > Provisioning). “Terraform Runtime” must also be set to “auto” in global settings for Morpheus to manage the Terraform version for you. When set to “manual”, Morpheus will use the Terraform version installed on the appliance box.
- OPTIONS
Specify any valid Terraform command line options Morpheus should append to its internal “terraform apply” call when the App is provisioned
Terraform (.tf.json)
- CONFIG
Draft or paste in .tf.json content in the config text area. Variables will be presented as input fields during App provisioning, or auto-populated with matching values if contained in a selected TFVAR Secret file added to the Cypher service.
- TFVAR SECRET
Select an existing tfvar secret file stored in Morpheus Cypher service. This list is automatically filtered to show all Cypher entries which are currently stored at the “tfvar/*” Cypher mount point.
- VERSION
Specify a version required by your Terraform App (optional). If specified, the given version will supersede the global Terraform version specified in Morpheus global settings (Administration > Settings > Provisioning). “Terraform Runtime” must also be set to “auto” in global settings for Morpheus to manage the Terraform version for you. When set to “manual”, Morpheus will use the Terraform version installed on the appliance box.
- OPTIONS
Specify any valid Terraform command line options Morpheus should append to its internal “terraform apply” call when the App is provisioned
Terraform Specs
- SPEC TEMPLATE
Using the typeahead field, select all Terraform-type Spec Templates which make up your App. Variables will be presented as input fields during App provisioning, or auto-populated with matching values if contained in a selected TFVAR Secret file added to the Cypher service.
- TFVAR SECRET
Select an existing tfvar secret file stored in Morpheus Cypher service. This list is automatically filtered to show all Cypher entries which are currently stored at the “tfvar/*” Cypher mount point.
- VERSION
Specify a version required by your Terraform App (optional). If specified, the given version will supersede the global Terraform version specified in Morpheus global settings (Administration > Settings > Provisioning). “Terraform Runtime” must also be set to “auto” in global settings for Morpheus to manage the Terraform version for you. When set to “manual”, Morpheus will use the Terraform version installed on the appliance box.
- OPTIONS
Specify any valid Terraform command line options Morpheus should append to its internal “terraform apply” call when the App is provisioned.
Git Repository
- SCM INTEGRATION
Select a Github or Git integration that has been added in Administration > Integrations and which contains relevant .tf files. Integrations must be pre-existing prior to creating the App Blueprint.
- Repository
Select a repository which contains relevant .tf files from the Github or Git integration selected in the prior step.
- BRANCH OR TAG
Select the Git branch containing the desired version of .tf files for the App. “master” is chosen by default if no value is entered.
- WORKING PATH
Enter the repo path for the .tf file(s).
./is default if no value is entered.- TFVAR SECRET
Select an existing tfvar secret file stored in Morpheus Cypher service. This list is automatically filtered to show all Cypher entries which are currently stored at the “tfvar/*” Cypher mount point.
- VERSION
Specify a version required by your Terraform App (optional). If specified, the given version will supersede the global Terraform version specified in Morpheus global settings (Administration > Settings > Provisioning). “Terraform Runtime” must also be set to “auto” in global settings for Morpheus to manage the Terraform version for you. When set to “manual”, Morpheus will use the Terraform version installed on the appliance box.
- OPTIONS
Specify any valid Terraform command line options Morpheus should append to its internal “terraform apply” call when the App is provisioned.
Select COMPLETE
Morpheus will scan the blueprint to check for validity and will surface any errors which need correcting before the App Blueprint can be saved. Your Terraform App is ready to be provisioned from Provisioning > Apps.
Provisioning Terraform Apps
Note
Terraform App Blueprints must be added to Library > Blueprints > App Blueprints before they can be provisioned. At least one Terraform App Blueprint must exist before Terraform Apps can be provisioned from Provisioning > Apps.
Note
In order to provision Terraform Apps in Provisioning > Apps, the Morpheus user must have Role permissions for Provisioning: Blueprints - Terraform set to Provision or Full.
Navigate to Provisioning > Apps
Select + ADD
Choose an existing Terraform App Blueprint
Select NEXT
Enter a NAME for the App and select the Group, Default Cloud and Environment (optional)
Select NEXT
Populate any required variables in the Terraform Variables section. Variables whose values are stored in a tfvars file sourced from Morpheus Cypher and associated with the App Blueprint at creation will automatically be loaded and aren’t shown to the user here. Other variables will be presented in the Terraform Variables section and any configured default values will be pre-loaded.
Select NEXT
Morpheus will now validate the App and surface any errors which would cause provisioning issues. If all is well, click COMPLETE
Tip
Review the App in the Terraform Preview section. If any config data needs to be edited, select the RAW tab, edit the config, and then select the BUILDER tab once again. The config changes from the RAW edit will be updated in the preview section for further review. Permanent edits can be made by editing the App Blueprint, pushing .tf changes to your code repository, or Terraform Spec Templates (depending on how the .tf files are sourced for your App Blueprint).
The Terraform App will begin to provision.
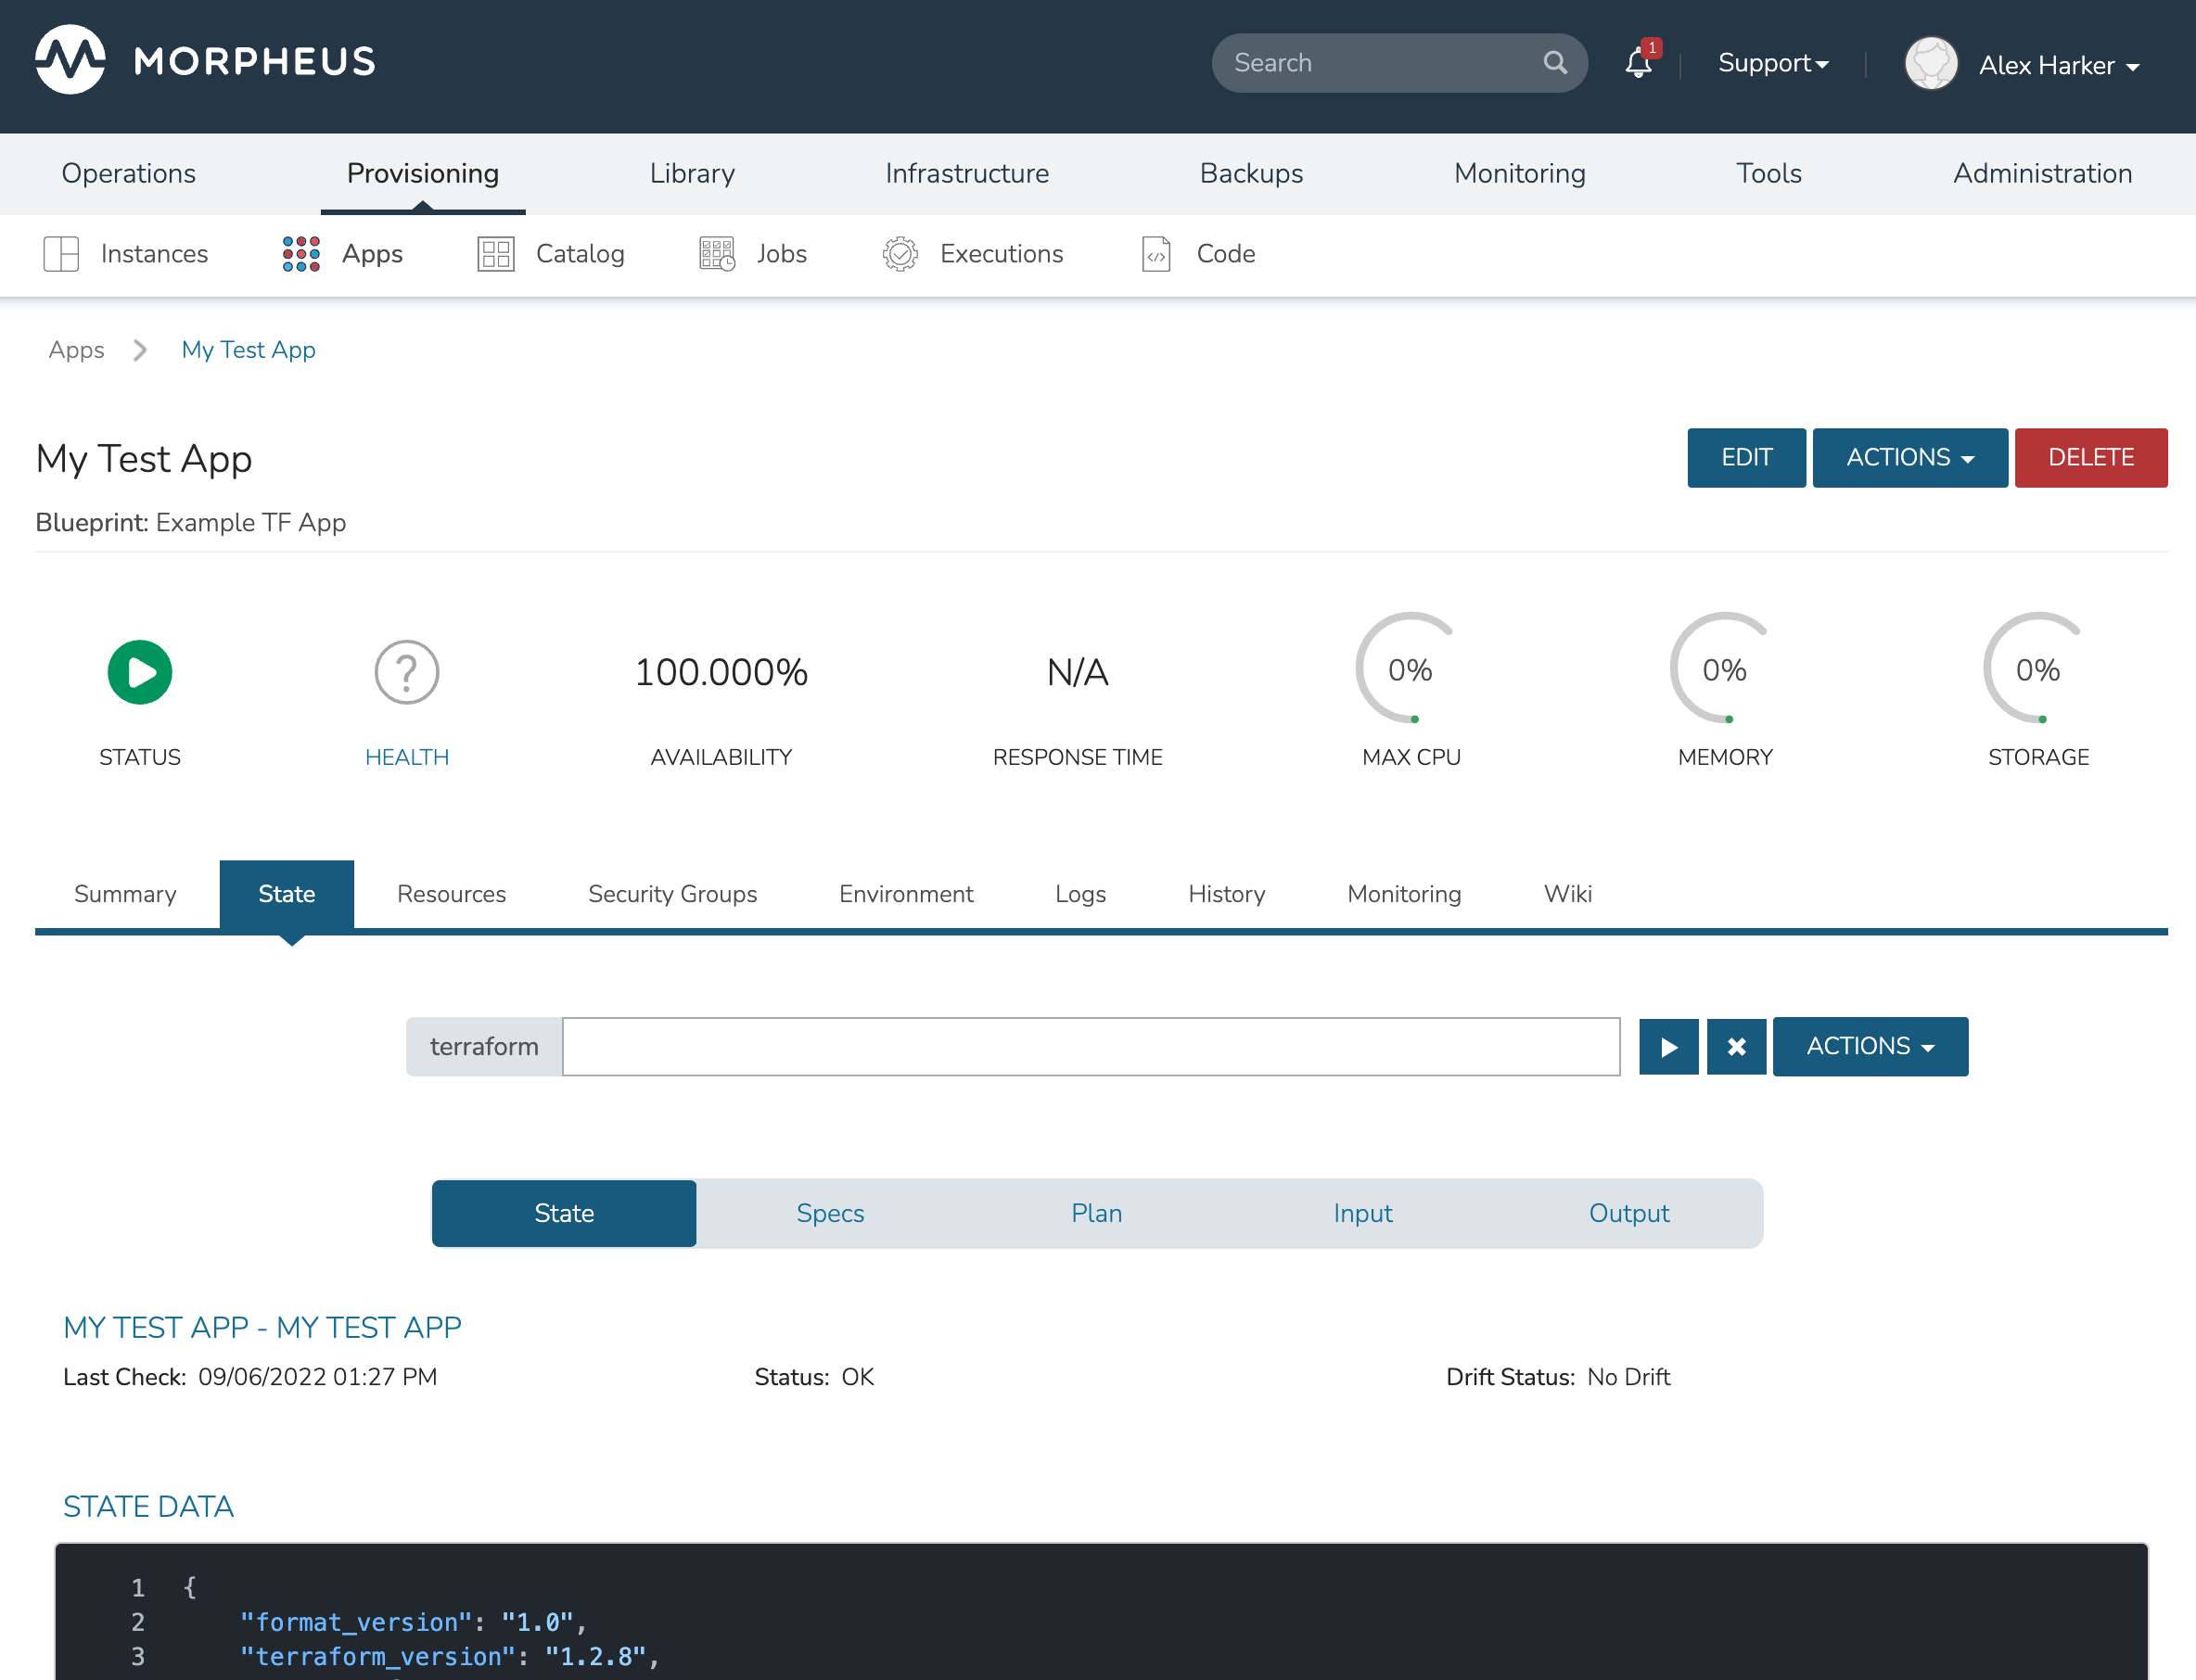
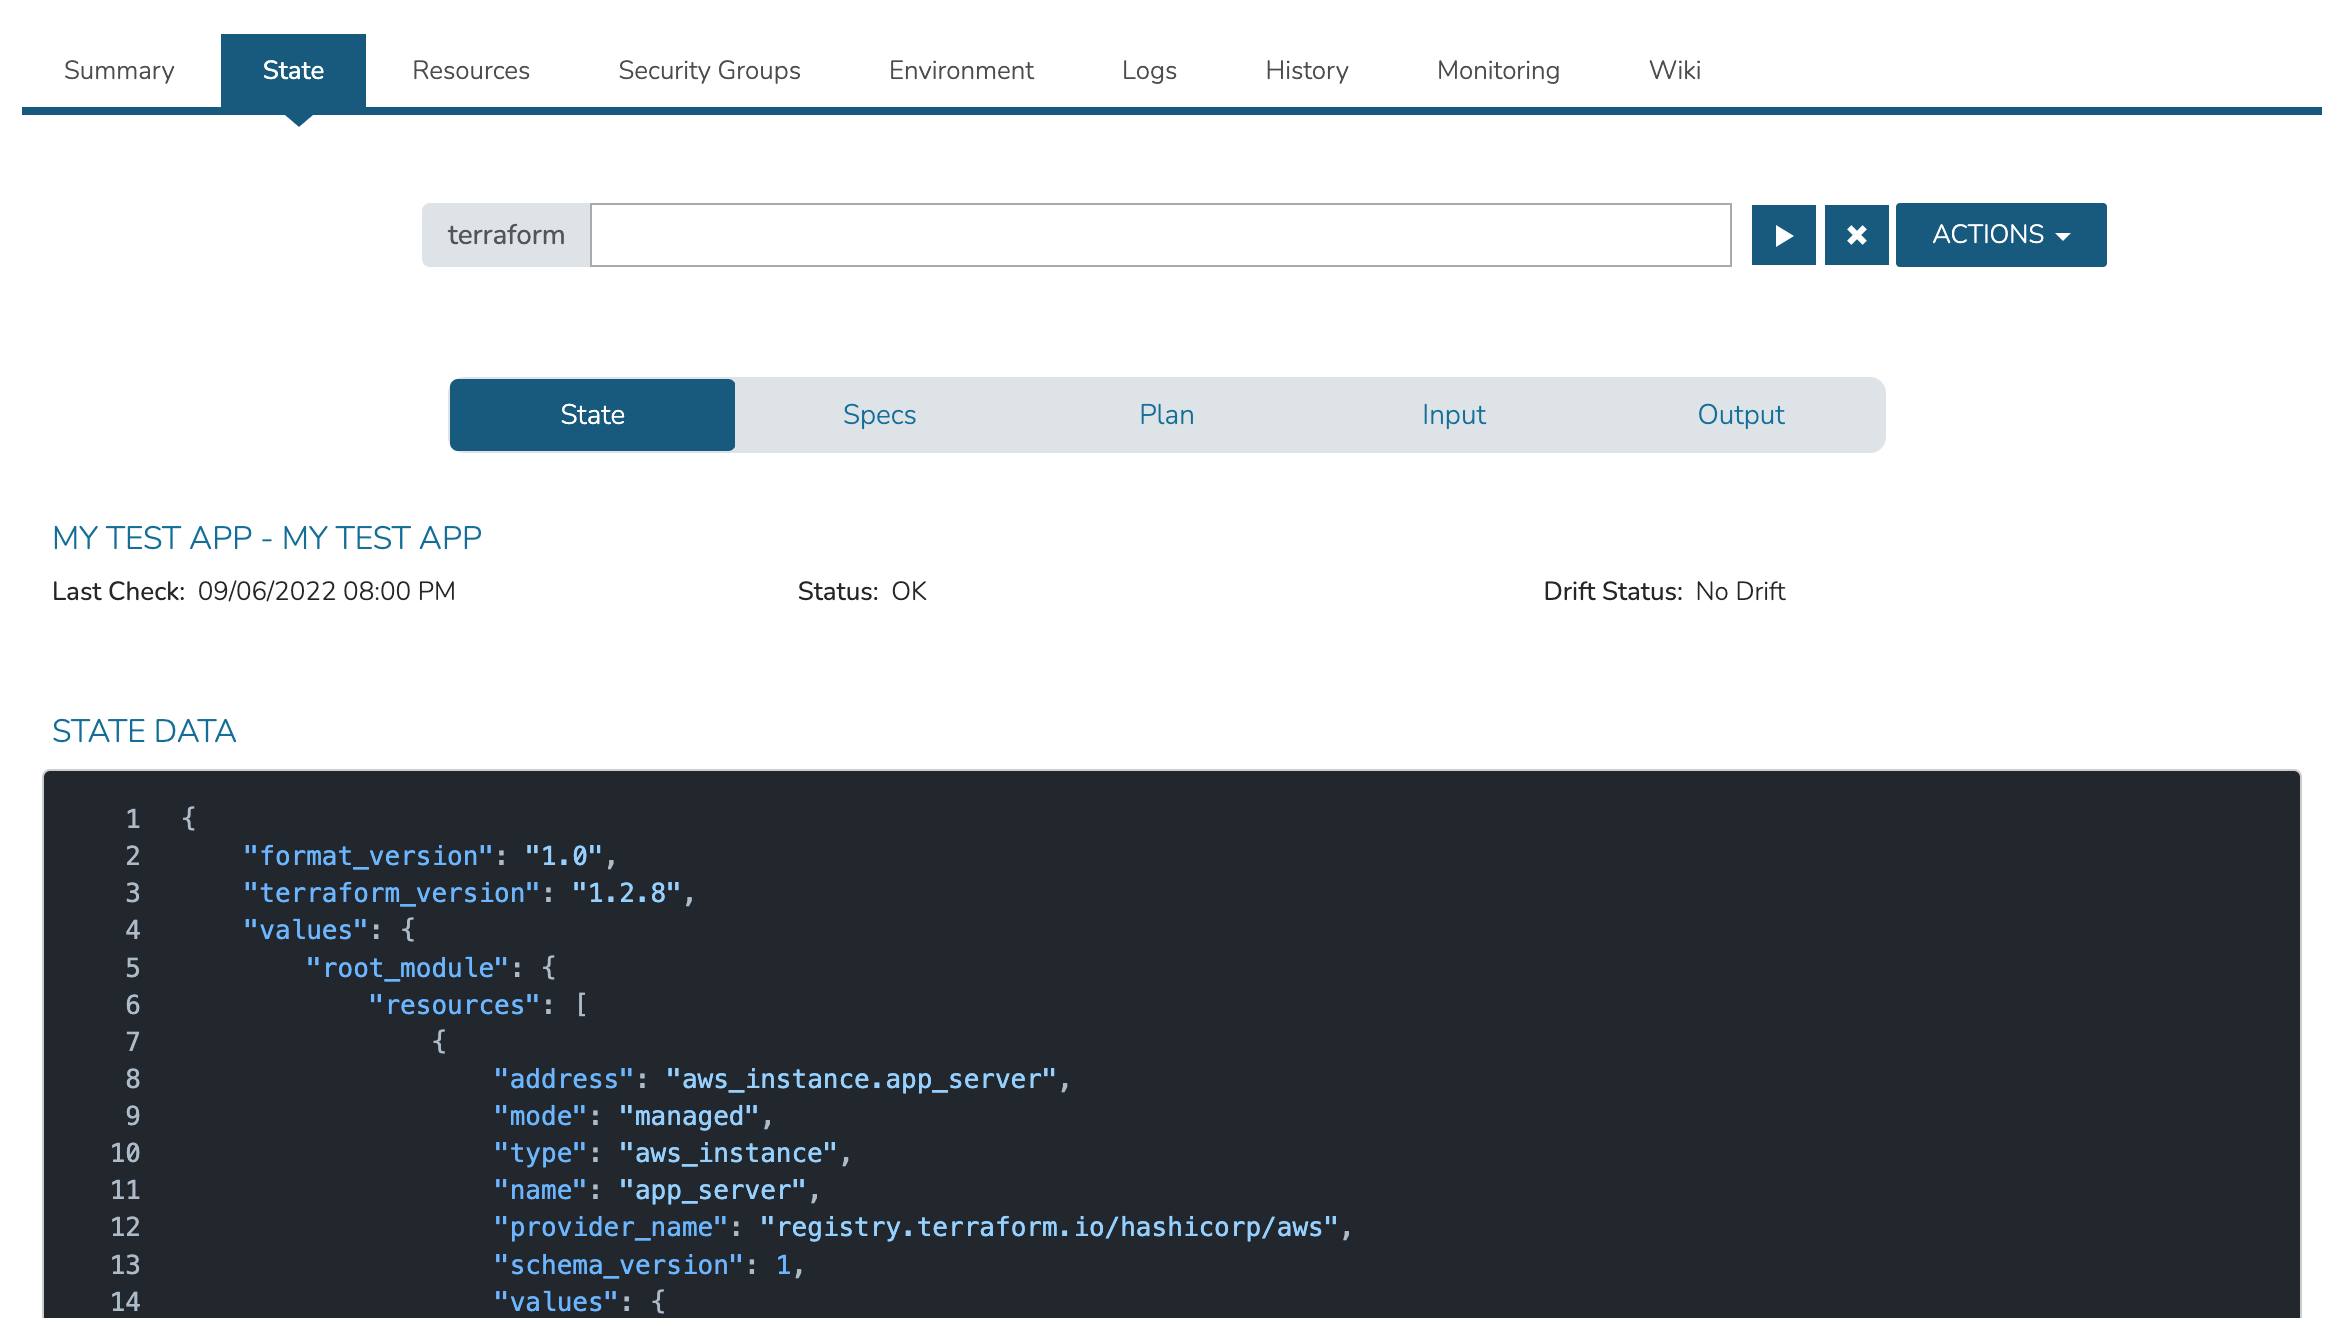
Once provisioning is completed, note the State tab in the App details page (Provisioning > Apps > select the App). This tab contains subsections related to state management which is discussed in greater detail in the next section.
Terraform App State Management
State management is handled from the State Tab of the Terraform App detail page (Provisioning > Apps > selected App). With the tab selected, the Terraform command field will be present regardless of the selected subsection. Use this field to send Terraform commands to your apps just like using Terraform from the command line. Press return on the keyboard or click on the “play” button to the right of the text field to execute the commmand.
Tip
“terraform” is automatically entered for each command as printed along the left edge of the text field. Thus, you don’t need to enter “terraform” with each command sent. Entering “state” or “plan” is equal to entering “terraform state” or “terraform plan” from the command line.
When Terraform commands are executed against the application, Morpheus provides progress bars and command output in the UI. Command output is shown underneath the Terraform command field. Users can dismiss individual output windows by clicking the “x” button in the upper-right of each window. All command output can be dismissed by clicking the blue “x” button to the right of the command field itself.
Within the ACTIONS reside two selections: Refresh State and Apply State. Selecting Refresh State is equivalent to using the “terraform plan” command from the command line. This will read the existing state of any existing objects which are part of the App and compare their current configuration against the prior state. Any differences will be noted in the output. If differences are discovered, the App is considered to be in a “drift” state. This drift status is shown in the UI when the user is viewing the “State” subsection (which is described in greater detail in the next section). The output of the Refresh State command, including detailed information about changes Terraform would make to App objects to in order to realign them with the App spec are shown in the UI.
The Apply State selection brings up a modal which allows the user to view the App spec once again. This includes being able to view and edit Terraform variables if needed. After making any needed edits, click NEXT and Morpheus will validate the App once again, just like it did at provision time. On the next tab of the wizard, Morpheus will show the user and planned changes that would be executed if the user completes the modal. An output will be shown as if “terraform plan” were run from the command line. Make note of any App objects which would be created, altered, or destroyed if the actions are accepted as Morpheus would immediately take them if desired. When ready, click COMPLETE. This will execute all planned changes as if the user had run “terraform apply -auto-approve” from a terminal session.
State Subsection
The State Subsection shows the current drift state of the App. This includes when Morpheus has last checked for drift and whether the App is currently in a “Drift” or “No Drift” state. If the App is currently in a Drift state, users can select Refresh State from the ACTIONS menu to identify which objects and attributes have deviated from the App configuration.
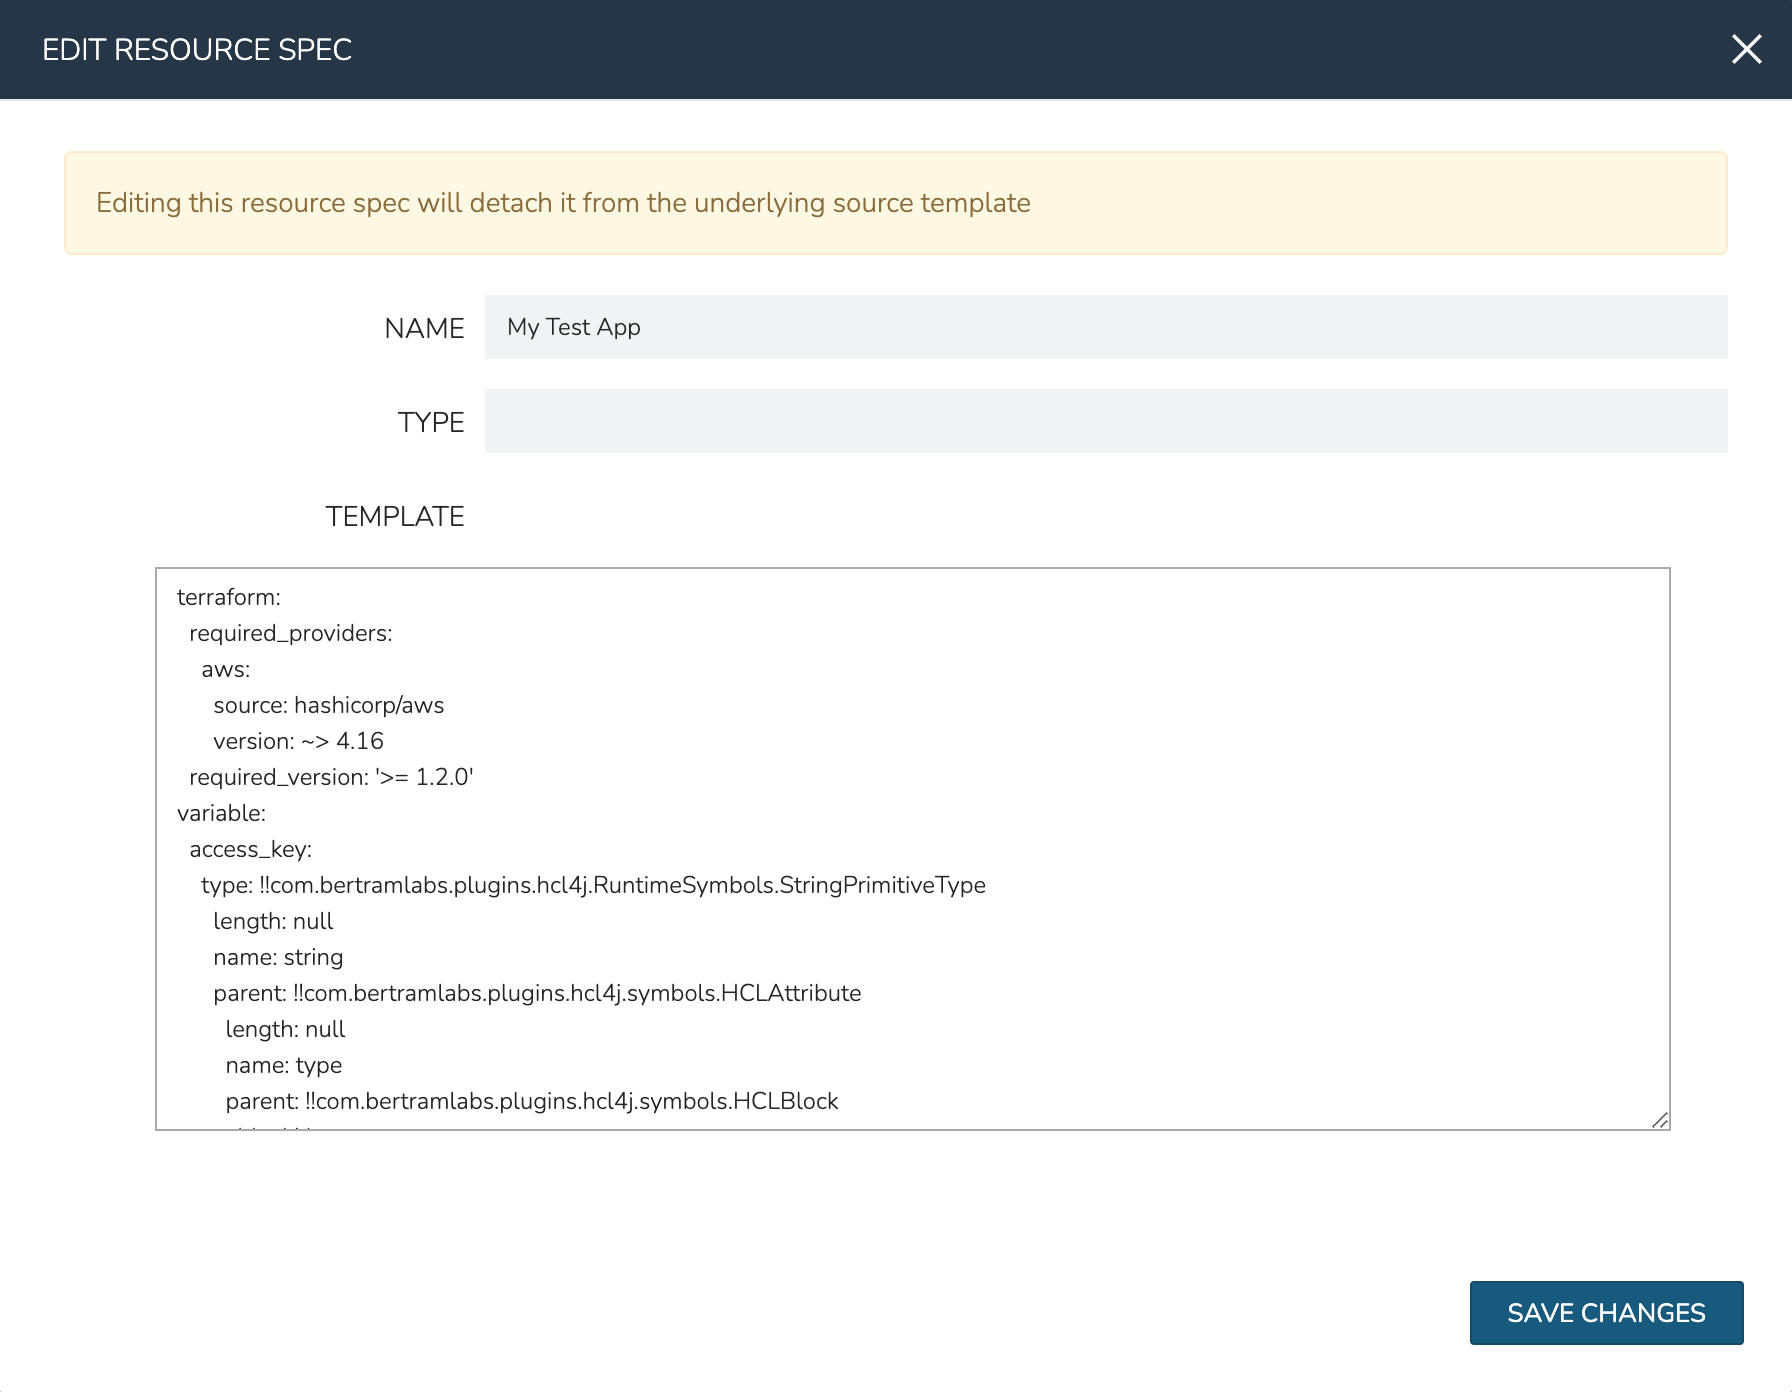
Specs Subsection
The Specs Subsection will show the user all Morpheus Spec Templates (Library > Templates > Spec Templates) which make up the App. Users may even edit Spec Template config directly from this view by clicking the Edit (pencil) icon to the right of each Spec Template listed.
Tip
Editing a Spec Template here will detach it from the source object, essentially making it a brand new object that exists only here. All future updates to that Spec Template would have to be made here going forward. In most cases, it’s advisable to edit the Spec Template directly at the source. For example, if this Spec Template were sourced from an integrated version control repository (ex. Github), it’s likely the best option to make a new commit into your repository and then let Terraform handle the process of bringing your App in line with the new specifications.
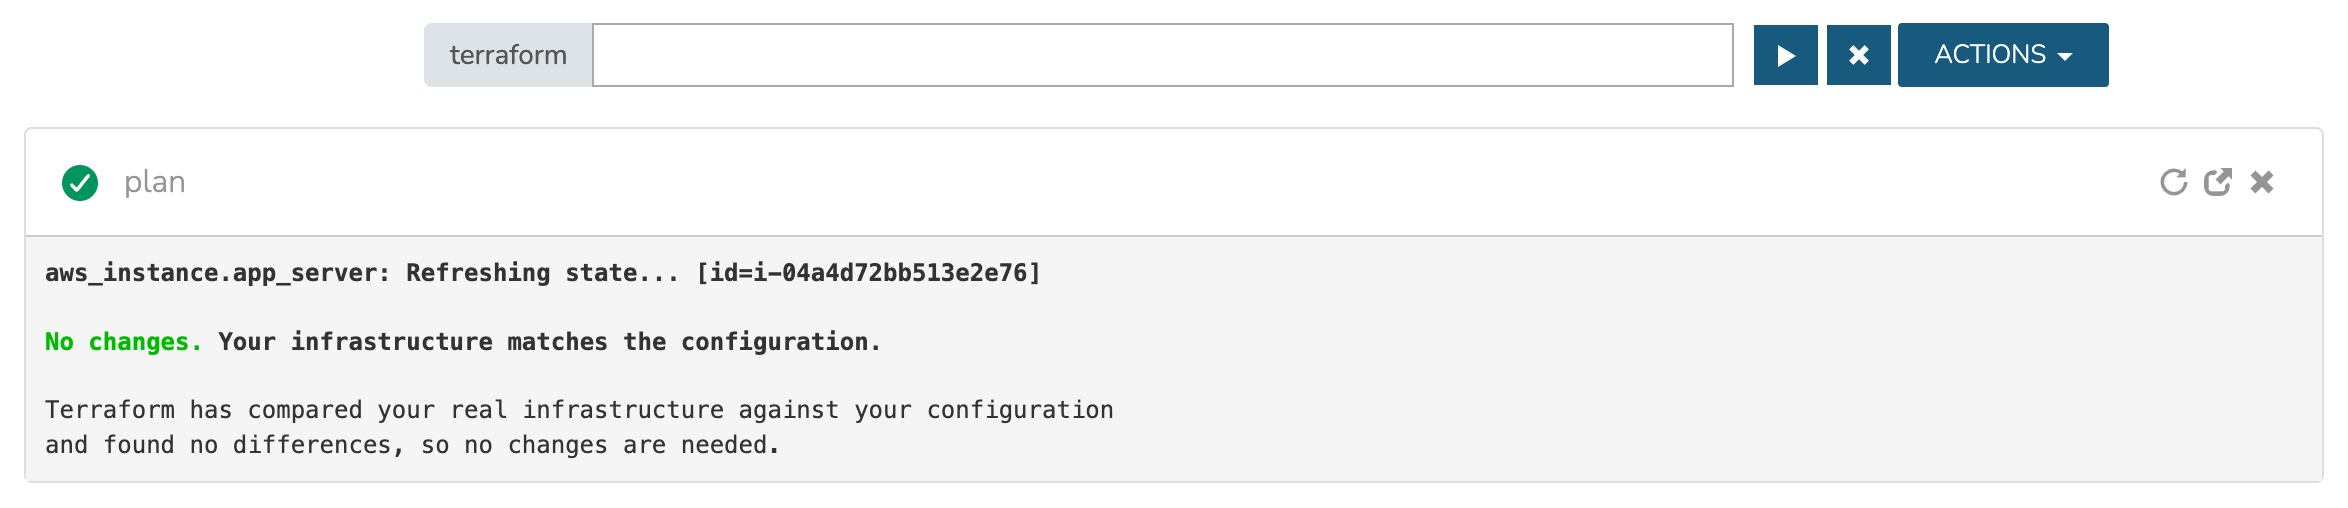
Plan Subsection
This section displays the output of the most recent “terraform plan” run against your App. This will either indicate that your infrastructure (App) matches the configuration or it will indicate that a drift of some sort has taken place.
Input Subsection
This section lists all Terraform inputs, such as variables, which are relevant to the App. Variable values are shown unless they are flagged as sensitive in your configuration. All variables sourced from a Morpheus Cypher tfvars mount will automatically be masked.
Output Subsection
This section lists all configured Terraform output.