Unisys Stealth
Introduction
Unisys Stealth is a network security tool for safeguarding sensitive information across shared networks. By creating pre-defined communities of interest (COIs) and curating user access to these groups, the need to create separate networks for handling restricted data is reduced.
Morpheus includes a full integration with Stealth allowing administrators to create and manage COIs, work with configurations and roles, and provision new endpoints into COIs.
Stealth Concepts
Communities of Interest (COIs): A collection of endpoints cryptographically separated so they can only communicate to each other
Endpoints: Any system or device with a Stealth agent
Configuration: Tells the endpoints which authorization methods and services to use for obtaining COI membership
Role: Defines COI membership. Users and groups are assigned to a role which grants access to that role’s COIs
Filters: Customizes Stealth communication. More specifically, filters constrain Stealth communication to specific addresses, ports, or protocols and allow Stealth endpoints to communicate with non-Stealth endpoints
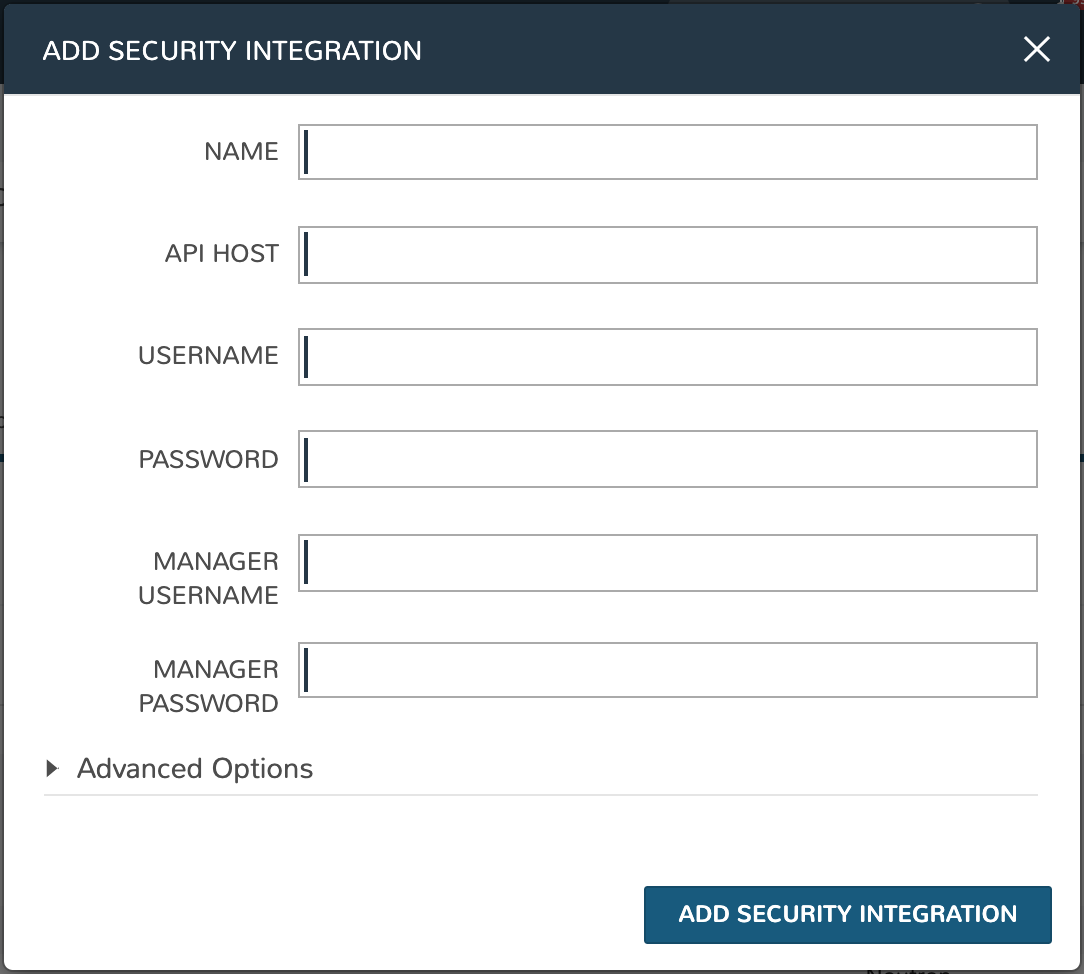
Integrating Stealth with Morpheus
Navigate to Infrastructure > Network > Integrations
Click + ADD
Complete the following fields:
NAME: A name for this Stealth integration in Morpheus
API HOST: The address for the server hosting Stealth (ex: https://x.x.x.x:8448)
USERNAME: A username for the portaladmin, or the user who logs into the web console
PASSWORD: A password for the account
MANAGER USERNAME: A username for the manager account
MANAGER PASSWORD: A password for the manager account
Click ADD SECURITY INTEGRATION
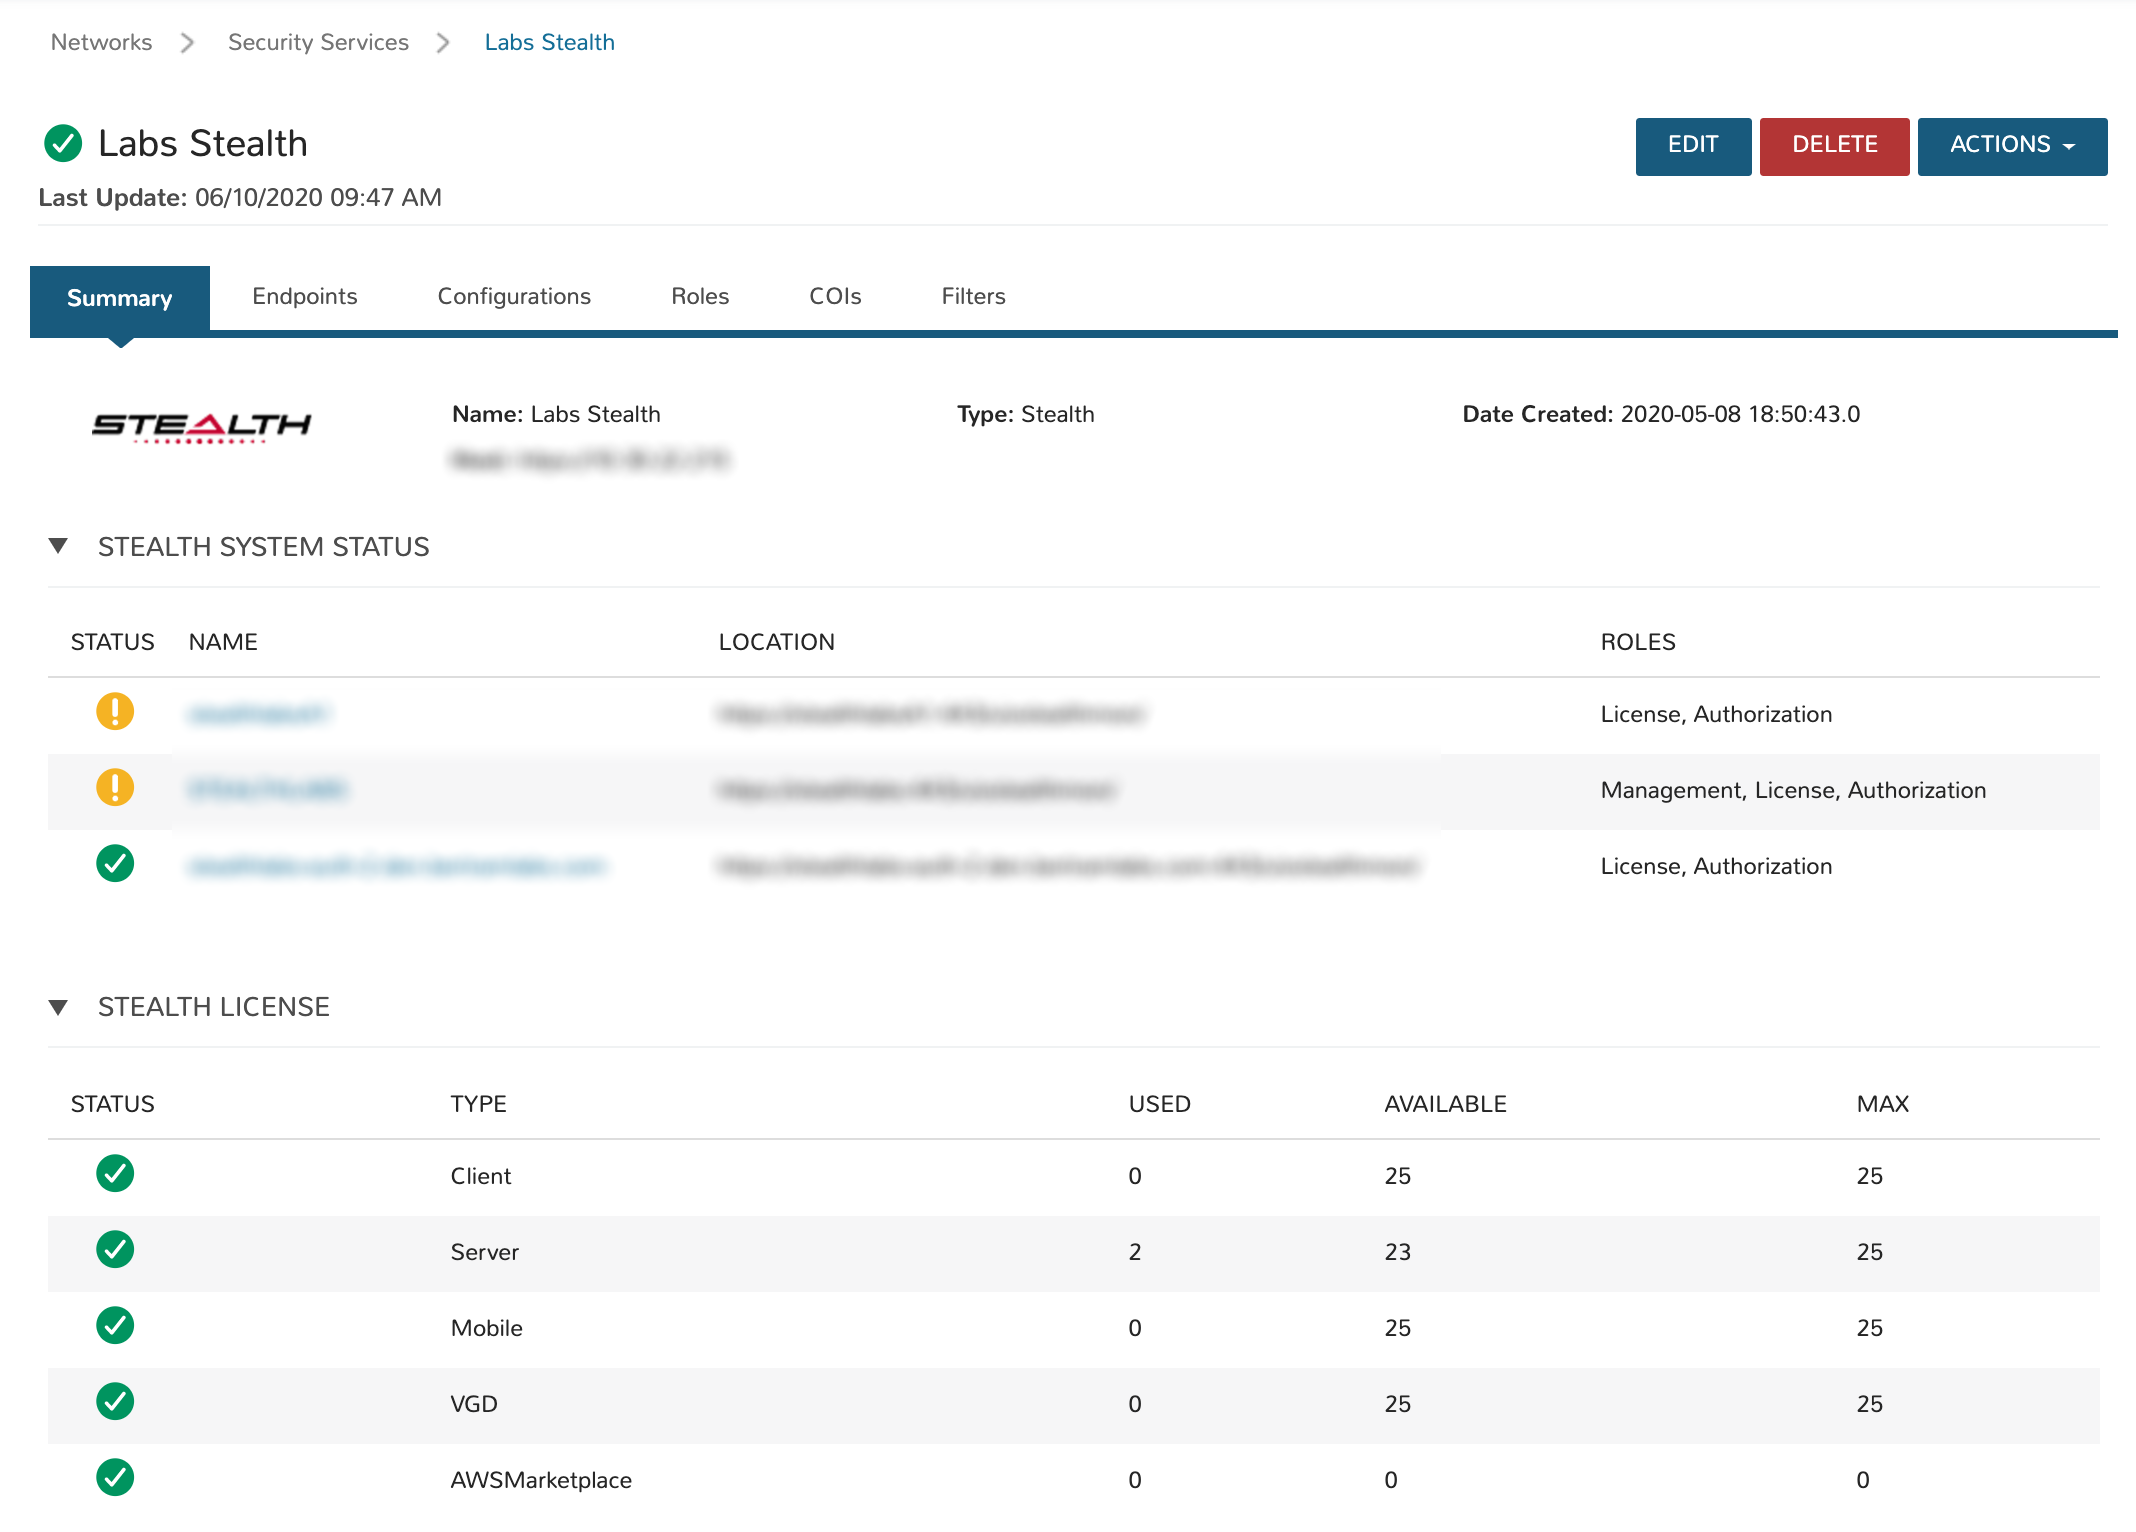
Summary View
The default view when accessing a Stealth integration in Morpheus is the Summary view. In addition to basic information about the Stealth server itself, we can see system status, license and service information.
Endpoints
Endpoints are any system or device with a Stealth agent. Stealth endpoints can be provisioned in Morpheus in the same way other cloud resources are provisioned. With Stealth integrated, workloads provisioned on the appointed networks are assigned Stealth configuration and a Stealth role during the provisioning process. Based on a user’s assigned roles and COIs assigned to those roles, only workloads on the appointed COIs will be visible to the user. Additionally, workloads can only see other workloads within their COI.
Note
Machines on the same network which are not Stealth-managed will be able to see and communicate with each other but will not be able to see workloads which are assigned to a Stealth COI.
Endpoints View
The endpoints view will display all available Stealth-managed resources. Endpoints are not created here but will be synced into this view as they are created (through Morpheus provisioning or outside creation). Stealth-managed endpoints can be deleted by clicking the trash can icon at the end of each row in this view.
The following fields are exposed in the endpoints list view:
DISPLAY NAME
NAME
DESCRIPTION
Configurations
Configurations in Stealth are the top-level construct and house COIs, roles, groups, users and endpoints. Your Stealth integration will include at least one configuration but often they will include more.
Configurations are primarily created and managed from the Stealth console but we can opt to remove them from Morpheus by clicking the trash can icon at the end of each row on the configurations list page. Configurations are selected along with a Stealth role at provision time in Morpheus.
Configurations View
The following fields are exposed in the configurations list view:
NAME: The name of the configuration
DESCRIPTION: A description value for the configuration
Roles
Users are placed into roles which are associated with COIs. A user’s role(s) determine which COIs he or she will be able to see and access. Roles are synced into Morpheus once the integration process is complete and can be viewed in the Roles list view. Roles can also be created from the Morpheus integration as described later in this section.
Roles View
The following fields are exposed in the roles list view:
NAME: The name of the role
DESCRIPTION: A description value for the role
Note
More detail on each item in the roles list can be revealed by clicking on the (i) icon in each row, including the COIs associated with the role.
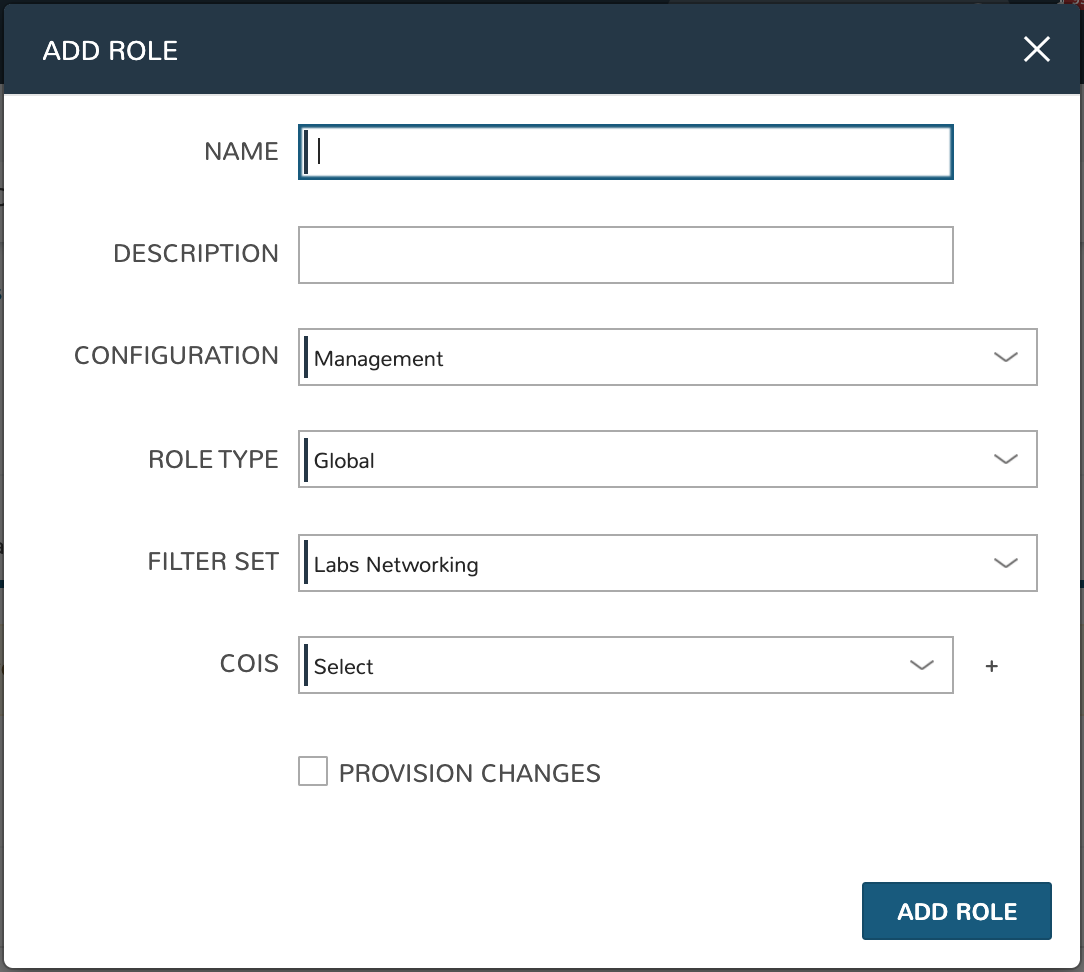
Creating Stealth Roles
Navigate to Infrastructure > Network > Integrations > (Your Stealth integration) > Roles
Click + CREATE ROLE
Complete the following fields:
NAME: The name for the new role
DESCRIPTION: A description value for the new role
CONFIGURATION: Select an existing Stealth configuration to associate with the role
ROLE TYPE: Identifies how the role is used. Can be Global (for roles used to isolate endpoints and users), Service (for roles used by endpoints in service mode to access an authorization service) or WorkGroup (for roles used by endpoints in normal operation)
FILTER SET: Choose a filter set to apply to the role to allow or deny clear text communication with non-Stealth-managed endpoints
COIs: Select the COIs to be associated with the role
PROVISION CHANGES:
Click ADD ROLE
COIs (Communities of Interest)
COIs exist within configurations and create a logical separation between endpoints in separate COIs. Communication between endpoints in the COI is encrypted and those outside the COI are unable to see or access endpoints despite being on the same network.
On completing the integration, Morpheus will sync in existing COIs. COIs can also be created from Morpheus UI which is described later in this section. COIs are deleted by clicking on the trash can icon at the end of each row in the COIs list view.
COIs View
The following fields are exposed in the roles list view:
NAME: The name of the COI
DESCRIPTION: A description value for the COI
Creating Stealth COIs
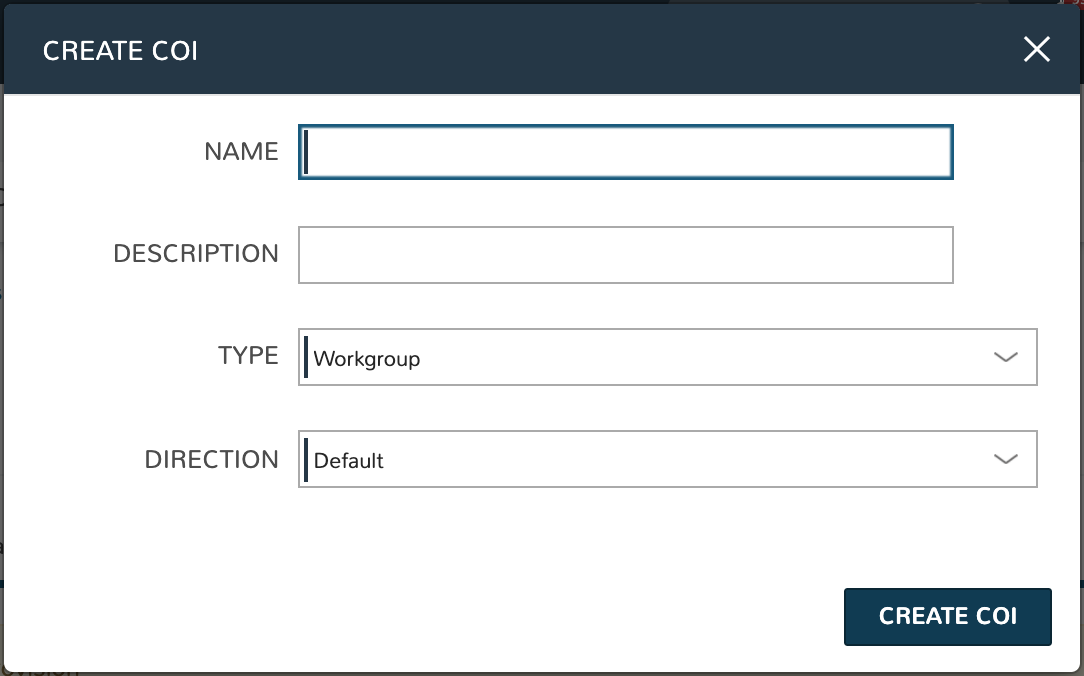
Navigate to Infrastructure > Network > Integrations > (Your Stealth integration) > COIs
Click + CREATE COI
Complete the following fields:
NAME: The name for the new COI
DESCRIPTION: A description value for the new COI
TYPE: Workgroup or Service
DIRECTION: Default (enables COI to accept inbound and initiate outbound tunnels), Initiate (restricts the COI to only initiate outbound tunnels), or Accept (restricts the COI to only accept inbound tunnels)
Click CREATE COI
Filters
Filters customize Stealth communication. More specifically, filters constrain Stealth communication to specific addresses, ports, or protocols and allow Stealth endpoints to communicate with non-Stealth endpoints.
Filters are synced into Morpheus when integrating with Stealth and are viewable from the filters list view. They are created and managed from within the Stealth console itself.
When accessing the filters list view, all filter sets are displayed. Each filter set can be expanded to view the individual filters within. Information on each filter is displayed once the filter set has been expanded to reveal the individual filters.
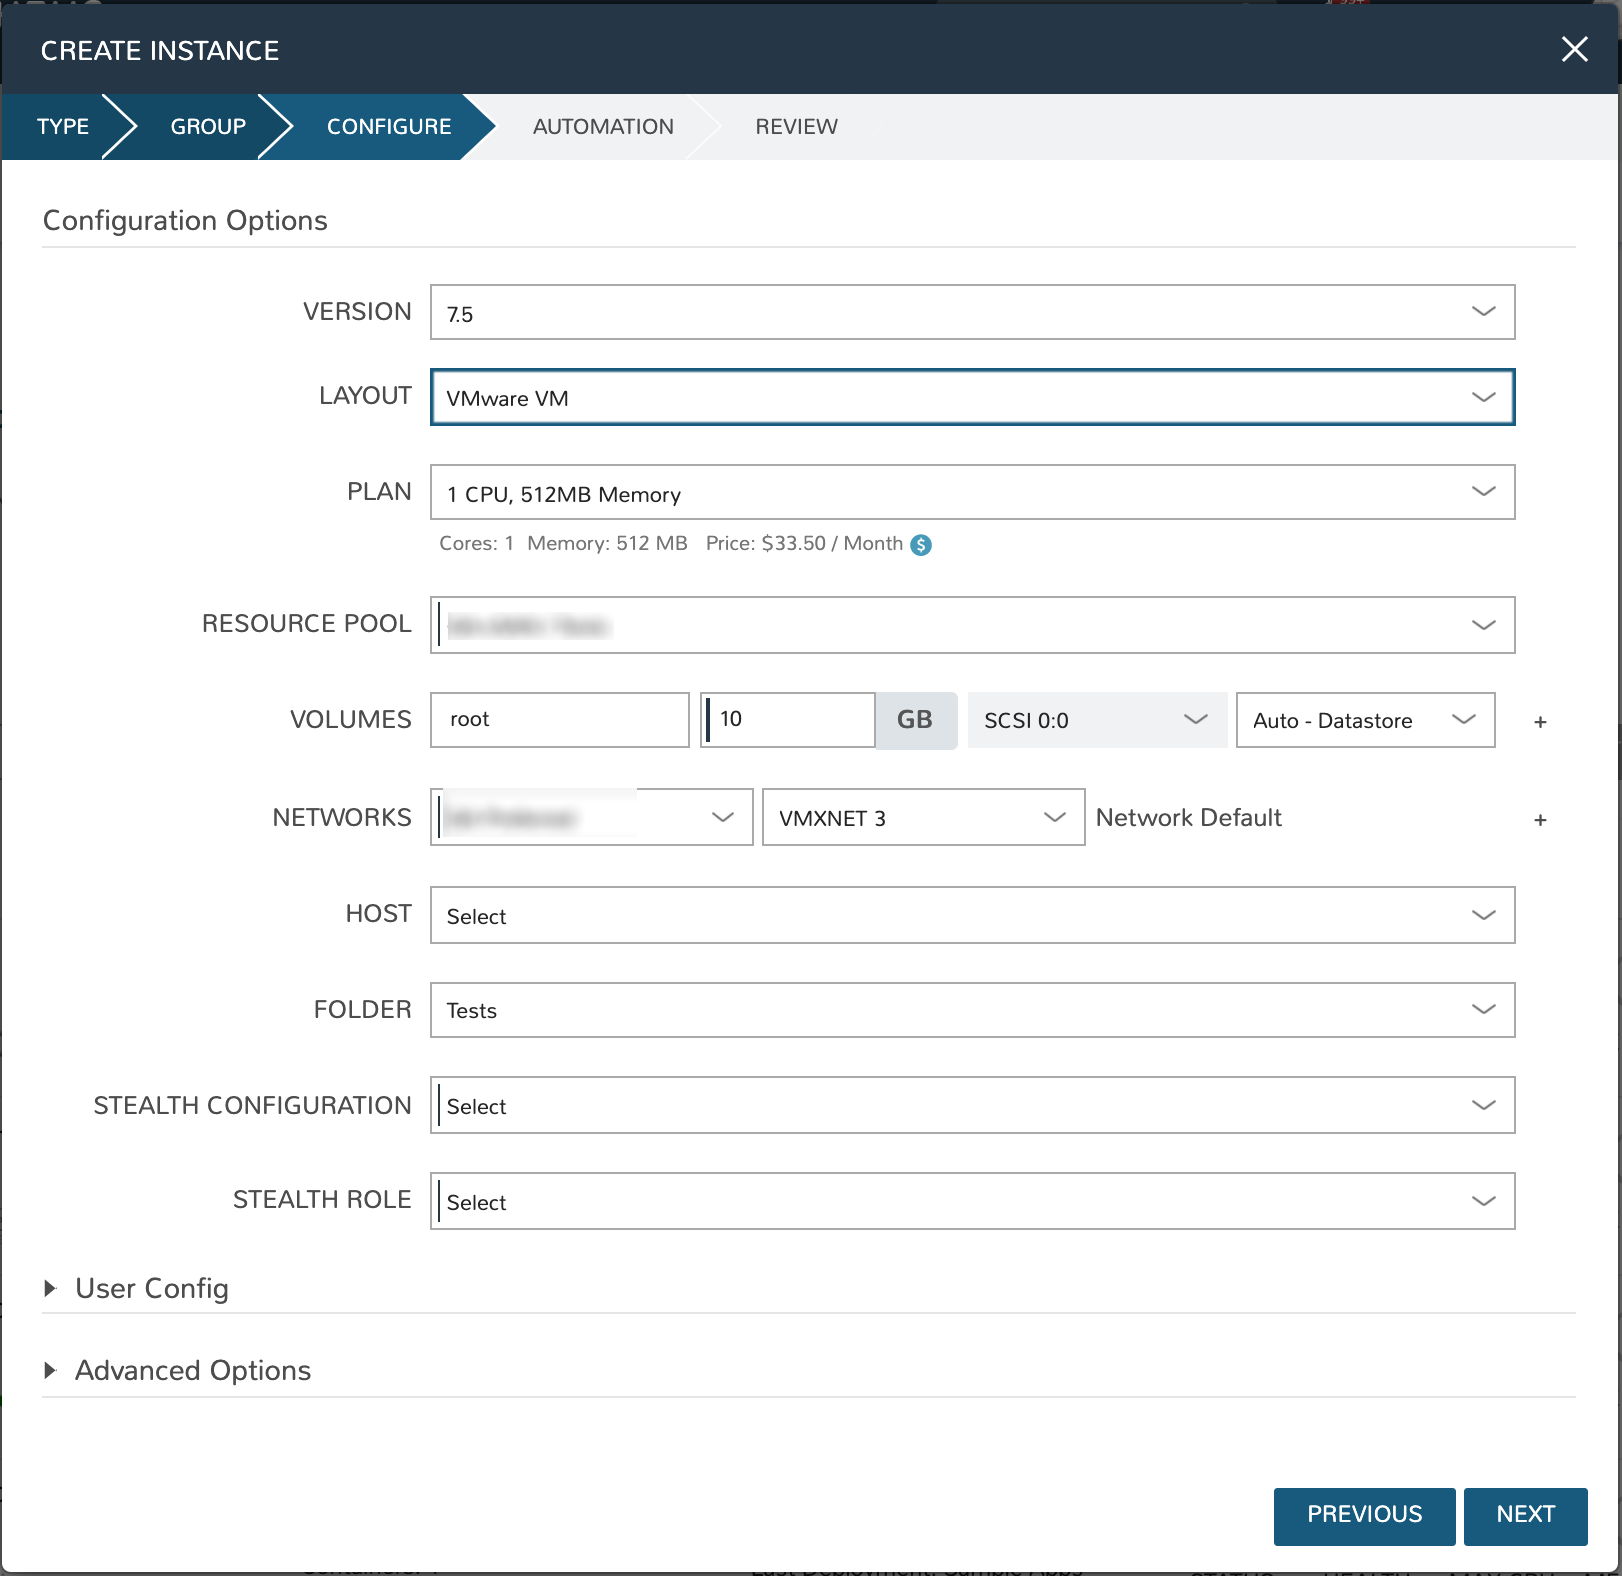
Provisioning with Stealth
In order to provision new Stealth-managed endpoints, Stealth must be integrated with Morpheus as described above. In addition, Stealth must be selected as the Security Server for the cloud you’re provisioning into. Security servers can be selected at the time a new Cloud integration is created or by editing an existing Cloud integration.
Choosing a Cloud Security Server
Assuming the Cloud is already integrated with Morpheus, use the steps below to set the security server and activate Stealth prompts at provision time. The steps to set the security server during the time the cloud is initially integrated with Morpheus is very similar.
Navigate to Infrastructure > Clouds > (Your Selected Cloud)
Click EDIT
Click on Advanced Options to reveal additional selections
In the dropdown for SECURITY SERVER, choose an existing Stealth integration
Provisioning to a Stealth-enabled Cloud
Once we have selected our Stealth integration as the security server for at least one Cloud in Morpheus, new Instances (endpoints) can be provisioned and managed by Stealth.
Navigate to Provisioning > Instances
Click + ADD
Select the Instance Type, Cloud, and Group making sure to choose a Cloud that has been set up for an existing Stealth integration
On the Configure tab of the provisioning wizard, choose a Stealth Configuration and a Stealth Role according to the needs of the machine(s) being provisioning
Once the provisioning process is complete, the new Stealth-managed endpoints will be available and restricted based on the Stealth implementation