Tenants
Overview
A Tenant in Morpheus is an isolated environment with unique users and workloads. The Master Tenant is the default Tenant in Morpheus, created upon installation. All other Tenants outside of the Master Tenants are Subtenants.
The Master Tenant is the default Tenant created during the installation of Morpheus
All Tenants created after installation are Subtenants. Only one Master Tenant can exist
The Master Tenant creates and controls all Subtenants.
Tenants are isolated environments with unique users, workloads, and Groups
The Master Tenant can share or assign its resources to Subtenants
Subtenants cannot share their resources with other Tenants
Subtenants cannot see resources from other Subtenants
Subtenants can only access Master Tenant resources that have been set to Public visibility or specifically assigned to the Subtenant
Roles
There are two Role types in Morpheus, Tenant Roles and User Roles. Understanding these Role types is key to effectively administering Role permissions in Morpheus. These two Role types are discussed in greater detail in this section.
Tenant Roles
Tenant Roles set the maximum permission levels for Users in the Tenant. User Role permissions will not exceed the permissions of the Tenant Role.
Tenant Roles set the maximum permissions for a Tenant
User Roles in a Tenant cannot exceed the permissions of the Tenant Role
A Tenant Role can be assigned to one or multiple Tenants
Tenant Roles determine Cloud access for the Subtenant such that all Clouds in the Master Tenant which have visibility set to Public will show as options in the Tenant Role Cloud Access tab
Only Master Tenant Clouds given access in the Tenant Role will be accessible in the Subtenant
Important
Tenant Roles cap permissions on all Subtenant User Roles. User Roles can be created in the Subtenant with lesser permissions than the Tenant Role allows. Tenant Roles are designed for a Master Tenant Admin to set max permissions for the Subtenant, and a Subtenant Admin to configure User Roles inside the Subtenant.
User Roles
User Roles determine feature, Group, and Instance Type access for all Users. In a multi-Tenant environment, there are two types of User Roles: Single-Tenant User Roles and Multi-Tenant User Roles.
Single-Tenant User Roles: These exist solely in the Tenant they are created in. All Roles created in a Subtenant will be Single-Tenant User Roles
Multi-Tenant User Roles: The Master Tenant can create Multi-Tenant User Roles. These Roles are automatically seeded into Subtenants and can be assigned to Subtenant Users. Changes to Multi-Tenant User Roles made in the Master Tenant are propagated to all Subtenants. However, once a Multi-Tenant User Role is edited inside a Subtenant, it is no longer linked to the Multi-Tenant User Role and becomes its own unique Role. It will no longer receive propagated changes.
Note
Multi-Tenant User Roles are intended to make Subtenant User Role creation easier, so Master Tenant Users do not have to re-create the same base Subtenant Users Roles for every Subtenant. Multi-Tenant User Roles are not a single Role across Tenants, but more like a template that creates new Subtenant User Roles that can then be managed in the Sub Tenant.
Tenants
The Tenants page displays a list of all Tenants. This page enables users to Create, Edit, and Delete Tenants. The list of Tenants displays the Tenant Name, Role, Total Instances, Total Users, and the Created Date.
Click the Tenant Name to drill into the Tenant View where you can again Edit or Delete the Tenant, as well as Create Users, Edit Users, and Delete Users users belonging to the Tenant.
Create Tenants
To Create Tenants:
Select the Administration link in the navigation bar.
Select the Tenants link in the sub navigation bar.
Click the Create Tenant button.
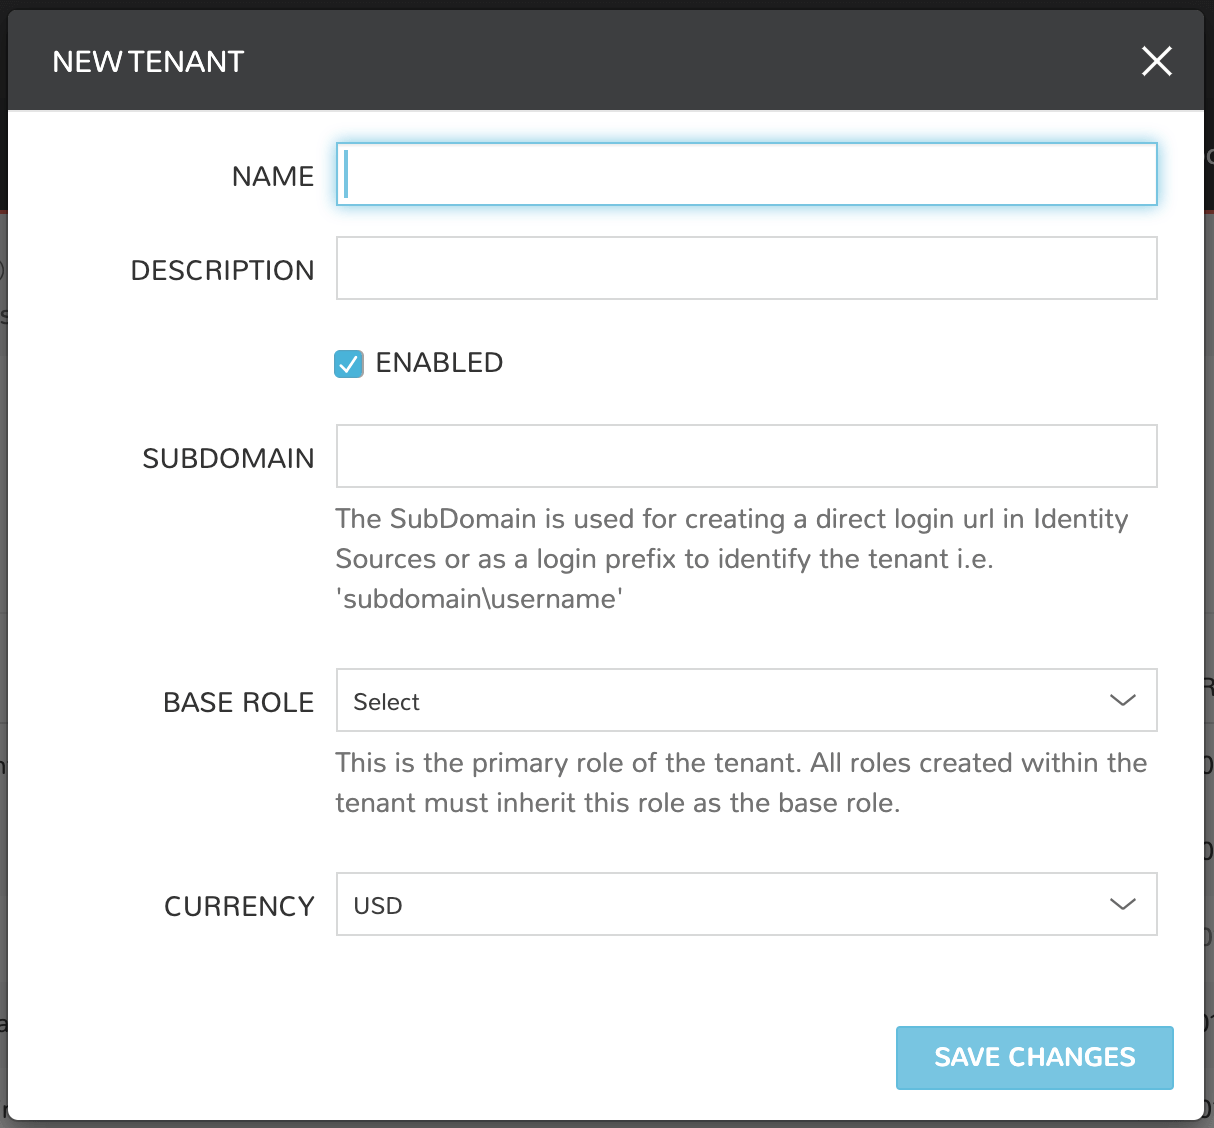
From the New Tenant wizard input:
Name
Description (optional)
Subdomain
Base Role
Currency
Within the Advanced Options section, track customer data related to the Tenant if needed:
Account Number
Account Name
Customer Number
Click the Save Changes
Edit Tenant
To edit a Tenant:
Select the Administration link in the navigation bar.
Select the Tenants link in the sub navigation bar.
Click the Edit pencil icon on the row of the Tenant to edit.
Edit the Edit Tenant settings.
Disabling Tenant
When disabling a tenant, they are not able to login and cannot be impersonated by another tenant. However all of their information will still remain in Morpheus and they may still receive notifications and alerts.
To disable a Tenant:
Select the Administration link in the navigation bar.
Select the Tenants link in the sub navigation bar.
Click the Edit pencil icon on the row of the Tenant to edit.
Uncheck the
Enabledbox.
Delete Tenant
To delete a Tenant:
Select the Administration link in the navigation bar.
Select the Tenants link in the sub navigation bar.
Click the Delete trashcan icon on the row of the Tenant to delete.
Confirm
Tenant Users
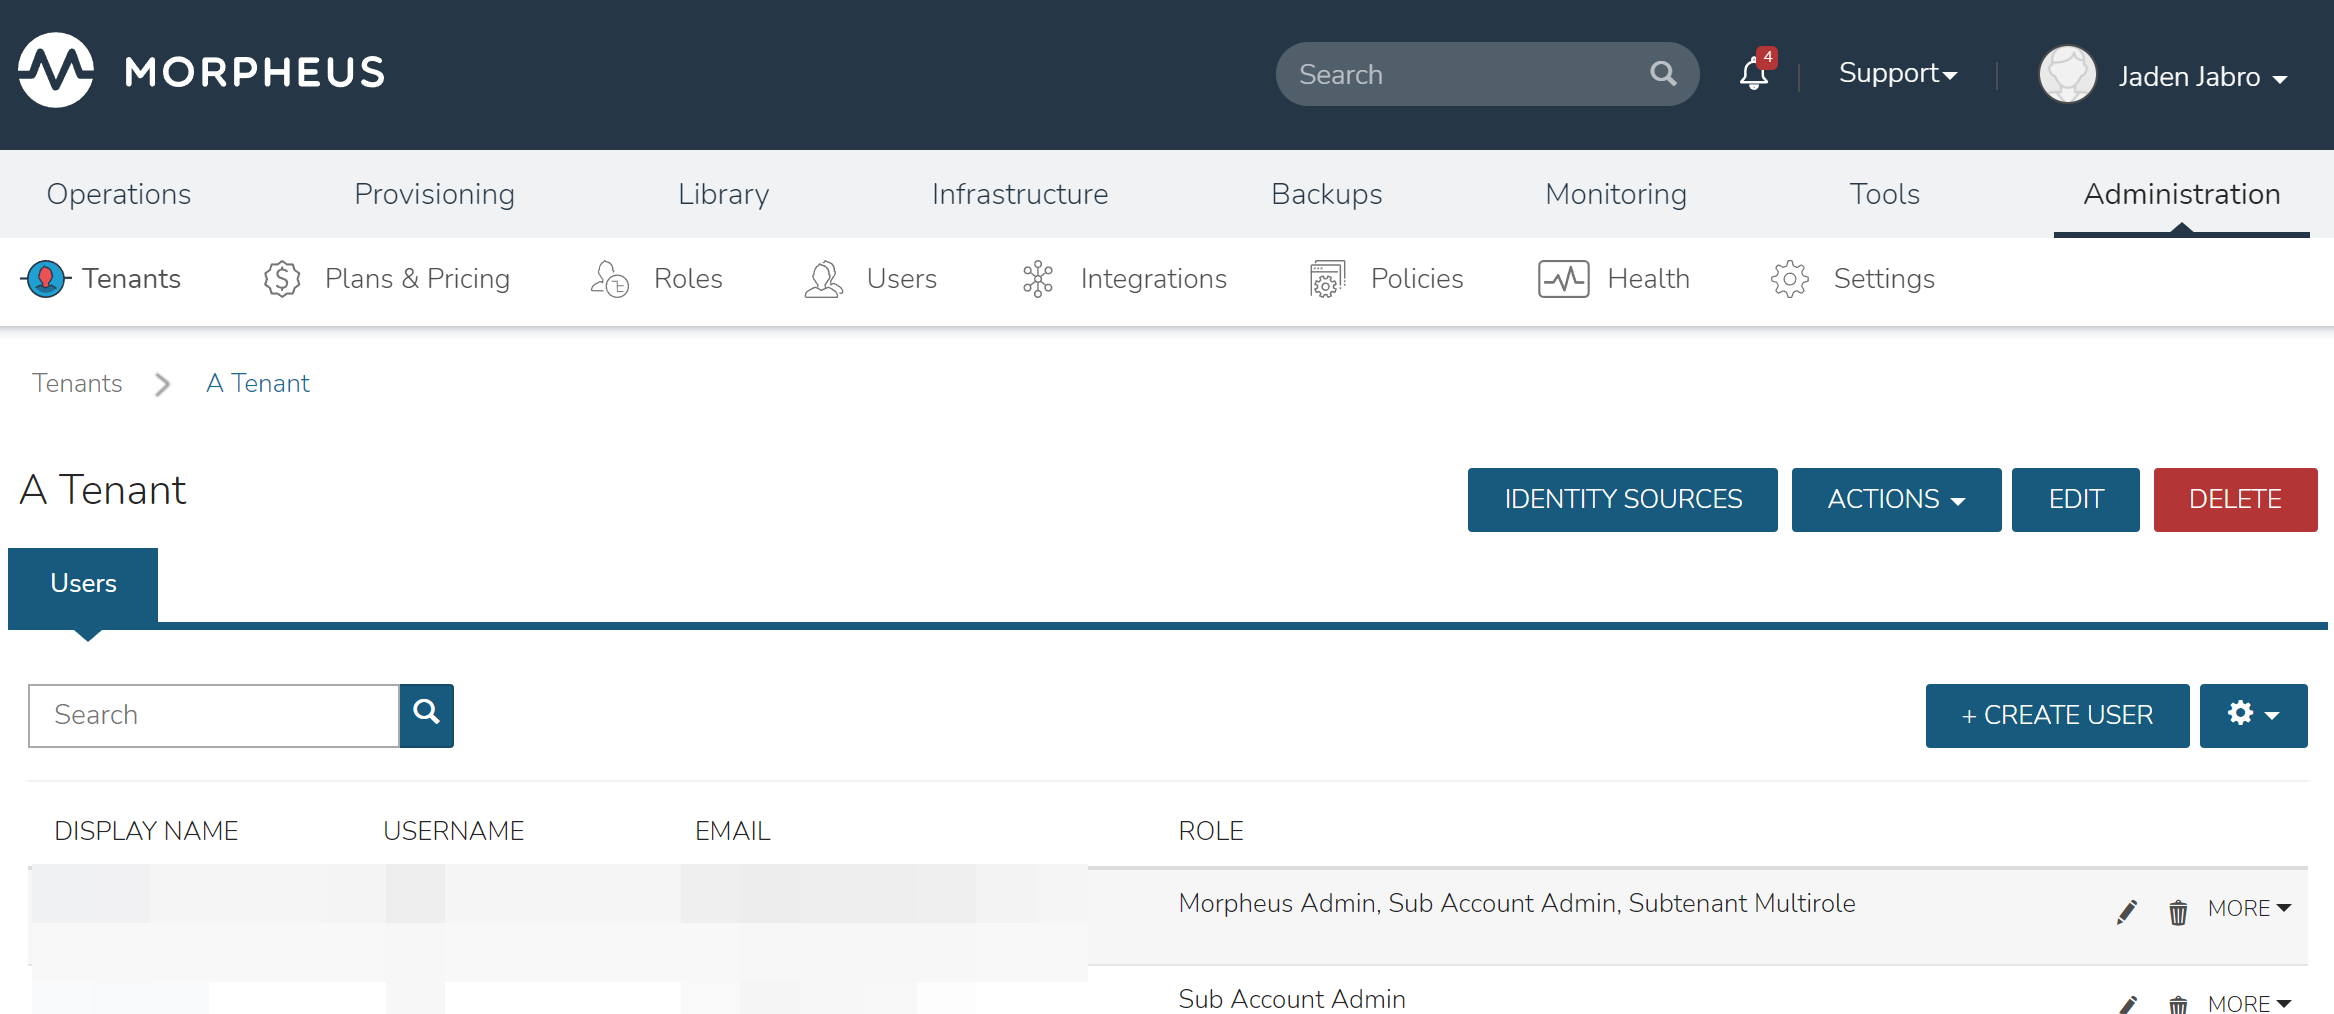
The Tenant View displays a list of users belonging to the Tenant and their Name, Username, Email, and Role.
From this page: Create, Edit, and Delete users within the Tenant.
Important
In versions 3.1.1 and 2.12.5 and later, a Multi-Tenant User Role must be created prior to adding Subtenant Users or the User will not save. In previous versions a default Multi-Tenant Role was seeded. Due to customer requests, the seeded role was removed and a Multi-Tenant Role must be created by the Master Tenant for Subtenant Users.
Create Tenant User
To create a Tenant User:
Select the Administration link in the navigation bar.
Select the Tenants link in the sub navigation bar.
Click the Tenant Name on the row of the Tenant where the user will be added.
Click + ADD USER
From the New User wizard, input the fields below:
First Name
Last Name
Username
Email address
Role (to be inherited by the user)
Password
Any default Windows or Linux credentials
Click SAVE CHANGES
Important
In versions 3.1.1 and 2.12.5 and later, a Multi-Tenant User Role must be created prior to adding Subtenant Users or the User will not save. In previous versions a default Multi-Tenant Role was seeded. Due to customer requests, the seeded role was removed and a Multi-Tenant Role must be created by the Master Tenant for Subtenant Users.
Edit a Tenant User
To edit a User:
Select the Administration link in the navigation bar.
Select the Tenants link in the sub navigation bar.
Click the specific Tenant name from the row of available Tenants.
Click the Edit pencil icon for your selected Tenant.
Edit User information
Note
Name, Username, Passwords and e-mail addresses cannot be edited on Users created from Identity Source Integrations.
Click SAVE CHANGES
Delete Tenant User
To delete a Tenant User:
Select the Administration link in the navigation bar.
Select the Tenants link in the sub navigation bar.
Click the Tenant Name from the row for the Tenant containing the user.
Click the Delete trashcan icon of the row of the user to delete.
Confirm
Subtenant User Login
Subtenant Users can have the same Username as the User on the Master Tenant or any other Tenant. Subtenant Users will now have to login using the subdomain prefix.
Important
Subtenant users will no longer be able to login from the main login page without specifying their subdomain.
- Example:
I have a username
subuserthat belongs to a tenant with the subdomainsubaccount. When logging in from the main login url, I would now need to enter in:subaccount\subuser
Configuring Tenants and Resources for Multi-Tenancy
A very common scenario for Managed Service Providers is the need to provide access to resources on a customer by customer basis. Several administrative features are available in Morpheus to ensure customer resources are properly scoped and isolated. With its built multi-tenancy capabilities and white label support, managed service providers have a wide range of capabilities when it comes to managing customer Tenants and users.
Tenants
There are essentially two types of Tenants in Morpheus
Master Tenant
Sub Tenants
During the initial setup of a Morpheus Appliance, the Master Tenant is created. All Tenants created in addition to this Master Tenant are sub-Tenants. There can only be one Master Tenant, and sub-Tenants cannot become the Master Tenant. The delineation between the Master Tenant and sub-Tenants is important to understand for properly scoping resources across Tenants.
Creating Tenants
The Master Tenant is created during the initial appliance setup. Additional sub-Tenants can be created in the Administration > Tenants section.
The Tenants page displays a list of all Tenants. This page enables users to: Create, Edit, and Delete Tenants. The list of Tenants displays the Tenant Name, Role, Total Instances, Total Users, Status (active or inactive) and the Created Date. Click the Tenant Name to drill into the Tenant View where you can edit or delete the Tenant, as well as create, edit and delete users belonging to the Tenant.
Note
At least one Tenant in addition to the Master Tenant is required to scope resources across Tenants.
To create a new sub-Tenant
Select the Administration link in the navigation bar.
Select the Tenants link in the sub navigation bar.
Click the +Create Tenant button.
From the New Tenant wizard input * Name (Required) * Description * Base Role * Currency (for pricing)
The Base Role defines a role set from which all roles created within the Tenant will inherit.
Note
In prior versions, we could set Limits when creating a Subtenant. These could restrict the amount of storage, memory, and CPUs that can be collectively provisioned by all users in the Tenant. In more recent versions, this functionality has been rolled into Policies (Administration > Policies). When creating a Policy, we are able to specify a Tenant to which the Policy should apply.
Click the Save Changes button.
Viewing Tenants
To View an individual Tenant page, select the Tenant name from the main Tenants section.
From inside the Tenant view, we can edit or delete the Tenant, as well as click into any of the Tenant’s users.
Tenant Users
To create a new user within the Tenant:
Click the CREATE USER button, then from the New User wizard input the fields below:
First Name
Last Name
Username
Email
Role
Password
Confirm Password
Click Save Changes.
Note
Users are specific to each Tenant. Users created in the Master Tenant or other sub-Tenants will only have access to the Tenant they are created in.
Impersonate Tenant User
Morpheus allows admin users in the Master Tenant to impersonate any user in the Subtenants to see the application as if they are that user. To impersonate a user, you must be logged in as a user with the “Impersonate User” feature enabled in the assigned role.
From inside a Tenant detail page (containing the list of that Tenant’s users), and in the specific user’s ACTIONS drop down, select “Impersonate”.

This will log you in as that user in their respective Tenant. To log out of the impersonate users Tenant, select the username in the header, and then select “Quit Impersonating”

Resources
In the Master Tenant, resources can be configured with private or public visibility:
Private Visibility: Only available to the assigned Tenant.
Public Visibility (option available in Master Tenant only): Available across all Tenants
Resources in the Master Tenant can also be assigned directly to Subtenants. When a resource is assigned to a Subtenant, it is only available for that Subtenant, and its visibility is automatically set to private. Public visibility is not an option for any resource assigned to or created in a Subtenant.
From the Master Tenant, the following resources can be configured for public visibility across all Tenants, or assigned to individual sub-Tenants
Clouds
Hosts
Virtual Machines
Networks
Datastores
Resource Pools
Folders
Virtual Images
Library Instance Types
Pricing
Policies
Workflows
Roles
Note
Virtual Image Blueprints can be made available to multiple select Tenants when set to private.
Cloud Visibility & Assignment
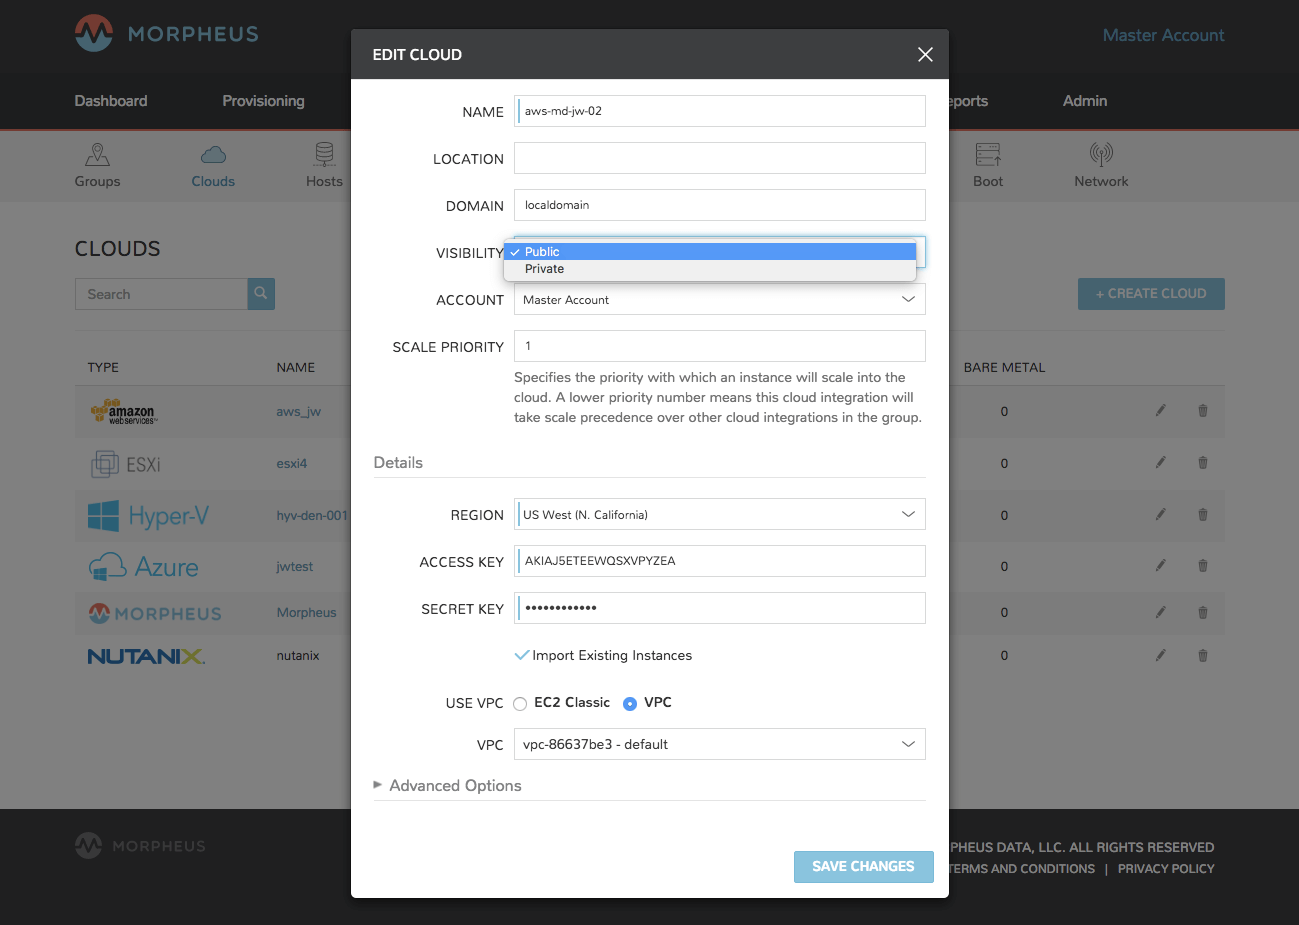
To set the visibility of a Cloud to Public (shared across all Tenants) or Private (only available to the assigned Tenant):
Navigate to Infrastructure > Clouds
Select either the pencil/edit icon on the end of the cloud row, or click the name of the cloud and select “Edit” in the cloud page.
From the “Visibility” drop down, select either “Public” or “Private”
Select Save Changes in the footer of the Edit Cloud modal.
When a cloud is set to Public visibility, it is available to be added to Subtenants. All Subtenants created after a Master Tenant cloud is set to public will automatically have clouds with public visibility added, and a group will be created for each available cloud matching the cloud name in the new Subtenant(s).
For Tenants created prior to a Master Tenant cloud being set to public visibility, the Subtenant will have the option to add that cloud but it will not automatically be added.
While the cloud will be available for Subtenants, the resources available in that cloud to the Subtenant(s) depends on the visibility or assignment of the individual resources.
Note
A Subtenant user must have sufficient role permissions and cloud access to add publicly available clouds. Master Tenant clouds settings cannot be edited from Subtenants.
Assign a Cloud to an Tenant
Important
When assigning a Cloud to a Tenant, all resources for that Cloud will only be available to the assigned Tenant. If a cloud is created in the Master Tenant and assigned to a sub-Tenant, it will no longer be available for use by the Master Tenant or any other sub-Tenants, although it can be assigned back to the Master Tenant, or to another sub-Tenant.
It may be preferable for service providers to share or assign their cloud resources, such as specific hosts, networks, resources pools and datastores, across sub-Tenants, rather than an entire cloud.
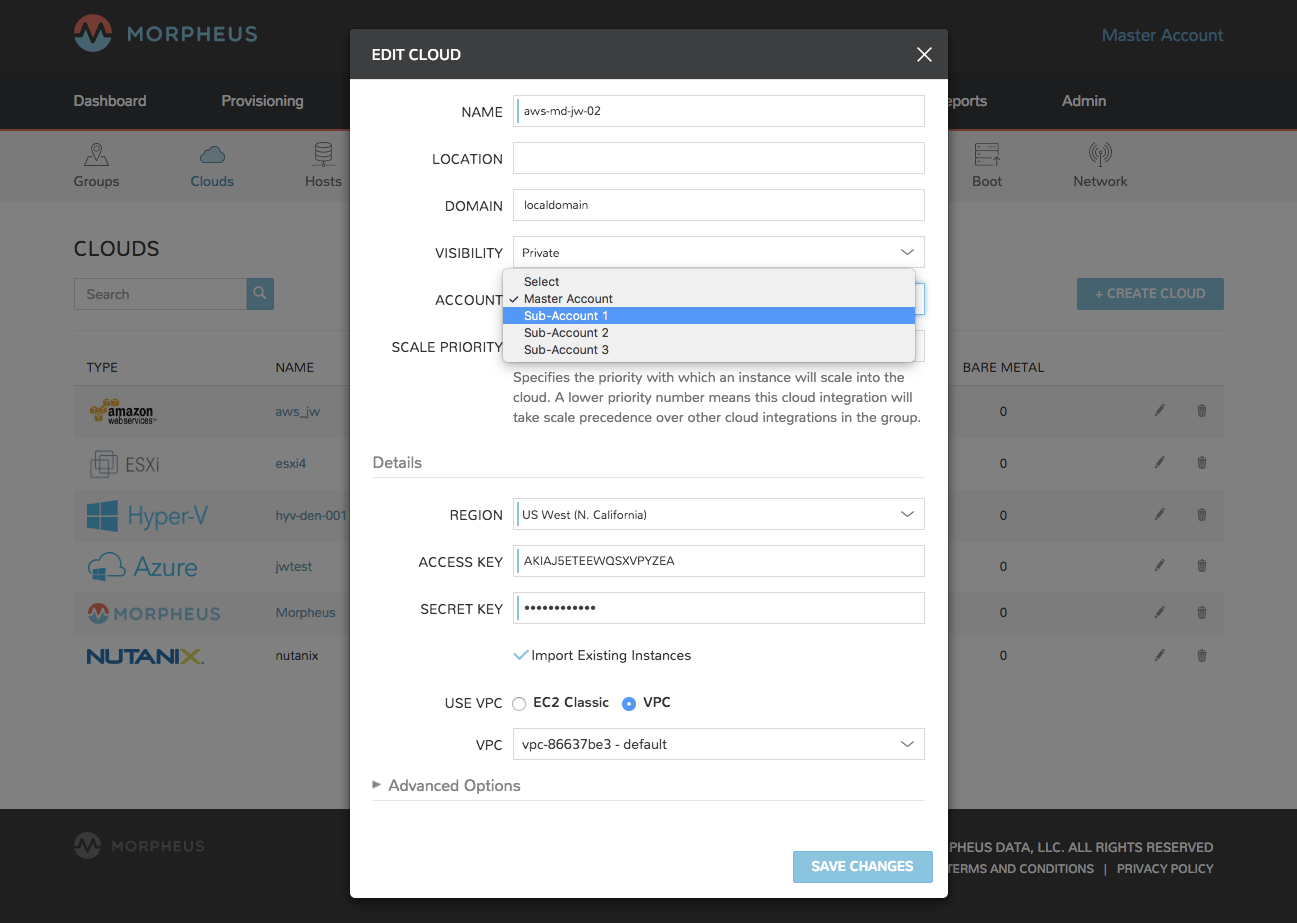
To assign a cloud from the Master Tenant to a Sub-Tenant
Navigate to Infrastructure, Clouds
Select either the pencil/edit icon on the end of the cloud row, or click the name of the cloud and select “Edit” in the cloud page.
From the “Tenant” drop down, select the Tenant to assign the cloud to. The visibility will automatically be set to “Private” when a cloud is assigned to a sub-Tenant.
Select Save Changes in the footer of the Edit Cloud modal.
When a cloud is assigned to a sub-Tenant, or assigned to the Master Tenant with private visibility, that cloud and all of its resources are only available to the assigned Tenant. The Master Tenant still maintains control and visibility, and can edit the cloud settings or re-assign the cloud.
Individual Resource Visibility & Assignment
Similar to clouds, individual resources from the Master Tenant can be set to public and available to sub-Tenants, or assigned to sub-Tenants.
By default, any host, virtual machine, bare metal server, network, resource pool, datastore or blueprint added, created or inventoried by an Tenant is assigned to that Tenant. If these resources are in the Master Tenant, they can be assigned to sub Tenants. Assigning one of these resources will make it unavailable to the Master Tenant, but it will still be visible and editable by the Master Tenant. This allows Master Tenant resources to be isolated for use by sub-Tenants while still under the control of the Master Tenant.
Resources assigned to sub-Tenants from the Master Tenant will be visible and available for use by that sub-Tenant, however they cannot be edited or re-assigned by the sub-tenant.
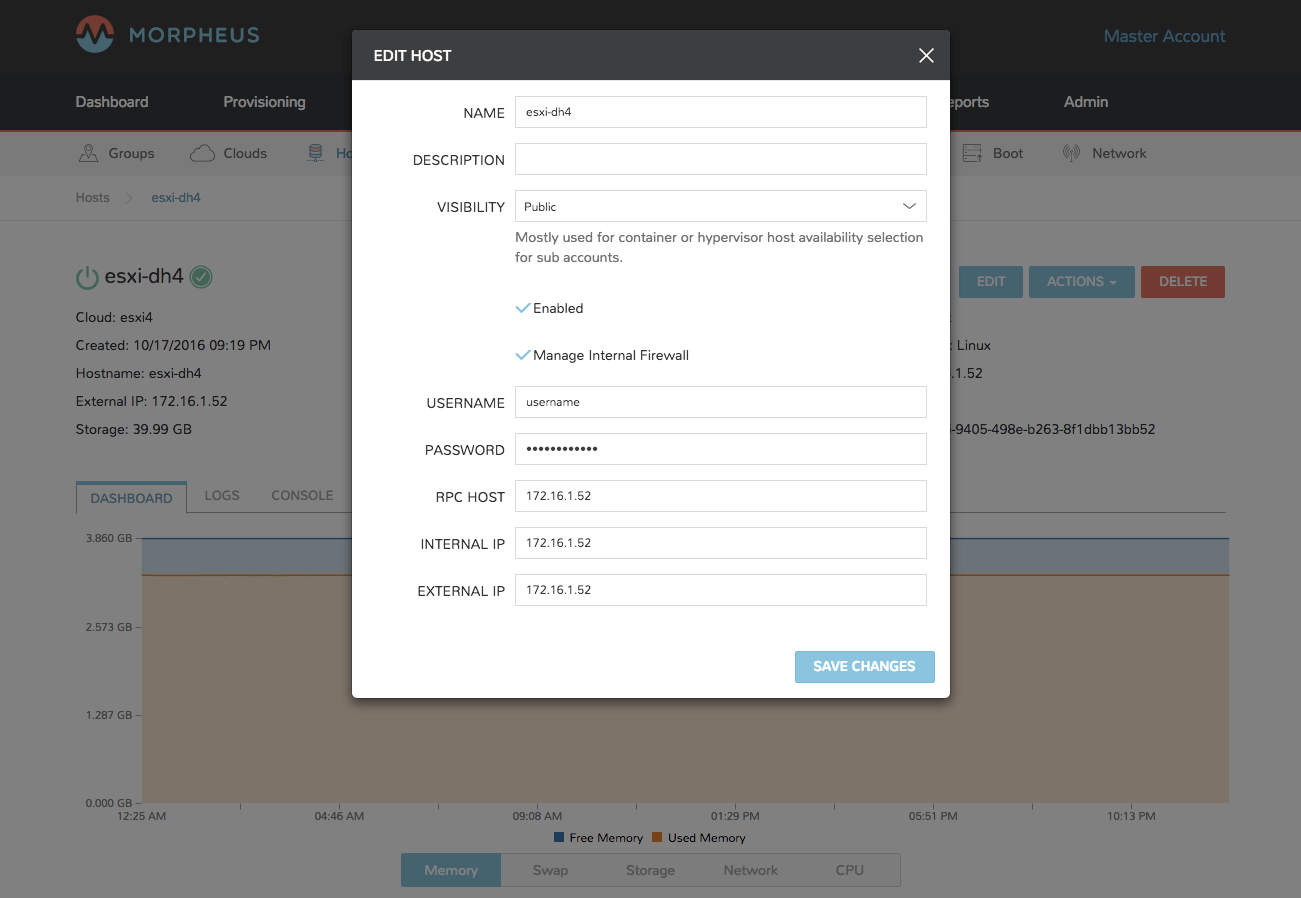
Set the Visibility of a Host, Virtual Machine or Bare metal Server to Public or Private
From the Master Tenant, navigate to Infrastructure, Hosts
Select either the Hosts, Virtual Machines or Bare Metal tab
Click the name of the resource
Select Edit in the resource page to bring up the config modal
From the “Visibility” drop down, select either “Public” or “Private”
Select Save Changes
Assigning a Host, Virtual Machine, or Bare Metal server to an Tenant
From the Master Tenant, navigate to Infrastructure, Hosts
Select either the Hosts, Virtual Machines or Bare Metal tab
Click the name of the resource
From the “Actions” dropdown in the the resource page, select Assign Tenant
In the Assign Tenant modal, select the Tenant to assign the resource to.
Select Execute in the modal
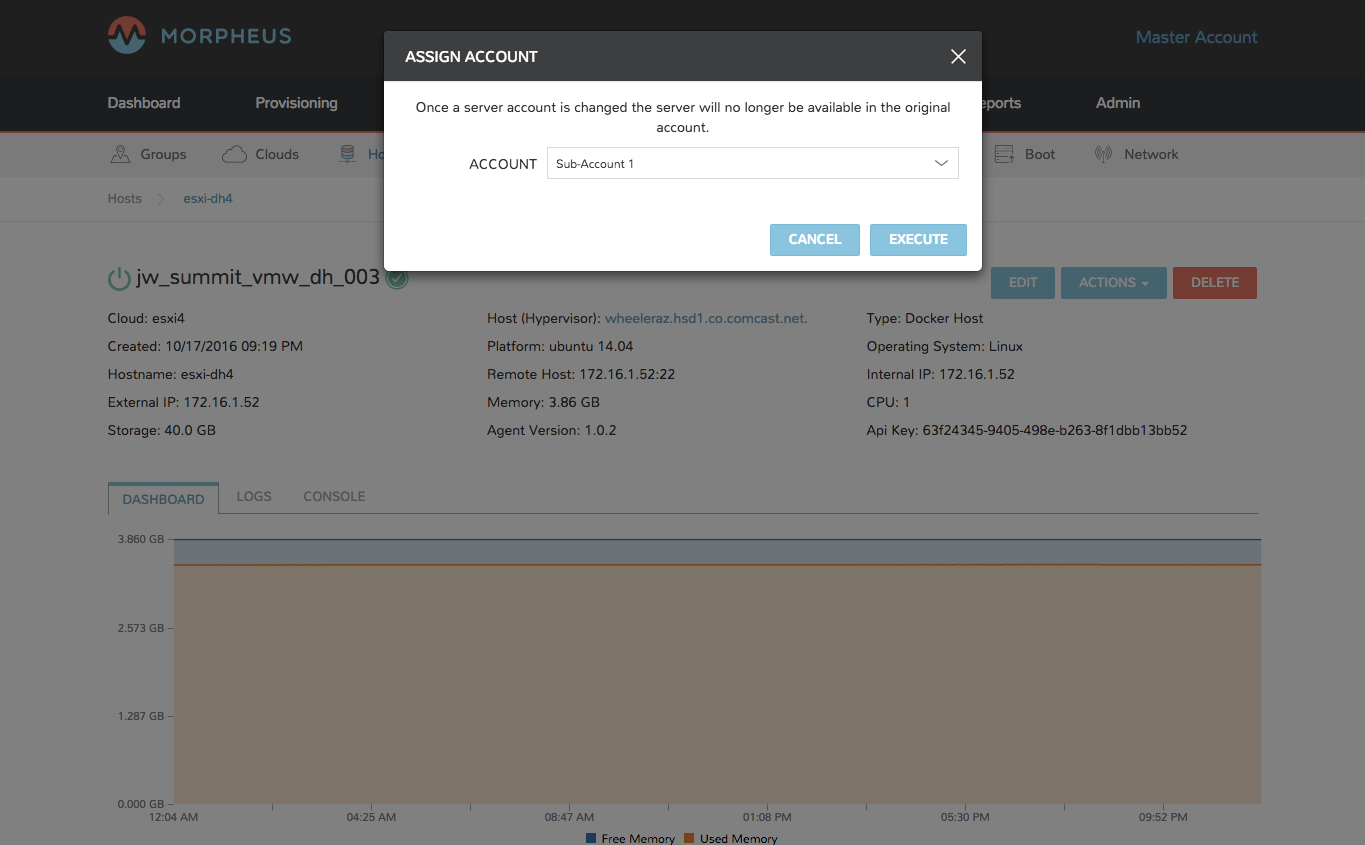
The resource will now be assigned and available for use by the assigned Tenant. If assigned to a sub-Tenant, the Master Tenant will maintain visibility and control.
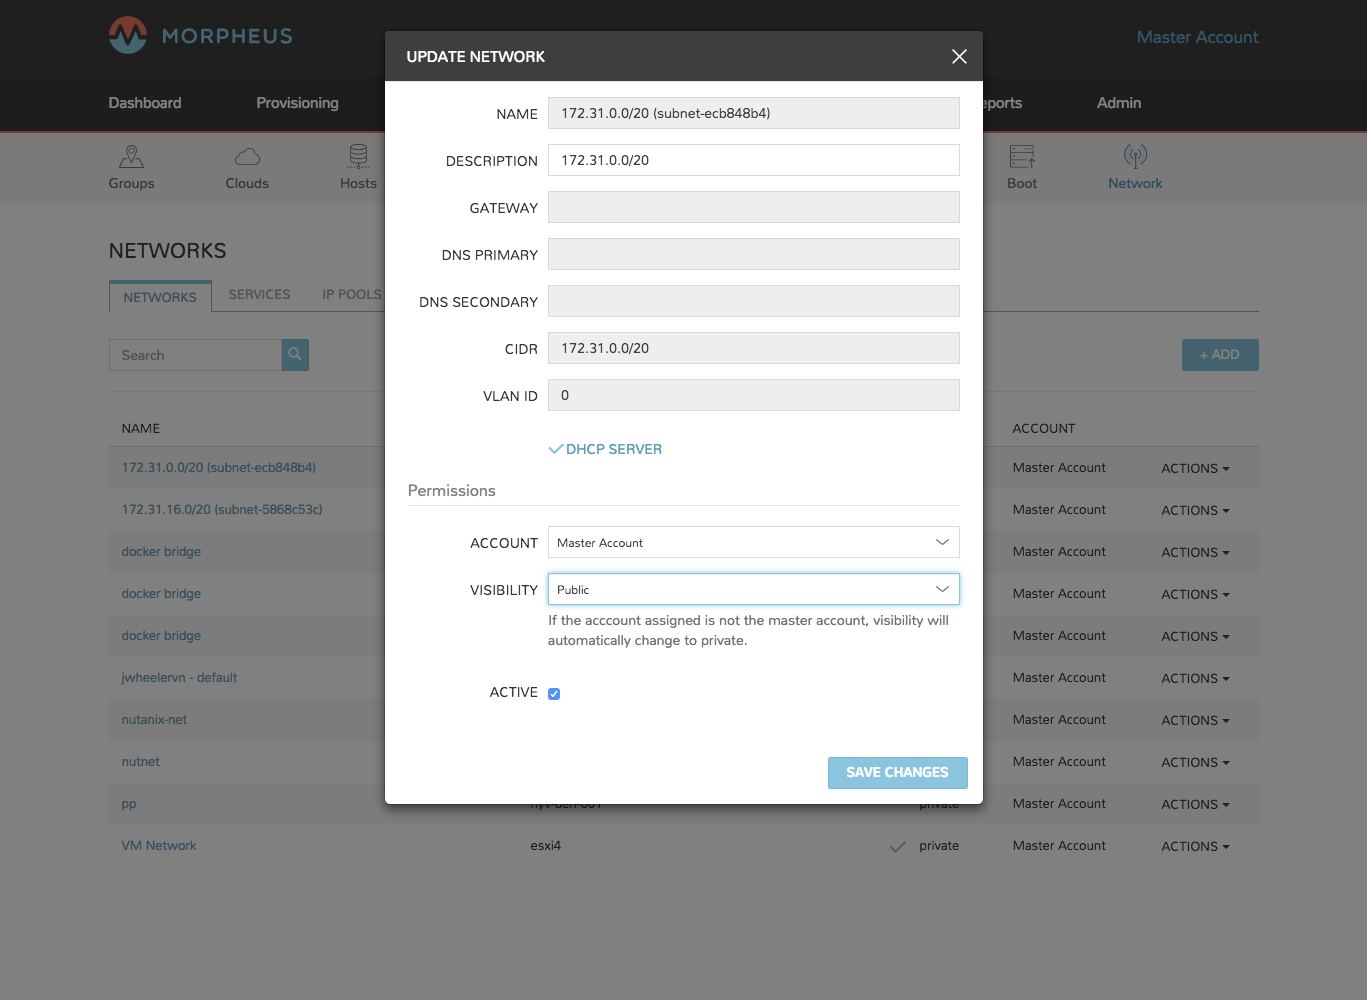
Set the Visibility of a Network to Public or Private
From the Master Tenant, navigate to Infrastructure, Network
Select either the pencil/edit icon in the network row, or click the name of the network and select “Edit” in the network page.
From the “Visibility” drop down, select either “Public” or “Private”
Select Save Changes in the modal
Assign a Network to an Tenant
From the Master Tenant, navigate to Infrastructure, Network
Select either the pencil/edit icon in the network row, or click the name of the network and select “Edit” in the network page.
From the “Tenant” drop down, select an Tenant to assign the network to.
Select Save Changes in the lower the modal
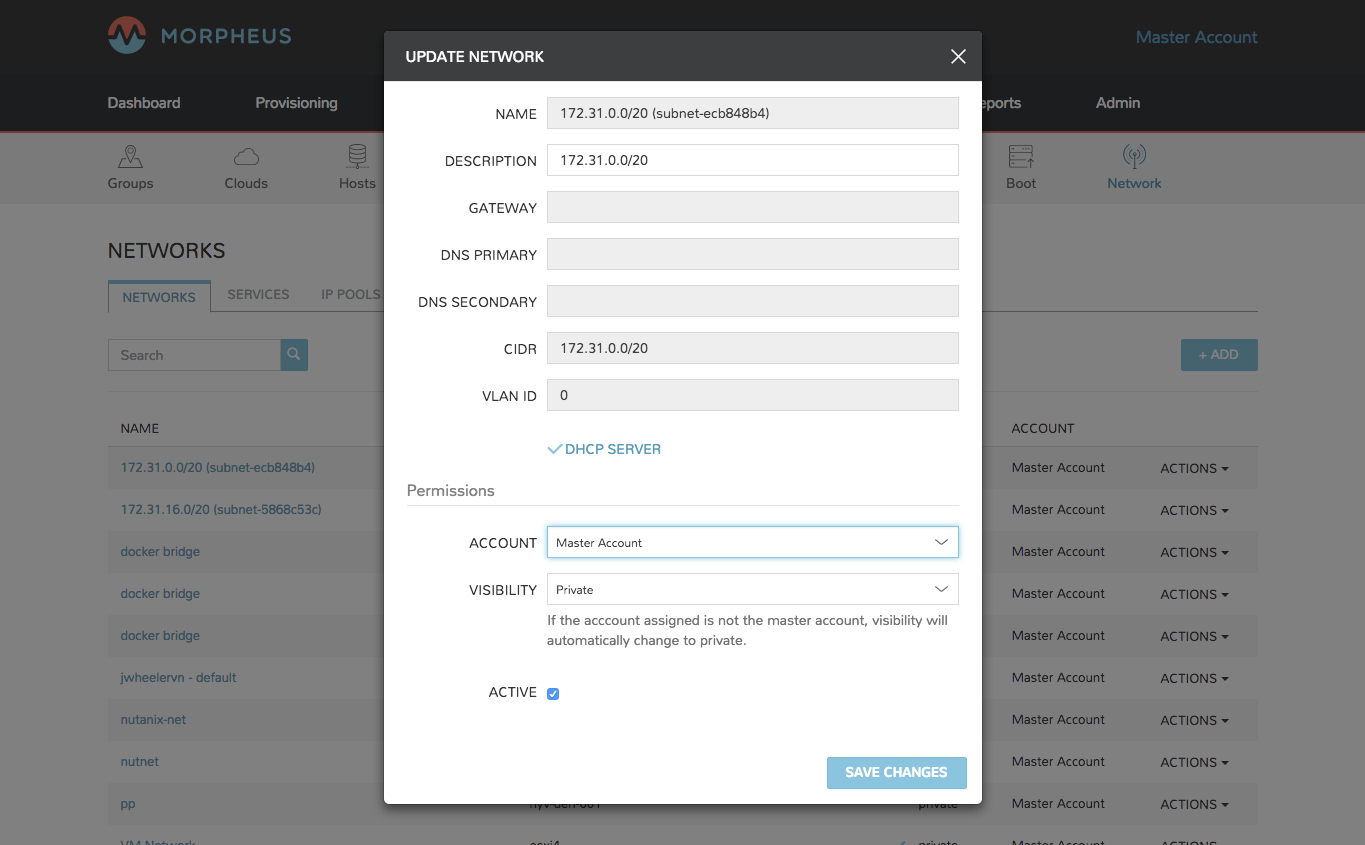
The Network will now be assigned and available for use by the assigned Tenant. If assigned to a sub-Tenant, the Master Tenant will maintain visibility and control.
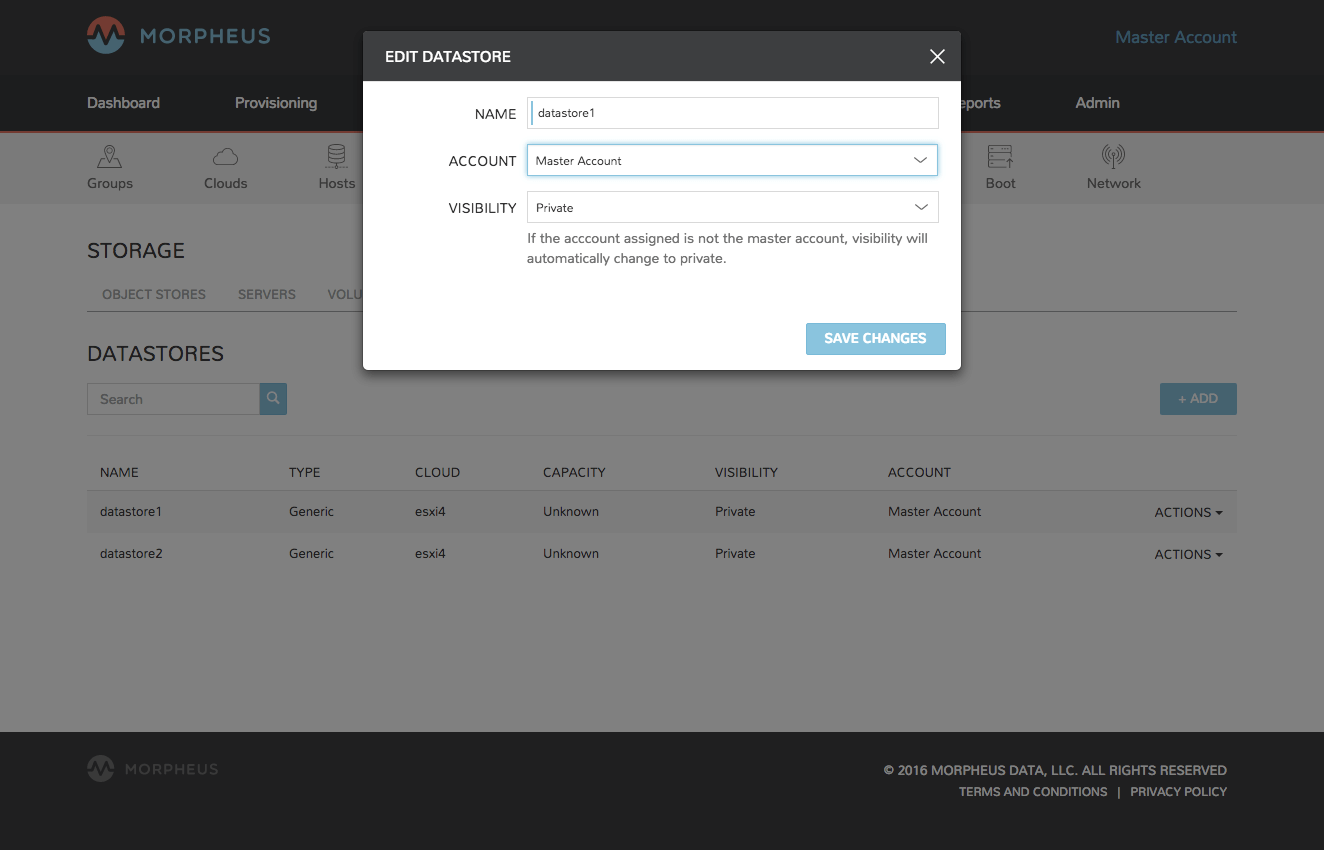
Set the Visibility or assign a datastore to an Tenant
From the Master Tenant, navigate to Infrastructure, Storage
Select the “Data Stores” tab
Select Edit from the “Actions” dropdown in the datastores row
From the “Visibility” drop down, select either “Public” or “Private”
From the “Tenant” drop down, select the Tenant to assign the datastore to.
Note
If assigned to a sub-tenant, the visibility will be automatically set to private.
Select Save Changes in the modal
Set the Visibility or assign a Virtual Image to an Tenant
From the Master Tenant, navigate to Provisioning, Virtual Images
Select Edit from the “Actions” dropdown in the Virtual Images row
From the “Visibility” drop down, select either “Public” or “Private”. Public will share the
From the “Tenant” field, start typing the name of the Tenant to assign the Virtual Image to. Matching Tenants will populate, then select the Tenant to add.
Note
Virtual Images can be set to Private, but accessible to more that one Tenant
#. Repeat step 4 for all Tenants requiring access to the virtual image. .. To remove access for an Tenant, click the “x” next to the Tenant name #. Select Save Changes in the modal
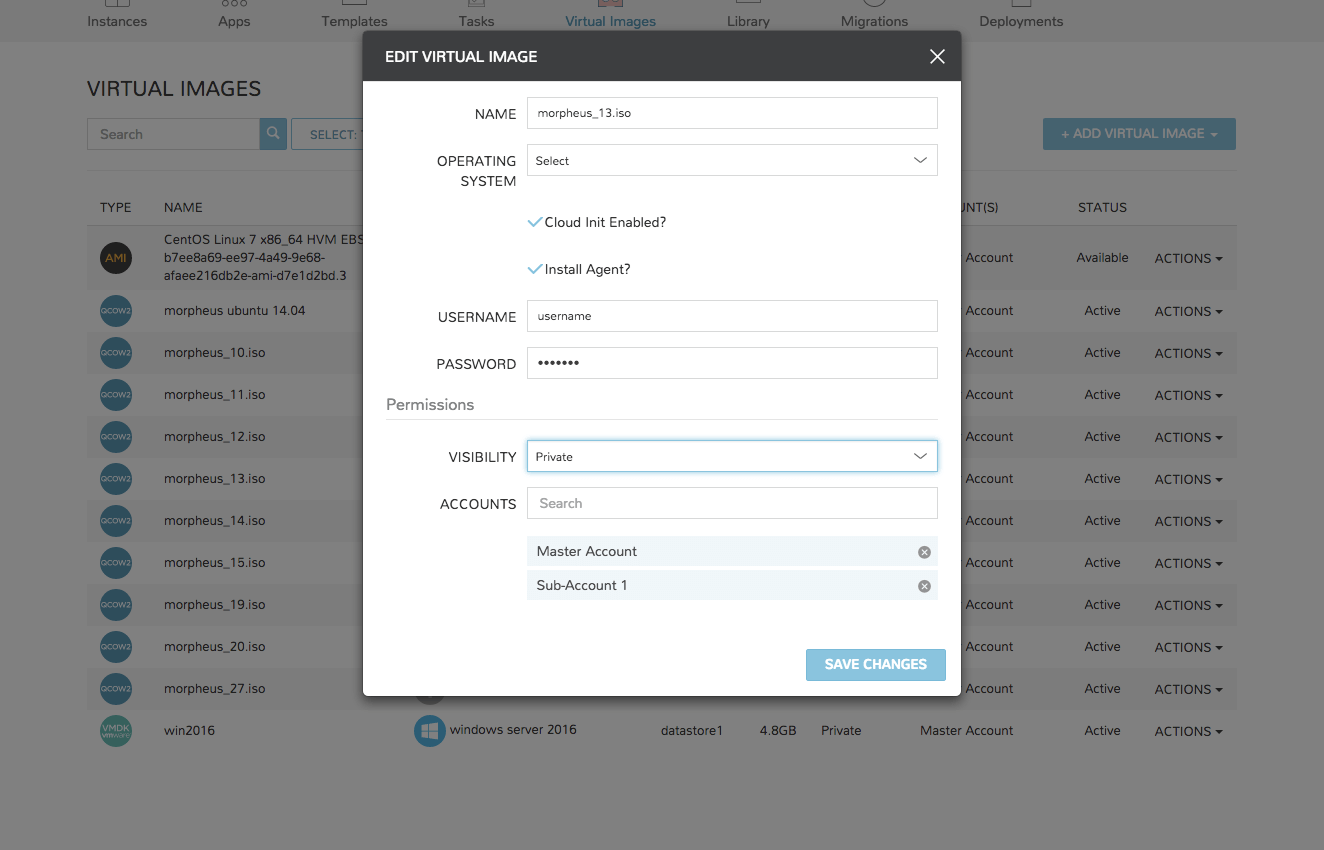
The Virtual Image will now be available for use by the assigned Tenants.