Policies
Overview
Policies add governance, ease of use, cost-savings, and auditing features to Morpheus. Morpheus enables end users to create Policies scoped to Users, Roles, Groups, Clouds, Tenants, Networks, Plans, and Global scoping to give Admins full control and governance over their environments. The available scoping will vary from one Policy type to another. See the section below for information on each Policy type and guides for more complex Policy implementation.
Policy Types
- Approve Delete
Sets an approval requirement for deleting Instances or Apps within the Policy scope. When setting the Policy, users have the option of using Morpheus Approvals or an Approval Integration such a ServiceNow. On delete request, Instances will be shut down and only deleted if approved.
- Approve Provision
Sets an approval requirement for provisioning Instances or Apps within the Policy scope. When setting the Policy, users have the option of using Morpheus Approvals or an Approval Integration such a ServiceNow.
- Approve Reconfigure
Sets an approval requirement for reconfiguring Instances and servers within the Policy scope. When setting the Policy, users have the option of using Morpheus Approvals or an Approval Integration such a ServiceNow.
- Approve Workflow Execute
If enabled, when Workflows are executed on workloads within the Policy scope, an Approval is generated. This could apply when a Workflow is executed from the Workflows list page or from the detail page for an Instance or server. Approvals can be targeted to Morpheus internal Approvals or targeted to a third-party integration (such as ServiceNow). The Workflow will not begin to execute until after the approval is granted.
- Backup Creation
Disable or enable the ability to create a backup when provisioning an instance.
- Backup Targets
A master account can determine storage provider options for backups with Backup Targets policies.
- Budget
Sets a maximum total combined price for all instances in the Group, Cloud, Tenant or owned by the User this policy is applied to.
- Cluster Resource Name
The name of Cluster hosts (master and workers) when creating Kubernetes, Docker and KVM Clusters. Pre-populates a fixed or editable Resource Name value for the cluster using ${variable} naming patterns and/or text, including ${sequence} numbering. Toggle whether sequence numbers are reusable (after the resource using them is destroyed) by enabling Reuse Naming Sequence Numbers in Administration > Settings
- Cypher Access
Granularly set LIST, READ, WRITE, and DELETE access to arbitrary Cypher secret paths scoped globally or to specific Roles and Users. See the section below for a guide to establishing a Cypher access policy.
- Delayed Delete
Delayed Delete Policies allow for soft deletion of Instances and Apps. Instead of deleting immediately, Instances and Apps with a Delayed Delete policy applied will be shutdown upon deletion request and hidden by default from the UI. The Instance/App will then be in
Pending Removalstatus. In order to see Instances pending deletion on the Instances list page (Provisioning > Instances), you must filter for “Pending Removal” status. These Instances will not show when filtered for “All Statuses”- Expiration
Sets an expiration timeframe in days after which the Instance will be deleted. Extensions can be auto-approved or require approval immediately or after x amount of auto-extensions using Morpheus Approvals or an Approval Integration. See Morpheus Knowledge Base for more information about Expiration policies
- File Share Storage Quota
Sets a Storage Quota for File Share usage (in GB) to scoped User, Role, Tenant or Global.
- Hostname
The
hostnameorcomputer namewhich is set in the OS and DNS. On some platforms, hostnames are restricted by length, spaces, and/or special characters. Pre-populates a fixed or editable name for hostnames/machine names using ${variable} naming patterns and/or text, including ${sequence} numbering. Toggle whether sequence numbers are reusable (after the resource using them is destroyed) by enabling Reuse Naming Sequence Numbers in Administration > Settings- Instance Name
Pre-populates a fixed or editable name for Instance Names using ${variable} naming patterns and/or text, including ${sequence} numbering. Toggle whether sequence numbers are reusable (after the resource using them is destroyed) by enabling Reuse Naming Sequence Numbers in Administration > Settings. Note that it’s not recommended administrators include “>”, “<”, “%”, “$”, or “=” in naming policies
- Max Containers
Sets the max number of Containers for the Group or Cloud the Policy is added to.
- Max Cores
Sets the max number of total of Cores combined for Instances in the Group or Cloud the Policy is added to, includes the option to include or exclude container resources in the Policy.
- Max Hosts
Sets the max number of total Hosts in the Group or Cloud the Policy is added to.
- Max Load Balancer Pools
Sets the max number of load balancer pools within the policy scope
- Max Memory
Sets the max number of total of RAM combined for Instances in the Group or Cloud the Policy is added to, includes the option to include or exclude container resources in the Policy.
- Max Pool Members
Sets the maximum number of members in a load balancer pool
- Max Snapshots
Set the maximum number of Snapshots that may be stored for each Instance or VM within the scope. Once the limit is met, Morpheus will warn the user when attempting to create more snapshots until the number is reduced
- Max Storage
Sets the max number of total of Storage combined for Instances in the Group or Cloud the Policy is added to, includes the option to include or exclude container resources in the Policy.
- Max Virtual Servers
Sets the maximum number of virtual servers within the policy scope
- Max VMs
Sets the max number of Virtual Machines for the Group or Cloud the Policy is added to.
- Message of the Day (MOTD)
Message of the Day”” Policy for displaying Alerts in Morpheus. Configurable as a pop-up or full-page notification with Info, Warning and Critical message types.
Note
Requires role permission:
Admin: Message Of the Dayset to “Full” to create and manage MOTD Policies.- Network Quota
Limits the number of networks that can be created within the policy’s scope
- Object Storage Quota
Sets a Storage Quota for Object Storage usage (in GB) to scoped User, Role, Tenant or Global.
- Power Scheduling
Adds a Power Schedule for the Instances in a Group or Cloud. Power Schedules can be created in Library > Automation > Power Scheduling
- Router Quota
Limits the number of routers that can be created within the policy’s scope
- Shutdown
Sets a shutdown timeframe in days upon provision after which the Instance will be stopped. Extensions can be auto-approved or require approval immediately or after x amount of auto-extensions using Morpheus Approvals or an Approval Integration.
- Storage Server Storage Quota
Sets a Storage Quota for selected Storage Server (in GB), applied Globally or per specified Tenants.
- Tags
Requires the user to add compliant Tags at provision time, this can be enforced on a strict or passive basis
Note
Tag scanning and enforcement is currently only available for Azure, Amazon, Google, and VMware clouds. For a more comprehensive guide on implementing Tag Policies, see the associated article in our KnowledgeBase.
- User Creation
Controls the “CREATE YOUR USER” flag in the User Config options during provisioning do be always disabled, always enabled, enabled by default, or disabled by default.
- User Group Creation
Forces User Creation of members in the selected User Group during Provisioning.
- Workflow
Forces execution of selected Workflow for Instance Provisioning.
Creating Policies
Policies can be created in three different locations.
Administration > Policies
Infrastructure > Groups > Group > PoliciesInfrastructure > Clouds > Cloud > Policies
Policies can be disabled and re-enabled at anytime.
Important
Precedence is applied to matching or conflicting Policies in the following order: Cloud > Group > Role > User > Global.
To create a Global Policy:
Navigate to Administration > Policies
Select + ADD Policy and choose from the available policy types.
Refer to Policy Type sections below for Configuration options.
Under Filter next to scope select Global
Select SAVE CHANGES
To create a Policy for a User:
Navigate to Administration > Policies
Select + ADD Policy and choose from the available policy types.
Refer to Policy Type sections below for Configuration options.
Under filter next to scope select User a drop down menu will appear below allowing you to select a user
Select SAVE CHANGES
To create a Policy for a Role:
Navigate to Administration > Policies
Select + ADD Policy and choose from the available policy types.
Refer to Policy Type sections below for Configuration options.
Under filter next to scope select Role a drop down menu will appear below allowing you to select a Role
- For
APPLY INDIVIDUALLY TO EACH USER IN ROLE Select for Max Resource/Quota Policies to be calculated per user
Leave unselected to calculate by total usage of all users within that Role.
- For
Select SAVE CHANGES
To create a Policy for a Cloud:
Note
Resource Limitation Policies apply to all Instances in the Cloud the Policy is added to. Approval, Naming, Power, Shutdown and Expiration Policies apply to Instances created or moved into the Group after the Policy is enabled.
Navigate to
Infrastructure > CloudsSelect a Cloud by clicking on the name of the Cloud to go to the Cloud Detail page.
Select the
POLICIEStab in the Cloud Detail page.Select + ADD and choose from the available policy types.
Refer to Policy Type sections below for Configuration options.
Select SAVE CHANGES
To create a Policy for a Group:
Note
Resource Limitation Policies apply to all Instances in the Group the Policy is added to. Approval, Naming, Power, Shutdown and Expiration Policies apply to Instances created after the Policy is enabled.
Navigate to
Infrastructure > GroupsSelect a Group by clicking on the name of the Group to go to the Group Detail page.
Select the
POLICIEStab in the Group Detail page.Select + ADD and choose from the available policy types.
Refer to Policy Types sections below for Configuration options.
Select SAVE CHANGES
Policy Types
Cypher Policies
Morpheus allows administrators to set robust Cypher policies, which determine global, role, and/or specific user access to configured Cypher secret mount points. A number of considerations should be made when deploying Cypher Access policies, including how user role permissions will interact with the policy and how conflicts between overlapping policies are resolved.
Role Permissions
User Role permissions (Administration > Roles) greatly affect Cypher access. Cypher access Role permissions are set from the Features tab of the selected Role under “Tools: Cypher”. The Role permission should be set based on the highest level of access to any one individual Cypher entry needed for the specific Role. For example, if the Role needs no access to any Cypher entries, set the feature permission to “None” and hide the Cypher UI from the Role completely. Alternatively, if the Role needs to use and decrypt even one Cypher entry, set the feature permission to “Full Decrypt”. The complete set of available permissions are below:
NONE: Cypher UI hidden
READ: Cypher UI present, entries can be listed
USER: Cypher UI present, user sees and can use their own entries, user can create new entries
FULL: Cypher UI present, user sees and can use all entries, user can create new entries, user cannot decrypt any entries
FULL DECRYPT: Full access to Cypher features including the ability to decrypt secrets
Cypher Access Policies
Like other Policy types, Cypher Access Policies are created in Administration > Policies. Click + ADD POLICY to create new. Set the type to “Cypher Access” and the relevant configuration options will be displayed. In addition to the type, enter a name for the Policy in the top section.
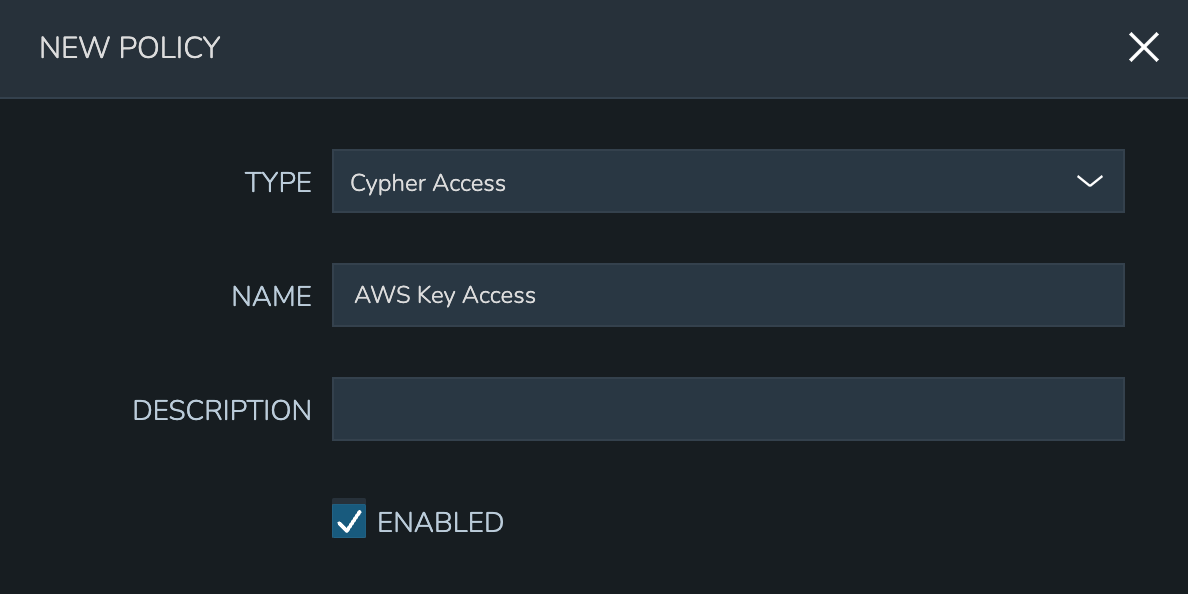
In the next section, enter the key path to which the Policy will apply. In addition to static entries that point to one specific Cypher entry, this field supports pattern matching with regex. For example, enter “.*” to refer to all Cypher entries or “secret/.*” to refer to all entries under the secret mount point.
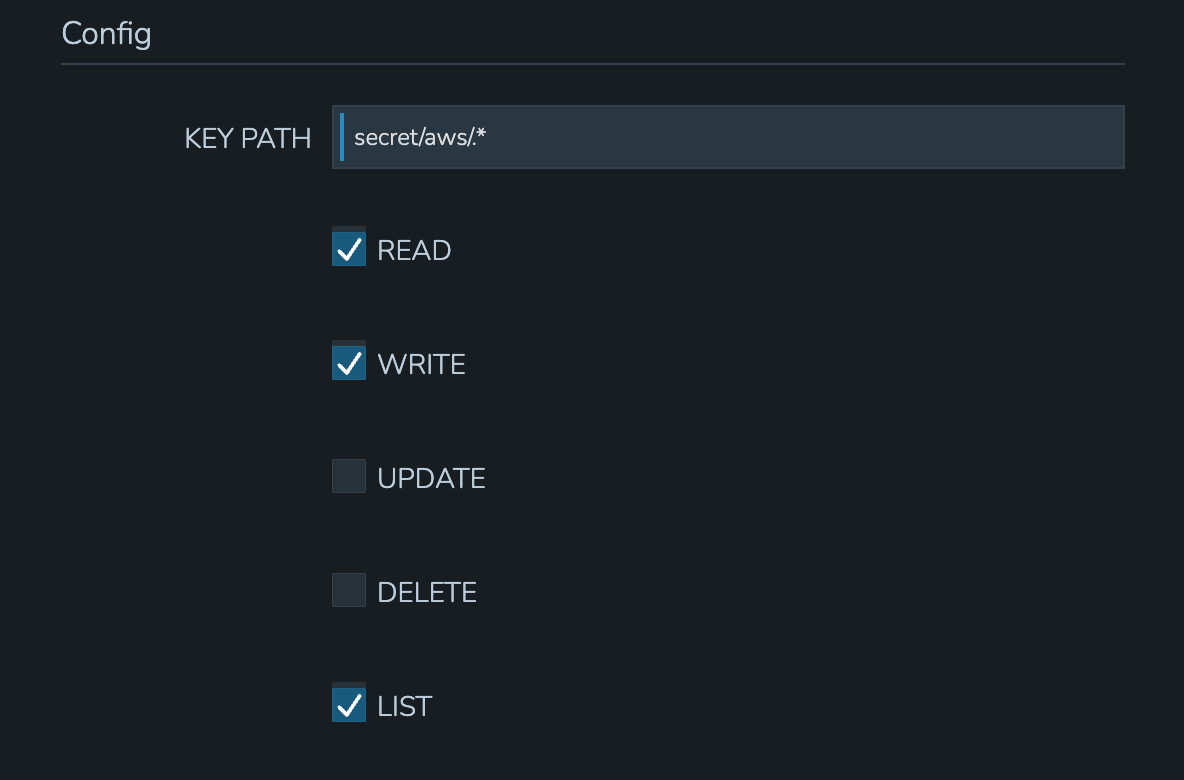
In addition to the path, set the privileges users in the Policy scope should have on the indicated path.
LIST: See the entries on the indicated path listed in the Cypher UI
READ: Decrypt the entries on the indicated path
WRITE: Add new entries on the indicated path
UPDATE: Edit Cypher entries on the indicated path. This is future functionality, the ability to update Cypher entries does not currently exist in the product
DELETE: Delete entries on the indicated path
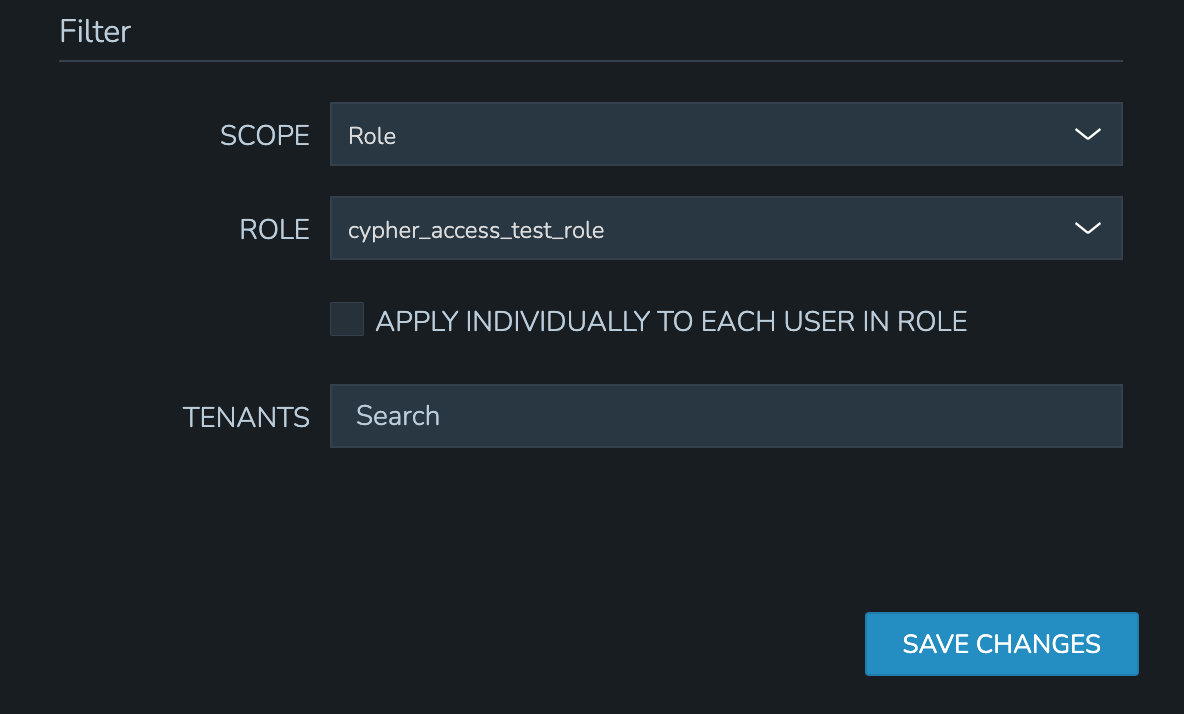
Finally, set the scope for the Policy. Cypher Access Policies support Global, Role, and User scope. For example, you may want to block off sets of Cypher entries for various departments within your organization. If you have existing Roles in Morpheus for each department, you can set up Role-scoped Policies to ensure they can only list, use, and add Cypher entries which are relevant to their own department.
Important
When Cypher Access Policies conflict, the Policy with the longest path string length (typically the most specific) takes precedence. For example, a Policy giving LIST and READ access to “secret/aws/.*” would be superseded by a Policy giving NO access to “secret/aws/my-secret-key”. In such a case, the user would see everything at the “secret/aws/.*” path except the one indicated in the more specific Policy. When Policies targeting the same path differ only in their scope, the following scope precedence is applied: Role > User > Global. For example, if a Role-scoped Policy targeting “.*” grants LIST and READ while a User-scoped Policy targeting the same path grants LIST, the user would be granted the rights in the Role-scoped Policy.
Cloud Profiles
Terraform Cloud Profiles are created on each Cloud detail page (Infrastructure > Clouds > Selected Cloud > Profiles Tab), encrypted in Cypher, and create a Cypher entry that is visible both on the Profile tab of the Cloud detail page and in Cypher. When added to a Cloud they create a Cypher entry at path tfvars/profile/cloud/$cloudCode/variables. If a Cloud profile Cypher entry is restricted by a Cypher Access policy, it will be (or will not be) listable/readable/deletable as dictated by the Policy but still will be viewable from the Cloud detail page if the user has sufficient permissions. Restricting or granting access to Cloud profiles via Policy does not affect access on the Cloud. Other Role permissions, such as “Admin: Profiles”, “Infrastructure: Clouds”, and Cloud/Group access must be used to restrict access via Cloud detail pages.
Example Policy
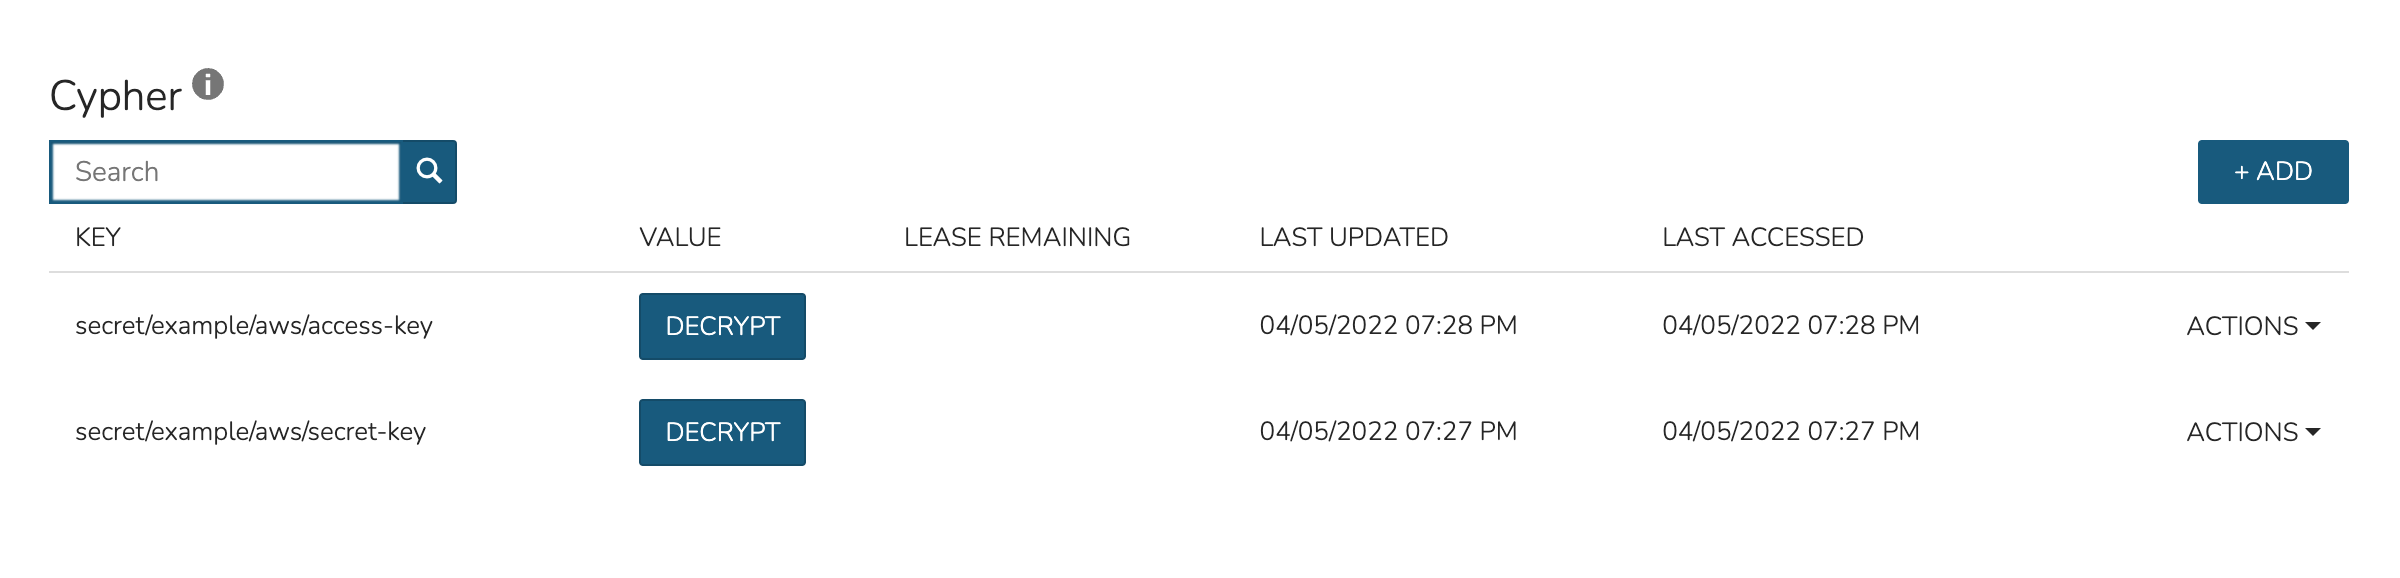
In my example organization, I have one department that needs access to AWS-related secrets and another department that needs access to Azure-related secrets. There are many other secrets stored in my appliance but I don’t want either of these departments to access any of those.
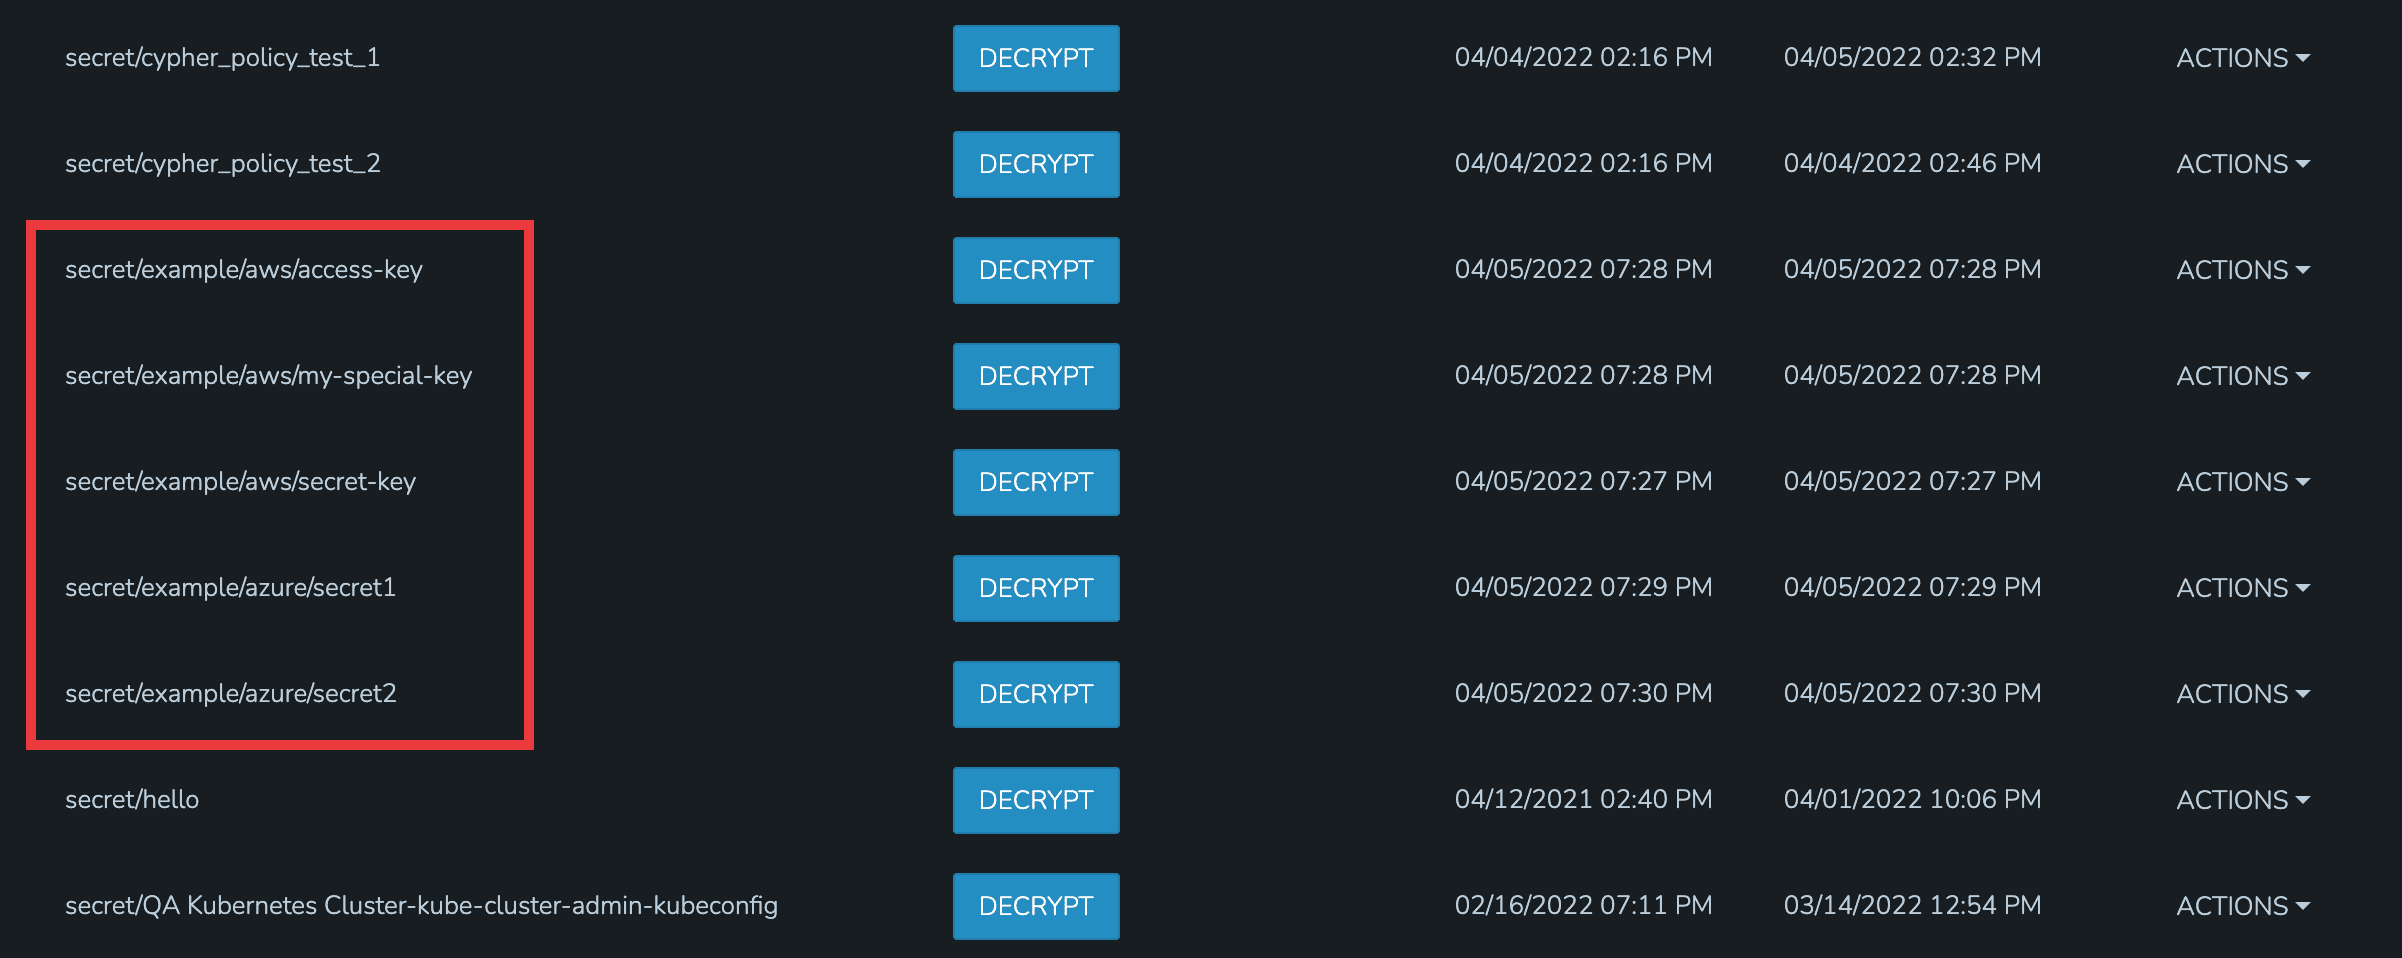
For the first department, I’ve set up a Policy that allows them to list and read (including use and decryption rights) AWS secrets. A second Policy specifically excludes them from seeing one specific entry. The Policy with the more specific path will supersede the more generic Policy that includes a wildcard.

By impersonating the user, we see they indeed have access to just the two desired Cypher entries.
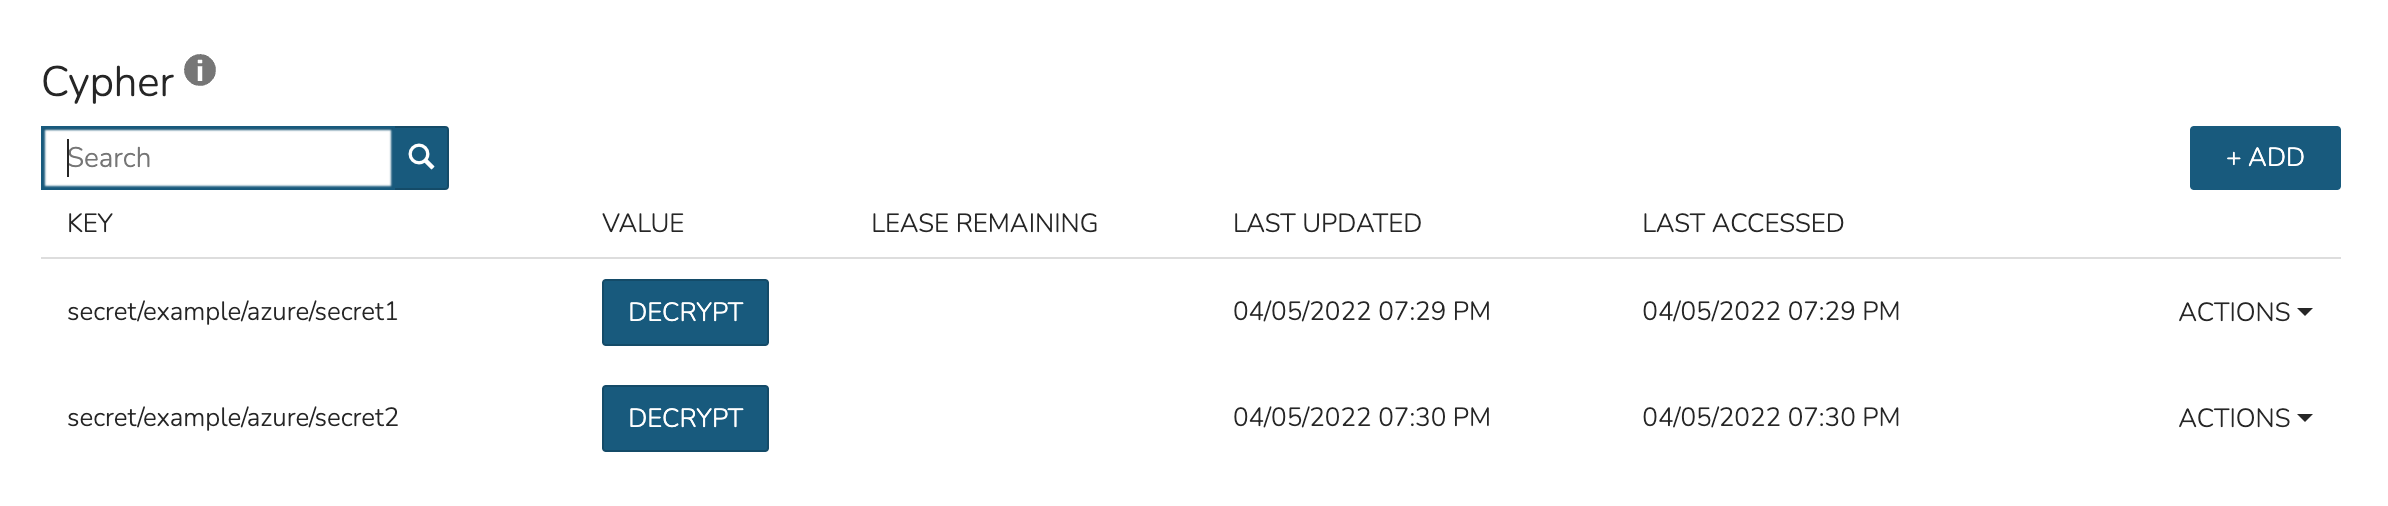
For the second department, I have set up a Policy that allows them to list and read (including use and decryption rights) Azure secrets.

By impersonating the user once again, we see they indeed have access only to Azure entries.
Expiration Policies
Expiration policies set an expiration timeframe for any instance provisioned into the cloud, role, group or by the user the policy is added to. When an instance expires, it is terminated and deleted.
Configuration options for expiration policies:
- Expiration Type
User Configurable- expiration timeframe is editable during provisioning
Fixed Expiration- user cannot change expiration timeframe
- Expiration Days
Configures the number of days the instance is allowed to exist before being removed.
- Renewal Days
If the instance is renewed, this is the number of days by which the expiration date is increased.
- Notification Days
This allows an email notice to be sent out X days before the instance is set to expire.
- Notification Message
Customizable message for notification emails. The default message is
Instance ${instance?.name} is set to expire on ${instance?.expireDate}- Auto Approve Extensions
Enable this to auto-approve extension requests, bypassing approval workflows.
Instances with expirations show the time until expiration in the instance detail pane. Instances with active expiration policies can be extended by selecting the EXTEND NOW button in the instance detail pane. The extension length is set in the policy by the RENEWAL DAYS field.
Expirations can also be added to any instance during provisioning by entering the number of days in the EXPIRATION DAYS field in the Lifecycle section of the automation section of the provisioning wizard. Expiration can be added to any instance even if no policies have been created.
Note
Expiration and Shutdown Policies will be enforced on Instances created when converting a discovered host to managed.
Instance and Host Names
Naming Policies will populate a fixed or editable name for instances, hosts and hostnames. The Name Pattern field uses ${variable} string interpolation.
- NAMING TYPE
- User Configurable
Naming pattern will pre-populate during provisioning but can be edited by the user.
- Fixed Name
Naming pattern will pre-populate during provisioning and cannot be changed.
- NAME PATTERN
The Name Pattern field uses Static text and/or
${variable}string interpolation, such asmorpheus${cloudCode}${type}${sequence+3000}An example Instance Name Policy using a naming pattern with User Initials, Cloud Code, Instance Type, and a sequential number starting at 3000 is
${userInitials}-${cloudCode}-${type}-${sequence+3000}, resulting in an Instance Name of md-vmwd3-centos-3001 for the first instance, followed by md-vmwd3-centos-3002 and so on.Commonly used variables for naming patterns include:
${groupName}
${groupCode}
${cloudName}
${cloudCode}
${type}
${accountId}
${account}
${accountType}
${platform}
${platform == 'windows' ? 'w':'l'} # results in `w` for Windows platforms and `l` for Linux Platforms
${userId}
${username}
${userInitials}
${provisionType}
${instance.instanceContext} # Environment Code
${sequence} # results in 1
${sequence+100} # results in 101
${sequence.toString().padLeft(5,'0')} #results in 00001
Cloud codes and Group codes are fields found in their respective configuration panes.
- AUTO RESOLVE CONFLICTS
Morpheus will automatically resolve naming conflicts by appending a sequential -number to the name when enabled.
Shutdown Policies
Shutdown policies dictate the number of days an instance is allowed to run before it is shut down. Shutdown is consistent across cloud types i.e.: in VMware, a VM is powered off. In AWS, an instance is stopped. Etc.
Configuration options for shutdown policies:
- Shutdown Type
- User Configurable
Shutdown timeframe is editable during provisioning.
- Fixed Expiration
User cannot change shutdown timeframe during provisioning.
- Expiration Days
Configures the number of days the instance is allowed to exist before being shut down.
- Renewal Days
If the instance is renewed, this is the number of days by which the shutdown date is increased.
- Notification Days
This allows an email notice to be sent out X days before the instance is set to shut down.
- Notification Message
Customizable message for notification email.
- Auto Approve Extensions
Enable this to auto-approve extension requests, bypassing approval workflows.
Note
Expiration and Shutdown Policies will be enforced on Instances created when converting a discovered host to managed.
Provision Approval
Morpheus Provision Approvals enable an approval workflow via internal Morpheus approval or via ServiceNow workflow. If a ServiceNow integration is present, the ServiceNow option is enabled. The Approval workflow to be selected is dynamically created by querying the ServiceNow Workflow table in the integrated ServiceNow instance.
This ServiceNow approval integration enables users to use the Morpheus Self-Service provisioning portal to provision new instances and still respect the required ServiceNow business approval workflow.
Power Schedules
Power Schedules set daily times to shutdown and startup instances. Power schedule can be created and managed in Library > Automation > Power Scheduling
Note
Power Schedule Policies will apply to Instances created in a Group or Cloud after the Policy is enabled, and will not apply to pre-existing Instances.
Configuration options for Power Schedule Policies:
- DESCRIPTION
Add details about your Policy for reference in the Policies tab.
- Enabled
Policies can be edited and disabled or enabled at any time. Disabling a Power Schedule Policy will prevent the Power Schedule from running on the Groups Instances until re-enabled.
- ENFORCEMENT TYPE
User Configurable: Power Schedule choice is editable by User during provisioning.
Fixed Schedule: User cannot change Power Schedule setting during provisioning.
- POWER SCHEDULE
Select Power Schedule to use in the Policy. Power schedule can be added in Library > Automation > Power Scheduling
- TENANTS
Leave blank for the Policy to apply to all Tenants, or search for and select Tenants to enforce the Policy on specific Tenants.
Max Resources
Max Resource policies allow setting quotas for Clouds, Groups, Roles or Users for maximum amount of Memory, Storage, Cores, Hosts, VM’s, or Containers that can be created in the Cloud, Group, Role or by the User the Policy is assigned to.
Configuration options for Max Resources Policies:
- Max Containers
Sets the maximum combined total of Containers in Instances per Policy Scope.
- Max Cores
Sets the maximum combined total of Cores in Instances per Policy Scope.
- Max Hosts
Sets the maximum total of Hosts per Policy Scope.
- Max Memory
Sets the maximum combined total of RAM (capacity) for Instances per Policy Scope.
- Max Storage
Sets the maximum combined total of Storage (capacity) for Instances per Policy Scope.
- Max VMs
Sets the maximum total of managed Virtual Machines per Policy Scope.
- TENANTS
Leave blank for the Policy to apply to all Tenants, or search for and select Tenants to enforce the Policy on specific Tenants.
User Creation
The User Creation policy controls the “CREATE YOUR USER” flag in the User Config options during provisioning do be always disabled, always enabled, enabled by default, or disabled by default.
Configuration options for User Creation Policies:
- TYPE
User Creation
- DESCRIPTION
Description to identify the policy config
- Enabled
Policies enforcement can be disabled or enabled at any time.
- ENFORCEMENT TYPE
User Configurable: User Creation choice is editable by User during provisioning.
Fixed: User cannot change User Creation setting during provisioning.
- CREATE USER
Check to allow or force user creation. Uncheck to disable by default or force no user creation.
- TENANTS
Leave blank for the Policy to apply to all Tenants, or search for and select Tenants to enforce the Policy on specific Tenants.