Tenancy
Morpheus appliances may be multi-tenanted, that is, they may contain multiple isolated environments known as Tenants. Successfully building a multi-Tenanted Morpheus environment requires creating and pulling together multiple constructs. This guide aims to describe the pieces needed to create functioning Tenants with Users, identity integrations, Roles, Groups, and whitelabeling. We will also share a Cloud and Library item from the Master Tenant which is provisionable from the new Subtenant.
On installation, a single Tenant is created. This Tenant is often referred to as the Master Tenant and has some special properties that additional created Tenants (known as Subtenants) do not have. Tenants manage their own workloads, may have their own custom whitelabeling, and also have their own users and integrations. The Master Tenant may (or may not) share down integrations, Library items, Roles, and more but Subtenants are fully isolated from each other.
The Master Tenant is the default Tenant created during the installation of Morpheus
All Tenants created after installation are Subtenants. Only one Master Tenant can exist
The Master Tenant creates and controls all Subtenants.
Tenants are isolated environments with unique users, workloads, and Groups
The Master Tenant can share or assign its resources to Subtenants
Subtenants cannot share their resources with other Tenants
Subtenants cannot see resources from other Subtenants
Subtenants can only access Master Tenant resources that have been set to Public visibility or specifically assigned to the Subtenant
Tenant Roles
Before even creating the Tenant, we need to understand what a Tenant Role is and ensure that a Tenant Role with correct rights permissions exists. Tenant Roles set the maximum feature permissions levels for any User in the Subtenant and also give (or revoke) access to Clouds, Library items, Tasks, Workflows, and other things integrated or created in and shared from the Master Tenant. Only Master Tenant administrators have the ability to create Tenant Roles.
Note
User Roles within the Tenant may be created with lesser permissions than the Tenant Role allows but we will discuss User Roles further in a later section.
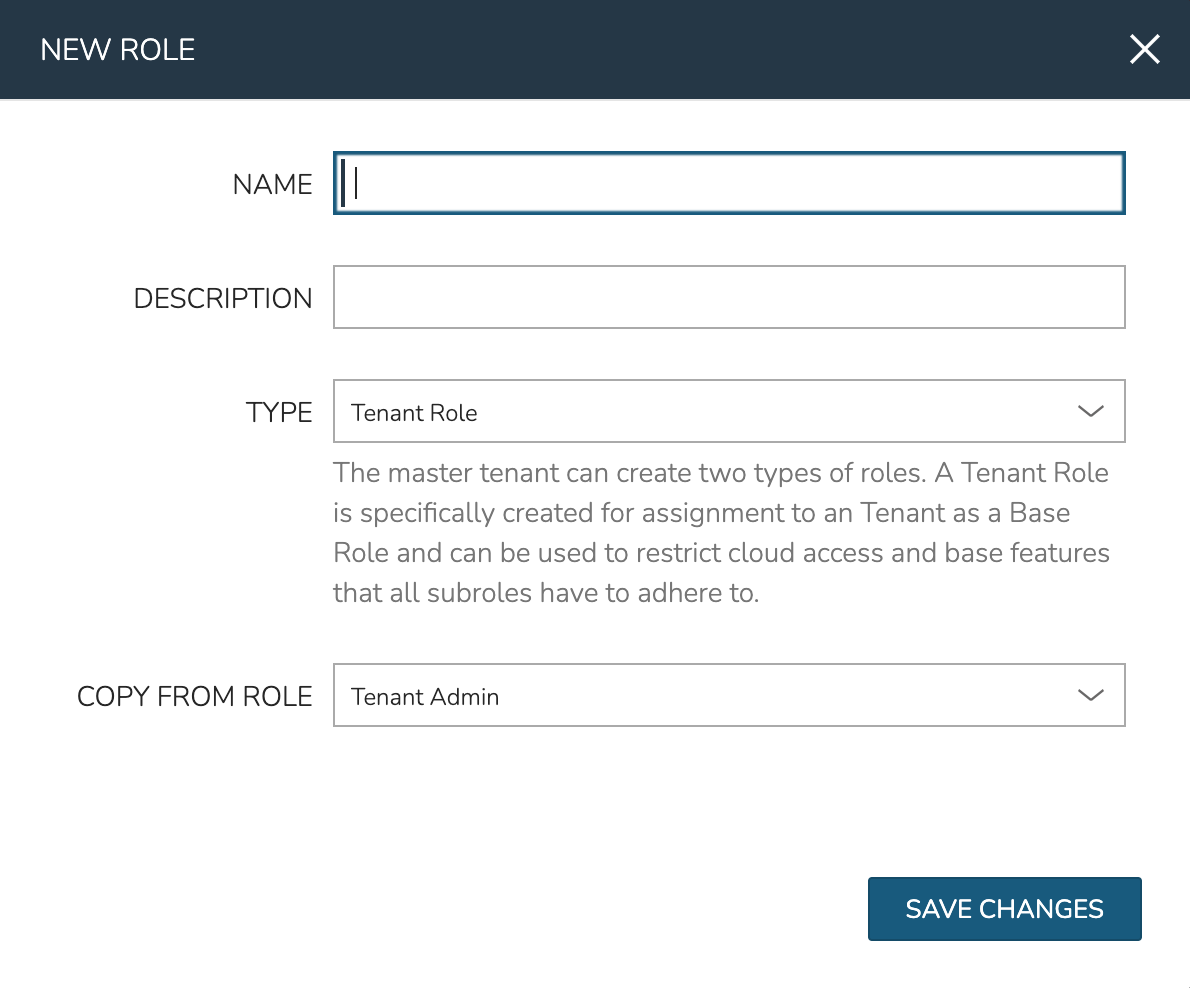
In a new environment, the only Tenant Role will be the included “Tenant Admin” Role but this Role is not editable. It’s advisable to create your own Tenant Roles so they may be edited as needed. To get started, we can create a new Tenant Role and copy from the pre-existing “Tenant Admin” Role.
Navigate to Administration > Roles
Click + CREATE ROLE
Set a NAME, TYPE (Tenant Role), and COPY FROM ROLE (Tenant Admin)
Click SAVE CHANGES
Once created, click into the new Role and edit feature permissions if you wish. Remember the Tenant Role is setting the maximum available Role permissions for each feature that Users within the Tenant can have. We’ll worry about scoping resources to the Subtenant (such as Clouds) in a later section.
With a Tenant Role created, we can move on to creating the Tenant itself.
Create a Tenant
We’ll now create a Tenant and apply the Tenant Role we’ve just created.
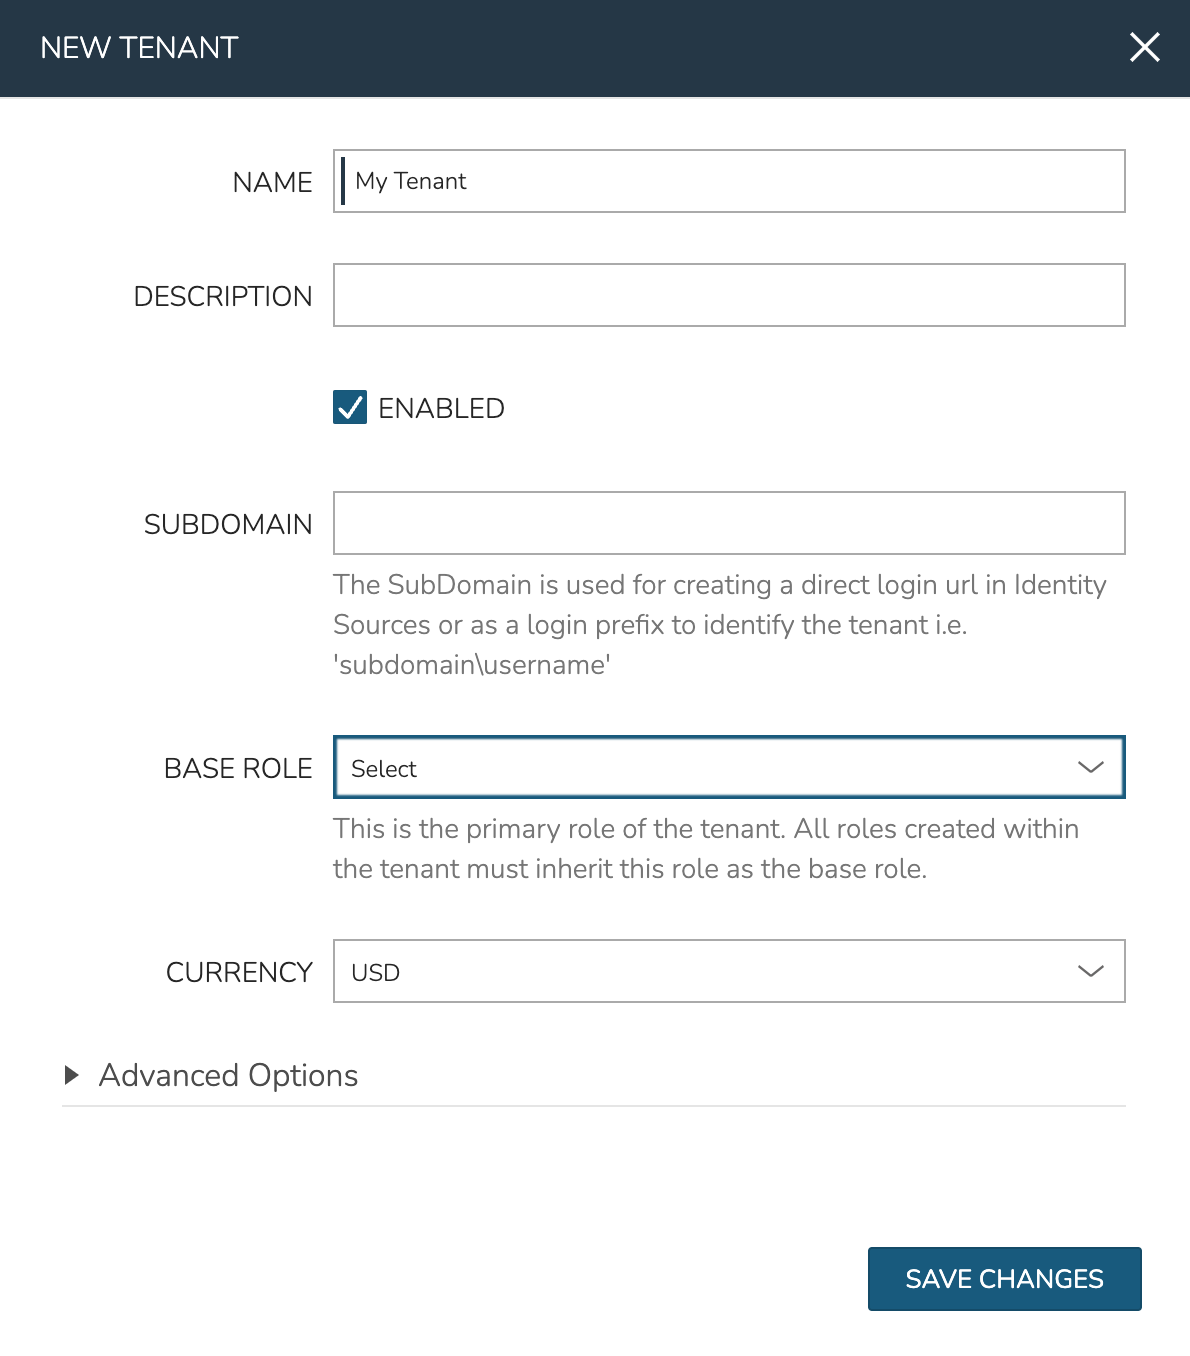
Navigate to Administration > Tenants
Click CREATE TENANT
Name your Tenant and set the Tenant Role in the BASE ROLE field
Click SAVE CHANGES
The NAME and BASE ROLE are the most important settings and the only two required. See the Tenants section of Morpheus documentation to learn more about other settings which may be applied when adding or editing Tenants.
With the Tenant created, the rest of the guide will pertain to configuring the new Tenant and demonstrating how to provision new workloads using resources shared down from the Master Tenant.
Users and User Roles
In the prior steps we’ve created a new Tenant and associated our created Tenant Role with it. If you click into the new Tenant you’ll notice that there are currently no users so the new Tenant is still unusable. We could go ahead and create a new User but if this is a new Morpheus environment, the new Tenant will not have any User Roles to apply to the new User we wish to create.
To remedy this problem, we can add a “Multi-Tenant User Role” from the Master Tenant. This is essentially a Role Template from which a Role is created and seeded down to each Tenant. Only Master Tenant administrators can create Multi-Tenant User Roles. After creation, edits can be made and permission changes will be filtered down to the child Role that exists within each Subtenant. However, it’s important to know that should the child Role ever be edited in the Subtenant, the link back to the Multi-Tenant User Role will be broken and it will become like any other User Role created in the Subtenant. To prevent this situation, Master Tenant administrators can set a “MULTITENANT LOCKED” option to restrict such edits in the Subtenant.
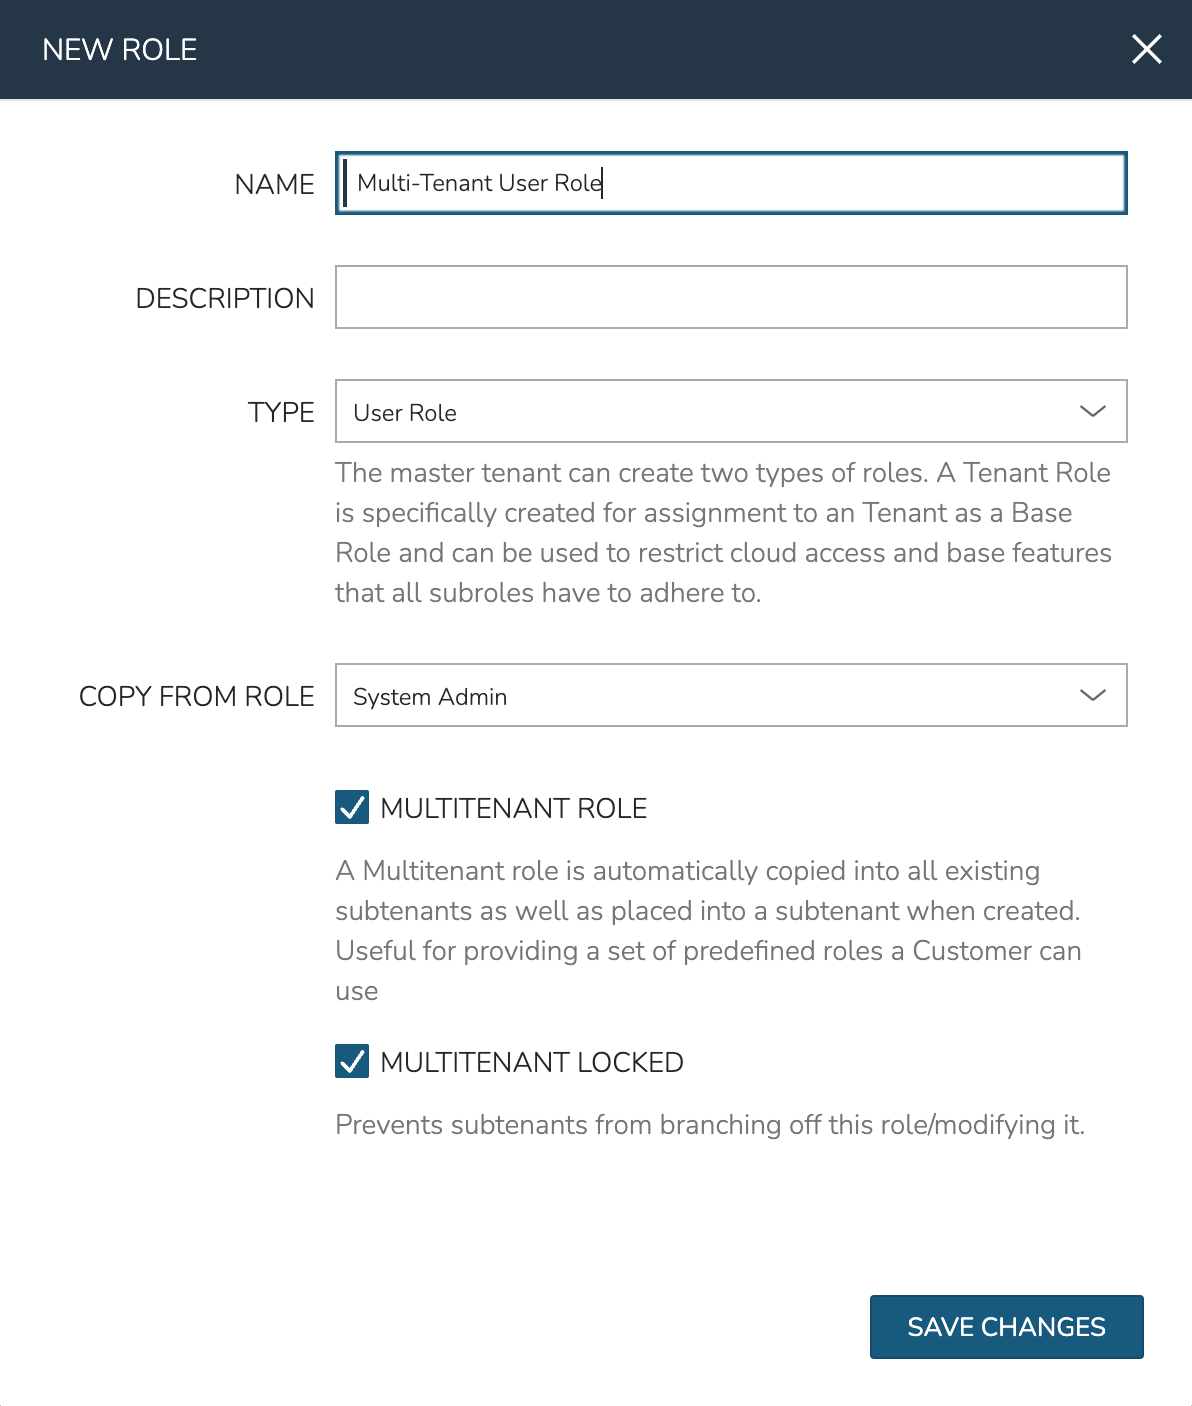
New Multi-Tenant User Roles are created in Administration > Roles:
Click + CREATE ROLE
Provide a NAME, TYPE (User Role), COPY FROM ROLE (if desired)
Mark the boxes to set MULTITENANT ROLE and MULTITENANT LOCKED
Click SAVE CHANGES
After saving the Role, it will appear in the Master Tenant and will also be seeded down to the Tenant we’ve already created since it is a Multi-Tenant User Role. We’ve also locked the Role so that Subtenant users cannot edit it and thus unlink it from future permissions edits made in the Master Tenant. Keep in mind that no matter what permissions we set, Users in the Subtenant will not be able to exceed permissions set on the Tenant Role as discussed in a prior section. If desired, you can click into this User Role now and edit its permissions to suit your needs.
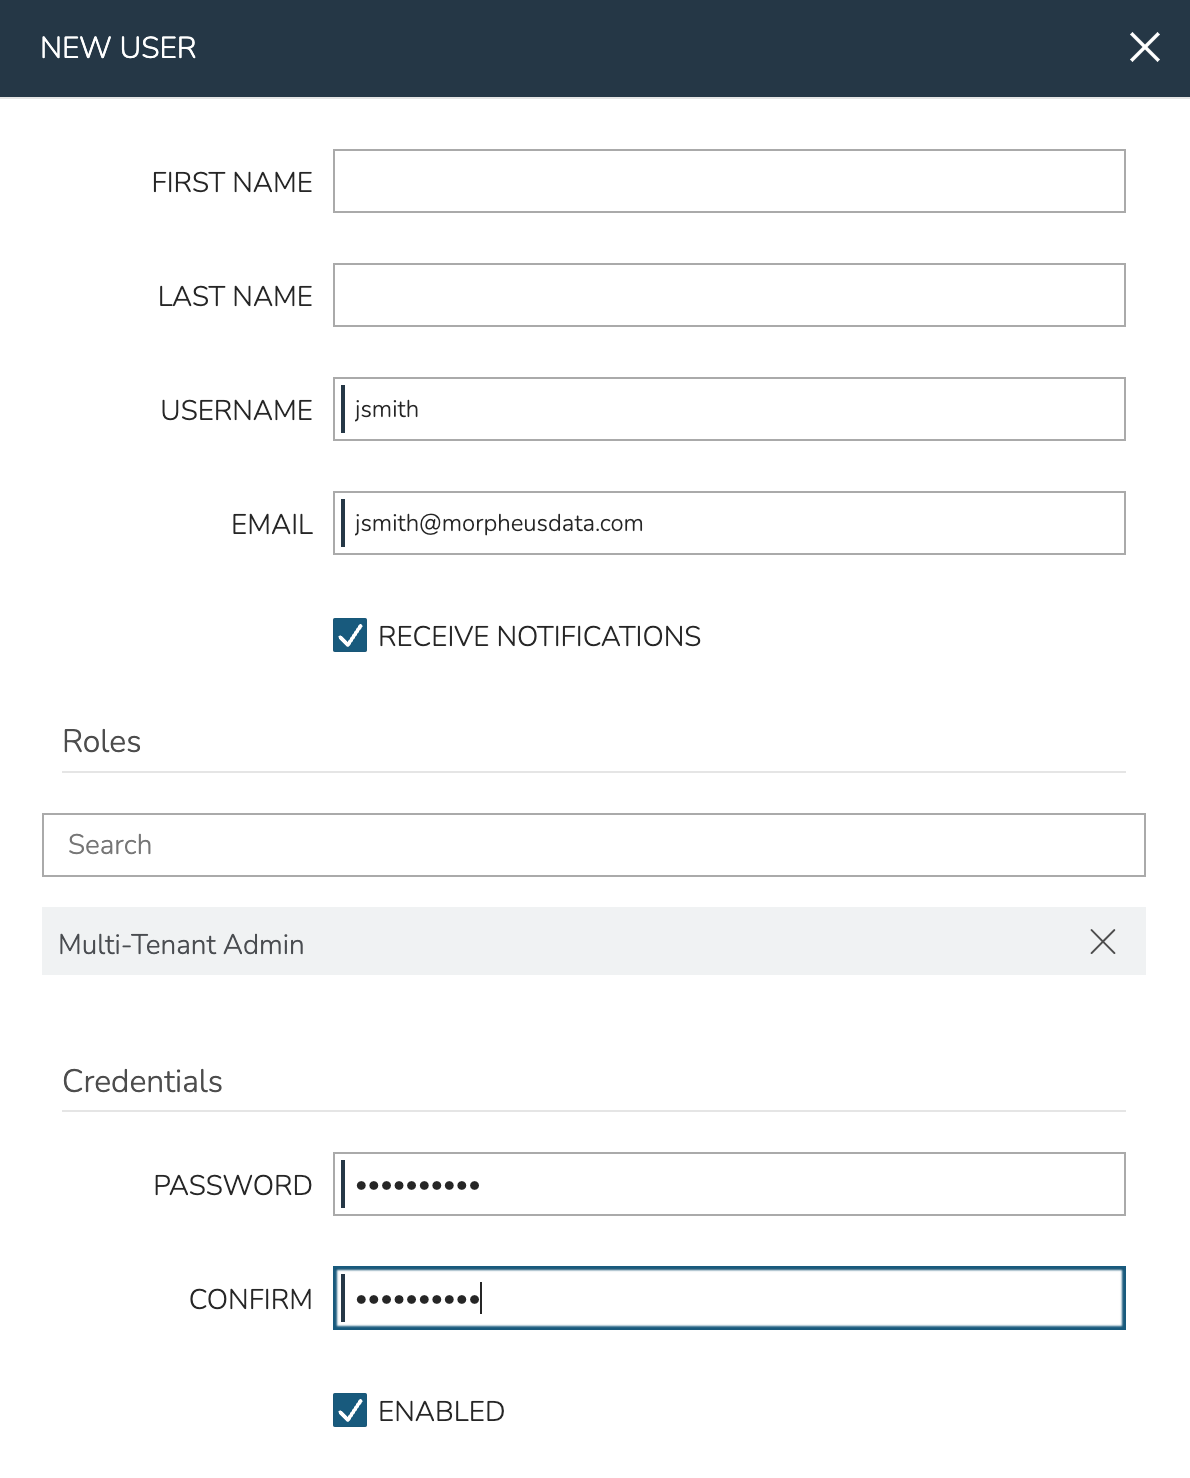
At this point we’re ready to add a User which will make the Tenant usable. We can create one in the new Tenant by navigating to the Tenant list page (Administration > Tenants) and selecting the Tenant. There are a number of configurations to make when creating a user but when selecting the User’s Role you should see the previously-created Multi-Tenant User Role.
After saving the new User, we can make the first test of the new Tenant by impersonating the User and entering the Tenant. In the list of Users on the Tenant detail page, click the gear (⚙) icon at the end of the User’s row and select “Impersonate.” You should end up inside the new Tenant operating as the new user. This can be confirmed by making note of the updated name given in the upper-right portion of the application window. To quit impersonating, click on the name and select “Quit Impersonating.”
At this point we’ve created a User manually but it’s important to point out that Morpheus can also use an existing identity integration, such as Microsoft Active Directory, to manage User creation and Role assignment. Expand the section below to see an example use case or continue on if you’d prefer to administer your Users directly in Morpheus. The complete integration guide elsewhere in Morpheus docs also includes common Active Directory troubleshooting steps should those be needed.
Microsoft Active Directory Example
Active Directory is Microsoft’s primary authentication service. It is widely used in enterprise organizations and even in Microsoft cloud services. While Active Directory also supports LDAP protocol support (which Morpheus can integrate with as well), Morpheus includes a dedicated identity integration type specifically for Active Directory. By integrating Active Directory, Morpheus administrators can fully offload the work of managing the user lifecycle to Active Directory. Creating new users, applying roles to users, updating basic user data, disabling users, and more can be handled in Active Directory and automatically filtered down to Morpheus. This section includes an example integration walkthrough as well as additional details on the integration feature set.
Note
Caution should be used when integrating more than one Active Directory identity source with the same Morpheus Tenant. You must ensure the users on each identity source are unique users or that the two domains use different naming conventions for users.
In Morpheus, identity sources (if used) are configured per Tenant. In order to see an identity integration or create a new one, navigate to a Tenant detail page (Administration > Tenants > Selected Tenant) and click IDENTITY SOURCES. From this page we can add a new identity source or click the pencil (✎) icon next to an existing identity source to view or edit it. Any configured identity source will apply to just one Tenant and they cannot be shared. One scenario where this is especially useful is in an MSP appliance where each Tenant is a siloed environment for a specific customer. The customer’s own existing Active Directory server and groups can be leveraged to build Morpheus user accounts with correct role mapping automatically.
When configuring an Active Directory integration in Morpheus, AD groups are mapped to Morpheus roles. When the user logs in for the first time, Morpheus adds the new user account with correct name, email address, and applies one or more roles depending on configuration. Going forward, Morpheus will sync down any changes to the user, including any role changes based on changes to the user’s associated AD groups or updated passwords. Additionally, disabling a user in AD will prevent them from accessing Morpheus.
Important
Morpheus will connect over port 389 for non-secure LDAP and port 636 for secure LDAP. Ensure that Morpheus is able to talk to the AD server on the proper port.
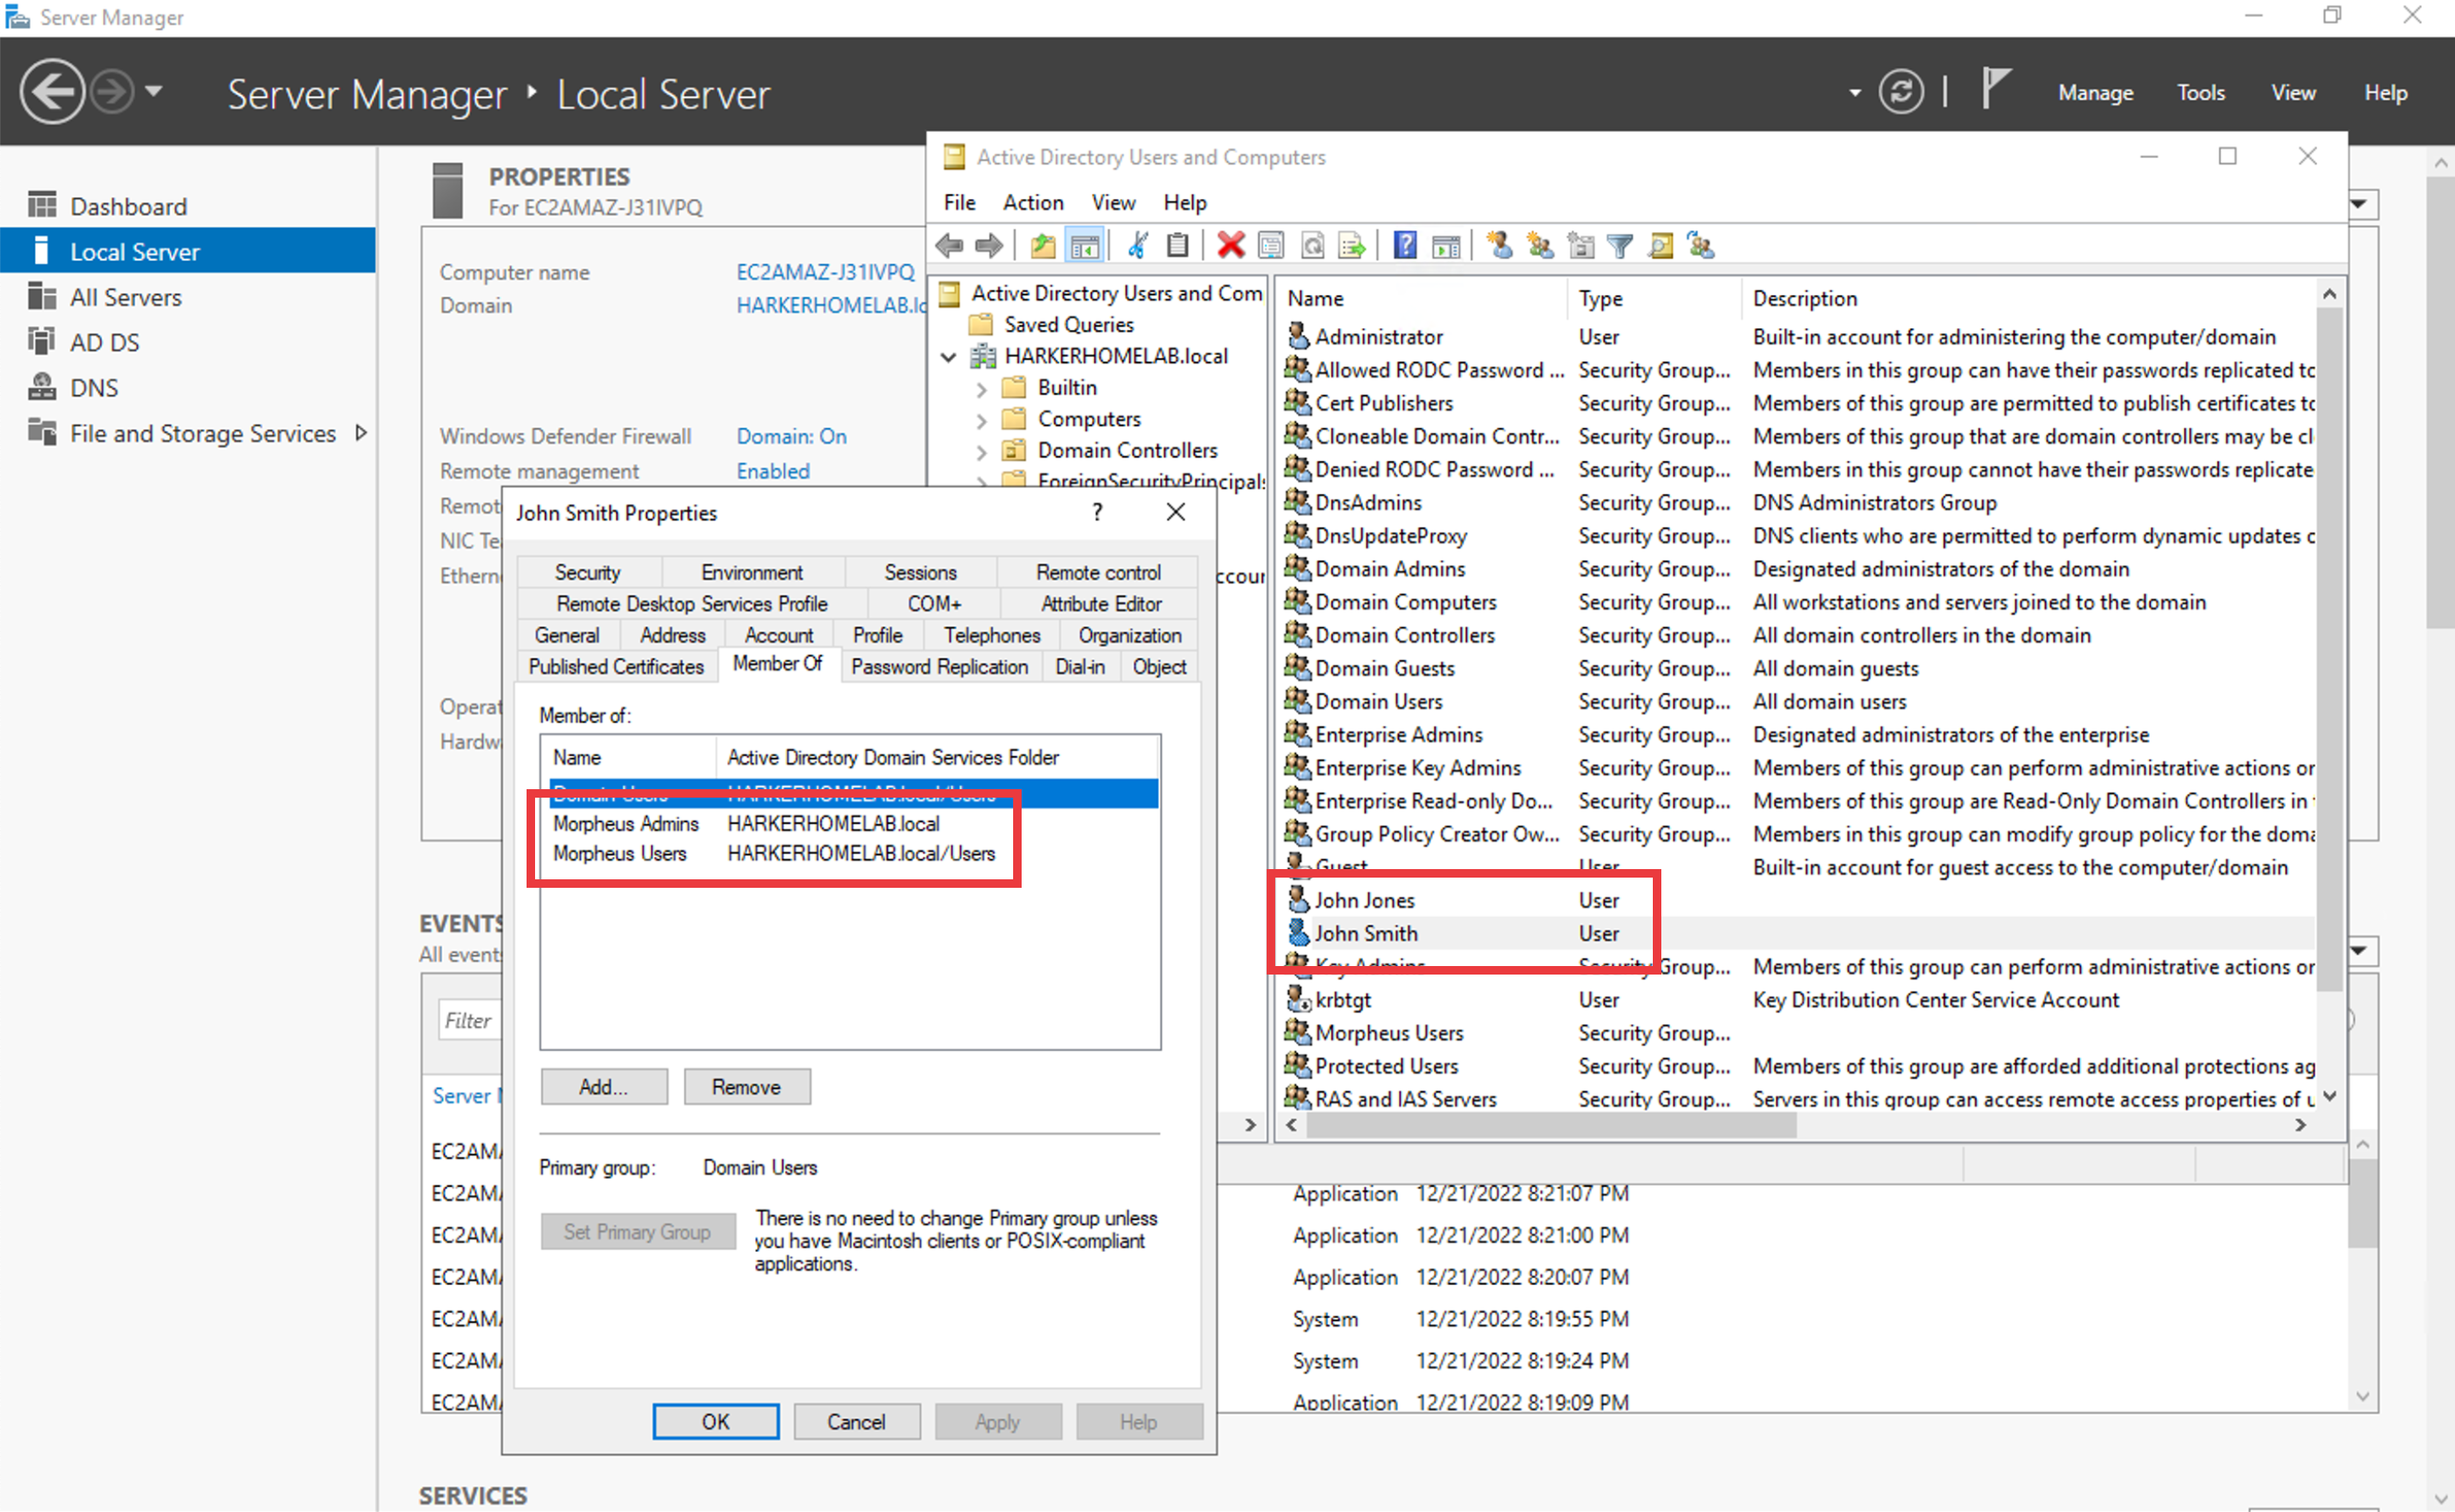
In a simple example, we have an Active Directory server which has two groups relevant to Morpheus, “Morpheus Users” and “Morpheus Admins.” We will configure Morpheus so that only users in the “Morpheus Users” group can access Morpheus in any capacity. Users who are also in the “Morpheus Admins” group will take on the System Admin role in Morpheus. We’ll see later when the integration is configured how Morpheus roles can be mapped to AD groups. In the same AD server, I have two users. John Smith is in groups “Morpheus Users” and “Morpheus Admins”. John Jones is only in the “Morpheus Users” group.
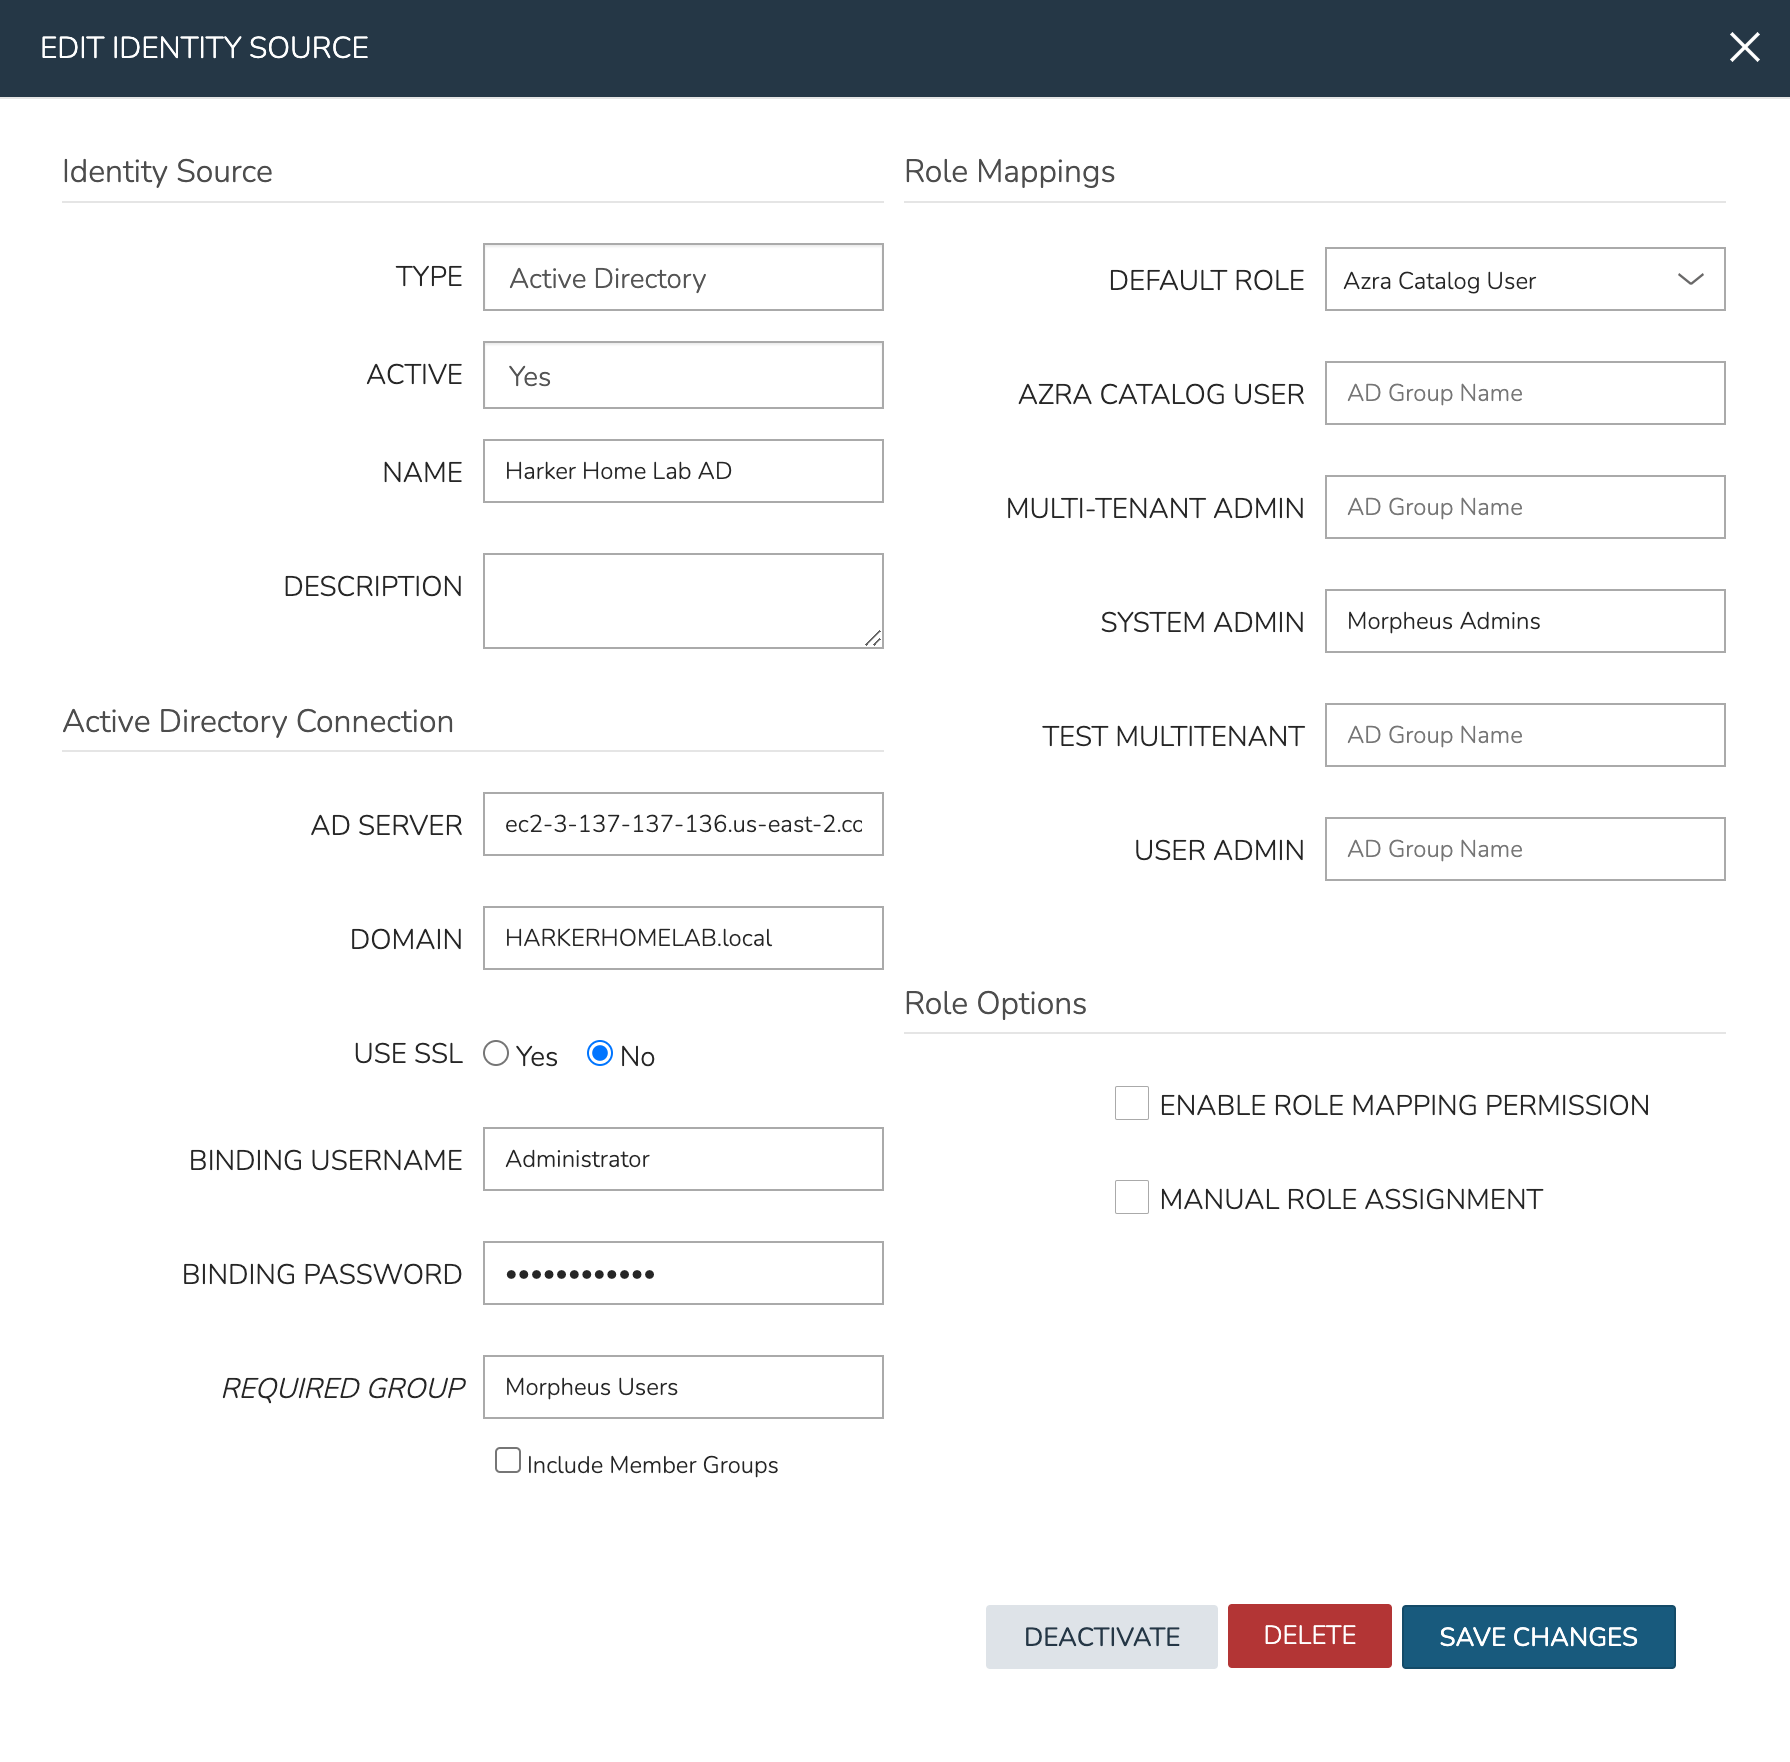
Knowing the AD scheme and the requirements for Morpheus user roles, we can begin the process of creating the integration. Identity integrations are specific to each Tenant so begin by navigating to the Tenant detail page (Administration > Tenants > Selected Tenant) and clicking IDENTITY SOURCES. On setting the type to “Active Directory,” the form will update with the needed fields. Note the following basic fields:
AD SERVER: The IP address or hostname for the Active Directory Server
DOMAIN: The AD domain in which the relevant users and groups reside
BINDING USERNAME: A server user which has access to relevant objects on the AD server. In my example, I’ve used the in-built Administrator user which is the easiest option. Other users may be used depending on your organization’s IT security policies but the integration with Morpheus will not work properly if the user does not have the needed access
BINDING PASSWORD: The password for the user in the prior field
With the basic configurations completed, the remaining configurations will affect Morpheus user and role generation. A REQUIRED GROUP is optional and is a group the user must be in to have any Morpheus access. Here we require that users be in the “Morpheus Users” group. A DEFAULT ROLE is required and will be assigned to all users regardless of any additional roles they may be assigned based on their AD group membership. Beyond that, all other Morpheus roles will be listed here and an AD group name can be associated with as many as you required. In this example, we are giving users in the “Morpheus Admins” group the Morpheus System Admin role. Though we did not use them, it’s worth pointing out that ENABLE ROLE MAPPING PERMISSION will give administrators in the Tenant the ability to update the AD role mappings (though they will not have access to the core integration fields such as AD SERVER, DOMAIN, or binding user details). MANUAL ROLE ASSIGNMENT allows users to manually update Morpheus roles outside of the automatic mappings created by the AD integration.
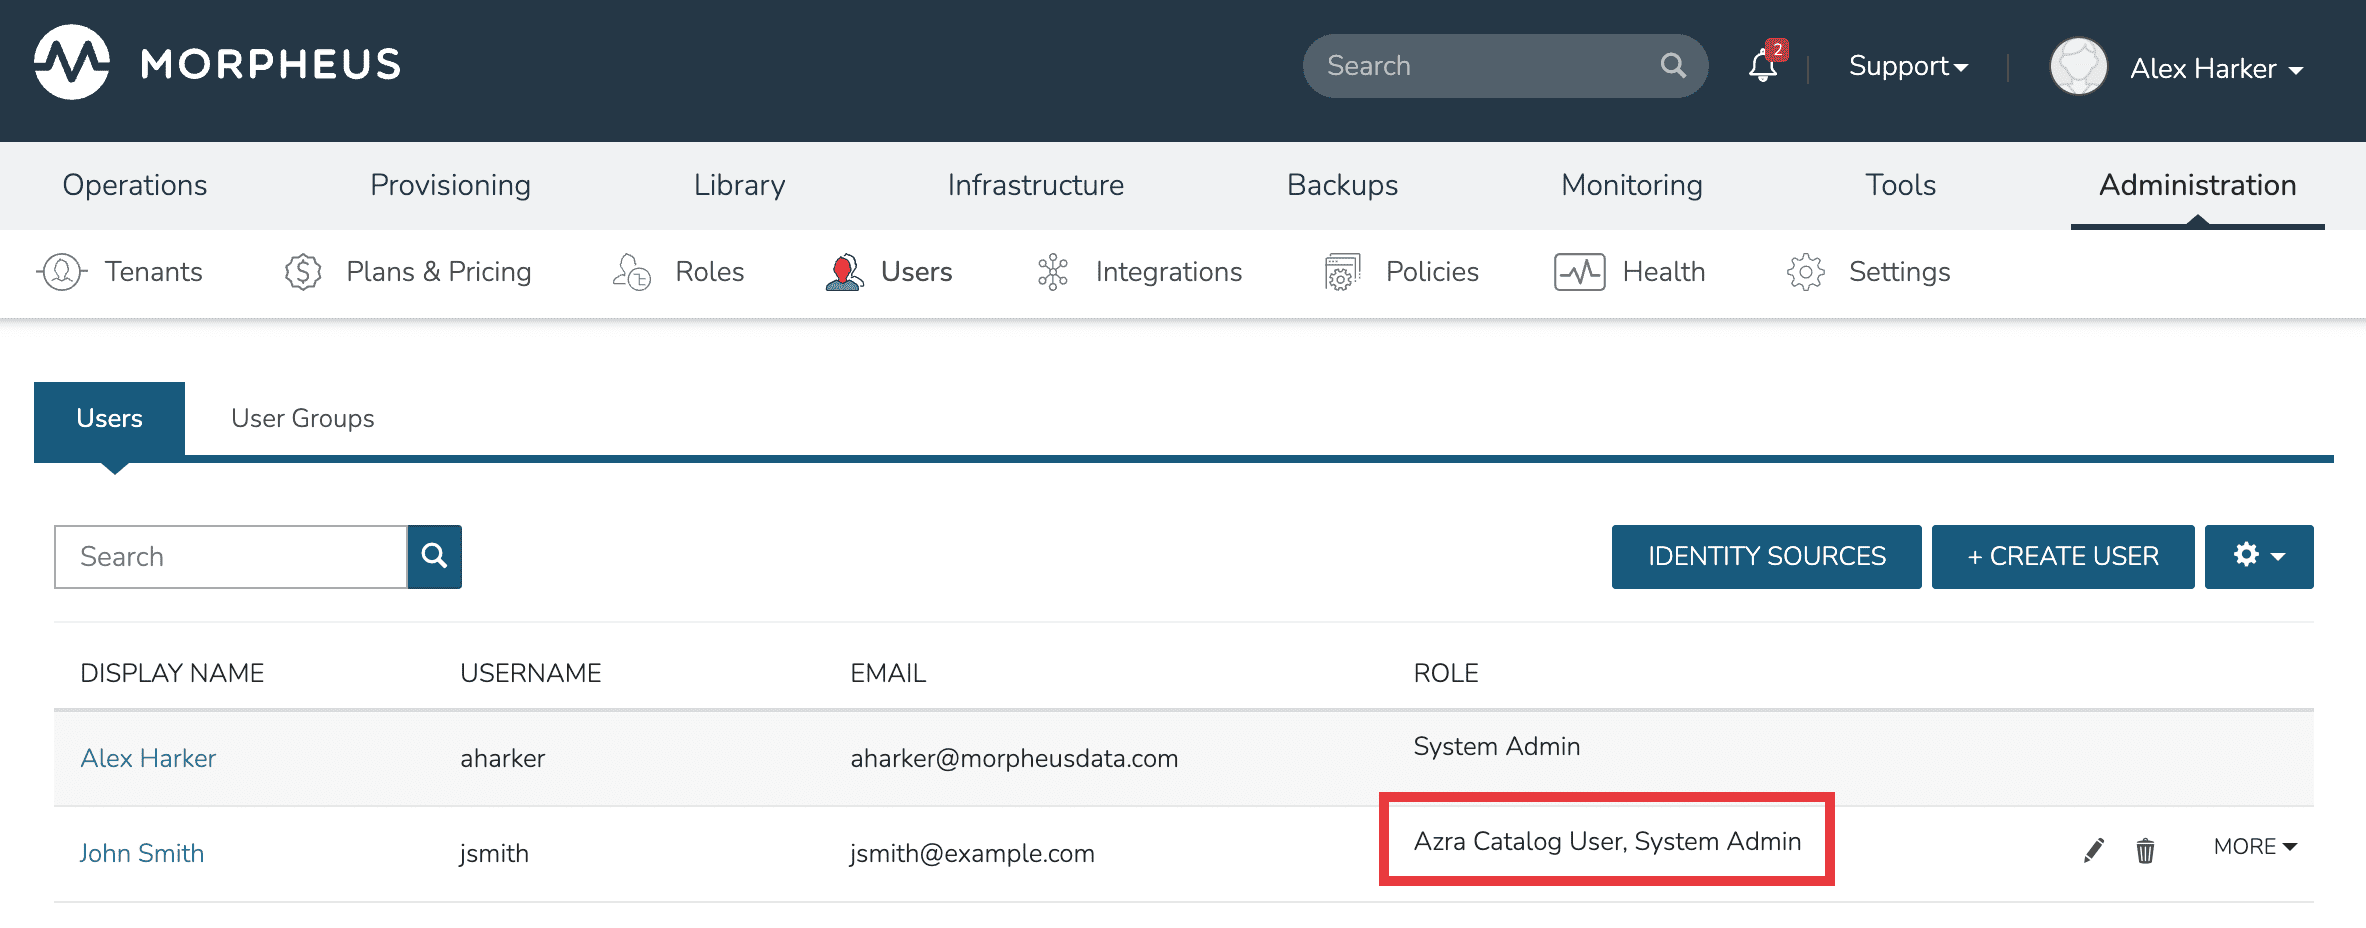
With the above integration steps completed, users can now log into Morpheus and a user account with correct roles will automatically be created. In our example case, John Smith has logged in and we can see he is assigned the default role as well as the System Admin role based on his AD group associations. Going forward, Morpheus will continue to sync any changes to these users. For example, Morpheus roles may be updated based on changing AD groups or user access may be completely revoked by disabling the user in AD.
Navigate to Administration > Tenants
Select a Tenant
Select IDENTITY SOURCES
Select + ADD IDENTITY SOURCE
Set the TYPE to “Active Directory”
Populate the following:
- Name
A friendly name in Morpheus for the AD integration
- AD Server
The Hostname or IP address of AD Server
- Domain
The AD domain in which the relevant user and group objects reside
- USE SSL
Indicates whether SSL should be used for communication with the AD server. Morpheus will connect over port 389 for non-secure LDAP and port 636 for secure LDAP, ensure Morpheus can connect to the AD server over the correct port
- Binding Username
A username for a service account which has access to relevant objects (users, groups, etc.). For ease, the “Administrator” user may be used
- Binding Password
The password for the above account
- Support User Principal Names
When marked, users will log in with their UPN login credentials rather than a simple username. This allows users to log on to subdomains. Leave unmarked where this is not needed
- Required Group
The AD group users must be in to have access (optional, see example in the prior section)
- Default Role
The default role a user is assigned when they are in the required group or if no specific group mapping applies to the user (see example in prior section)
- ENABLE ROLE MAPPING PERMISSION
When selected, Tenant users with appropriate rights to view and edit Roles will have the ability to set role mapping for the Identity Source integration. This allows the Tenant user to edit only the role mappings without viewing or potentially editing the basic Identity Source configuration (AD server, domain, binding user details, etc)
- MANUAL ROLE ASSIGNMENT
When selected, administrators can manually edit Roles for users created through this identity source integration from the user detail page (Administration > Users > Selected user)
Note
For more on Identity Source role mapping permissions, see the associated guide in our KnowledgeBase.
Select SAVE CHANGES.
Now allowed AD users can login to Morpheus via their Active Directory credentials and a User will be automatically generated to Morpheus with matching metadata and mapped Role permissions.
Note
Sub-tenant Morpheus API authentication for Active Directory generated users is not currently supported.
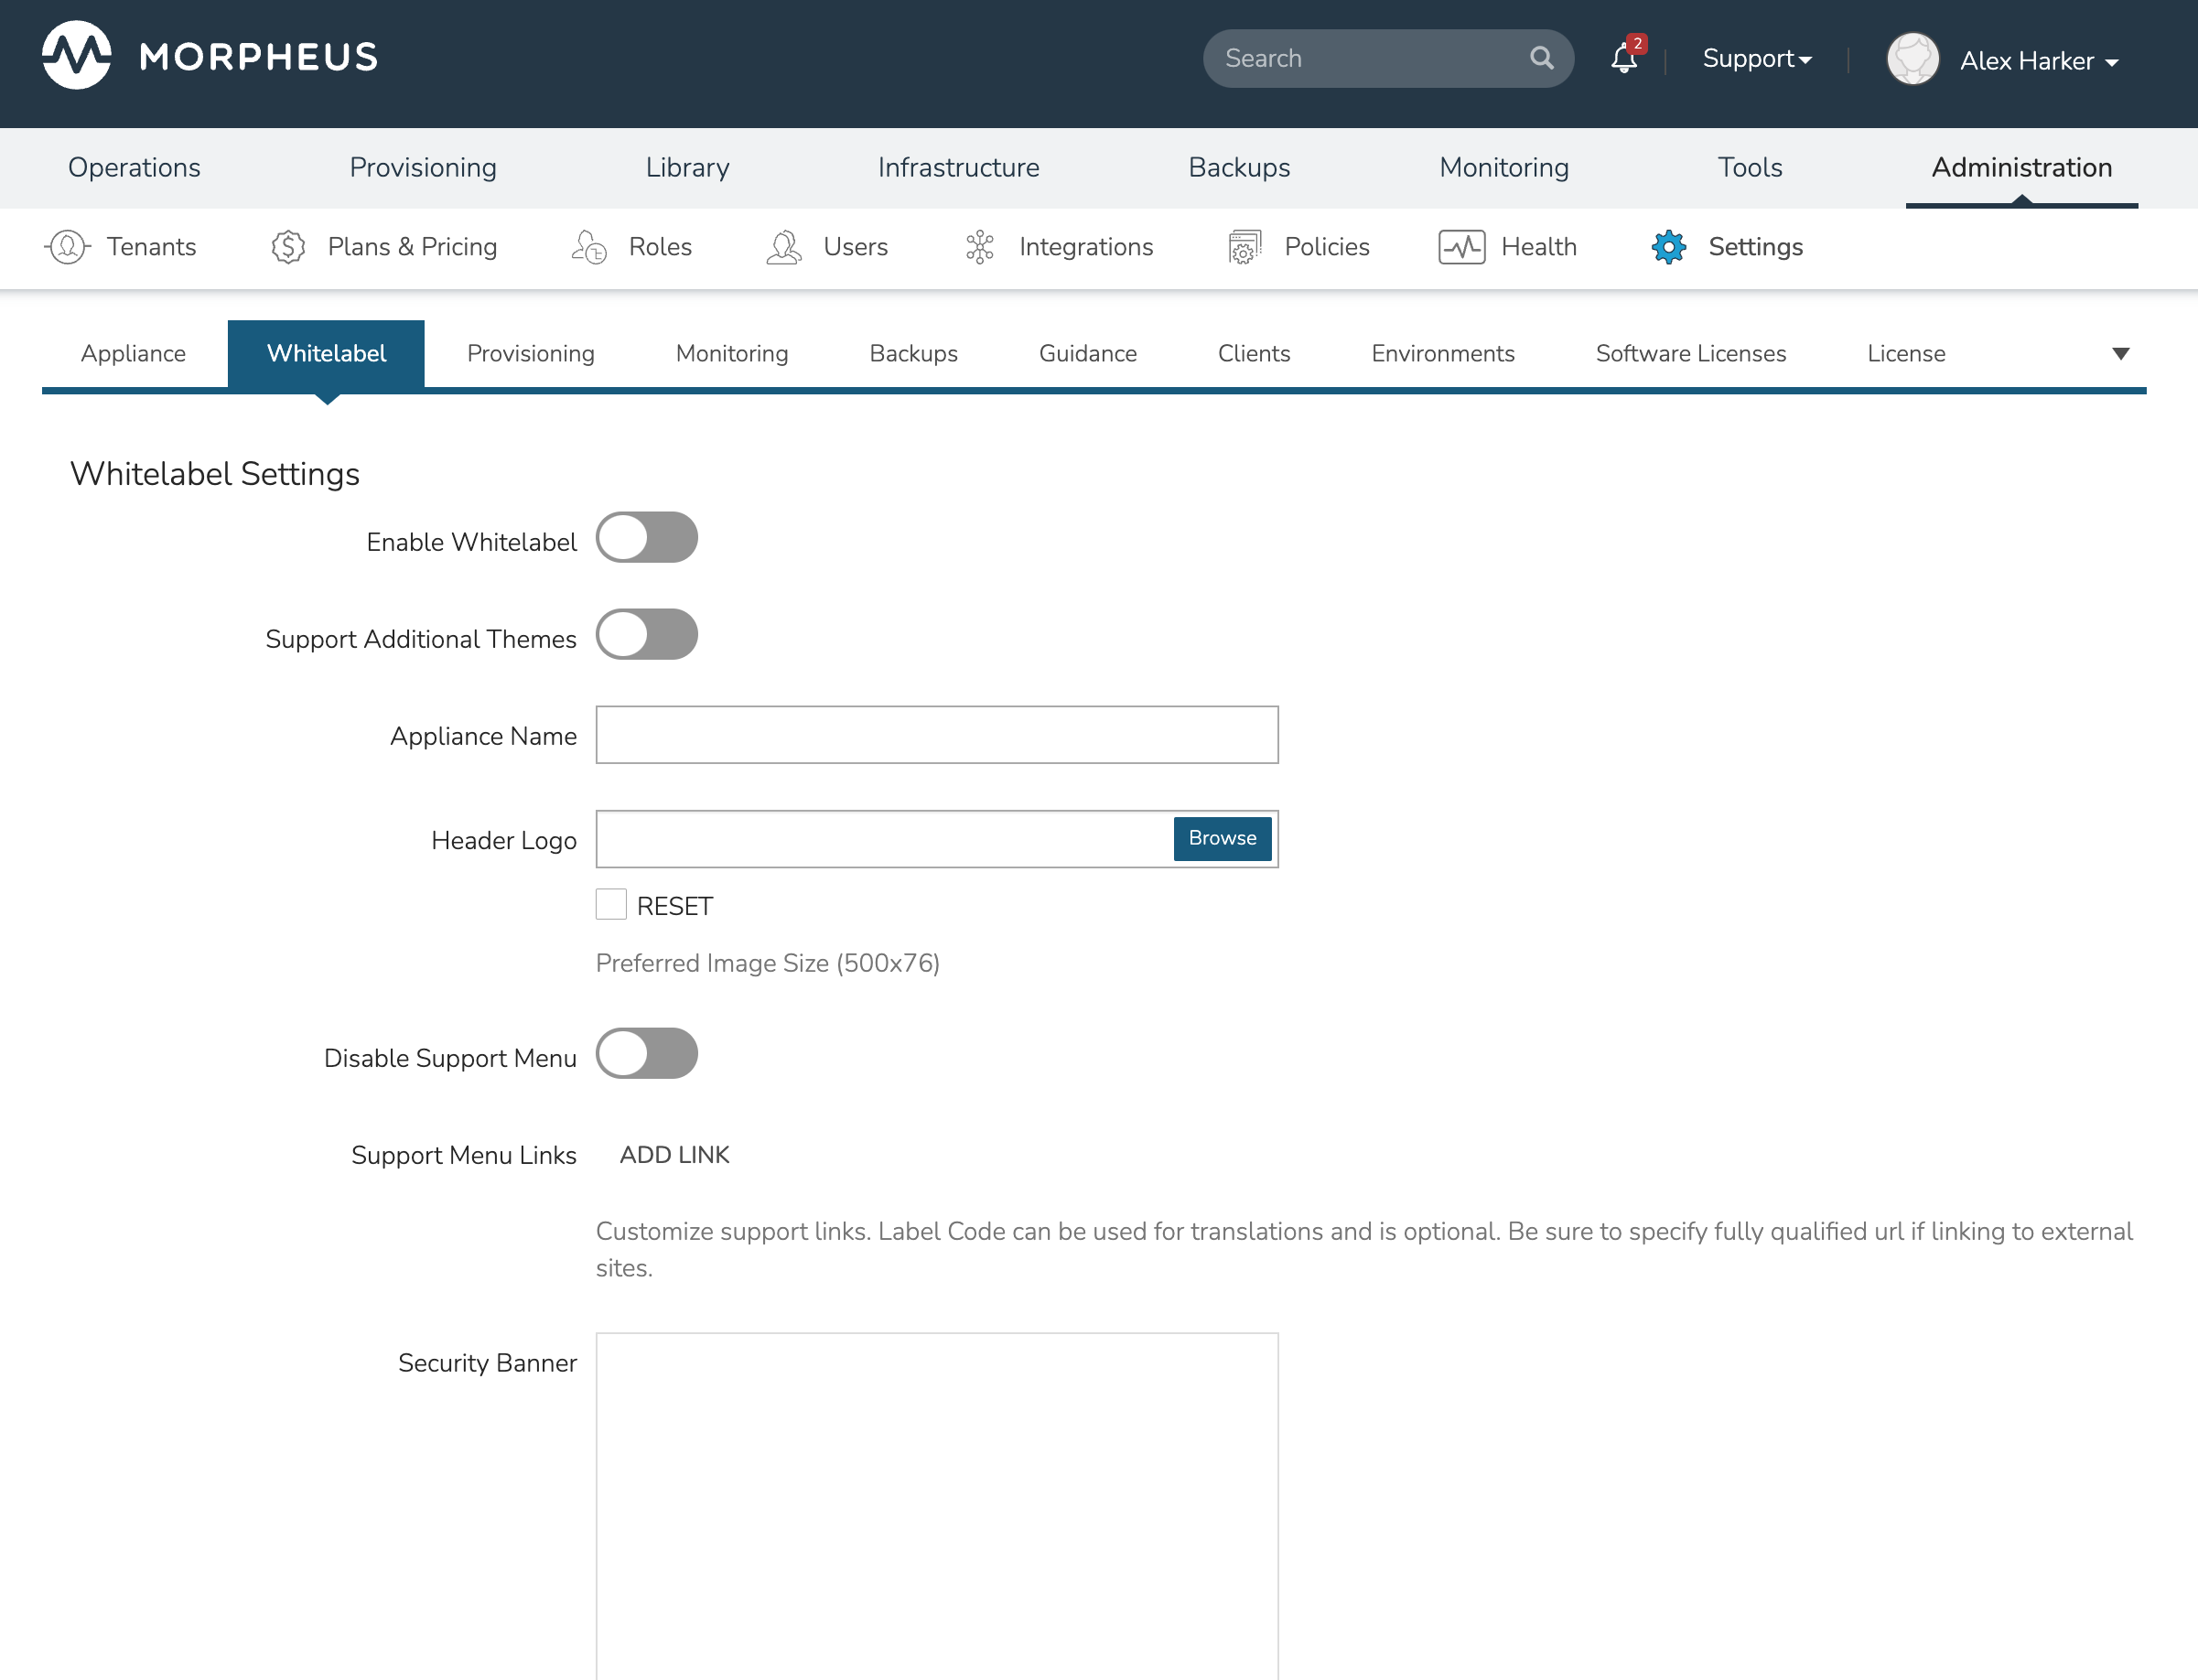
Whitelabeling
Morpheus allows each Tenant to be customized with its own look and feel through whitelabeling features. Your organization can replace the stock Morpheus logo and color scheme with your own logos and colors. Whitelabel settings are held in Administration > Settings > Whitelabel and are mostly self-explanatory. Upload logos and set custom hexadecimal colors in each field. When done, be sure to set the “Enable Whitelabel” configuration and click SAVE all the way at the bottom of the page. If needed, review a more detailed explanation of each whitelabel setting in Morpheus documentation.
Scoping Clouds to Tenants
With the Tenant now created and seeded with a User and Roles, we’re ready to look at how to set up useful provisioning resources. Of course, Tenants are complete (yet isolated) Morpheus environments which can create their own Cloud integrations or utilize integrations with other third party technologies (assuming they haven’t been restricted from doing so by the Tenant Role). However, Master Tenant administrators may also choose to share integrations created in the Master Tenant down to Subtenant users.
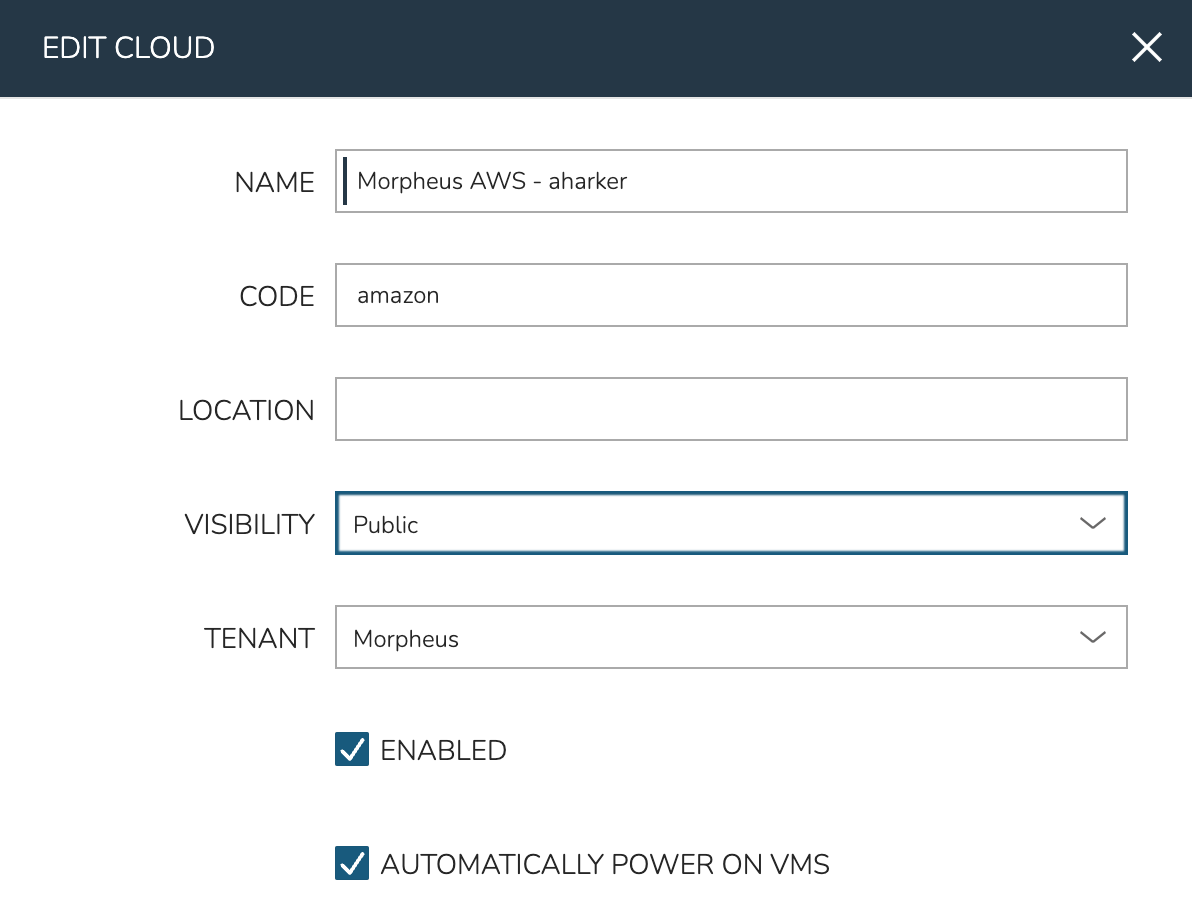
Many constructs in Morpheus have a “Visibility” attribute when viewed from the Master Tenant. This attribute controls whether the construct is “Private” (in other words reserved for a selected Tenant) or Public (available to all Tenants). In our example, we’re going to expose an Amazon AWS Cloud integrated in the Master Tenant down to our newly-created Subtenant. To set the Cloud visibility, use the following steps:
Navigate to the Clouds list page (Infrastructure > Clouds)
Edit the Cloud by clicking the pencil icon (✎) in its row
Toggle the VISIBILITY attribute to “Public”
Click SAVE CHANGES
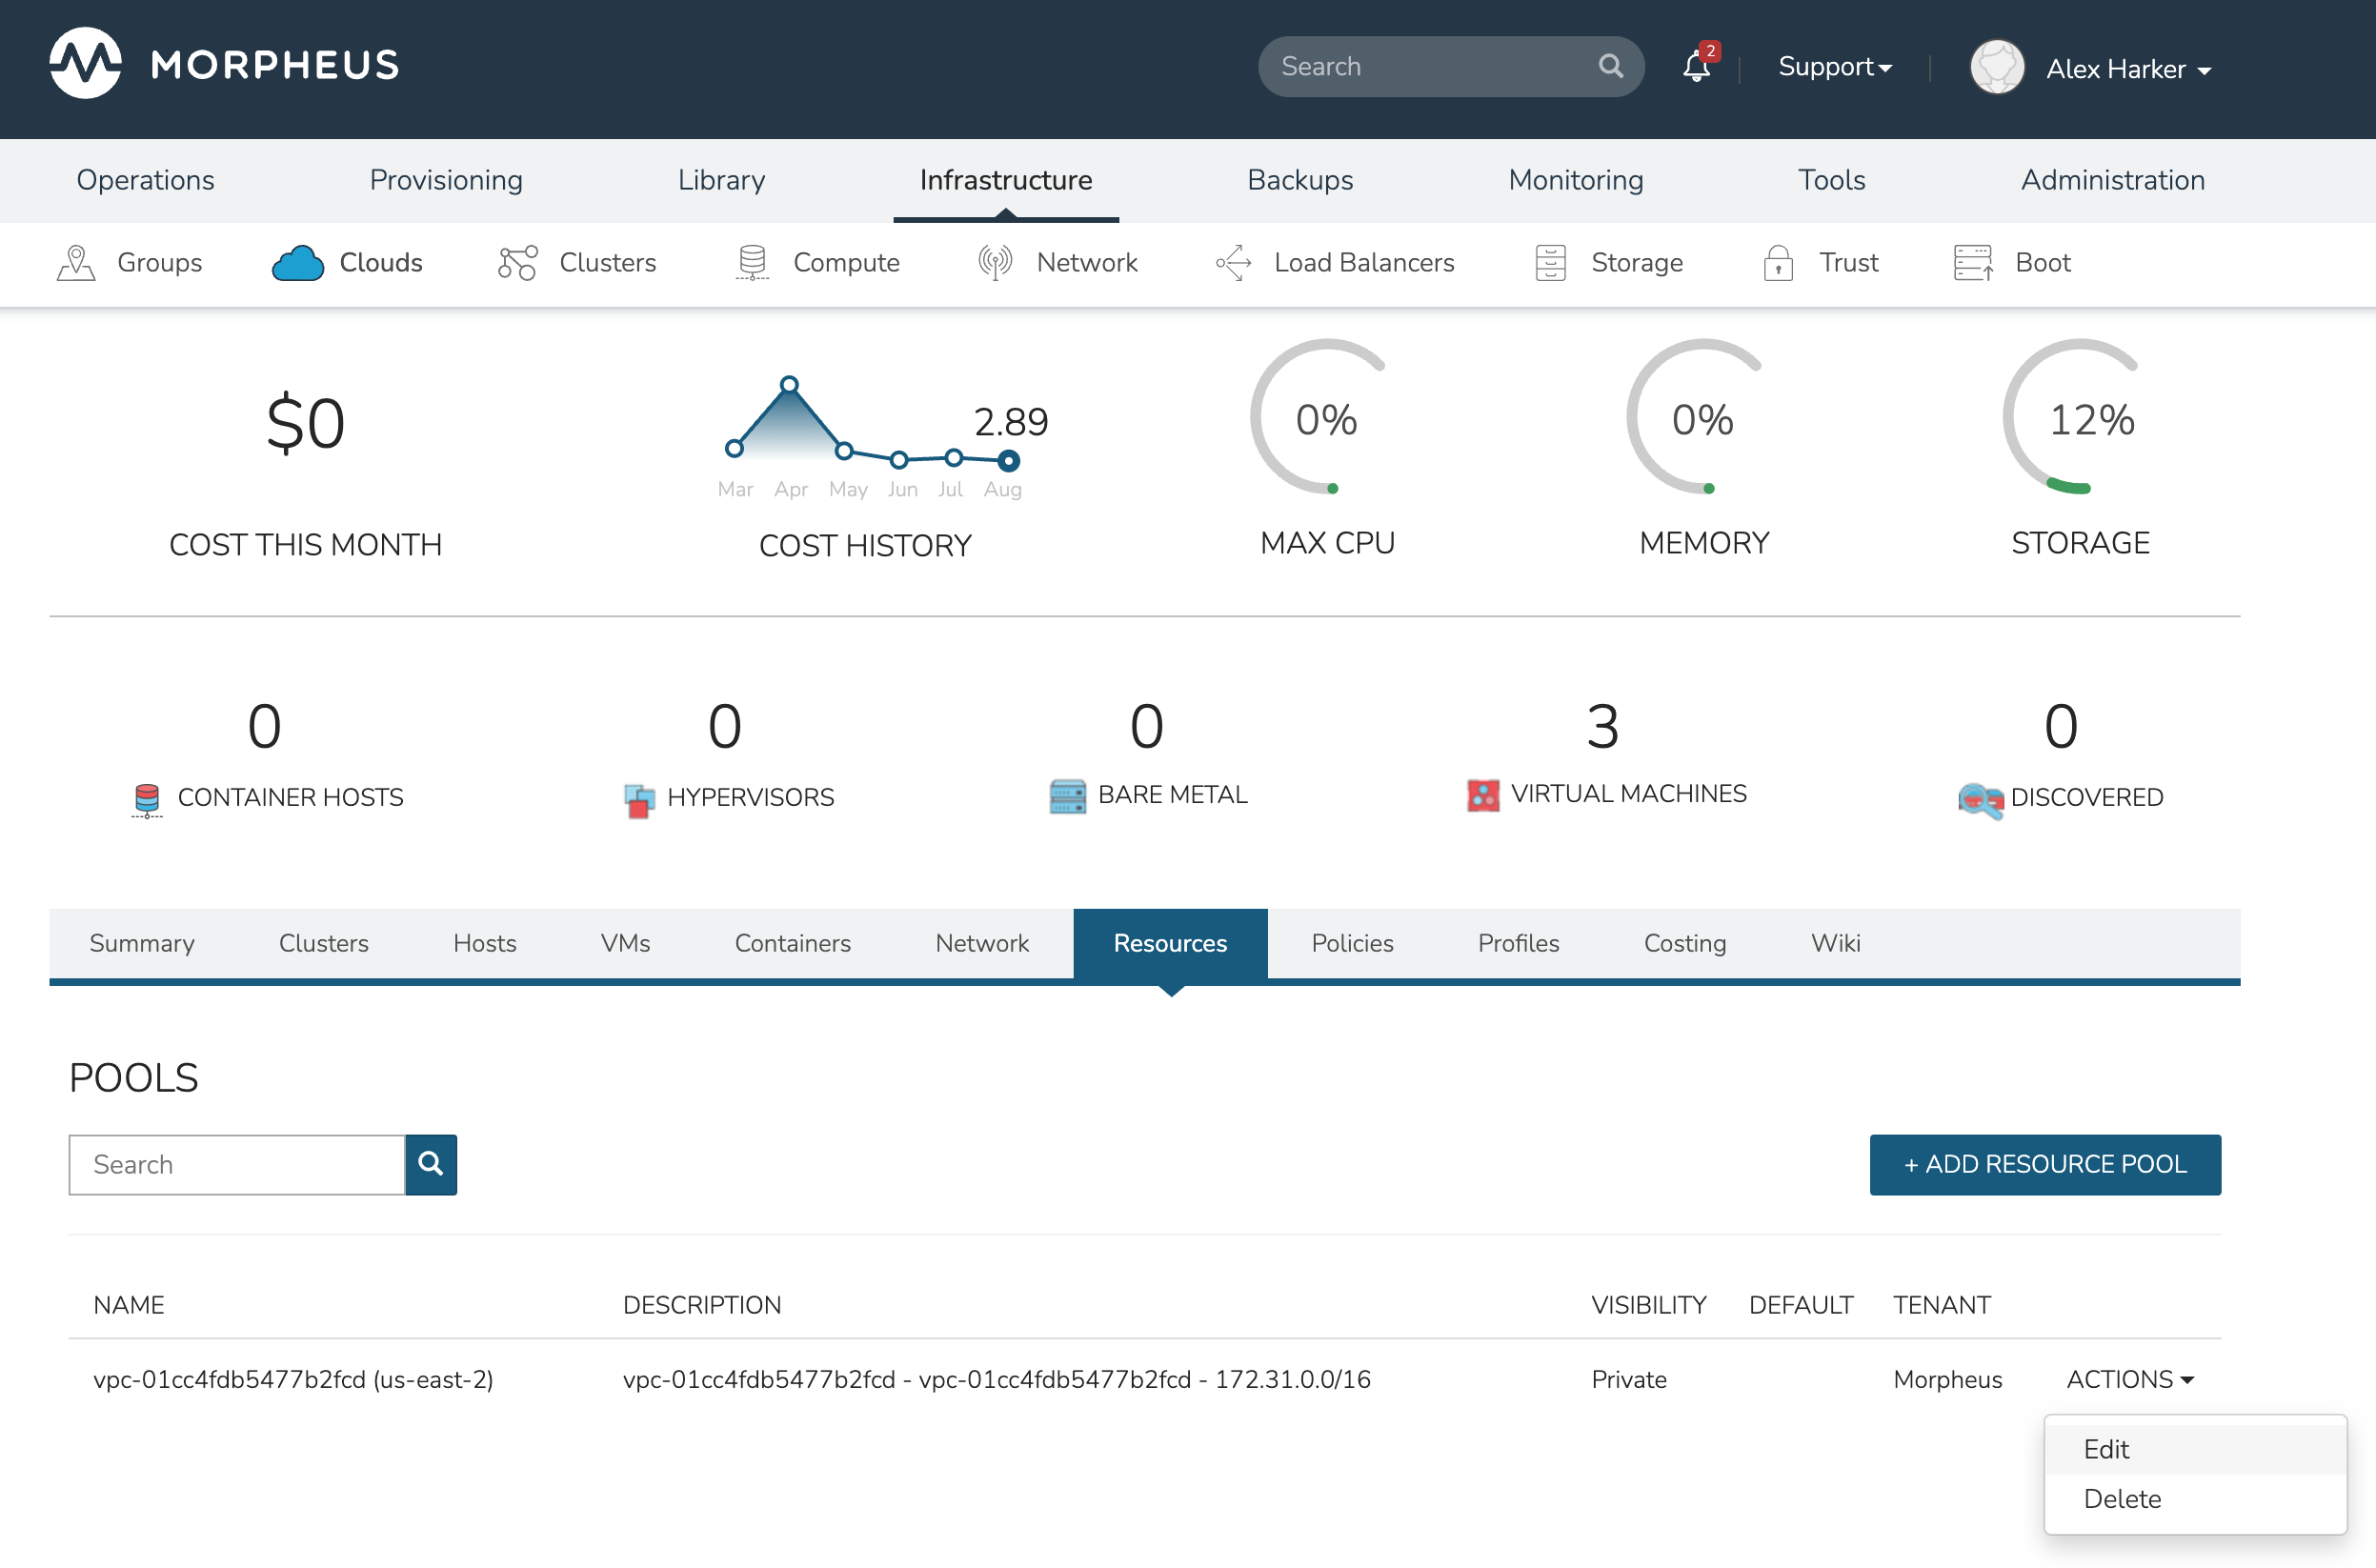
The Cloud is now exposed to the Subtenant but we also need to expose a Resource Pool (A VPC, in Amazon parlance) for Subtenant users to provision into. We do this from the Cloud detail page (Infrastructure > Clouds) > Click on selected Cloud.
Select the Resources subtab
Click ACTIONS next to the selected Resource Pool (VPC)
Click Edit
Expand the “Tenant Permissions” section
Set Visibility to Public (alternatively, you could keep the Private visibility and add the new Tenant in the next field)
Click SAVE CHANGES
Repeat the same process for Networks and Security Groups, both of which are contained in the Networks subtab of the Cloud detail page.
Groups
The last thing to take a look at before Library items and provisioning are Groups. Groups define which resources a User can access. Group access is defined by the User Role and many resources have a Group access component which allows administrators to control User access to things like Clouds, Networks, Datastores, Resource Pools, Folders and more.
Groups exist solely within the Tenant that creates them, they cannot be shared down from Master Tenant to Subtenants. In order to create a Group for our new Tenant, impersonate the User we’ve created in previous steps. Once working in the Tenant, use the following steps:
Navigate to Infrastructure > Groups
Click + CREATE
Set a NAME for the Group and click SAVE CHANGES
We’ll now add the shared Cloud to the Group:
Click on the name of the Group to access the Group detail page
Click on the Clouds tab
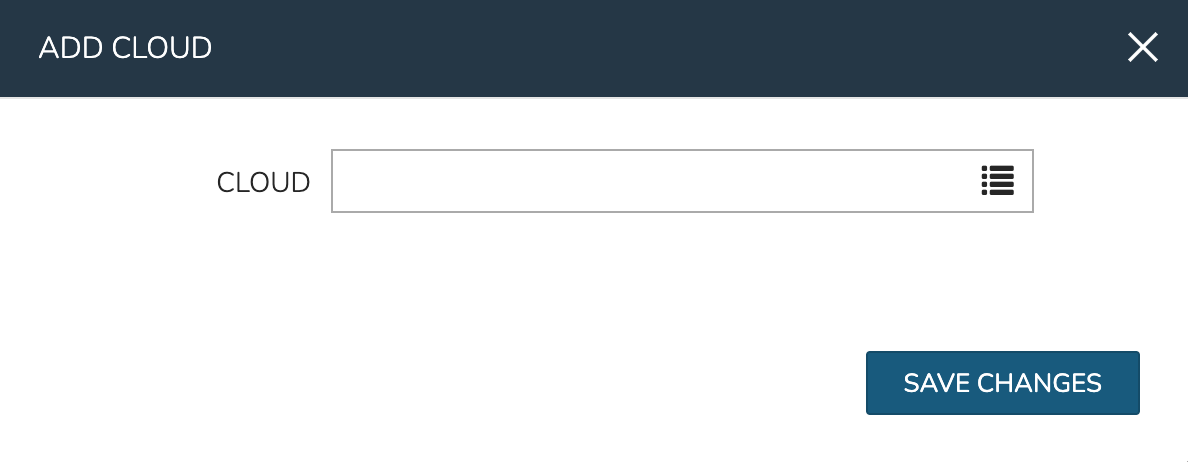
Click + ADD
Use the typeahead field to select the shared Cloud
Click SAVE CHANGES
At this point the basic configuration steps are complete and we will attempt a provisioning test using built-in Instance Types which are preinstalled with Morpheus.
Provisioning Test
At this point, you can conduct a test by attempting to provision one of the basic Instance Types shipped with Morpheus for demonstration purposes. To test, we’ll provision a basic Ubuntu box to our AWS Cloud.
Navigate to Provisioning > Instances
Click + ADD
Select the Ubuntu Instance Type
Click NEXT
Select the Group and Cloud noting that only resources shared with the Subtenant are selectable
Name the Instance
Click NEXT
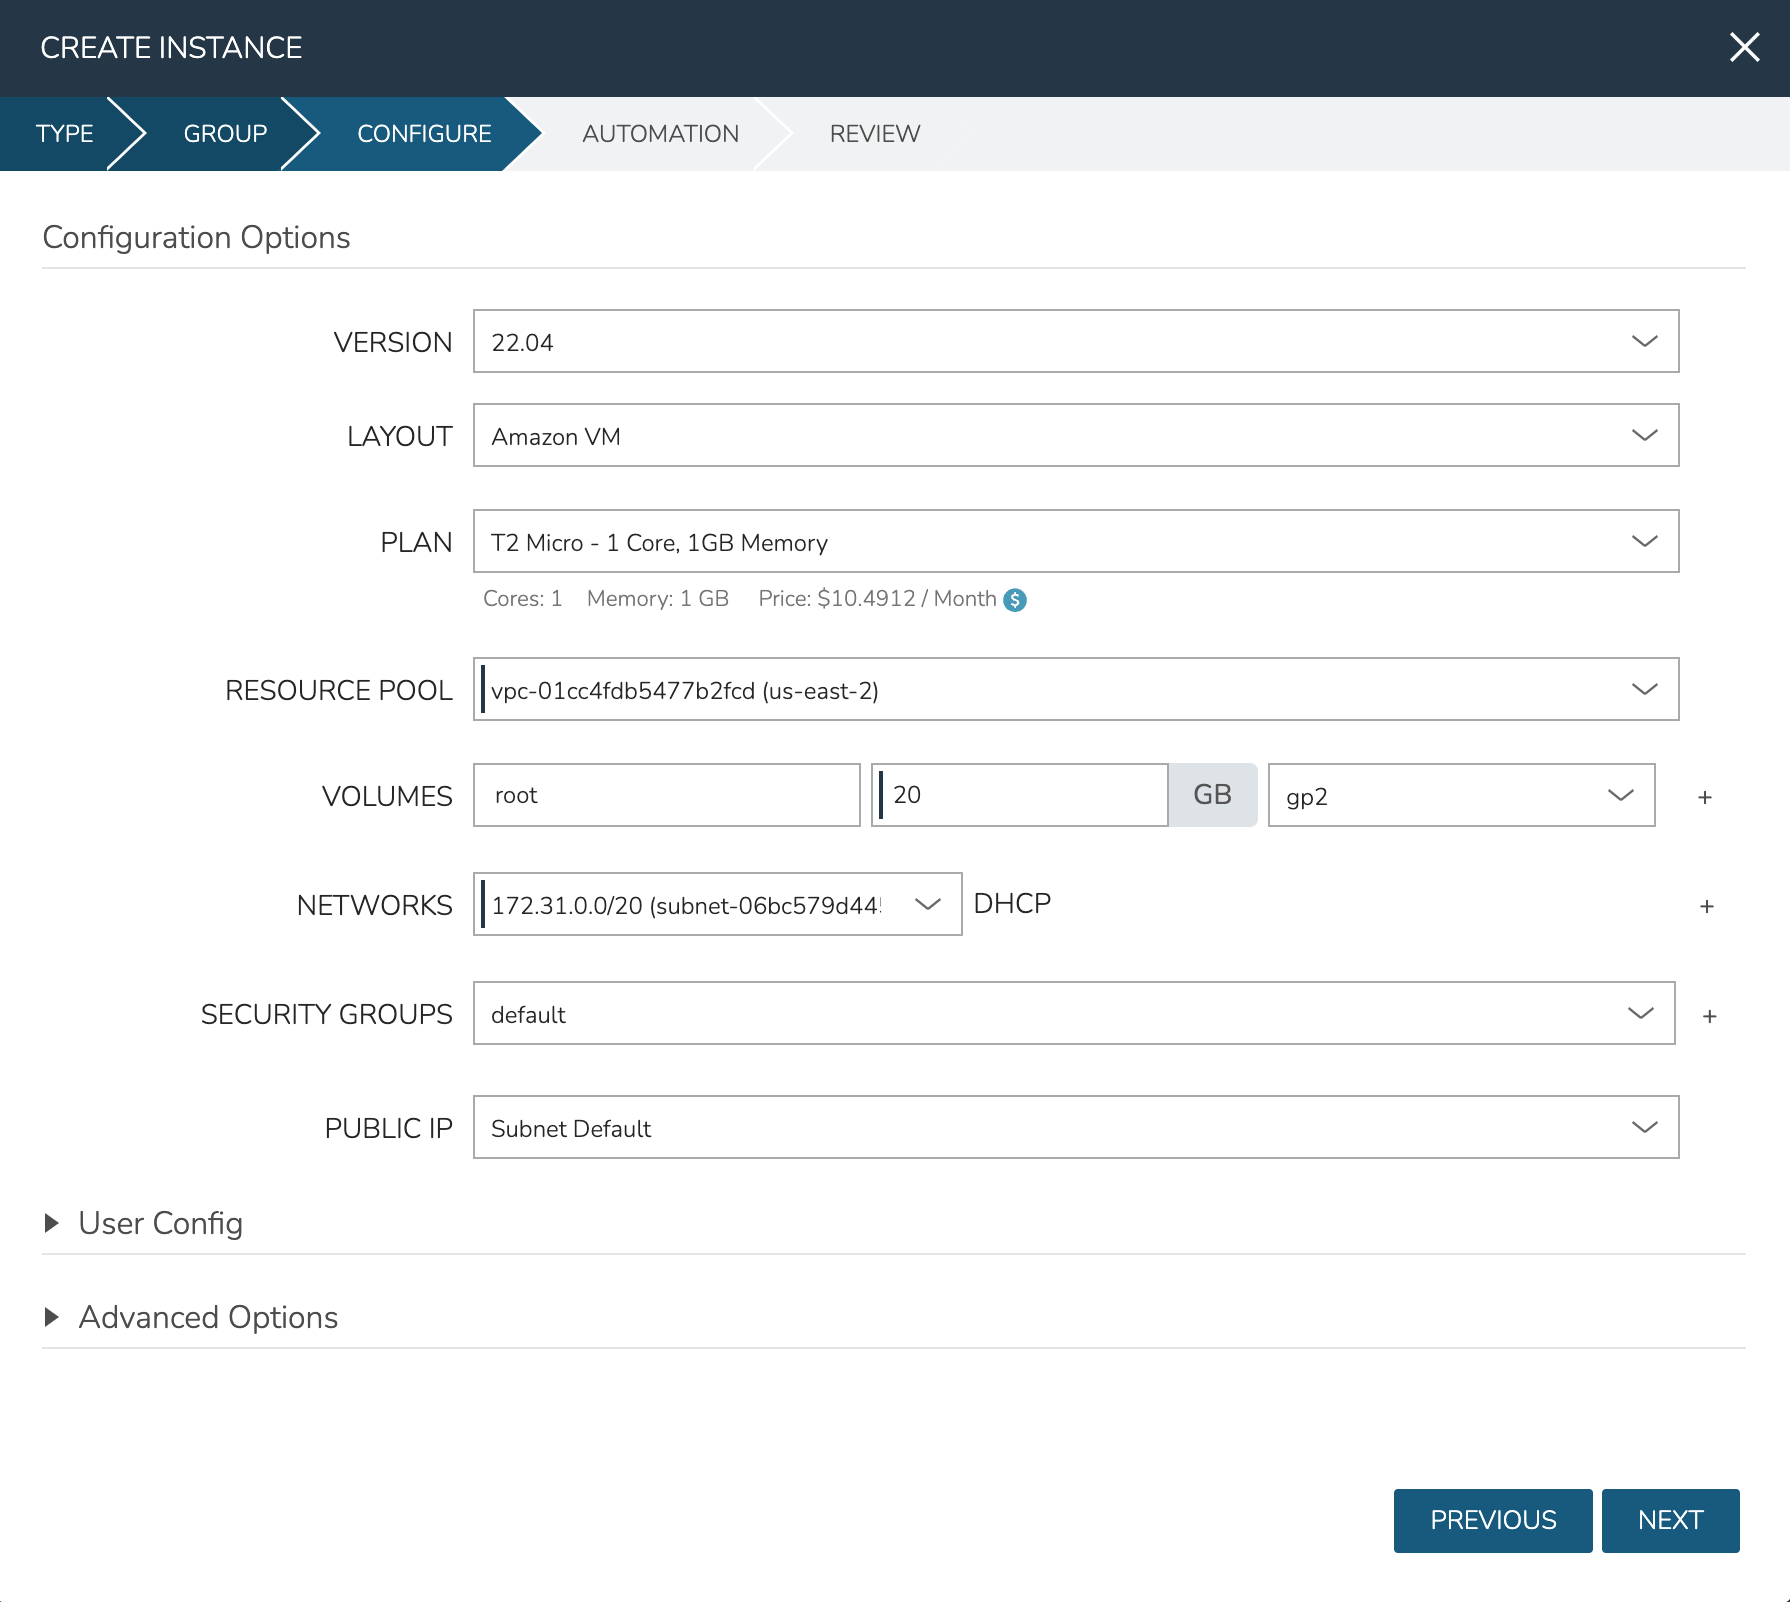
On the CONFIGURE tab, select a Resource Pool, Network, and Security Group once again noting that only resources shared with the Subtenant are selectable
Click NEXT
Click NEXT once again
Click COMPLETE
After a minute or two, the Instance should be fully provisioned.
Exposing Custom Instance Types to Subtenants
Master Tenant administrators can also share custom Library items down to Subtenants. Do do this, navigate to Library > Blueprints and select an Instance Type. Click the pencil (✎) icon in the row for the selected Instance Type to edit it. As we’ve done before, update the VISIBILITY setting to Public. In addition, ensure the User Role for the Subtenant User grants access to the selected Instance Type. Once configurations have been made, conduct a similar test to the previous section. When you attempt to provision a new Instance, the new Instance Type should be selectable and the User should be able to provision the custom Instance Type in the same was as the default Instance Type was provisioned in the previous step.