MVM Clusters
Important
MVM clusters are currently in a closed beta with a selected subset of the customer base. It is not for production use and is not available to appliances that are not part of the closed beta program. Expect that MVM Cluster capabilities, as well as this documentation, will change significantly over the coming months.
MVM virtualization solution is a hypervisor clustering technology utilizing KVM. Beginning with just a few basic Ubuntu boxes, Morpheus can create a cluster of hypervisor hosts complete with monitoring, failover, easy migration of workloads across the cluster, and zero-downtime maintenance access to hypervisor host nodes. All of this is backed by Morpheus Tenant capabilities, a highly-granular RBAC and policy engine, and Instance Type library with automation workflows.
Features
Host Features
Automated MVM cluster provisioning
Ceph storage configuration for multi-node clusters
Cluster and individual host monitoring
Add hosts to existing clusters
Console support for cluster hosts
Add, edit and remove networks and data stores from clusters
Gracefully take hosts out of service with maintenance mode
Migration of workloads across hosts
Configurable automatic failover of running workloads when a host is lost
Integration with Morpheus costing
Governance through Morpheus RBAC, Tenancy, and Policies
VM Features
Workload provisioning and monitoring
Console support for running workloads
Migration of VMs across hosts
Configure automatic failover for individual VMs in the event a host is lost
Reconfigure running workloads to resize plan, add/remove disks, and add/remove network interfaces
Backup and restore MVM workloads
Take snapshots and revert to snapshots
Morpheus library and automation support
Integration with Morpheus costing features
Base Cluster Details
An MVM cluster using the hyperconvered (HCI) Layout consists of at least three hosts. Physical hosts are recommended to experience full performance of the MVM solution. In smaller environments, it is possible to create an MVM cluster with three nested virtual machines, a single physical host (non-HCI only), or a single nested virtual machine (non-HCI only) though performance may be reduced. With just one host it won’t be possible to migrate workloads between hosts or take advantage of automatic failover. Currently, a host must be a pre-existing Ubuntu 22.04 box with environment and host system requirements contained in this section. Morpheus handles cluster configuration by providing the IP address(es) for your host(s) and a few other details. Details on adding the cluster to Morpheus are contained in the next section.
Hardware Requirements
Operating System: Ubuntu 22.04
CPU: One or more 64-bit x86 CPUs, 1.5 GHz minimum with Intel VT or AMD-V enabled
Memory: 4 GB minimum. For non-converged Layouts, configure MVM hosts to use shared external storage, such as an NFS share or iSCSI target. Converged Layouts utilize Ceph for clustered storage and require a 4 GB minimum memory per Ceph disk
Disk Space: For converged storage, a data disk of at least 500 GB is required for testing. More storage will be needed for production clusters. An operating system disk of 15 GB is also required. Clusters utilizing non-converged Layouts can configure external storage (NFS, etc.) while Morpheus will configure Ceph for multi-node clusters
Network Connectivity: MVM hosts must be assigned static IP addresses. They also need DNS resolution of the Morpheus appliance and Internet access in order to download and install system packages for MVM dependencies, such as KVM, Open vSwitch (OVS), and more
Note
Ubuntu 22.04 uses netplan for networking. To configure a static IP address, change into the directory holding the config files (cd /etc/netplan) and edit the existing configuration file (/etc/netplan/50-cloud-init.yaml or /etc/netplan/00-installer-config.yaml or /etc/netplan/01-netcfg.yaml). If desired, backup the existing configuration prior to editing it (cp /etc/netplan/<file-name>.yaml /etc/netplan/<file-name>.yaml.bak). For additional information on configuration file formatting, refer to netplan documentation. Once the configuration is updated, validate and apply it (netplan try). The try command will validate the configuration and apply it if it’s valid. If invalid, it will automatically be rolled back.
Note
Clustered storage needs as much network bandwidth as possible. Network interfaces of at least 10 Gbps with jumbo frames enabled are required for clustered storage and for situations when all traffic is running through the management interface (when no compute or storage interface is configured). It’s highly likely that performance will be unacceptable with any lower configurations.
Description |
Source |
Destination |
Port |
Protocol |
|---|---|---|---|---|
Morpheus Agent communication with the Morpheus appliance |
MVM Host |
Morpheus appliance server |
443 |
TCP |
MVM host configuration and management |
Morpheus appliance server |
MVM Host |
22 |
TCP |
MVM interhost communication for clustered deployments |
MVM Host |
MVM Host |
22 |
TCP |
Morpheus server SSH access for deployed virtual machines |
Morpheus appliance server |
MVM-hosted virtual machines |
22 |
TCP |
Morpheus server WinRM (HTTP) access for deployed virtual machines |
Morpheus appliance server |
MVM-hosted virtual machines |
5985 |
TCP |
Morpheus server WinRM (HTTPS) access for deployed virtual machines |
Morpheus appliance server |
MVM-hosted virtual machines |
5986 |
TCP |
Ceph Storage |
MVM Host |
MVM Host |
3300 |
TCP |
Ceph Storage |
MVM Host |
MVM Host |
6789 |
TCP |
Ceph MDS/ODS |
MVM Host |
MVM Host |
6800-7300 |
TCP |
Example Cluster Deployment
In this example cluster, each host box consists of:
4 vCPU
16 GB memory
20 GB OS boot disk
250 GB data disk (deployed to
/dev/dsb)3 network interfaces for management, storage, and compute traffic (set to
eth0,eth1, andeth2, respectively)
Note
250 GB data disks used in this example are simply for demonstration purposes. A typical test cluster should consist of at least 500 GB storage and more will be required for production. Do not raid disks on physical servers. Multiple disks may be used and they will be added to the total Ceph storage in one large volume. In the DATA DEVICE configuration during cluster setup, give a comma-separated list of disk devices if required.
MVM clusters must also live in Morpheus-type Clouds (See Infrastructure > Clouds). A pre-existing Morpheus Cloud may be used or a new Cloud could be created to handle MVM management.
Provisioning the Cluster
As mentioned in the previous section, this example is starting with three provisioned Ubuntu 22.04 boxes. I also have a Morpheus-type Cloud to house the cluster. Begin the cluster creation process from the Clusters list page (Infrastructure > Clusters). Click + ADD CLUSTER and select “MVM Cluster”.
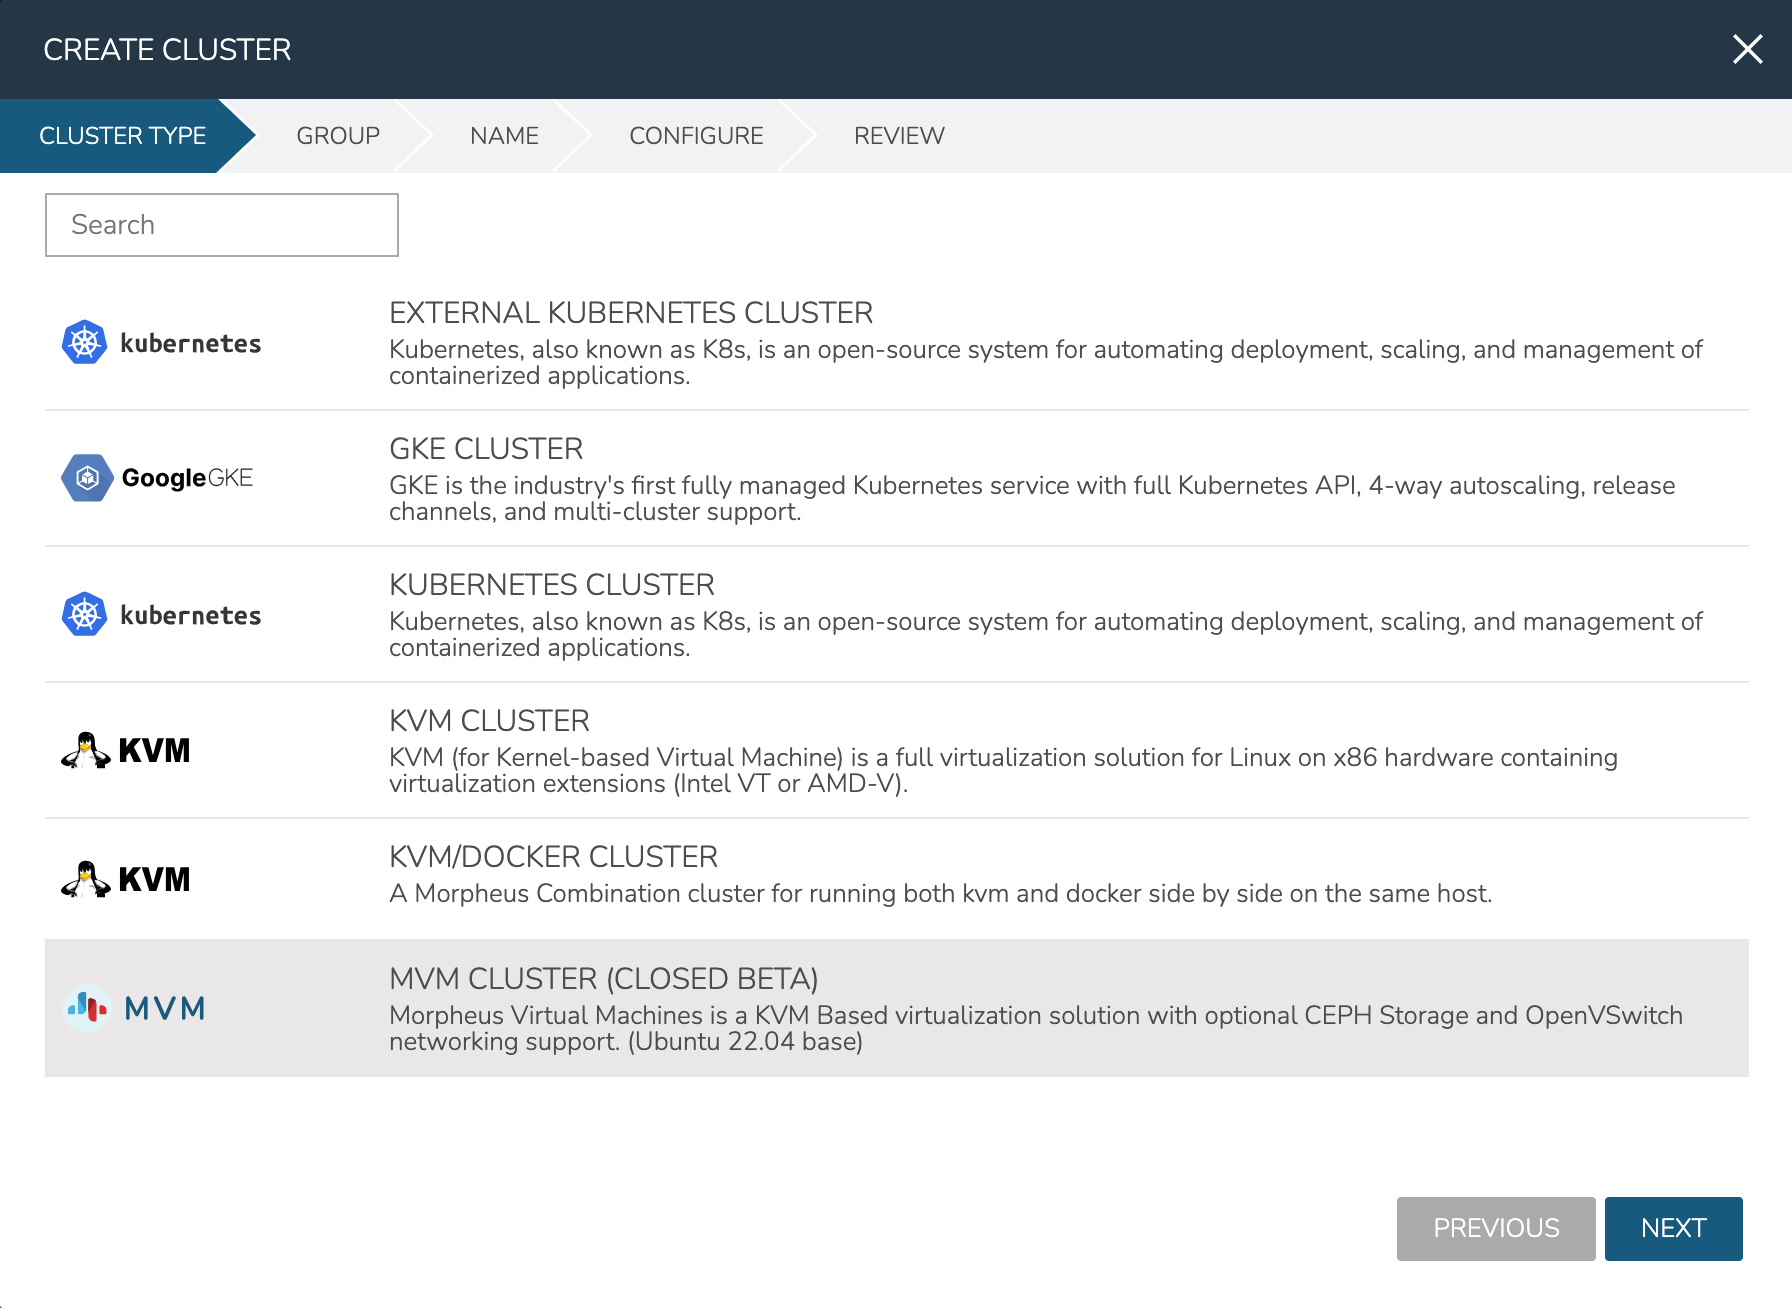
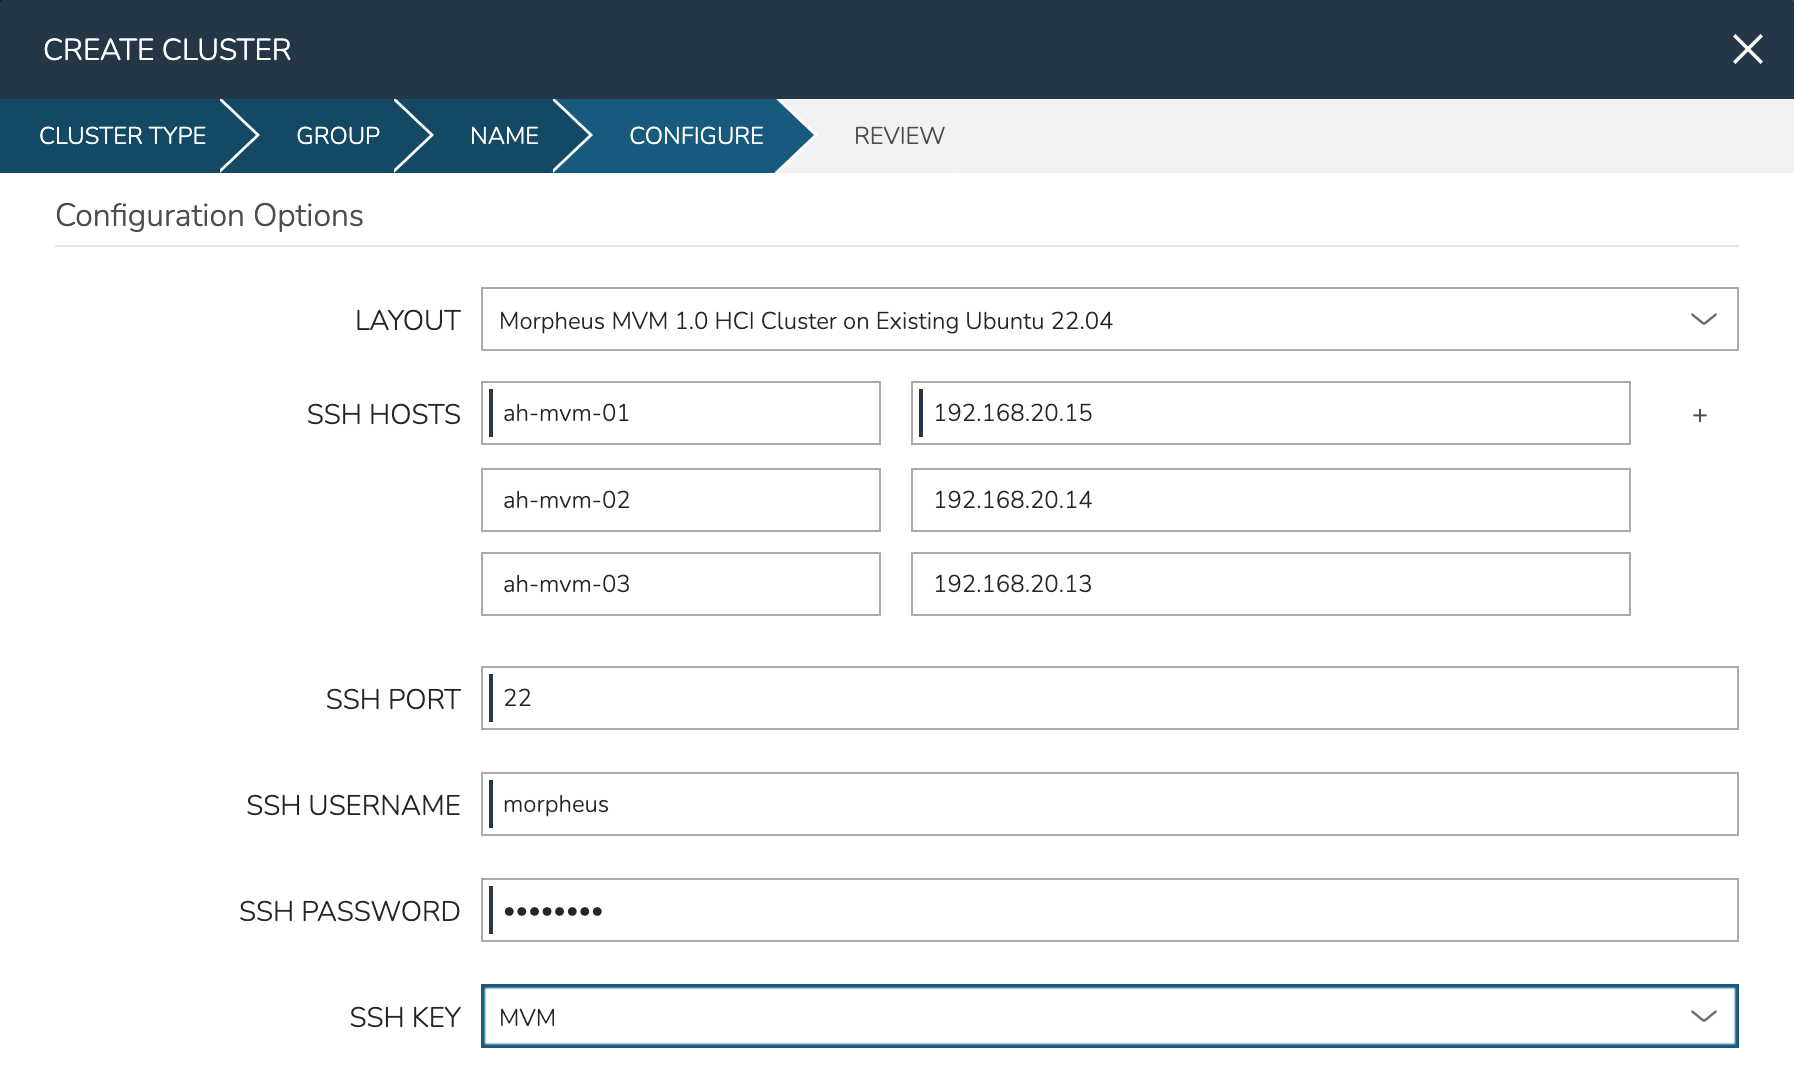
Morpheus gives the option to select a hyperconverged infrastructure (HCI) LAYOUT or non-HCI. In this example, the HCI Layout is used (requires a three-node minimum). Next, configure the names and IP addresses for the host boxes (SSH HOST). The SSH HOST name configuration is simply a display name in Morpheus, it does not need to be a hostname. By default, configuration space is given for three hosts which is what this example cluster will have. You must at least configure one and it’s possible to add more by clicking the (+) button. The SSH PORT is pre-configured for port 22, change this value if applicable in your environment. Next, set a pre-existing user on the host boxes (SSH USERNAME and SSH PASSWORD) and SSH KEY. Use a regular user with sudo access.
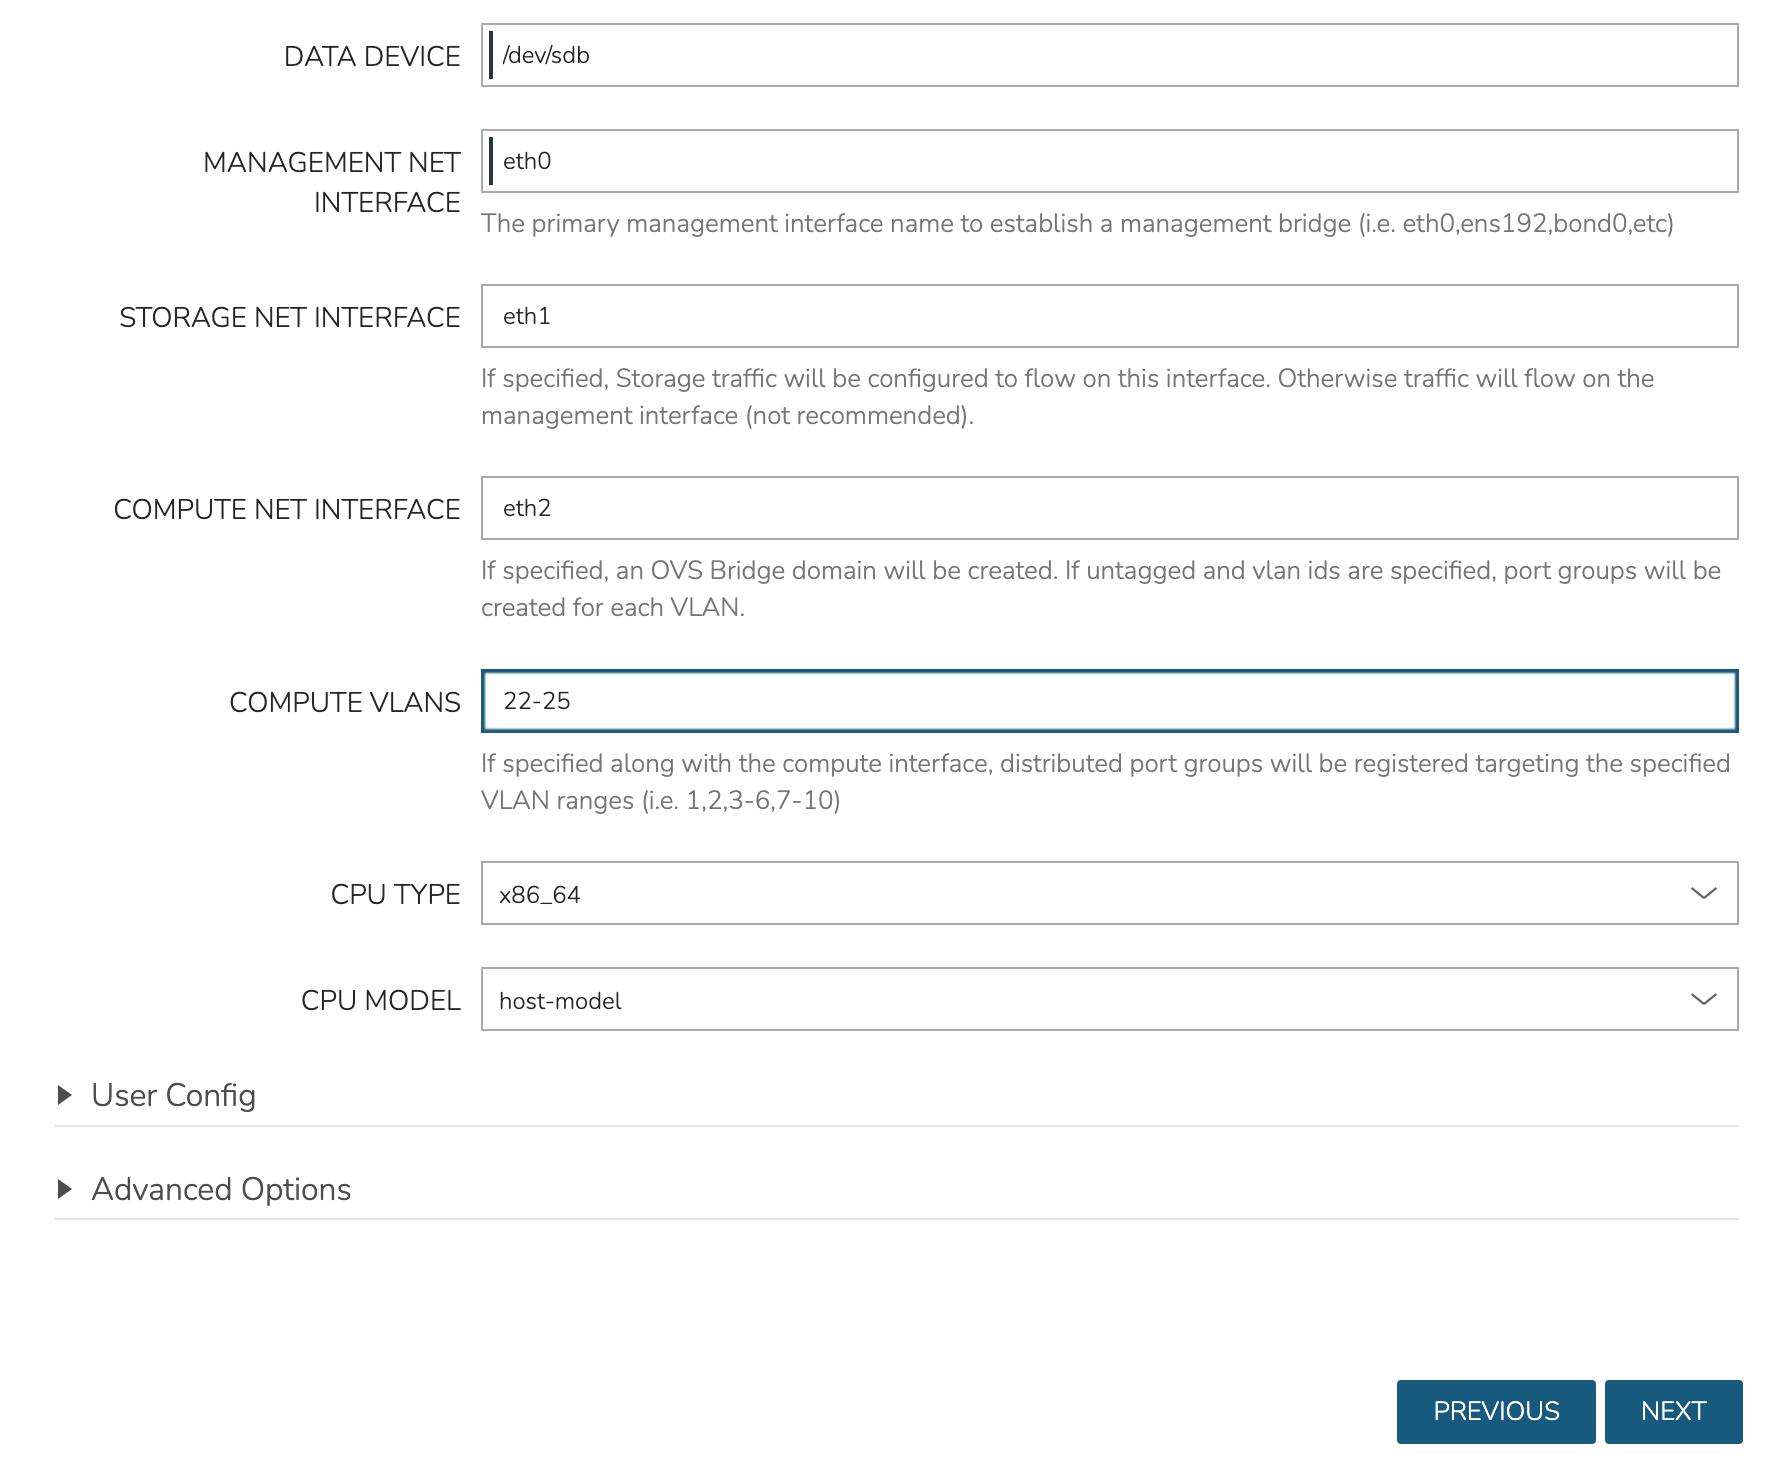
In the next part of the modal, you’ll configure the storage devices and network interfaces. When Ceph initializes, it needs to be pointed to an initial data device (or devices). Configure this in the DATA DEVICE field. Multiple devices may be given in a comma-separated list and will be added to the total Ceph storage as one large volume. Find your disk names, if needed, with the lsblk command. In my case, the target device is located at /dev/sdb.
Though not strictly required, it’s recommended to have separate network interfaces to handle cluster management, storage traffic, and compute. In this example case, eth0 is configured as the MANAGEMENT NET INTERFACE which handles communication between the cluster hosts. eth1 is configured as the STORAGE NET INTERFACE and eth2 is configured as the COMPUTE NET INTERFACE. The COMPUTE VLANS field can take a single value (ex. 1) or a range of values (ex. 22-25). This will create OVS port group(s) selectable as networks when provisioning workloads to the cluster. If needed, you can find your network interface names with the ip a command.
Finally, only one CPU TYPE is currently supported (x86_64) though this may change in the future. For CPU MODEL configuration, we surface the entire database of model configurations from libvirt. If unsure or if you don’t know of a specific reason to choose one or the other, select host-model which is the default option.
At this point we’ve kicked off the process for configuring the cluster nodes. Drill into the Cluster detail page and click on the History tab. Here we can monitor the progress of configuring the cluster. Morpheus will run scripts to install KVM, install Ceph, install OVS, and to prepare the cluster. In just a short time, the cluster provisioning should complete and the cluster will be ready to deploy workloads.
Provisioning a Workload
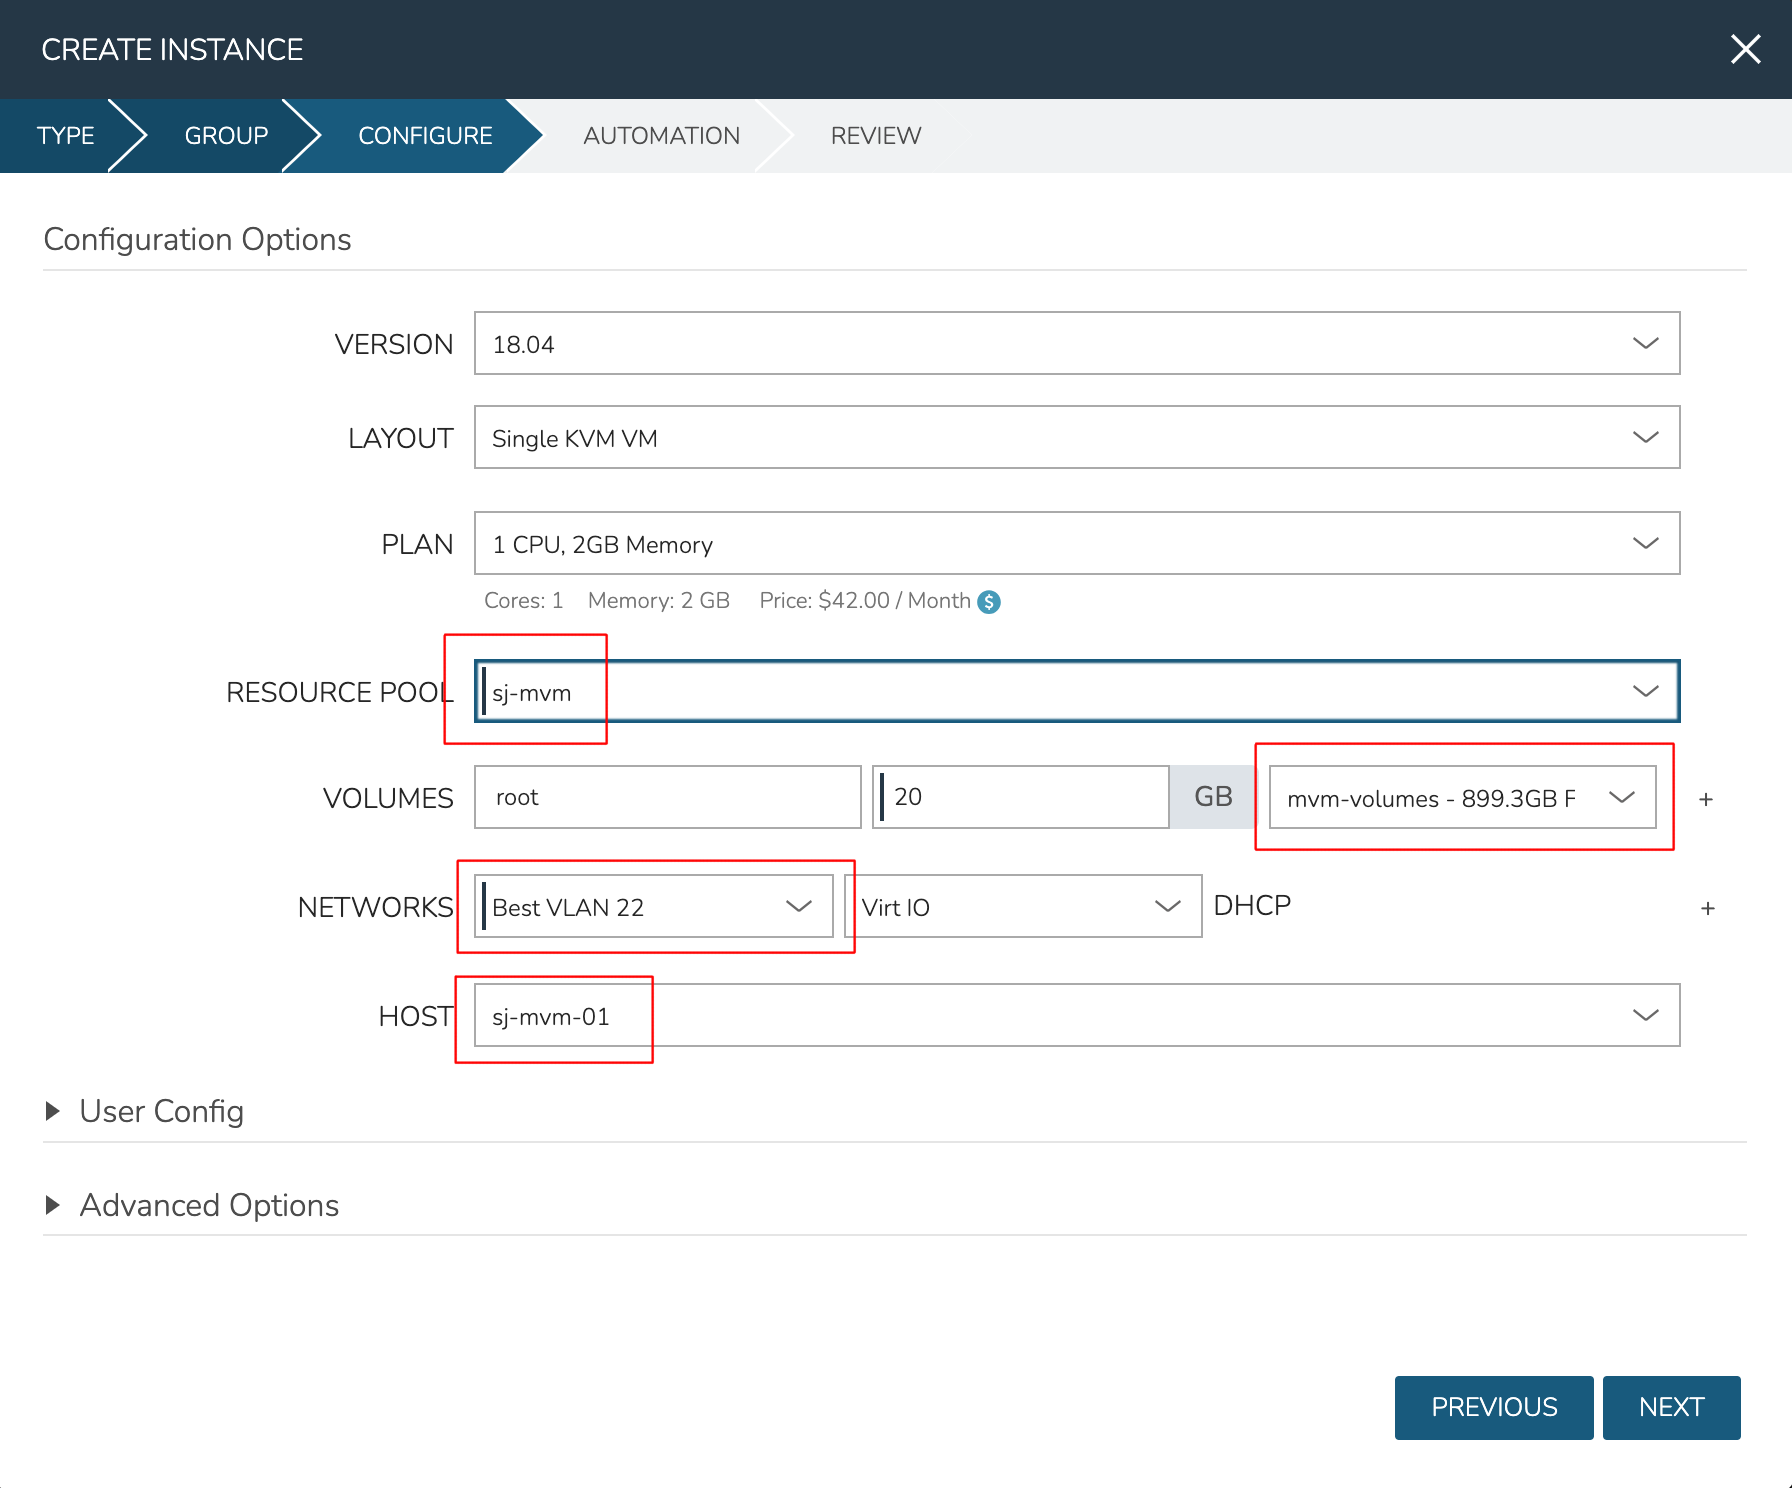
At this point, the cluster is ready for workloads to be provisioned to it. The system default Ubuntu Instance Type contains a compatible Layout for MVM deployment. Add an Instance from the Instances list page (Provisioning > Instances). After selecting the Instance Type, choose a Group that allows for selection of the Morpheus-type Cloud containing the MVM cluster.

After moving to the next tab, select a Plan based on resource needs. From the RESOURCE POOL field, select the desired MVM cluster. When configuring VOLUMES for the new workload, note that space can be claimed from the Ceph volume. Within NETWORKS, we can add the new workload to one of the VLANS set up as part of cluster creation. Finally, note that we can choose the HOST the workload should run on.
Review and complete the provisioning wizard. After a short time, the workload should be up and running. With a workload now running on the cluster, we can take a look at some of the monitoring, migration, failover, and other actions we can take for workloads running on MVM clusters.
Monitoring the Cluster
With the server provisioned and a workload running, take a look at the monitoring and actions capabilities on the cluster detail page (Infrastructure > Clusters, then click on the new MVM cluster). View cluster performance and resource usage (Summary and Monitoring tabs), drill into individual hosts (Hosts tab), see individual workloads (VMs tab), and more.
Moving Workloads Between Hosts
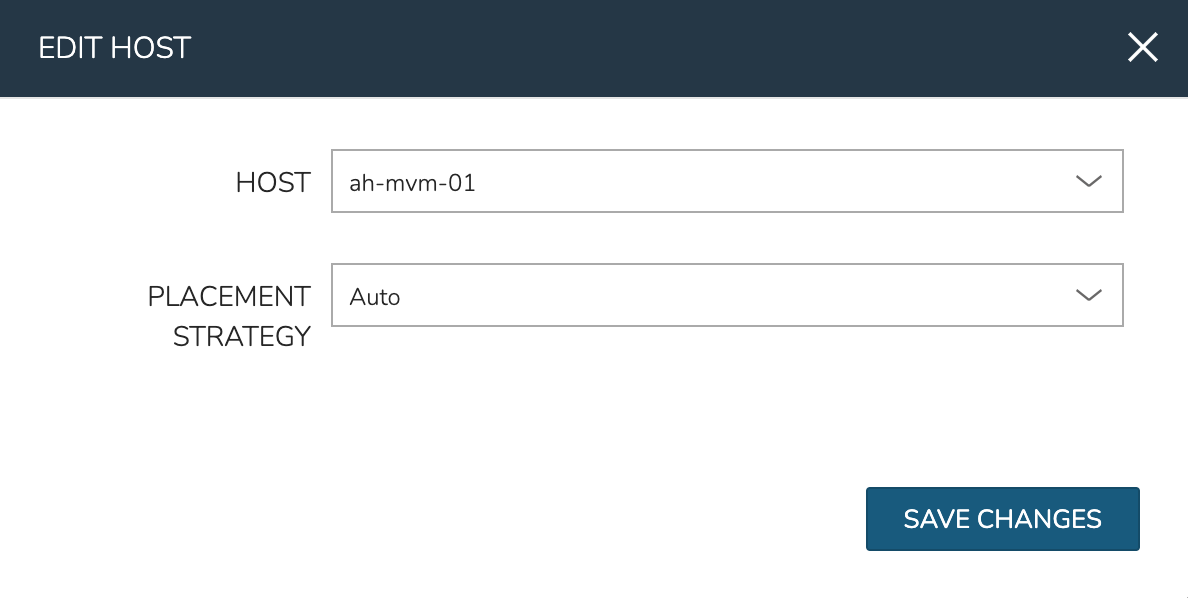
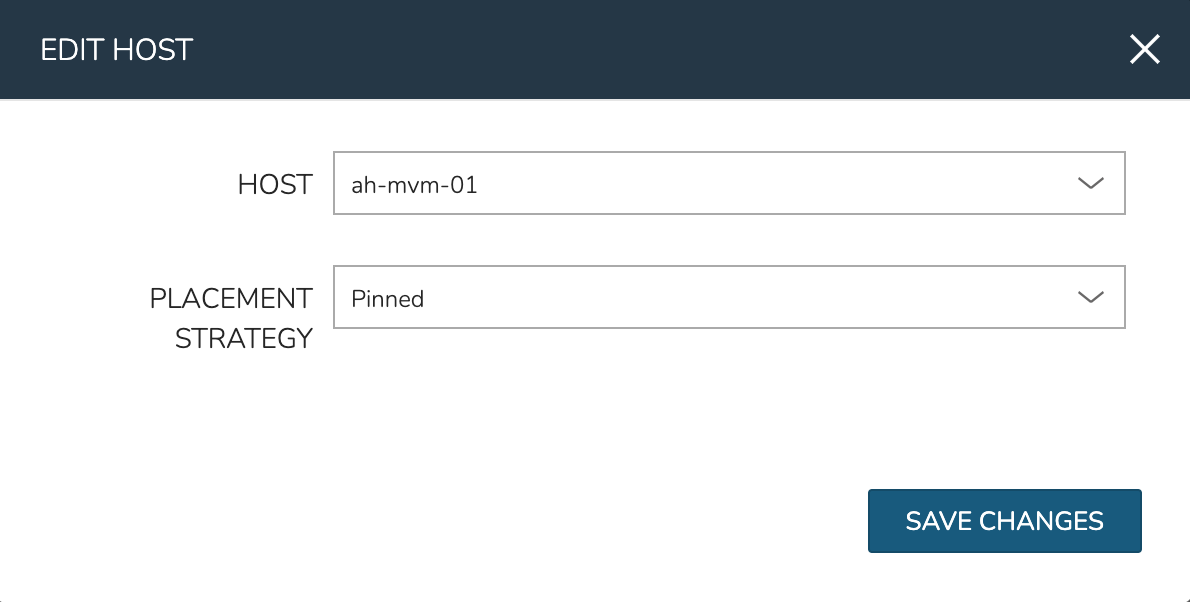
To manually move workloads between hosts, drill into the detail page for the VM (from the VMs tab of the cluster detail page). Click ACTIONS and select “Manage Placement”. Choose a different host and select from the following placement strategies:
Auto: Manages VM placement based on load
Failover: Moves VMs only when failover is necessary
Pinned: Will not move this workload from the selected host
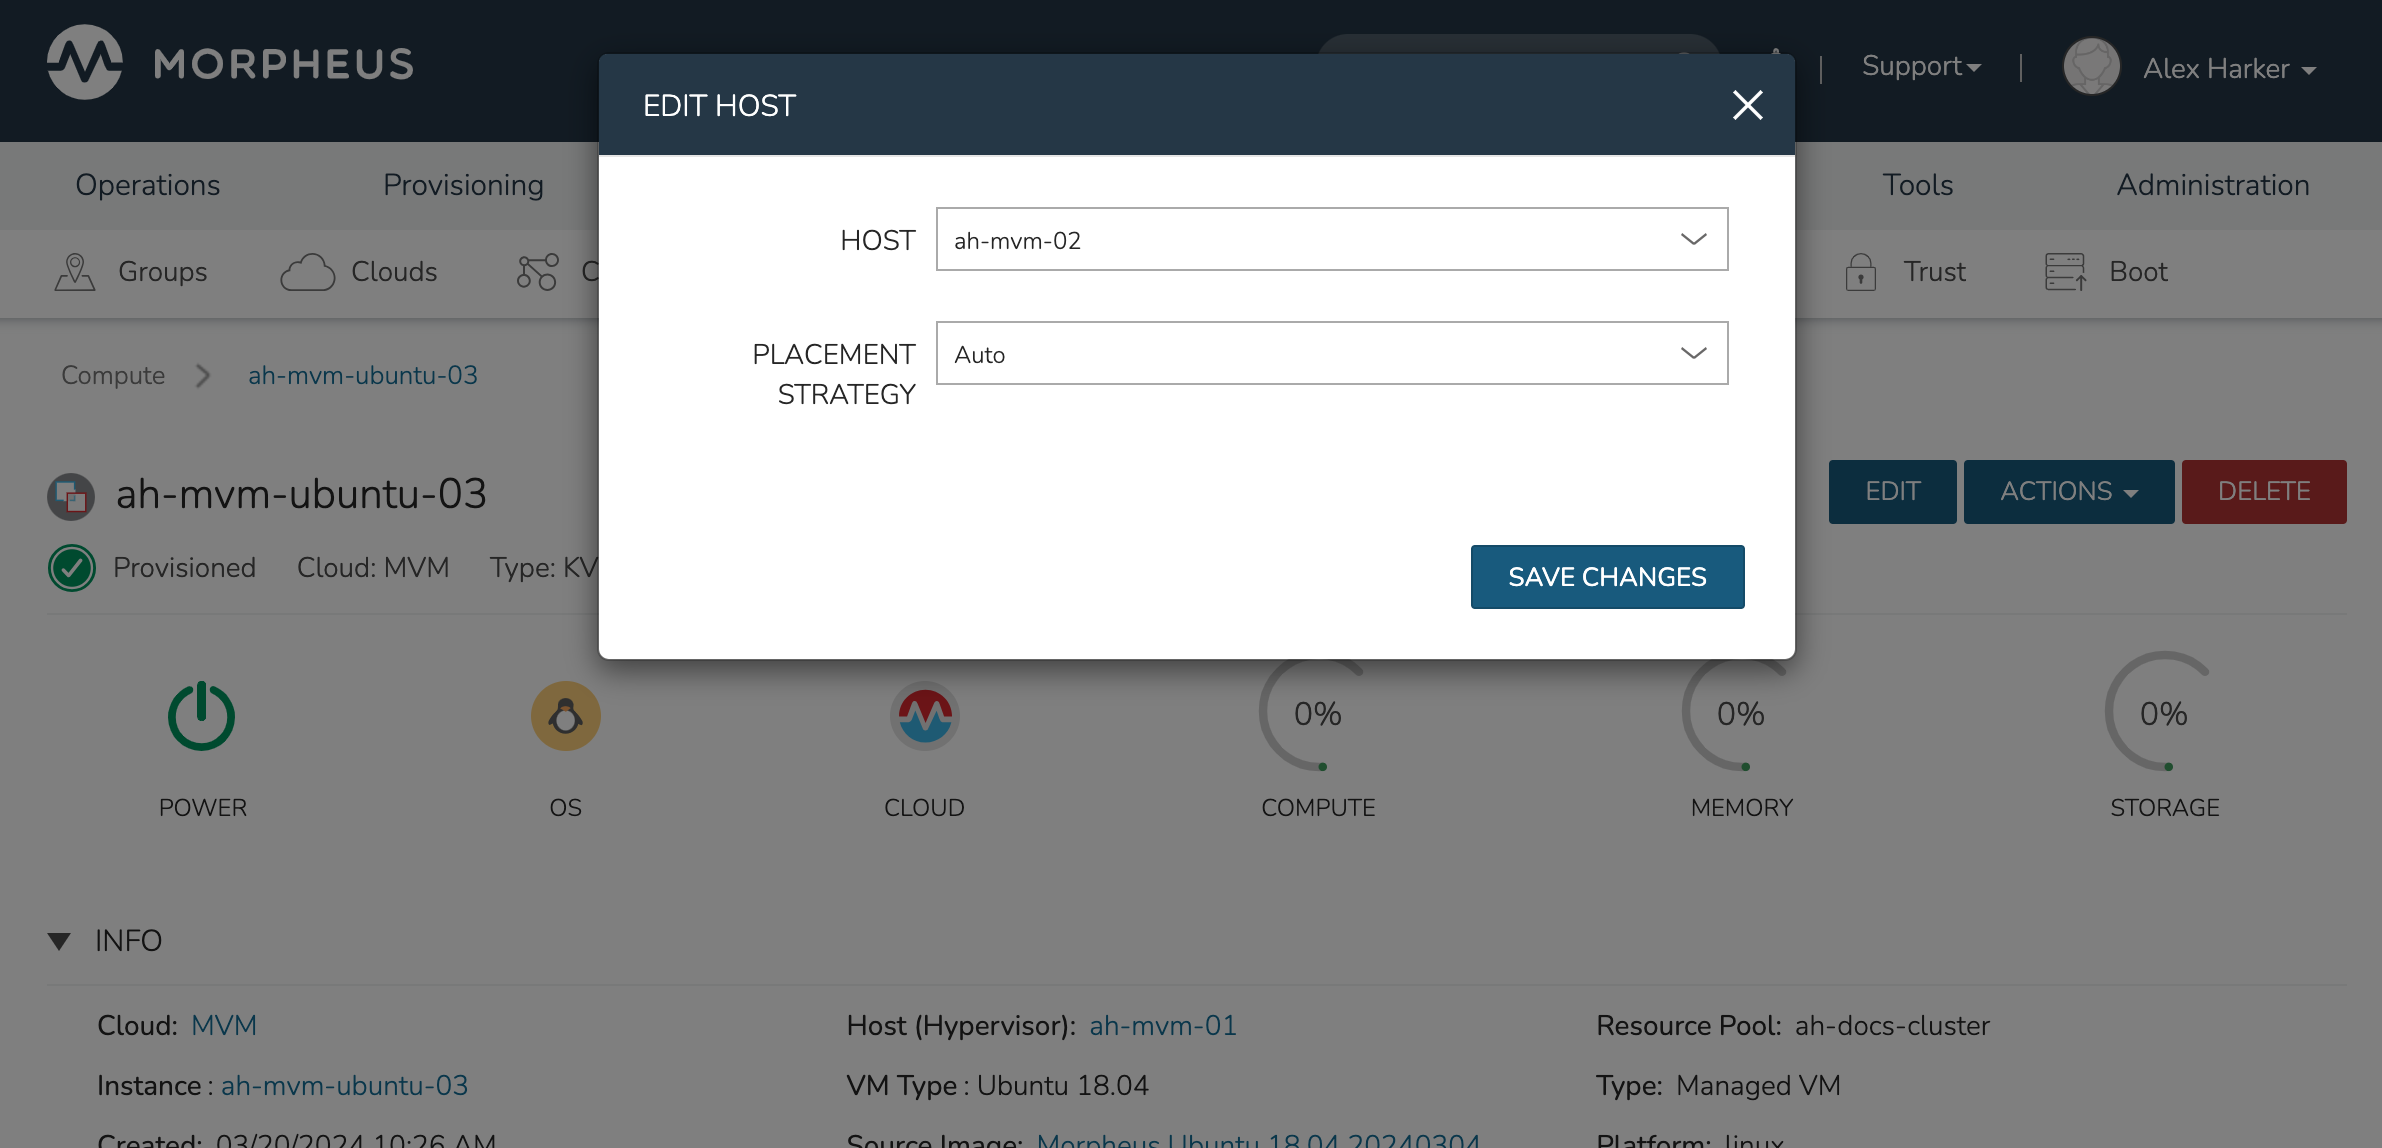
Within a short time, the workload is moved to the new host.
Adding hosts
The process of adding hosts to a pre-existing cluster is very similar to the process of provisioning the cluster initially. The requirements for the new worker node will be identical to the nodes initially added when the cluster was first provisioned. See the earlier sections in this guide for additional details on configuring the worker nodes.
Too add the host, begin from the MVM Cluster detail page (selected from the list at Infrastructure > Clusters). From the Cluster detail page, click ACTIONS and select “Add Worker”. Configurations required are the same as those given when the cluster was first created. Refer to the section above on “Provisioning the Cluster” for a detailed description of each configuration.
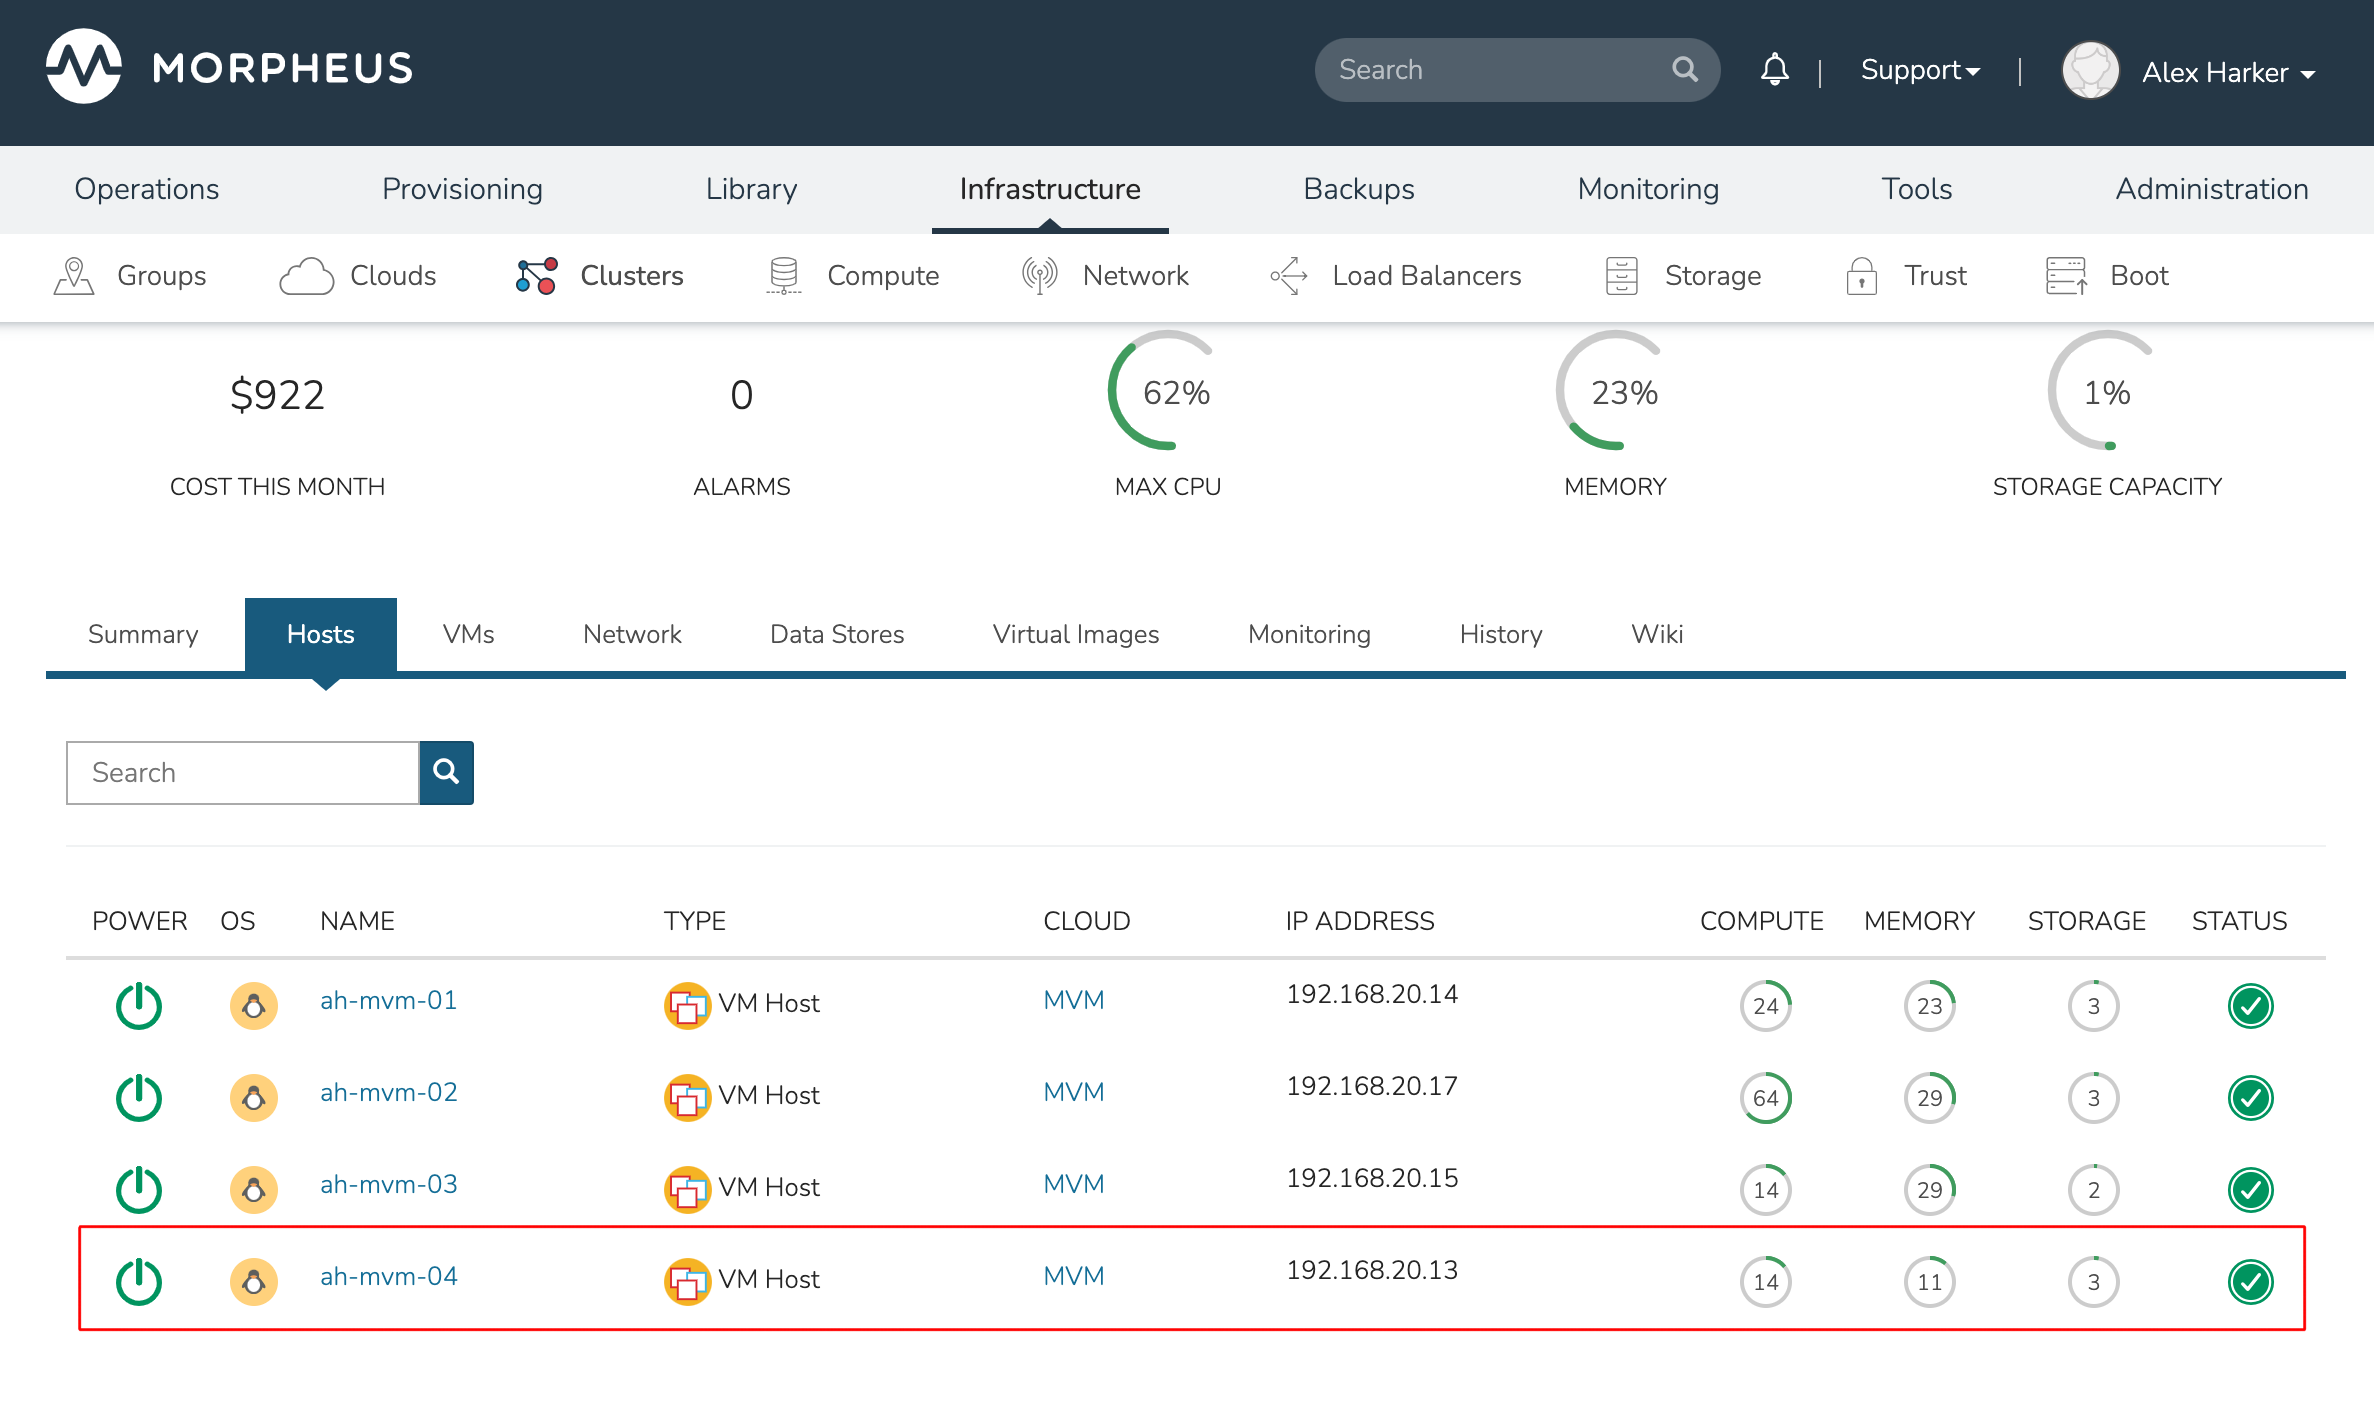
Once Morpheus has completed its configuration scripts and joined the new worker node to the cluster, it will appear in a ready state within the Hosts tab of the Cluster detail page. When provisioning workloads to this Cluster in the future, the new node will be selectable as a target host for new Instances. It will also be an available target for managing placement of existing VMs running on the cluster.
Note
It’s useful to confirm all scripts related to creating the new host and joining the new host to the cluster completed successfully. To confirm, navigate to the detail page for the new host (Infrastructure > Clusters > Selected Cluster > Hosts Tab > Selected Host) and click on the History tab. Confirm all scripts, even those run on the pre-existing hosts, completed successfully as it’s possible the new host was added successfully (green status) but failed in joining the cluster. When such a situation occurs it may appear adding the new host was successful though it will not be possible to provision workloads onto it due to not joining the cluster successfully.
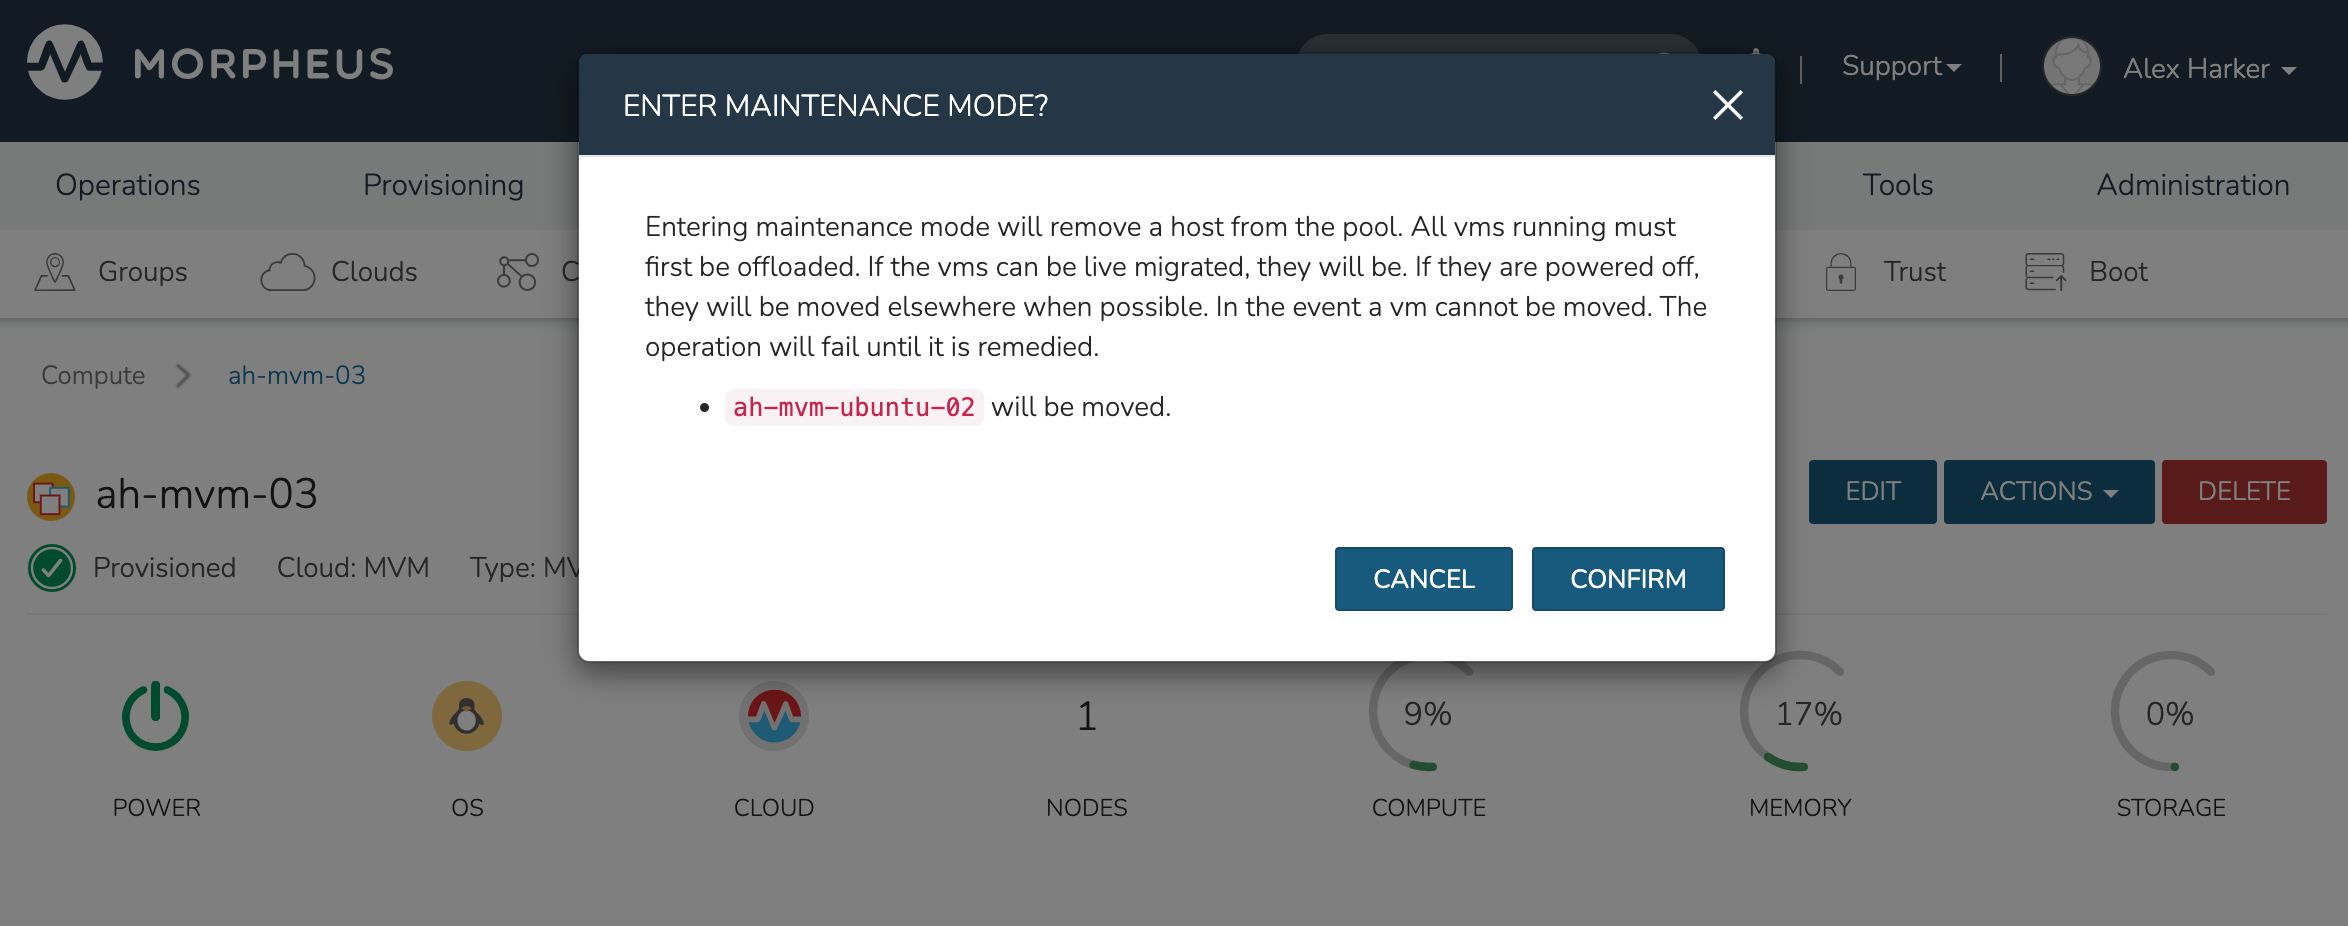
Maintenance Mode
MVM cluster hosts can be easily taken out of service for maintenance when needed. From the host detail page, click ACTIONS and then click “Enter Maintenance.” When entering maintenance mode, the host will be removed from the pool. Live VMs that can be migrated will be moved to new hosts. VMs that are powered off will also be moved when possible. When a live VM cannot be moved (such as if it’s “pinned” to the host), the host will not go into maintenance mode until that situation is cleared. You could manually move a VM to a new host or you could power it down if it’s non-essential. After taking that action, attempt to put the host into maintenance mode once again. Morpheus UI provides a helpful dialog which shows you which VMs live on the host are to be moved as the host goes into maintenance mode. When maintenance has finished, go back to the ACTIONS menu and select “Leave Maintenance.”
Failover
MVM supports automatic failover of running workloads in the event of the loss of a host. Administrators can control the failover behavior through the “Manage Placement” action on any running VM. From the VM detail page, click ACTIONS and select “Manage Placement”. Any VM with a placement strategy of “Auto” or “Failover” will be eligible for an automatic move in the event its host is lost. When the loss of a host does occur, the workload will be up and running from a different cluster host within just a short time if it’s configured to be moved during an automatic failover event. Any VMs pinned to a lost host will not be moved and will not be accessible if the host is lost. When the host is restored, those VMs will be in a stopped state and may be restarted if needed.
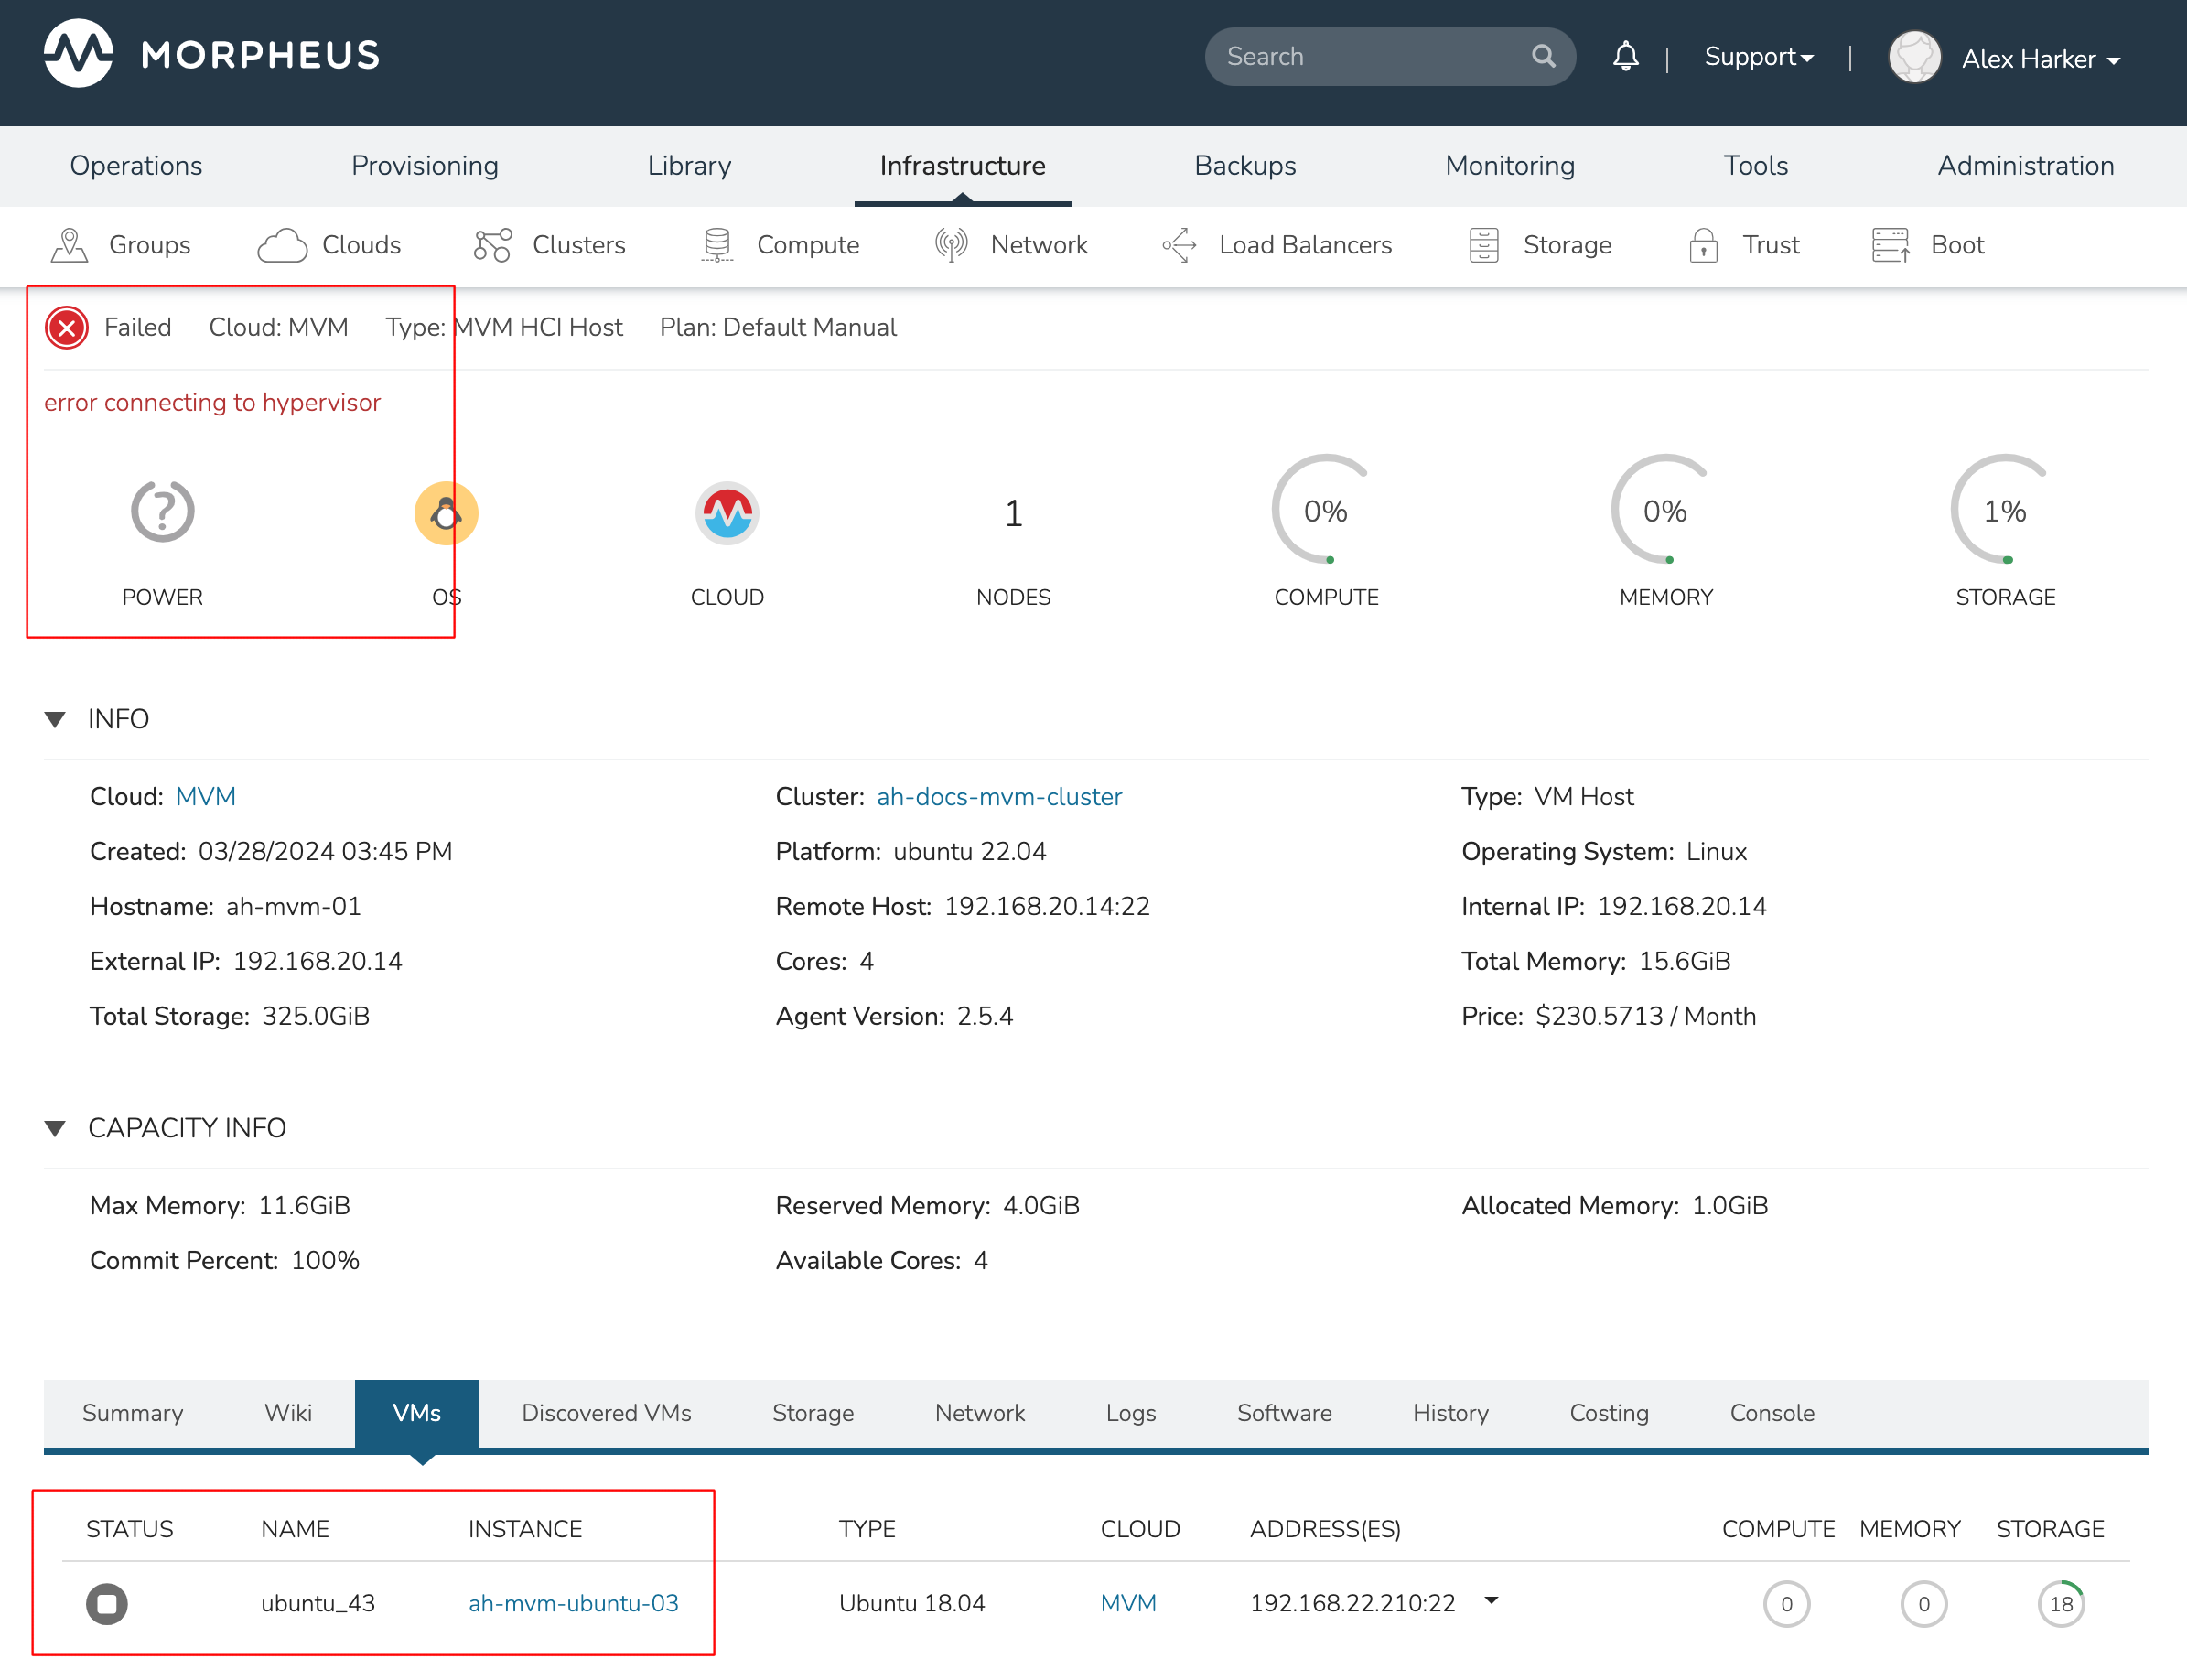
This three-node cluster has three VMs running on the first host:
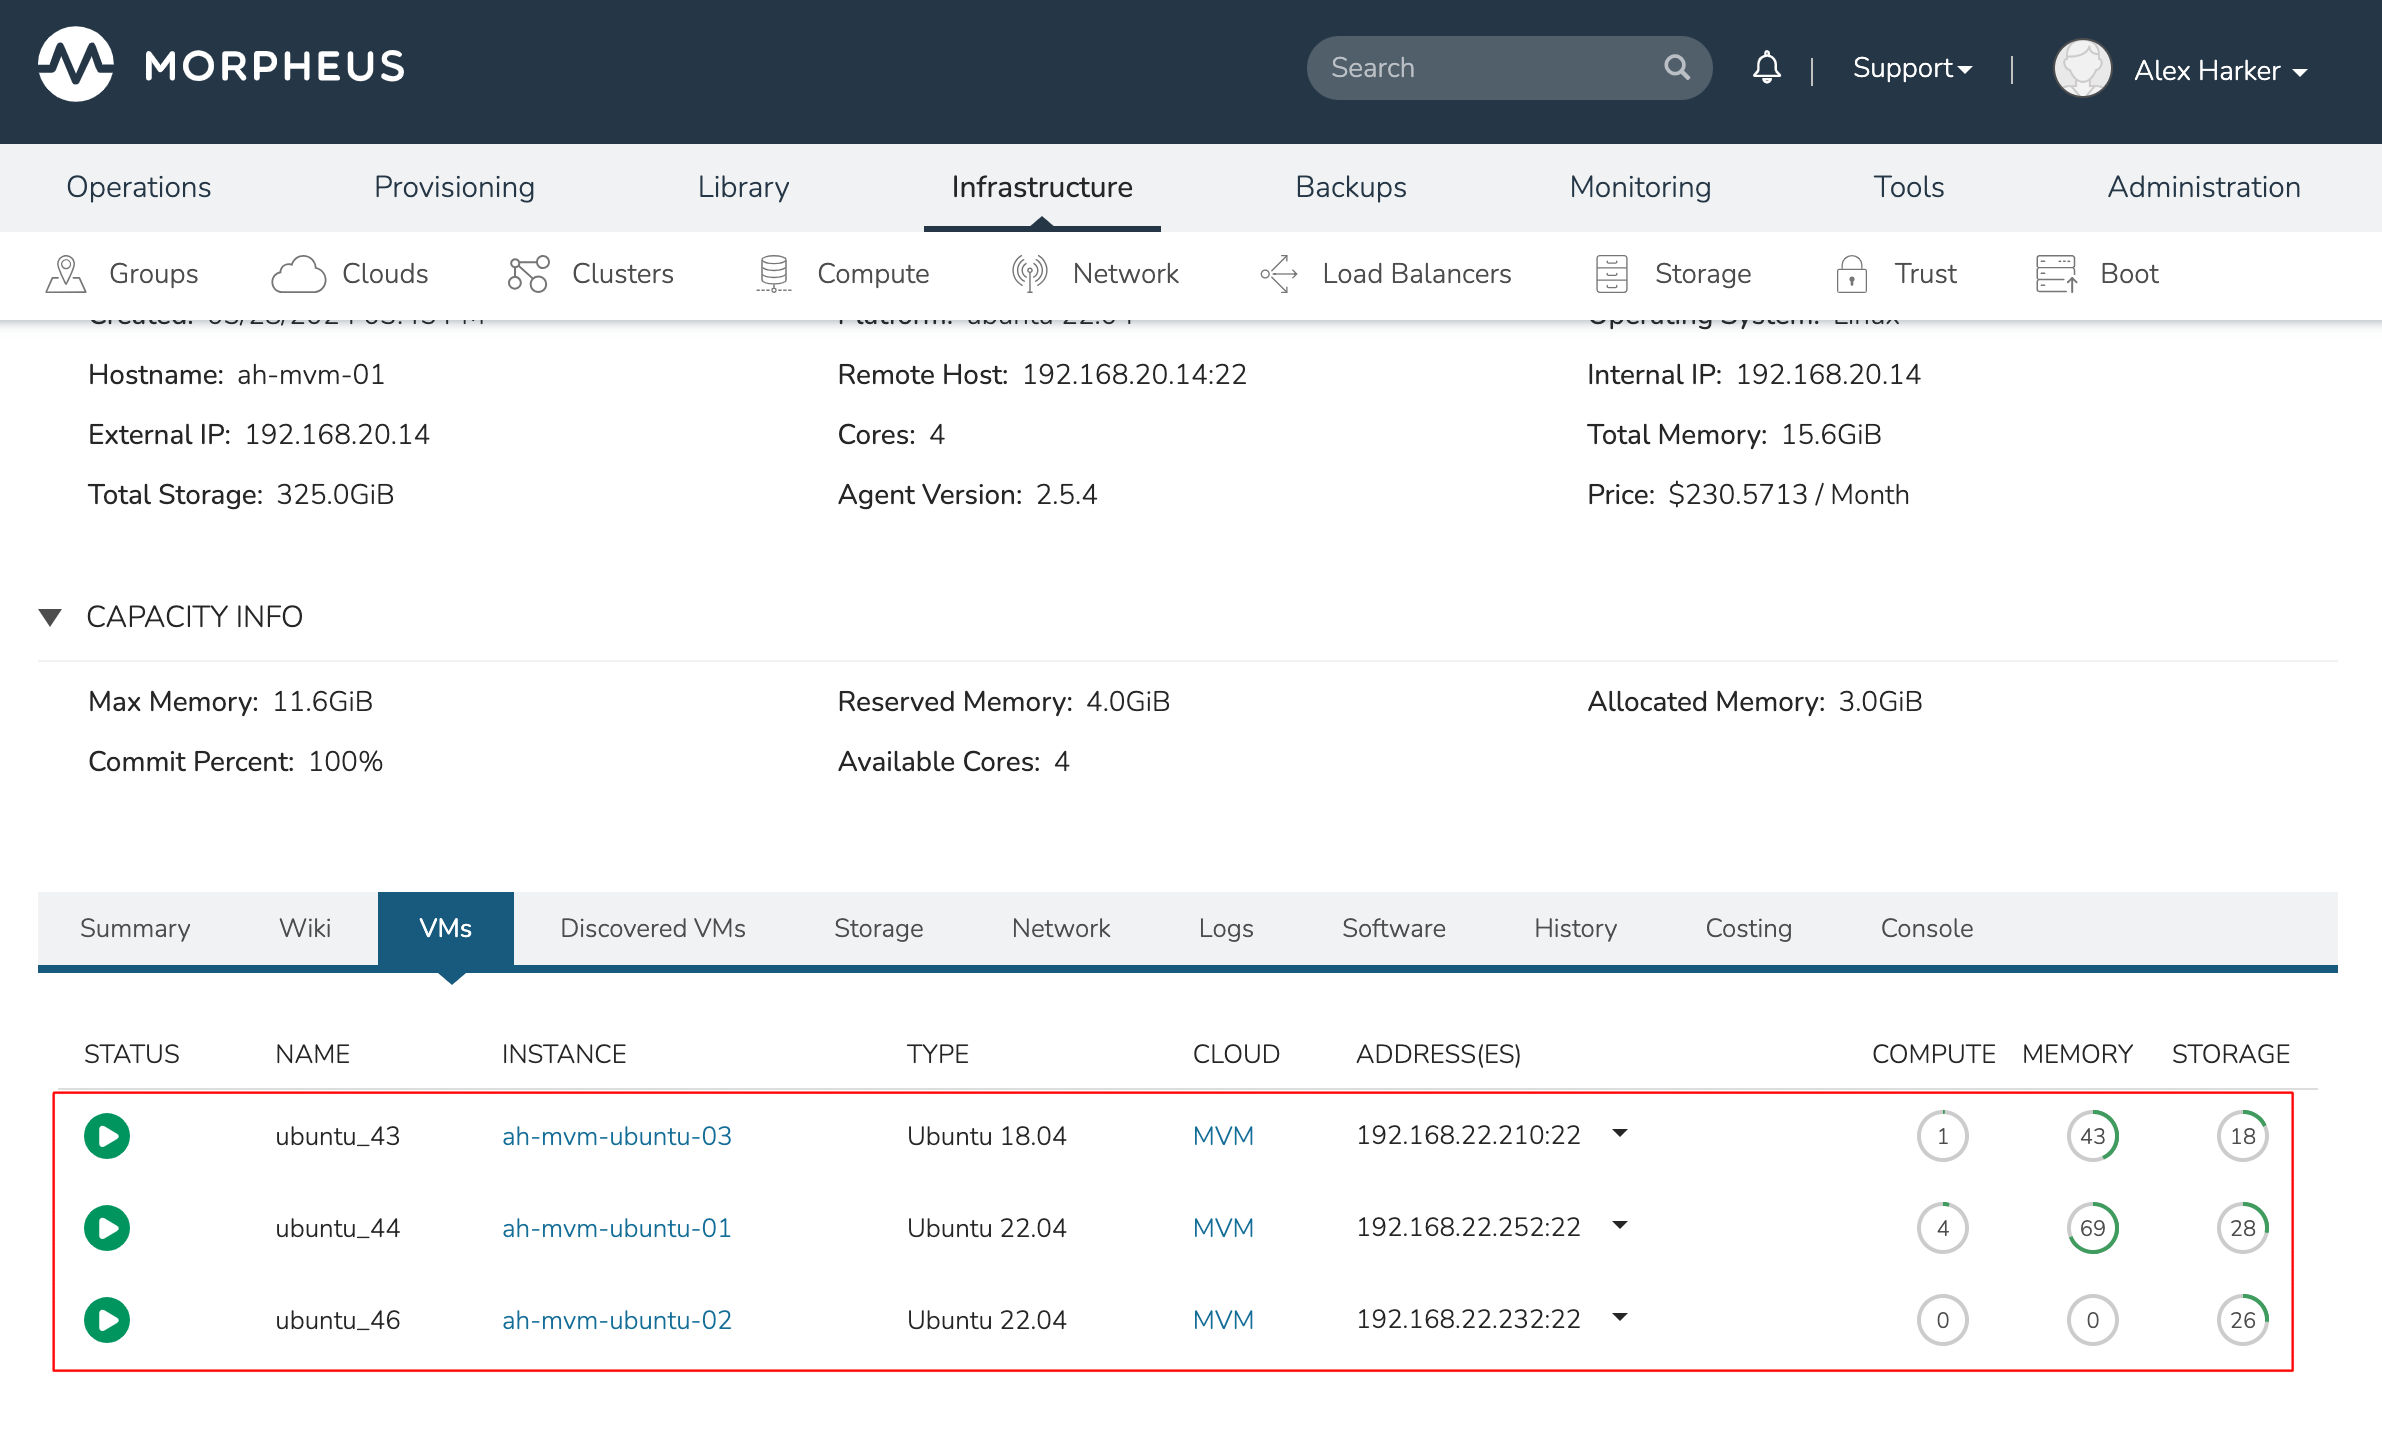
Each of these VMs is configured for a different failover strategy. When the host is lost, we should expect to see the first two VMs moved to an available host (since they have the “Auto” and “Failover” placement strategies, respectively). We should not see the third VM moved.

After loss of the host these three VMs were running on, we can see the lost host still has one associated VM in a stopped state. The other two VMs are running on a second host which is still available.
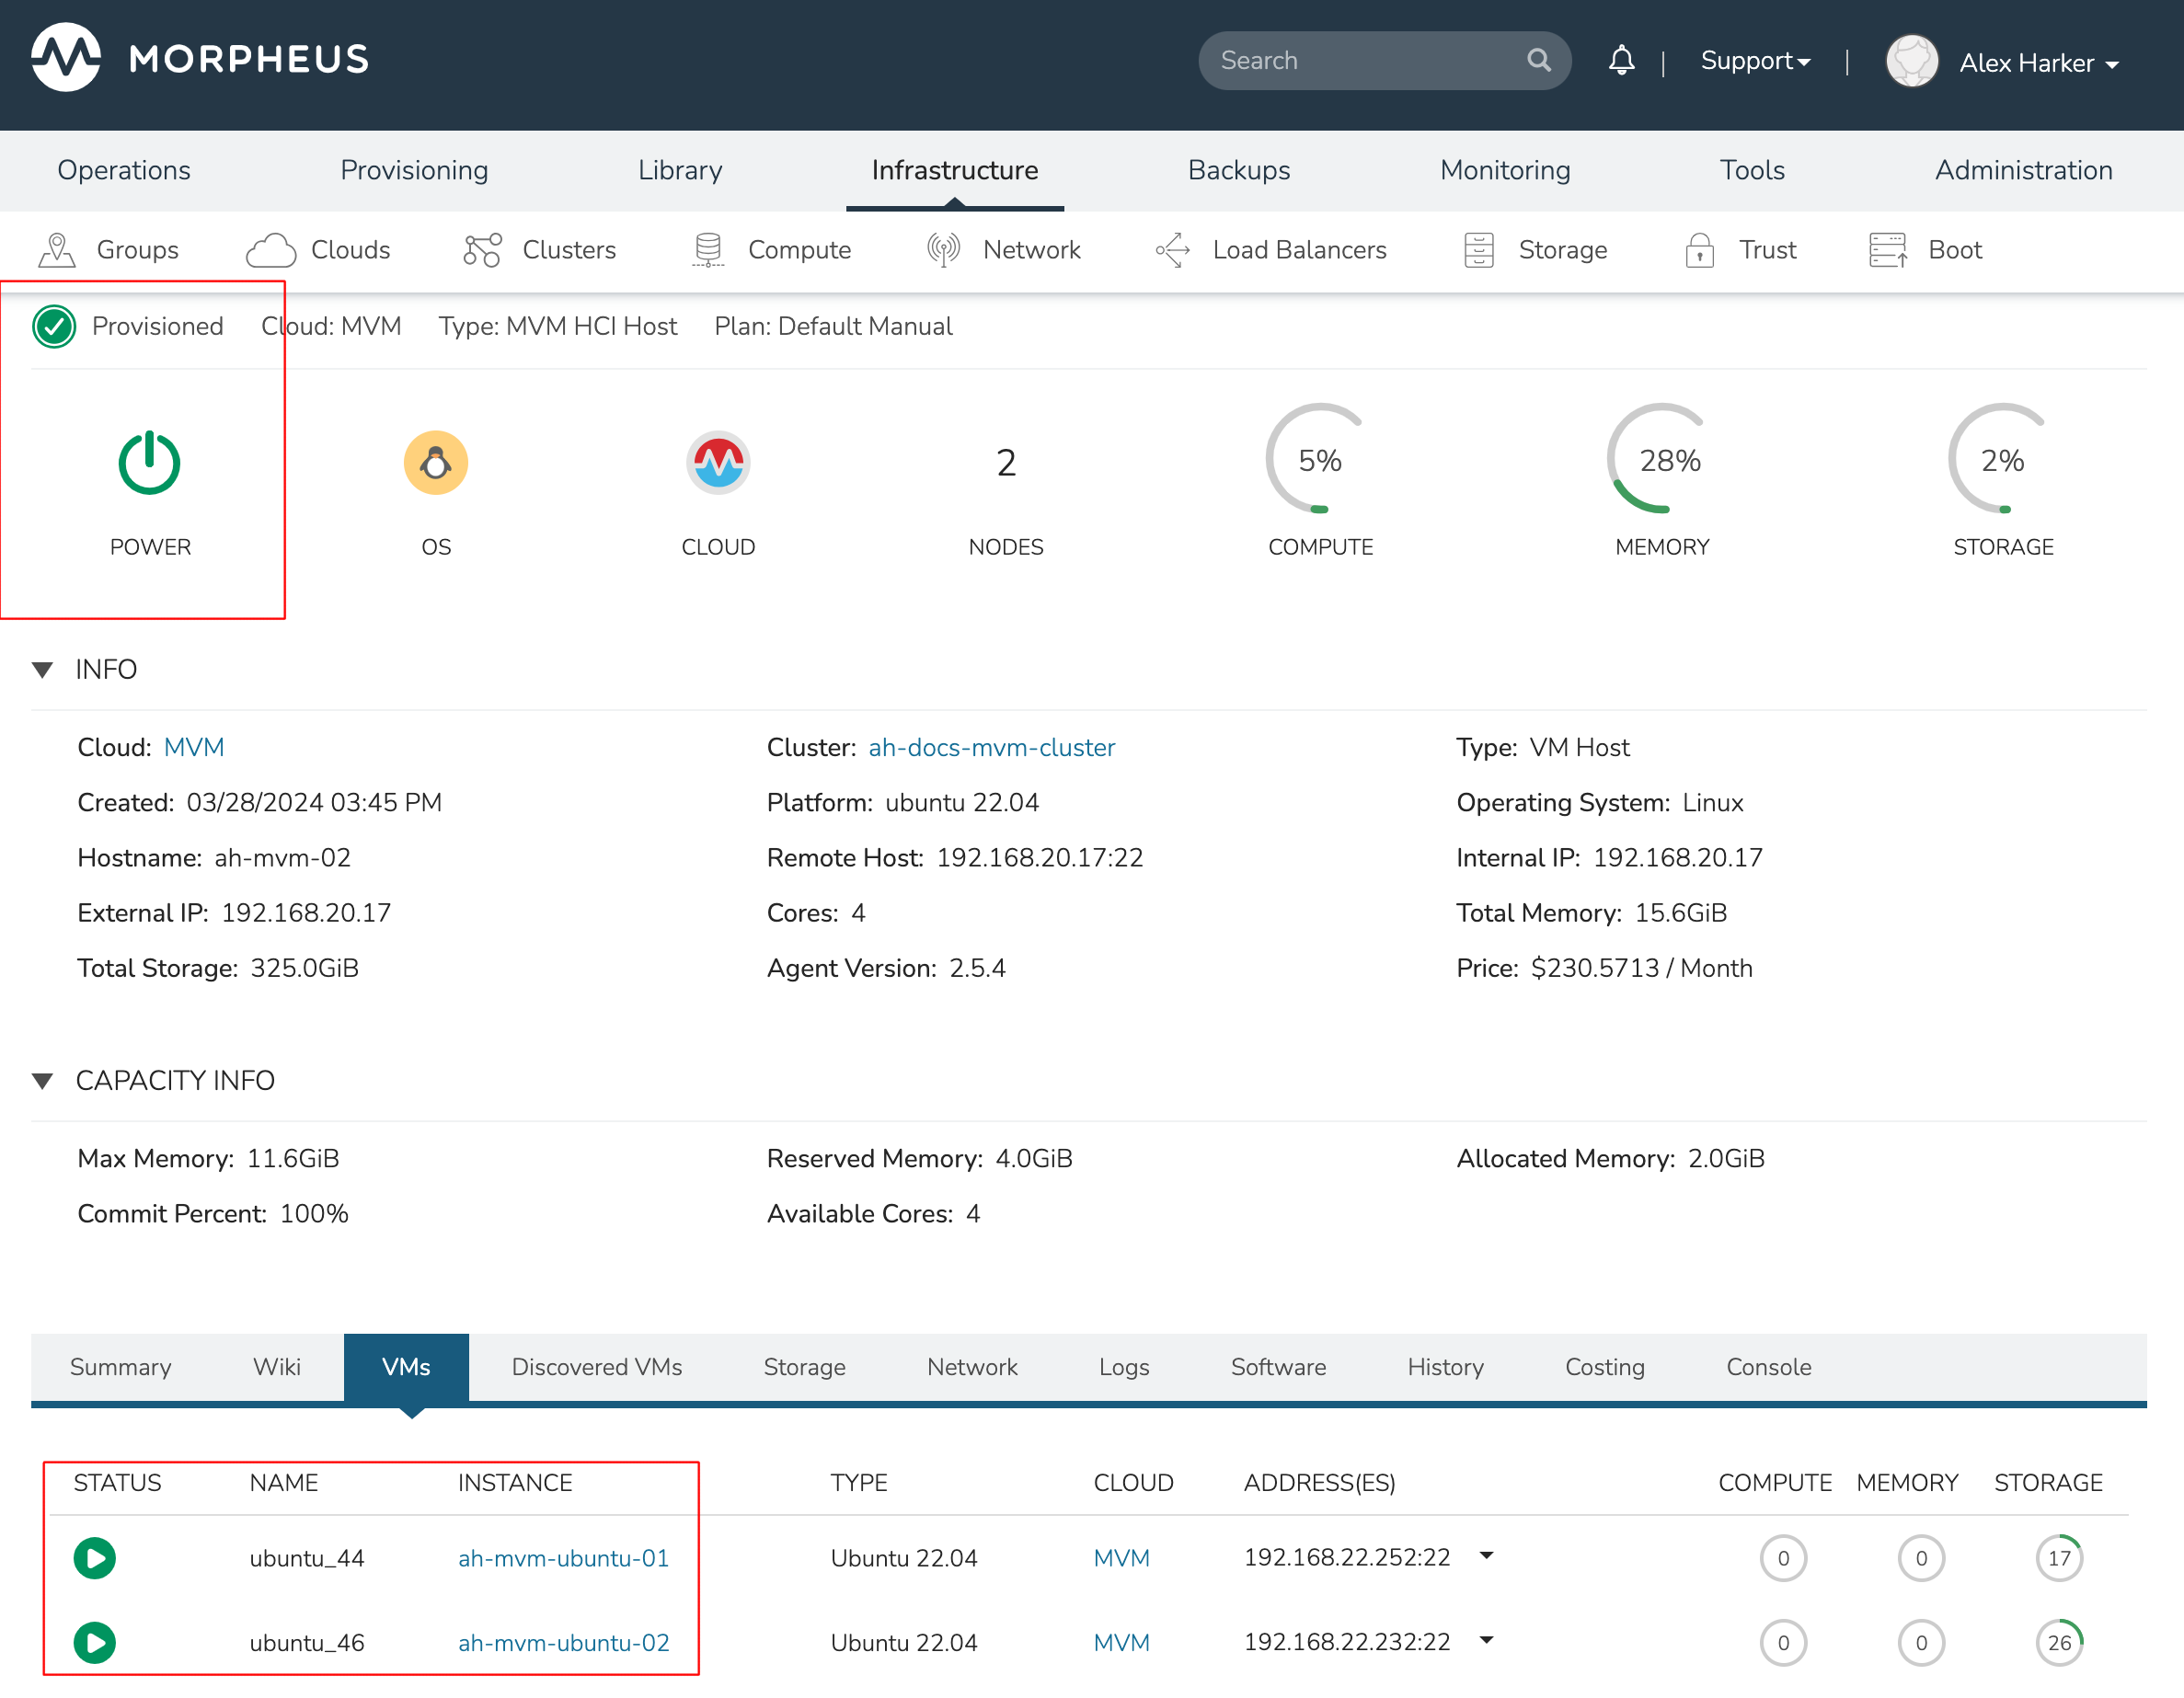
When the lost host returns, the moved VMs will come back to their original host. The third VM is associated with this host as well and is in a stopped state until it is manually restarted.
Decommissioning a CEPH-backed Host
Morpheus MVM clusters utilize global pools and for that reason, we need to remove the object storage daemon (OSD) from each host manually prior to decommissioning the host and removing it from the cluster.
First, put the host into maintenance mode and allow time for any running VMs to be migrated to other hosts. See the section above, if needed, for additional details on maintenance mode.
Outing the OSDs
Begin by checking the cluster health. If the cluster is not in a healthy state, an OSD should not be removed:
ceph -s
You should see something similar to the following:
$ ceph -s
  cluster:
    id:       bxxxx-bxxxxx-4xxx...
    health:   HEALTH_OK
Important
Do not remove an OSD if the cluster health does not return HEALTH_OK.
Get the OSD IDs. The following command will return a map of OSDs and their ID values:
ceph osd df tree
We’re now ready to out the OSD, do so with the following command:
ceph osd out osd.<osd-id>
Wait for the cluster to rebalance. Do not remove any additional OSDs until the cluster has rebalanced. As above, you can use ceph -s to check cluster status. Wait until something like this:
data:
  volumes: 1/1 healthy
  pools:   5 pools, 593 pgs
  objects: 6.69k objects, 19 GiB
  usage:   48 GiB used, 2.9 TiB / 2.9 TiB avail
  pgs:     677/20079 objects degraded (3.372%)
           1115/20079 objects misplaced (5.553%)
           567 active+clean
           13  active+recovery_wait+degraded
           6   active+remapped+backfill_wait
           6   active+recovery_wait+undersized+degraded+remapped
           1   active+recovering+undersized+degraded+remapped
…becomes something like this:
data:
  volumes: 1/1 healthy
  pools:   5 pools, 593 pgs
  objects: 6.69k objects, 19 GiB
  usage:   53 GiB used, 2.9 TiB / 2.9 TiB avail
  pgs:     593 active+clean
This process must be completed for each OSD that is to be removed. Once again, wait for the cluster to rebalance between each OSD removal.
Stopping OSD service
We can now stop and remove the OSD service for each OSD that should be removed. Stop the OSD service:
systemctl stop ceph-osd@<osd-id>.service
Remove the OSD service:
systemctl disable ceph-osd@<osd-id>.service
Removing OSDs from the CRUSH map
Remove the OSDs from the CRUSH map:
ceph osd crush remove ods.<osd-id>
This must be repeated for each OSD that should be removed. Next, validate the removal:
ceph osd crush tree
At this point once again, wait for the cluster rebalance to complete. Run ceph -s and look for a healthy state similar to the following:
data:
  volumes: 1/1 healthy
  pools:   5 pools, 593 pgs
  objects: 6.69k objects, 19 GiB
  usage:   53 GiB used, 2.9 TiB / 2.9 TiB avail
  pgs:     593 active+clean
Remove the Ceph Monitor (ceph-mon) service
First find the service:
systemctl --type=service --state=running | grep ceph-mon
The service should look something like: ceph-mon@<hostname provided at cluster provision time>.service
Stop the service:
systemctl stop ceph-mon@<hostname>.service
Remove the monitor by its ID. The ID is the part between “ceph-mon@” and “.service”. Generally, this is the hostname.
ceph mon remove <hostname>
Remove the hostname from CRUSH
ceph osd crush rm <hostname>
Check the cluster health once again to confirm the cluster is in a healthy state:
ceph -s
Final Steps
Cleanup the OSD auth. Repeat this step for each OSD that must be removed.
ceph auth del osd.<osd-id>
Validate the removal:
ceph auth list
Remove the last of the data and repeat this step for each OSD that should be removed:
ceph osd rm <osd-id>
Important
Note that the above command does not prepend “osd.” before the OSD ID.
At this point you can now delete the host cluster from Morpheus.