vRealize Orchestrator
The vRealize Orchestrator (vRO) Integration provided for Morpheus enables users to easily trigger existing workflows that may already exist in vRealize Orchestrator. Not only can the user trigger these workflows, but they can also be chained easily into non-vRO workflows and process both output and input parameters of a workflow.
Adding the Integration
Setting up the vRO integration involves some steps which vary depending on the authentication model being used.
- NAME
Name of the integration
- API URL
Typically, the API URL is run on port 8283. A sample API URL may look like the following example:
https://vrahost.com:8283/- AUTH TYPE
Chosen based on the authentication provider configured on vRO
- CREDENTIALS
Choose
Local Credentialsto enter credentials for this integration or choose to create/use an existing credentials- USERNAME
Username that will be configured on the integration that can authenticate with vRO
- PASSWORD
Password that will be configured on the integration for the username that can authentication with vRO
- Tenant Token
The domain or tenant ID, for example:
vsphere.local, with a username ofadministrator@vsphere.localNote
At times, this can vary depending on how authentication and role assignments for the user have been set up for vRO.
- CLIENT ID
The ID used and obtained from the vRO server, typically used when using
OAuth 2.0Auth Type
Basic Auth Type
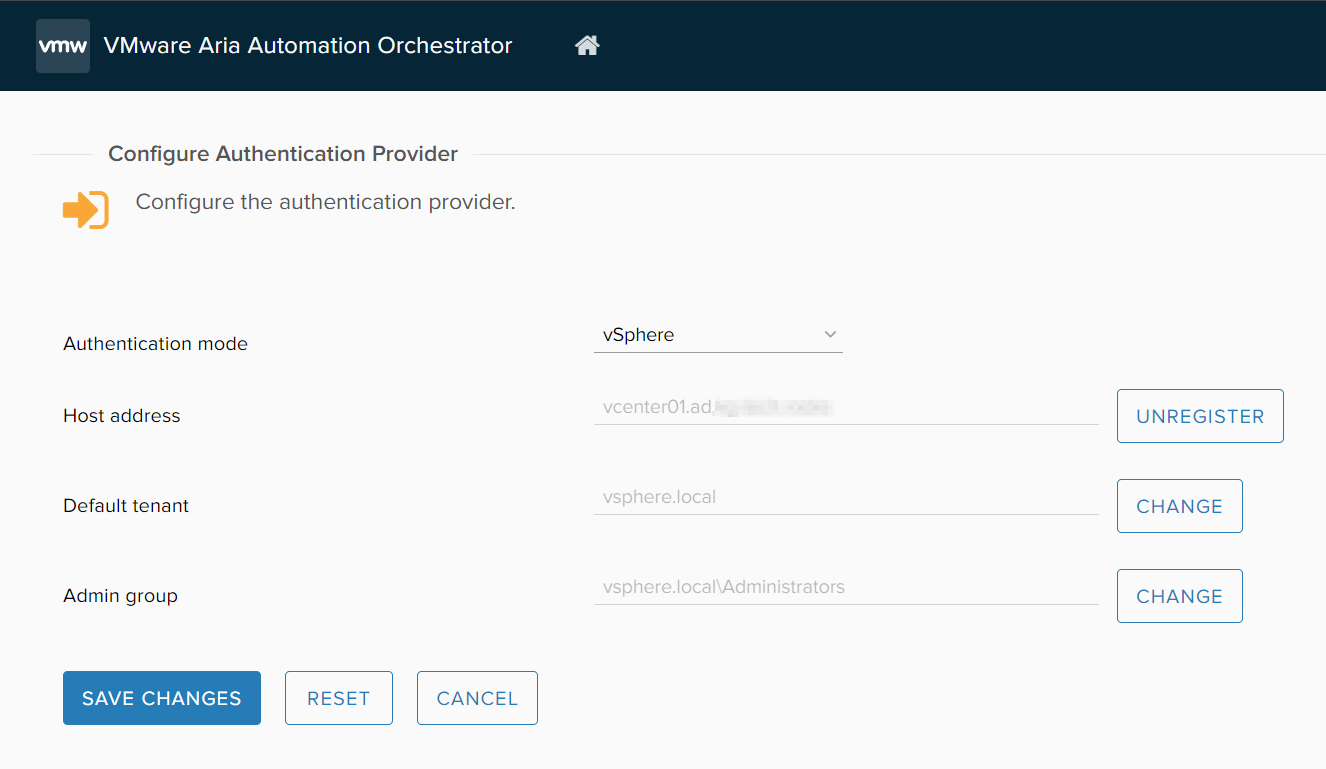
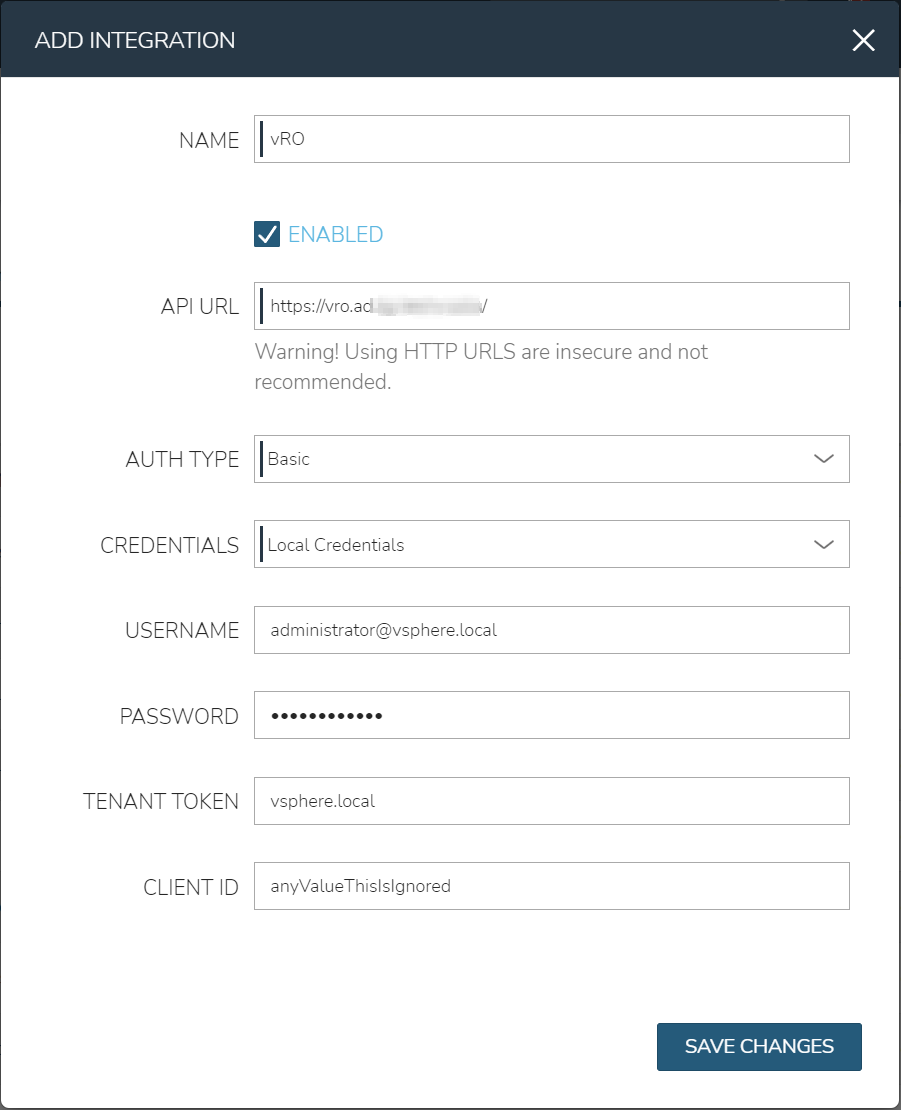
The Basic Auth Type should be used when configuring the Morpheus integration to a vRO instance configured with the vSphere Authentication Provider. When vRO is configured with this provider, users login to vRO using their vSphere/vCenter credentials, which Morpheus will use the same.
Note
The CLIENT ID field can contain any value. It will be unused with the Basic Auth Type
Example of a configured vSphere Authentication Provider from the vRO Control Center:

Example of a configured Basic Auth Type in the Morpheus integration:

OAuth 2.0 Auth Type
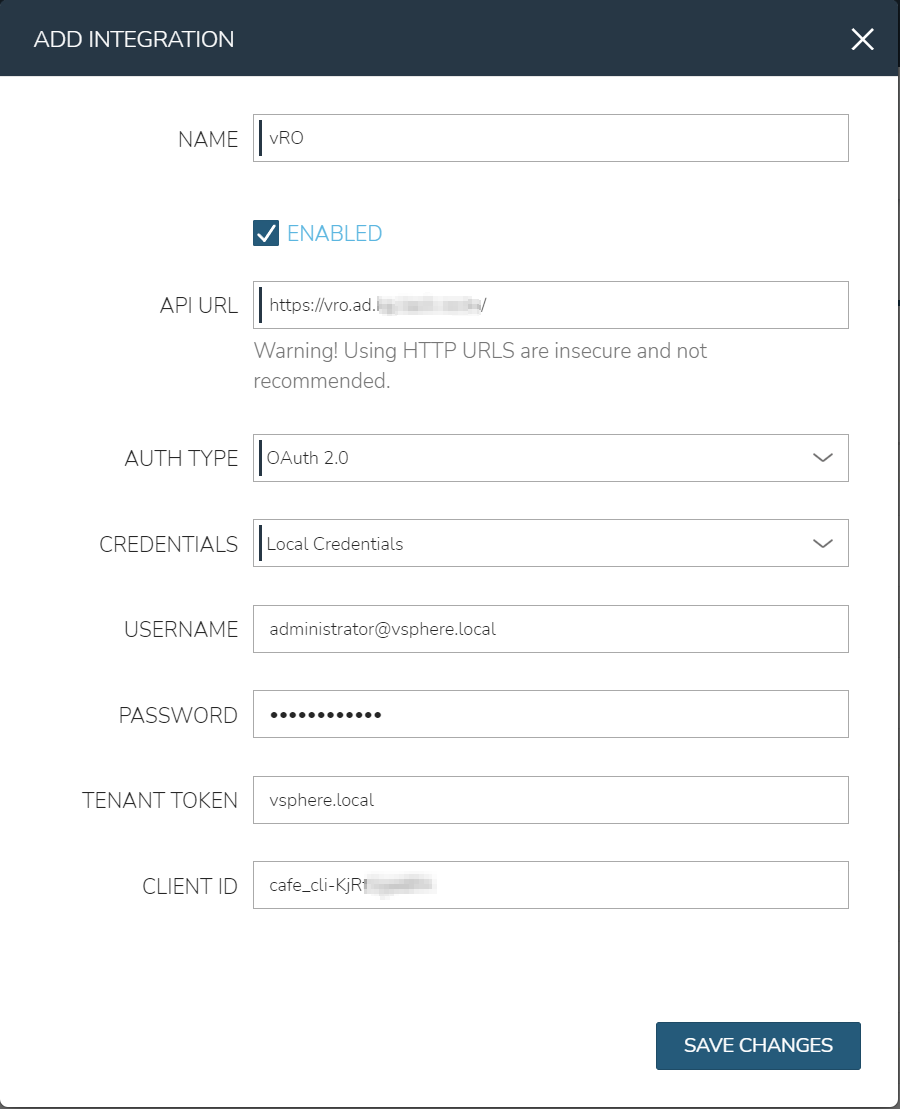
The OAuth 2.0 Auth Type should be used when configuring the Morpheus integration to a vRO instance configured with the VIDM option or other OAuth provider.
When using OAuth 2.0, the Client ID must be gathered first. This can be found by browsing a file on the actual VRA server using SSH. On the vRA server, run the following command: grep -i cafe_cli= /etc/vcac/solution-users.properties | sed -e 's/cafe_cli=//'
Be sure to fill in the tenant token as the domain or tenant ID, for example: vsphere.local, with a username of administrator@vsphere.local.
Example of a configured OAuth 2.0 Auth Type in the Morpheus integration:

vRA Auth Type
The vRA Auth Type should be used when the vRA identity provider is configured for your vRO. The vRA Auth Type and OAuth Auth Type fields requirements are the same, execept when using vRA Auth Type the Client ID is no longer needed.
Using vRealize Orchestrator
One of the first things Morpheus does when it is tied into a vRO integration is sync all available workflows by category. These workflows become available when creating a new Morpheus task in Library > Automation. Morpheus allows a user to map these vRO workflows into the task engine. The task engine allows users to design workflows that chain tasks in order or operate at different phases of a provisioning request. For more information on tasks, please read the Automation documentation.
Creating a task for vRO is simple.
First, go to Library > Automation and create a new task. Enter a Name and a Code, the Code can be used later to reference the results of tasks. Choose a task type of vRealize Orchestrator Workflow. A dropdown will appear allowing one to first select the active vRO Integration you would like to use. Once that is selected, a list of workflows becomes available.
Note
The next part is where things can get a bit tricky. The parameter body (expected in JSON) format can be a bit difficult to track down. One way is to use the Network Chrome inspector when kicking off a sample workflow from the vRO HTML5 client and grabbing the parameter JSON. Another is to query the API yourself and look at the samples from historical run history.
An example payload for the SSH / Run SSH Command Workflow would look like this:
{
    "parameters": [
        {
            "name": "hostNameOrIP",
            "type": "string",
            "value": {
                "string": {
                    "value": "x.x.x.x"
                }
            }
        },
        {
            "name": "port",
            "type": "number",
            "value": {
                "number": {
                    "value": 22
                }
            }
        },
        {
            "name": "cmd",
            "type": "string",
            "value": {
                "string": {
                    "value": "echo \"Hello <%=instance.name%>\""
                }
            }
        },
        {
            "name": "encoding",
            "type": "string",
            "value": {
                "string": {
                    "value": ""
                }
            }
        },
        {
            "name": "username",
            "type": "string",
            "value": {
                "string": {
                    "value": "myuser"
                }
            }
        },
        {
            "name": "passwordAuthentication",
            "type": "boolean",
            "value": {
                "boolean": {
                    "value": true
                }
            }
        },
        {
            "name": "password",
            "type": "string",
            "value": {
                "string": {
                    "value": "password"
                }
            }
        },
        {
            "name": "path",
            "type": "string",
            "value": {
                "string": {
                    "value": "\/var\/lib\/vco\/app-server\/conf\/vco_key"
                }
            }
        },
        {
            "name": "passphrase",
            "type": "string",
            "value": {
                "string": {
                    "value": ""
                }
            }
        }
    ]
}
Note that all Morpheus variables can be injected into the parameter body. In the above example we inject the instance name into the sample command with <%=instance.name%> but other values can be used, such as <%= server.sshHost %> for the hostname and <%= server.sshPort %> for the port. Additional variable examples can be found here: Variables
Adding this task to a workflow allows the result parameters to be referenced in subsequent tasks called throughout the workflow. For example, a local script task type could reference the output text of the above ssh command by injecting the following results map: echo "results.vro: <%=results.vro.find{it.name == 'outputText'}?.value?.string?.value%>" With this example, vro refers back to the “Code” of the vRO task that would contain the ouput we wish to referece.
More information on Task Results can be found here: Task Results
Additional output/map examples referencing a previous task with the “Code” of vrossh:
Print all output:
echo '<%=results.vrossh.encodeAsJson().toString() %>'Print the
outputTextvariable/output:echo "results.vrossh.outputText: <%=results.vrossh.find{it.name == 'outputText'}?.value?.string?.value%>"Print the
errorTextvariable/output:echo "results.vrossh.errorText: <%=results.vrossh.find{it.name == 'errorText'}?.value?.string?.value%>"Print the
resultvariable/output, returned as a string:echo "results.vrossh.result: <%=results.vrossh.find{it.name == 'result'}?.value?.string?.value%>"Print the
exitcodevariable/output, returned as a number:echo "results.vrossh.exitcode: <%=results.vrossh.find{it.name == 'exitcode'}?.value?.number?.value%>"
There are very powerful options available for chaining results and injecting variables relevant to the instance being provisioned or even custom inputs from an operational workflow. Please reference the rest of the Automation documentation for examples.