Azure (Public)
Overview
Morpheus offers a complete Integration with Microsoft Azure including the following:
Virtual Machine Sync, Create, Delete, Manage, RBAC, Tenant Permissions, Policies
Resource Group Sync, Create, Delete, RBAC, Tenant Permissions
Network Sync, Create, Delete, RBAC, Tenant Permissions
Subnet Sync, Create, Delete, RBAC, Tenant Permissions
Security Group Sync, Create, Delete, Tenant Permissions
Security Group Rule Sync, Create, Delete, Tenant Permissions
ARM Blueprints, Spec Templates, Deployment Logs Sync, Git/GitHub Integration
MSSQL Service Sync, Create, Delete, Manage, RBAC, Tenant Permissions
AKS Sync, Sync, Create, Delete, Manage, RBAC, Tenant Permissions
Backup Create, Delete, Manage, RBAC, Policies
Storage Sync, Create, Delete, Manage, Browse, RBAC, Tenant Permissions, Policies
Marketplace Sync
Private Image Sync & Upload
Azure Marketplace Custom Library Item Support
Remote Console (SSH & RDP)
Lifecycle Management
Availability Set Support
Scale Set Sync, Create, Assign, Manage, Delete
Azure Load Balancer Create, Assign, Manage, Delete, RBAC, Tenant Permissions
Docker (VM) Cluster Sync, Create, Delete, Manage, RBAC, Tenant Permissions
Kubernetes (VM) Cluster Sync, Create, Delete, Manage, RBAC, Tenant Permissions
Service Plan Sync, Tenant Permissions, RBAC
Pricing Sync RBAC, Tenant Permissions, Markup
Costing Sync, Reporting, Invoicing
Reservations Sync, Guidance Recommendations
Azure Stack Support
Tag Bi-Directional Sync, Creation, Deletion Policy Enforcement
Cost Estimator
Azure US Gov Support
Azure China Support
Azure Germany Support
CSP Account Support
Requirements
Morpheus Azure Integration requires Owner or Contributor access to subscription via App Registration. Adding an Azure Cloud or Clouds to Morpheus will require the following:
Azure Subscription ID
Directory (tenant) ID
Application (client) ID
Application (client) Secret
Application (client) must be Owner or Contributor of Subscription
CSP Accounts require the additional following input:
CSP Directory (tenant) ID
CSP Application (client) ID
CSP Application (client) SECRET (Web App Key)
The Morpheus appliance requires outbound HTTPS (443) access to the Azure endpoints. Depending on the type of cloud you choose when adding Azure, ensure the proper endpoints are allowed:
- Global Azure Cloud
https://management.core.windows.net (ServiceManagementUrl)
https://management.azure.com (ResourceManagerUrl)
https://login.microsoftonline.com (ActiveDirectoryAuthority)
- US Gov Cloud
https://management.core.usgovcloudapi.net (ServiceManagementUrl)
https://management.usgovcloudapi.net (ResourceManagerUrl)
https://login.microsoftonline.us (ActiveDirectoryAuthority)
- Germany Cloud
https://management.core.cloudapi.de (ServiceManagementUrl)
https://management.microsoftazure.de (ResourceManagerUrl)
https://login.microsoftonline.de (ActiveDirectoryAuthority)
- China Cloud
https://management.core.chinacloudapi.cn (ServiceManagementUrl)
https://management.chinacloudapi.cn (ResourceManagerUrl)
https://login.chinacloudapi.cn (ActiveDirectoryAuthority)
Credentials & Permissions
Morpheus authenticates with Azure via an App Registration with an Owner or Contributor Role on a Subscription. Use the steps below to create and collect the required credentials and assign the required permissions to integrate Azure with Morpheus.
Warning
Using an App Registration (service principal) that has selective resource permissions and is not an Owner or Contributor of the Subscription is not supported and will cause failures/issues. Please confirm the App Registration you use to integrate Azure with Morpheus has Owner or Contributor permissions on the specified Subscription before contacting support.
Create an App Registration
If you do not have an existing Azure Active Directory App Registration, or you wish to use an new one for Morpheus, you will need to create one.
Tip
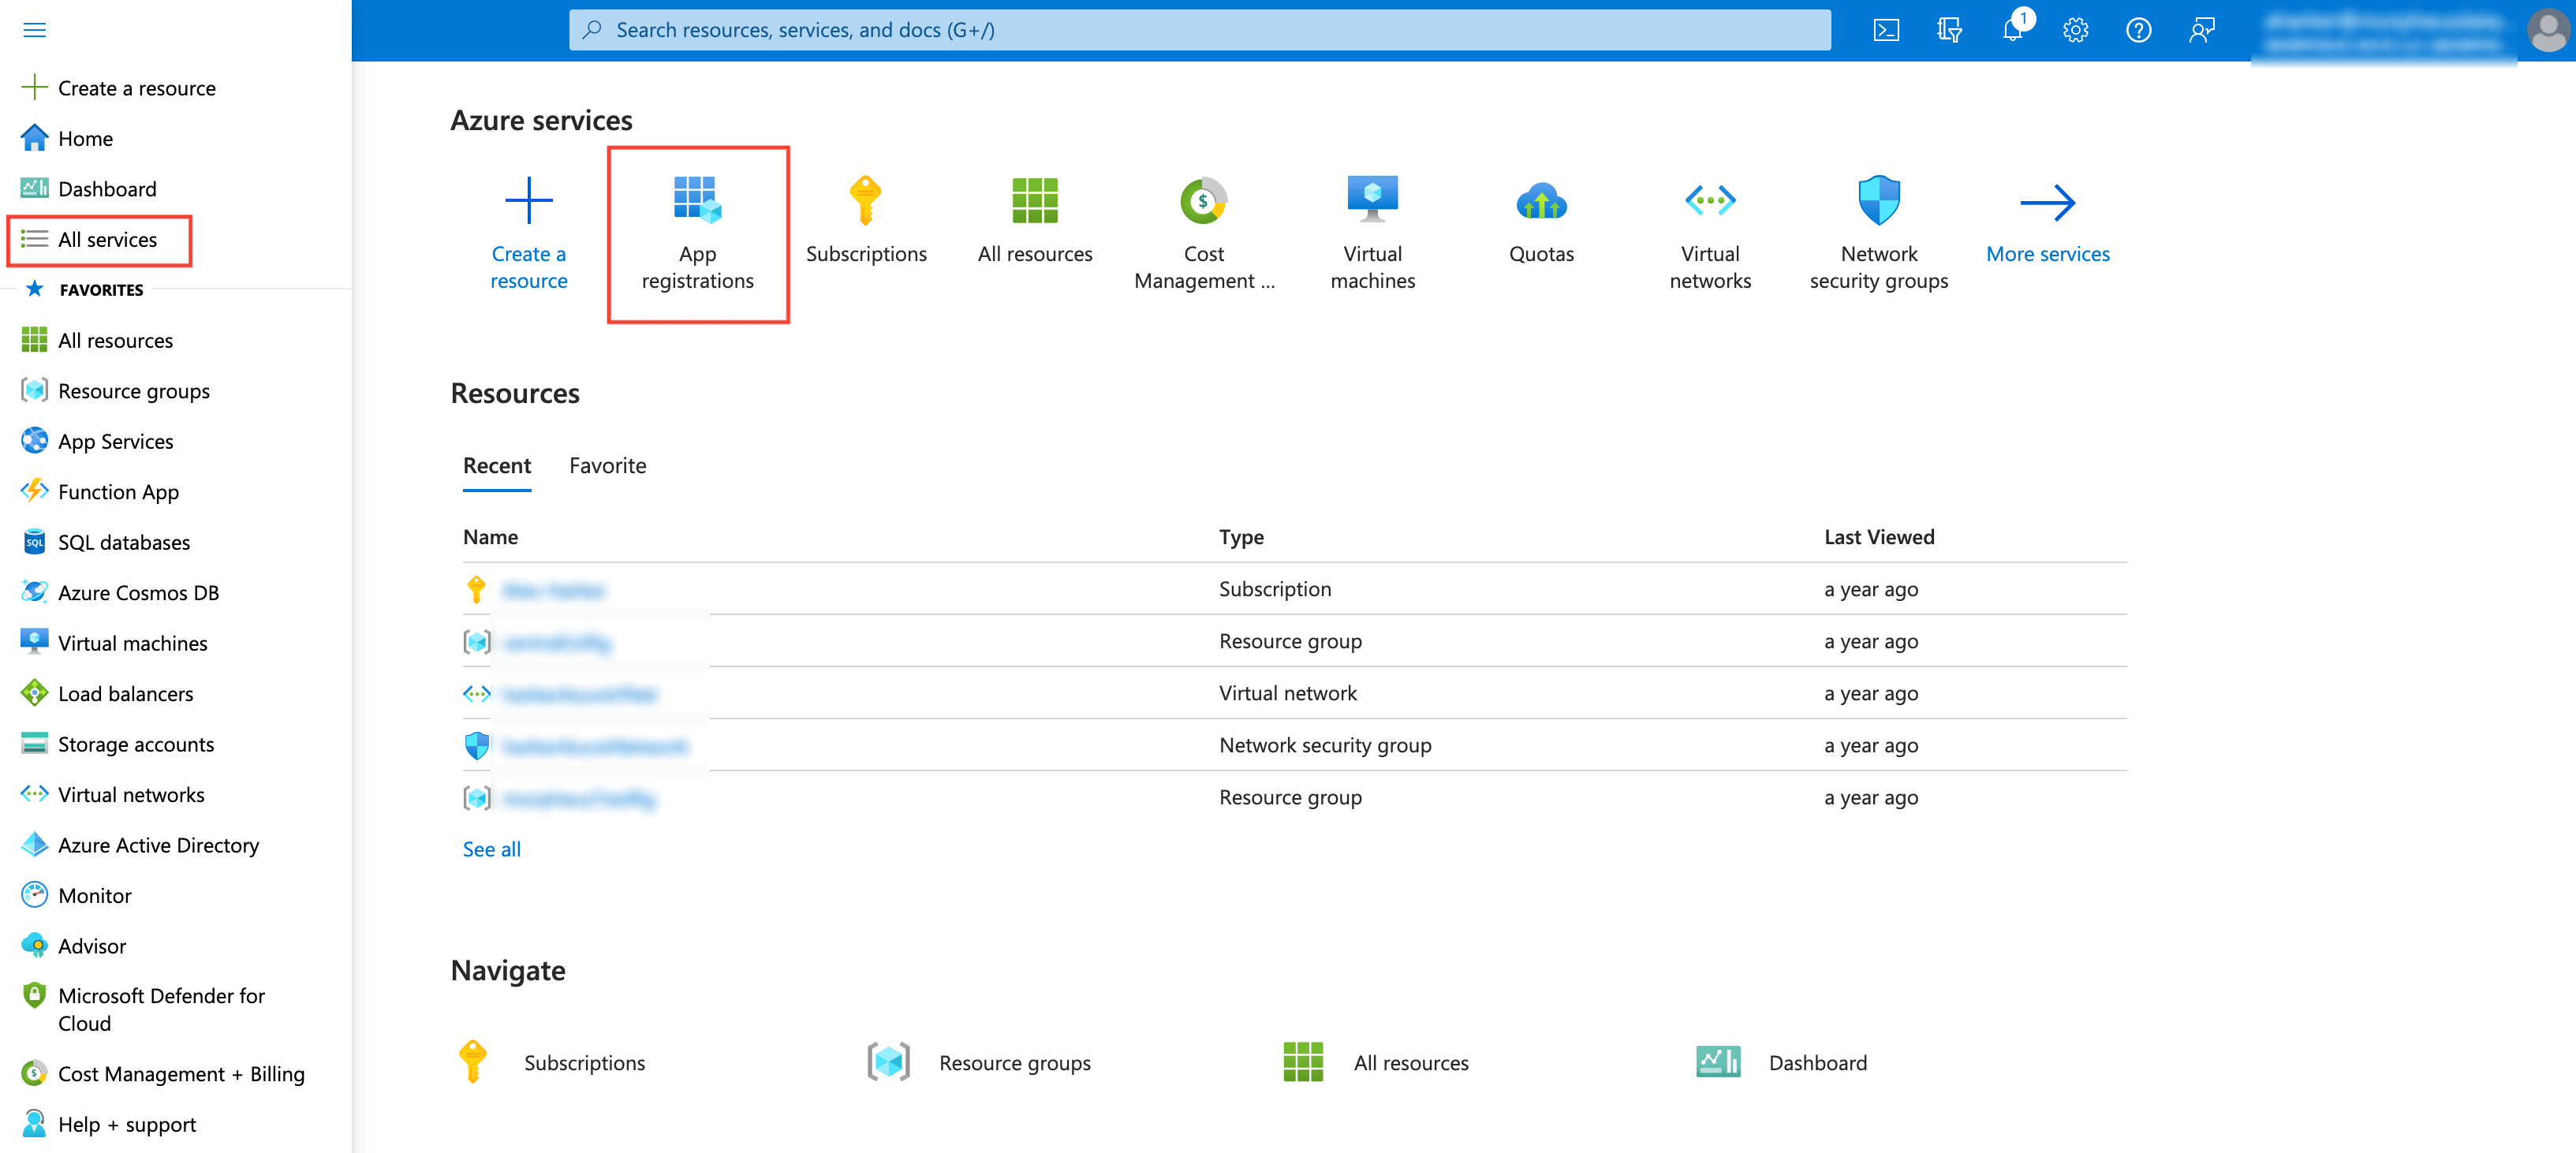
If you can’t find sections of the Azure portal discussed in this integration guide, such as App Registrations or Subscriptions, you may be able to find them under the “Favorites” section within the main hamburger menu, at the “All Resources” page from within the main hamburger menu, or by using the global search bar.
Log into the Azure web console
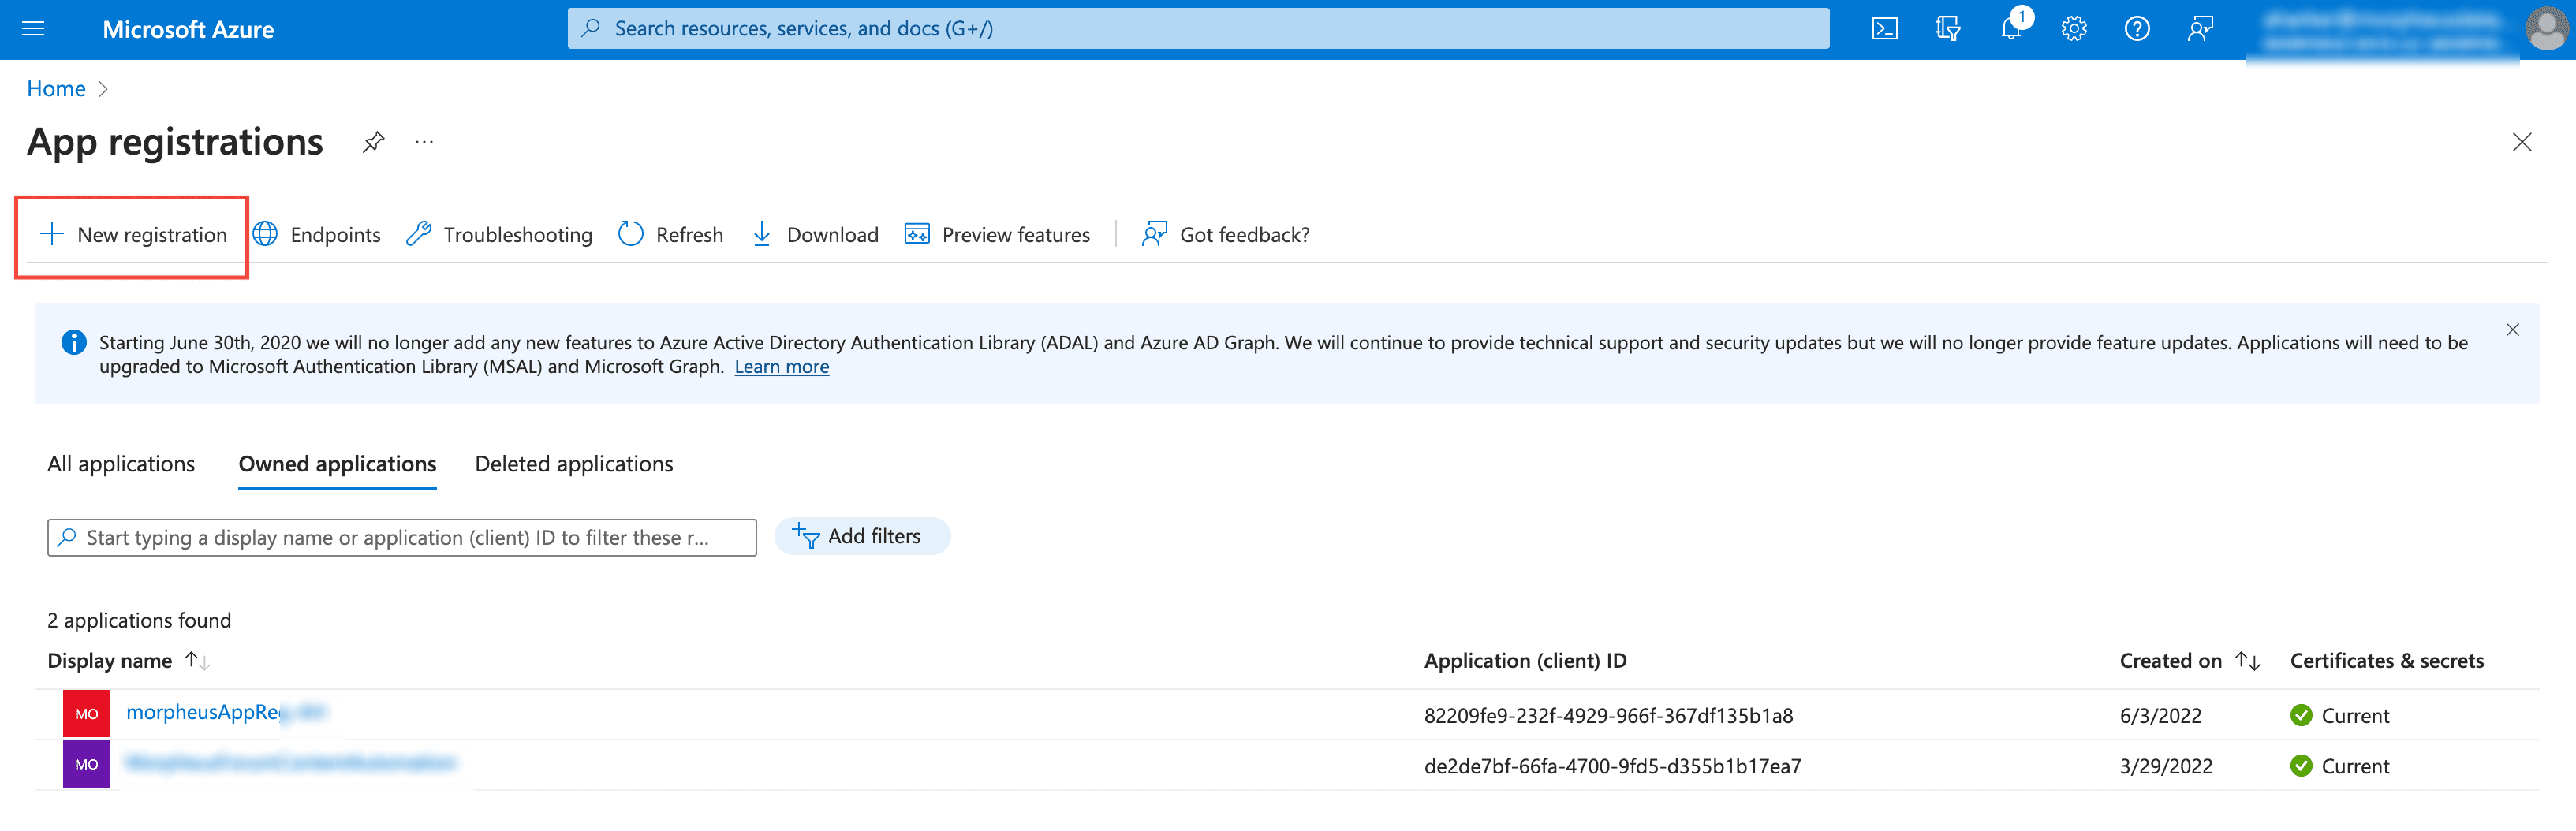
Select “App Registrations”, you may have to go to the “All Services” page to find it
Click “+ New registration”
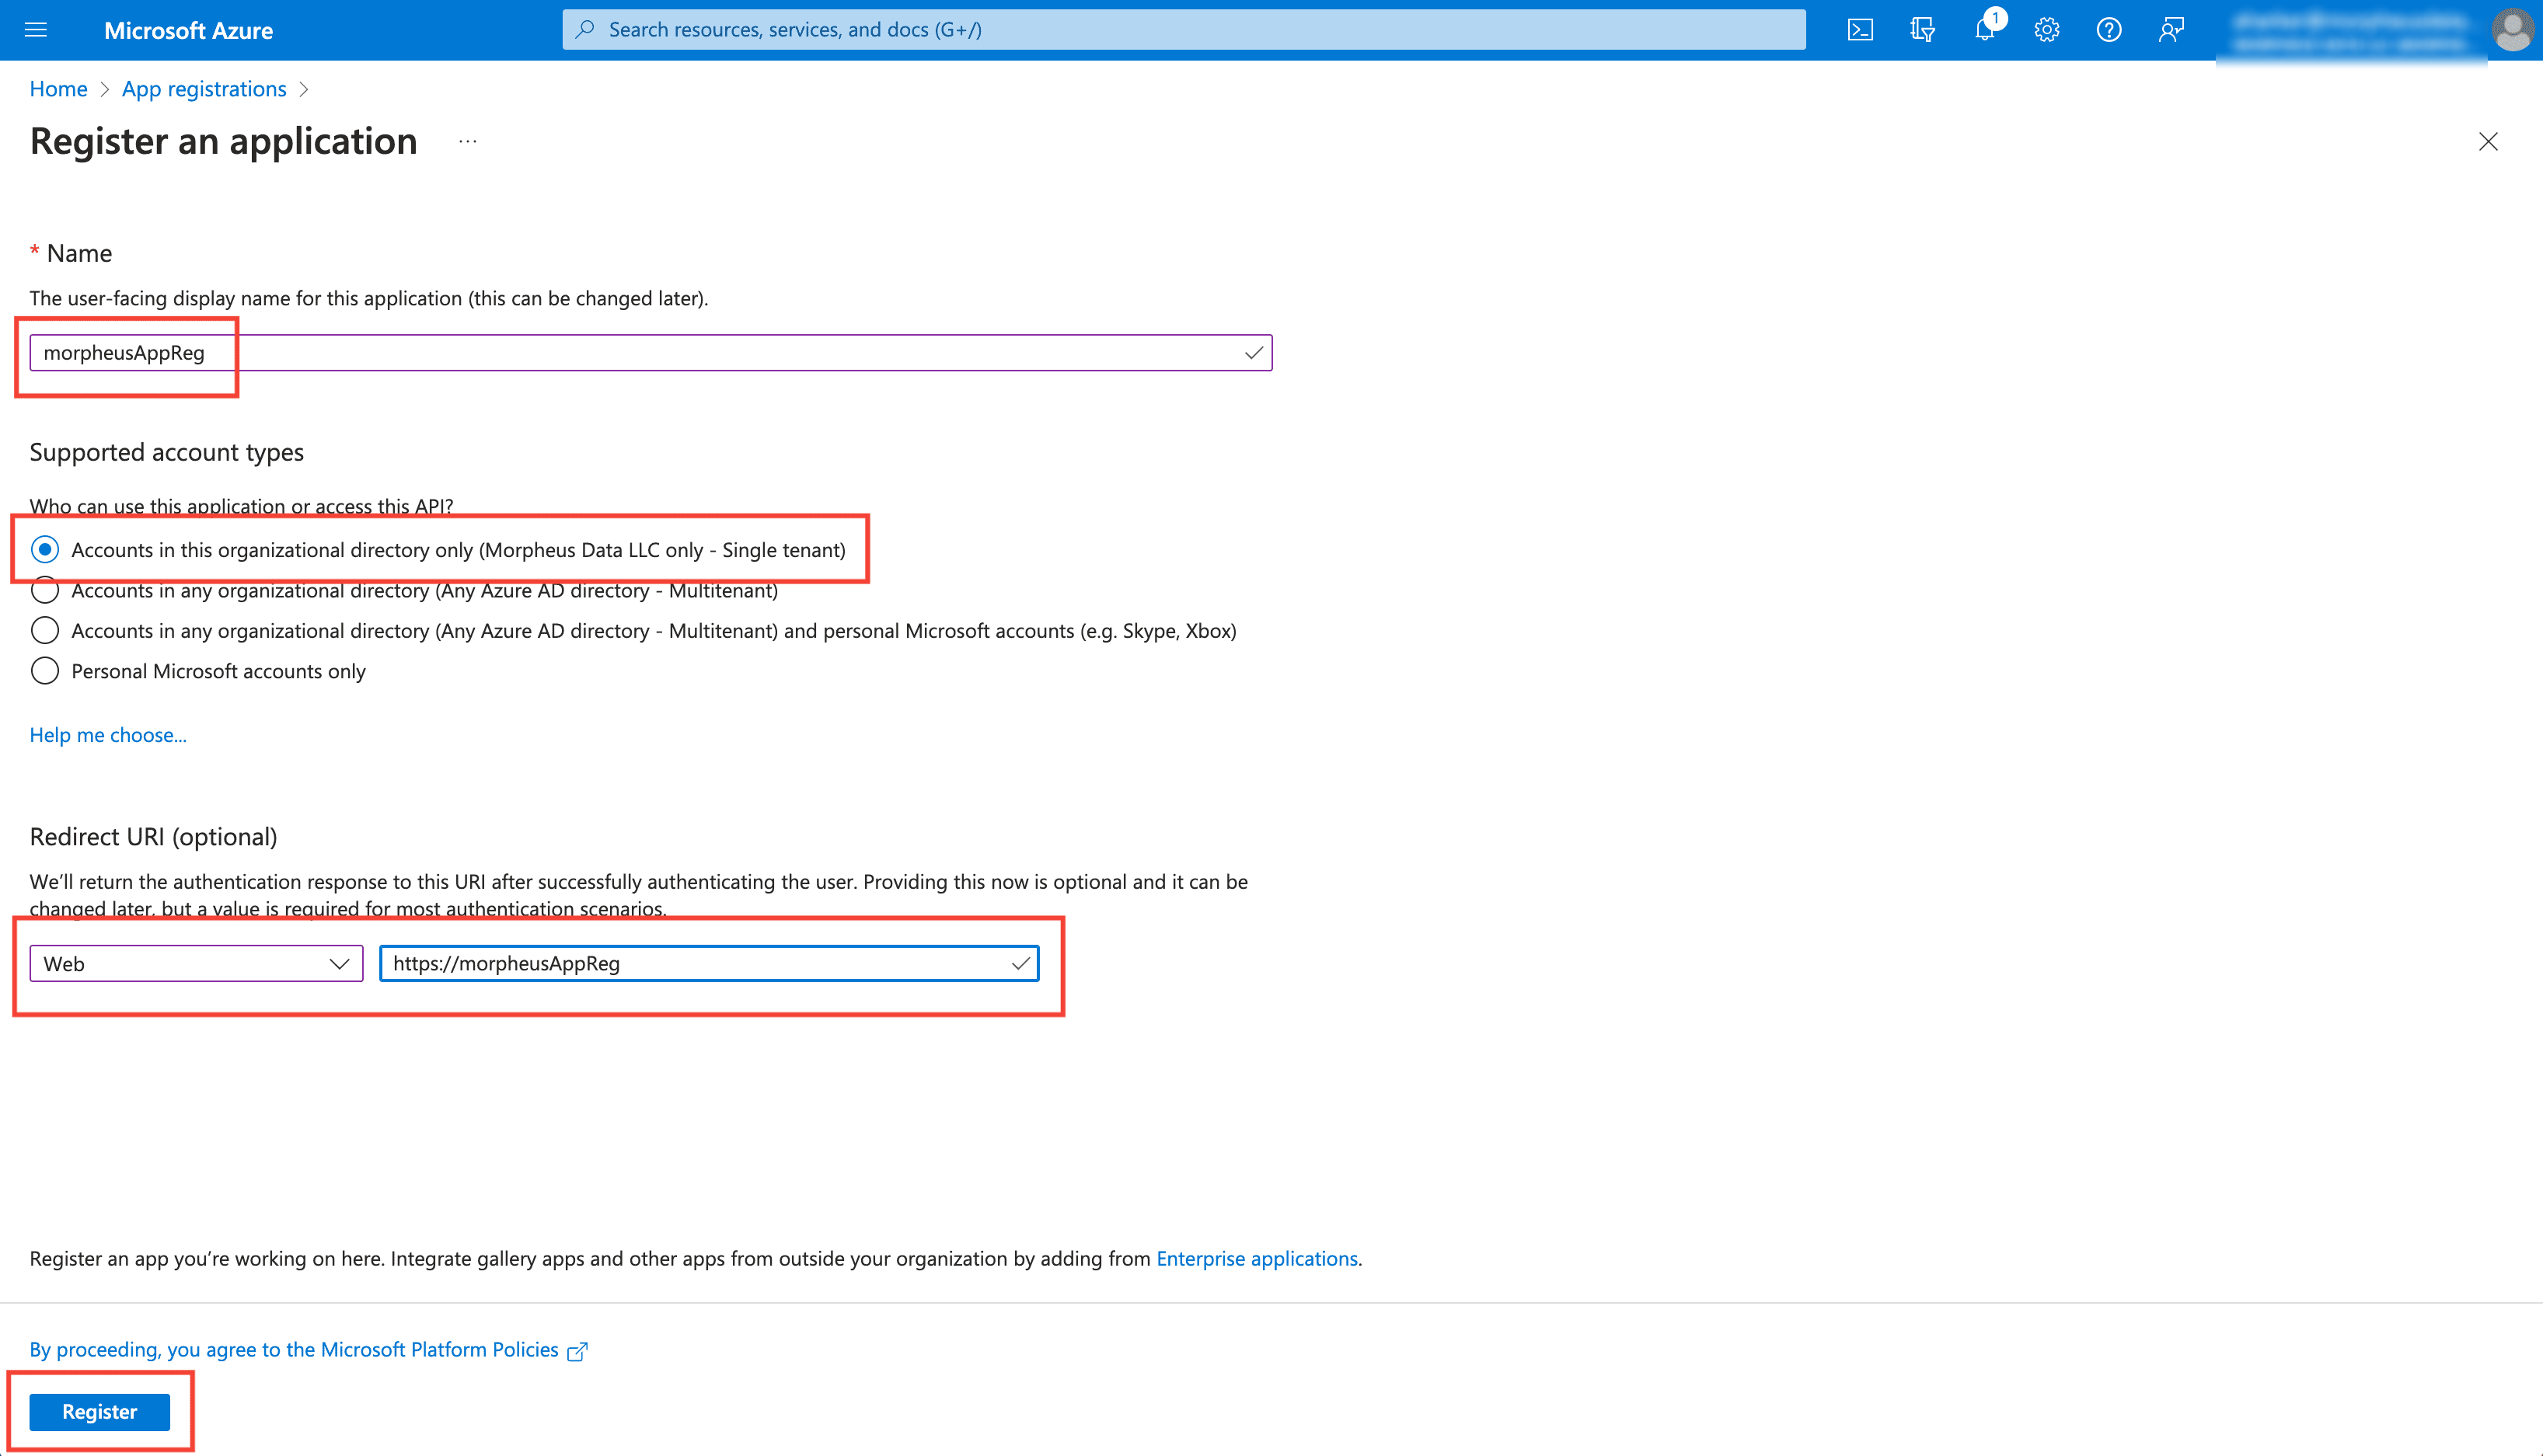
Next, give app a name, specify which accounts may access this API, specify Web for the Redirect URI type and enter any url for the Sign-on URL:
Click Register and your new App Registration will be created.
Now that we have (or already had) our App Registration, we will gather the credentials required for the Morpheus Azure integration.
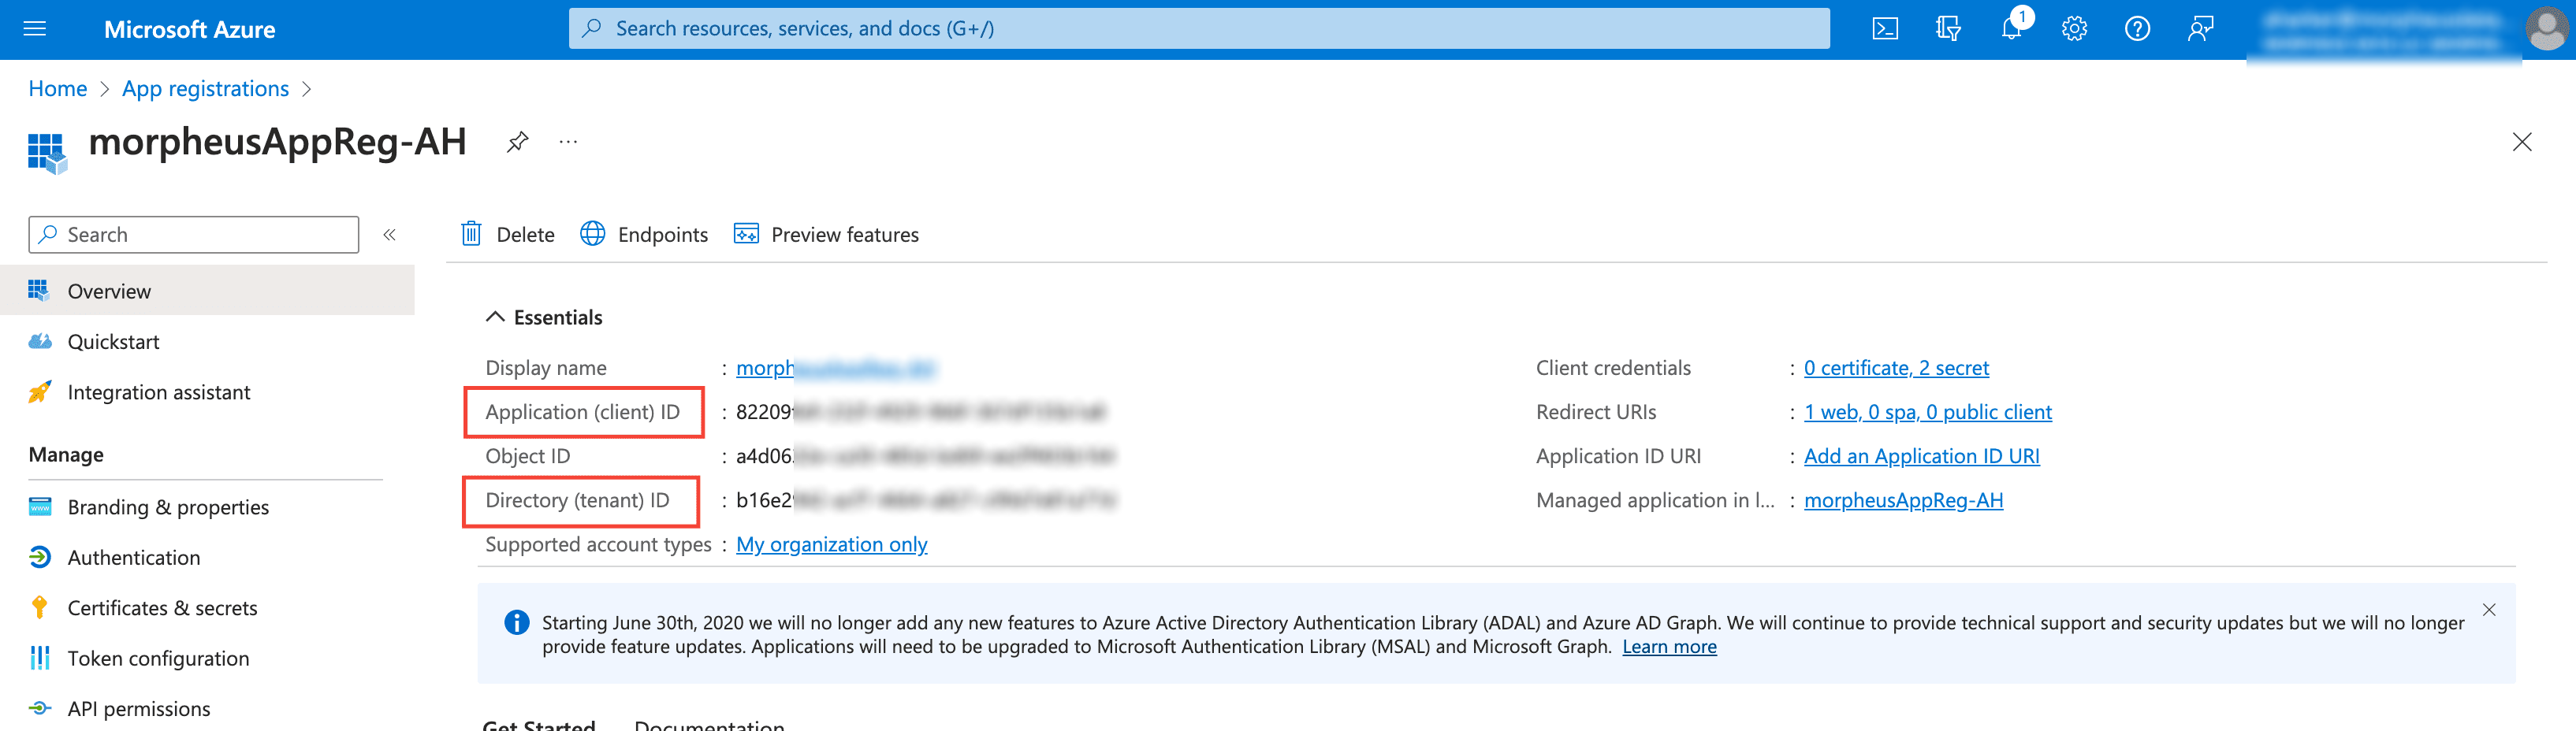
Copy Directory (tenant) and Application (client) IDs
The App Registration Directory (tenant) and Application (client) ID are required for the Morpheus Azure integration. Both can be found in the overview section of the App Registration.
Go to the Overview section of your App Registration
Copy the Directory (tenant) ID
Store/Paste for use as the Tenant ID when Adding your Azure cloud in Morpheus
Copy the Application (client) ID
Store/Paste for use as the Client ID when Adding your Azure cloud in Morpheus
Generate a Client Secret
While still in your App Registration:
Select Certificates & secrets in the Manage Section
Select
+ New client secret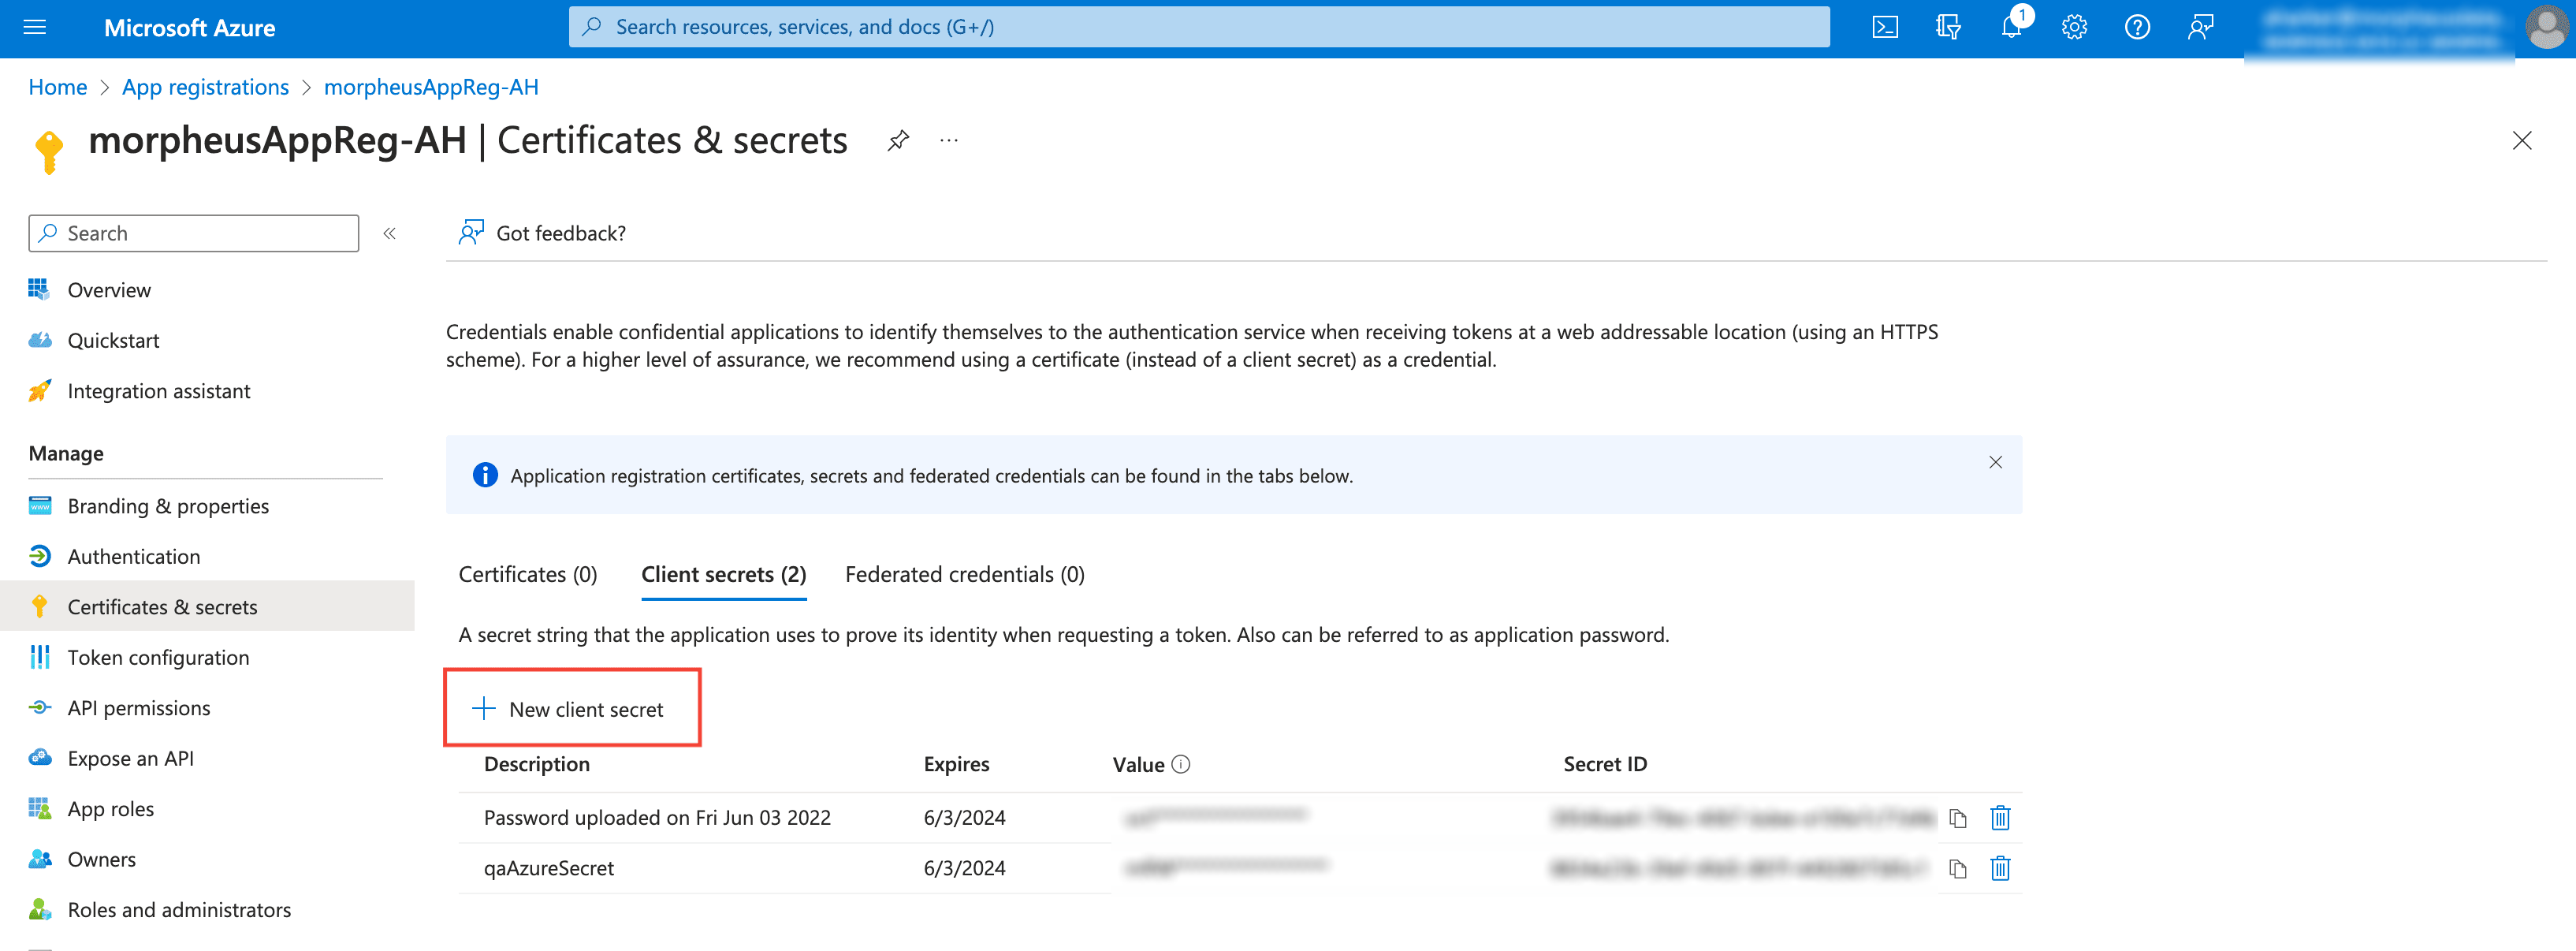
The “Add a client secret” modal will come up
Add a description to help identify the secret in the future
Select a duration
Select Add
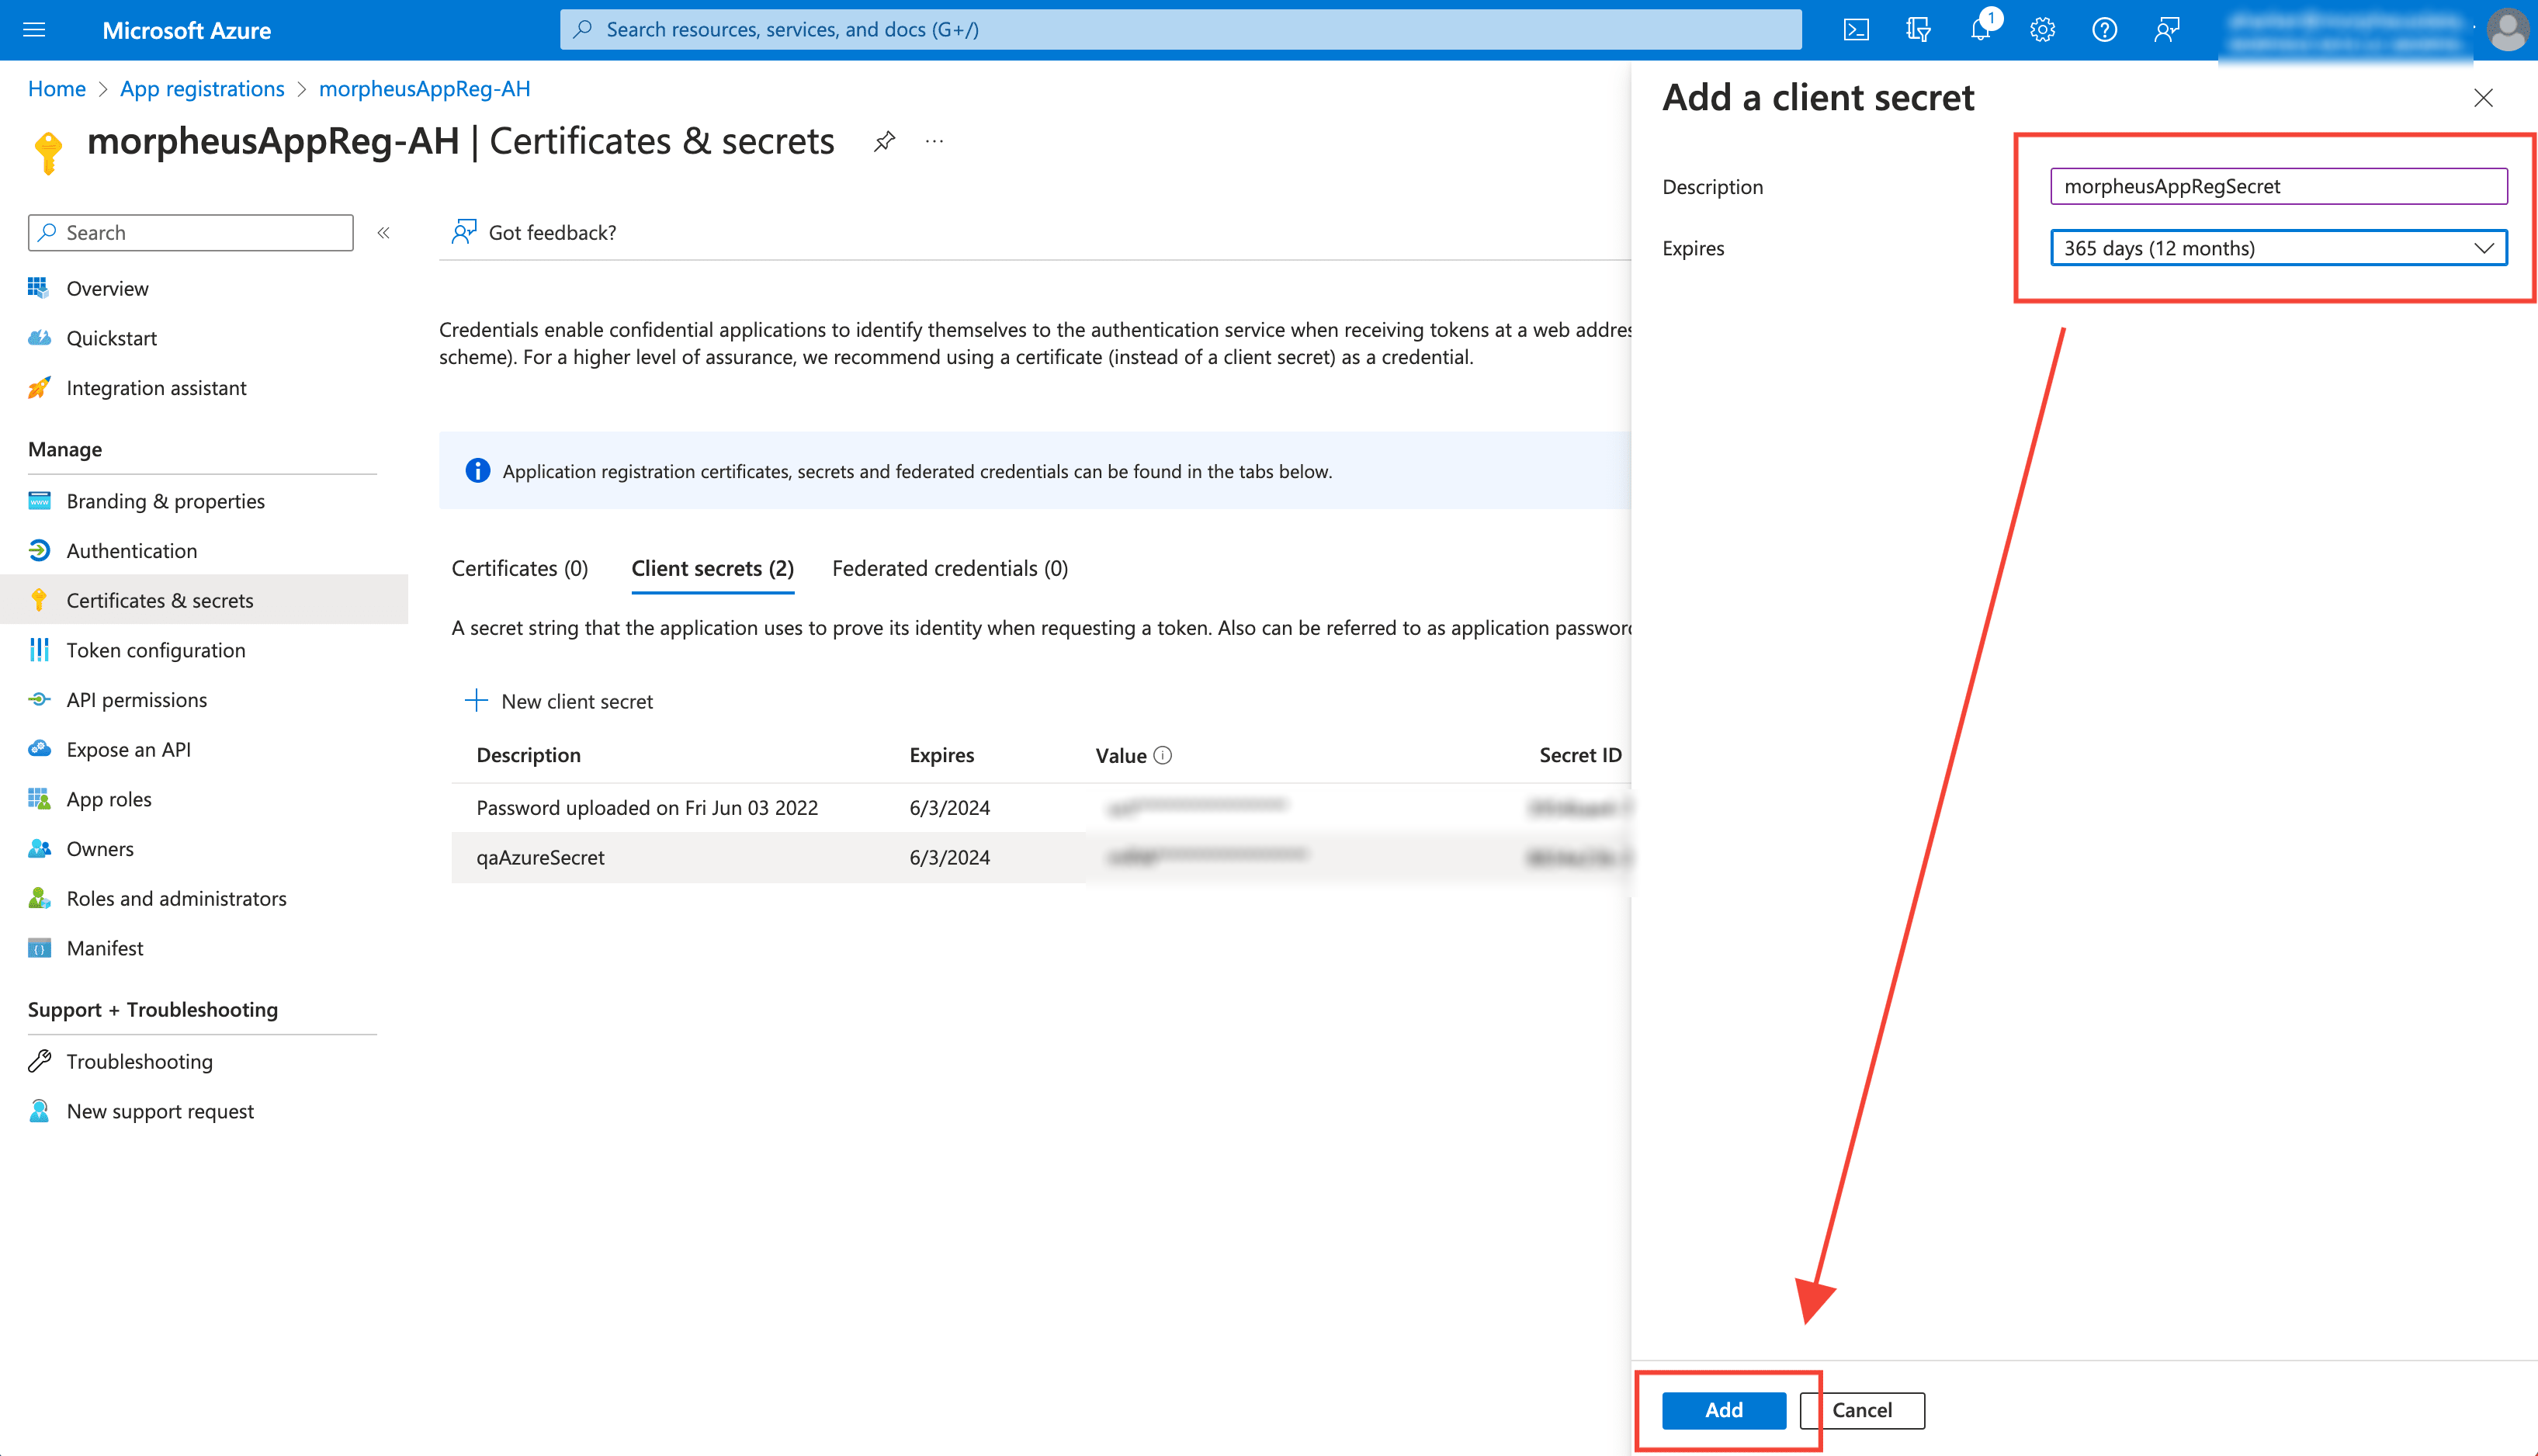
Copy the newly generated Client Secret Value. It is important to copy the Client Secret Value now as it will not be displayed/available
Important
Copy the key value before continuing as it will not be displayed/available again.
Store/Paste for use as the Client Secret when Adding your Azure cloud in Morpheus
You now have 3 of the 4 credentials required for Morpheus Azure cloud integration. The last credential required is the Azure Subscription ID.
Subscription ID
To get the Azure Subscription ID:
Navigate to the main Subscriptions section. One way is to search for “Subscriptions” and select Subscriptions in the search results
In the main “Subscriptions” section, copy the Subscription ID
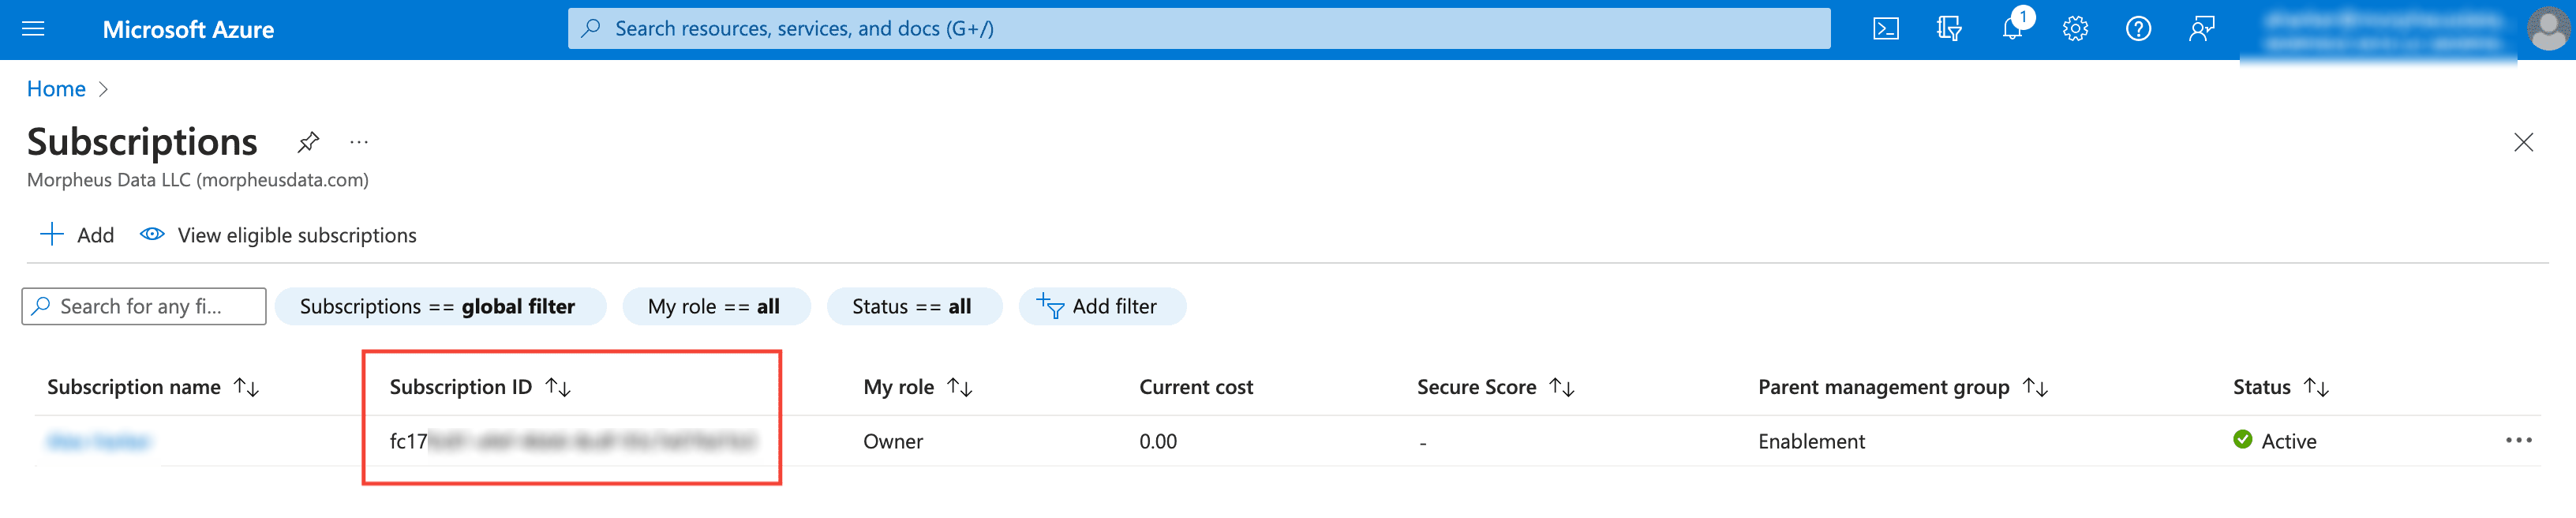
Store/Paste for use as the Subscription ID when Adding your Azure cloud in Morpheus
Make App Registration owner or contributor of Subscription
The App Registration created/used needs to be an owner of the Azure Subscription used for the Morpheus cloud integration. If lesser permissions are given or permissions are assigned at individual resource levels, Morpheus will not be able to properly inventory/sync, create and/or remove resources.
In the main Subscriptions section, click on the name of the Subscription
With the Subscription detail open, select “Access Control (IAM)”
Click “+ ADD” and then click “Add role assignment” from the pop-out menu
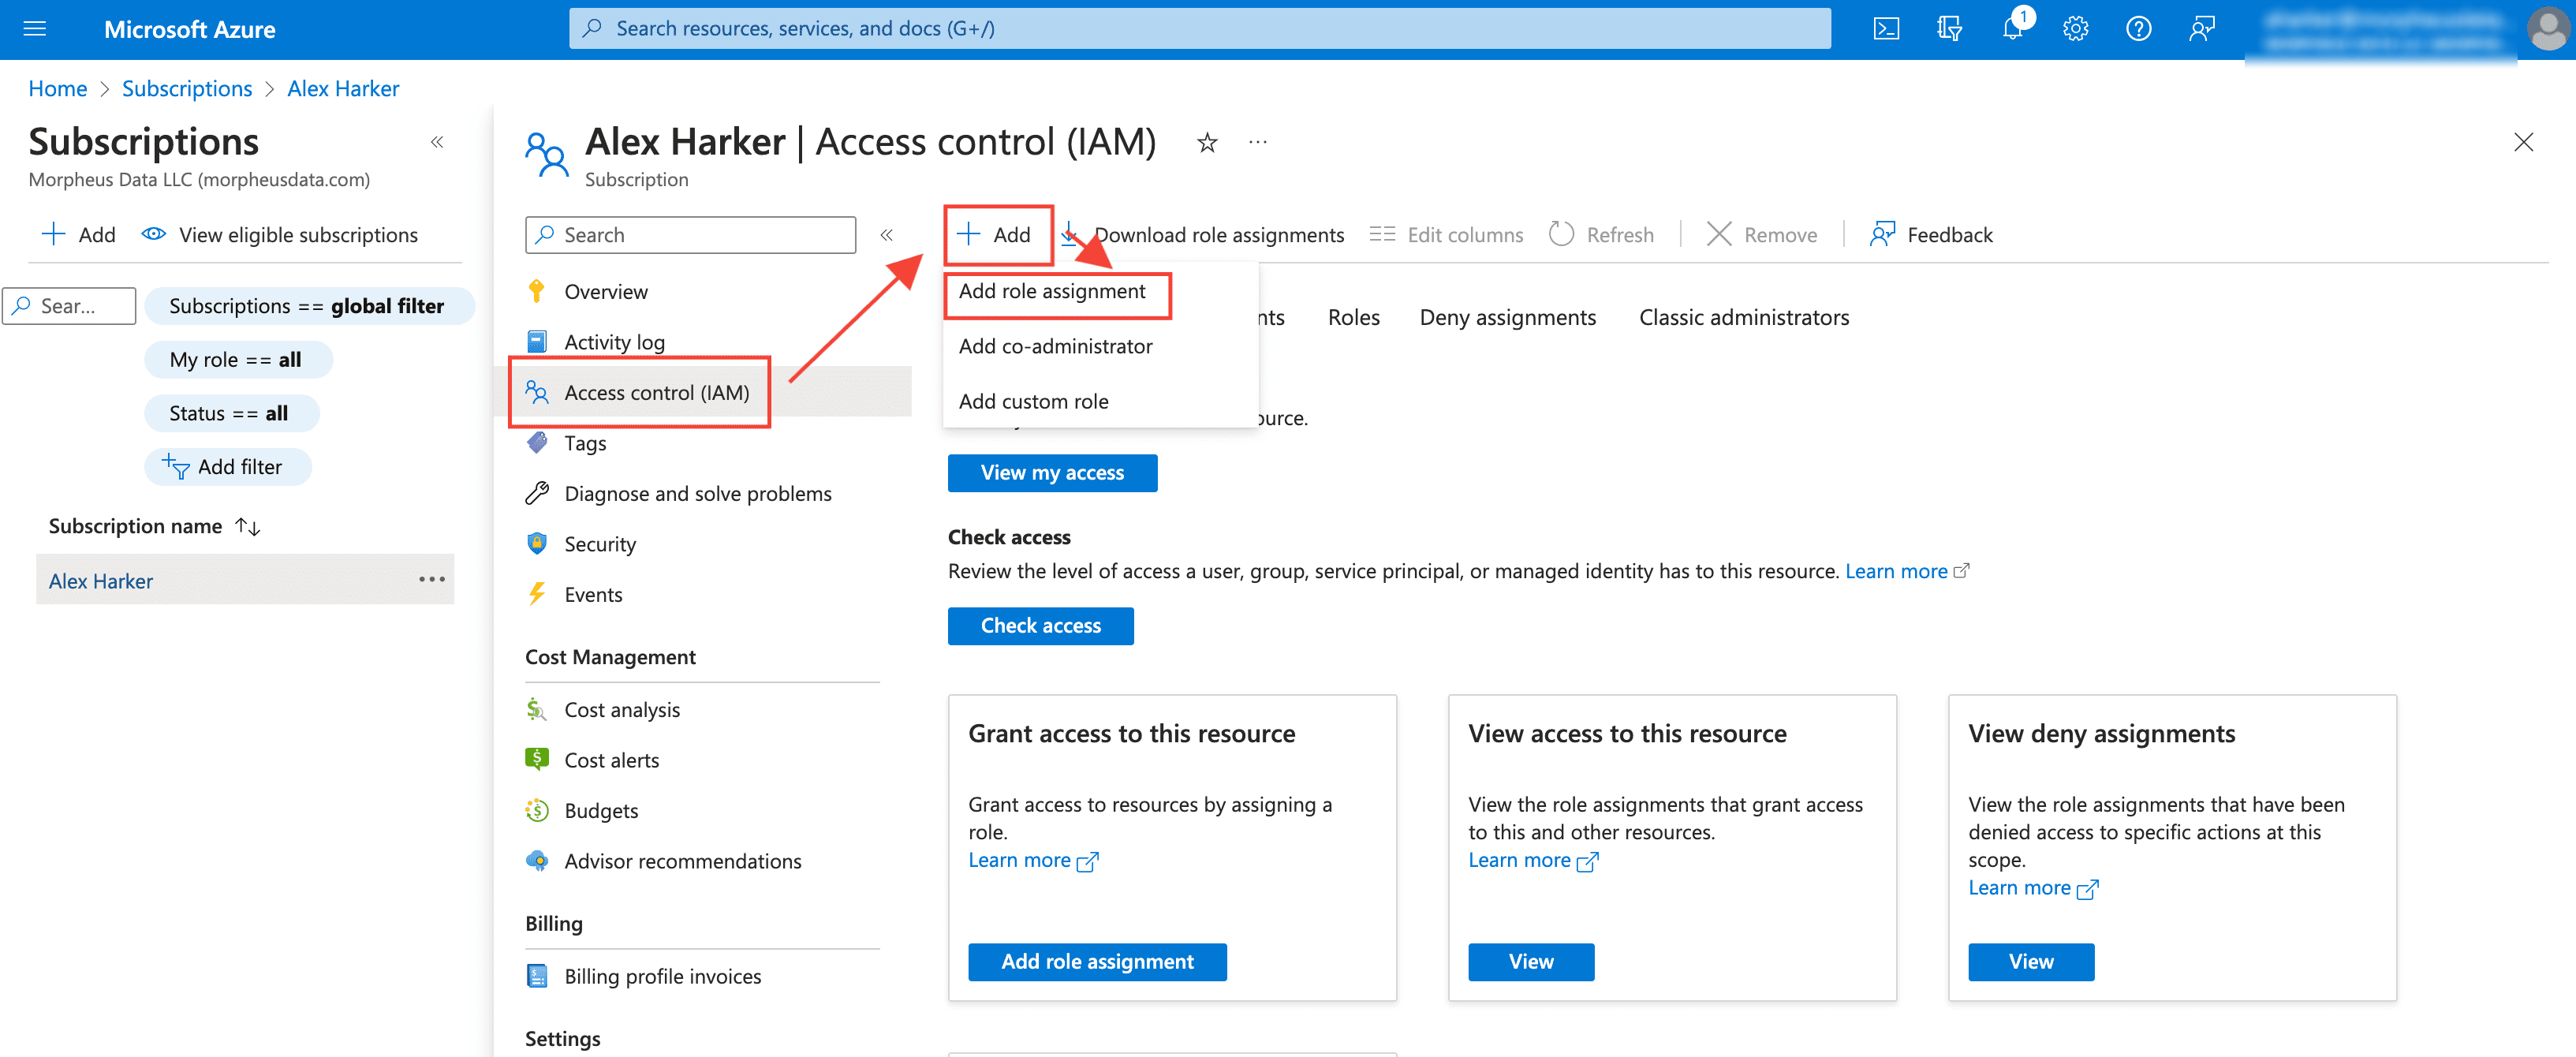
Click on the tab for “Privileged administrator roles”
Select Owner or Contributor and click “Next”
Add Members to the Role Assignment by clicking “+ Select members”
Select the App Registration from the search results and click Select
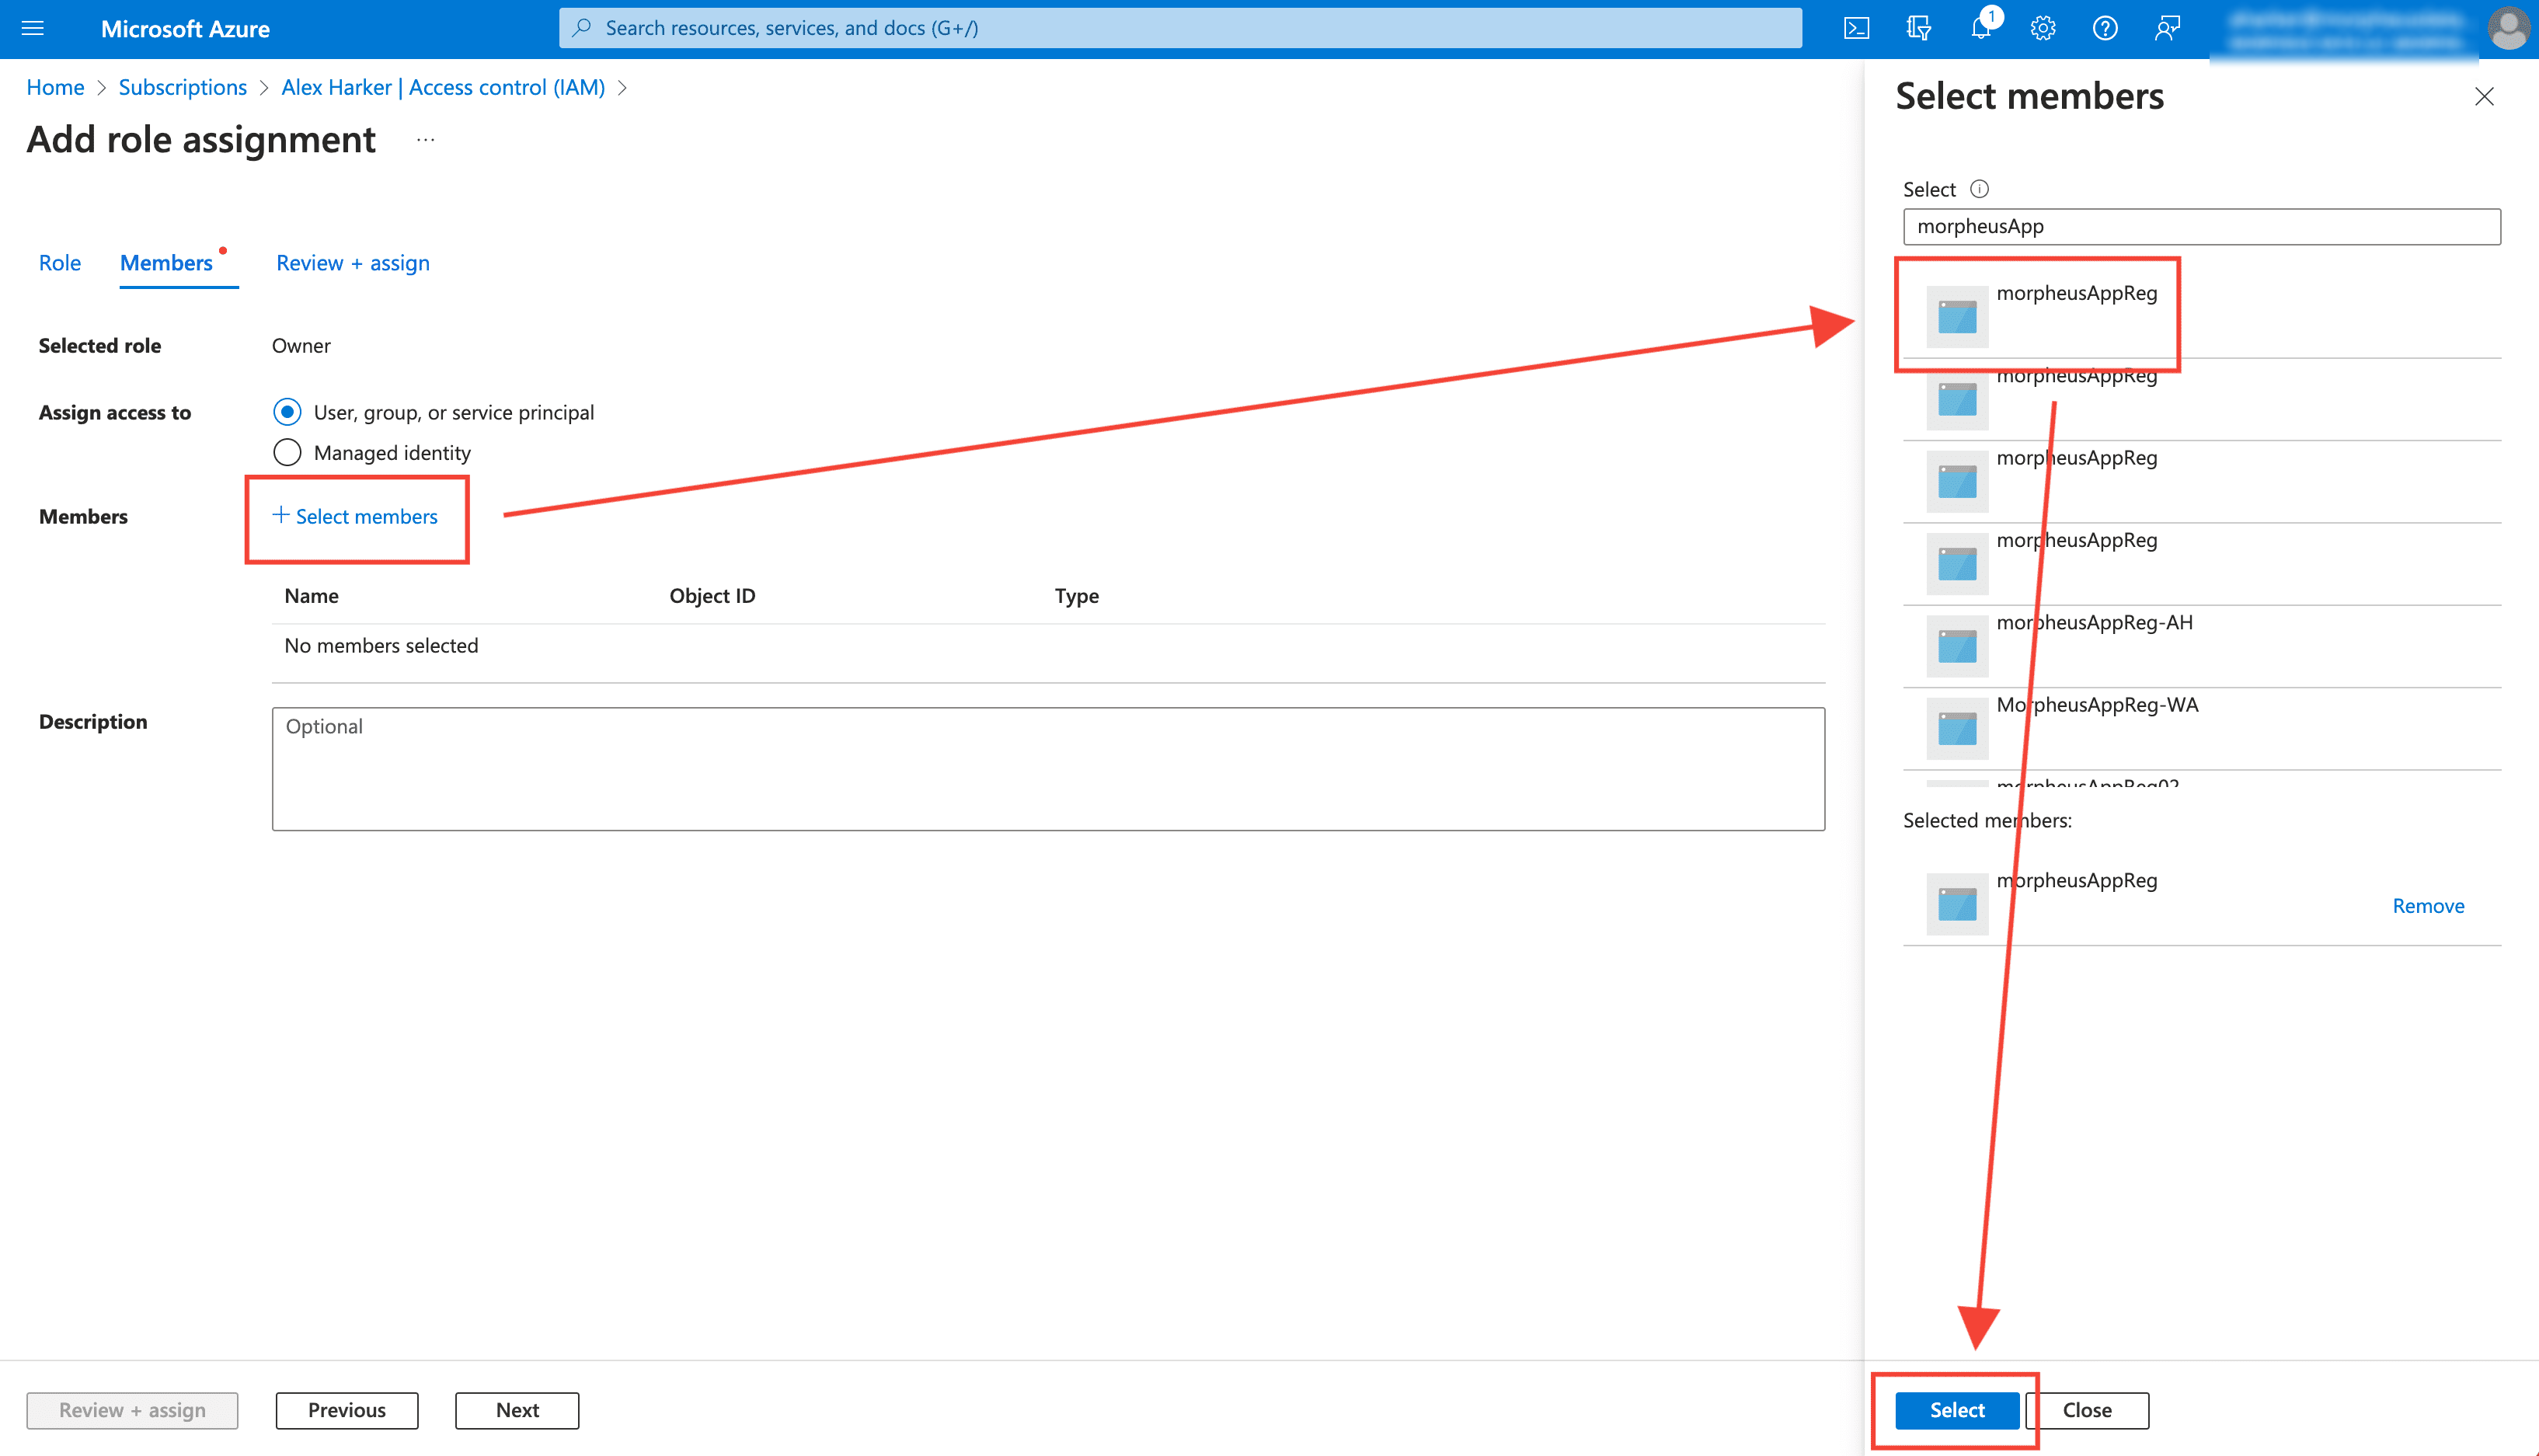
Click “Review + Assign”
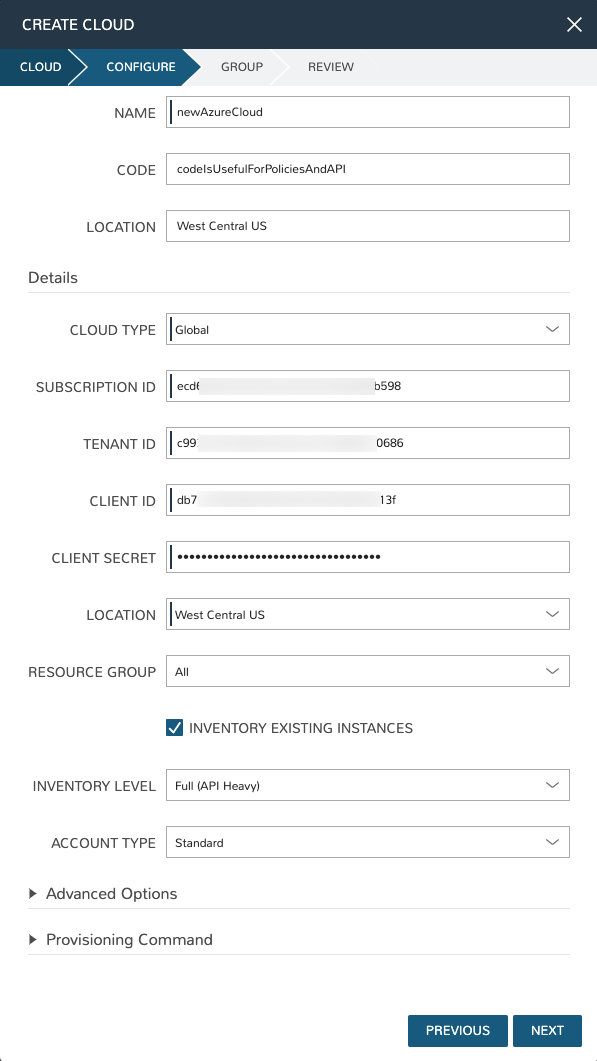
Add an Azure Cloud Integration
To add a new Azure Cloud integration into Morpheus using the credentials created/collected from the previous section, perform the following:
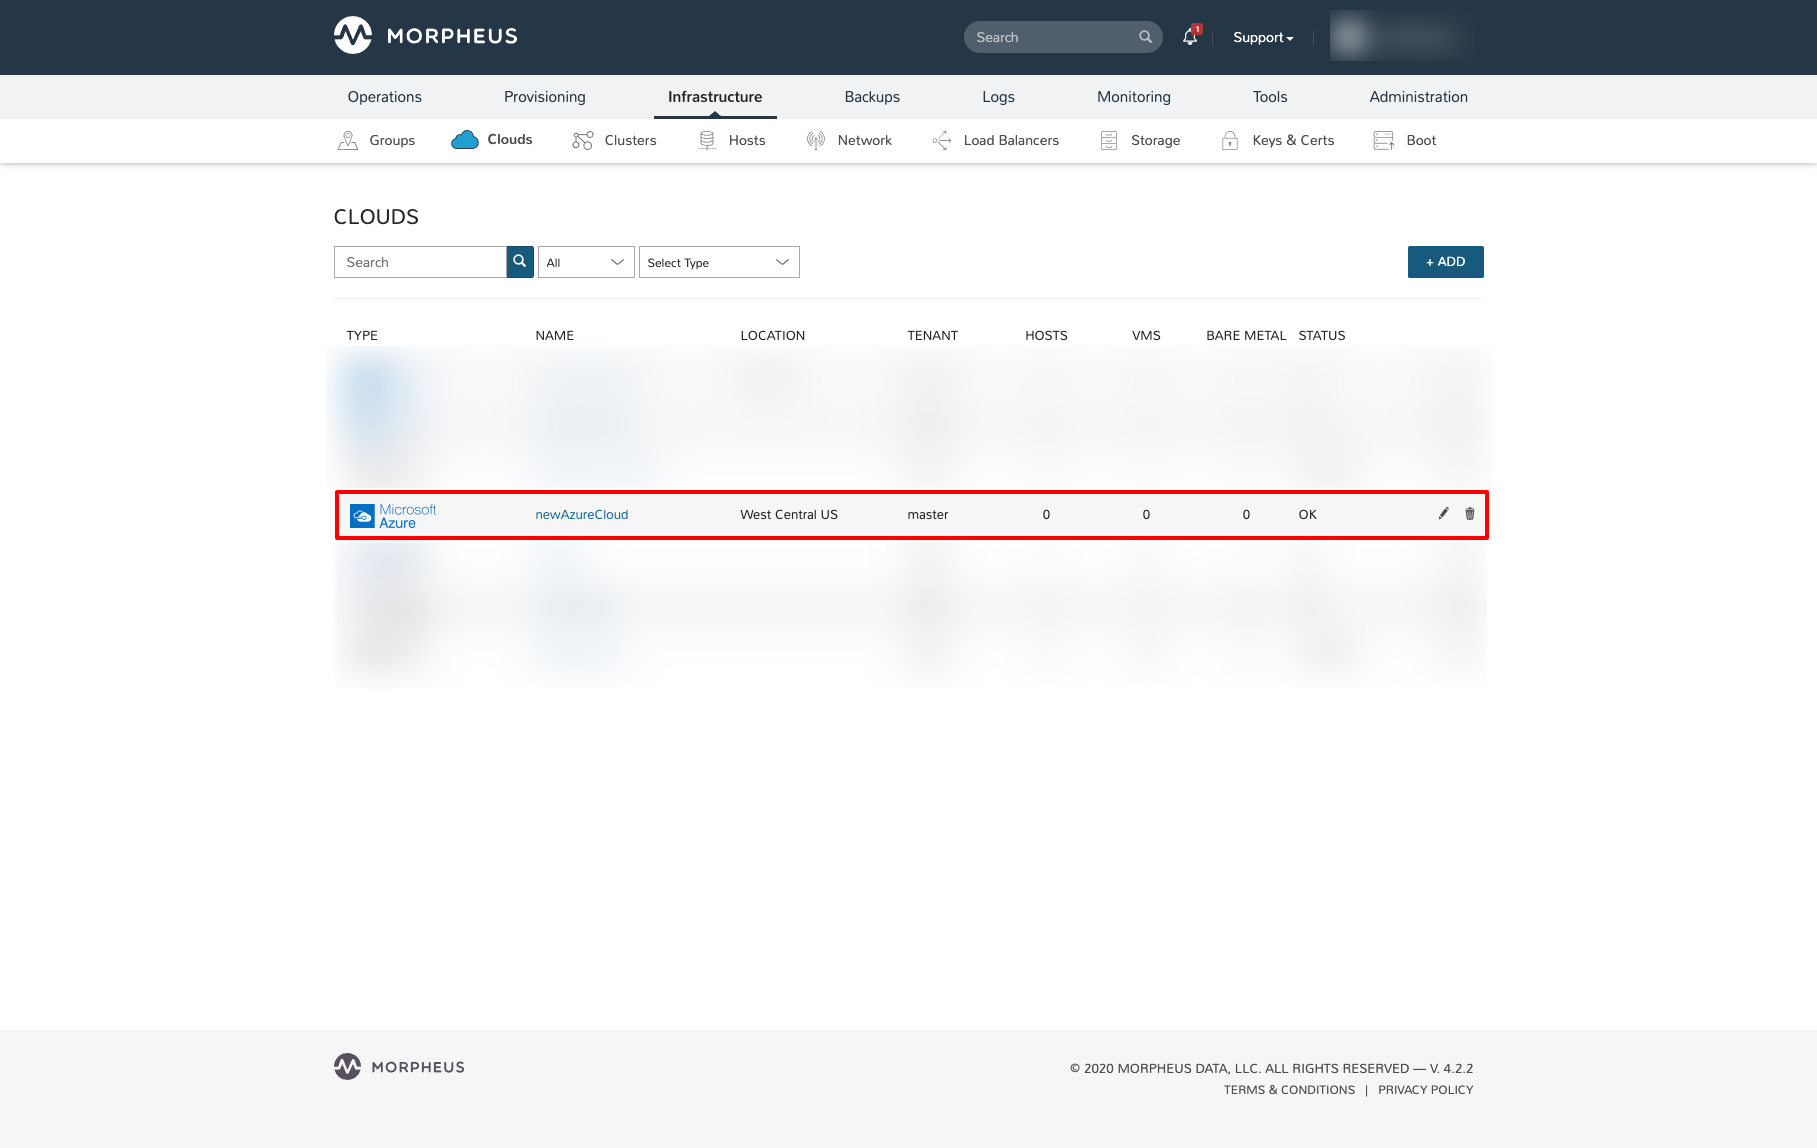
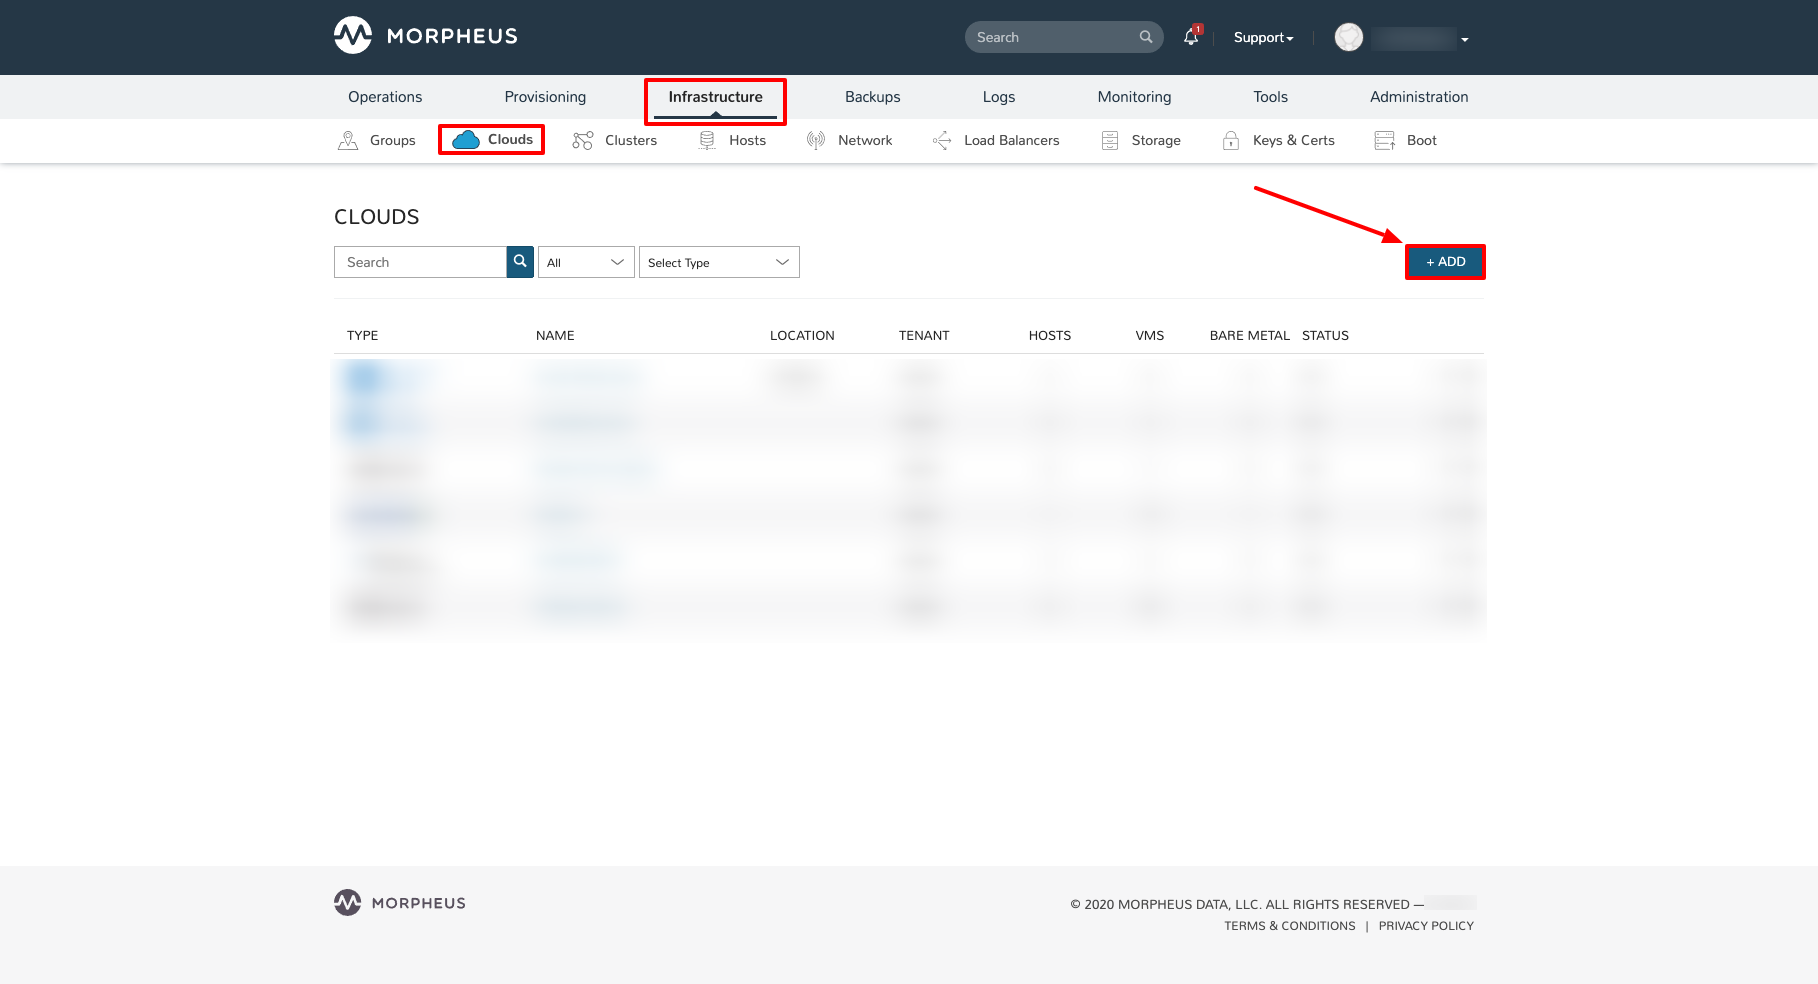
In Morpheus, navigate to Infrastructure > Clouds and select + ADD
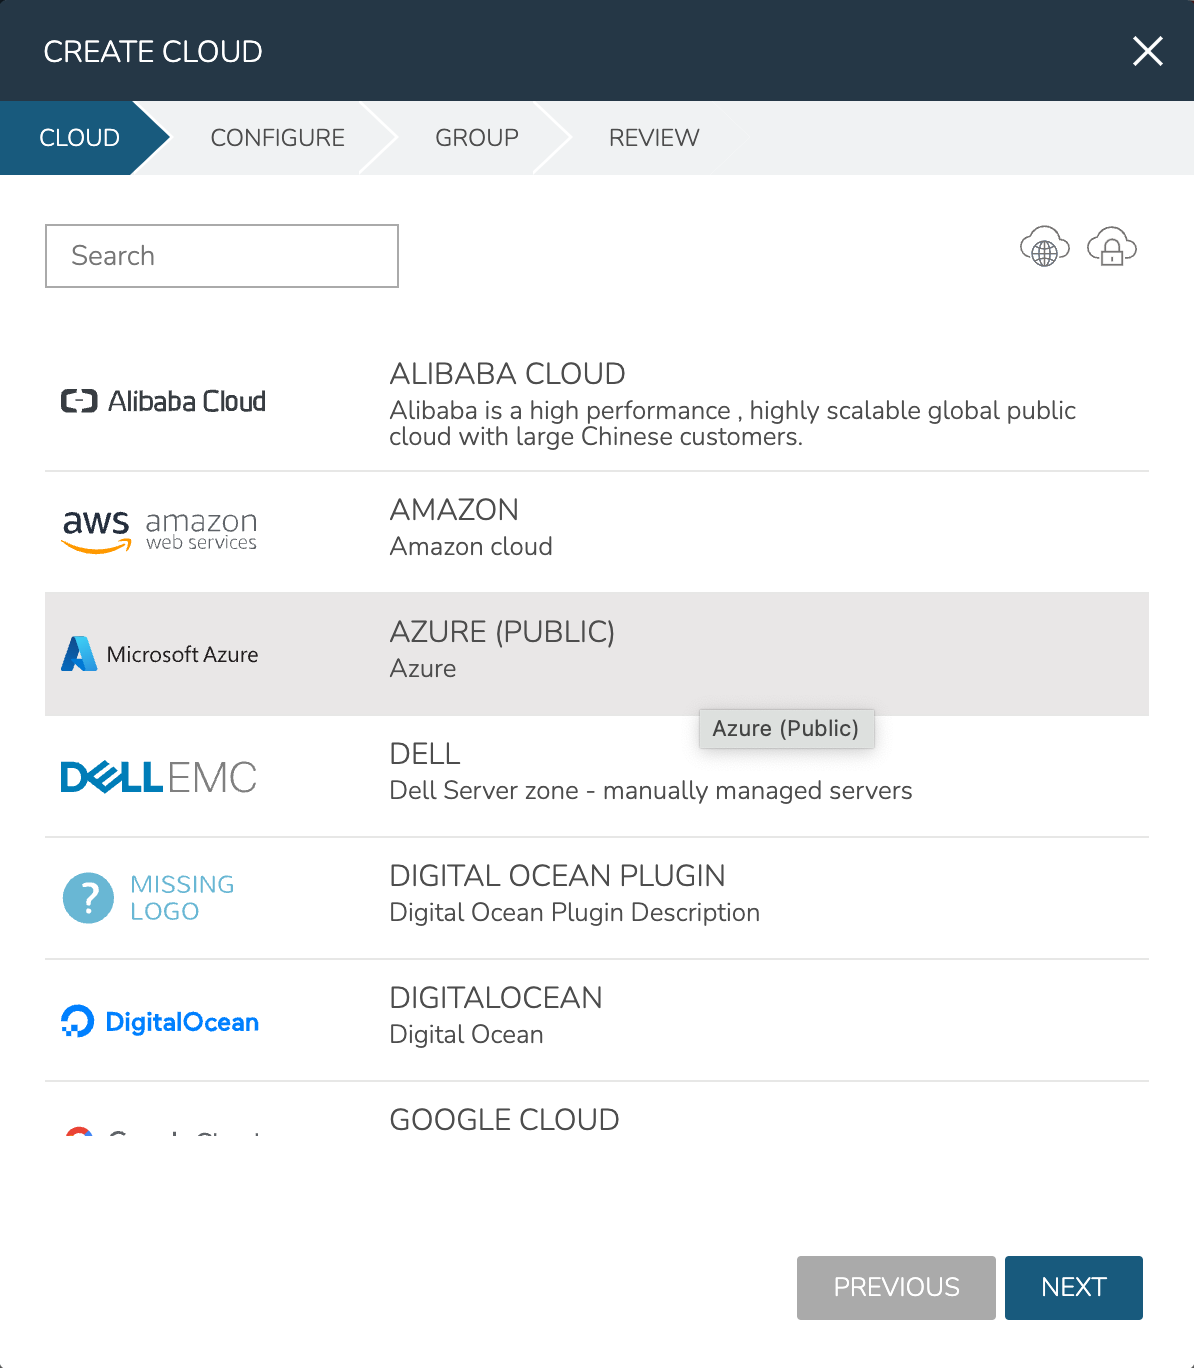
Select “AZURE (PUBLIC)” from the Cloud Types list and click NEXT
Populate the Following
Cloud Configuration
- NAME
Name of the Cloud in Morpheus
- CODE
Unique code used for api/cli, automation and policies.
- LOCATION
Description field for adding notes on the cloud, such as location.
- VISIBILITY
For setting cloud permissions in a multi-tenant environment. Not applicable in single tenant environments.
- TENANT
If Visibility is set to Private, select the Tenant the Cloud resources will assigned to.
- ENABLED
When disabled, automatic Cloud sync is paused and the Cloud will not be selectable for provisioning.
- AUTOMATICALLY POWER ON VMS
When enabled, Morpheus will maintain the expected power state of managed VMs. Morpheus will power on any managed VMs in the Cloud that have been shut down for unknown reasons (not powered off by Morpheus) to ensure availability of services.
Note
When “AUTOMATICALLY POWER ON VMS” is enabled, the power state of managed VMs should be maintained in Morpheus. This setting is not applicable to discovered/unmanaged resources.
Details
- CLOUD TYPE
Global (Azure Cloud)
US Gov (Azure US Government)
German (Azure German Cloud)
China (Azure China Cloud)
- SUBSCRIPTION ID
The target Azure Subscription ID obtained from the previous section
- TENANT ID
The Directory (tenant) ID obtained from the previous section
- CREDENTIALS
If available, select a pre-stored Client ID and Client Secret set. Alternatively, select “Local Credentials” to enter the Client ID and Client Secret without storing them for later access. “client id and secret” under the “New Credentials” heading can also be selected so your Client ID and Client Secret will stored for later use in either the Morpheus credential store or in an integrated third party secret store
- CLIENT ID
The Application (client) ID obtained from the previous section
- CLIENT SECRET
The Application (client) Secret obtained from the previous section
- LOCATION
Once valid credentials are populate above and Morpheus is able to successfully authenticate with Azure, the available locations/regions will populate.
- REGION
Scope the Cloud to either “All” regions or a selected Azure region
- RESOURCE GROUP
Select “All” to scope the Cloud to all available Resource Groups in the specified location/region.
Select a single Resource Group to limit Morpheus resource creation, selection and discovery to just this Resource Group.
- INVENTORY EXISTING INSTANCES
Check to enable discovery/inventory of existing VM’s in the scoped Region and Resource Group(s)
- ACCOUNT TYPE
Standard, EA or CSP
Note
For CSP Accounts, also enter CSP TENANT ID, CSP CLIENT ID and CSP CLIENT SECRET in the Advanced Options section. In order to enable cost sync for CSP accounts, the “CSP CUSTOMER” checkbox must be marked and “COSTING” should be set to “Costing” rather than “Costing and Reservations”.
For the CSP Client Secret, enter the Web App Key rather than the Native App Key. This should be accessed from the Microsoft Partner Center rather than the Azure web console. If this is not, Plans may sync but Price Sets and Prices would not.
Advanced Options
- DOMAIN
Specify a default domain for instances provisioned to this Cloud.
- SCALE PRIORITY
Only affects Docker Provisioning. Specifies the priority with which an instance will scale into the cloud. A lower priority number means this cloud integration will take scale precedence over other cloud integrations in the group.
- APPLIANCE URL
Alternate Appliance url for scenarios when the default Appliance URL (configured in admin > settings) is not reachable or resolvable for Instances provisioned in this cloud. The Appliance URL is used for Agent install and reporting.
- TIME ZONE
Configures the time zone on provisioned VM’s if necessary.
- DATACENTER ID
Used for differentiating pricing among multiple datacenters. Leave blank unless prices are properly configured.
- NETWORK MODE
Unmanaged or select a Network Integration (NSX, ACI etc)
- LOCAL FIREWALL
On or Off. Enable to managed Host and VM firewall/IP Table rules (linux only)
- SECURITY SERVER
Security Server setting is for Security Service Integrations such as ACI
- TRUST PROVIDER
Select Internal (Morpheus) or an existing Trust Provider Integration
- STORAGE MODE
Single Disk, LVM or Clustered
- BACKUP PROVIDER
Select a backup provider. Depending on the Cloud type and any currently-configured backup plugins you may select Internal Backups (Morpheus) or another configured backup solution
- REPLICATION PROVIDER
Sets the default Replication Provider for the Cloud. Select an existing Replication Provider Integration
- GUIDANCE
Enable Guidance recommendations on cloud resources.
- COSTING
Enable for Morpheus to sync Costing data from the Cloud provider, when available. For on-prem Clouds, enabling costing activates a costing service designed to mirror the live costing experience of public clouds, including invoicing with line items and real-time cost data (Operations > Costing > Invoices). If your organization utilizes reserved instances and you want to pull in related pricing data, some Cloud integrations include the option to select Costing and Reservations. If this is not relevant, select Costing to save money on additional calls to the Cloud provider’s costing API.
- DNS INTEGRATION
Records for instances provisioned in this cloud will be added to selected DNS integration.
- SERVICE REGISTRY
Services for instances provisioned in this cloud will be added to selected Service Registry integration.
- CONFIG MANAGEMENT
Select a Chef, Ansible or Puppet integration to be used with this Cloud.
- CMDB
Select CMDB Integration to automatically update selected CMDB.
- CMDB DISCOVERY
When checked, any automatically discovered (unmanaged) servers onboarded into Morpheus from this Cloud will also have CMDB records created for them.
- CHANGE MANAGEMENT
Select an existing Change Management Integration to set on the Cloud. ex: Cherwell
- AGENT INSTALL MODE
SSH / WINRM / Guest Execution: Morpheus will attempt to use SSH, WINRM or Guest Execution for Agent install.
Cloud Init / Unattend (when available): (DEFAULT) Morpheus will utilize Cloud-Init or Cloudbase-Init for agent install when provisioning images with Cloud-Init/Cloudbase-Init installed. Morpheus will fall back on SSH or WINRM if cloud-init is not installed on the provisioned image. Morpheus will also add Agent installation to Windows unattend.xml data when performing Guest Customizations or utilizing syspreped images.
- VDI GATEWAY
Set a VDI Gateway for outbound communication from the Morpheus Appliance to the vdi endpoints. VDI Gateways can be added in
/tools/vdi/gateways
CUSTOM LOGOS
When integrating a Cloud, it will appear by default throughout the UI with its standard logo (VMware logo for VMware Clouds, etc.). If desired, you may upload a custom logo that should appear instead. This might be useful for MSPs which might not want to reveal the Cloud type underlying its services. A dark mode version of the logo may also be uploaded if the standard logo doesn’t look right against the Morpheus dark mode theme. Checking USE DEFAULT CLOUD LOGOS allows the user to return to the standard logo for the Cloud type without deleting the custom uploaded logo.
INVENTORY OPTIONS
Inventory options allow you to set a default active or inactive state for certain discovered resources. The list of available resources to configure will vary based on the Cloud type and its supported resources. By default, all possible resources for the Cloud type will be discovered in an active state. Uncheck the box for some or all resources to discover them in an inactive state. The list of potential resources that may appear include:
Service Plans
Resource Pools
Networks
Security Groups
Datastores
Folders
Provisioning Command
- PROXY
Set a proxy for inbound communication from Instances to the Morpheus Appliance. Proxies can be added in the Infrastructure > Networks > Proxies tab.
- Bypass Proxy for Appliance URL
Enable to bypass proxy settings (if added) for Morpheus Agent communication to the Appliance URL.
- NO PROXY
Include a list of IP addresses or name servers to exclude from proxy traversal
- USER DATA (LINUX)
Add cloud-init user data. Morpheus 4.1.0 and earlier assumes bash syntax. Morpheus 4.1.1 and later supports all User Data formats. Refer to https://cloudinit.readthedocs.io/en/latest/topics/format.html for more information.
- AZURE COSTING MODE
Standard, CSP, or Azure Plan
Example configurations but choose what is applicable to the tenant:
Example Azure Costing Configurations¶ Account Type
Azure Costing Mode
Notes
Standard (Pay as you go)
Standard
EA (Enterprise Agreement)
Standard
CSP (Cloud Solution Provider)
CSP
CSP Tenant, ID, Client ID, and Client Secret required
CSP (Cloud Solution Provider)
Azure Plan (Microsoft Customer Agreement)
CSP Tenant, ID, Client ID, and Client Secret required on the primary cloud
Once done configuring the Cloud, select NEXT. NOTE all specified values except the Subscription ID can be changes after the Cloud is created.
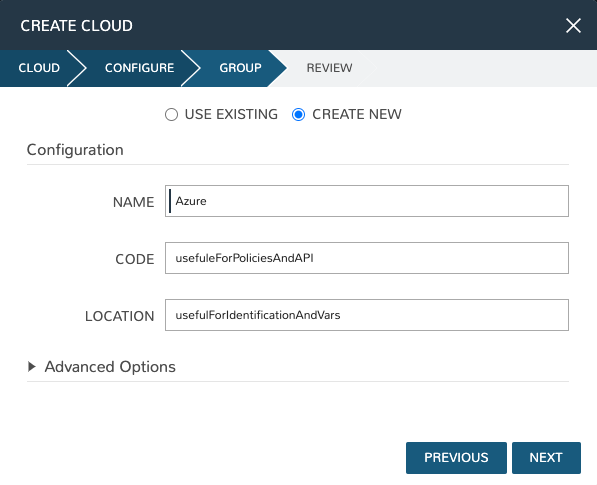
Next select an existing Group to add the Azure Cloud to, or create a new Group, then select NEXT
Review the configuration and then select COMPLETE
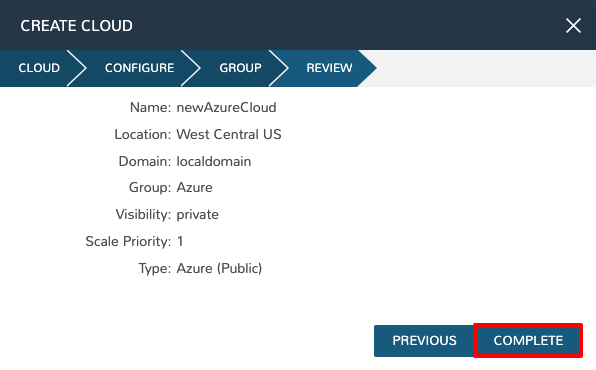
Your new Azure Cloud integration will be created and begin to sync.
Note
The initial sync of an Azure Cloud can take some time due to Marketplace data sync.