Hyper-V
Hyper-V is the virtualized server computing environment introduced by Microsoft. Hyper-V is consumed by Morpheus as a private cloud offering and is a common hypervisor technology in data centers. Morpheus provides an avenue to aggregate Hyper-V resources together to allow efficient and seamless deployment of applications as a virtual machine (VM) or Docker host in the world of Hyper-V.
Features
Virtual Machine Provisioning
Discovery of Existing Instances
Containers
Backups / Snapshots
Resources Groups
Migrations
Auto Scaling
Load Balancing
Remote Console
Periodic Synchronization
Veeam Integration
Lifecycle Management and Resize
Unique Kerberos Authentication
Getting Started
To get started, a few prerequisites must first be met. The Hyper-V host must be installed with its firewall enabled and it can either be joined to a domain or standalone. The Hyper-V host must also have the external network of Hyper-V configured and it can share this network with the management operating system. A user account that is part of the local administrators group on the Hyper-V host is also required. This document covers Hyper-V 2008 and Hyper-V 2012.
Understanding WinRM
Morpheus uses WinRM to communicate to the Hyper-V host for deployment of the Morpheus Agent. The Morpheus Agent allows for the host dashboard to be populated with information in the form of graphs that cover CPU, Network, Storage, and memory consumption. Furthermore, this Agent provides logging and monitoring capabilities.
If Windows Remote Management (WinRM) is not installed and configured, WinRM scripts do not run and the WinRM command line tool cannot perform data operations or allow for the Morpheus Agent to be installed. WinRM uses HTTP port 5985 or HTTPS port 5986 for communications.
To better understand all of the default settings of WinRM please refer to the following page in Microsoft documentation.
Native Authentication
To configure WinRM with default settings (WINRM_NATIVE)
Type the following command at a command prompt:
$ winrm quickconfig
If you are not running under the local computer Administrator account, you must either select Run as Administrator from the Start menu or use the Runas command at a command prompt.
When the tool displays Make these changes [y/n]?, type y.
If configuration is successful, the following output is displayed:
$ WinRM has been updated for remote management.
$ WinRM service type changed to delayed auto start.
$ WinRM service started.
$ Created a WinRM listener on HTTP://* to accept WS-Man requests to any IP on this machine.
Keep the default settings for client and server components of WinRM, or customize them. By default Kerberos is enabled and if domain authentication is not being used we want to disable that. Issue the below commands to setup basic authentication:
$ winrm set winrm/config/service/Auth '@{Basic="true"}'
$ winrm set winrm/config/service '@{AllowUnencrypted="true"}'
$ winrm set winrm/config/service/Auth '@{Kerberos="false"}'
Domain Authentication
To configure WinRM with Domain Authentication (WINRM_INTERNAL)
Type the following command at a command prompt
$ winrm quickconfig
If you are not running under the local computer Administrator account, you must either select Run as Administrator from the Start menu or use the runas command at a command prompt.
When the tool displays Make these changes [y/n]?, type y.
If configuration is successful, the following output is displayed:
$ WinRM has been updated for remote management.
$ WinRM service type changed to delayed auto start.
$ WinRM service started.
$ Created a WinRM listener on HTTP://* to accept WS-Man requests to any IP on this machine.
Keep the default settings for client and server components of WinRM, or customize them. Issue the below commands to setup domain authentication:
$ winrm set winrm/config/service/Auth @{Basic="true"}
$ winrm set winrm/config/service @{AllowUnencrypted="false"}
$ winrm set winrm/config/service/Auth @{Kerberos="true"}
Kerberos authentication will also need to be configured on the Morpheus appliance to support Windows domain accounts to access the remote host with WINRM_INTERNAL connection type.
On the Morpheus appliance the krb5-user package must be installed.
For Ubuntu the command is as follows:
$ sudo apt-get install krb5-user
For Centos the command is as follows:
$ sudo yum install krb5-workstation pam_krb5 -y
Create a file in /etc called krb5.conf and replace the domain name with the name of the domain to be used. In this case we used Morpheus .com as the domain.
[libdefaults]
        default_realm = |morpheus| .COM
            dns_lookup_kdc = true
            verify_ap_req_nofail = false
        default_tgs_enctypes = rc4-hmac
        default_tkt_enctypes = rc4-hmac
[realms]
        |morpheus| .COM = {
                kdc = win-ad.|morpheus| .COM:88
                admin_server = win-ad.|morpheus| .COM:749
     }
[domain_realm]
    .|morpheus| .COM = |morpheus| .COM
        |morpheus| .COM = |morpheus| .COM
[login]
     krb4_convert = true
     krb4_get_tickets = false
After creation of the krb5.conf a keytab file is also required. See below for instructions on how to create a keytab file. http://www.itadmintools.com/2011/07/creating-kerberos-keytab-files.html
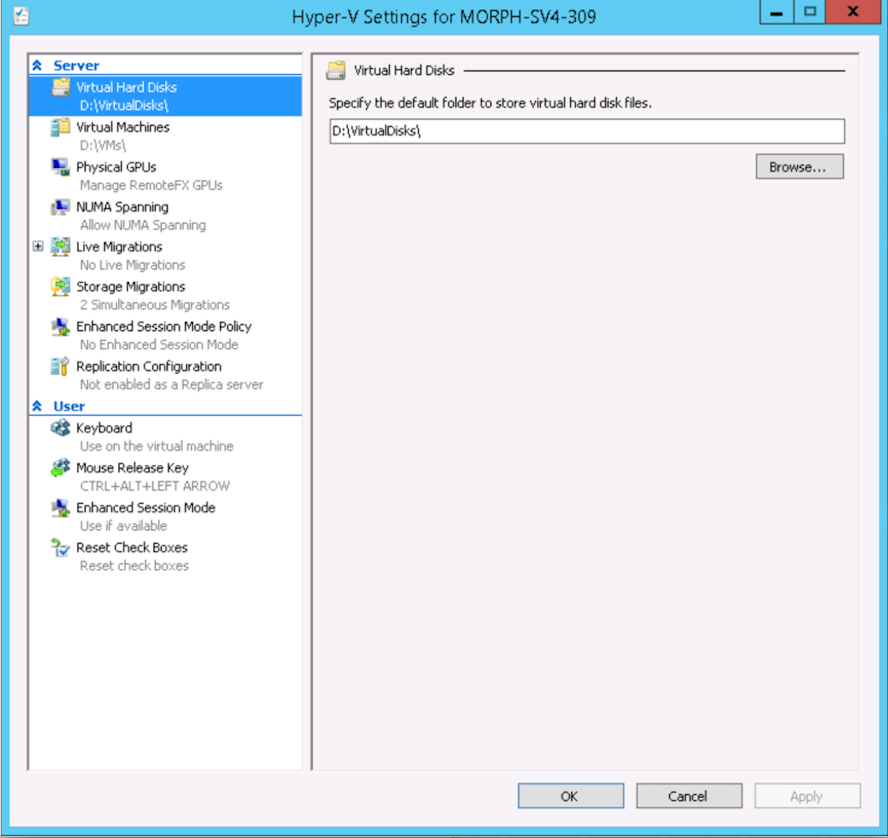
Adding Hyper-V as a Private Cloud
The Hyper-V host is prepared for Morpheus to communicate with it via WinRM so the Hyper-V private cloud is ready to be configured. Create a group and then create a Morpheus cloud for Hyper-V. Populated the information as show in Figure 1: specific for the environment being configured.

Note
The working path, vm path, and disk path should be created on the Hyper-V host by the Hyper-V administrator. If these paths are not created they will need to be setup and the Hyper-V settings will need to adjusted to reference them.
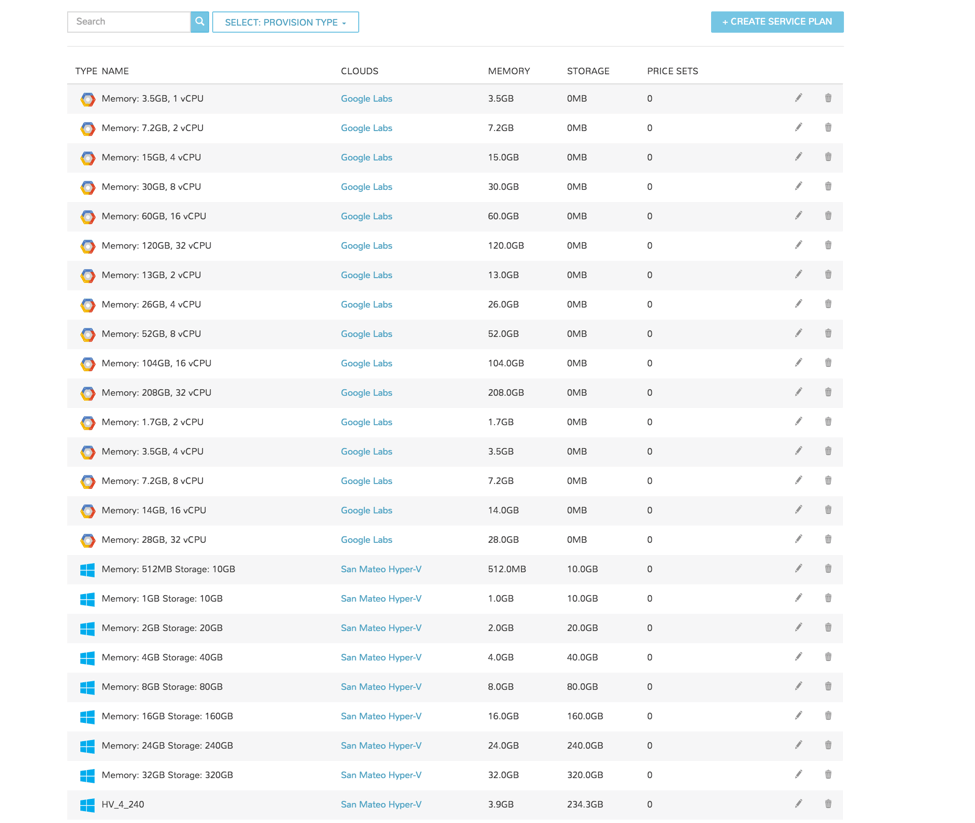
Service Plans
A default set of Service Plans are created in Morpheus for the VMware provisioning engine. These Service Plans can be considered akin to AWS Flavors or Openstack Flavors. They provide a means to set predefined tiers on memory, storage, cores, and cpu. Price tables can also be applied to these so estimated cost per virtual machine can be tracked as well as pricing for customers. By default, these options are fixed sizes but can be configured for dynamic sizing. A service plan can be configured to allow a custom user entry for memory, storage, or cpu. To configure this, simply edit an existing Service Plan tied to Hyper-V or create a new one. These are managed from the Admin > Plans & Pricing section.
Docker
So far this document has covered how to add the Hyper-V cloud integration and has enabled users the ability to provision virtual machine-based instances via the Add Instance catalog under the Provisioning menu. Another great feature provided by Morpheus out of the box is the ability to use Docker containers and even support multiple containers per Docker host. To do this a Docker Host must first be provisioned into Hyper-V (multiple are needed when dealing with horizontal scaling scenarios).
To provision a Docker Host simply navigate to the Clusters tab of the Cloud detail page or Infrastructure > Clusters section. From there click + ADD CLUSTER to add a Hyper-V Docker Host. A cluster is created when adding Docker hosts, even when only one host is needed.
Morpheus views a Docker host just like any other hypervisor with the caveat being that it is used for running containerized images instead of virtualized ones. Once a Docker Host is successfully provisioned a green checkmark will appear to the right of the host marking it as available for use. In the event of a failure click into the relevant host that failed and an error explaining the failure will be displayed in red at the top.
Some common error scenarios include network connectivity. For a Docker Host to function properly, it must be able to resolve the Morpheus appliance url which can be configured in Admin | Settings. If it is unable to resolve and negotiate with the appliance than the agent installation will fail and provisioning instructions will not be able to be issued to the host.