Openstack
Overview
Openstack is becoming a widely used on-premise infrastructure orchestration platform. It has a wide array of contributors and enterprise sponsorships. There are several variations on Openstack as well. Morpheus supports integration with all the various platform offerings and ranges in support all the way back to Openstack Juno. The complete list of compatible versions is listed in our Integration Compatibility table. It leverages the APIs and provides full functionality as a self service portal in front of Openstack.
Features
Virtual Machine Provisioning
Backups and Snapshots
Security Group Management
Disk Mode support Local/Image (via Ceph)
Floating IP Assignment support
Brownfield VM management and Migration
Lifecycle Management and Resize
Docker Host management and configuration
Manila File Services (SFS)
Object Storage (OBS)
Network Lifecycle
LBaaS/Octavia Load Balancing Services
On top of all these features, Morpheus also adds additional features to Openstack that do not exist out of the box to make it easier to manage in multitenant environments as well as hybrid cloud environments:
Image to QCOW2 Image Conversion
QCOW2 to RAW Image Conversion
Multitenancy resource allocation
Virtual Image management (Blueprints)
Auto-scaling and recovery
Instance Cloning
Morpheus Kubernetes Cluster Deployment
Tip
To allow Morpheus to list Hypervisor Hosts, ensure the Openstack user used for the Cloud Integration has sufficient privileges for os_compute_api:os-hypervisors in /etc/nova/policy.json in Openstack.
Getting Started
OpenStack Clouds are very easy to integrate with Morpheus. First, go to the Infrastructure > Clouds section and click + ADD. Select OpenStack to begin the integration process, most branded flavors of OpenStack will work with this Cloud selection as well.
Warning
Support for OpenStack v2 Identity API has been removed in v5.3.3
Cloud Configuration
- NAME
Name of the Cloud in Morpheus
- CODE
Unique code used for api/cli, automation and policies.
- LOCATION
Description field for adding notes on the cloud, such as location.
- VISIBILITY
For setting cloud permissions in a multi-tenant environment. Not applicable in single tenant environments.
- TENANT
If Visibility is set to Private, select the Tenant the Cloud resources will assigned to.
- ENABLED
When disabled, automatic Cloud sync is paused and the Cloud will not be selectable for provisioning.
- AUTOMATICALLY POWER ON VMS
When enabled, Morpheus will maintain the expected power state of managed VMs. Morpheus will power on any managed VMs in the Cloud that have been shut down for unknown reasons (not powered off by Morpheus) to ensure availability of services.
Note
When “AUTOMATICALLY POWER ON VMS” is enabled, the power state of managed VMs should be maintained in Morpheus. This setting is not applicable to discovered/unmanaged resources.
Details
- IDENTITY API URL
v3 Identity endpoint.
- DOMAIN ID
For Default domains, Default can be used. For other domain the Domain ID must be entered, not the Domain Name.
- PROJECT
Enter the target project or leave this field blank to integrate all projects
- USERNAME
Service Username
- PASSWORD
Service user password
- OS VERSION
Select Openstack Version. Morpheus supports the latest versions of OpenStack, select the latest version available if your current version is not shown.
- IMAGE FORMAT
Select QCOW2, RAW or VMDK Image Type
- LB TYPE
Select LB Type for Openstack LB syncing and creation
- Inventory Existing Instances
Select for Morpheus to discover and sync existing VM’s
- Enable Hypervisor Console
Hypervisor console support for openstack currently only supports novnc. Be sure the novnc proxy is configured properly in your openstack environment. When disabled Morpheus will use ssh and rdp for console conneciton (vm/host credentials required)
Advanced Options
- DOMAIN
Specify a default domain for instances provisioned to this Cloud.
- SCALE PRIORITY
Only affects Docker Provisioning. Specifies the priority with which an instance will scale into the cloud. A lower priority number means this cloud integration will take scale precedence over other cloud integrations in the group.
- APPLIANCE URL
Alternate Appliance url for scenarios when the default Appliance URL (configured in admin > settings) is not reachable or resolvable for Instances provisioned in this cloud. The Appliance URL is used for Agent install and reporting.
- TIME ZONE
Configures the time zone on provisioned VM’s if necessary.
- DATACENTER ID
Used for differentiating pricing among multiple datacenters. Leave blank unless prices are properly configured.
- NETWORK MODE
Unmanaged or select a Network Integration (NSX, ACI etc)
- LOCAL FIREWALL
On or Off. Enable to managed Host and VM firewall/IP Table rules (linux only)
- SECURITY SERVER
Security Server setting is for Security Service Integrations such as ACI
- TRUST PROVIDER
Select Internal (Morpheus) or an existing Trust Provider Integration
- STORAGE MODE
Single Disk, LVM or Clustered
- BACKUP PROVIDER
Select a backup provider. Depending on the Cloud type and any currently-configured backup plugins you may select Internal Backups (Morpheus) or another configured backup solution
- REPLICATION PROVIDER
Sets the default Replication Provider for the Cloud. Select an existing Replication Provider Integration
- GUIDANCE
Enable Guidance recommendations on cloud resources.
- COSTING
Enable for Morpheus to sync Costing data from the Cloud provider, when available. For on-prem Clouds, enabling costing activates a costing service designed to mirror the live costing experience of public clouds, including invoicing with line items and real-time cost data (Operations > Costing > Invoices). If your organization utilizes reserved instances and you want to pull in related pricing data, select Costing and Reservations. If this is not relevant, select Costing to save money on additional calls to the AWS Cost Explorer API or similar service for other clouds.
- DNS INTEGRATION
Records for instances provisioned in this cloud will be added to selected DNS integration.
- SERVICE REGISTRY
Services for instances provisioned in this cloud will be added to selected Service Registry integration.
- CONFIG MANAGEMENT
Select a Chef, Salt, Ansible or Puppet integration to be used with this Cloud.
- CMDB
Select CMDB Integration to automatically update selected CMDB.
- CMDB DISCOVERY
When checked, any automatically discovered (unmanaged) servers onboarded into Morpheus from this Cloud will also have CMDB records created for them.
- CHANGE MANAGEMENT
Select an existing Change Management Integration to set on the Cloud. ex: Cherwell
- AGENT INSTALL MODE
SSH / WINRM: Morpheus will use SSH or WINRM for Agent install.
Cloud Init / Unattend (when available): (DEFAULT) Morpheus will utilize Cloud-Init or Cloudbase-Init for agent install when provisioning images with Cloud-Init/Cloudbase-Init installed. Morpheus will fall back on SSH or WINRM if cloud-init is not installed on the provisioned image. Morpheus will also add Agent installation to Windows unattend.xml data when performing Guest Customizations or utilizing syspreped images.
- API PROXY
Set a proxy for outbound communication from the Morpheus Appliance to the Cloud endpoints. Proxies can be added in the Infrastructure > Networks > Proxies tab.
- INSTALL AGENT
Enable to have Agent Installation on by default for all provisioning into this Cloud. Disable for Agent Installation to be off by default for all provisioning into this Cloud.
Provisioning Options
- PROXY
Set a proxy for inbound communication from Instances to the Morpheus Appliance. Proxies can be added in the Infrastructure > Networks > Proxies tab.
- Bypass Proxy for Appliance URL
Enable to bypass proxy settings (if added) for Morpheus Agent communication to the Appliance URL.
- NO PROXY
Include a list of IP addresses or name servers to exclude from proxy traversal
- USER DATA (LINUX)
Add cloud-init user data. Morpheus 4.1.0 and earlier assumes bash syntax. Morpheus 4.1.1 and later supports all User Data formats. Refer to https://cloudinit.readthedocs.io/en/latest/topics/format.html for more information.
Note
v5.3.3 adds openstack project management which requires additional permissions in openstack:
identity:list_domain_roles
identity:list_roles
identity:list_projects
identity:create_project
identity:update_project
identity:delete_project
identity:create_grant
identity:revoke_grant
Most of the information in the dialog can be acquired from the Openstack dashboard. under Project > Access & Security > API Access. The API URL that is needed is the one tied to Identity. The Domain and Project inputs typically correlate to the multitenant domain setup within Openstack (sometimes just left at default) as well as the project name given to instances. Morpheus allows multiple integrations to the same Openstack cluster to be scoped to various domains and projects as needed.
The remaining options help Morpheus determine which API capabilities exist in the selected Openstack environment. Hence the need for the Openstack version and image format. If a newer Openstack cluster is being used then exists in the dropdown, simply select the most recent version in the dropdown and this should function sufficiently until the new version is added.
Tip
Some Openstack environments do not support QCOW2 and force RAW image formats (like Metapod). This is due to some network overhead in Ceph created by using QCOW2. Morpheus keeps two copies of Openstack image templates for this exact purpose.
Saving this cloud integration should perform a verification step and close upon successful completion.
Existing Instances
Morpheus provides several features regarding pulling in existing virtual machines and servers in an environment. Most cloud options contain a checkbox titled ‘Inventory Existing Instances’. When this option is selected, all VMs found within the specified scope of the cloud integration will be scanned periodically and Virtual Machines will be synced into Morpheus.
By default these virtual machines are considered ‘unmanaged’ and do not appear in the Provisioning > Instances area but rather Infrastructure > Compute > Virtual Machines. However, a few features are provided with regards to unmanaged instances. They can be assigned to various accounts if using a multitenant master account, however it may be best suited to instead assign the ‘Resource Pool’ to an account and optionally move all servers with regards to that pool (more on this later).
A server can also be made into a managed server. During this process remote access is requested and an agent install is performed on the guest operating system. This allows for guest operations regarding log acquisition and stats. If the agent install fails, a server will still be marked as managed and an Instance will be created in Provisioning, however certain features will not function. This includes stats collection and logs.
Service Ports
Morpheus consumes the following OpenStack service ports by default as part of its cloud integration. If your OpenStack implementation has been configured to use alternate service ports, these can be overwritten in the Cloud configuration under the Service Endpoints section when adding or editing the Cloud integration.
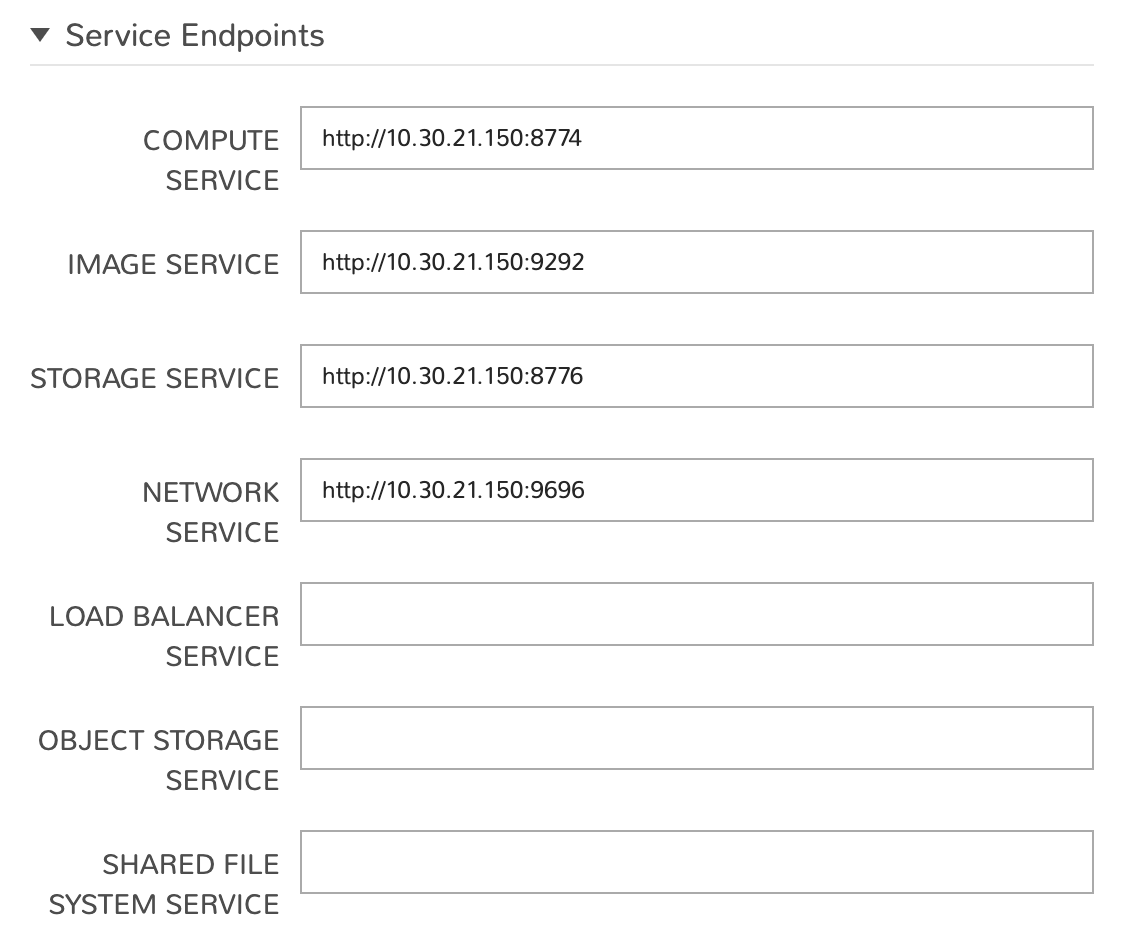
Default Service Ports
Identity: 5000
Compute: 8774
Image: 9292
Key Manager: 9311
Network: 9696
Volume API v3: 8776 v3
Manila: 8786
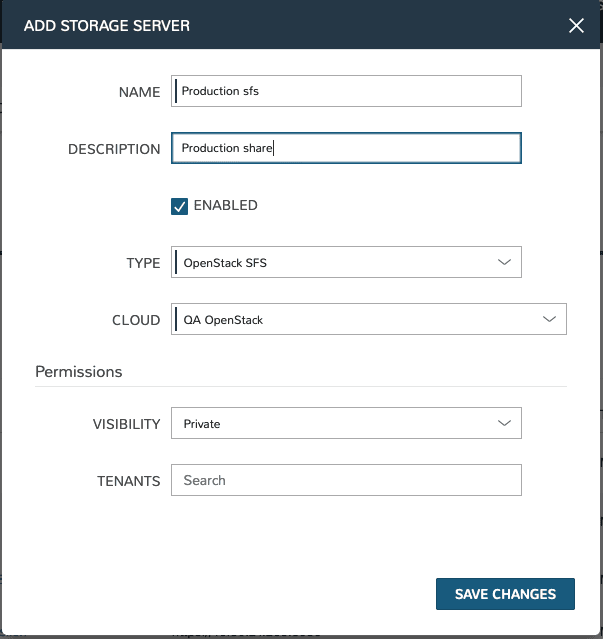
OpenStack Scalable File Service (SFS)
The Morpheus integration with Openstack Cloud includes the capability to work with Openstack Scalable File Service (SFS). SFS is shared file storage hosted on Openstack Cloud. By integrating Morpheus with Openstack you can discover, create, manage, and delete SFS servers, as well as view and work with the file shares and files contained therein.
SFS Server Discovery and Management
On integrating Openstack Cloud with Morpheus, SFS servers and file shares are discovered automatically after a short time. The server(s) can be viewed in Infrastructure > Storage > Servers. By viewing the server detail page and clicking EDIT, the storage server can be scoped as needed. Administrators can choose to scope to other Openstack Cloud integrations (if more than one relevant integration currently exists), select from synced availability zones, and scope the storage server to specific Tenants if desired.
Additionally, Openstack SFS servers can be created from the storage server list page (Infrastructure > Storage > Servers) directly in Morpheus. Click +ADD to begin and set the storage server type value to “Openstack SFS”. Just like with existing synced SFS servers, those created from Morpheus can be scoped as needed.
Network and Router Creation
Once an OpenStack Cloud is integrated into Morpheus, new network creation options become available. When adding a new network (Infrastructure > Networks > Networks Tab), a new type labeled “OpenStack Private Network” is available when clicking +ADD. When the user creates this network construct in Morpheus, a layer two subnet is created but it’s not connected to a Virtual Private Cloud (VPC). This is by design as an Internet-routable network is not always desired. Continue on with this section after creating the network to also create a VPC (router).
Create a network
Navigate to Infrastructure > Networks
Click on the Networks tab
Click +ADD
Select OpenStack Private Network
Complete the modal based on requirements for the new network
Click SAVE CHANGES
Create a router
Navigate to Infrastructure > Networks
Click on the Routers tab
Click +ADD
Select OpenStack Router
Complete the modal based on requirements for the new router
Click SAVE CHANGES
When creating a router, it’s helpful to note that the External Network is the floating IP network that has been assigned to the OpenStack project. This network will grant your Instances their routes out to the Internet. The Internal Subnet can be a layer two subnet that you may have created in the previous step. In addition, multiple subnets can be added to the router (VPC) and the IP address on the subnet would be the router’s internal IP address.
Advanced
There are a few advanced features when it comes to provisioning on top of Openstack. Most of these present themselves in the provisioning wizard. This includes OS Volume Type (Local or Volume) which dictates whether the main OS disk is copied and run off the hypervisor or remotely mounted as a volume via Glacier. Some Openstack setups only configure hypervisors with minimal local disks so volume type is needed.
Another option during provisioning is “Assign Floating IP”. This option does exactly what it says and is similar to the feature on the Openstack instance dashboard itself. It should be noted that this will attempt to acquire a floating IP from the project and, if out of capacity, will attempt to increase capacity to the project if the cloud credentials provided have sufficient administrative privileges to do so.
Docker
So far this document has covered how to add the Openstack cloud integration and has described how to provision virtual machine-based Instances via the Add Instance catalog in Provisioning. Another great feature provided by Morpheus out of the box is the ability to work with Docker containers and even support multiple containers per Docker host. To do this, a Docker host must first be provisioned into Openstack (multiple hosts are needed when dealing with horizontal scaling scenarios).
To provision a Docker Host, navigate to Infrastructure > Clusters and click + ADD CLUSTER. Complete the provisioning wizard including selecting the appropriate Group and Cloud. Alternatively, you can navigate to the Clusters tab for a specific Cloud (Infrastructure > Clouds > Specific Cloud detail page > Clusters tab) and begin the process of provisioning a Docker host to that Cloud from there. Once completed, this host will show up in the Hosts sections (Infrastructure > Hosts OR Infrastructure > Clouds > Specific Cloud detail page > Hosts tab). Morpheus views a Docker host just like any other Hypervisor with the caveat being that it is used for running containerized images instead of virtualized ones.
Once a Docker Host is successfully provisioned, a green checkmark will appear to the right of the host marking it as available for use. In the event of a failure, click into the relevant host that failed and an error explaining the failure will be displayed in red at the top.
Some common error scenarios include network connectivity. For a Docker Host to function properly, it must be able to resolve the Morpheus appliance URL which can be configured in Administration > Settings. If it is unable to resolve and negotiate with the appliance, the Morpheus Agent installation will fail and provisioning instructions will not be able to be issued to the host.