Trust
The Trust section is where credentials, SSH keypairs, and SSL certificates are stored. In addition, related integrations to outside technologies can be made in this section as well. Integration types include Morpheus Cypher and Hashicorp Vault for externalized credential storage. Continue onto the next section for more on standing up an external Cypher credential store.
Credentials
The credentials section allows for various credential types to be securely stored and called back when necessary, such as when creating new integrations with Cloud accounts or other outside technologies. Credentials can also be used to populate REST-based Option Lists sourced from data behind an authentication wall, as well as to run automation Tasks on remote targets that require authentication. Credentials can be securely stored internally on the appliance or stored in an external Cypher integration, more information about setting up and integrating with an external Cypher store are in the next section. The following credential pair types are currently supported:
Access Key and Secret Key
Client ID and Secret
Email and Private Key
OAuth 2.0
Tenant, Username, and Keypair
Username and API Key
Username and Keypair
Username and Password
Username, Password, and Keypair
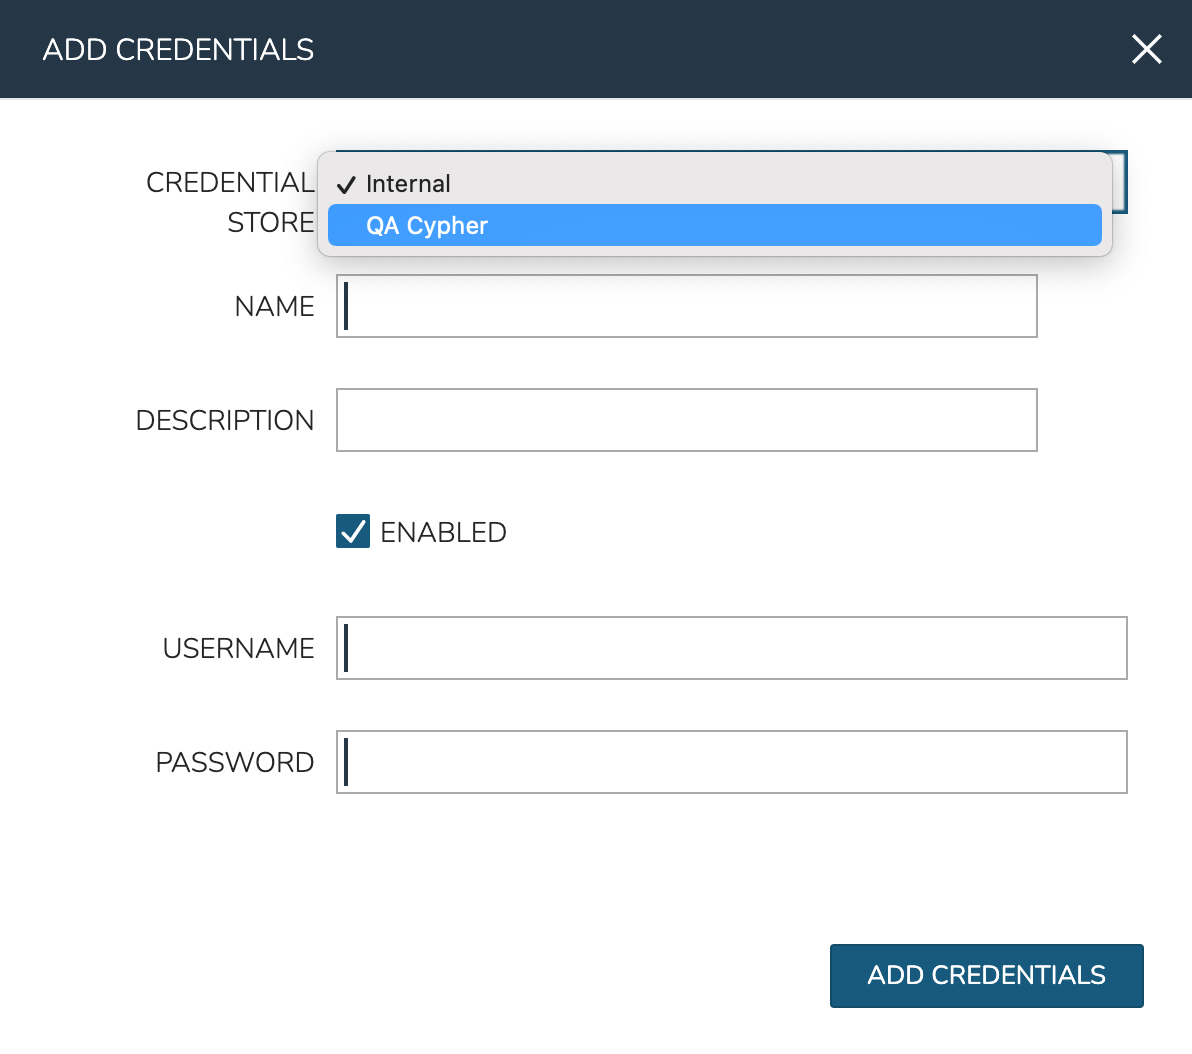
To create a new credential set, click + ADD and then select the type of credential set you’d like to store. Complete the following:
CREDENTIAL STORE: Select “Internal”, an integrated external Cypher store (if any), or an integrated Hashicorp Vault server (if any). See the section below for instructions on integrating with Vault or standing up and integrating with an external Cypher store.
NAME: A name for the credential set in Morpheus
DESCRIPTION: An optional description for the credential set
ENABLED: If checked, the credential set will be available for use
CREDENTIAL VALUES: Depending on the credential pair type selected (listed above), the remaining fields will be specific to the chosen type. See the next section for a more complete walkthrough on storing and using OAuth 2.0 credentials

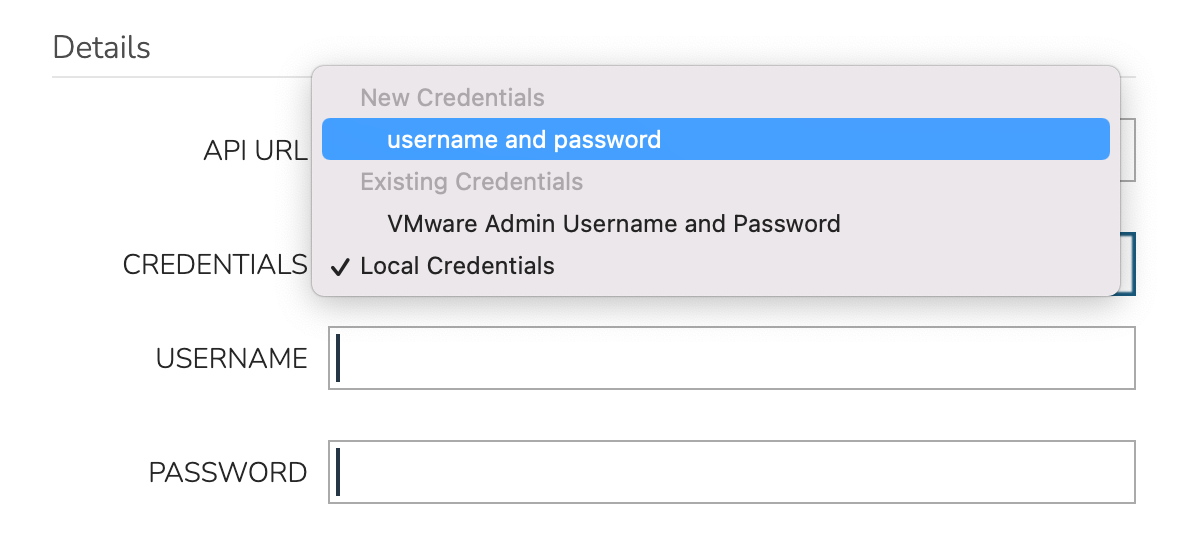
Finally, click ADD CREDENTIALS. Once saved, the credential set will be available for selection where appropriate in Morpheus UI. In the screenshot below, I’m integrating a new VMware Cloud. In the credentials section, I have the following options: Creating (and using) a new Username and Password credential set (which includes the option to save internally or to an external Cypher store), choosing a previously-stored credential set, or simply entering my credentials locally and not saving them for reuse.

OAuth 2.0 Credentials
Morpheus supports storage of credential sets for retrieving temporary access tokens, through OAuth 2.0, and using the tokens to access some resource. These credential sets can be used with REST-type Option Lists to retrieve information behind this type of authentication wall. Once stored, the credential can be used with as many Option Lists as needed and potentially in other areas of the product in the future.
To create a new credential set, click + ADD and then select “OAuth 2.0”. Complete the following, not all fields are present or required in every context:
CREDENTIAL STORE: Select “Internal” or an integrated external Cypher store (if any). See the next section for instructions on standing up and integrating with an external Cypher store
NAME: A name for the credential set in Morpheus
DESCRIPTION: An optional description for the credential set
ENABLED: If checked, the credential set will be available for use
GRANT TYPE: Client Credentials or Password Credentials
ACCESS TOKEN URL: The authorization server’s token endpoint
CLIENT ID: The client ID for an app registered with the target service
CLIENT SECRET: The client secret, often needed when requesting access outside the context of a specific user
USERNAME: (Only present with “Password Credentials” Grant Type) The username for a user with target data access
PASSWORD: (Only present with “Password Credentials” Grant Type) The password for the user indicated above
SCOPE: The scope of access requested to the target resource
CLIENT AUTHENTICATION: “Send as basic auth header” or “Send client credentials in body” - Indicates how Morpheus should issue the token received in requests to the target resource
Once done, click ADD CREDENTIALS.
With the OAuth 2.0 credential set stored, they can be set on REST-type Option Lists to source data from behind a compatible authentication wall. With a REST-type Option List open (Library > Options > Option Lists), click the CREDENTIALS dropdown and select the credential set you’ve created. Alternatively, you can add a credential set directly in the add/edit Option List modal if needed. Option Lists can be associated with Select List or Typeahead-type Inputs and applied to Layouts, Instance Types, Workflows, and more to allow for customization at provision or Workflow execution time. Additional details on creating Option Lists can be found in the Library section of Morpheus docs.
Integrating Hashicorp Vault
The Hashicorp Vault integration is not included with Morpheus by default. Download the plugin from Morpheus Exchange and add the plugin to Morpheus through the Plugins section. This allows users to store credential sets completely outside of Morpheus and in Hashicorp Vault, which may be required by your organization’s IT policies.
Note
The plugin space is universal and not specific to Tenants. If Subtenant users have access to Administration > Integrations > Plugins, any integrated plugins will be available in all Tenants across the appliance. In most cases, it makes sense to restrict access to this section from Subtenant users through the associated Tenant Role. Instead integrate plugins from the Primary Tenant and expose them to various Subtenants as needed.
Once downloaded, plugins are added to Morpheus in Administration > Integrations > Plugins. Simply browse your local filesystem for the JAR file downloaded from Morpheus Exchange and its capabilities will immediately be added to the appliance. After adding the plugin, configure access for the plugin to your Vault server. Do this by clicking the Edit (pencil) button in the row for the Vault plugin. Supply a URL for your Vault server and an access token, then save your changes.
Note
When creating a Vault integration, it’s recommended that you use a long-lived token. If the token suddenly becomes invalid, Morpheus will be unable to write new credential sets to Vault and will be unable to edit or delete any existing ones. Additionally, you won’t be able to use Vault-stored credential sets elsewhere in Morpheus, such as when creating new Cloud integrations or populating REST-based Option Lists which require authentication. Should this happen, simply obtain a new token, edit the Vault integration, update the token, and save your changes.
With the plugin added, a new integration type will appear in Infrastructure > Trust > Integrations. Click + ADD, then “Hashicorp Vault Credentials” to get started. The fields in the list below are available for configuration but it’s possible that no configuration will be necessary. If you do not enter a new API URL and TOKEN value, these are taken from the plugin configuration set a moment ago. Similarly, The Vault Secret Engine and Secret Path can be left at default values (or empty) if those values are acceptable. If you need to override the defaults or the URL/token set on the plugin, you may do so here.
NAME: A friendly name for the Vault integration in Morpheus
ENABLED: When marked, this Vault integration will be available to have credentials written to it
API URL: The URL for the Vault server (ex. http://xx.xx.xx.xx:8200)
TOKEN: A valid API token for the server (see note below)
HASHICORP VAULT SECRET ENGINE: Select KV Engine version 1 or 2, additional engines may be available in the future
ENGINE MOUNT: If desired, enter a custom engine mount. By default, if left empty, credentials are written to the “secret/” engine mount
SECRET PATH: If desired, enter a custom path and Morpheus will write new credential sets to that path. By default, if left empty, new credentials are written to “morpheus-credentials/”
When done, click SAVE CHANGES.
With the above process finished, this Vault integration will be available as a storage target when creating new credential sets. In Infrastructure > Trust > Credentials, after clicking + ADD and selecting the type of credential set to add, select the new Vault integration in the CREDENTIAL STORE field (default selection is “Internal”).
Installing and Integrating an External Cypher Appliance
The external Cypher appliance runs on a small separate VM and supports a variety of base OS distributions. Credentials are securely passed to the external appliance and can be retrieved and consumed in specific places within Morpheus UI. The download URL for the installer can be retrieved from Morpheus Hub, replace the placeholder URL in the instructions below with the correct URL for the latest version of the Cypher appliance.
Begin by provisioning and updating the VM for the Cypher appliance. Then, download the installer. The following steps go through the installation process on Ubuntu but, as mentioned in the previous paragraph, many popular distributions are supported.
# An example URL is shown below, find the URL for the latest version and for the correct distro at |morpheus| Hub
wget https://downloads.morpheusdata.com/path/to/morpheus-cypher_$version_amd64.deb
Next, install and reconfigure the package.
sudo dpkg -i morpheus-cypher_$version_amd64.deb
sudo morpheus-cypher-ctl reconfigure
After the installation and reconfigure is complete, we need to record the generated API key so we can integrate the external Cypher store with Morpheus in a later step. We can get this from the logs with the following command:
sudo morpheus-cypher-ctl tail

==> /var/log/morpheus-cypher/cypher/current <==
2022-02-02_15:22:27.84848 |  \/  (_) ___ _ __ ___  _ __   __ _ _   _| |_
2022-02-02_15:22:27.84848 | |\/| | |/ __| '__/ _ \| '_ \ / _` | | | | __|
2022-02-02_15:22:27.84848 | |  | | | (__| | | (_) | | | | (_| | |_| | |_
2022-02-02_15:22:27.84848 |_|  |_|_|\___|_|  \___/|_| |_|\__,_|\__,_|\__|
2022-02-02_15:22:27.84849   Micronaut (v3.2.2)
2022-02-02_15:22:27.84849
2022-02-02_15:22:28.09130 15:22:28.087 [main] INFO  i.m.context.env.DefaultEnvironment - Established active environments: [ec2, cloud]
2022-02-02_15:22:30.15129 15:22:30.151 [main] INFO  c.m.cypher.service.CypherService - Root Data: null
2022-02-02_15:22:30.83499 15:22:30.834 [main] INFO  c.m.cypher.service.CypherService - Initialized Root Token: c90xxxx00000xxxxxx000000xxxxx000 ... Write this down as it will only display once
2022-02-02_15:22:32.01282 15:22:32.012 [main] INFO  io.micronaut.runtime.Micronaut - Startup completed in 4749ms. Server Running: http://localhost:8080
Important
The API key is only shown once when the appliance is first installed. Securely store this API key for later reference or you will be unable to integrate this Cypher appliance with any other Morpheus appliances.
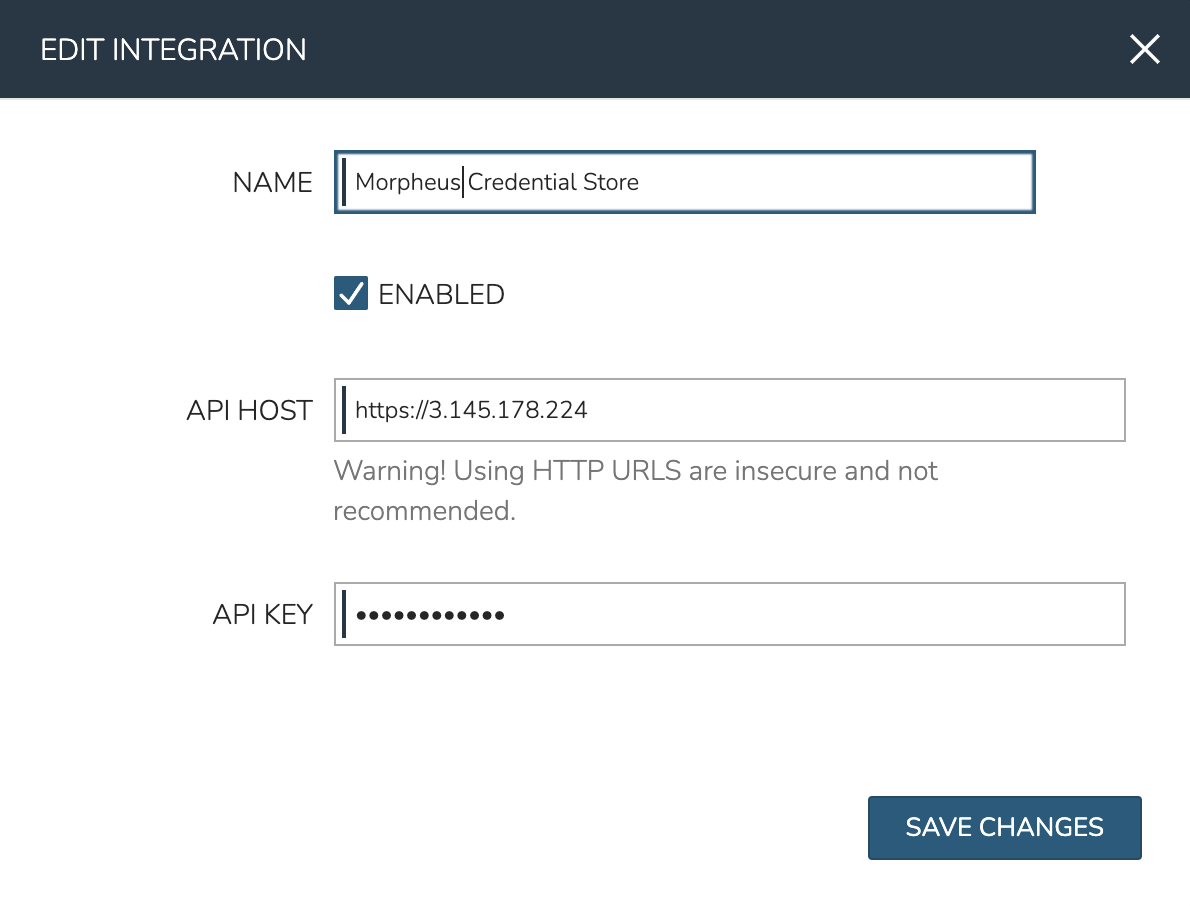
This completes the installation process, move to Morpheus UI to integrate the remote Cypher store with Morpheus. Cypher integrations are added in Infrastructure > Trust > Integrations. Click + ADD and then click Cypher. Configure the following:
NAME: A name for the Cypher integration in Morpheus
ENABLED: When checked, this Cypher integration is available for storing and retriving credentials
API HOST: The URL where your Cypher appliance can be reached (ex. https://x.x.x.x/)
API KEY: The API Key we retrieved and saved in the previous step

Click SAVE CHANGES to save the new integration. Refer to the “Credentials” section above for details on storing new credential sets using the external appliance and how they can be called back in various places throughout the UI.
Key Pairs
The key pairs section enables the following actions: Add and Delete key pairs. Key pairs are commonly used by Morpheus for accessing instances via SSH. Morpheus stores key pairs to simplify administration and access across both private and public clouds.
Morpheus only accepts key pairs in PEM format (for example, a private key beginning with -----BEGIN RSA PRIVATE KEY-----). If you have a key in another format, such as OpenSSH, convert the key:
#No passphrase
ssh-keygen -m pem -f /path/to/key

#With passphrase
ssh-keygen -p -P "old passphrase" -N "new passphrase" -m pem -f path/to/key
Add Existing Key Pair
To generate a existing Key Pair:
Navigate to Infrastructure > Trust > Key Pairs
On the Key Pairs tab, click + ADD and select “Existing Key Pair”
From the Add Key Pair modal input the following as needed:
Name
Public Key
Private Key
Passphrase
Note
Certain features do not require storage of the private key.
Generate Key Pair
To generate a Key Pair:
Navigate to Infrastructure > Trust > Key Pairs
On the Key Pairs tab, click + ADD and select “Existing Key Pair”
After naming the new key pair, Morpheus will reveal both the public and private key
Note
After the private key is initially revealed it will not be shown again. If needed, you may view the public key from the Keypairs list page at any time going forward. This key pair can be associated with your Linux user details in Morpheus user settings. The public key will be added to the authorized_keys file on provisioned workloads where your Linux user is added at provision time.
Delete Key Pair
To Delete Key Pair:
Navigate to Infrastructure > Keys & Certs
On the Key Pairs tab, select the trash can icon at the end of any row
Acknowledge that you wish to delete the selected key pair
SSL Certificates
SSL certificates authenticate the identity of web servers and encrypt the data being transmitted. Morpheus stores SSL certificates to simplify administration and application of SSL certificates to Morpheus-managed resources.
Add SSL Certificate
Navigate to Infrastructure > Keys & Certs
On the SSL Certificates tab, click + ADD
From the Add SSL Certificate wizard input the following as needed:
Name
Domain Name
Key File
Cert File
Root Cert
Delete SSL Certificate
To Delete SSL Certificate:
Navigate to Infrastructure > Keys & Certs
On the SSL Certificates tab, select the trash can icon at the end of any row
Acknowledge that you wish to delete the selected SSL Certificate
Trust Integrations
Some organizations may use outside technologies to manage their key and certificates. Morpheus allows users to integrate with Venafi for trust management. Trust management integrations can be managed from the Integrations tab on the Infrastructure > Keys & Certs page. Additionally, they can be managed in Administration > Integrations.
Currently, Morpheus supports trust integration Venafi. For more detailed information on integrating Venafi with Morpheus, take a look at our integration guide.