Code
Note
In v5.3.2+, provisioning/deployments is moved to provisioning/code.
Provisioning > Code contains the Repositories, Deployments and Code Integrations sections.
Required Role Permissions Click to Expand/Hide
Access and capabilities for the Code section is determined by the following role permissions:
- Role: Feature Access:
Infrastructure: Groups None: Cannot access Provisioning: Code section
Read or Full: Can access Provisioning: Code section
- Role: Feature Access:
Provisioning: Code Repositories None: Cannot access Provisioning: Code Repositories
List Files: Can browse repo folder and file names, select branch, refresh Repositories. Cannot access/view file contents.
Read or Full: Can browse repo folder and file names, select branch, refresh Repositories and access/view file contents.
- Role: Feature Access:
Provisioning: Code Deployments None: Cannot access Provisioning: Code Deployments.
Read: Can view Code Deployments. Cannot create, delete or edit Code Deployments.
Full: Can create, delete and edit Code Deployments.
- Role: Feature Access:
Provisioning: Code Integrations None: Cannot access Provisioning: Code Integrations.
Read: Can view Code Integrations. Cannot create, delete or edit Code Integrations.
Full: Can create, delete and edit Code Integrations
Repositories
The section contains the repositories integrated with HPE Morpheus Enterprise allowing users to browse repository folders and files, view file contents from any branch, trigger a refresh, and create tasks, scripts and templates directly from the repos. This section also handles Import/Export functionality which allows users to backup HPE Morpheus Enterprise items (Tasks, Library Items, etc.) as code in a repository which can also be imported into another appliance, if desired.
Browse integrated repositories
View repo files
Switch branches
Trigger repo refreshes
Filter by Integration, Organization or Text search
Create Custom Views
Create Tasks from repo files
Create Spec Templates from repo files
Role Permissions
Access and capabilities for the Repositories section is determined by the following role permissions:
- Role: Feature Access:
Infrastructure: Groups None: Cannot access Provisioning: Code section
Read or Full: Can access Provisioning: Code section
- Role: Feature Access:
Administration: Users None: Can view repo list but cannot browse repo folder and file names, select branch, refresh repositories or access/view file contents
Read or Full: Can view repo list, browse repo folder and file names, select branch, refresh repositories. Cannot access/view file contents without Read or Full level permission on
Provisioning: Code Repositories
- Role: Feature Access:
Provisioning: Code Repositories None: Cannot access Provisioning: Code Repositories
List Files: Can browse repo folder and file names, select branch, refresh Repositories. Cannot access/view file contents
Read or Full: Can browse repo folder and file names, select branch, refresh Repositories and access/view file contents
- Role: Feature Access:
Provisioning: Tasks None: Cannot create Tasks from repo files in repository browser
Read or Full: Can create Tasks from repo files in repository browser
- Role: Feature Access:
Provisioning: Library None: Cannot create Spec Templates from files in repository browser
Read or Full: Can create Spec Templates from files in repository browser
List Repositories
Select the
Provisioninglink in the navigation barSelect the
Codelink in the sub-navigation barUsers with sufficient permissions will see a list view of all integrated code repositories
Use the Search, Integrations or Organizations filter to filter listed repositories
Tip
Select the gear icon ⚙ in the top right of the repos list view to create and save custom list views.
Refresh Repository
Select the
Provisioninglink in the navigation barSelect the
Codelink in the sub-navigation barSelect name of target repository
Select ACTIONS ▿ >
Refresh
Browse Repositories
Select the
Provisioninglink in the navigation barSelect the
Codelink in the sub-navigation barSelect name of target repository
Users with sufficient permissions can browse repo folder and file names, select branches, and refresh repositories. Users can access/view file contents with Read or Full level permission on
Provisioning: Code RepositoriesSelect target folder icon to drill into the folder
View Repository File
Select the
Provisioninglink in the navigation barSelect the
Codelink in the sub-navigation barSelect name of target repository
Select ℹ icon to right of target file name
Note
Users can access/view file contents only with Read or Full level permission on Provisioning: Code Repositories. File contents displayed is from last repo sync. Refresh repo to ensure current version for recent commits.
Create Task from Repository File
Select the
Provisioninglink in the navigation barSelect the
Codelink in the sub-navigation barSelect name of target repository
Select gear icon to right of compatible target file name
Select target task type from available actions
Complete the NEW TASK wizard to create a new Task. The TYPE, SOURCE, REPOSITORY and FILE PATH fields will be automatically configured
Note
Shell and Powershell Tasks types can be created from the code repo browser in v8.0.7. Ensure file compatibility with target Task type.
Note
Users can create tasks from Repositories only with Read or Full level permission on Library: Tasks.
Create Spec Template from Repository File
Select the
Provisioninglink in the navigation barSelect the
Codelink in the sub-navigation barSelect name of target repository
Select gear icon to right of target file name
Select target spec template type from available actions
Complete the NEW SPEC TEMPLATE wizard to create a new Spec Template. The TYPE, SOURCE, REPOSITORY and FILE PATH fields will be automatically configured
Note
Terraform spec template types can be created from the code repo browser in v8.0.7. Other spec template types can be created from repo files by changing the TYPE field in the NEW SPEC TEMPLATE wizard.
Note
Users can create tasks from Repositories only with Read or Full level permission on Library: Templates.
Import and Export
Onboarded Git repositories can be configured as either import or export targets for a HPE Morpheus Enterprise appliance. This means that many created HPE Morpheus Enterprise constructs, such as Tasks, Library Items, and others, can be backed up to an integrated Git repository as code. This backup can take place on an automatic schedule (syncs every four hours) or can be triggered manually after changes are made. Users can back up all supported constructs within the appliance to a single repository or use Labels to back up only selected items. Exported constructs can also be imported into target appliances. This is useful for sharing items between two HPE Morpheus Enterprise environments, such as from a development appliance to a production appliance.
Note
The use of this feature requires an integrated Git repository. Please see our integration guide for Github or other Git integrations if you’ve not yet integrated your code repositories. While Morpheus can onboard and work with both public and private code repositories, it is strongly recommended that you use private repositories for exporting your Morpheus constructs as code.
Supported Constructs:
Tasks
Workflows
Spec Templates
Library Items
Forms
Note
When exporting all supported constructs HPE Morpheus Enterprise will export more than just the above types, however, only the above types are exportable as individual resources. This list may expand in the future as additional constructs become supported by future updates.
Role Permissions
Access and capabilities for the Import/Export feature set is determined by the following role permissions:
- Role: Feature Access:
Admin: Export/Import None: Cannot access the edit button on the Code List Page (Provisioning > Code) to set Import/Export settings or see Import/Export actions on the Code Repository Detail Page
Full: Code repositories can be edited to set Import/Export configurations and Import/Export actions can be viewed and used on Code Repository Detail Pages
Import/Export Settings
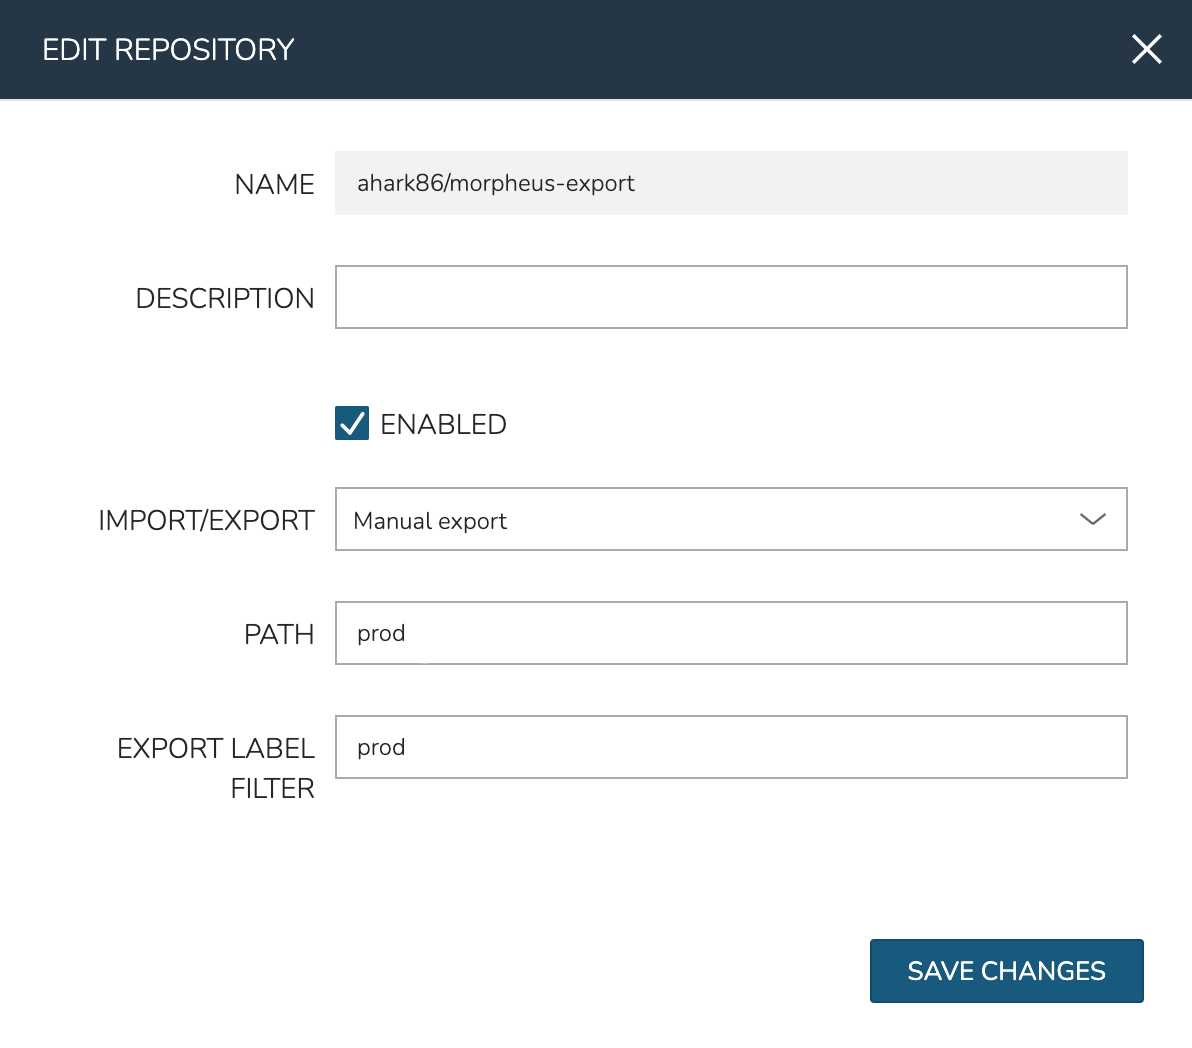
Code repositories are set to allow import, export or both from the Code Repositories List Page (Provisioning > Code). Click the edit button (✎) to the right of the selected repository to edit its import/export settings. When editing a code repository for import and export, set the following configurations:
ENABLED: When marked, routine syncs will take place between HPE Morpheus Enterprise and this repository. This includes all file syncs and not just actions related to import and export
IMPORT/EXPORT: Set “Auto export all” to automatically export once every four hours, “Manual export” to enable this repository for manual exports on demand, “Manual import” to enable this repository for manual imports on demand, “Import/Export” to enable both manual imports and exports on demand
PATH: The path within the repository where HPE Morpheus Enterprise should import from or export to
EXPORT LABEL FILTER: Enter a Label and HPE Morpheus Enterprise will export or import only constructs which include the Label into the repository. This must be a single Label, it cannot be a list of multiple Labels
Once you’ve configured the code repository, click SAVE CHANGES
Note
Code repositories must have at least one file in them in order to export HPE Morpheus Enterprise constructs as code. This can be as simple as a README file, they just cannot be empty.
Exporting
After a repository is configured to allow export (see previous section), it may perform periodic automatic refreshes or the user may need to refresh the repository on demand (depending on settings). To manually initiate an export, drill into the Repository Detail page, click ACTIONS, and click “Export All Resources”.
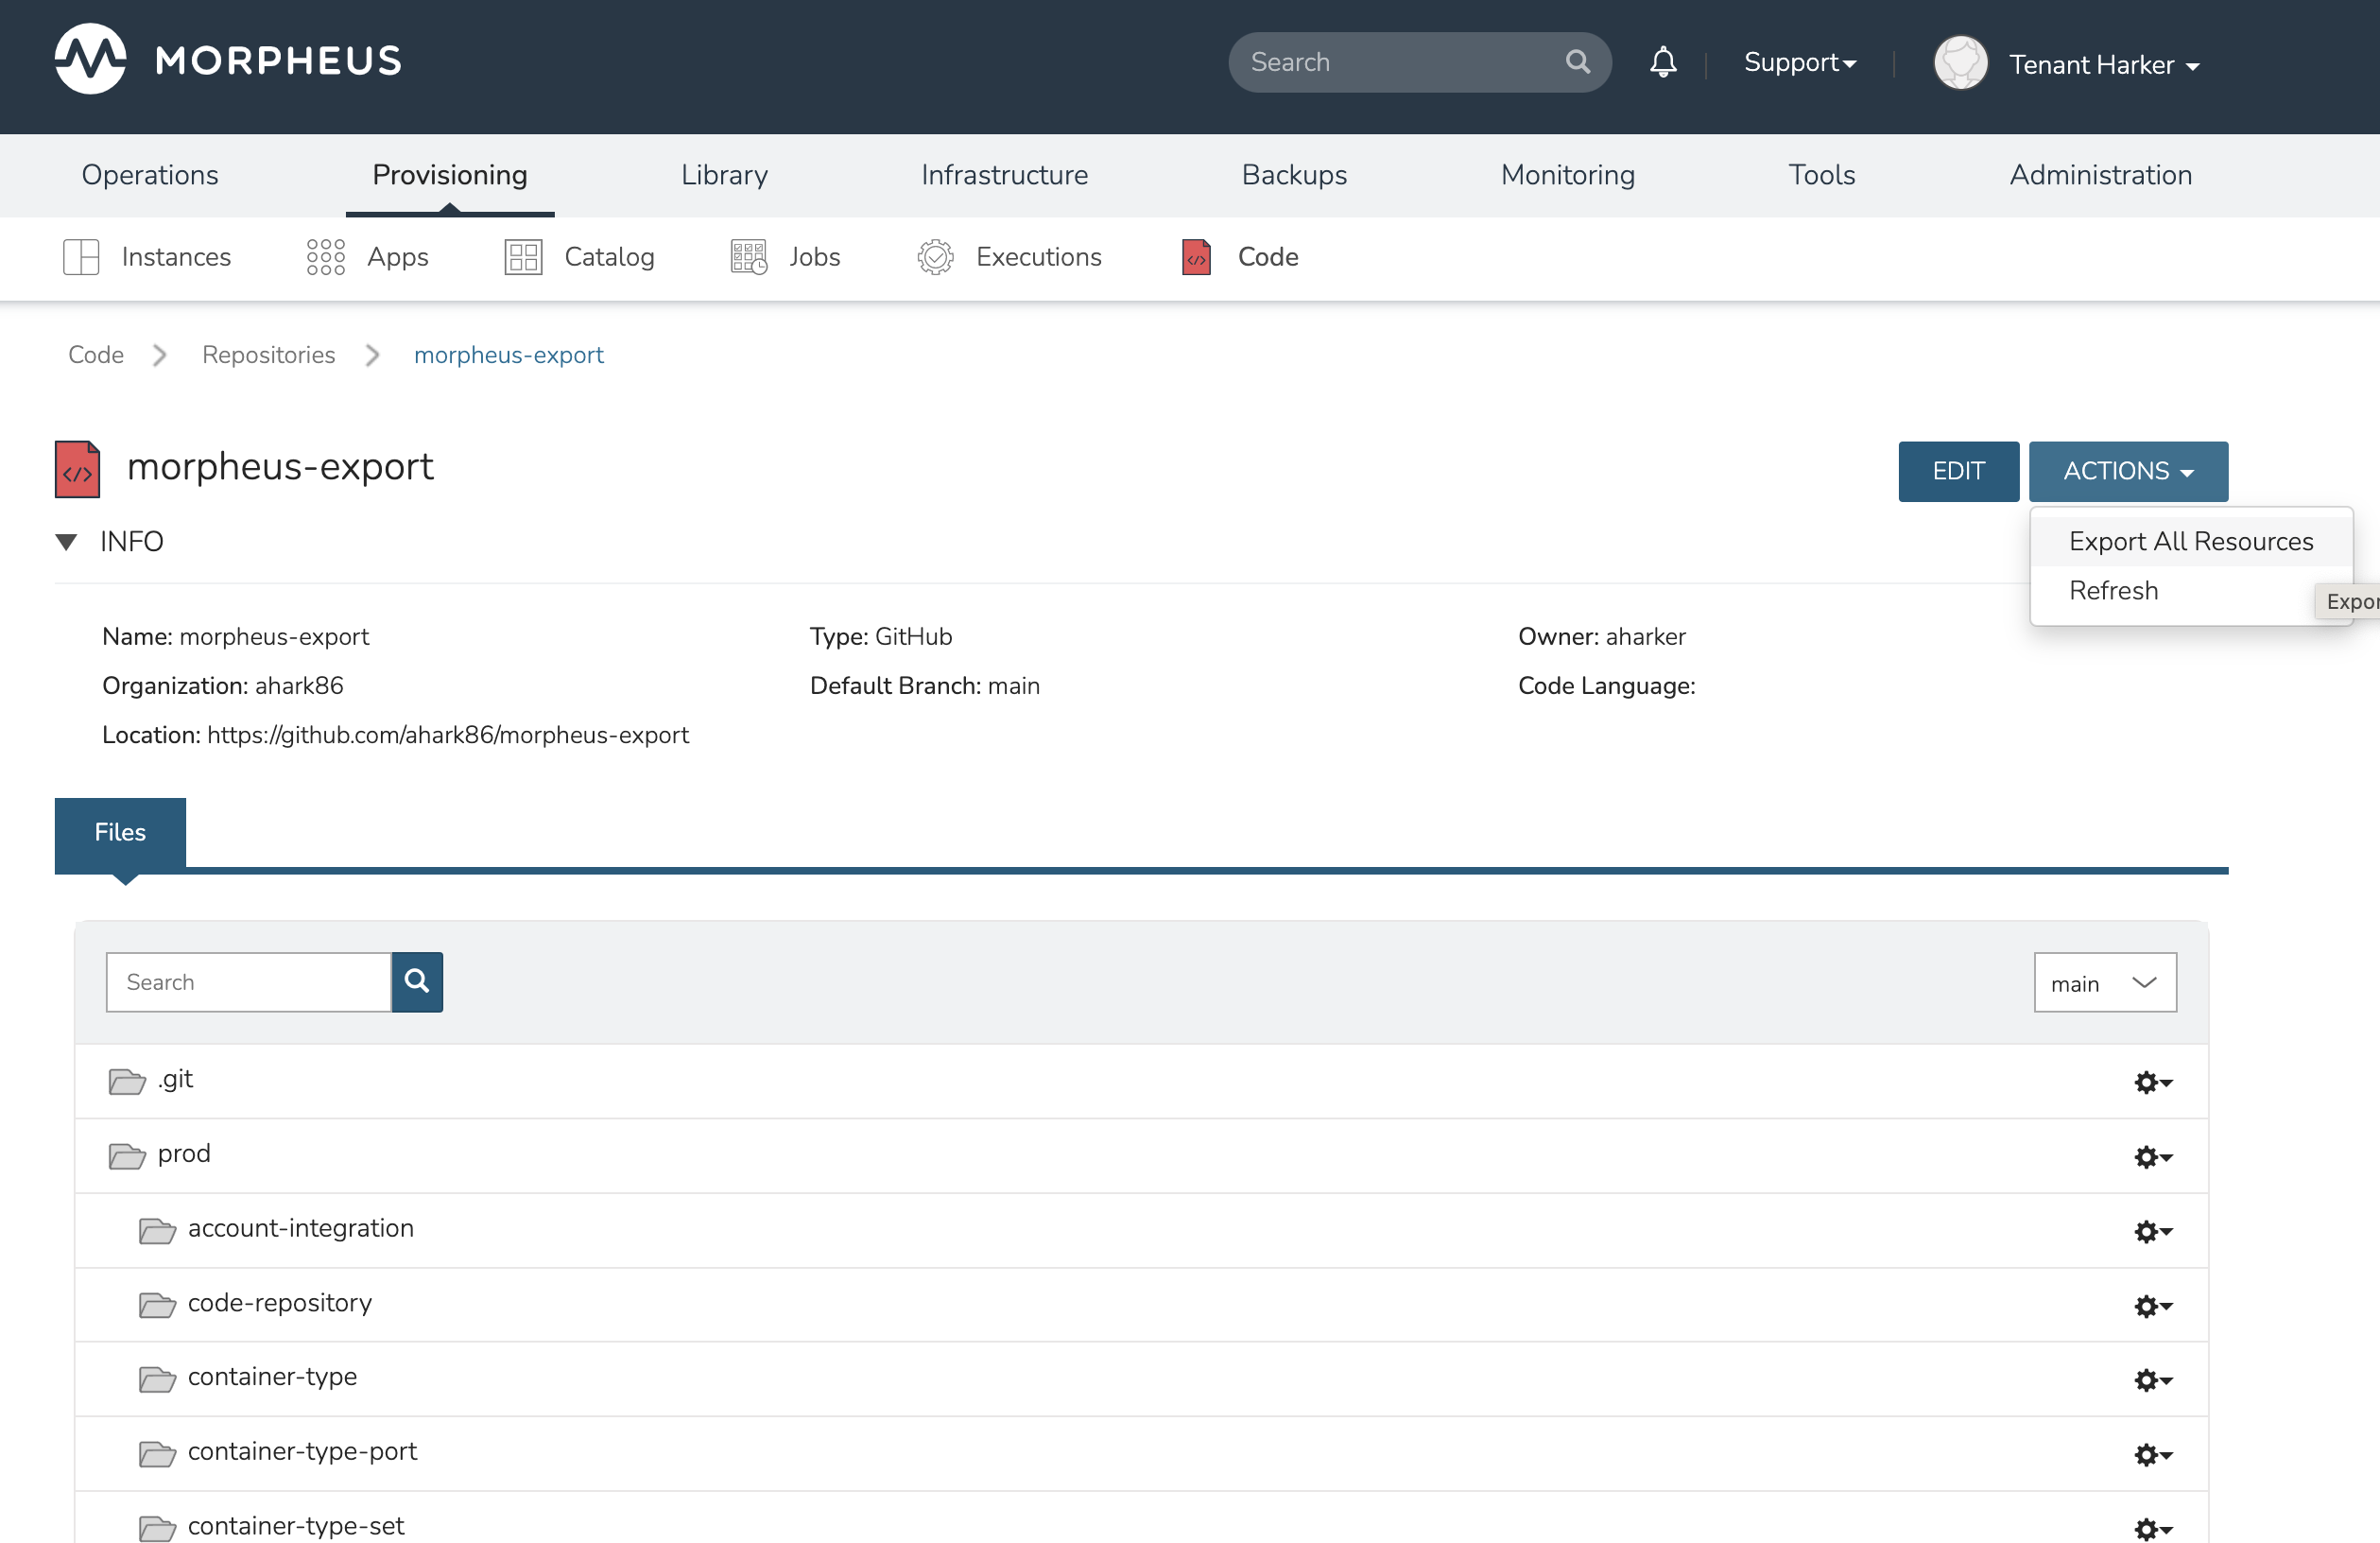
Any new or updated constructs will be refreshed within the repository at the path your repository is configured to export into. Bear in mind that, even if you’ve configured HPE Morpheus Enterprise to export only constructs categorized with a specific Label, any required dependencies would also be exported. For example, if you’ve labeled a Workflow to be exported, HPE Morpheus Enterprise will also export the dependency Tasks so the Workflow will be functional. A similar behavior applies for exported Library Items which may have a number of dependencies. In the screenshot below, files can be seen populating the targeted Github repository.
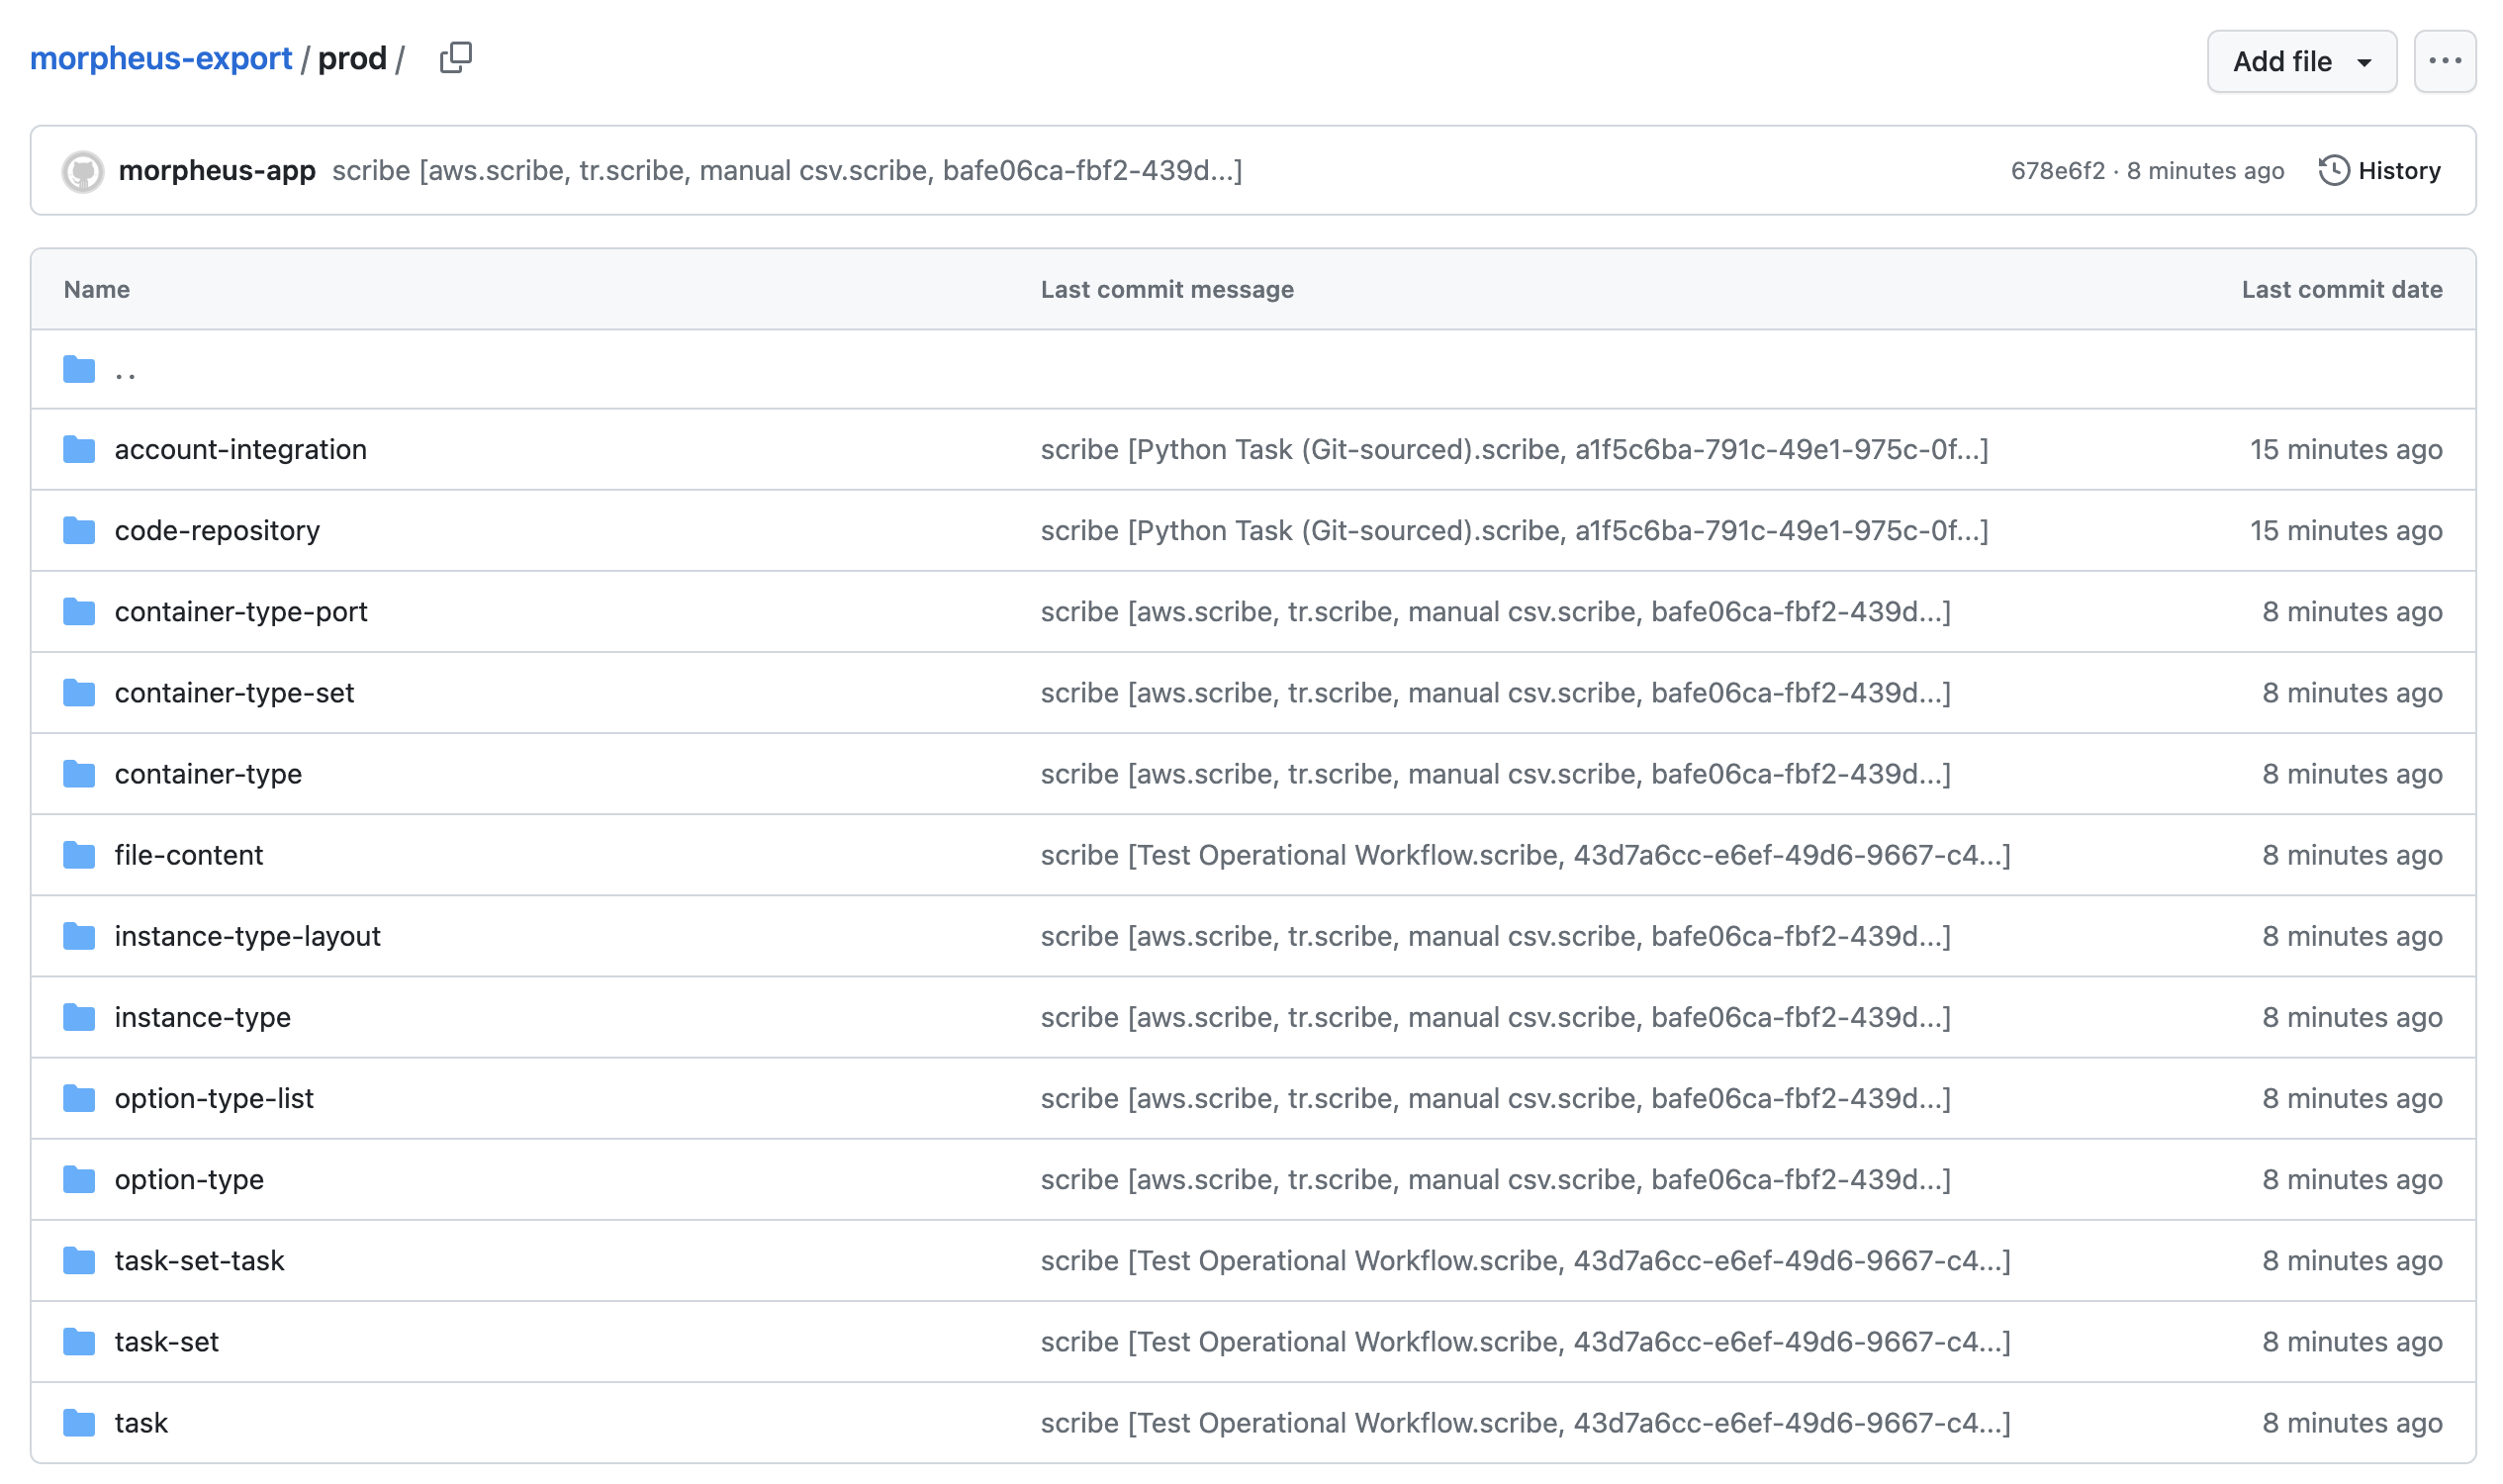
HPE Morpheus Enterprise items are exported as scribe files. These are HCL-formatted representations of the construct as code. They include static attributes representative of the attributes set on the construct itself or they may use UUIDs to refer to other constructs or integrations. It shouldn’t be necessary to view or edit them unless you’re curious.

Importing
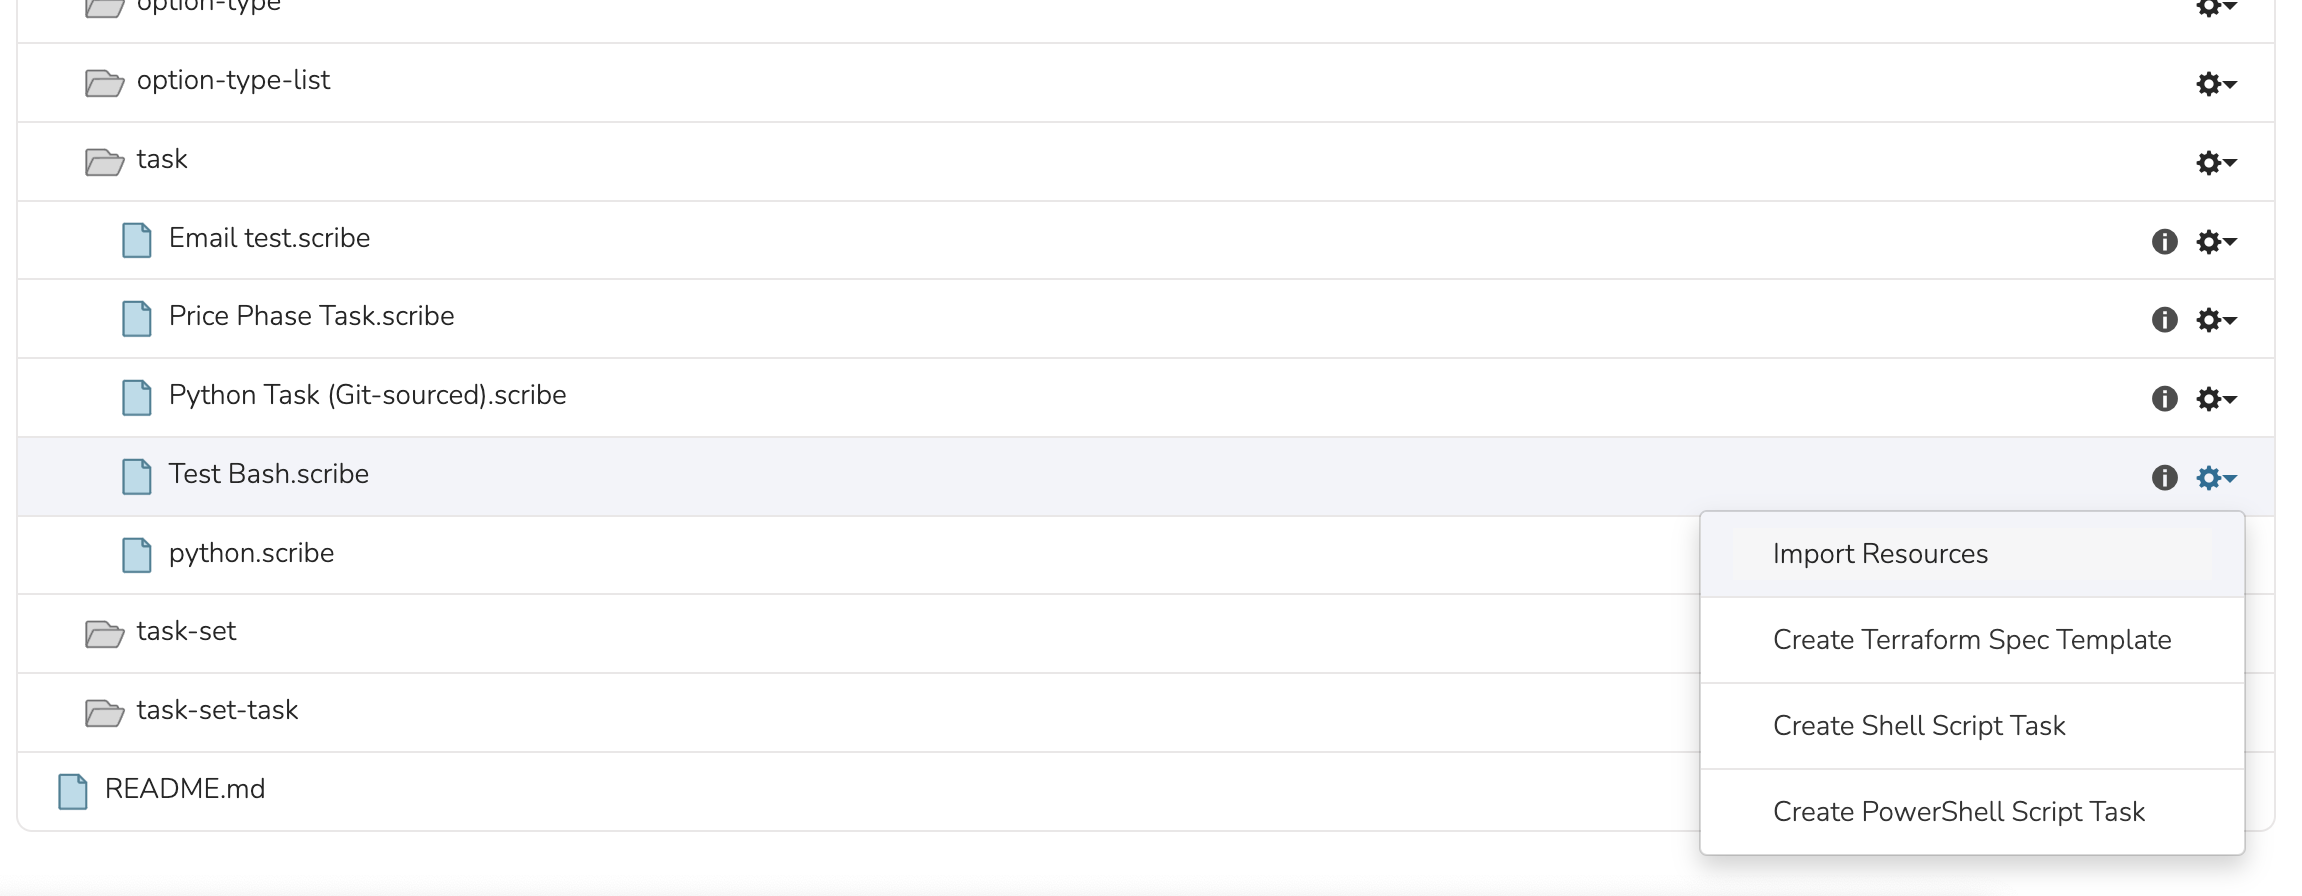
After HPE Morpheus Enterprise constructs have been exported as code, they can be pulled down into other appliances which have the same repositories integrated. Items can be imported ad-hoc from the file browser within a Code Repository Detail page. Click on the gear (⚙) dropdown to the right of any scribe file that may exist in your repository. For example, in the screenshot below, an individual Task is being imported into the destination appliance.
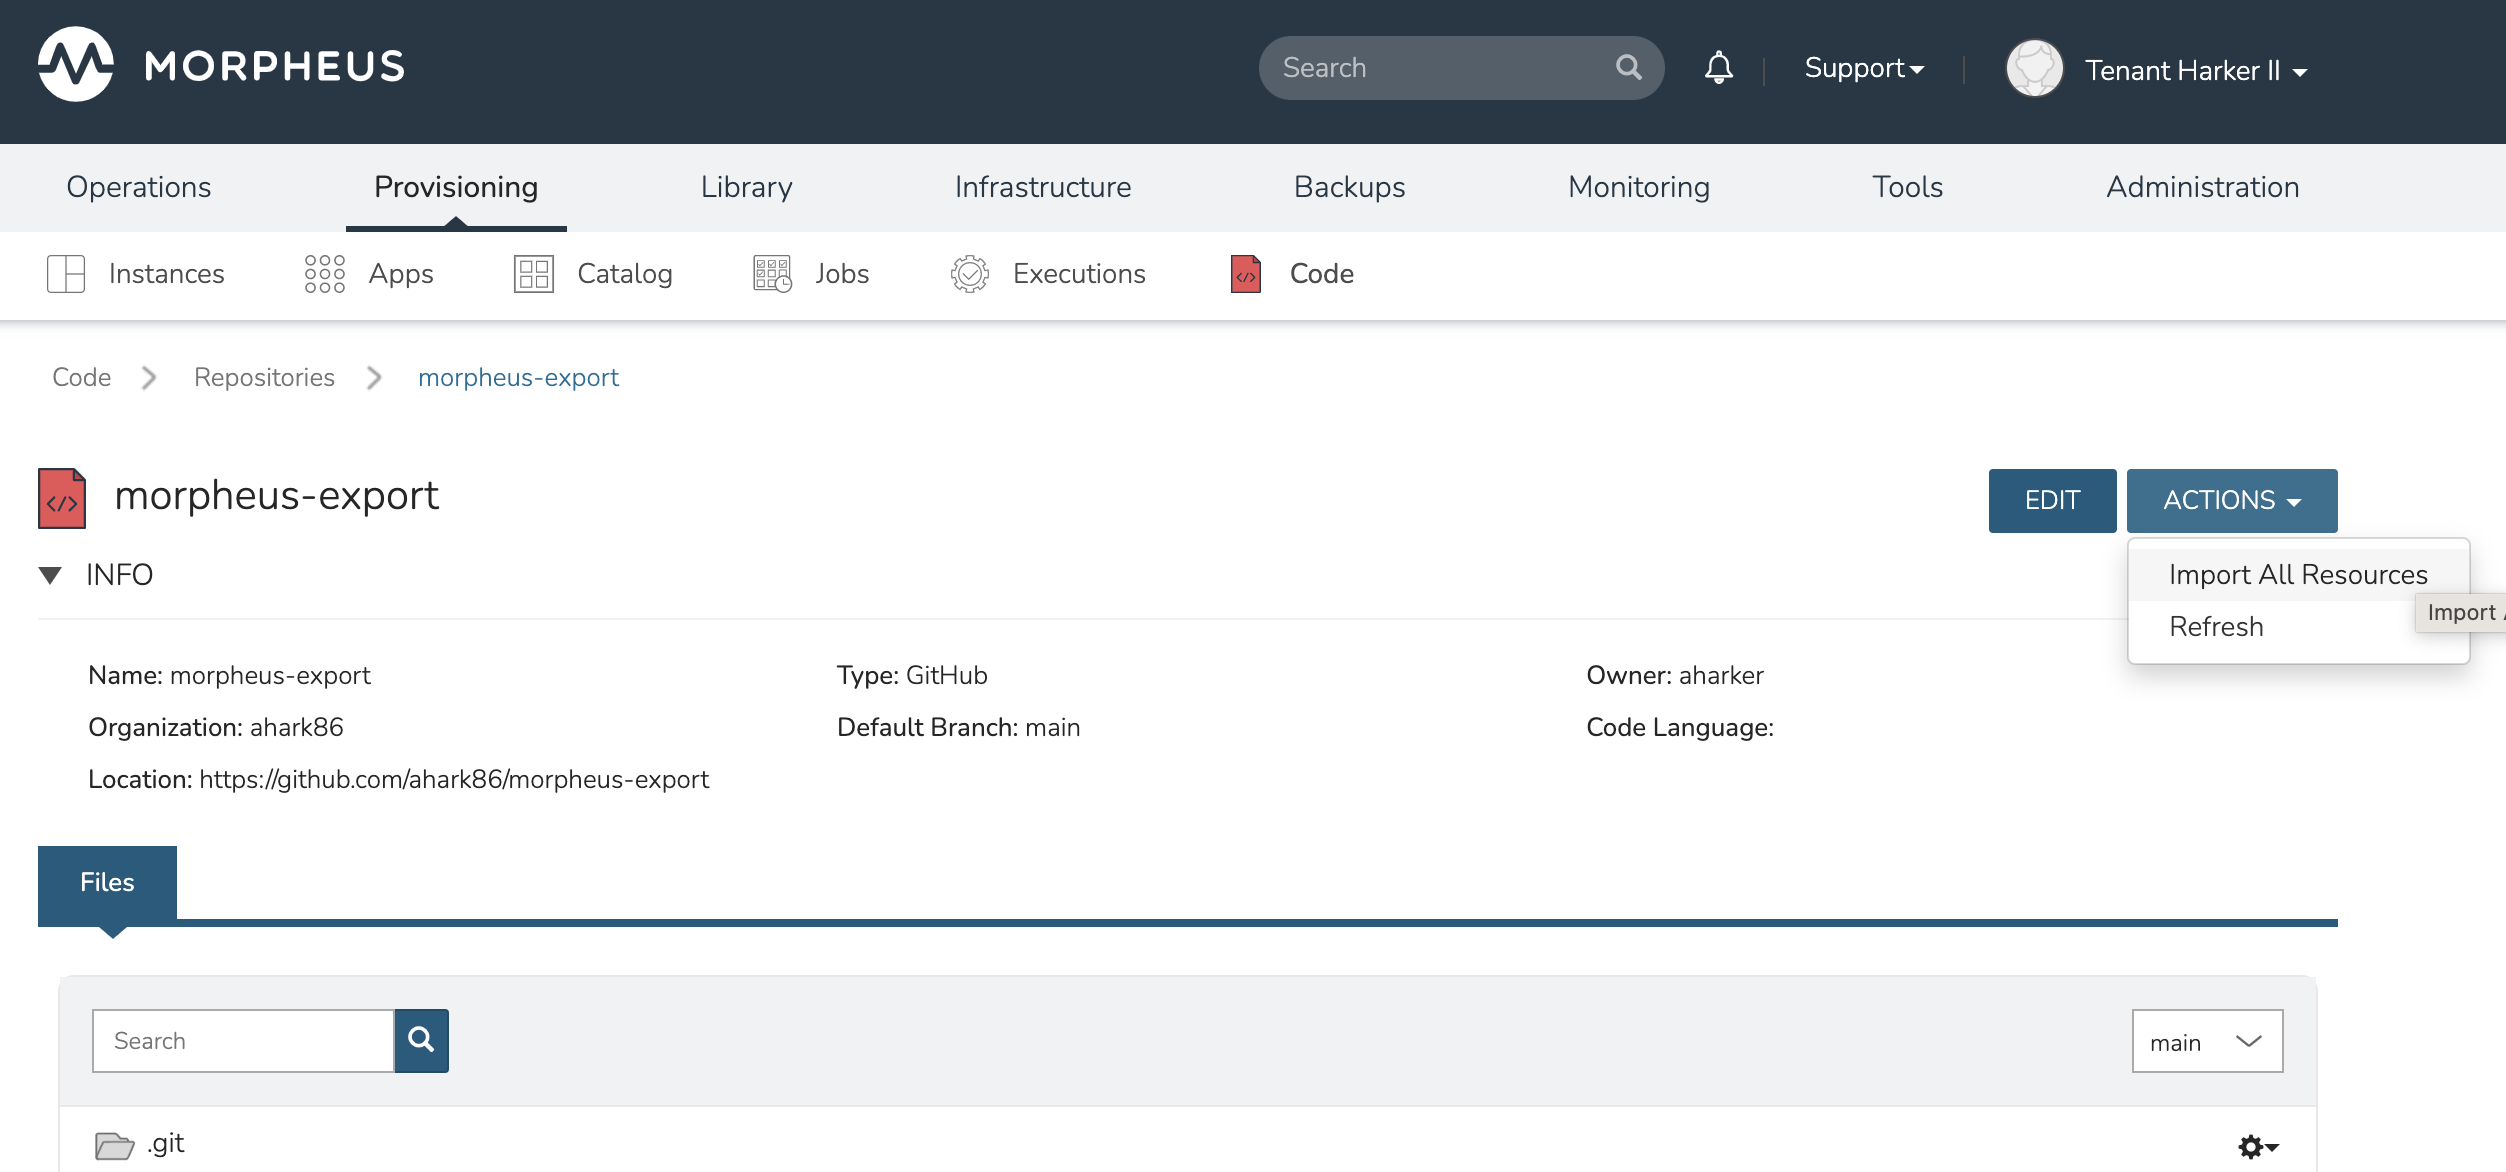
In addition to importing one-off items, code repositories may also be configured for import so that many items can be imported at once. The same configurations can be made for import as export, including a specific path within the repository to import from and whether only specific Label groups should be targeted. Triggering a larger scale import for a whole repository is done from the Code Repository Detail Page. Click the ACTIONS button and then click “Import All Resources”.
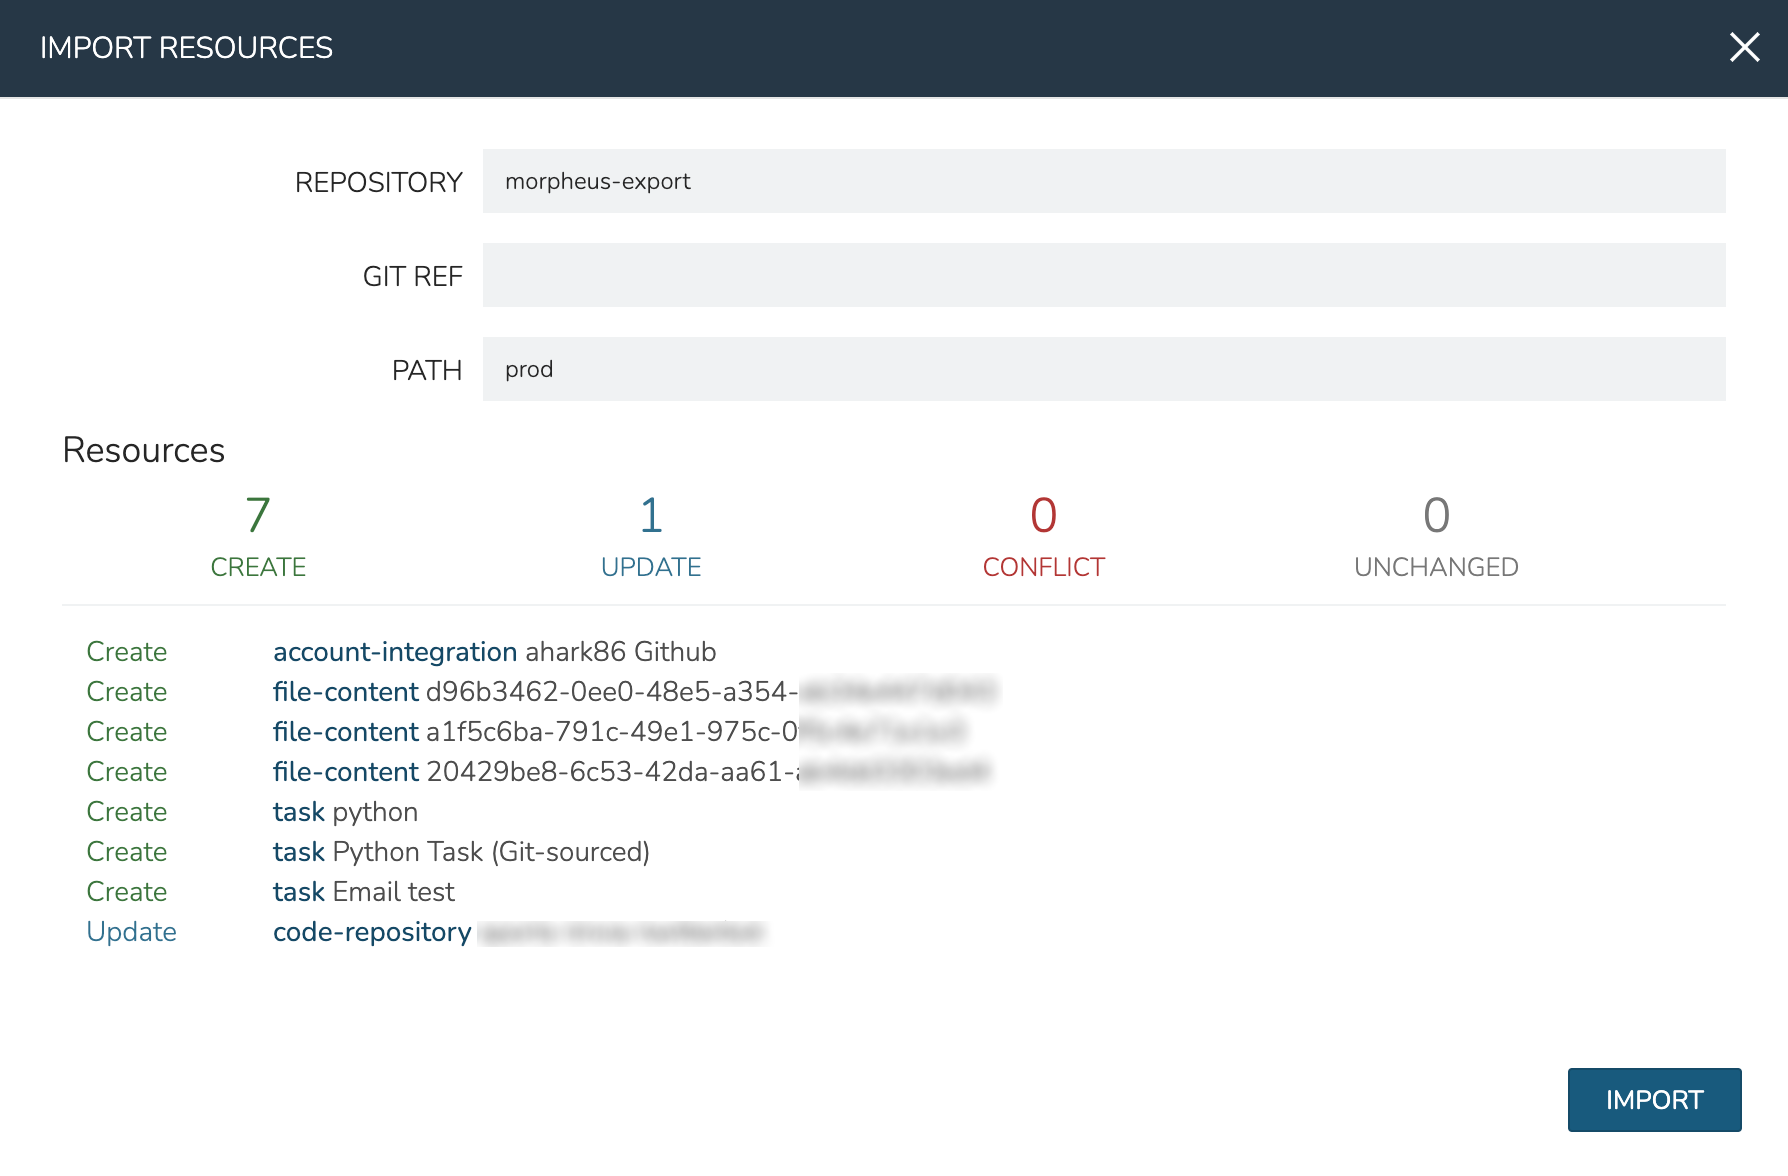
Once the import has been initiated, HPE Morpheus Enterprise will check to see if a new item will be created, if an existing item would be updated, if no action could be taken due to a conflict, or if no changes would result. This information is presented to the user who may then decide if the import action should go ahead.
Important
Care has been taken with HPE Morpheus Enterprise Import/Export to ensure that existing work cannot be wiped out by an import action. For example, if a Task with a name identical to a pre-existing Task would try to be imported, HPE Morpheus Enterprise will require the naming conflict be resolved before the import can take place. In fact, HPE Morpheus Enterprise Import can only create new items or overwrite items created by import. It cannot overwrite anything user-created or anything pre-seeded with the system at install. Additionally, import cannot be scheduled automatically. Users must initiate all imports.
Important
Importing resources which rely on existing integrations or sensitive values will require some additional configuration on the destination appliance. For example, importing a Task which references code in a separate repository which is not integrated on the target appliance will be imported with reference to the missing integration. This integration would need to be added before the Task could be used. Another example scenario would be a Task which references a secret value held in HPE Morpheus Enterprise Cypher. Once again, the Task would be imported and the required Cypher references would need to be made within the destination appliance before the Task could be used.
Checking Imported Items Prior to Use
As mentioned in the previous section, not every imported item will immediately be available for use. This is primarily due to the target appliance lacking an integration (for example, an Ansible Tower integration required for an imported Task) or a securely stored secret string (for example, a Task that calls a secret string stored in HPE Morpheus Enterprise Cypher). HPE Morpheus Enterprise will still import these resources but this section discusses some manual changes that may have to be made to imported items in order for them to be usable.
Protected Fields and User Credentials
Protected information and secret values are not exported. When importing any resources which rely on protected information, the user will need to manually update the resource on the target appliance. Examples include anything authenticated using a stored credential set (from the Infrastructure > Trust > Credentials section), anything with a password field (such as HTTP Tasks or REST-based Option Lists accessing password-protected information), Chef Task Data Bag Keys, and more. Anything configured with a password or other protected field will need to be edited on the importing appliance and updated to have the protected information needed to function.
Integrations
When an imported Task requires an integration that does not exist on the appliance, an integration will be created with the same name. The integration credentials will not be established, nor will any other configuration fields outside of the name. Users will need to update the integration configuration to make it functional in order for the imported Task to function.
SSH Keys
SSH Keys are not set on imported resources, such as Tasks configured to be executed on a remote host. Users will need to add a valid key to the importing appliance and update the Task to use that SSH Key.
Ansible Tower Tasks
Following import, “Inventory” and “Job Template” fields will need to be configured on Ansible Tower Tasks.
vRealize Orchestrator Tasks
Following import, “Inventory” and “Job Template” fields will need to be configured on vRO Tasks.
Option Lists
Option lists need to be edited and saved prior to use in order to load any initial data sets that have been configured on the Option List.
Forms
Input defaults that are ID-based will require manual correction after import. For example, if you have a Group Input which defaults to GroupName:A(ID:2), when imported it will still be based off an ID value of 2. It’s highly likely that in the importing environment, a different Group will have an ID value of 2. A manual change to the correct ID value is required in the destination environment. Bear in mind that if you re-import a Form, you will also undo any manual changes you’ve made in the importing environment. Thus, if you update all defaults after importing, and then import once again, these manual default changes will be wiped out.
Additionally, when Forms are using existing Inputs, those Inputs will be exported and imported for use in the destination environment. On import, HPE Morpheus Enterprise will add the needed Inputs unless the destination environment already has an Input with the same CODE value. This could give the appearance of creating duplicate Inputs if the destination environment happens to have an Input with the same name but a different code value. Users may wish to rename Inputs in the event they end up with more than one having the same name.
Tasks
The user must ensure the presence of any dependency required by a Task. One example would be any Cypher keys being called by the Task. Add any required Cypher entries with identical keys or add compatible Cypher keys and update the Task configuration to utilize the updated Cypher mountpoints. Cypher is just one example, any other dependency required by the Task must be present. HPE Morpheus Enterprise does not parse the Task configuration to determine which dependencies are or are not present or required.
Icons and Images
Icons which are set up on imported Instance Types will need to be manually uploaded to the appliance after import. They are not brought over as part of the import/export process.
Virtual Images
When importing Node Types, the associated Virtual Image is mapped by its “Code” value. It is expected that a Virtual Image with the correct “Code” value already exists on the target appliance. If not, the Node Type will be imported without any Virtual Image attached. The user will then need to edit the Node Type and associate it with a compatible Virtual Image in order to become usable.
Deployments
Note
In v5.3.2+, has been moved to
The deployments section provides very useful PaaS like capabilities when it comes to deploying applications into the newly provisioned environment. These can be uploaded directly from the UI, pulled from a build server, pulled from a public or private Git repository or even via the API and the various plugins created, such as Jenkins, and Gradle to support continuous build / integration workflows.
A deployment can be considered a set of versions that relate to a particular project or application being deployed. This allows one to keep track of a history of versions and easily reuse these deployment versions across Instances that may exist in different environments. An example might be to deploy a version from a deployment to a staging Instance and (once approved) also deployed into production.
Role Permissions
Access and capabilities for the Deployments section is determined by the following role permissions:
- Role: Feature Access:
Provisioning: Code Deployments None: Cannot access Provisioning: Code Deployments.
Read: Can view Code Deployments. Cannot create, delete or edit Code Deployments.
Full: Can create, delete and edit Code Deployments.
Getting Started
Getting started with deployments is easy. They can vary slightly for the application stack being deployed but the simplest phase of a deployment is adding a version and adding the appropriate files to the deployment archive that are needed for the application to run. This could be a single file like a WAR file for Tomcat, or it could be hundreds of files for stacks like Ruby on Rails.
There are a few ways to create a deployment. The first is to use the section of the application to create them. Simply add a new deployment and give it a name representing the application that is being deployed. Once a deployment is created select the deployment to view its versions (which will be empty to start). Next, it is time to add a version.
When adding a version there are several options. There are 3 types represented by the UI. These include File, Fetch, and Git respectively. A File deployment allows the user to simply drag their files into the file explorer presented by the dialog. This file explorer can take single files or entire file trees (If files exist in subfolders then only the Chrome browser is supported due to browser limitations at the time of this writing). This is also the common type that is represented when files are uploaded via the CLI, or available build tool integration plugins. Once the files have completed their upload simply save the version for use.
Git
For performing git based deploys HPE Morpheus Enterprise supports both public and private repositories. To utilize a private git repository the add version dialog will display a public keypair that can be added to the git service for authentication purposes. Currently this keypair is shared across the account and not specifically scoped to the user so it may be advisable to connect this integration to a deployment account in git. From here either a ssh or https git url can be entered along with a git branch or tag name. Once the version is saved, this repository will be copied down into the deployment archive for use.
Fetch
Fetch based deployments are pretty straightforward. Simply enter a url to a file representing the deployment. This can be a single file (in which case it will just be added to the deployment archive singularly) or it can be a zip file (which will automatically be expanded into the archive). HTTP Authentication options can also be entered if the url requires some form of basic authentication scheme for access by the appliance.
Configuring Library Items for Deployments
In order to have the UI tools available to utilize Deployments with a provisioned Instance, the Library items must have certain configurations set. Once configured correctly, any Instance provisioned from the Library item would then have access to any of your Deployments.
First, within the Instance Type (Library > Blueprints > Instance Types), ensure the SUPPORT DEPLOYMENTS attribute is marked. This is off by default so it will need to be manually enabled on all relevant Instance Types. Next, you’ll want to ensure you have the correct DEPLOY FOLDER configured on Node Types (Library > Blueprints > Node Types). This is the mount point which will be replaced by the contents of your Deployments. Finally, you will want the Provisioning Workflows associated with the Library item to have the proper Tasks configured within its Pre-Deploy and/or Deploy phases. Tasks in the Pre-Deploy phase are run as soon as the Deployment is triggered from the UI prior to any other Deploy actions taking place. This could be used, for example, to extract files from the deploy folder and move them to their final destinations before the primary deploy actions take place. Tasks in the Deploy phase are run after the deployment is completed, such as if you wanted to update configuration files or inject connection details from the environment after the completion of the deploy process.
Deploying to an Instance
Now that the Deployment object and Library items are configured, it is easy to push that deployment out to any Instance provisioned within HPE Morpheus Enterprise by navigating to the specific Instance that it needs deployed to. On the Instance detail page there is a tab called Runtime and within it another tab labeled Deploy. From here simply add a deploy. The dialog will ask firstly from which deployment the deploy is from (or allow you to create a new one on the spot), and secondly which version to deploy (also with the option to add one on the fly). The next step of the wizard will display any configuration options that might be specific to the Instance type being deployed to (i.e. CATALINA_OPTS for Tomcat or Java Command for java) as well as the file explorer and deployment type selections for review (or use when creating a new version on the fly). Fill in the required items then simply hit complete. The deploy will now be asynchronously sent off to all of the virtual machines or containers within the Instance in a rolling restart and the deployment status will be represented.
Tip
When deploying to an Instance, the custom configuration options that were entered during the previous deployment are automatically carried forward allowing one to edit them or leave them as is.
Rolling Backwards and Forwards
Because of the tracked history of deployments kept within HPE Morpheus Enterprise, the deploy tab of Instance detail makes it easy to choose a previously run deployment and jump back to it in the event of a failed deployment. The history will automatically be updated and the configuration, as well as data from the previous deployment state of the Instance will be restored.
Offloading Storage
Since a full history of the backup builds are kept in HPE Morpheus Enterprise, as the appliance grows it becomes necessary to change where these are stored. On a fresh install these are stored on the local appliance in /var/opt/morpheus or wherever the master account may have changed the configuration to point to. It is also possible to adjust the deployment archive store by creating a Storage Provider tied to an S3 compatible object store, Openstack Swift object store, or any other type of mountpoint provided. This option can be adjusted in Administration > Settings > Provisioning once a storage provider is created within the account.
Add Deployment
Select the
Provisioninglink in the navigation bar.Select the
Codelink in the sub-navigation bar.Select the
Deploymentstab.Click the + Add button.
Enter a Name for the deployment and a description (optional)
Click the Save Changes button to save.
Add Version
Select the
Provisioninglink in the navigation bar.Select the
Codelink in the sub-navigation bar.Select the
Deploymentstab.Click the Name of the deployment you would like to add a version to.
Click the Add Version button.
From the Add Version Wizard select the deployment type.
Input the Version of the deployment.
Depending on the type of deployment selected perform one of the following:
- Files
Drag files into the file explorer presented by the dialog. This file explorer can take single files or entire file trees.
- Fetch
Enter a url to a file representing the deployment.
- Git
The add version dialog will display a public key pair that can be added to the git service for authentication purposes. Either a ssh or https git url can be entered along with a git branch or tag name.
Click the Save Changes button to save.
Edit Deployment
Select the
Provisioninglink in the navigation bar.Select the
Codelink in the sub-navigation bar.Select the
Deploymentstab.Click the ✎ icon on the row of the deployment you wish to edit, or click the Name of the deployment and then the Edit button from the deployment detail page.
Modify information as needed
Click the Save Changes button to save.
Delete Deployment
Select the
Provisioninglink in the navigation bar.Select the
Codelink in the sub-navigation bar.Select the
Deploymentstab.Click the 🗑 icon on the row of the deployment you wish to delete, or click the Name of the deployment and then the DELETE button.
Code Integrations
The section is where Code Integrations, such as Git and Github Repository Integrations, and Jenkins Build Service Integrations, can be created and managed.
Role Permissions
Access and capabilities for the Integrations section is determined by the following role permissions:
- Role: Feature Access:
Infrastructure: Groups None: Cannot access Provisioning: Code section
Read or Full: Can access Provisioning: Code section
- Role: Feature Access:
Provisioning: Code Integrations None: Cannot access Provisioning: Code Integrations.
Read: Can view Code Integrations. Cannot create, delete or edit Code Integrations.
Full: Can create, delete and edit Code Integrations