Terraform
Requirements
Role Access
In order to see the Terraform App Blueprint type option and create Terraform App Blueprints in Library > Blueprints > App Blueprints, the HPE Morpheus Enterprise user must have Role permissions for Provisioning: Blueprints - Terraform set to Full.
In order to provision Terraform Apps in Provisioning > Apps, the Morpheus user must have Role permissions for Provisioning: Blueprints - Terraform set to Provision or Full.
Existing Terraform Blueprints must be added before they can be provisioned from Provisioning > Apps.
In order to provision Terraform Apps, the user must have Role permissions for Provisioning: Apps set to Full.
Github/Git Repo
To use .tf files from a Git repo, a Git or Github integration needs to be configured in Administration > Integrations. If one is not configured, .tf or .tf.json files can be manually drafted in HPE Morpheus Enterprise and added to Terraform App Blueprints but they could not be sourced from version control repositories.
Supported App Provisioning Targets
VMware
Amazon AWS
Microsoft Azure
Google Cloud Platform (GCP)
Oracle Cloud
Note
Additional clouds are planned for later releases.
Terraform Installation
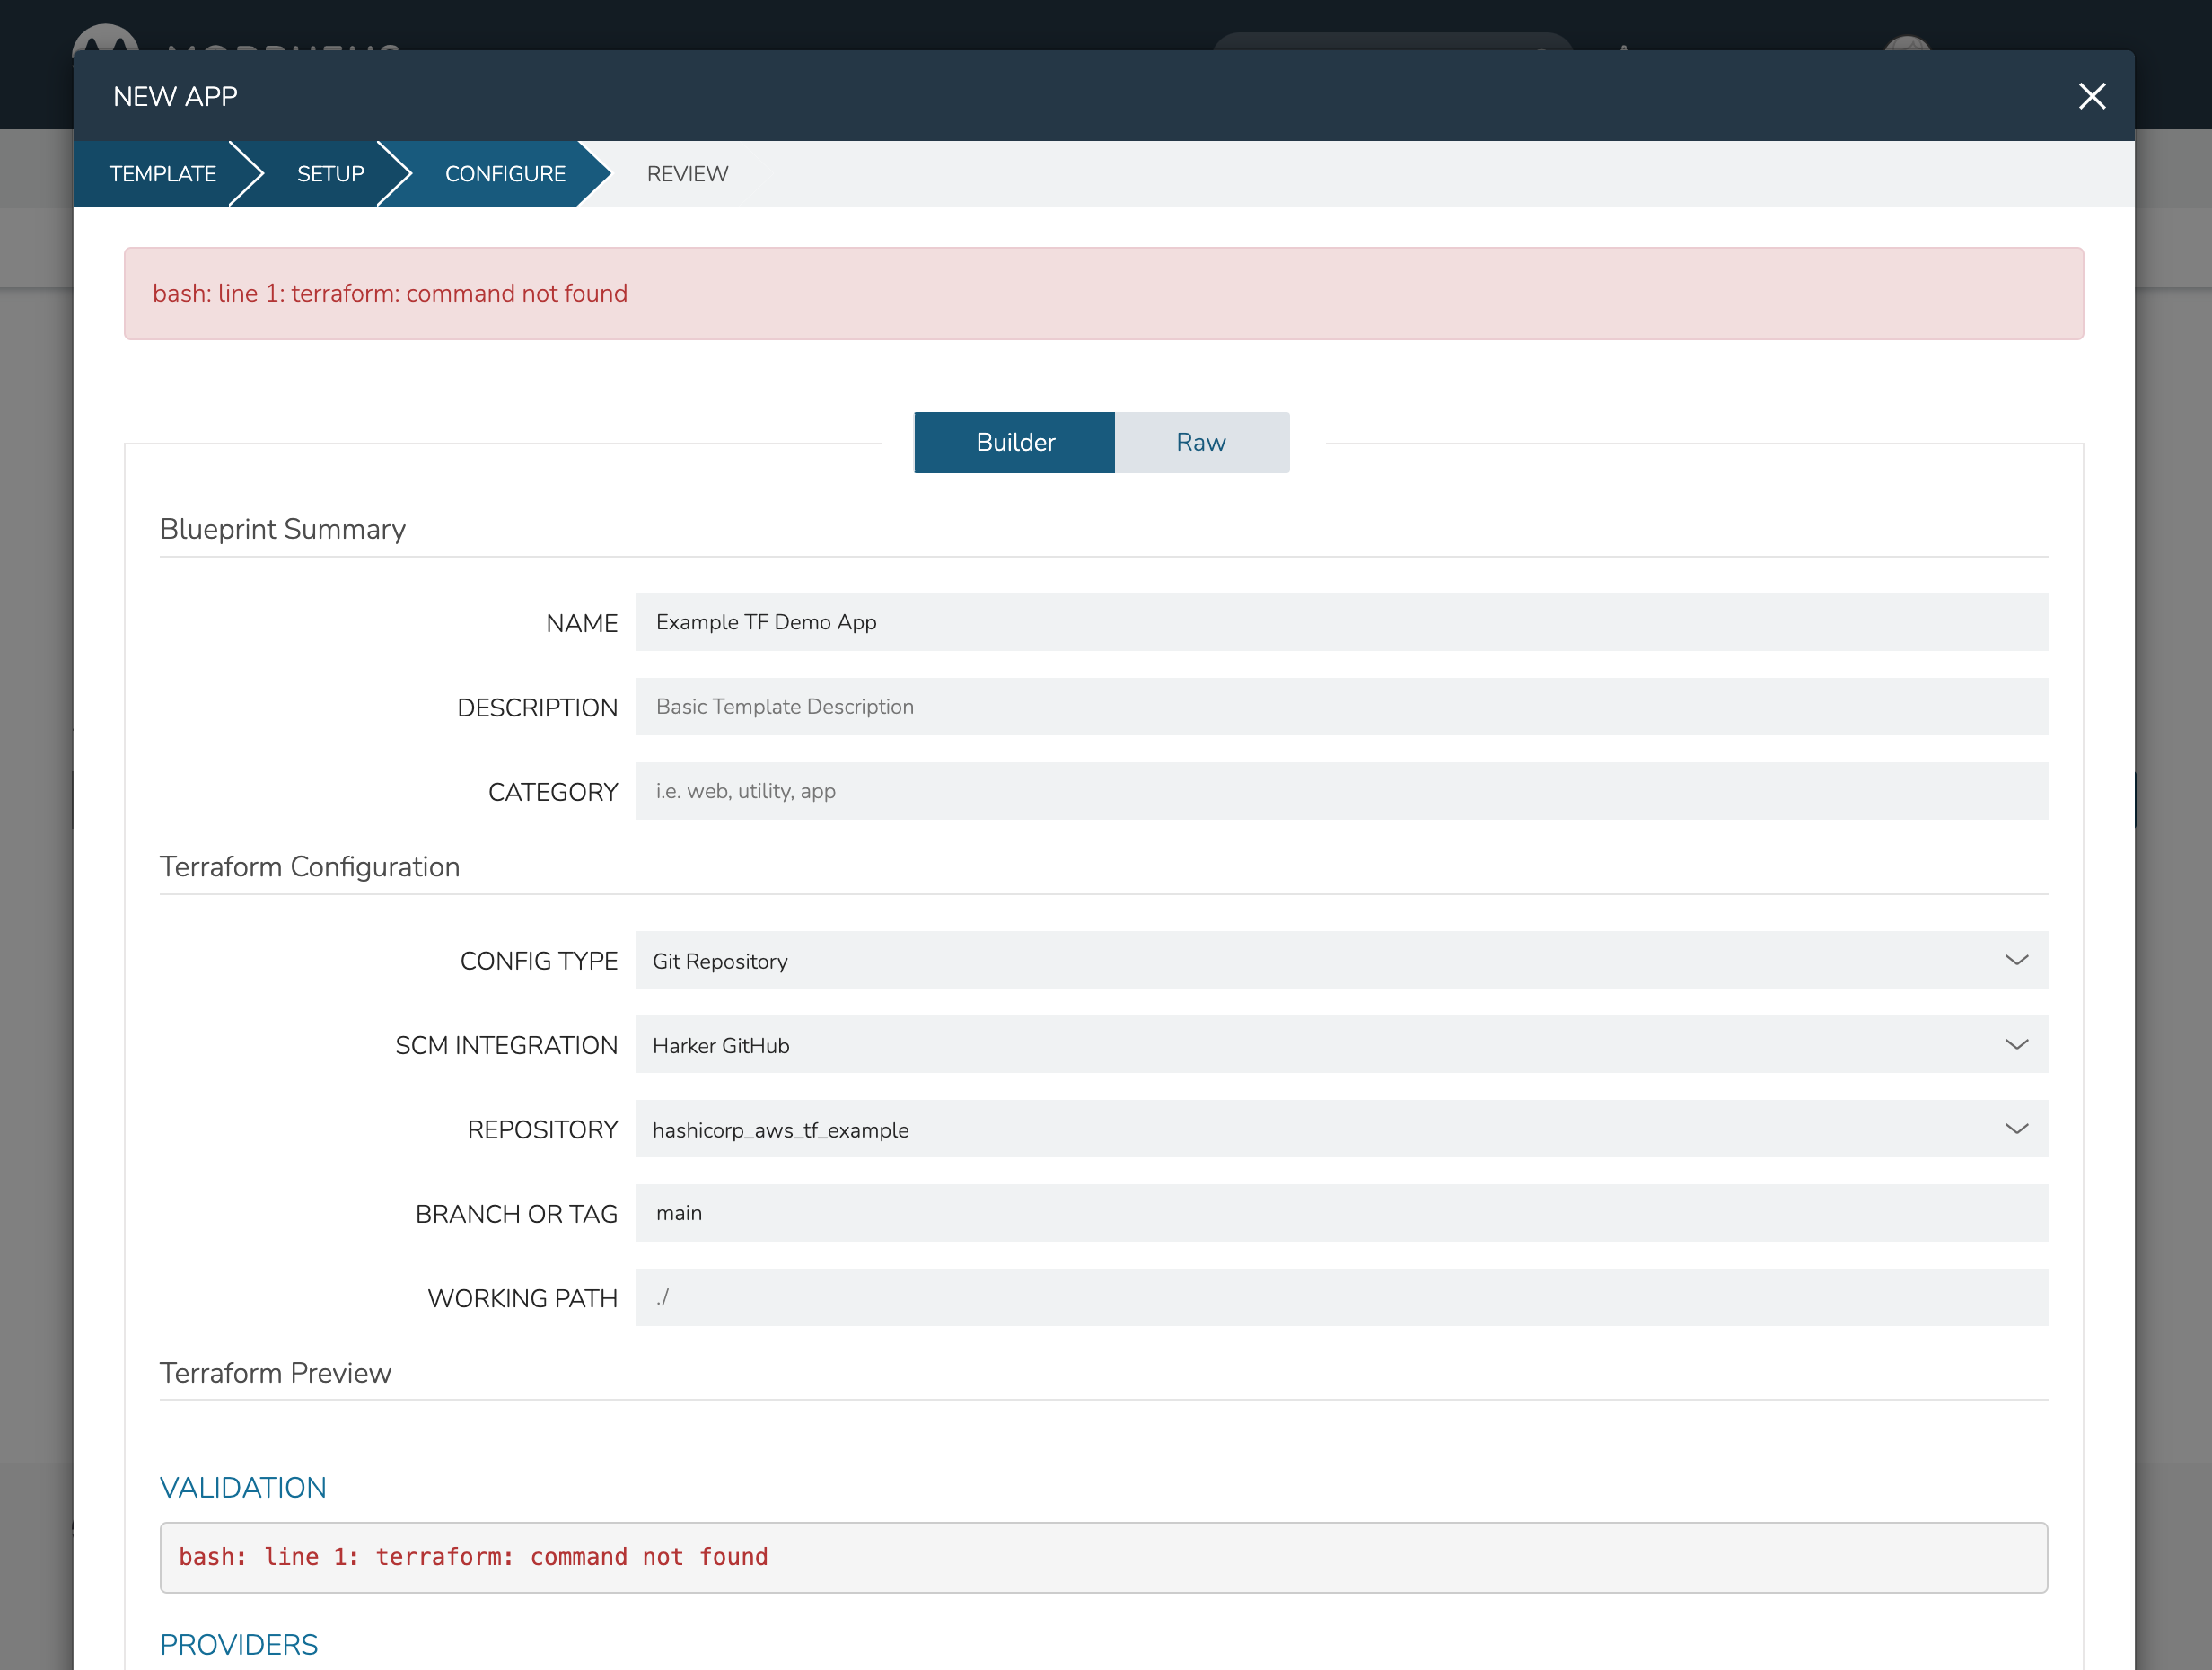
The first time you attempt to provision a Terraform App, you may come across an error indicating that Terraform is not installed:
bash: line 1: terraform: command not found
Command Not Found Error Screenshot
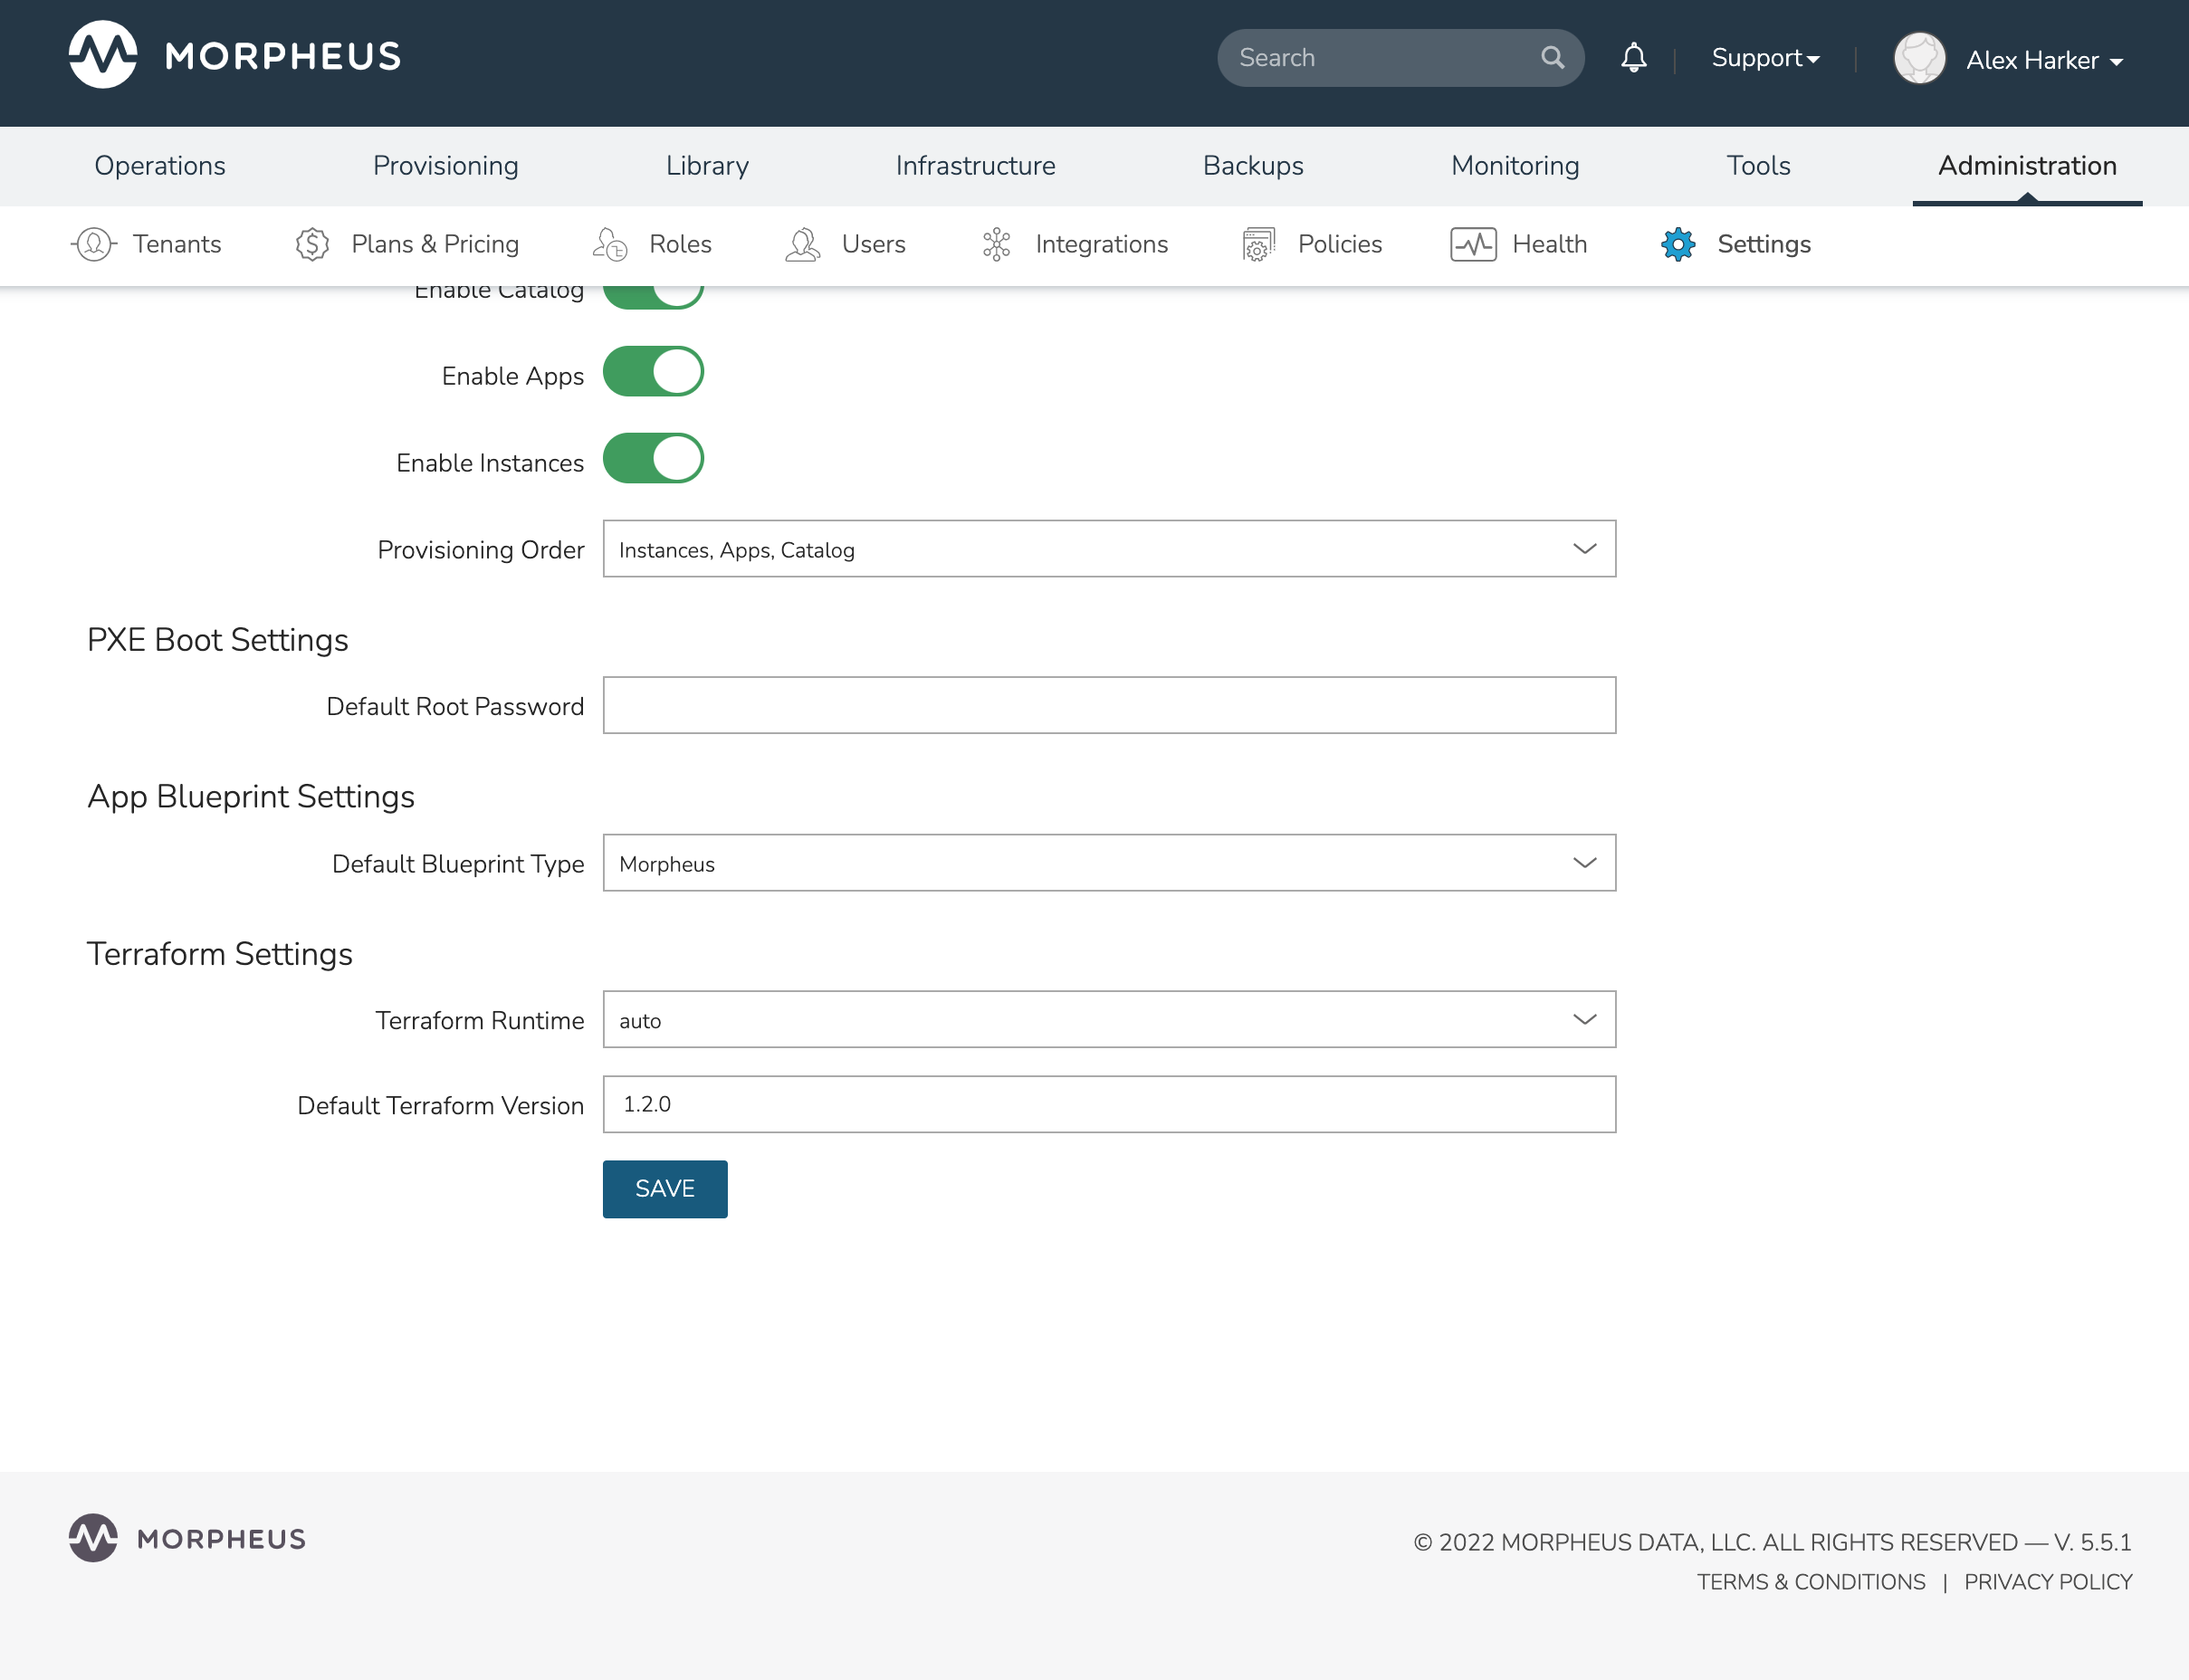
This likely means you’ve not yet configured Terraform Settings within HPE Morpheus Enterprise global settings. Navigate to Administration > Settings > Provisioning and scroll down to the Terraform Settings section. By default, the Terraform Runtime field is set to “Manual”. When set this way, HPE Morpheus Enterprise will attempt to use Terraform as installed on the appliance box and it may not be currently installed. To have HPE Morpheus Enterprise manage the Terraform installation process for you and manage Terraform versioning on a per-App basis, set the Terraform Runtime to “Auto”. You should also set the Default Terraform Version field as well. When a version is set on a Terraform Spec Template or Terraform App Blueprint, that version will supersede the default version indicated in global settings.
Configured Terraform Runtime Screenshot
Important
HPE Morpheus Enterprise appliances which do not have access to the Internet will need to leave Terraform Runtime settings on “Manual” and ensure Terraform is installed appropriately on the appliance. Install Terraform in the /usr/sbin/terraform directory and make sure it’s owned by the morpheus-local user.
Creating Terraform App Blueprints
In order to provision Terraform apps, Terraform App Blueprints must be created first.
Navigate to Library > Blueprints > App Blueprints
Select + ADD
Name the Blueprint and select Terraform type.
Note
In order to see the Terraform Blueprint type option, the HPE Morpheus Enterprise user must have Role permissions for Provisioning: Blueprints - Terraform set to Full.
Select NEXT
Configure the following:
- NAME
Friendly name for the App Blueprint in HPE Morpheus Enterprise
- DESCRIPTION
Description for your App Blueprint shown in the Apps list (optional)
- CATEGORY
A category for your App (optional)
- IMAGE
Add reference icon for your App Blueprint to make it more identifiable at provision time (optional)
CONFIG TYPE (select Terraform Specs, Terraform (.tf), Terraform.json, or Git Repository)
Terraform (.tf)
- CONFIG
Draft or paste in .tf content in the config text area. Variables will be presented as input fields during App provisioning, or auto-populated with matching values if contained in a selected TFVAR Secret file added to the Cypher service.
- TFVAR SECRET
Select an existing tfvar secret file stored in HPE Morpheus Enterprise Cypher service. This list is automatically filtered to show all Cypher entries which are currently stored at the “tfvar/*” Cypher mount point. Note that tfvars already set in any existing Terraform Cloud Profiles will already be available to your App and wouldn’t need to be set here.
- VERSION
Specify a version required by your Terraform App (optional). If specified, the given version will supersede the global Terraform version specified in HPE Morpheus Enterprise global settings (Administration > Settings > Provisioning). “Terraform Runtime” must also be set to “auto” in global settings for HPE Morpheus Enterprise to manage the Terraform version for you. When set to “manual”, HPE Morpheus Enterprise will use the Terraform version installed on the appliance box.
- OPTIONS
Specify any valid Terraform command line options HPE Morpheus Enterprise should append to its internal “terraform apply” call when the App is provisioned
Terraform (.tf.json)
- CONFIG
Draft or paste in .tf.json content in the config text area. Variables will be presented as input fields during App provisioning, or auto-populated with matching values if contained in a selected TFVAR Secret file added to the Cypher service.
- TFVAR SECRET
Select an existing tfvar secret file stored in HPE Morpheus Enterprise Cypher service. This list is automatically filtered to show all Cypher entries which are currently stored at the “tfvar/*” Cypher mount point. Note that tfvars already set in any existing Terraform Cloud Profiles will already be available to your App and wouldn’t need to be set here.
- VERSION
Specify a version required by your Terraform App (optional). If specified, the given version will supersede the global Terraform version specified in HPE Morpheus Enterprise global settings (Administration > Settings > Provisioning). “Terraform Runtime” must also be set to “auto” in global settings for HPE Morpheus Enterprise to manage the Terraform version for you. When set to “manual”, HPE Morpheus Enterprise will use the Terraform version installed on the appliance box.
- OPTIONS
Specify any valid Terraform command line options HPE Morpheus Enterprise should append to its internal “terraform apply” call when the App is provisioned
Terraform Specs
- SPEC TEMPLATE
Using the typeahead field, select all Terraform-type Spec Templates which make up your App. Variables will be presented as input fields during App provisioning, or auto-populated with matching values if contained in a selected TFVAR Secret file added to the Cypher service.
- TFVAR SECRET
Select an existing tfvar secret file stored in HPE Morpheus Enterprise Cypher service. This list is automatically filtered to show all Cypher entries which are currently stored at the “tfvar/*” Cypher mount point. Note that tfvars already set in any existing Terraform Cloud Profiles will already be available to your App and wouldn’t need to be set here.
- VERSION
Specify a version required by your Terraform App (optional). If specified, the given version will supersede the global Terraform version specified in HPE Morpheus Enterprise global settings (Administration > Settings > Provisioning). “Terraform Runtime” must also be set to “auto” in global settings for HPE Morpheus Enterprise to manage the Terraform version for you. When set to “manual”, HPE Morpheus Enterprise will use the Terraform version installed on the appliance box.
- OPTIONS
Specify any valid Terraform command line options HPE Morpheus Enterprise should append to its internal “terraform apply” call when the App is provisioned.
Git Repository
- SCM INTEGRATION
Select a Github or Git integration that has been added in Administration > Integrations and which contains relevant .tf files. Integrations must be pre-existing prior to creating the App Blueprint.
- Repository
Select a repository which contains relevant .tf files from the Github or Git integration selected in the prior step.
- BRANCH OR TAG
Select the Git branch containing the desired version of .tf files for the App. “master” is chosen by default if no value is entered.
- WORKING PATH
Enter the repo path for the .tf file(s).
./is default if no value is entered.- TFVAR SECRET
Select an existing tfvar secret file stored in HPE Morpheus Enterprise Cypher service. This list is automatically filtered to show all Cypher entries which are currently stored at the “tfvar/*” Cypher mount point. Note that tfvars already set in any existing Terraform Cloud Profiles will already be available to your App and wouldn’t need to be set here.
- VERSION
Specify a version required by your Terraform App (optional). If specified, the given version will supersede the global Terraform version specified in HPE Morpheus Enterprise global settings (Administration > Settings > Provisioning). “Terraform Runtime” must also be set to “auto” in global settings for HPE Morpheus Enterprise to manage the Terraform version for you. When set to “manual”, HPE Morpheus Enterprise will use the Terraform version installed on the appliance box.
- OPTIONS
Specify any valid Terraform command line options HPE Morpheus Enterprise should append to its internal “terraform apply” call when the App is provisioned.
Select COMPLETE
HPE Morpheus Enterprise will scan the blueprint to check for validity and will surface any errors which need correcting before the App Blueprint can be saved. Your Terraform App is ready to be provisioned from Provisioning > Apps.
Cloud Profiles
Access to Profiles tab is determined by the following role permissions:
- Role: Feature Access:
Admin: Profiles None: Cannot access Profiles tab or create/view/edit/delete profiles
Read: Can access Profiles tab, can view profiles, cannot create/edit/delete profiles
Full: Can access Profiles tab, can create/view/edit/delete profiles
Terraform Profiles
Terraform Profiles allow creation of Cloud-associated tfvars secrets, allowing tf apps and specs to be provisioned across multiple clouds that required different tfvars.
Target Cloud Terraform Profiles are automatically mapped to tf apps/specs during provisioning, no manual scoping is required.
Terraform Profiles are encrypted in Cypher and creating a profile creates a Cypher entry with key tfvars/profile/cloud/$cloudCode/variables`
Terraform Profiles can be edited after creation
Terraform Profiles are limited to one per Cloud, once one is created for the Cloud the option to create a Terraform Profile is no longer present. Edit the existing Terraform Profile to make changes at that point
Important
Since HPE Morpheus Enterprise mounts Terraform Profiles in Cypher using a mount point which contains the Cloud code value, any Clouds which have the same code will share a Terraform Profile. Create or edit Clouds to have a unique code value if they should have a unique Terraform Profile. It’s also important to understand that HPE Morpheus Enterprise does not require Clouds have a code at creation time. When Clouds are created without a code, HPE Morpheus Enterprise applies a generic non-unique code based on the Cloud type (“amazon” for AWS Clouds, as an example). This sets up a potential situation where all Clouds of the same type have the same generic Cloud code and thus share a Terraform Profile. To avoid this situation, enter a Cloud code value at creation time or edit existing Clouds to have a unique code.
Create a Terraform Profile
Navigate to Infrastructure > Clouds and select a Cloud
Select the “Profiles” tab
Select + ADD PROFILE
Select Terraform Profile Type
Enter tfvars in the Terraform Profile Variables field
example Terraform Profile Variables
access_key="****acccessKey****"
secret_key="********secretKey**********"
region="us-west-1"
Select SAVE CHANGES
Now, when provisioning a Terraform Instance or App to the Cloud the profile was created in, the tfvars in the profile become available to Terraform. It is not necessary to manually tie this tfvars files to your App Blueprint, these tfvars will automatically be available to Terraform whenever you provision an App to this cloud.
Provisioning Terraform Apps
Note
Terraform App Blueprints must be added to Library > Blueprints > App Blueprints before they can be provisioned. At least one Terraform App Blueprint must exist before Terraform Apps can be provisioned from Provisioning > Apps.
Note
In order to provision Terraform Apps in Provisioning > Apps, the Morpheus user must have Role permissions for Provisioning: Blueprints - Terraform set to Provision or Full.
Navigate to Provisioning > Apps
Select + ADD
Choose an existing Terraform App Blueprint
Select NEXT
Enter a NAME for the App and select the Group, Default Cloud and Environment (optional)
Select NEXT
Configure the following sections:
App Settings
- BACKEND TYPE
Internal is the default selection and the most secure choice. This sends the Terraform state back to the appliance via HTTP loopback to be stored in the appliance database. Users may also select Local which will write Terraform state to the local filesystem first before being stored in the database and removed from the local filesystem. If unsure, use the default Internal value. Backend Type selection is currently only available for Terraform Apps. Selecting Backend Type for Terraform Instance Types is a planned future feature addition.
- VALIDATE PLAN
Marked by default. When unmarked, HPE Morpheus Enterprise will not perform its typical validation to ensure the Terraform spec is valid. Typically users would only unmark this box if onboarding an existing App with Initial State (see Advanced Options configuration below).
- RUN APPLY
Marked by default. When unmarked, HPE Morpheus Enterprise will not apply the plan at completion of the App wizard. Typically users would only unmark this box if onboarding an existing App with Initial State (see Advanced Options configuration below).
Terraform Variables
Populate any required or optional variables here. Variables whose values are stored in an associated tfvars file sourced from HPE Morpheus Enterprise Cypher are masked from the user. Variables stored in any Terraform Cloud Profile associated with the selected Cloud also are automatically masked. Other variables will be presented in the Terraform Variables section for user entry and any configured default values on the Terraform spec will be pre-loaded.
Advanced Options
- REFRESH MODE
Set an interval at which HPE Morpheus Enterprise should automatically check the App for drift from the Terraform spec. If set to Manual, HPE Morpheus Enterprise will never perform automatic checks and the user must do so when desired. The results of drift checks are reported on the App detail page and users may apply the plan at any time to bring the App back into alignment with the Terraform spec.
- INITIAL STATE
Paste in existing Terraform state to onboard an existing Terraform App for HPE Morpheus Enterprise management. Though the field is small, it will accept large, multiline Terraform state. When creating an App from existing state, users may want to skip plan validation or may not want to apply right away. Opt out of these functions by unmarking the corresponding box in the App Settings section.
Note
Terraform state import is a new feature. At this time, some state file components may break the import process. This feature is being iterated on rapidly to increase coverage to as many application types and conditions as possible.
Terraform Preview
Review the Terraform App components here, including any providers invoked, variables surfaced from the App spec, resources to be created, and .tf files utilized. There is no user input to be entered into this section.
Select NEXT
HPE Morpheus Enterprise will now validate the App (unless the user has opted out of this check) and surface any errors which would cause provisioning issues. If all is well, click COMPLETE
Tip
Review the App in the Terraform Preview section. If any config data needs to be edited, select the RAW tab, edit the config, and then select the BUILDER tab once again. The config changes from the RAW edit will be updated in the preview section for further review. Permanent edits can be made by editing the App Blueprint, pushing .tf changes to your code repository, or Terraform Spec Templates (depending on how the .tf files are sourced for your App Blueprint).
The Terraform App will begin to provision.
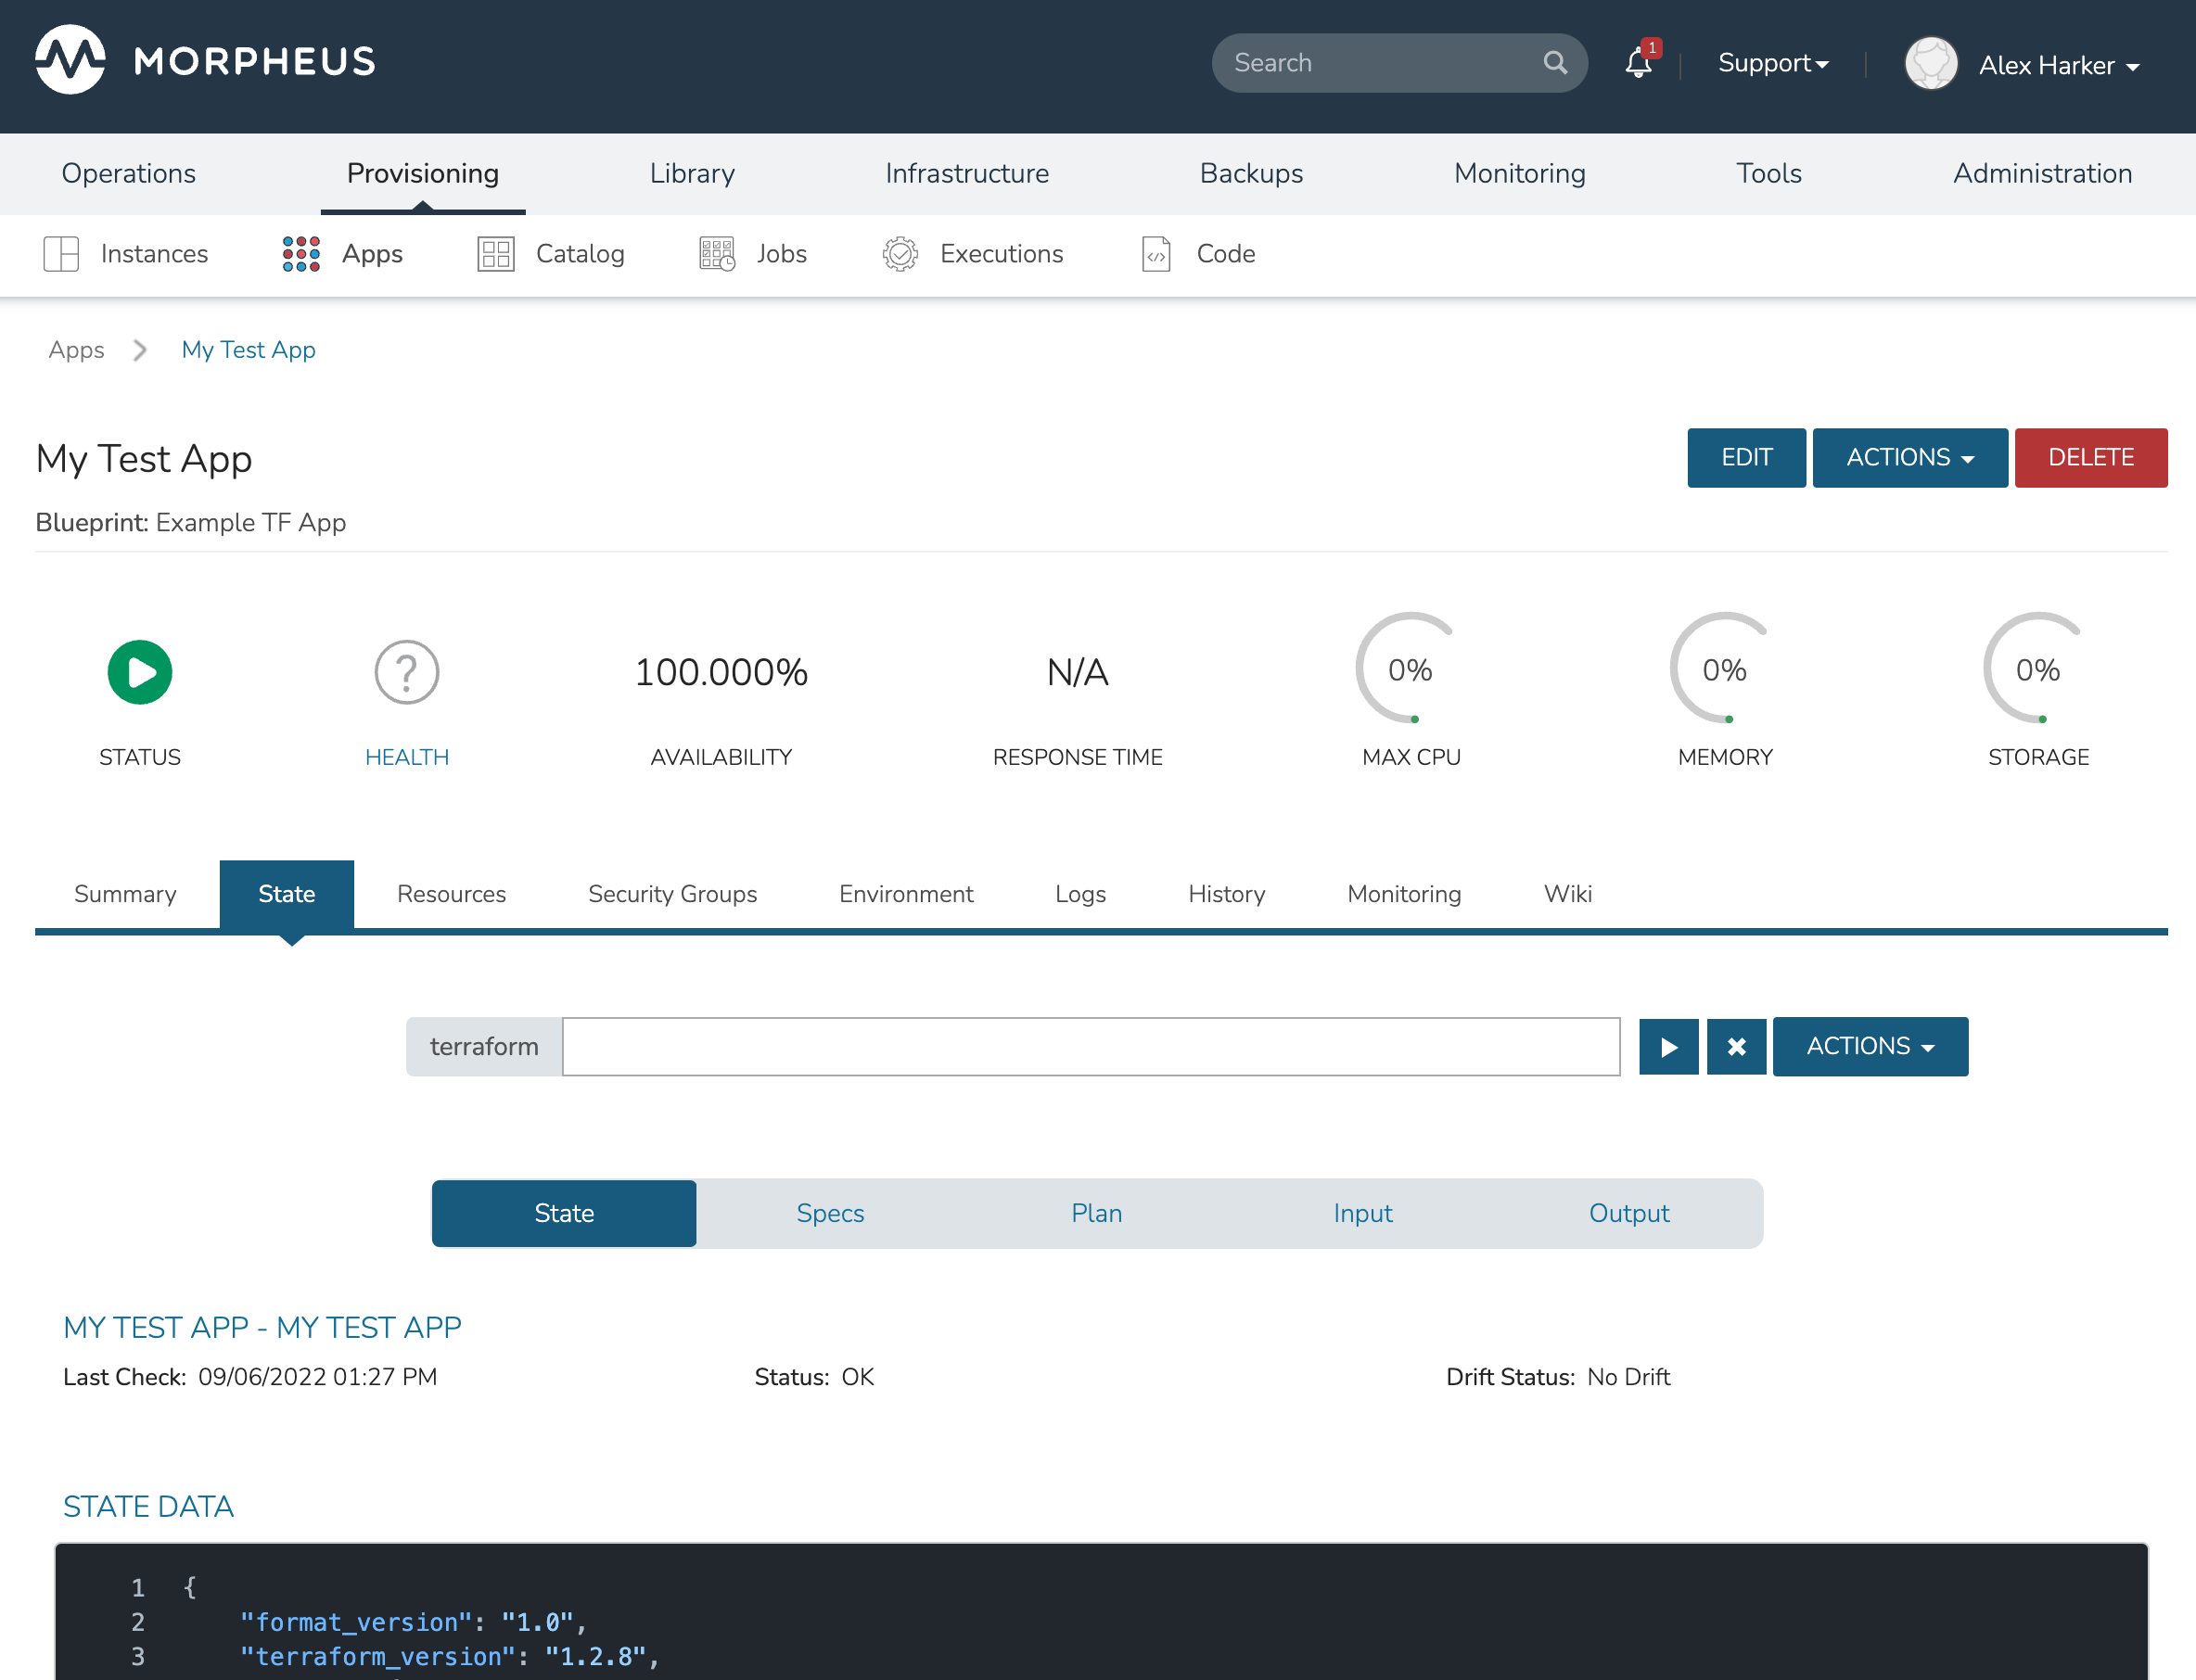
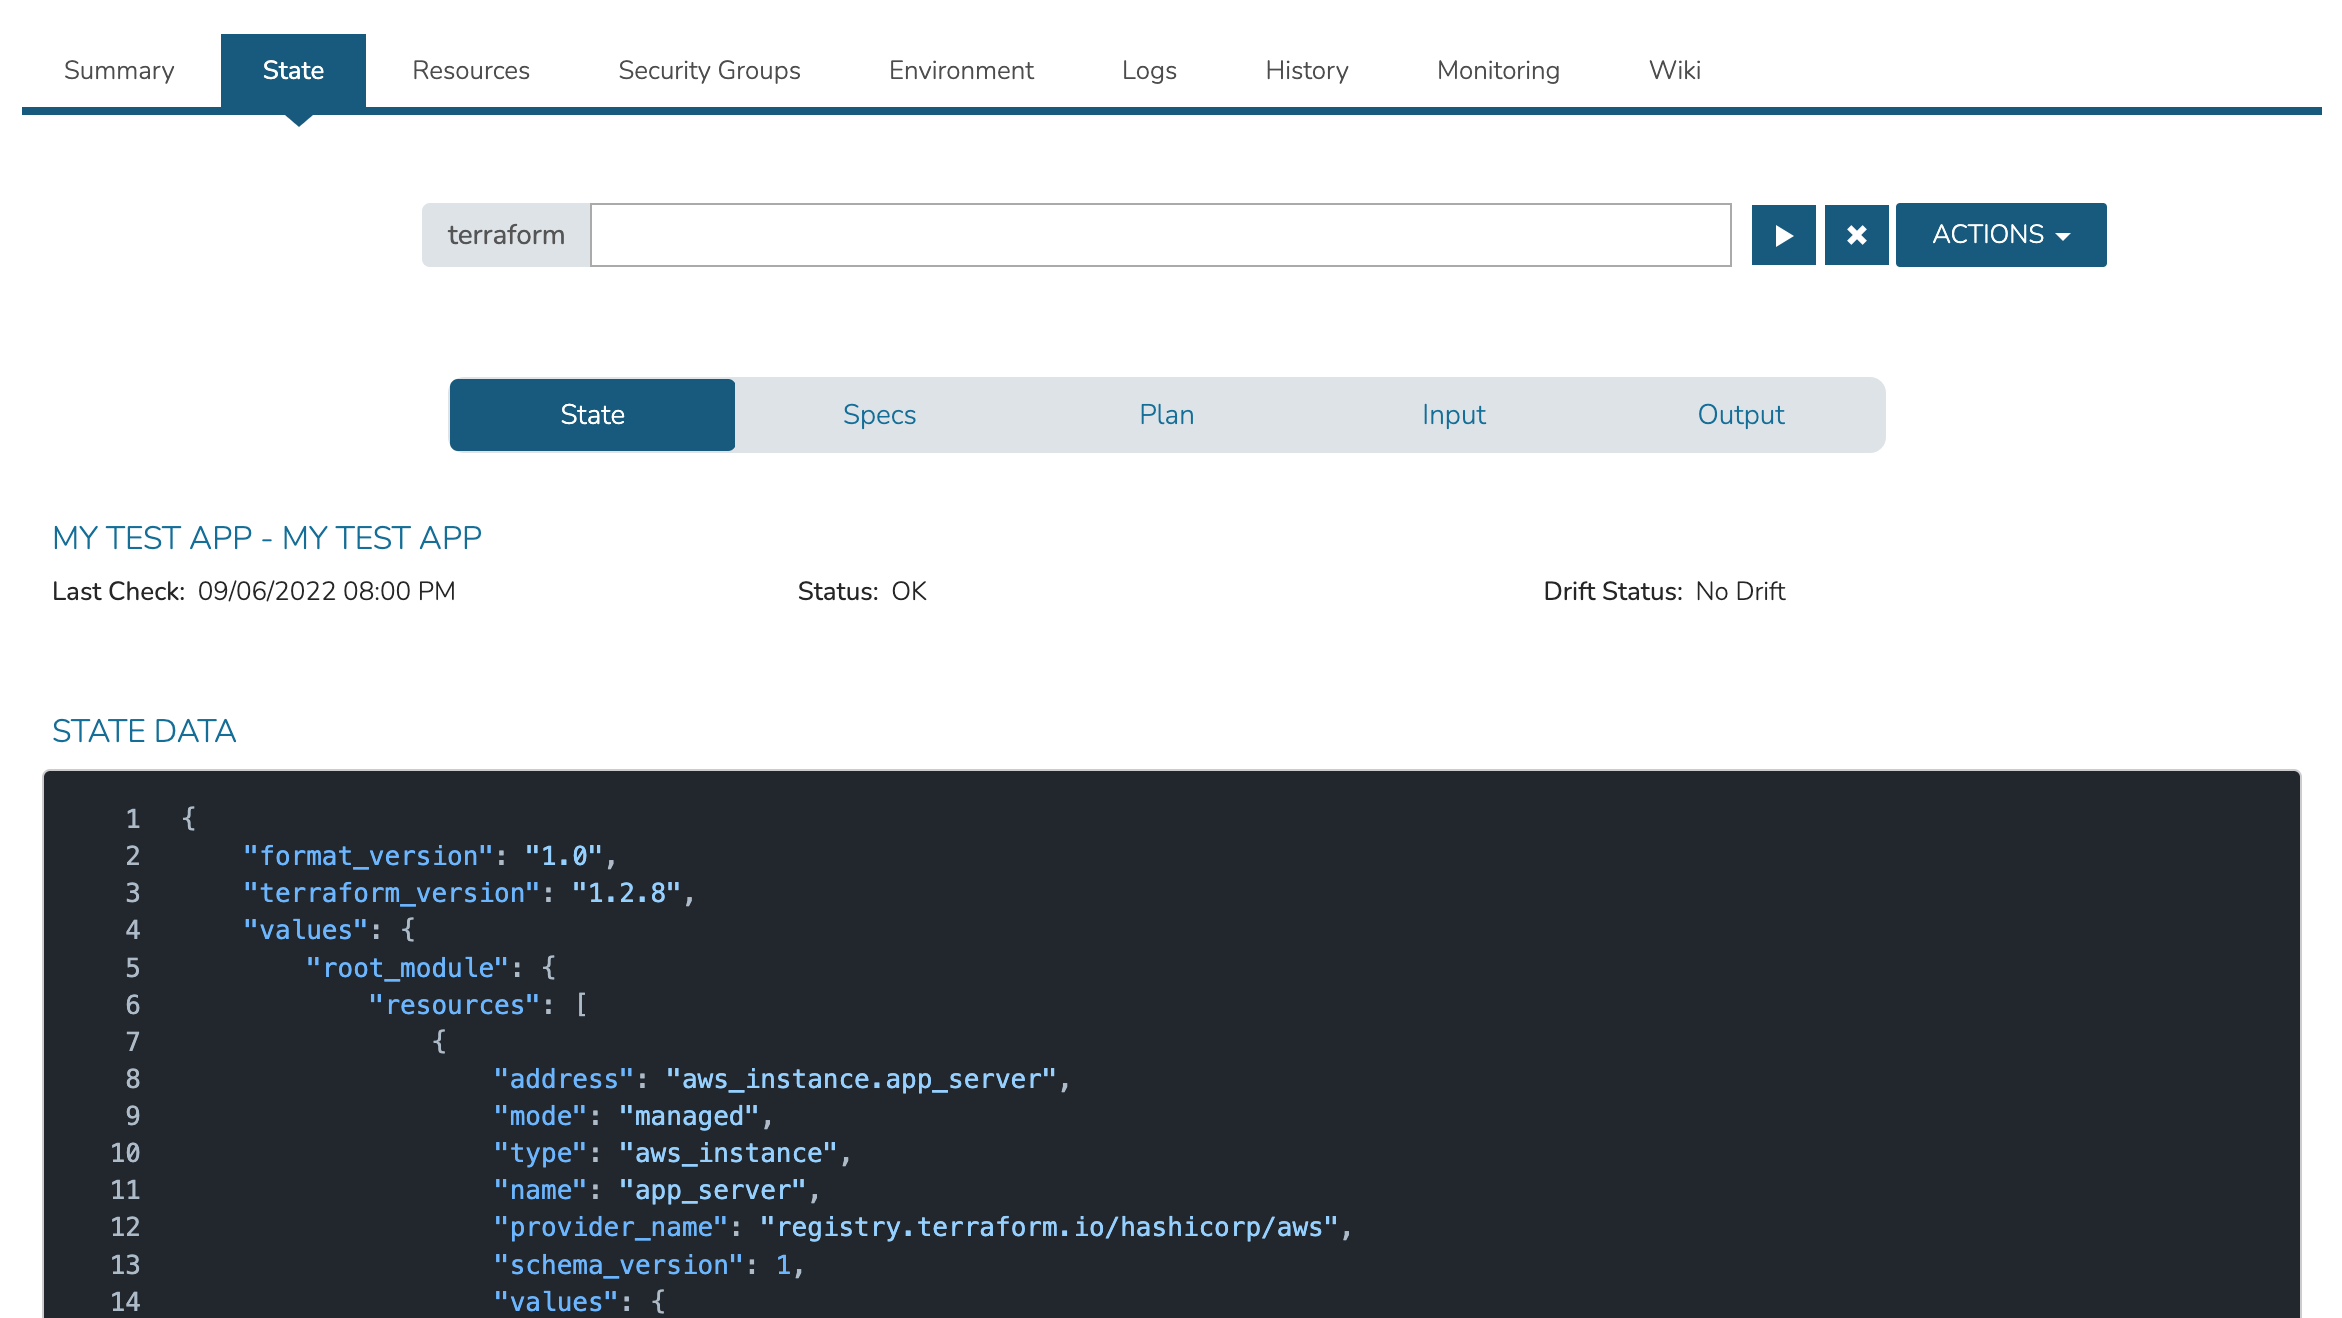
Once provisioning is completed, note the State tab in the App details page (Provisioning > Apps > select the App). This tab contains subsections related to state management which is discussed in greater detail in the next section.
Terraform App State Management
State management is handled from the State Tab of the Terraform App detail page (Provisioning > Apps > selected App). With the tab selected, the Terraform command field will be present regardless of the selected subsection. Use this field to send Terraform commands to your apps just like using Terraform from the command line. Press return on the keyboard or click on the “play” button to the right of the text field to execute the commmand.
Tip
“terraform” is automatically entered for each command as printed along the left edge of the text field. Thus, you don’t need to enter “terraform” with each command sent. Entering “state” or “plan” is equal to entering “terraform state” or “terraform plan” from the command line.
When Terraform commands are executed against the application, HPE Morpheus Enterprise provides progress bars and command output in the UI. Command output is shown underneath the Terraform command field. Users can dismiss individual output windows by clicking the “x” button in the upper-right of each window. All command output can be dismissed by clicking the blue “x” button to the right of the command field itself.
Within the ACTIONS reside four selections: Refresh State, Apply State, Edit Inputs, and Edit STATE. Selecting Refresh State is equivalent to using the “terraform plan” command from the command line. This will read the existing state of any existing objects which are part of the App and compare their current configuration against the prior state. Any differences will be noted in the output. If differences are discovered, the App is considered to be in a “drift” state. This drift status is shown in the UI when the user is viewing the “State” subsection (which is described in greater detail in the next section). The output of the Refresh State command, including detailed information about changes Terraform would make to App objects to in order to realign them with the App spec are shown in the UI.
The Apply State selection brings up a modal which allows the user to view the App spec once again. This includes being able to view and edit Terraform variables if needed. After making any needed edits, click NEXT and HPE Morpheus Enterprise will validate the App once again, just like it did at provision time. On the next tab of the wizard, HPE Morpheus Enterprise will show the user and planned changes that would be executed if the user completes the modal. An output will be shown as if “terraform plan” were run from the command line. Make note of any App objects which would be created, altered, or destroyed if the actions are accepted as HPE Morpheus Enterprise would immediately take them if desired. When ready, click COMPLETE. This will execute all planned changes as if the user had run “terraform apply -auto-approve” from a terminal session.
Edit Inputs allows for editing of Input values without going through the process of applying state. Edit State displays the state in a large text area for direct editing.
State Subsection
The State Subsection shows the current drift state of the App. This includes when HPE Morpheus Enterprise has last checked for drift and whether the App is currently in a “Drift” or “No Drift” state. If the App is currently in a Drift state, users can select Refresh State from the ACTIONS menu to identify which objects and attributes have deviated from the App configuration.
Specs Subsection
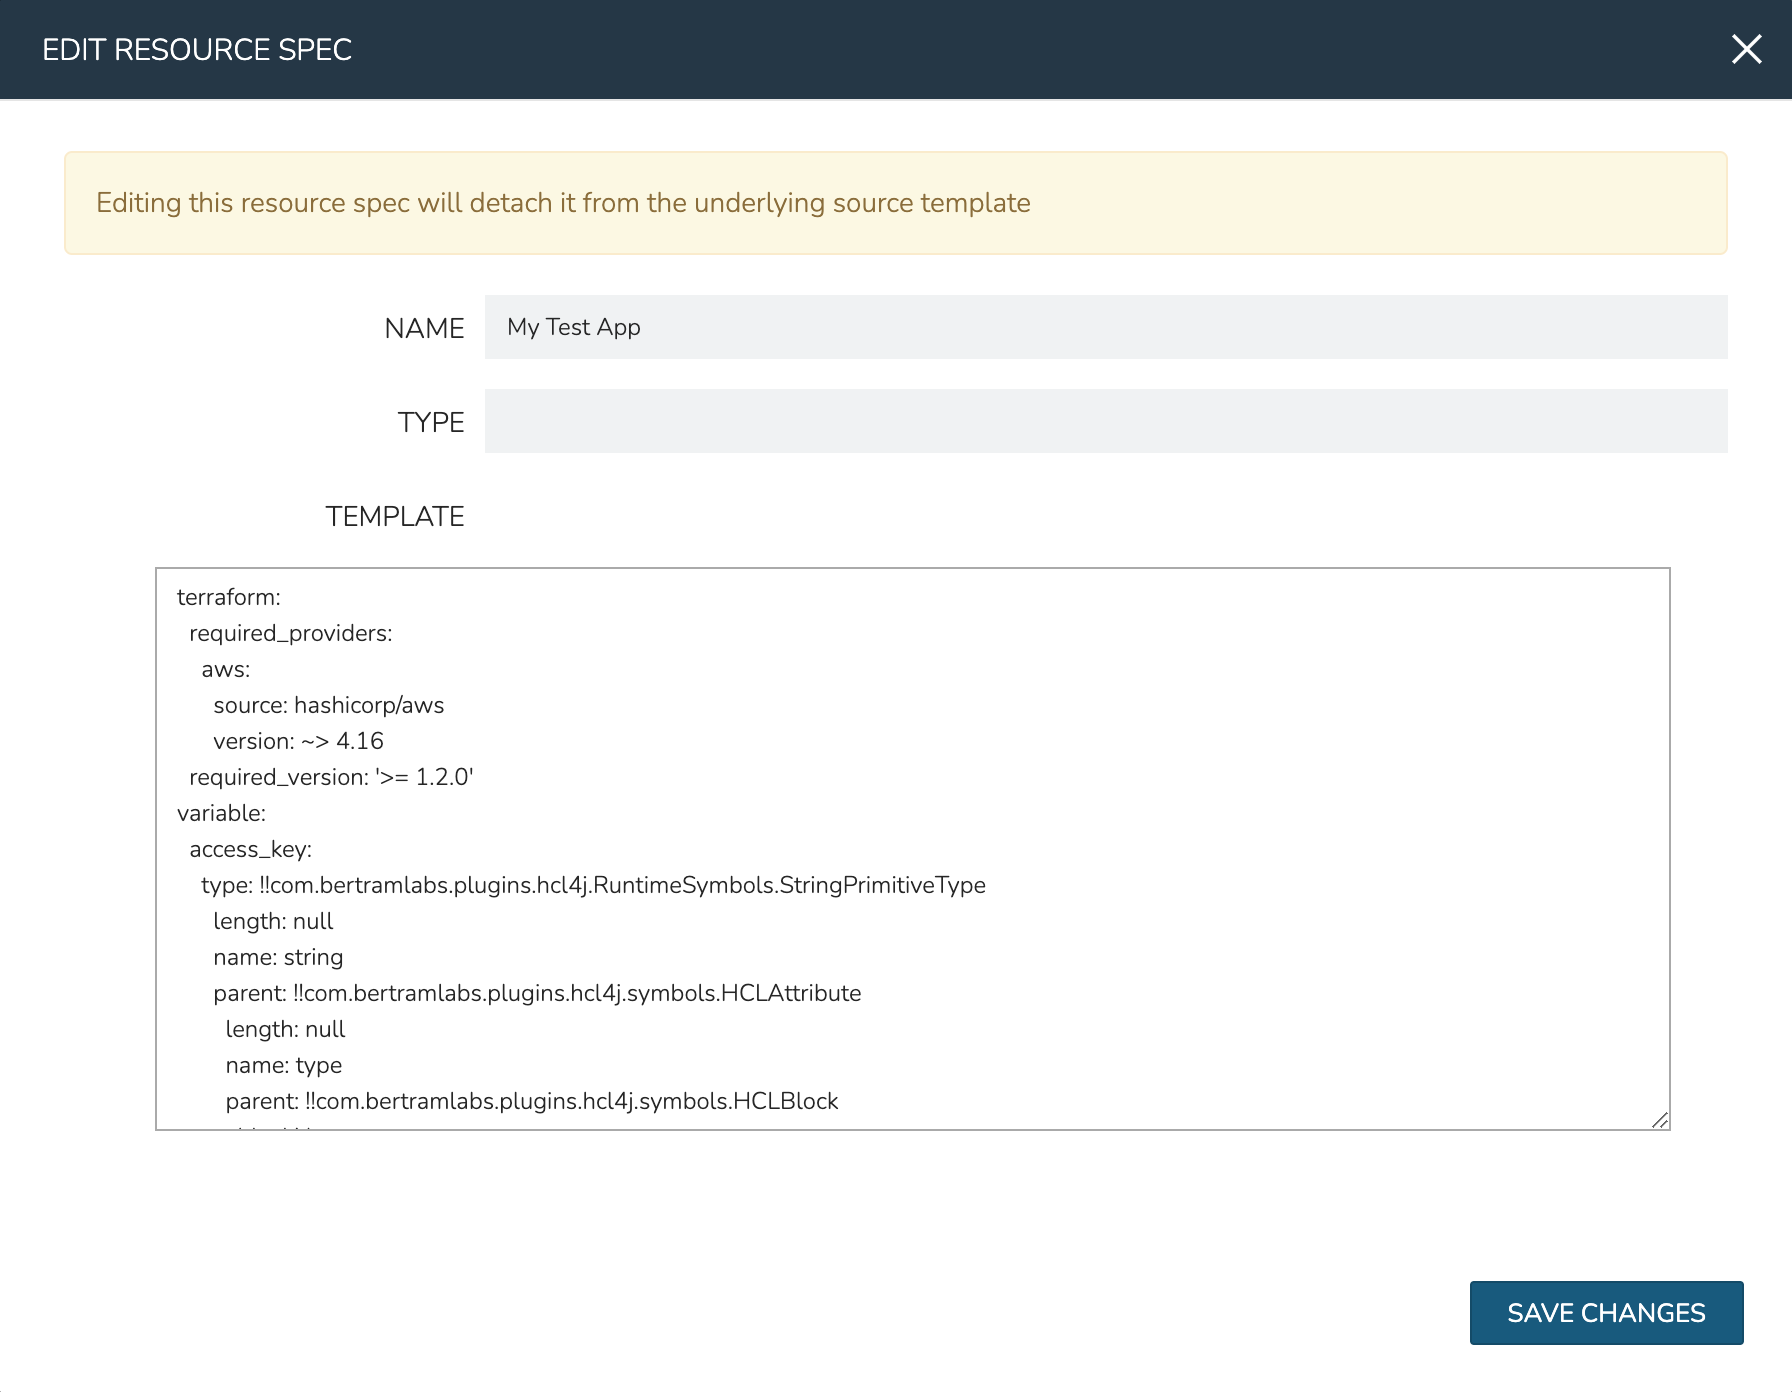
The Specs Subsection will show the user all HPE Morpheus Enterprise Spec Templates (Library > Templates > Spec Templates) which make up the App. Users may even edit Spec Template config directly from this view by clicking the Edit (pencil) icon to the right of each Spec Template listed.
Tip
Editing a Spec Template here will detach it from the source object, essentially making it a brand new object that exists only here. All future updates to that Spec Template would have to be made here going forward. In most cases, it’s advisable to edit the Spec Template directly at the source. For example, if this Spec Template were sourced from an integrated version control repository (ex. Github), it’s likely the best option to make a new commit into your repository and then let Terraform handle the process of bringing your App in line with the new specifications.
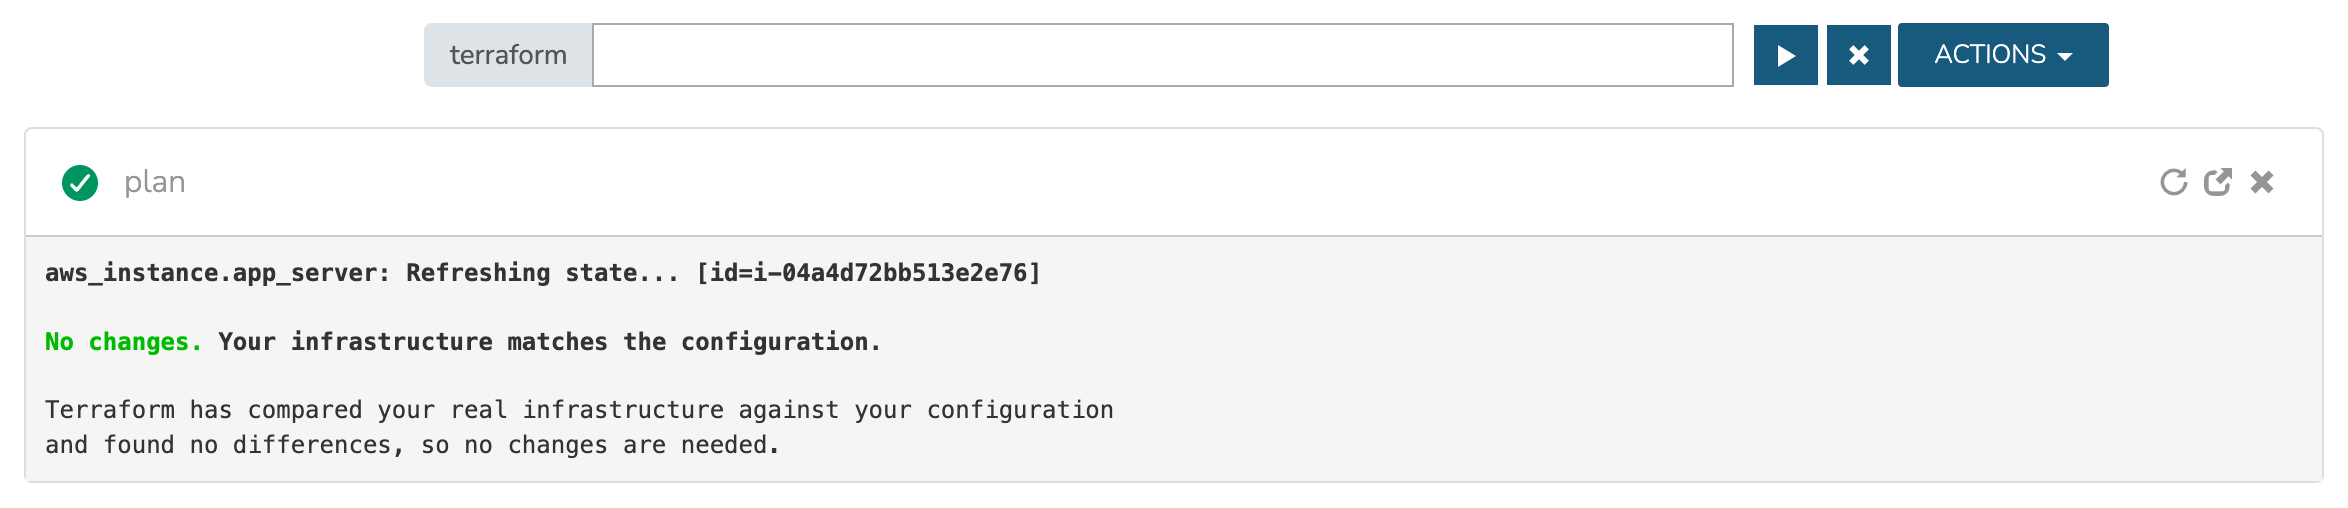
Plan Subsection
This section displays the output of the most recent “terraform plan” run against your App. This will either indicate that your infrastructure (App) matches the configuration or it will indicate that a drift of some sort has taken place.
Input Subsection
This section lists all Terraform inputs, such as variables, which are relevant to the App. Variable values are shown unless they are flagged as sensitive in your configuration. All variables sourced from a HPE Morpheus Enterprise Cypher tfvars mount will automatically be masked.
Output Subsection
This section lists all configured Terraform output.
Terraform Instance Type Example
Terraform Spec can also be used within the HPE Morpheus Enterprise Instance Type construct in addition to App Blueprints and Apps. Expand the section below to see a complete end-to-end example of a Terraform Instance Type from drafting new Spec Templates through to provisioning.
Terraform Instance Type Example
Terraform is a common tool that allows IT administrators to map out infrastructure as code in configuration files and supports all of the popular providers used in the modern datacenter. Once configured, Terraform will plan, deploy, and manage the infrastructure as needed. Configuration files can be brought under version control so teams can easily make changes to environments. Infrastructure can also be monitored for drift and corrective action can easily be taken.
HPE Morpheus Enterprise allows users to on-board or even draft Terraform spec directly. With the configuration on-board, we can begin to piece together infrastructure constructs into the HPE Morpheus Enterprise Library as Layouts and Instance Types. With the Library items staged, users can deploy new infrastructure directly into the selected providers. Once deployed, infrastructure can be monitored for drift from within HPE Morpheus Enterprise UI. When needed, we can plan and take corrective action easily from the detail page of a HPE Morpheus Enterprise Terraform Instance.
In this section, we’ve discussed a high-level overview of Terraform and working with Terraform in the HPE Morpheus Enterprise context. In the next section, we’ll actually onboard Terraform spec, create Library items, and deploy real infrastructure to AWS with HPE Morpheus Enterprise.
In this example, we’re going to deploy a VPC and three subnets to AWS using Terraform and HPE Morpheus Enterprise. I’ve created Spec Templates to onboard
.tfconfiguration files which handle the AWS provider (with assume role for account flexibility), VPC creation, subnet creation, and variable injection.We’ll onboard the Terraform configuration files as modular Spec Templates, create new Instance Types with custom Layouts for the HPE Morpheus Enterprise Library, and set up Inputs to inject variable values at provision time. Once deployed, we’ll take a look at the new infrastructure in HPE Morpheus Enterprise and go over the management capabilities for the new environment.
Terraform configuration is stored as a Spec Template in HPE Morpheus Enterprise. You can store your configuration as one monolithic file for each Instance Type you intend to create or you can create individual Spec Templates for modular pieces which can be reused across multiple Instance Types. When added to the Layout later, we’ll be able to include as many Spec Templates as we wish which enables us to reuse smaller modular pieces if desired.
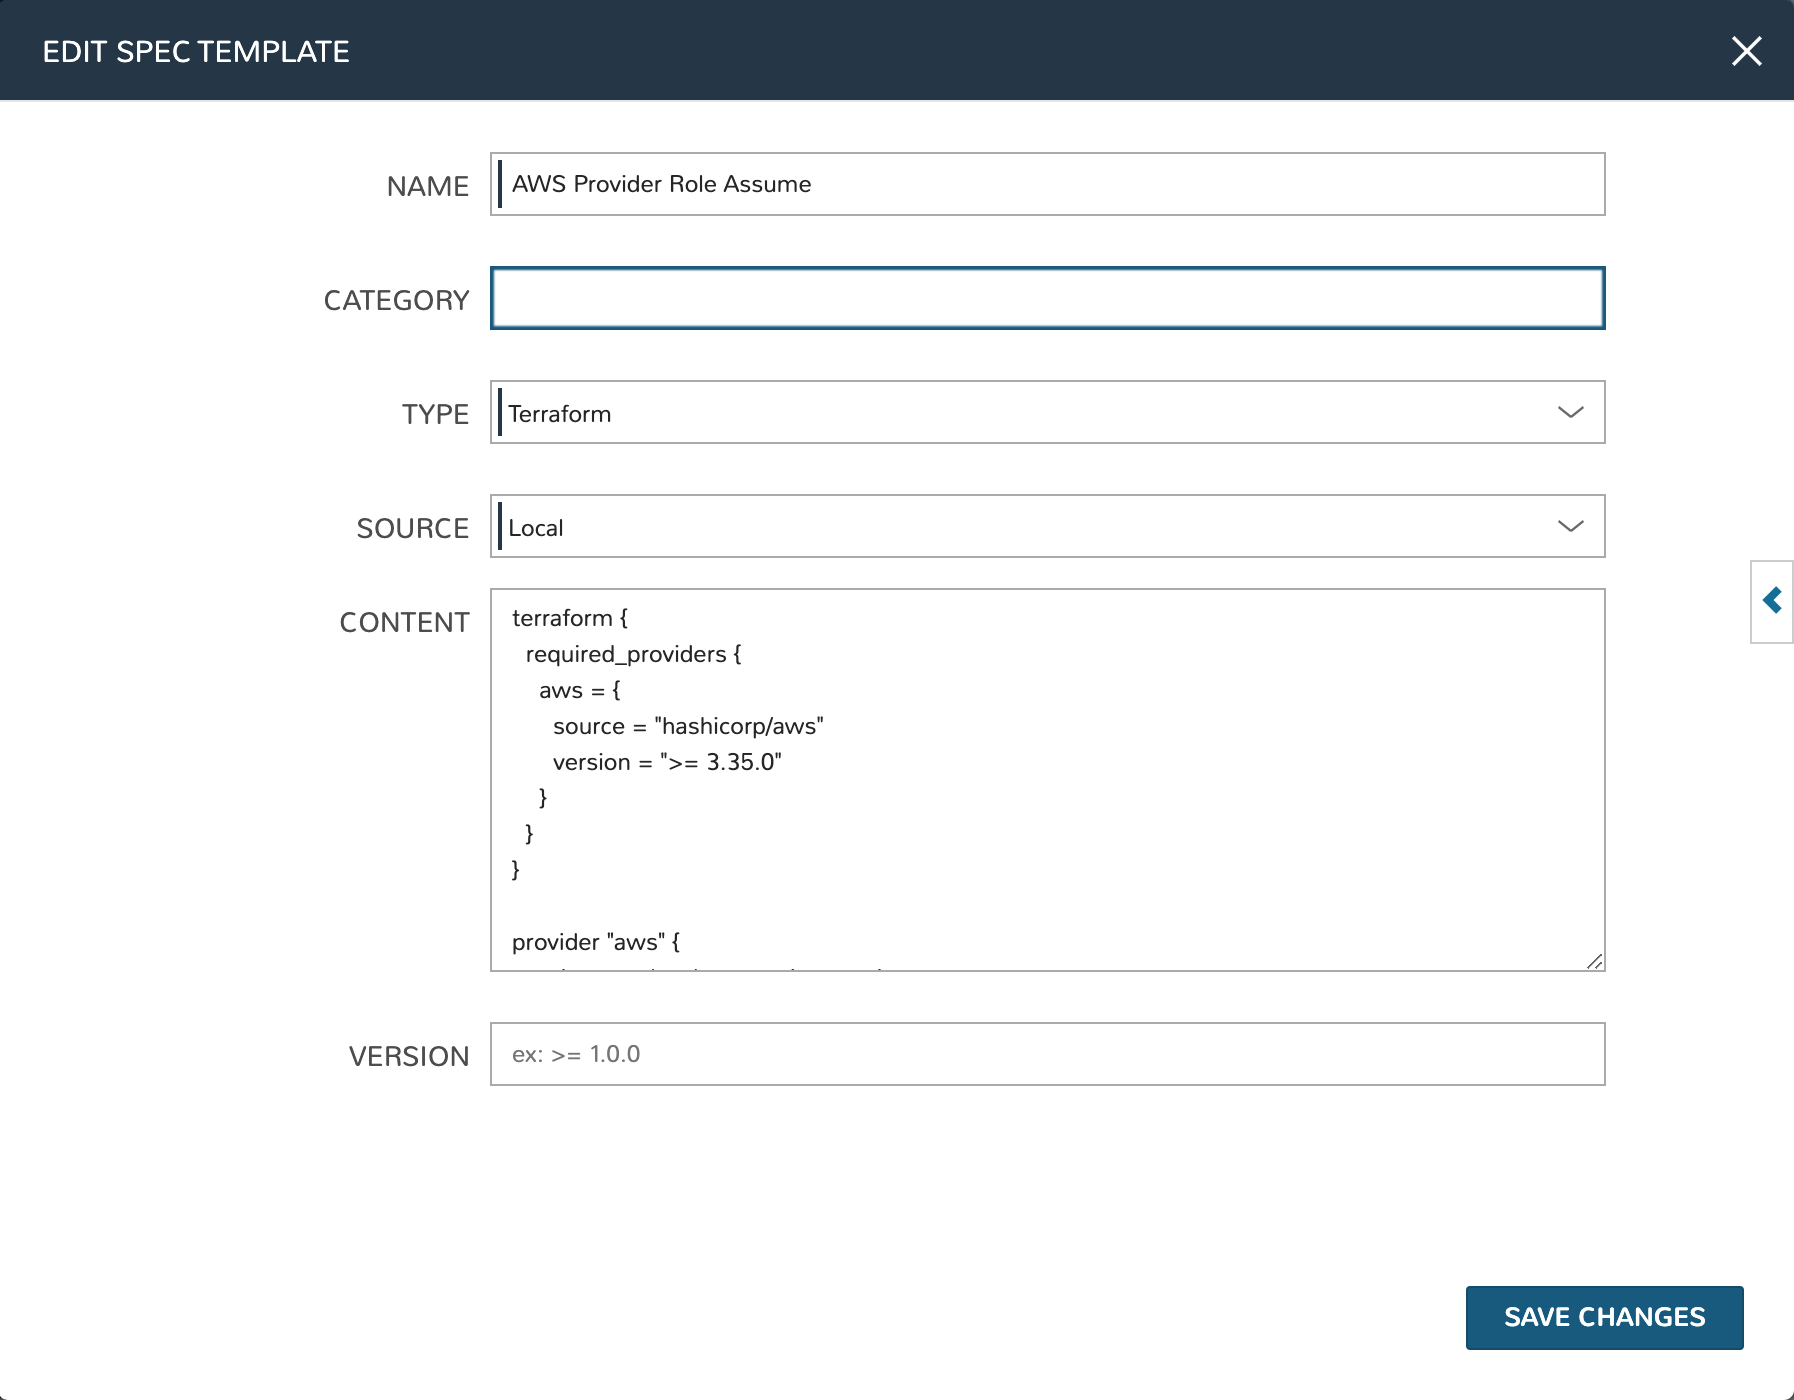
Spec Templates are added in the HPE Morpheus Enterprise Library (Library > Templates > Spec Templates tab). We can pull in the template from some type of repository, such as through a Github integration, or write new spec directly into the New Spec Template modal. In most cases, the spec will be pre-existing and pulled in from a version-controlled repository but here I have my Terraform spec entered locally. Click + ADD, complete the fields as I’ve done in the example below and click SAVE CHANGES.
In the VERSION field at the bottom of the TF Spec Template modal, enter a Terraform version number to force that version to be used. This version is only honored if the Terraform Runtime setting (Administration > Settings > Provisioning) is set to “auto”. When “manual” is selected as the Terraform Runtime setting, HPE Morpheus Enterprise will simply use the version installed on the appliance box.
Tip
When declaring variables, keep in mind that HPE Morpheus Enterprise expects users to follow Terraform best practices. For example, when a variable type is not defined, it defaults to string. See Terraform Documentation for additional resources on variable declaration.
AWS Subnet by Count
# This spec template creates AWS subnets based on the count requested utilizing the vpc cidr provided in var.vpc_cidr variable

locals {
  bitCount = sum([tonumber(local.subnet_options.cidrMask),-tonumber(split("/",var.vpc_cidr)[1])])
}

resource "aws_subnet" "main" {
    count = tonumber(var.subnetCount)
    vpc_id     = aws_vpc.main.id
    cidr_block = cidrsubnet(var.vpc_cidr, local.bitCount, count.index)

    tags = merge(
        local.default_tags,
        {
        Name = "${var.vpc_name}-subnet-0${count.index}"
        }
    )
}

output "aws_subnet" {
  value = aws_subnet.main
  sensitive = true
}
AWS Terraform Default Vars
variable "access_key" {
  type        = string
}

variable "secret_key" {
  type        = string
}

variable "subnetCount" {
  type = number
  default = "<%=customOptions.subnetCount%>"
}

variable "sensitive_thing" {
  type = string
  default = "this_var_is_sensitive"
  sensitive = true
}
AWS Provider Role Assume
terraform {
  required_providers {
    aws = {
      source = "hashicorp/aws"
      version = ">= 3.35.0"
    }
  }
}

provider "aws" {
  region     = local.vpc_options.region
  access_key = var.access_key
  secret_key = var.secret_key

  assume_role {
    # The role ARN within Account B to AssumeRole into.
    role_arn = "arn:aws:iam::${local.vpc_options.aws_account}:role/OrganizationAccountAccessRole"
  }
}
AWS Terrform Locals
locals {
  #  Common tags to be assigned to all resources
  default_tags = {
    Owner    = "<%=username%>"
    Group = "<%=groupName%>"
    Management_Tool = "Terraform"
    Management_Platform = "Morpheus"
  }

  subnet_options = {
    cidrMask = "<%=customOptions.cidrMask%>"
    subnetCount = "<%=customOptions.subnetCount%>"
  }
  vpc_options = {
    region = "<%=customOptions.awsRegion%>"
    aws_account = "<%=customOptions.awsAccount%>"
  }
}
AWS VPC
variable "vpc_cidr" {
  type        = string
  description = "CIDR for the the VPC"
  default = "172.16.0.0/24"
}

variable "vpc_name" {
  type        = string
  description = "Name for the VPC"
  default = "durka"
}

resource "aws_vpc" "main" {
    cidr_block = var.vpc_cidr

 tags = merge(
    local.default_tags,
    {
      Name = var.vpc_name
    }
  )
}

output "aws_vpc" {
  value = aws_vpc.main
  sensitive = true
}
Note
In the AWS Terraform Locals example Spec Template above, pre-provision variables are used. Note the use of pre-provision variables to store the value for Owner and Group, among other things. See the variables section of HPE Morpheus Enterprise documentation (linked in the prior sentence) for a listing of other possible pre-provision variables and a complete map of variables which can be resolved after provisioning has completed.
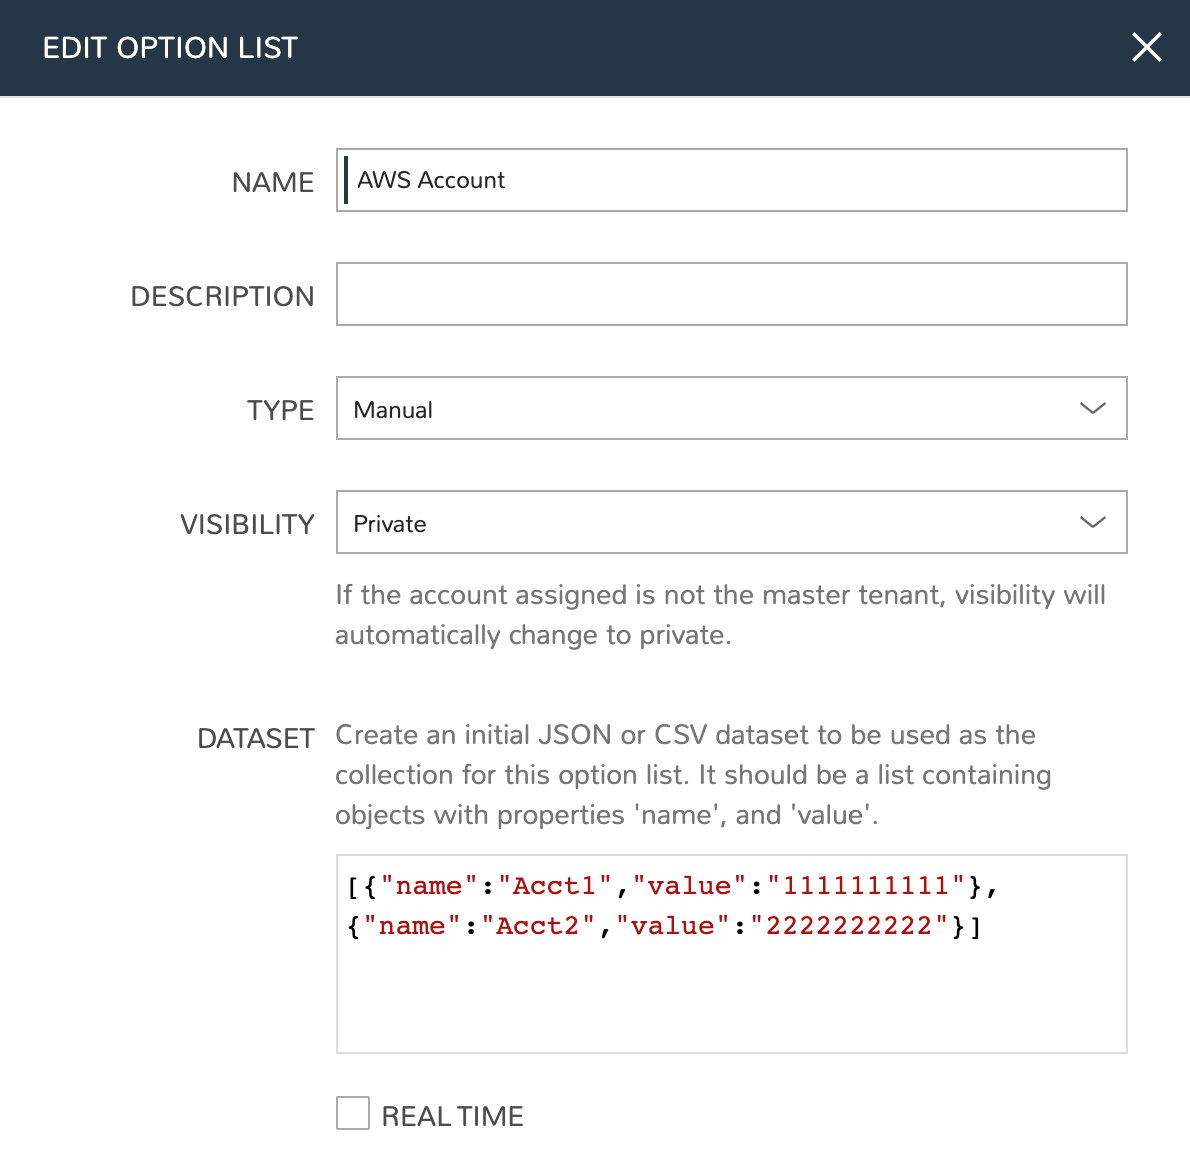
In order to create the Layout later in the guide, I need to create four Inputs so the user can make certain selections at provision time. I wrote my Terraform Configuration with this flexibility in mind so that the same Instance Type can be reused in different scenarios. In this particular case, I’m populating the Inputs with manual Option Lists but they can also be populated through REST calls or calls to the HPE Morpheus Enterprise API when needed.
Option Lists are created in the Library (Library) under the Option Lists tab. These are lists of items which will be used to create dropdown selections at provision time. Click + ADD, complete the fields as I’ve done in the example below and click SAVE CHANGES. I’ve created one each for the AWS account selection, region selection, and CIDR mask input.
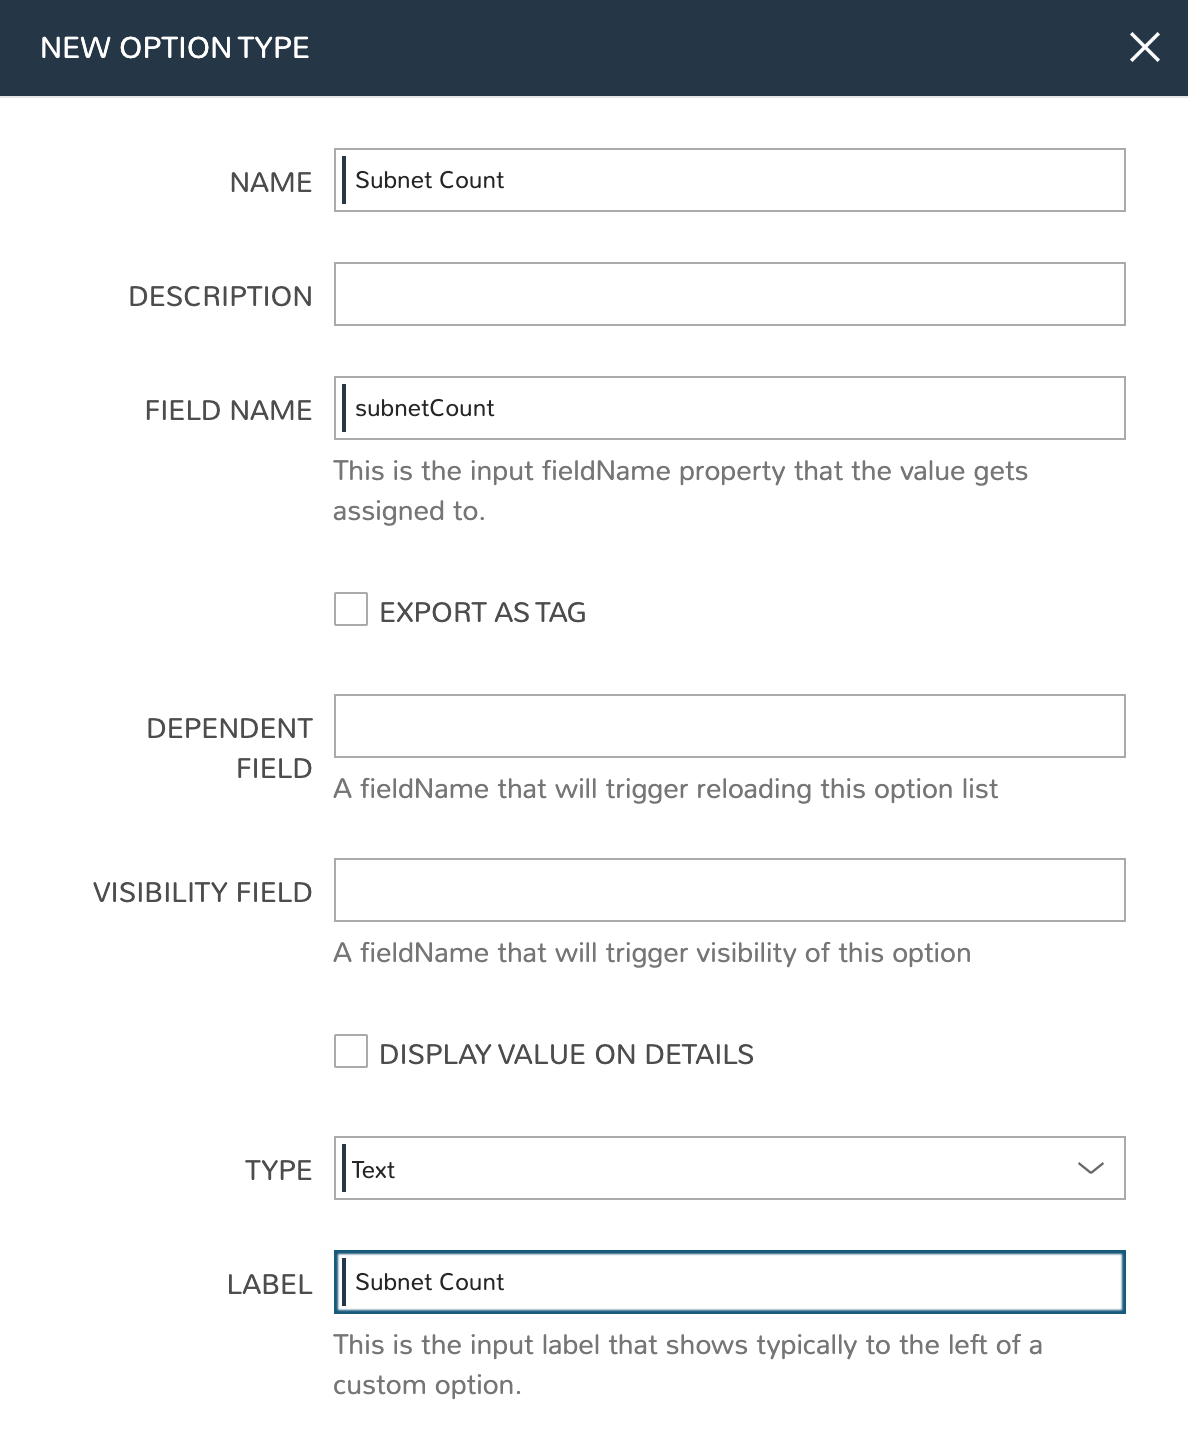
Inputs are also created in the Library under the Inputs tab. In this case, I’m creating four Inputs. Three of them will display as dropdown selections and will be tied to one of the Option Lists we just made. The other will be a simple text input where the user can indicate the total number of subnets that should be created. Click + ADD, complete the fields as I’ve done in the example below and click SAVE CHANGES.
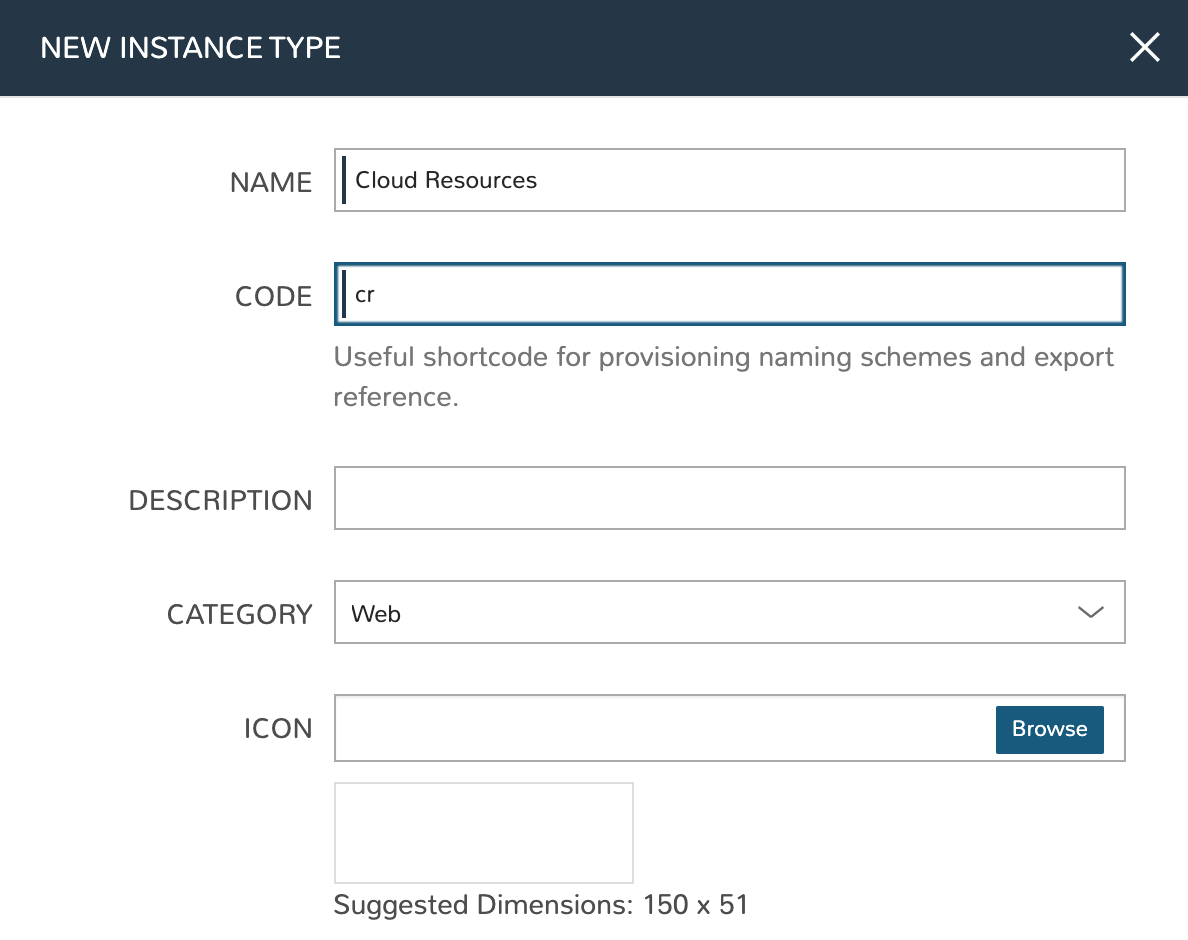
At this point we’re ready to create a new Instance Type. We’ll give the Instance Type a name, which users will use to identify the Instance Type from the list in the provisioning wizard. We don’t need to set much else in this case, most of the pieces we’ve created in previous steps will be associated with the Layout that we create next. The Layout will also be tied to the Instance Type we’re creating now. Instance Types are also created in the Library (Library) under the Instance Types tab. Click + ADD, complete the fields as I’ve done in the example below and click SAVE CHANGES.
The Layout will bring together everything we’ve made to this point, the Spec Templates, Inputs and the Instance Type. We can add a new one from the Instance Type detail page (Library > Blueprints > Instance Types > Selected Instance Type) by clicking + ADD LAYOUT. We can also create one from the Layouts section (Library > Blueprints > Layouts) by clicking + ADD.
First, change the TECHNOLOGY value to Terraform and the fields will change to allow proper configuration. Next, provide a name for your Layout. If you’re creating the Layout through the Layout tab rather than from the Instance Type detail page, you’ll need to identify the Instance Type the Layout goes with. Using the typeahead fields at bottom of the modal window, add our four Inputs and our five Spec Templates to the Layout. Finally, point the layout to a TFVAR SECRET from HPE Morpheus Enterprise Cypher if needed. You can see a screenshot of my Layout configuration below

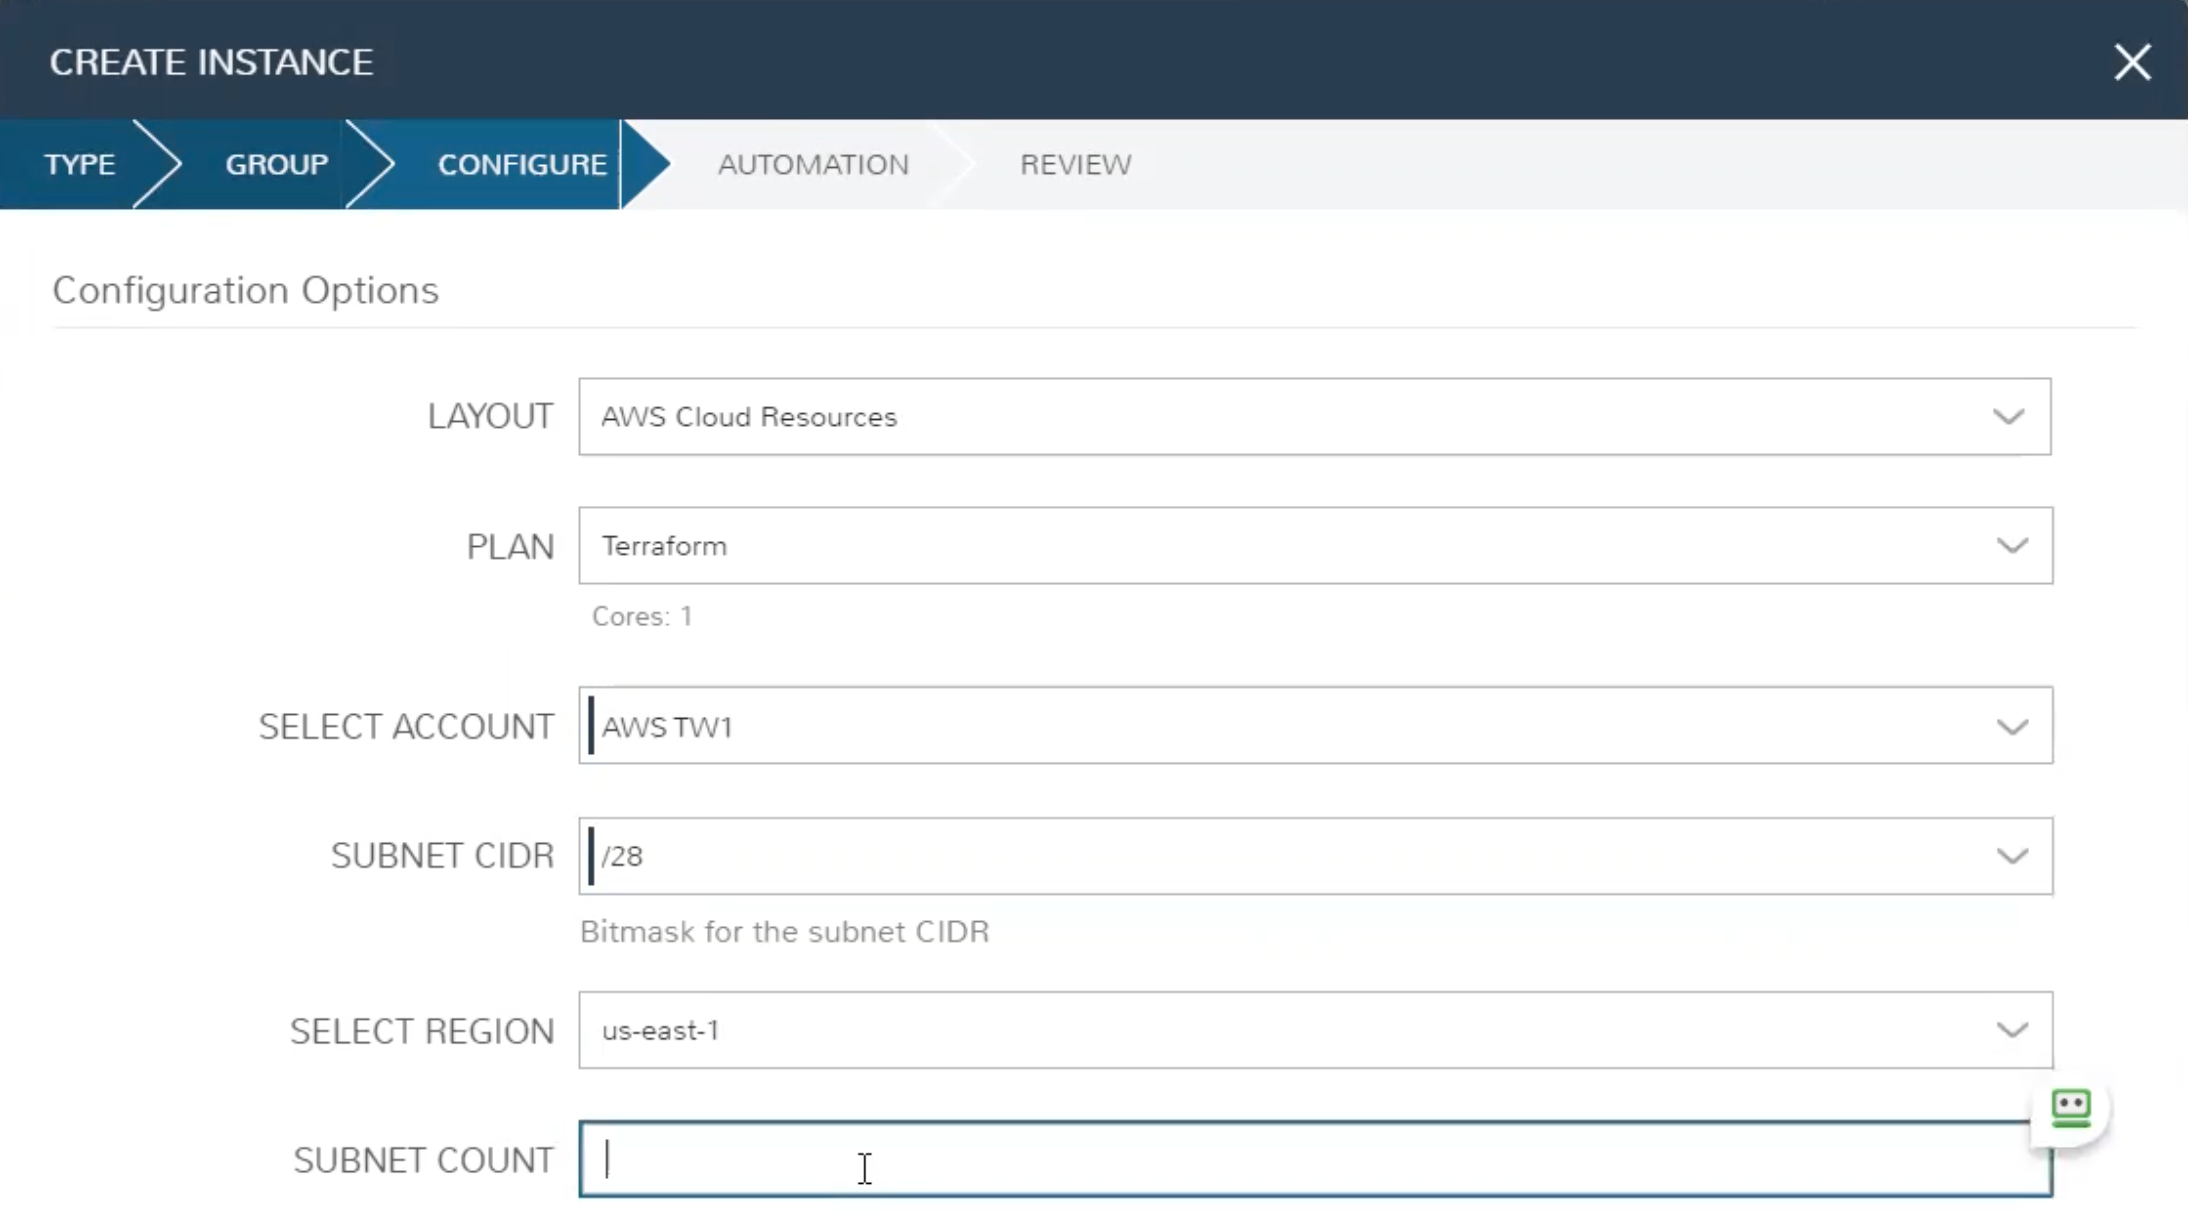
Now, we’re ready to provision new infrastructure into AWS using HPE Morpheus Enterprise and Terraform. Just like any other Instance Type, we begin from the Instances list page (Provisioning > Instances) and click + ADD. Select the Instance Type we’ve just created and move on to the GROUP tab of the wizard. Here you’ll give the new instance a name and select your Group and Cloud. Once finished, you’ll move on to the CONFIGURE tab where we’ll see the Inputs we created and associated with the Layout. Once finished with this tab, step through the rest of the wizard to complete the process. You can see the options I’ve selected for this configuration in the image below.
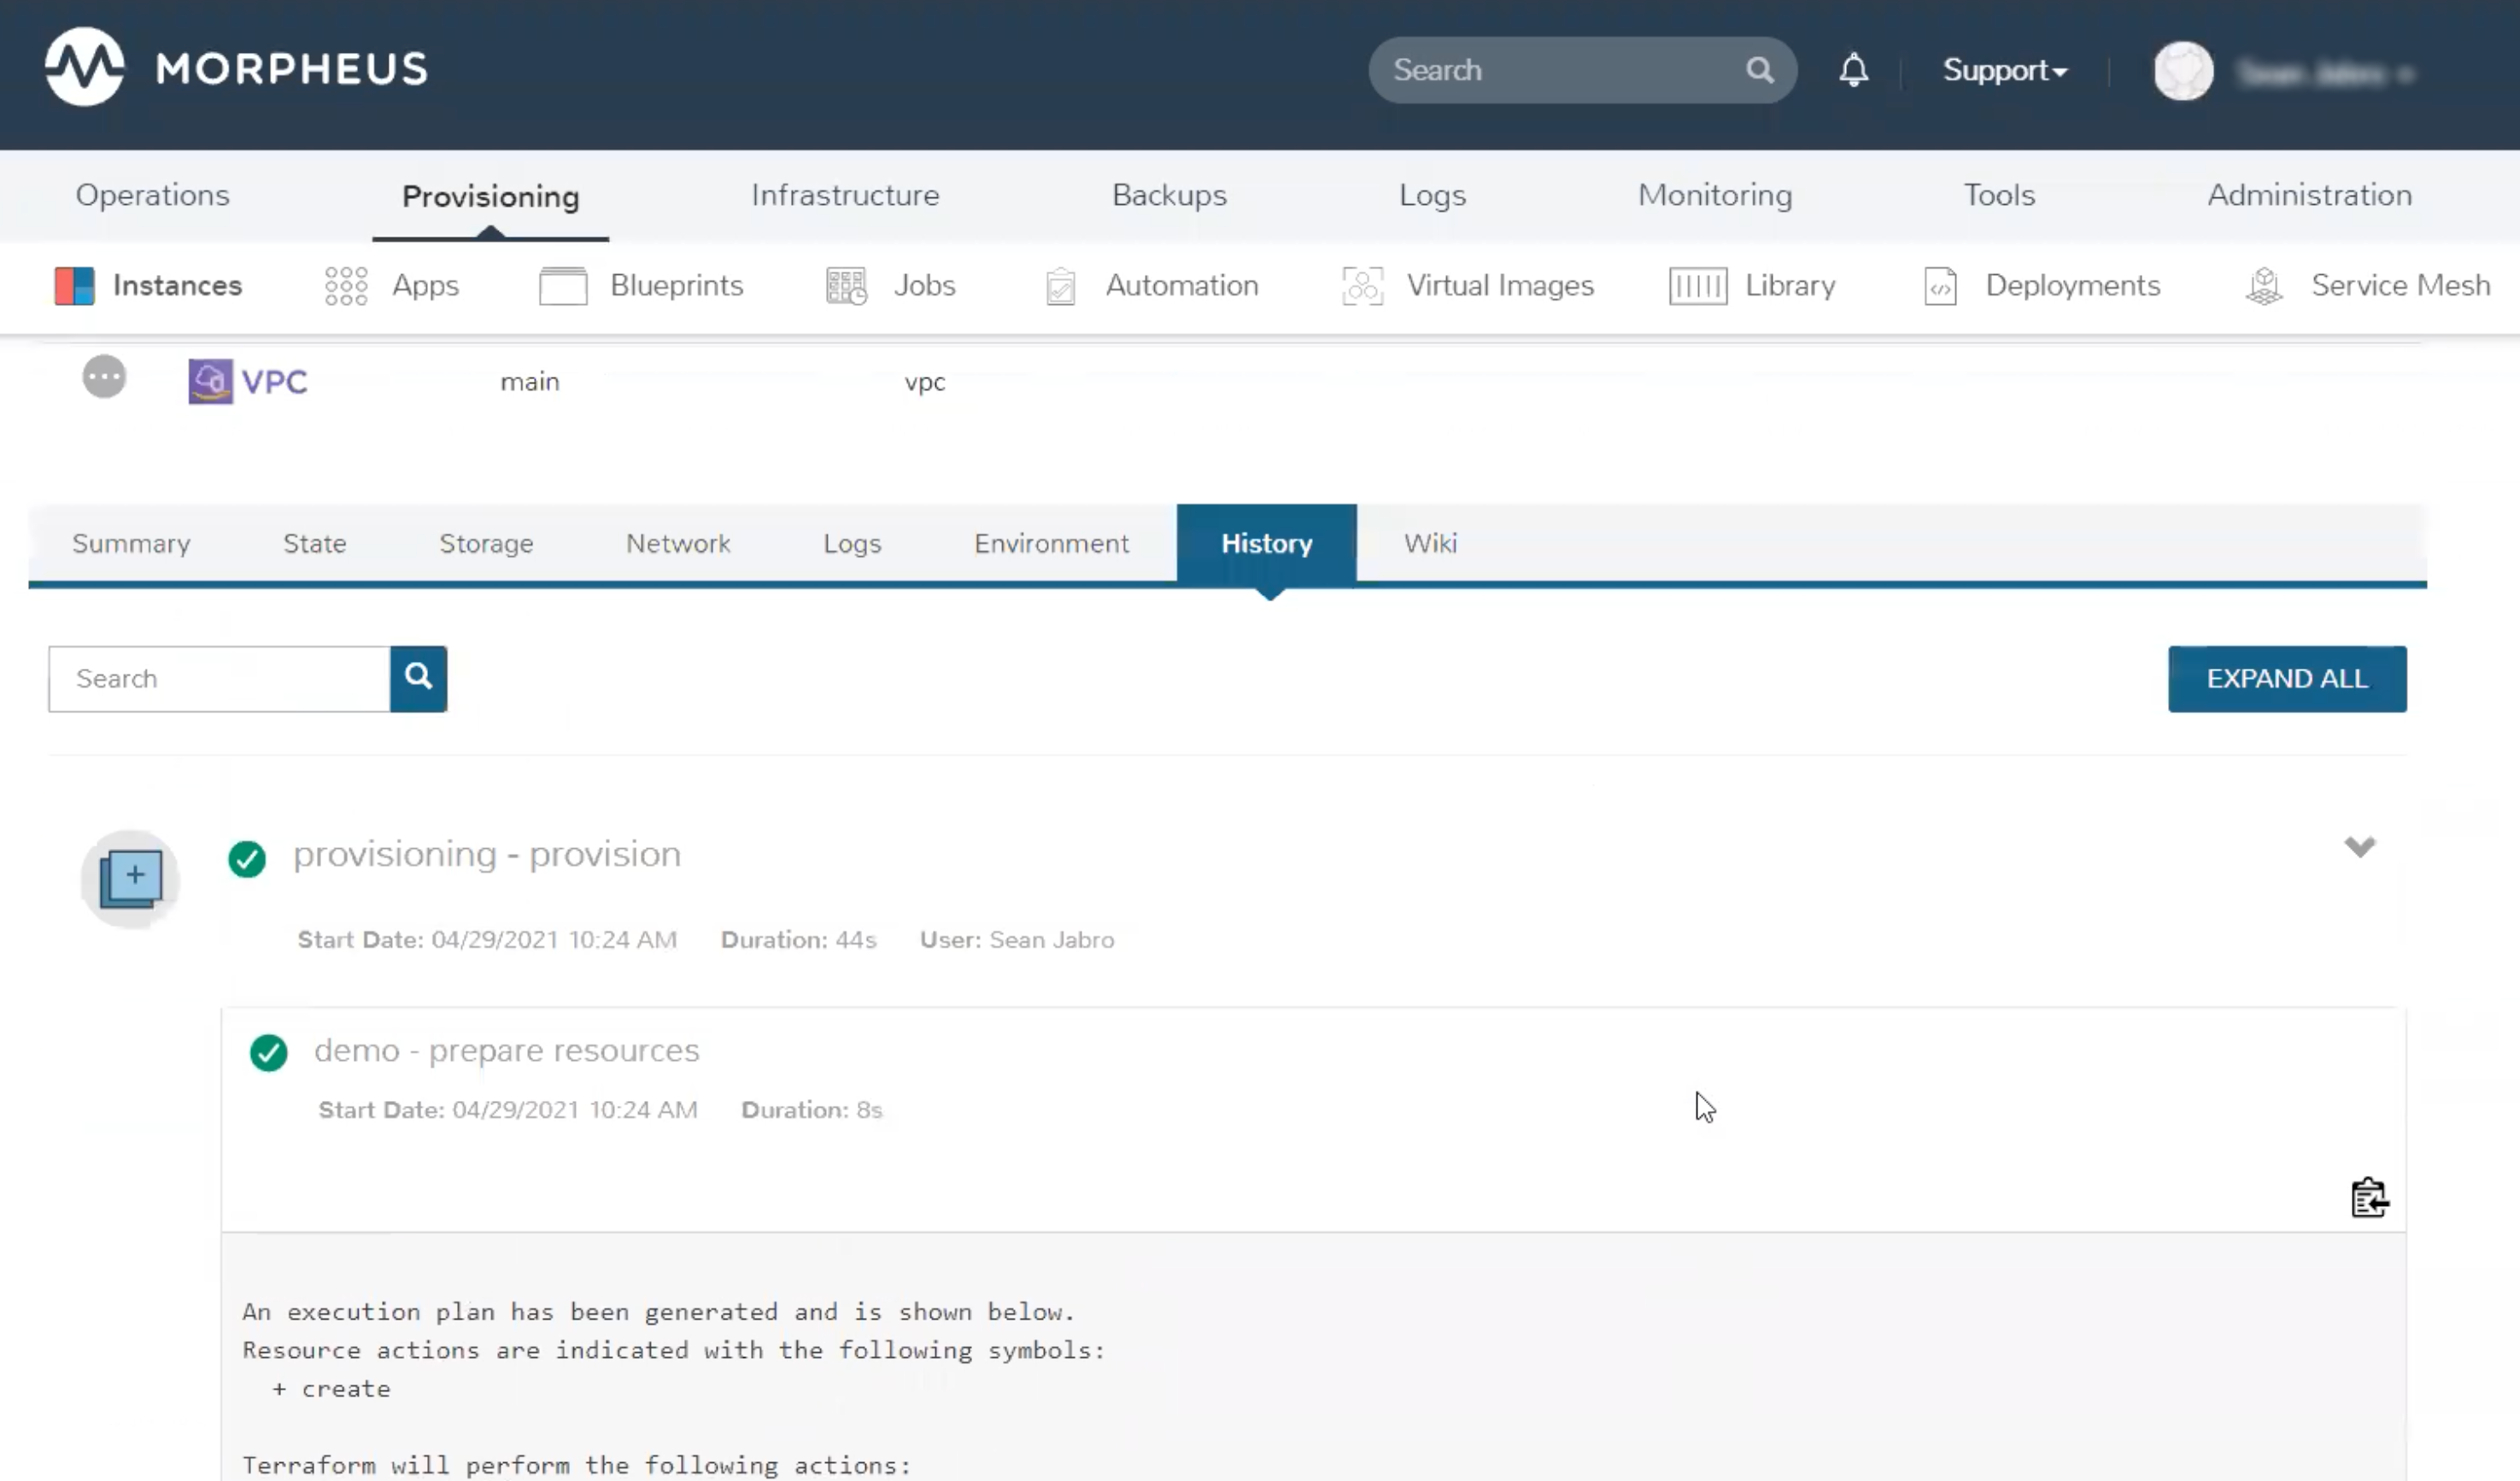
After completing the wizard, from the History tab of the Instance detail page users can review the Terraform plan being executed and see the output while the resources are still being provisioned.
Once the provisioning process is complete, head to the State tab. Here we can see and link through to the associated Spec Templates. If needed, you can also edit the configuration spec by clicking on the pencil icon at the end of the row for any listed Spec Template.
By clicking APPLY STATE, the user can once again see the Input selections which were presented during the initial provisioning and make changes when needed. After making changes and clicking NEXT, HPE Morpheus Enterprise will show the plan output no different than if you’d run
terraform plan. On clicking COMPLETE, the plan will be executed as if you’d runterraform apply. Back on the State tab you will see the output from the Apply process as well as an indicator of the success or failure of the operation.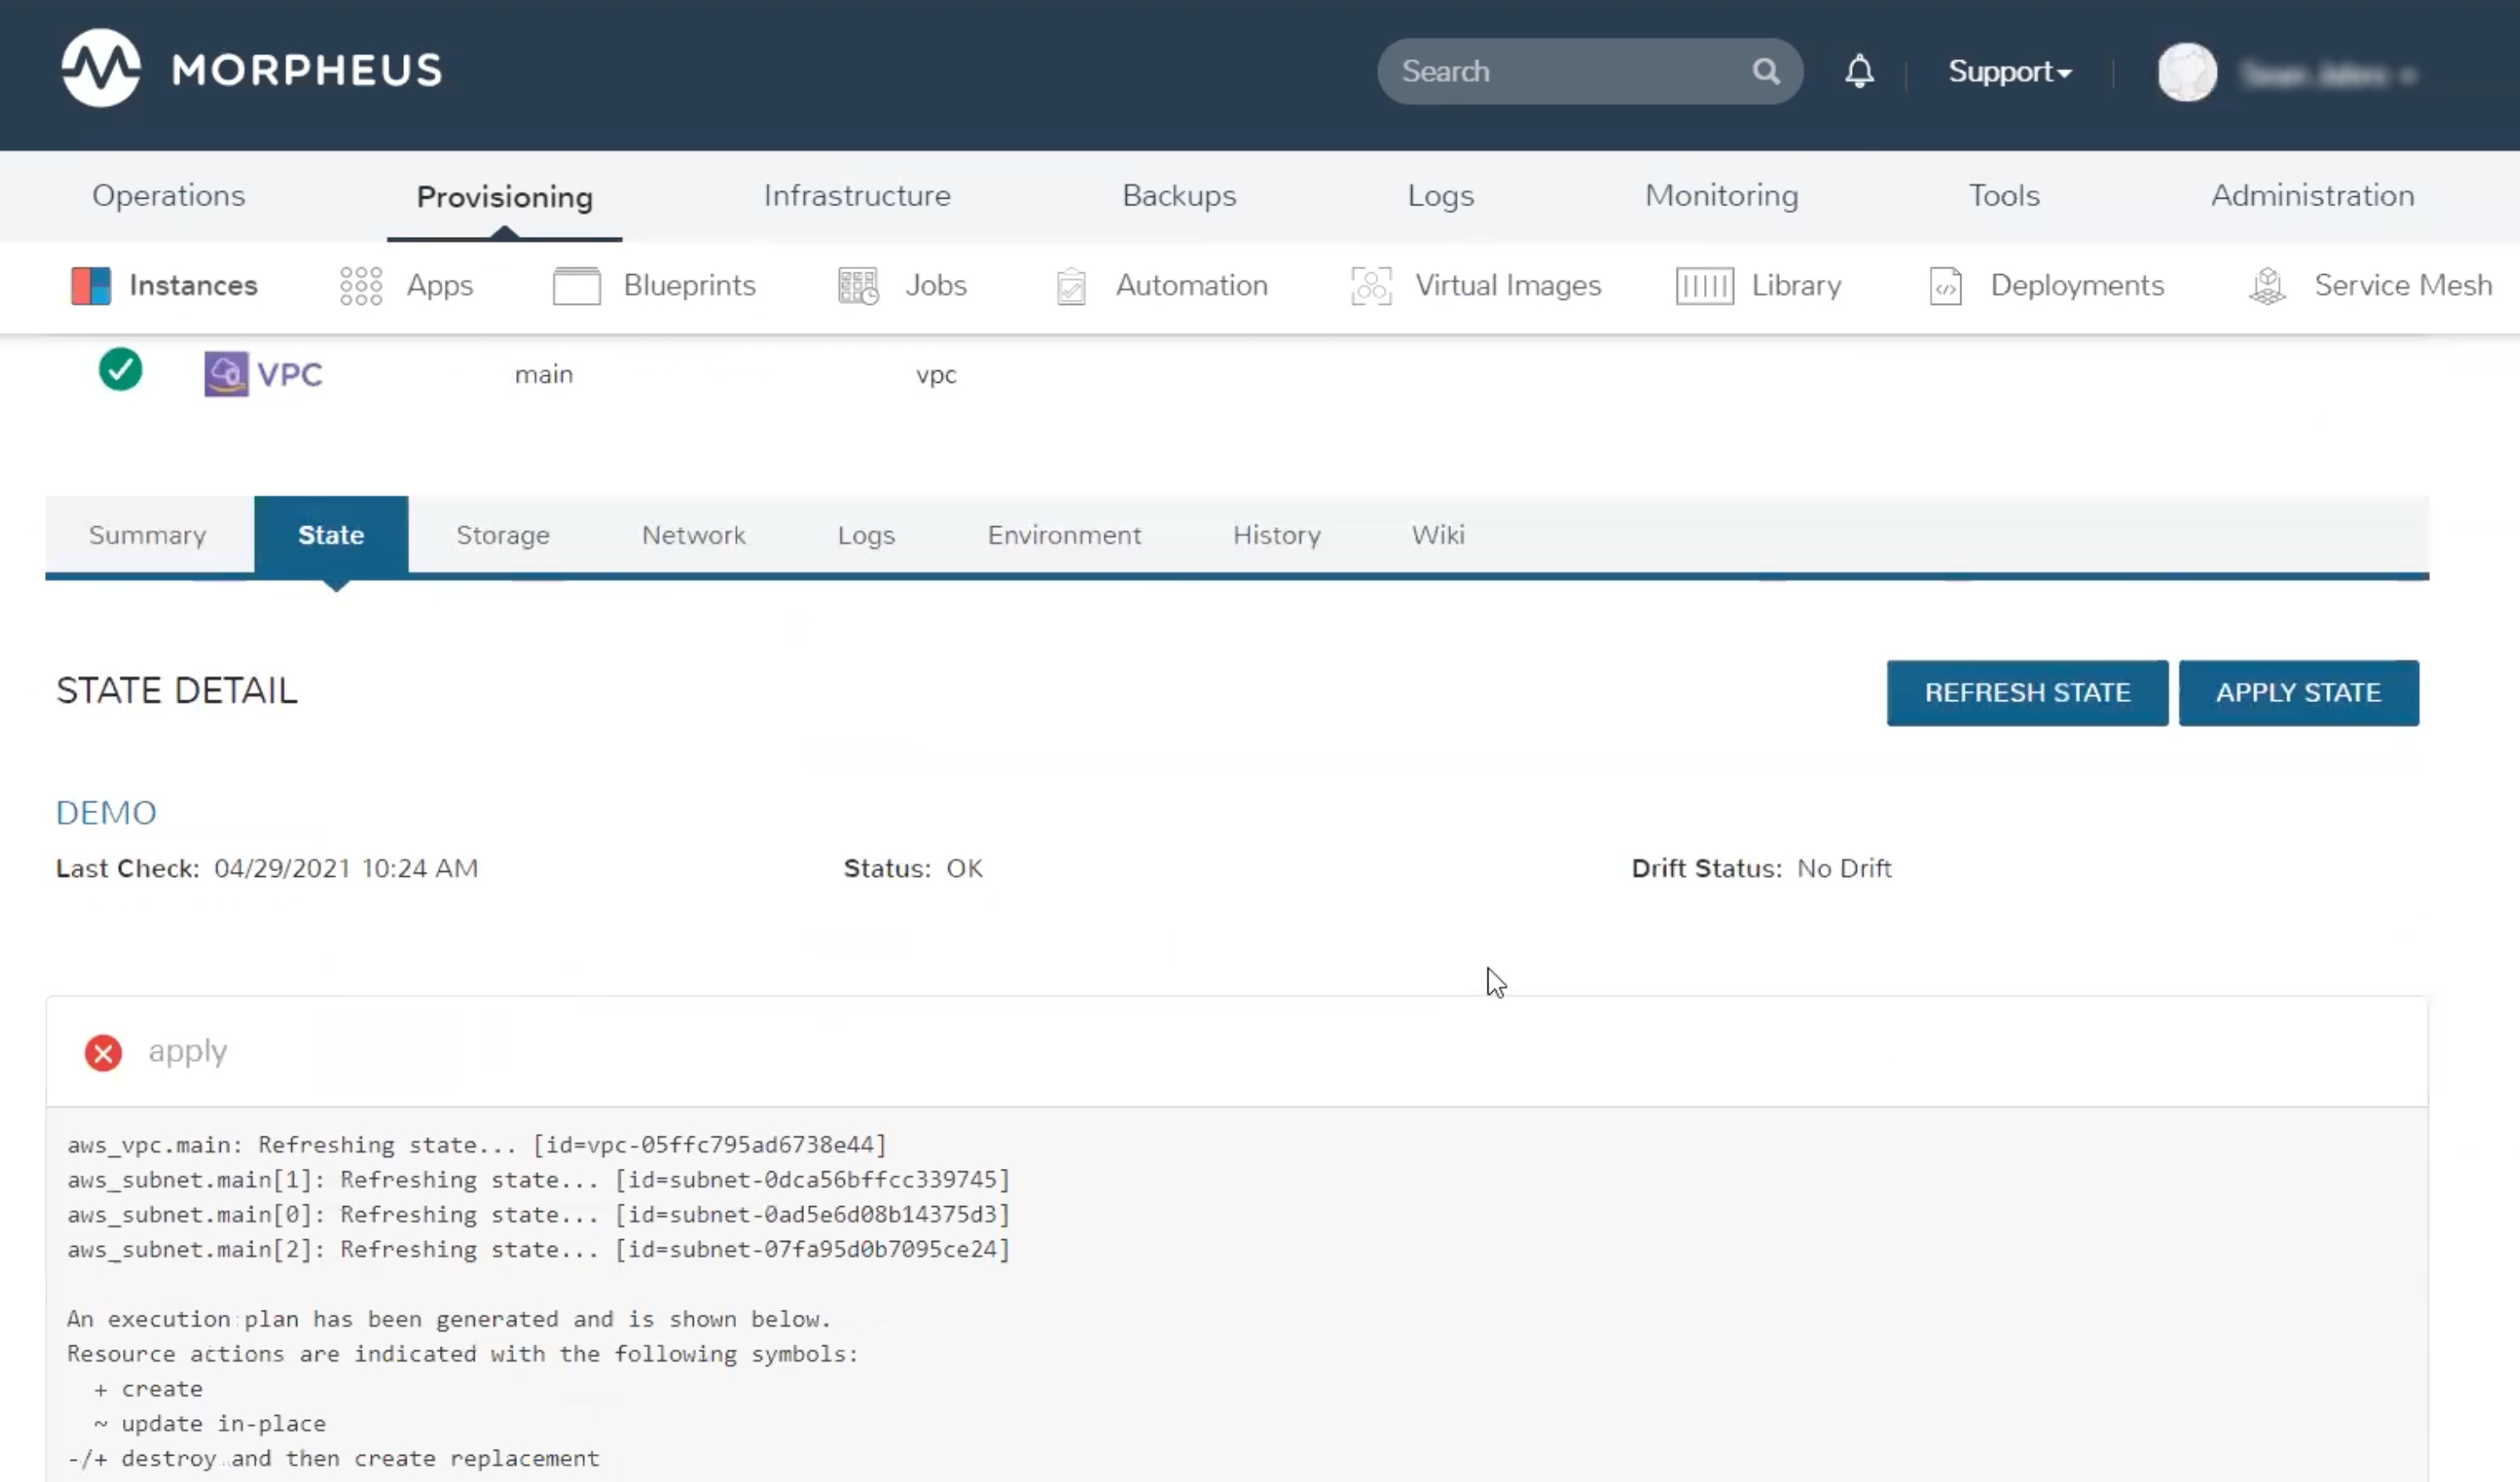
HPE Morpheus Enterprise will also regularly check for drift from the Terraform configuration. On the State tab near the top is a “Drift Status” indicator. This will either show Drift or No Drift depending on the situation. HPE Morpheus Enterprise will automatically check for drift every few minutes but you can perform a manual check at any time by clicking REFRESH STATE. Drift can be corrected when needed by reapplying state (APPLY STATE button).