Workflows
Workflows are groups of Tasks, which are described in detail in the preceding section. Operational Workflows can be run on-demand against an existing Instance or server from the Actions menu on the Instance or server detail page. Additionally, they can be scheduled to run on a recurring basis through Morpheus Jobs (Provisioning > Jobs).
Provisioning Workflows are associated with Instances at provision time (in the Automation tab of the Add Instance wizard) or after provisioning through the Actions menu on the Instance detail page. Provisioning Workflows assign Tasks to various stages of the Instance lifecycle, such as Provision, Post Provision, and Teardown. When the Instance reaches a given stage, the appropriate Tasks are run. Task results and output can be viewed from the History tab of the Instance or server detail page.
Provisioning Workflow Execution Phases
Phase |
Description |
Usage Example |
Notes |
|---|---|---|---|
Configuration |
Tasks are run prior to initial calls to the specified cloud API to initiate provisioning |
Call to an external platform to dynamically generate a hostname prior to kicking off provisioning or dynamically altering configuration of a Catalog Item prior to provisioning |
|
Price |
Price Phase Tasks are only invoked when the Workflow is tied to a Layout. Like the Configuration Phase, these Tasks are run prior to any calls made to the target Cloud API and allow pricing data to be overridden for the Workload being provisioned. A “spec” variable containing Instance config is passed into the Task and a specific return payload is expected in order to work properly. Any other pricing (such as on the Service Plan) is overridden. See the section below for a detailed example of this Phase being used. |
An MSP customer calling out to a custom pricing API to deliver Instance pricing to their own customers. |
See the section below on Price Phase implementation for a detailed setup example. |
Pre Provision |
For VMs, Tasks are run after the VM is running and prior to any Tasks in the Provision phase. For containers, Tasks in this phase are run on the Docker host and prior to |
Prepare a Docker host to run containers |
Pre Provision can be used for a Blueprint so it is added before a script which is set at the Provision phase executes. Pre Provision for scripts is mainly for Docker as you can execute on the host before the container is running. |
Provision |
Like pre-provision, Tasks for VMs are run after the VM is running. For containers, these Tasks are run on the containers once they are running on the host. For many users, this is the most commonly-used phase. |
Join the server to a domain |
Tasks included with in the Provision phase are considered to be vital to the health of the Instance. If a Task in the Provision phase fails, the Workflow will fail and the Instance provisioning will also fail. Tasks not considered to be vital to the existence of the Instance should go in the Post Provision phase where their failure will not constitute failure of the Instance. |
Post Provision |
Tasks are run after the entire provisioning process has completed |
Disable UAC or Windows Firewall on a Windows box or join Active Directory |
When adding a node to an Instance, Tasks in this phase will be run on all nodes in the Instance after the new node is provisioned. This is because Post Provision operations may need to affect all nodes, such as when joining a new node to a cluster. Tasks in Pre Provision and Provision phases would only be run on the new node in this scenario. |
Start Service |
Tasks in this phase are intended to start the service associated with the Instance type. |
Include a script to start the service associated with the Instance (such as MySQL) which will execute when the Start Service action is selected from the Instance detail page |
Start services is manually run from the Instance detail page and is designed to refer to the service the Instance provides. |
Stop Service |
Tasks in this phase intended to stop the service associated with the Instance type. |
Include a script to stop the service associated with the Instance (such as MySQL) which will execute when the Stop Service action is selected from the Instance detail page |
Stop services is manually run from the Instance detail page and is designed to refer to the service the Instance provides. |
Pre Deploy |
Tasks in this phase are run when a new deploy is triggered from the Deploy tab of the Instance detail page, prior to the deploy taking place. |
Extract files from a deploy folder and move them to their final positions prior to deploy |
Deployments are manually triggered from the Instance detail page and are designed to refer to deployment of services, like a website or database. |
Deploy |
Tasks in this phase are run when a new deploy is triggered from the Deploy tab of the Instance detail page, after the deploy has completed |
Update configuration files or inject connection details from the environment at completion of the deploy process |
Deployments are manually triggered from the Instance detail page and are designed to refer to deployment of services, like a website or database. |
Reconfigure |
Tasks in this phase are run when the reconfigure action is made against an Instance or host |
Rescan or restart the Instance after a disk is added |
|
Teardown |
Tasks are run during VM or container destroy |
Remove Active Directory objects prior to tearing down the Instance |
|
Scale Down |
Tasks are run when a node is removed from an Instance. This does not apply to Clusters when a worker node is removed. |
||
Shutdown |
Tasks are run immediately before the target is shutdown |
Send an update on Instance power state to a CMDB |
|
Startup |
Tasks are run immediately before the target is started |
Send an update on Instance power state to a CMDB |
Add Workflow
Select the Library link in the navigation bar
Select Automation from the sub-navigation menu
Click the Workflows tab to show the Workflows tab panel
Click the + Add dropdown and select a Workflow type (Operational or Provisioning, see the section above for more on Workflow type differences)
From the New Workflow Wizard input a name for the workflow
Optionally input a description and a target platform
Add Tasks and Inputs using the typeahead fields, Tasks must be added to the appropriate phases for Provisioning Workflows
If multiple tasks are added to the same execution phase, their execution order can be changed by selecting the grip icon and dragging the task to the desired execution order
For multi-Tenant environments, select Public or Private visibility for the Workflow
For Operational Workflows, optionally mark “Allow Custom Config” from the Advanced Options section if needed. See the next section for more on this selection
Click the SAVE CHANGES button to save
Note
When setting Workflow visibility to Public in a multi-Tenant environment, Tenants will be able to see the Workflow and also execute it directly from the Workflows list (if it’s an Operational Workflow). They will not be able to edit or delete the Workflow.
Allow Custom Config
When “Allow Custom Config” is marked on Operational Workflows, the user is shown a text area for custom configuration at execution time. This text area is inside the “Advanced Options” section, which must be expanded in order to reveal the text area. Within the text area, add a JSON map of key-value pairs which can be resolved within your automation scripts. This could be used to pass extra variables that aren’t always needed in the script or for specifying extra configuration.
Example JSON Map:
{"key1": "value1",
"key2": "value2",
"os": "linux",
"foo": "bar"}
When the Workflow is executed, these extra variables would be resolved where called into the script such as in the following simple BASH script example:
echo "<%=customOptions.os%>"
echo "<%=customOptions.foo%>"
The above example would result in the following output:
linux
bar
Retrying Workflows
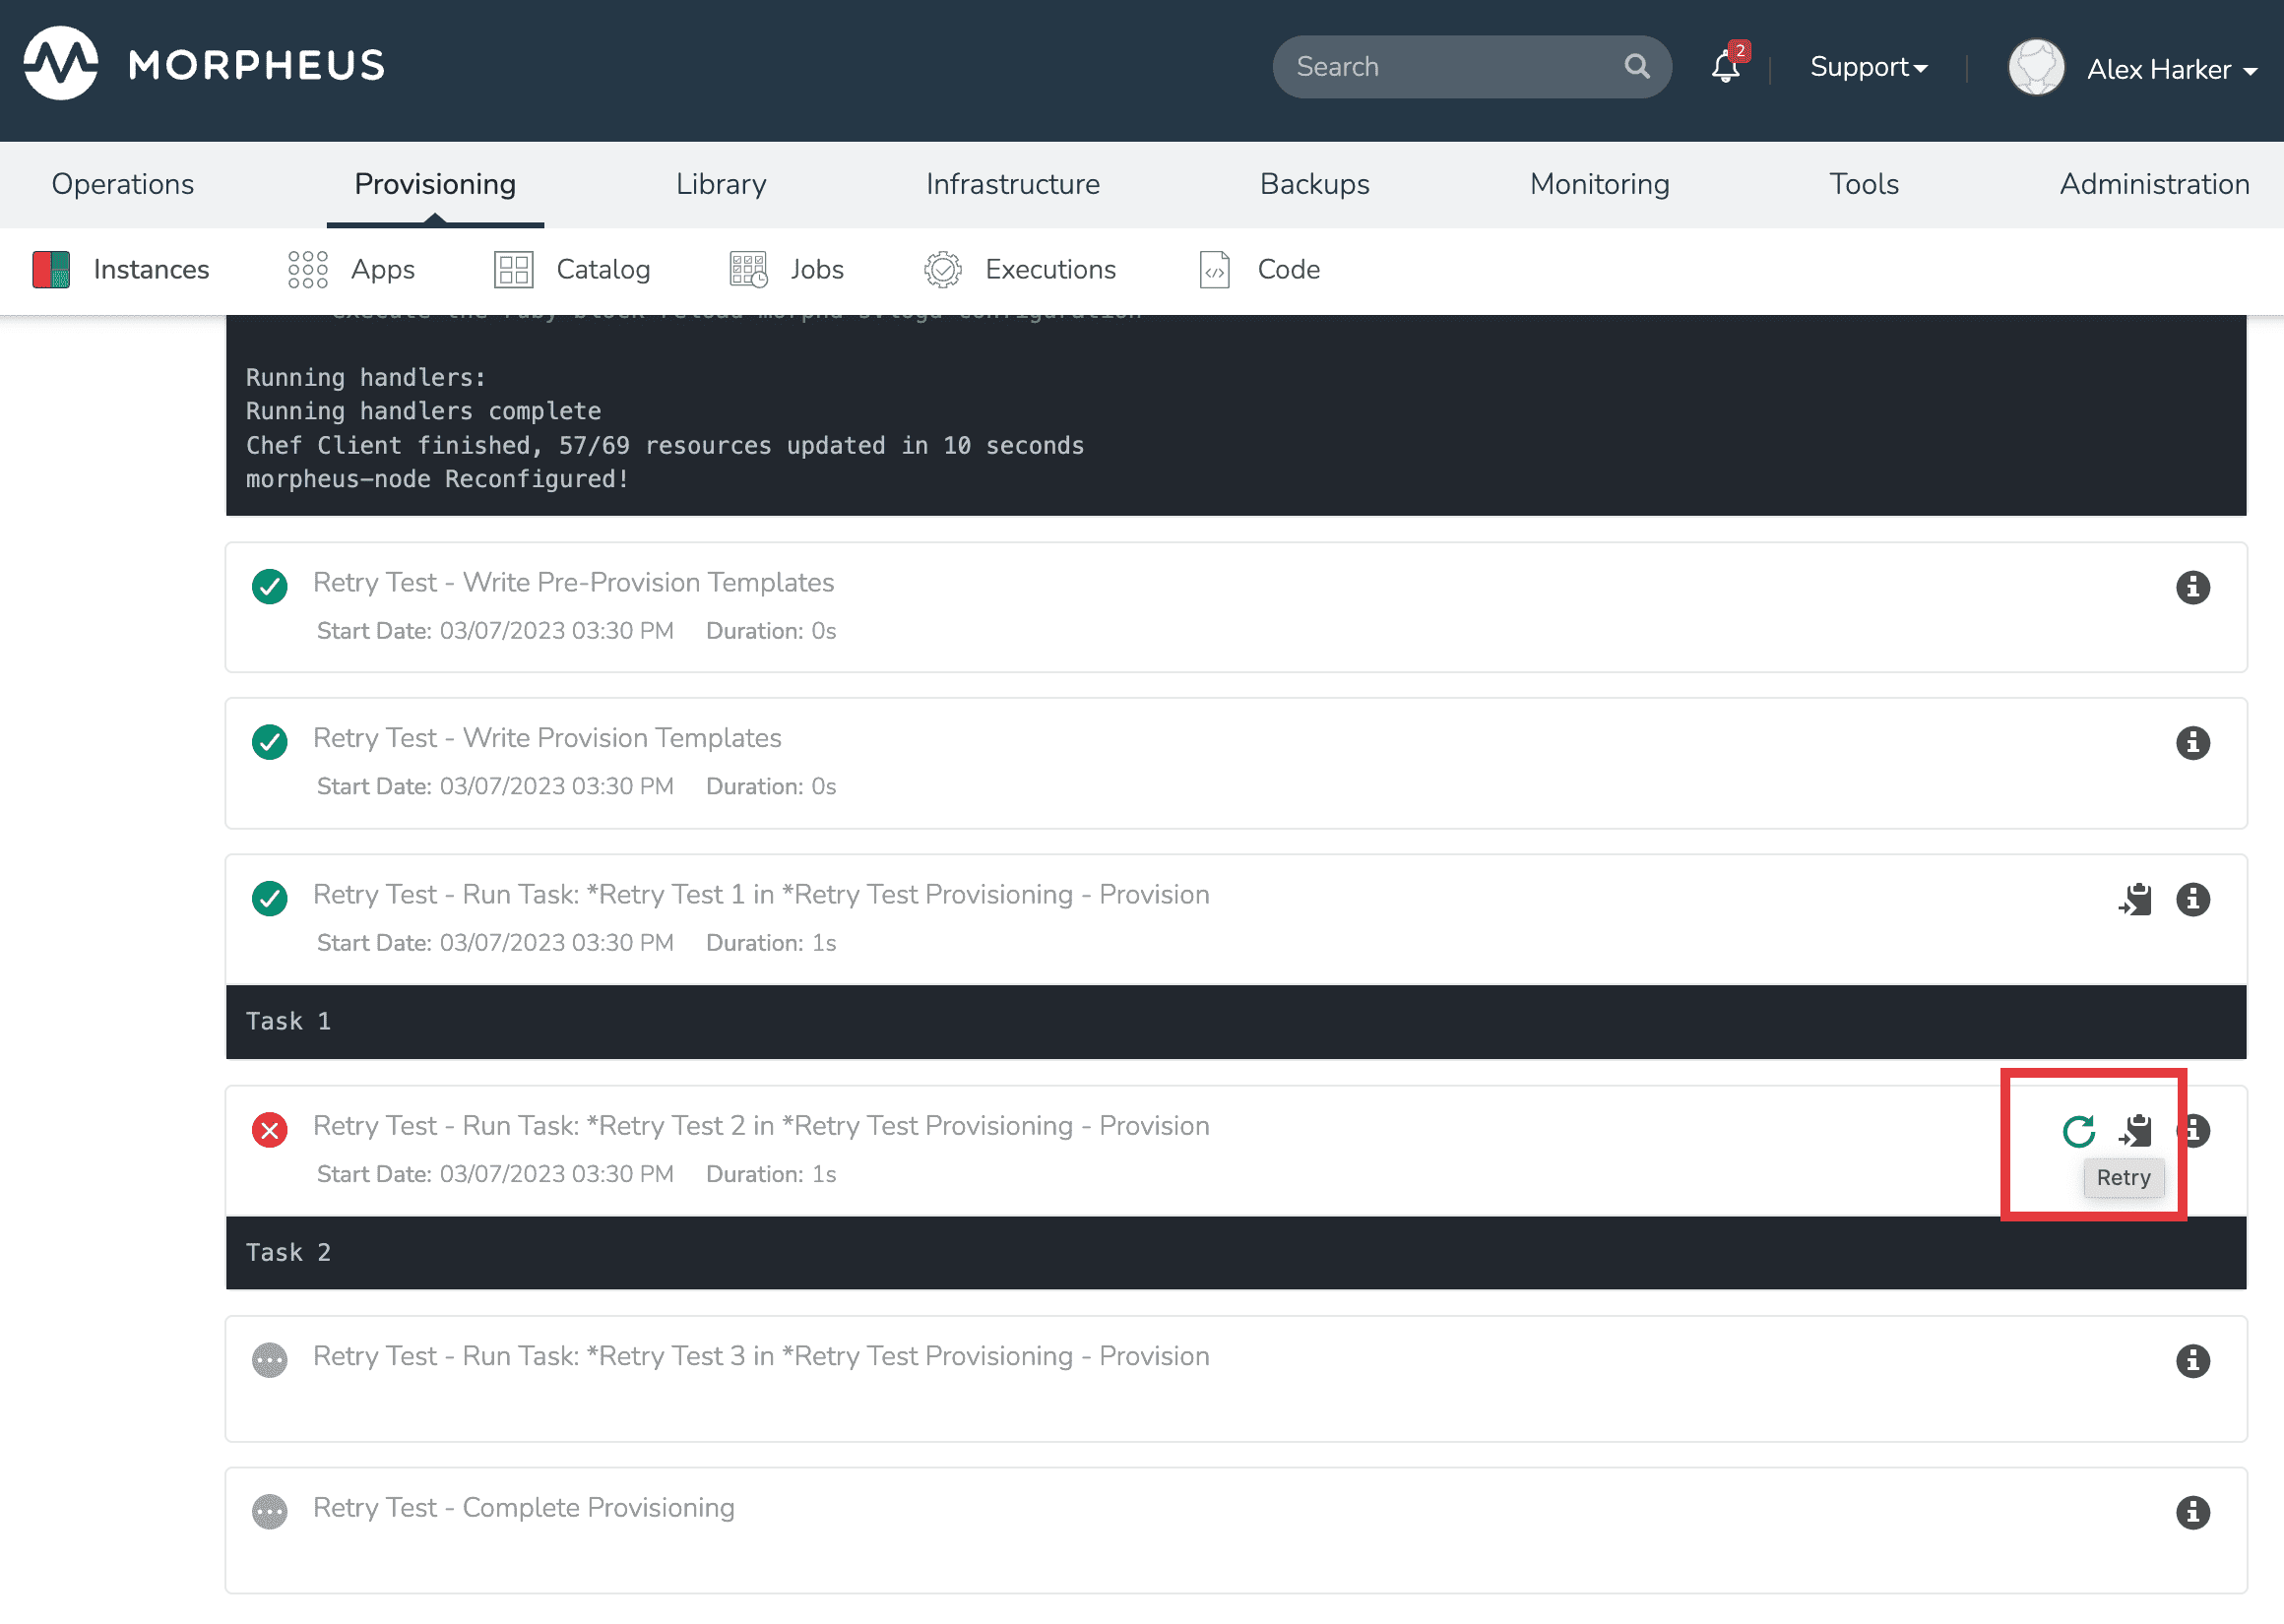
When a Workflow fails, HPE Morpheus Enterprise allows users to retry from the failed Task. Access the Workflow execution from the executions list page (Provisioning > Executions), from the Executions tab of the Workflow detail page (Library > Automation > Workflows > Selected Workflow), or from the History tab on the Instance detail page (Provisioning > Instances > Selected Instance). From the execution, select the Retry button which looks like a clockwise circular arrow and is highlighted in the screenshot below. This can be very useful as it allows you to resume what could potentially be a very long running Workflow from a point of failure without needing to start from the beginning. Similarly, if a provisioned Instance is in a failed state due to a failure in an attached Workflow (such as a failed Task in the Provision phase of an attached Provisioning Workflow), the user can opt to resume the Tasks from the failure point after making a correction and restore the Instance to a successfully-provisioned state.
Retry Workflow Tasks Video Demo
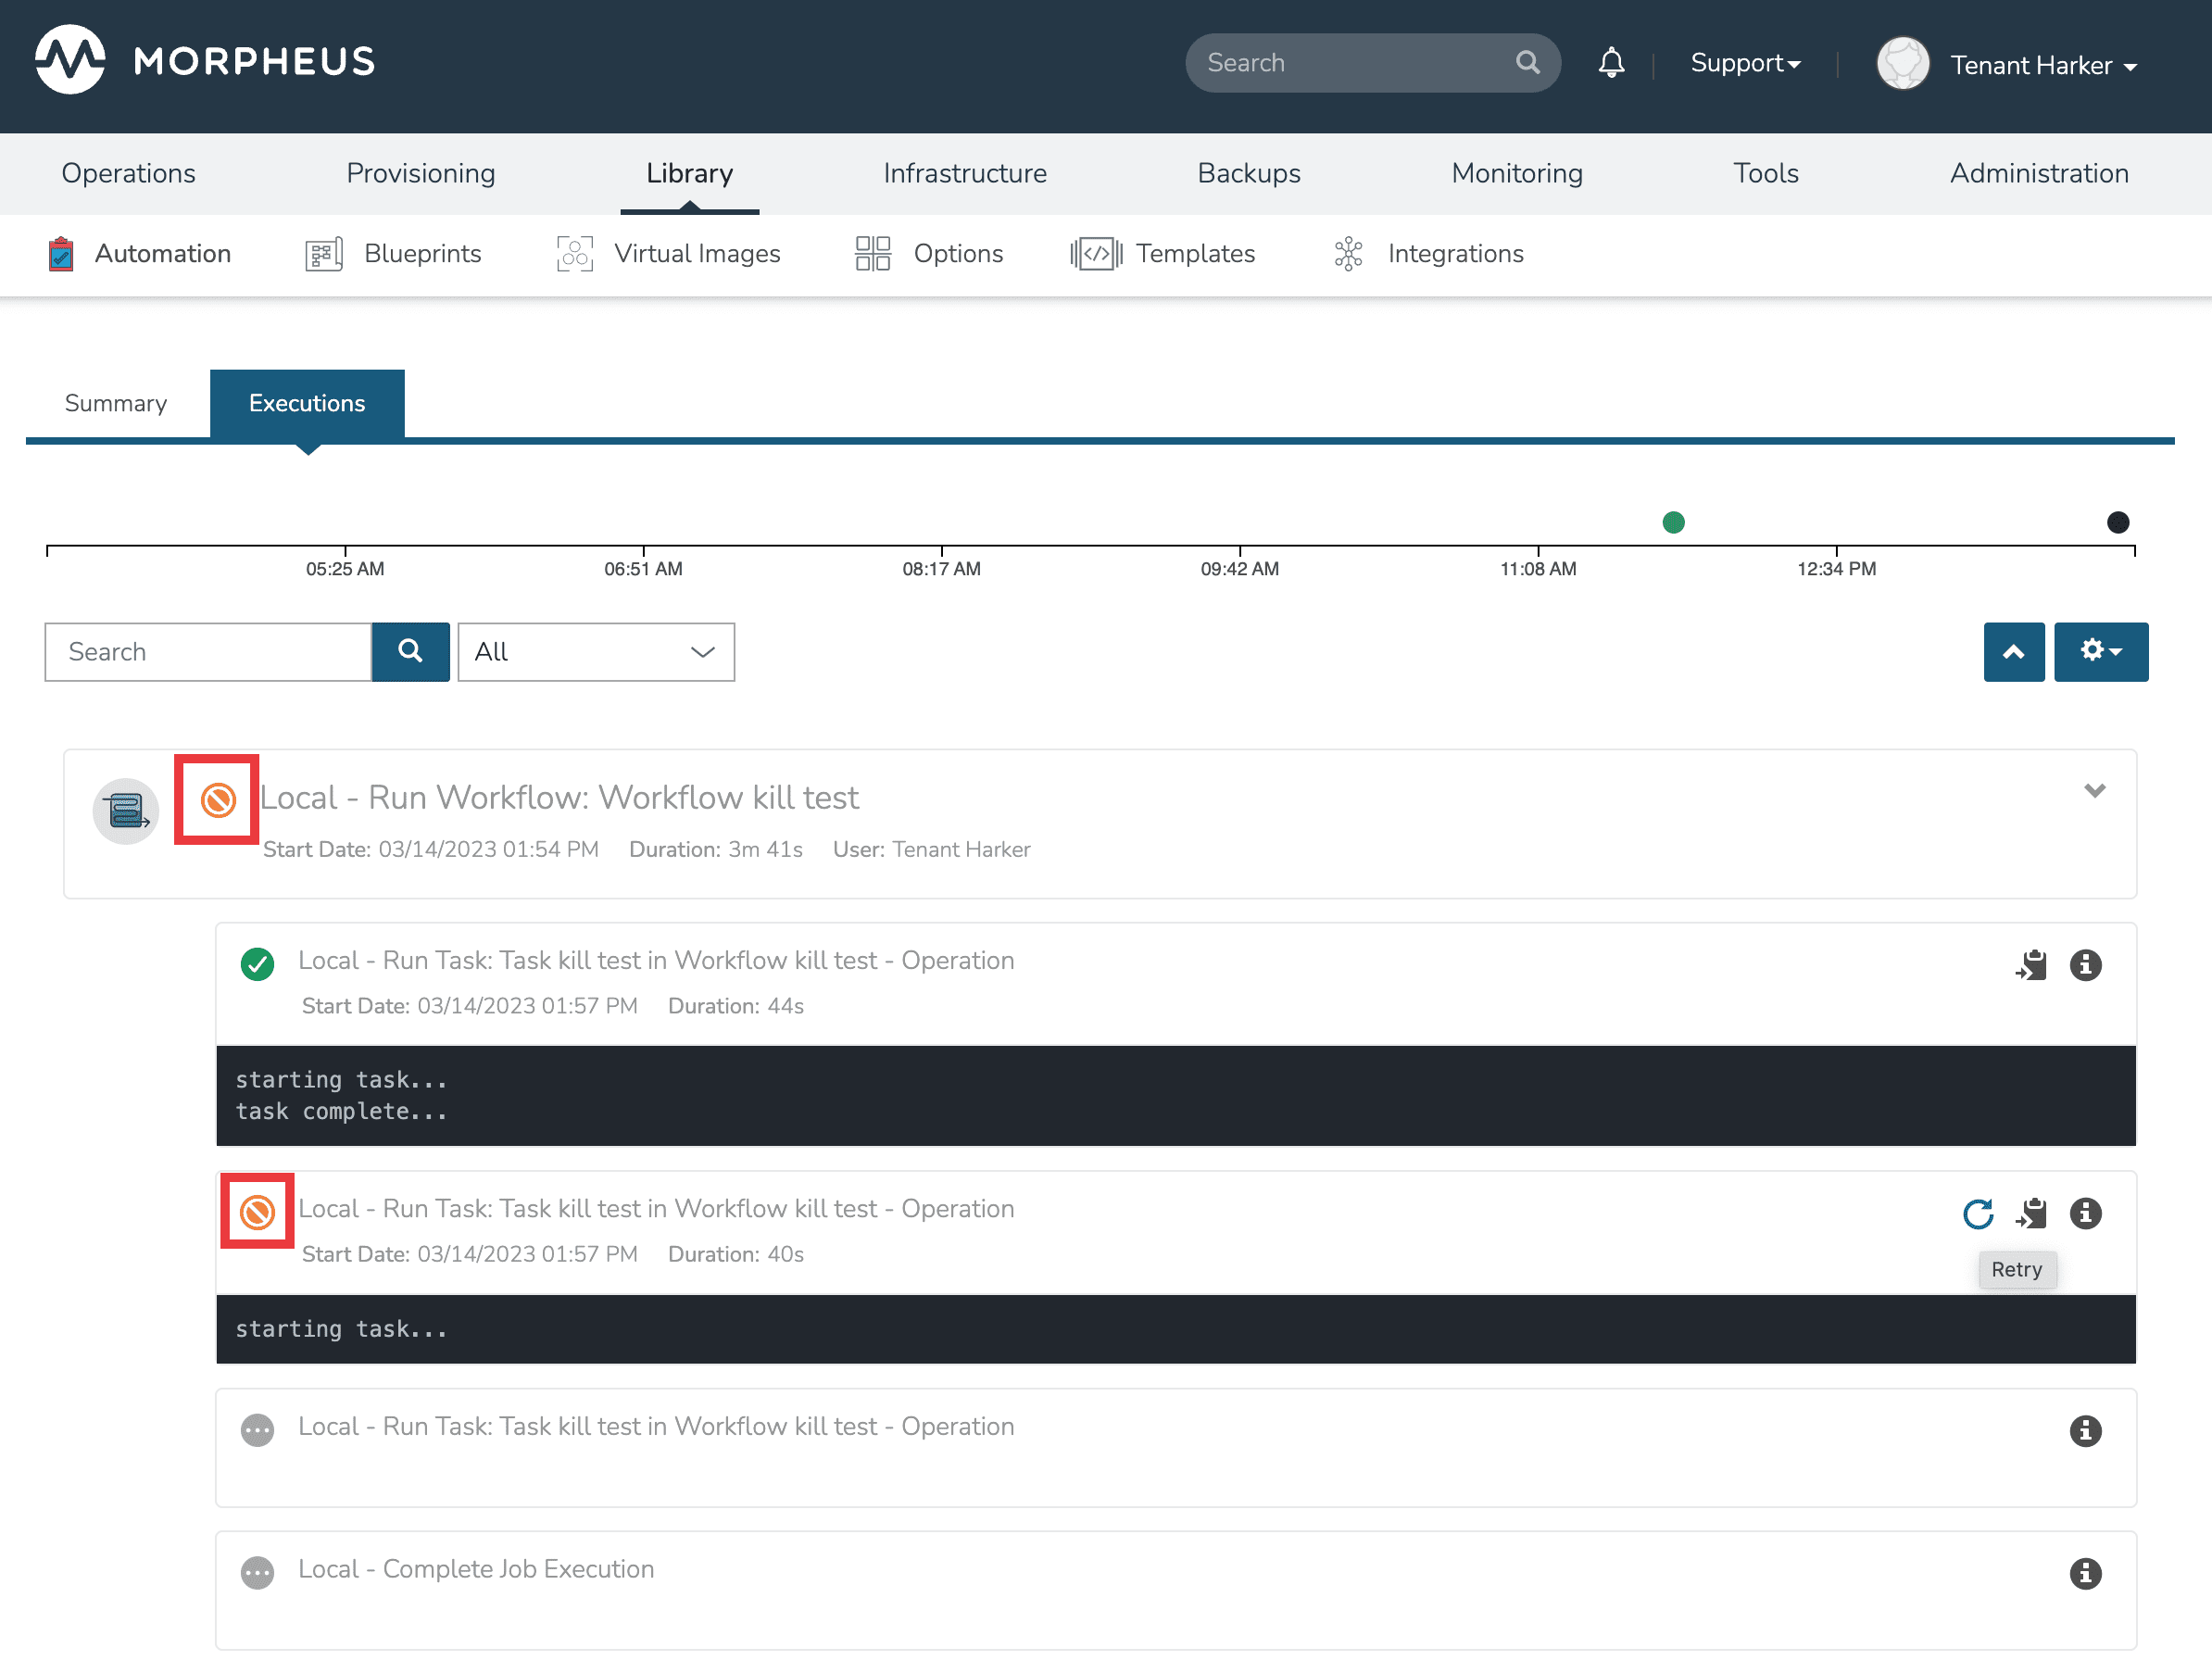
Cancelling Workflow Tasks
When a Workflow is running, HPE Morpheus Enterprise offers the capability of cancelling a Task and stopping any subsequent Tasks from starting. When viewed later in History or Executions, this leaves the Task and Workflow in a cancelled state. This is useful if you have a very long-running Task that you know will fail and wish to cancel or if you want to prevent a “retryable” Task from running again.
To cancel a Workflow, open the execution. Within the running Task will be a cancel button, click the button to interrupt the Workflow. Once cancelled, see that the Workflow and Task are now considered to be in a cancelled state which is shown in the UI. At this point the cancel button becomes a retry button and the Task could be resumed if desired.
Note
Cancelling a Task doesn’t actually interrupt the process already running on the workloads themselves. It simply interrupts the Workflow and stops it from continuing. Behind the scenes, HPE Morpheus Enterprise allows the running process to complete or time out rather than risk corrupting data with a non-graceful interrupt.
Price Phase Task Utilization
Price Phase Tasks Video Demo
Price Phase Tasks allow computed pricing for any workload in any Cloud (even public Clouds) to be overridden based on custom logic designed by the user. The variable “spec” is fed into the Task which represents the Instance configuration. The Task can be designed to use the Instance config data and compute an appropriate price for the Instance. HPE Morpheus Enterprise expects a return payload in the format below for the price override to work correctly. If used, pricing computed via Task replaces any other costing data which would have been applied to the workload (such as pricing based on the Service Plan). The user will see price estimates based on the Price Phase Task in the Instance provisioning wizard where the Service Plan pricing would otherwise be shown. Additionally, since Workflows which invoke Price Phase Tasks are tied to the Layout, the user can see different pricing depending on which Instance Type Layout is selected.
Note
Price Phase Tasks are only invoked if the Workflow is tied to a Layout.
The return payload should be a JSON array of “priceData” objects. priceData objects should contain values for each of the keys in the table below:
Key |
Description |
Data Type |
Possible Values |
|---|---|---|---|
incurCharges |
Indicates the Instance state when this charge should be applied |
String |
Running: Charge is incurred while the workload is in a running state, Stopped: Charge is incurred while the workload is in a stopped or shutdown state, Always: This charge is always applied. Some charges may apply simultaneously, for example, “Always” and “Running” states will apply while the workload is running. |
currency |
Indicates the currency in which the charge will be applied |
String |
Enter any three-letter currency code which HPE Morpheus Enterprise supports for its pricing, such as “USD”, “CAD”, or “GBP” |
unit |
Indicates the time interval at which the charge is applied |
String |
Enter “minute”, “hour”, “day”, “month”, or “year” |
cost |
Indicates the amount applied as cost for each configured time unit interval that passes. This is the cost to you, not the price with markup which the customer would see. |
Number |
A numerical amount such as “3.00” or “34.23” |
price |
Indicates the amount applied as price for each configured time unit interval that passes. This is the price to the customer with any built-in markup you need to apply. |
Number |
A numerical amount such as “3.00” or “34.23” |
A number of different Task types could be used in this phase. As long as the Task is returning the required JSON array, the Task will work correctly. Below is an example using a Groovy Task. This is simply outputting a static payload though in a real world scenario you’d likely use Task logic to output a dynamic array based on the Instance configuration.
def rtn = [
  priceData: [
    [
      incurCharges: 'always',
      currency: 'USD',
      unit: 'hour',
      cost: 2.0,
      price: 2.0
    ],
    [
      incurCharges: 'running',
      currency: 'USD',
      unit: 'hour',
      cost: 3.0,
      price: 3.0
    ],
    [
      incurCharges: 'stopped',
      currency: 'USD',
      unit: 'hour',
      cost: 1.0,
      price: 1.0
    ]
  ]
]
return rtn
Nesting Workflows
HPE Morpheus Enterprise allows Workflows to be nested for easier Workflow creation when many Workflows are used in an environment which have only slight differences or which are made up of common pieces. Nestable Workflows are created like any other Operational Workflow. Once the Workflow is saved, it can be embedded into a special Task type called “Nested Workflow.” A Nested Workflow-type Task simply references an Operational Workflow which may need to be used within other Workflows. Once Nested Workflow Tasks are created they can be used as part of any new Operational or Provisioning Workflows that are created thereafter (or may be added to existing Workflows too). For more on creating Tasks, see HPE Morpheus Enterprise Task documentation.
Note
Results from prior Tasks are still accessed using the same syntax even when a prior Task is embedded in a Nested Workflow. Additional syntax to reference the Nested Workflow Task or the Workflow itself are not needed. See HPE Morpheus Enterprise Task documentation for more on chaining Task results.
Nested Workflows Video Demo
Edit Workflow
Select the Library link in the navigation bar.
Select Automation from the sub-navigation menu.
Click the Workflows tab to show the workflows tab panel.
Click the Edit icon on the row of the workflow you wish to edit.
Modify information as needed.
Click the Save Changes button to save.
Delete Workflow
Select the Library link in the navigation bar.
Select Automation from the sub-navigation menu.
Click the Workflows tab to show the workflows tab panel.
Click the Delete icon on the row of the workflow you wish to delete.