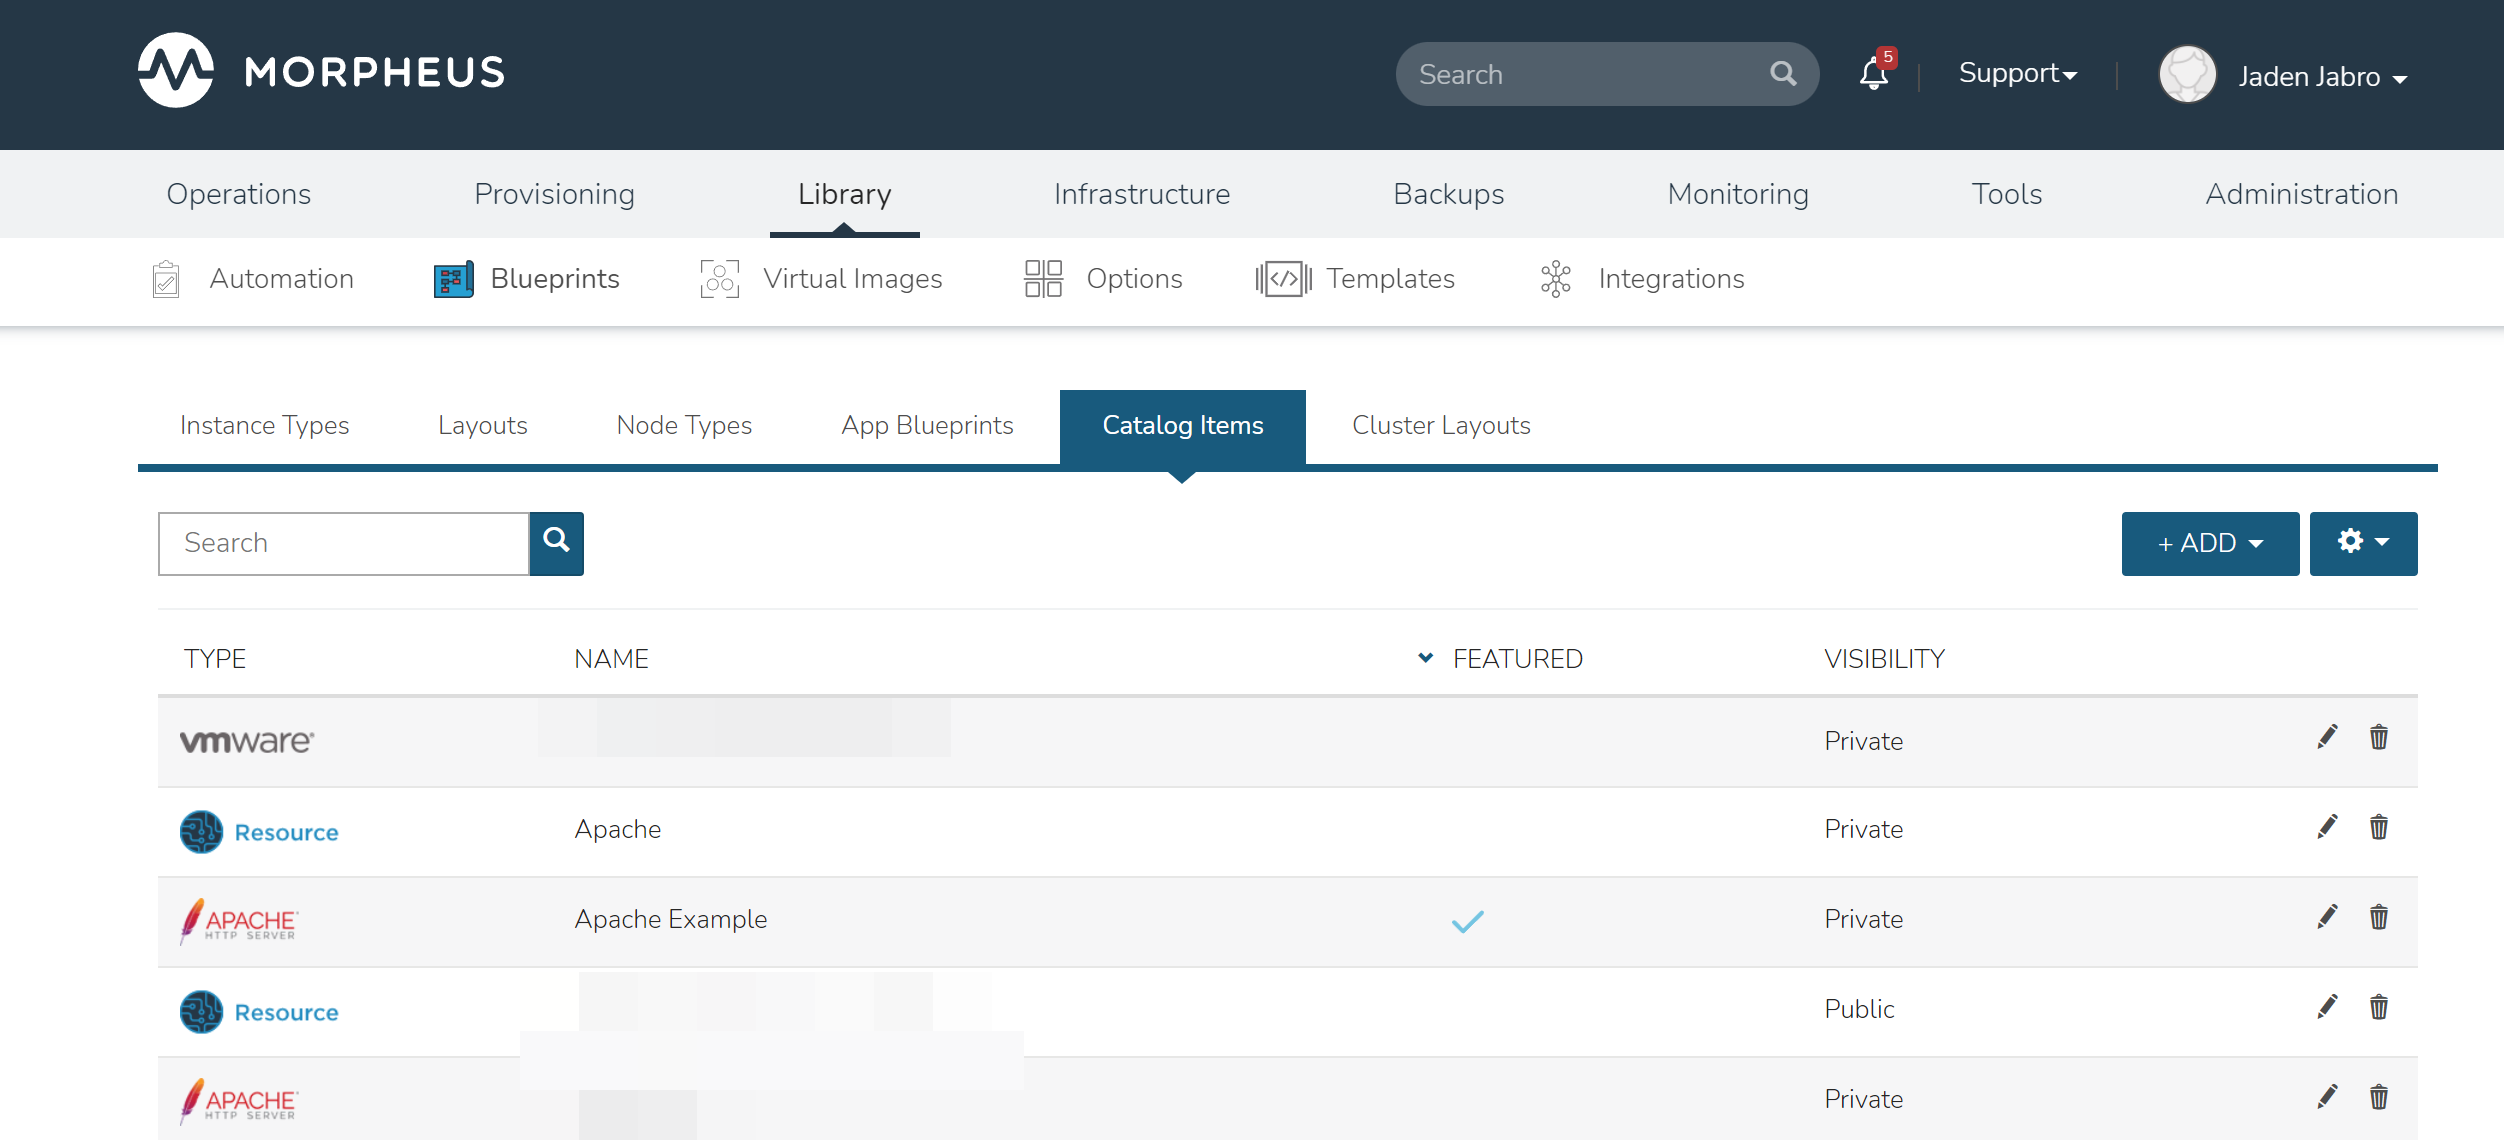
Catalog Items
The Self Service catalog (Library > Blueprints > Catalog Items) is where administrators can create easily-deployable items for consumption by users operating under the “Service Catalog” Persona in HPE Morpheus Enterprise. Catalog items can be fully-configured HPE Morpheus Enterprise Instances or Blueprints, complete with user input through HPE Morpheus Enterprise Inputs, automation Workflows, and more. The catalog items are presented in a simplified interface for ease of deployment without sacrificing configurability for administrators. All available catalog items are built in the Self Service area and users will see relevant items in their catalogs based on Role permissions.
Note
For more on Personas and using the Service Catalog persona, see the Personas sections of our documentation.
Access is granted to the Self Service section through the Library: Catalog Items Role permission. Users with Read rights can view the catalog while users with full rights can create and edit catalog items. Users without any rights to Self Service will not be able to access the page at all.
Additionally, a user’s Role determines access to the standard and/or service catalog persona and which service catalog items are available for a user under the service catalog persona. See the Roles section of HPE Morpheus Enterprise documentation for more information on administering Roles.
Viewing the Self Service Catalog
The complete Self Service catalog can be viewed by clicking on Catalog from the Provisioning menu. The complete list of items available for the Self Service catalog are shown here but users working in the Service Catalog Persona will see only those allowed based on their user role. In addition to the name and type of each catalog item, we can also see a description and whether not the catalog item is featured or active. Featured items are given special visibility in the Service Catalog Persona and inactive items will not appear as provisioning options.
Building Catalog Instances
Note
API usage for Catalog Items with Forms is not yet supported. If planning to use the API or CLI to order Catalog Items you should not use Forms on Catalog Items until it is supported.
An Instance in HPE Morpheus Enterprise is a set of one or more containers or virtual machines that correlate to a single, horizontally-scalable entity or service suite. From the Self Service section, we can pre-configure HPE Morpheus Enterprise Instances and present them to users viewing the Service Catalog Persona for one-click deployment.
From the Catalog Items List Page (Library > Blueprints > Catalog Items), click ADD. From the dropdown menu, select Instance. The modal window will appear to configure and add a new catalog Instance.
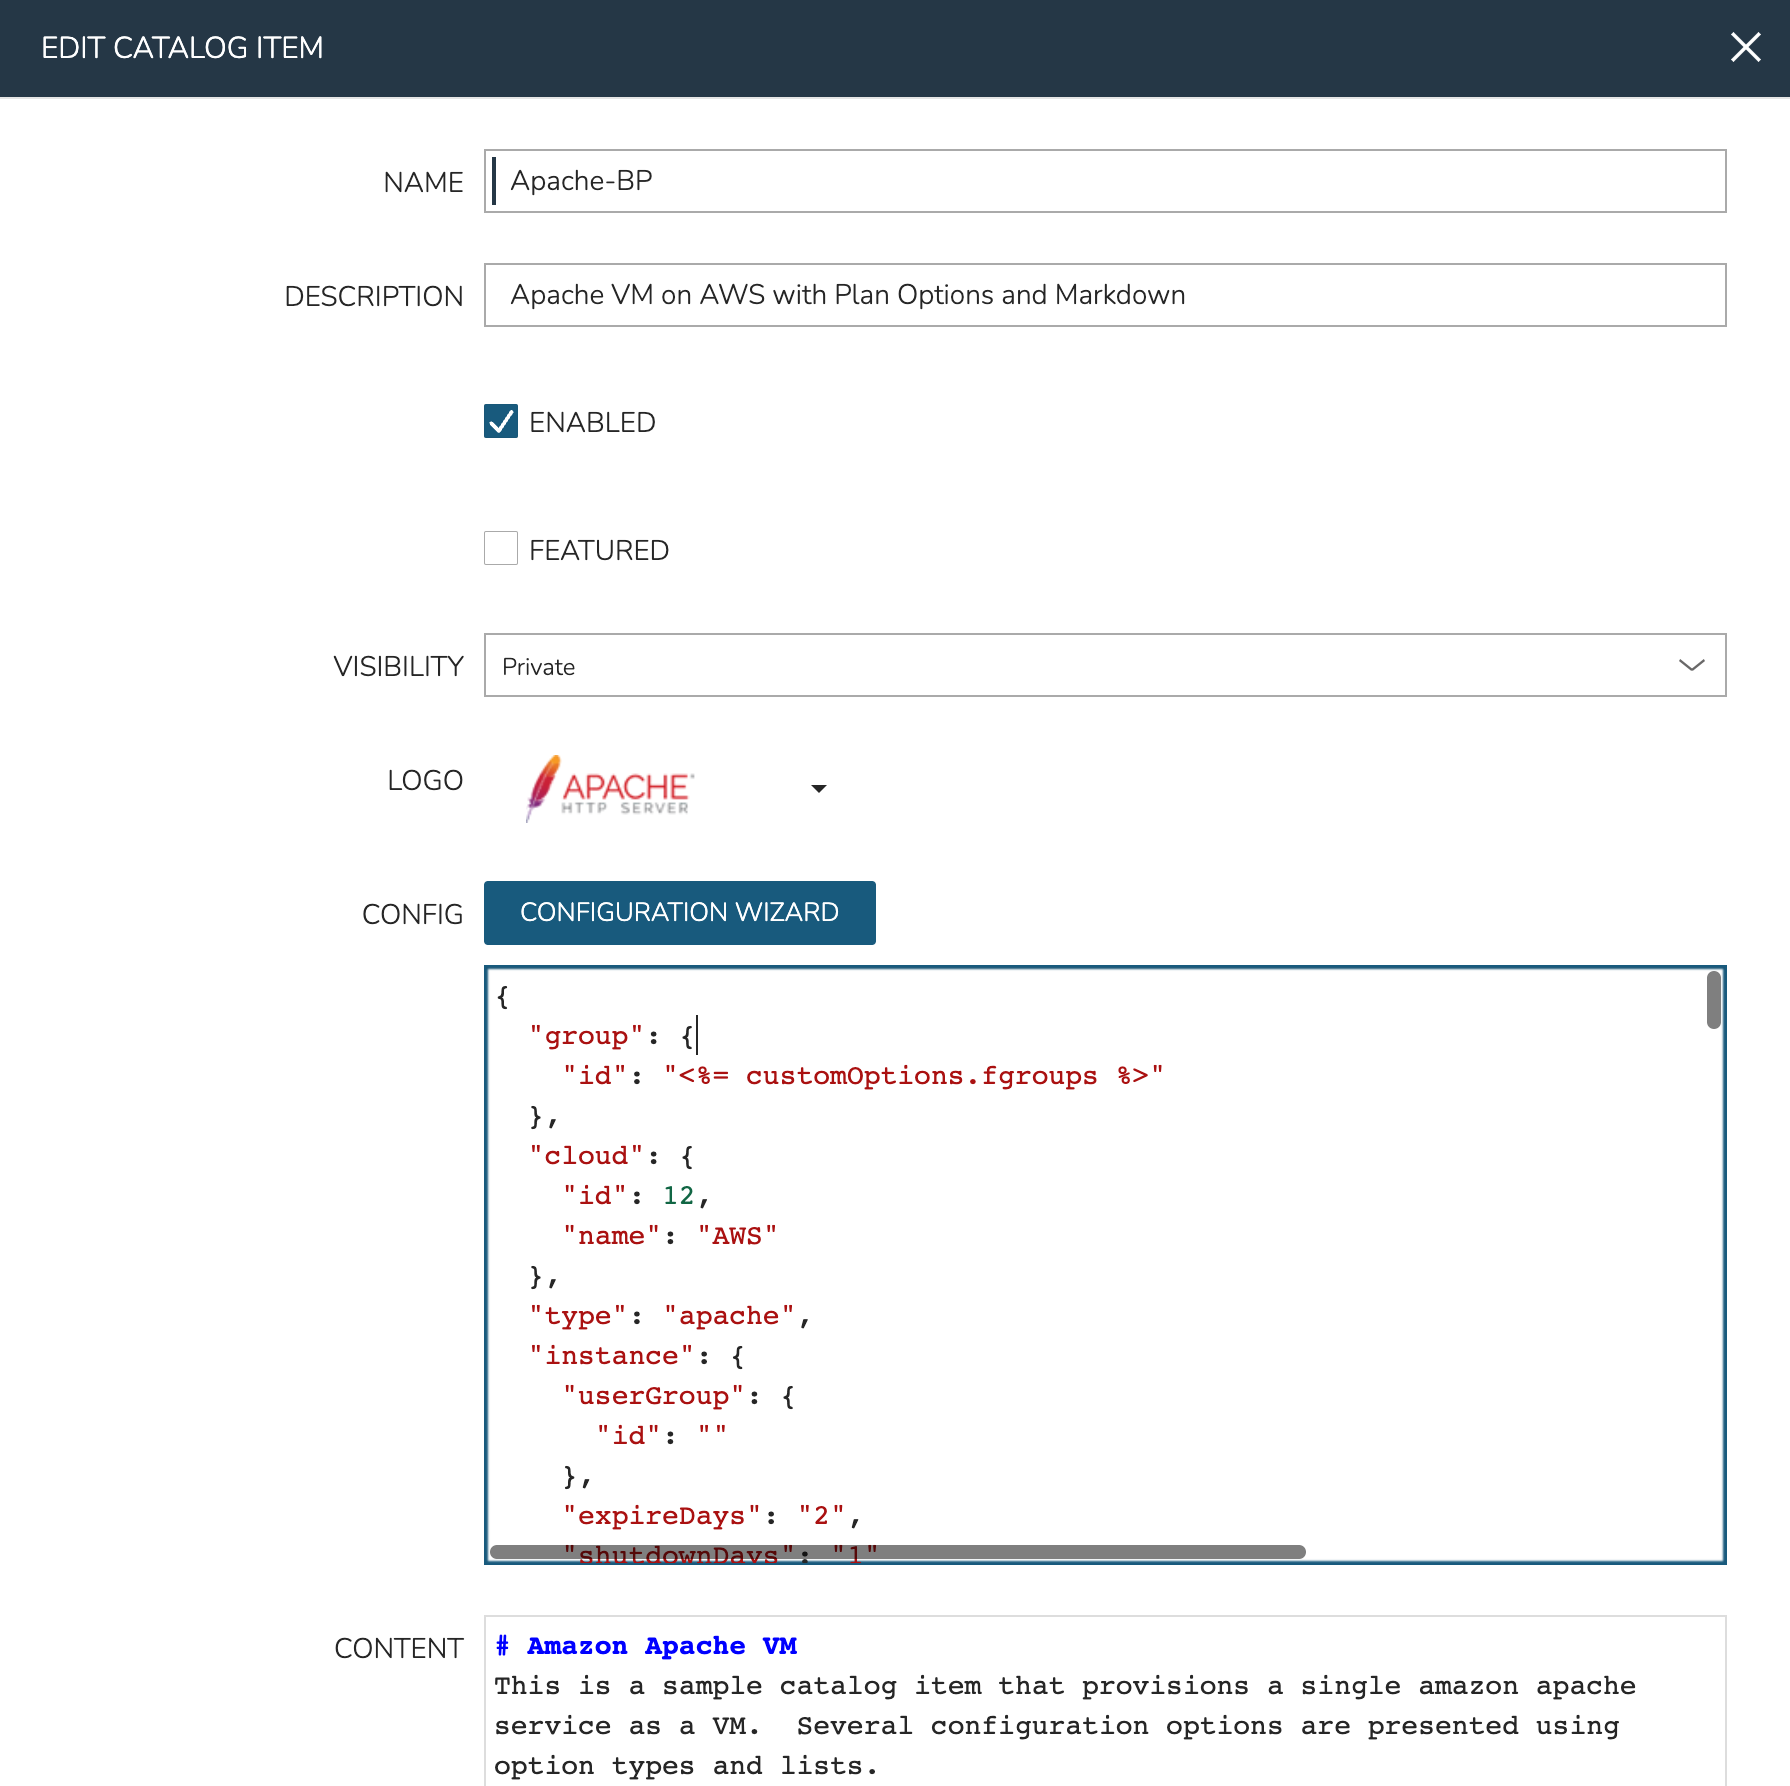
Configure the following:
NAME: A friendly name for the catalog item in HPE Morpheus Enterprise
CODE: An optional shortcode for coded naming schemes or programmatic reference
DESCRIPTION: An optional description identifying the catalog item
CATEGORY: Select an existing category or enter a new one. When provisioning from the catelog, items can be filtered by category
ENABLED: When checked, this catalog item will be available for provisioning
LABELS: A comma-separated list of descriptive strings which can be used to categorize the Catalog Item. The Catalog Items list view page can be filtered by labels to make them easier to find
ENABLED: When marked, this Catalog Item will be available from the provisioning Catalog view
DISABLE AUTO PRICE: When marked, price estimates are no longer refreshed with every field change at the time this Catalog Item is ordered. For some workloads with heavy Configuration-phase Tasks this may improve performance of the order page
FEATURED: When checked, this catalog item will be given special visibility in the Service Catalog Persona view
ALLOW QUANTITY: When checked, an additional field is added to the order page allowing users to order multiple copies. If this option is enabled, ensure your configuration supports that flexibility (such as when IP or load balancer details are specified)
MAX QUANTITY: When the ALLOW QUANTITY configuration is used, an additional MAX QUANTITY configuration is available which sets an upper limit on the quantity that may be executed
VISIBILITY: Set to private to keep the catalog item available only to users in the current Tenant. Master Tenant administrators may set catalog items to public to make them viewable and usable by Subtenant users
LOGO: Select or upload a logo to be associated with this catalog item
DARK LOGO: If desired, set an alternate logo for use when the dark theme is applied to the HPE Morpheus Enterprise appliance
CONFIG: Enter, view, or edit Instance config here. Click CONFIGURE to build a base configuration through the HPE Morpheus Enterprise Instance wizard. After configuration through the Instance wizard, you may need to overwrite some static values in the Instance JSON body with calls to custom Input values. This allows your users to easily set the Instance Plan, Group, name, tags, or anything else they may need to control. Dynamic inputs are passed with the following syntax: “<%= customOptions.fieldName %>” where fieldName is the Field Name value set on the Input
CONTENT: Optionally include documentation content for this Catalog Item. Markdown-formatted text is accepted and displayed appropriately when the item is ordered from the Service Catalog. A new Catalog Item-type Wiki entry will also be added containing this information
FORM TYPE: Choose whether a Form or individual Inputs should be used to set the user options at provisioning time. See Forms documentation for complete details on creating Forms.
FORM: If the Form Type of “Form” is selected, choose the pre-existing Form which should be associated with the Catalog Item
INPUTS: If the Form Type of “Inputs” is selected, choose the pre-existing Inputs which should be associated with the Catalog Item
Using Forms with Catalog Items
Note
API usage for Catalog Items with Forms is not yet supported. If planning to use the API or CLI to order Catalog Items you should not use Forms on Catalog Items until it is supported.
Using Forms provides a number of advantages over using Inputs. Once the Form is selected, HPE Morpheus Enterprise helpfully provides a sidebar which contains all variables that can be consumed in the Instance config from the Form:
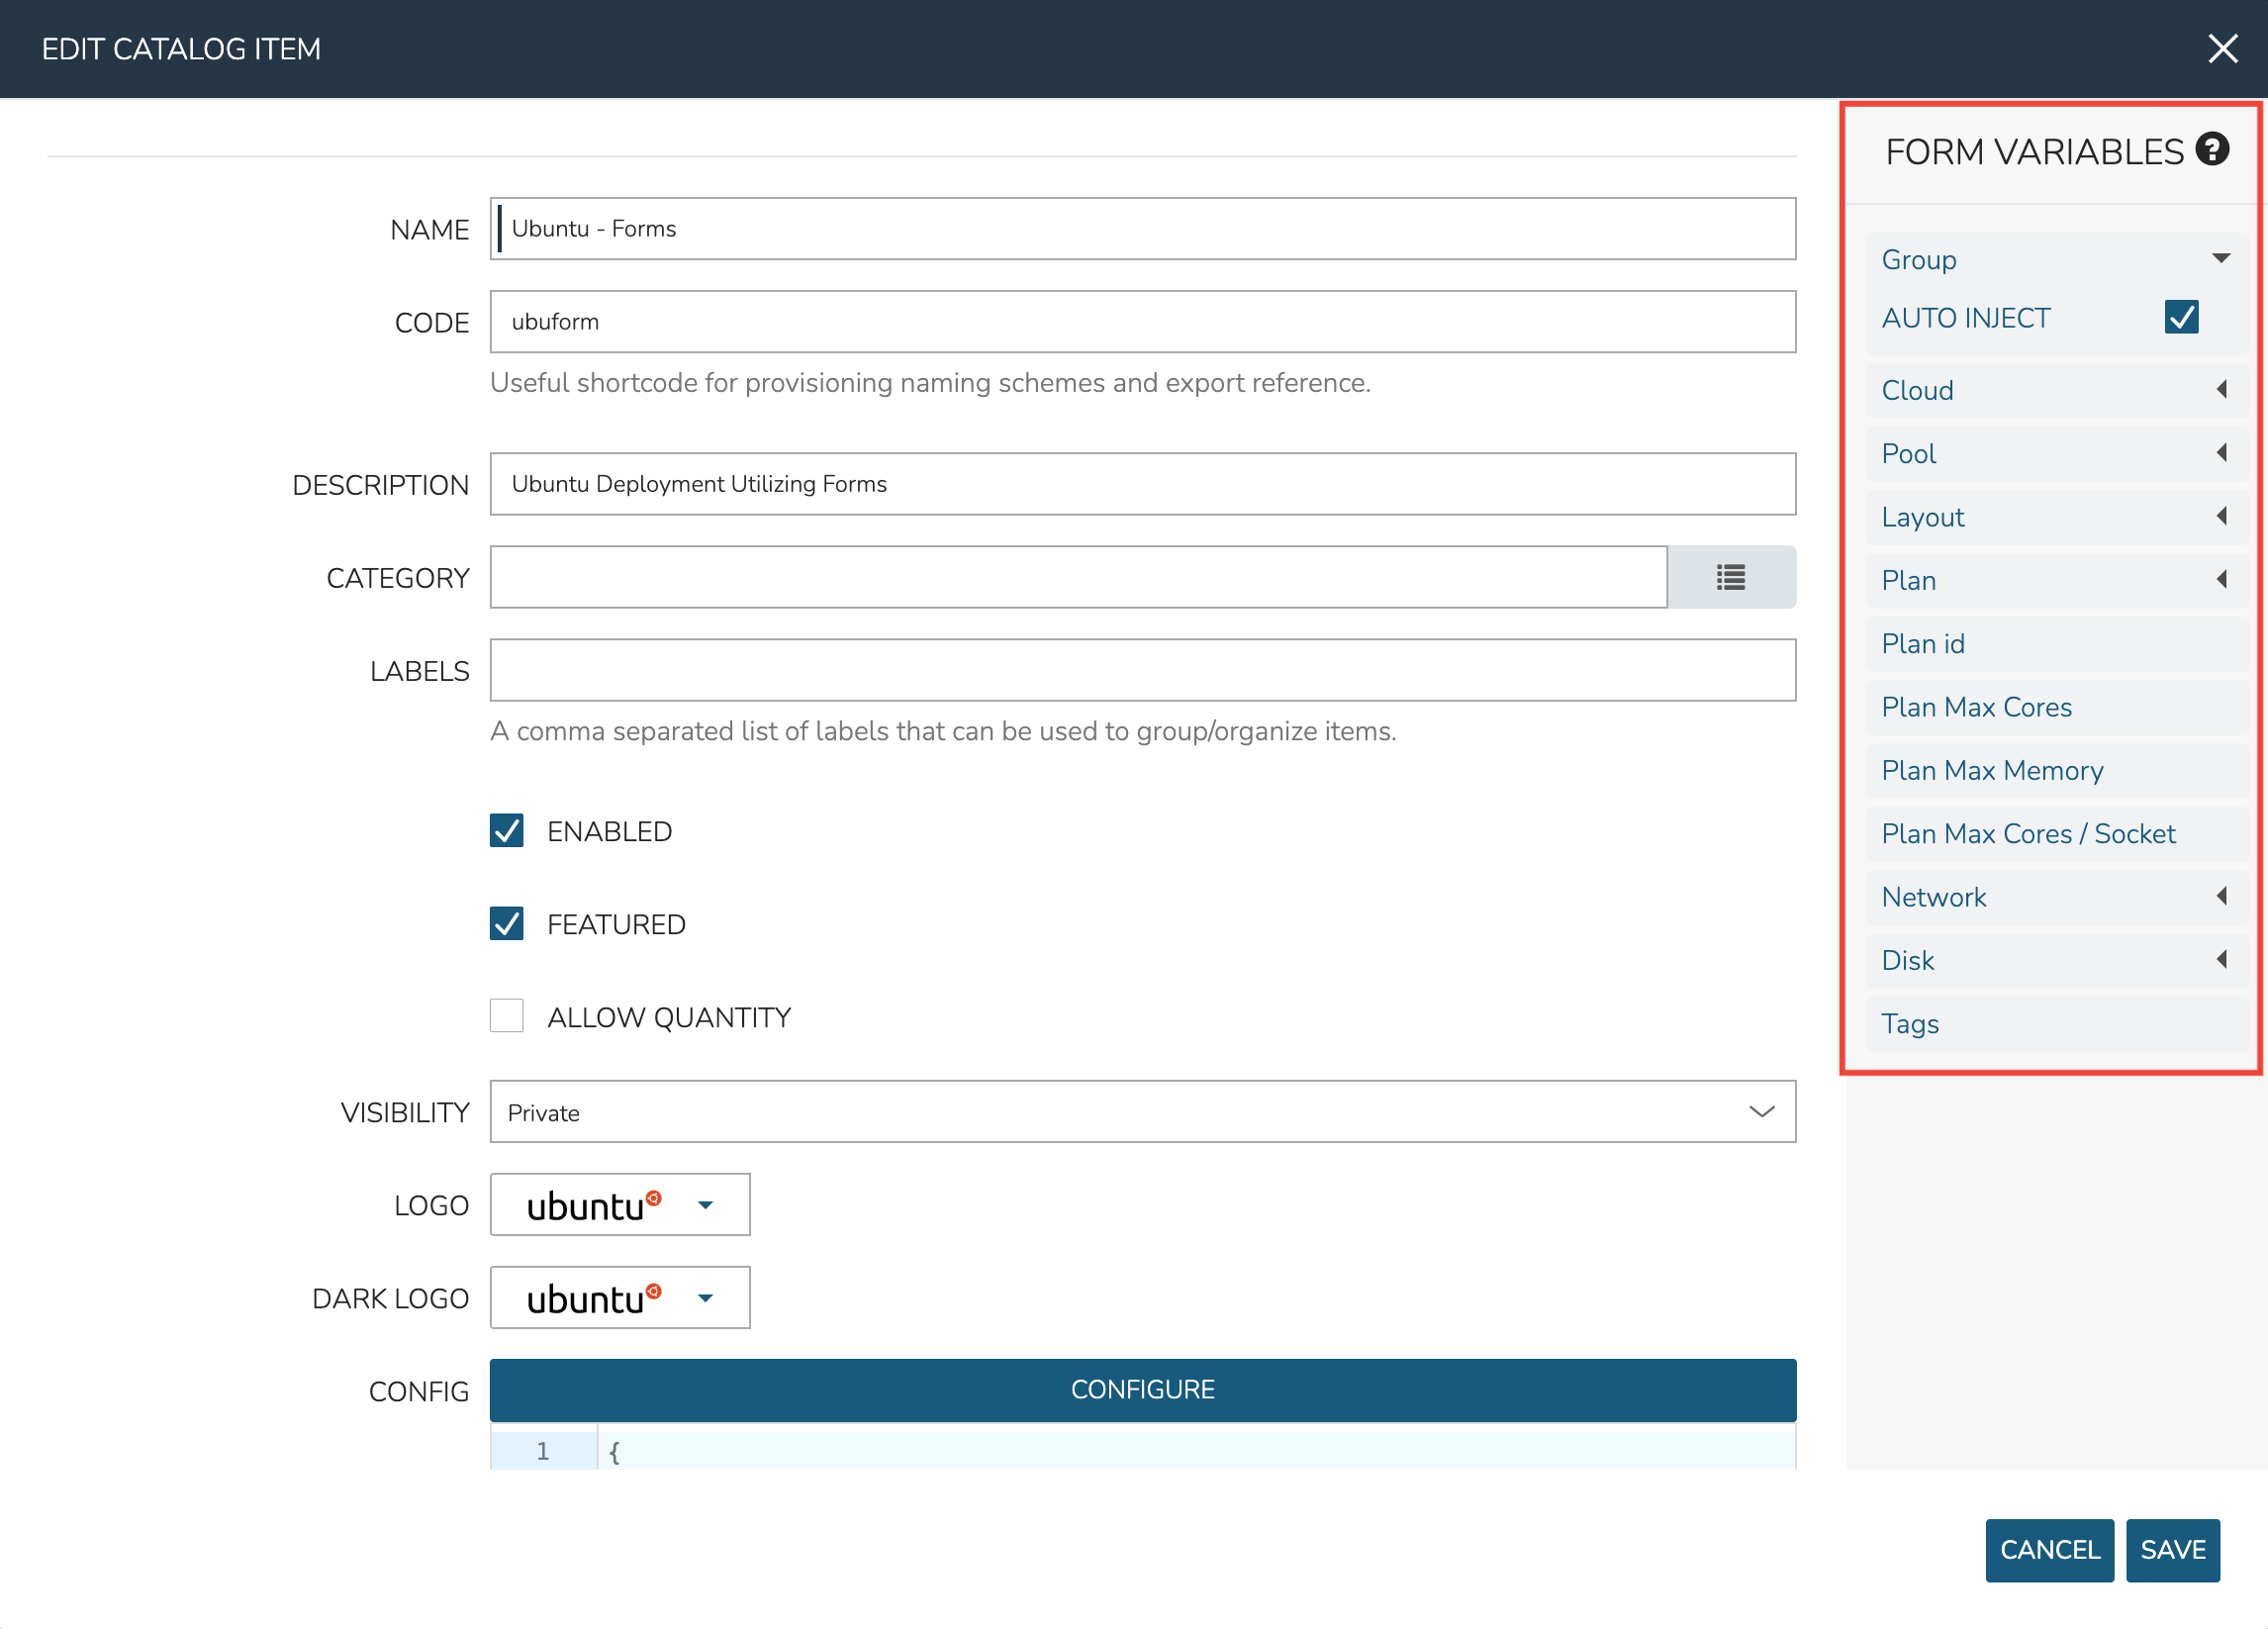
Many Form Inputs are designed to auto-inject themselves into the Instance config, you can see in the screenshot above that “AUTO INJECT” is checked. For variables that auto-inject, you do not need to override any static configuration with a variable call in order to consume that form value. In most cases, you should leave auto-inject turned on but the option is available to disable it for more advanced situations such as if you wanted to code custom logic into the variable call.
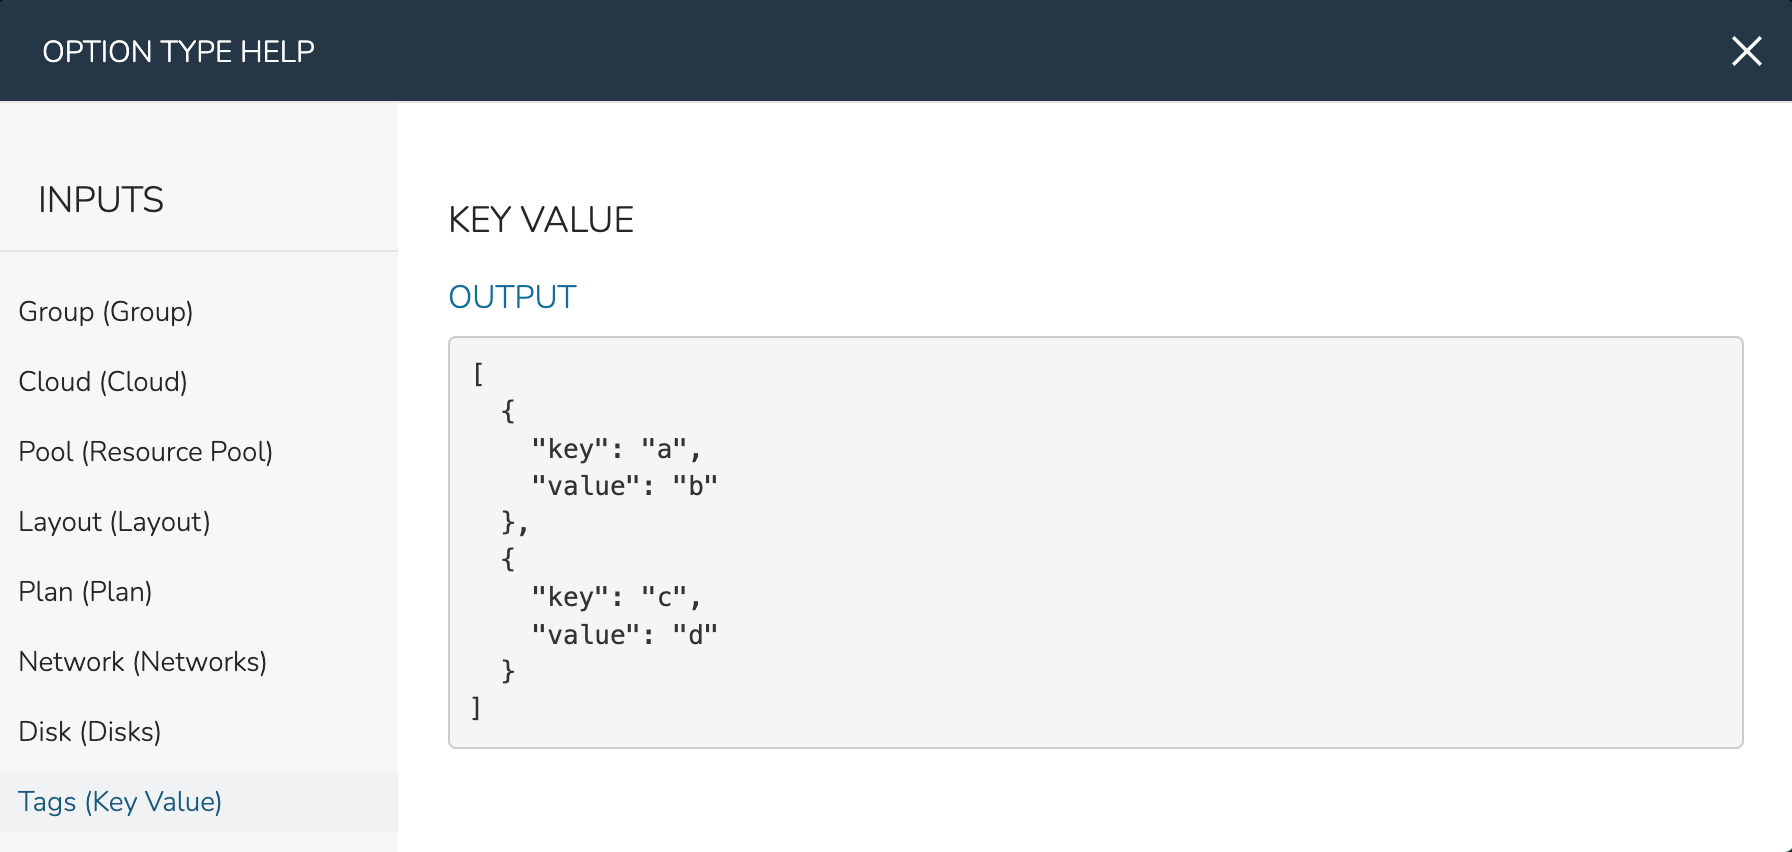
Other types of Form Inputs do not auto-inject and, for these, you must override any static configuration in the Instance config with a variable call. For these situations, HPE Morpheus Enterprise helpfully provides the results of all variables so you can be sure you’re injecting the proper call. Click on the question mark (?) button immediately to the right of the “FORM VARIABLES” header to see a list of available variables and an example resolved variable. Variable tiles may be dragged from the sidebar into the CONFIG text area and a properly-formatted variable call will be inserted.
As an example, see the configuration for an Ubuntu server in the expandable section below. You’ll notice in the configuration that a VMware Cloud, a specific Group, a specific Plan, and other static configurations are set. Since the Group, Cloud, Plan and other variables are able to be automatically injected, the user may select a different Group, Cloud, Plan, etc. from the form at provision time. The creator of the Catalog Item does not need to override those static configurations with variable calls.
Example Catalog Item Config
{
  "hostName": "${userInitials}-${cloudCode}-${type}-${sequence}",
  "metadata": "<%=customOptions.targetTags%>",
  "backup": {
    "backupRepository": 40,
    "veeamManagedServer": "",
    "jobSchedule": 2,
    "createBackup": true,
    "jobAction": "new",
    "jobRetentionCount": "3",
    "providerBackupType": 12,
    "target": 37006
  },
  "instance": {
    "userGroup": {
      "id": ""
    },
    "tags": "Forms,Test"
  },
  "defaultExpandAdvanced": false,
  "volumes": [
    {
      "maxIOPS": null,
      "displayOrder": 0,
      "unitNumber": "0",
      "minStorage": 5368709120,
      "configurableIOPS": false,
      "uuid": "a6781cc1-31ca-406b-aea0-e33ea1a18b7f",
      "controllerMountPoint": "2200223:0:4:0",
      "internalId": "[ESXi-DC2-QA-LUN01] Morpheus Ubuntu 22.04 20230307/Morpheus Ubuntu 22.04 20230307.vmdk",
      "id": 5255832,
      "datastoreId": "autoCluster",
      "maxStorage": 26843545600,
      "volumeCustomizable": true,
      "readonlyName": false,
      "controllerId": 2200223,
      "externalId": "2000",
      "virtualImageId": 1418543,
      "vId": 1418543,
      "size": 25,
      "name": "root",
      "planResizable": true,
      "rootVolume": true,
      "storageType": 1,
      "typeId": 1,
      "resizeable": true,
      "uniqueId": null
    }
  ],
  "type": "ubuntu",
  "ports": [
    {
      "code": "ubuntu.22",
      "visible": true,
      "internalPort": 22,
      "loadBalancePort": null,
      "loadBalanceProtocol": null,
      "sortOrder": 1,
      "name": "SSH",
      "id": 7,
      "shortName": "ssh",
      "externalPort": 22,
      "loadBalance": false
    }
  ],
  "version": "22.04",
  "hideLock": true,
  "cloud": {
    "name": "QA VMware",
    "id": 26324
  },
  "layout": {
    "code": "vmware-ubuntu-22.04-single",
    "id": 2608414
  },
  "showScale": false,
  "environment": "2",
  "networkInterfaces": [
    {
      "ipMode": "",
      "primaryInterface": true,
      "showNetworkPoolLabel": true,
      "showNetworkDhcpLabel": false,
      "network": {
        "idName": "VLAN0002 - Internal Server",
        "pool": {
          "name": "10.32.20.0 /22",
          "id": 18823
        },
        "id": "network-173431",
        "hasPool": false
      },
      "networkInterfaceTypeId": 4,
      "networkInterfaceTypeIdName": "VMXNET 3"
    }
  ],
  "copies": 1,
  "loadBalancer": [],
  "name": "${userInitials}-${cloudCode}-${type}-${sequence}",
  "storageControllers": [
    {
      "editable": false,
      "typeName": "IDE",
      "maxDevices": 2,
      "displayOrder": 0,
      "active": true,
      "unitNumber": null,
      "reservedUnitNumber": -1,
      "busNumber": "0",
      "removable": false,
      "name": "IDE 0",
      "typeId": 2,
      "id": 1729031,
      "category": "ide"
    },
    {
      "editable": false,
      "typeName": "IDE",
      "maxDevices": 2,
      "displayOrder": 1,
      "active": true,
      "unitNumber": null,
      "reservedUnitNumber": -1,
      "busNumber": "1",
      "removable": false,
      "name": "IDE 1",
      "typeId": 2,
      "id": 1729032,
      "category": "ide"
    },
    {
      "editable": false,
      "typeName": "SCSI LSI Logic Parallel",
      "maxDevices": 15,
      "displayOrder": 2,
      "active": true,
      "unitNumber": null,
      "reservedUnitNumber": 7,
      "busNumber": "0",
      "removable": false,
      "name": "SCSI 0",
      "typeId": 4,
      "id": 1729030,
      "category": "scsi"
    }
  ],
  "config": {
    "poolProviderType": null,
    "isVpcSelectable": true,
    "smbiosAssetTag": null,
    "isEC2": false,
    "resourcePoolId": "pool-139625",
    "hostId": null,
    "createUser": true,
    "nestedVirtualization": null,
    "vmwareFolderId": "group-v80",
    "noAgent": false
  },
  "plan": {
    "code": "vm-8192",
    "id": 149
  },
  "group": {
    "name": "All Clouds",
    "id": "2"
  }
}
Once done, click SAVE CHANGES
Building Catalog Blueprints
Note
API usage for Catalog Items with Forms is not yet supported. If planning to use the API or CLI to order Catalog Items you should not use Forms on Catalog Items until it is supported.
HPE Morpheus Enterprise Blueprints allow for full multi-tier application deployment. In the Self Service catalog, user can create catalog items based on pre-existing App Blueprints. If new Blueprints need to be created for the Service Catalog, see other sections of HPE Morpheus Enterprise docs on building App Blueprints of various supported types. Just like with catalog Instances, we can pre-configure Blueprints and present them to users viewing the Service Catalog Persona view for easy, one-click deployment.
From the Catalog Items List Page (Library > Blueprints > Catalog Items), click ADD. From the dropdown menu, select Blueprint. The modal window will appear to configure and add a new catalog Blueprint.
Configure the following:
NAME: A friendly name for the catalog item in HPE Morpheus Enterprise
CODE: An optional shortcode for coded naming schemes or programmatic reference
DESCRIPTION: An optional description identifying the catalog item
CATEGORY: Select an existing category or enter a new one. When provisioning from the catelog, items can be filtered by category
LABELS: A comma-separated list of descriptive strings which can be used to categorize the Catalog Item. The Catalog Items list view page can be filtered by labels to make them easier to find
ENABLED: When checked, this catalog item will be available for provisioning
DISABLE AUTO PRICE: When marked, price estimates are no longer refreshed with every field change at the time this Catalog Item is ordered. For some workloads with heavy Configuration-phase Tasks this may improve performance of the order page
FEATURED: When checked, this catalog item will be given special visibility in the Service Catalog Persona view
ALLOW QUANTITY: When checked, an additional field is added to the order page allowing users to order multiple copies. If this option is enabled, ensure your configuration supports that flexibility (such as when IP or load balancer details are specified)
MAX QUANTITY: When the ALLOW QUANTITY configuration is used, an additional MAX QUANTITY configuration is available which sets an upper limit on the quantity that may be executed
VISIBILITY: Set to private to keep the catalog item available only to users in the current Tenant. Master Tenant administrators may set catalog items to public to make them viewable and usable by Subtenant users
LOGO: Select or upload a logo to be associated with this catalog item
DARK LOGO: If desired, set an alternate logo for use when the dark theme is applied to the HPE Morpheus Enterprise appliance
CONFIGURE: Click CONFIGURE to use the familiar App provisioning wizard to tie Blueprint and App deployment configuration to the Catalog Item
APP SPEC: Inject App spec here for any fields required to provision an App from your Blueprint. You may also inject any overrides to the existing Blueprint spec that are desired. App Spec configuration must be YAML, a simple example that names the App and sets the Group and Cloud is included below:
#Example App Spec

name: '<%= customOption.appName %>'
group:
  name: Dev Group
environment: Dev
tiers:
  Web:
    instances:
      - instance:
          type: nginx
          cloud: Dev AWS
  App:
    instances:
      - instance:
          type: apache
          cloud: Dev AWS
CONTENT: Optionally include documentation content for this Catalog Item. Markdown-formatted text is accepted and displayed appropriately when the item is ordered from the Service Catalog. A new Catalog Item-type Wiki entry will also be added containing this information.
Note
App spec custom option variables should be single quoted in YAML:
cloud: '<%= customOption.cloud %>'. Additionally, not all variables are available here as many are unknown until provisioning. Users may use any custom Input values (customOption) as well as name or hostname values which are resolved as part of naming policy evaluation.FORM TYPE: Choose whether a Form or individual Inputs should be used to set the user options at provisioning time. See Forms documentation for complete details on creating Forms.
FORM: If the Form Type of “Form” is selected, choose the pre-existing Form which should be associated with the Catalog Item
INPUTS: If the Form Type of “Inputs” is selected, choose the pre-existing Inputs which should be associated with the Catalog Item
Tip
There are a number of advantages to using Forms over Inputs. See the section above on using Forms with Catalog Items for a complete description on how they are used and the advantages to using them.
Once done, click SAVE CHANGES
Building Catalog Workflows
Note
API usage for Catalog Items with Forms is not yet supported. If planning to use the API or CLI to order Catalog Items you should not use Forms on Catalog Items until it is supported.
From the Catalog Items List Page (Library > Blueprints > Catalog Items), click ADD. From the dropdown menu, select Workflow. The modal window will appear to configure and add a new catalog Workflow.
Configure the following:
NAME: A friendly name for the catalog item in HPE Morpheus Enterprise
CODE: An optional shortcode for coded naming schemes or programmatic reference
DESCRIPTION: An optional description identifying the catalog item
CATEGORY: Select an existing category or enter a new one. When provisioning from the catelog, items can be filtered by category
LABELS: A comma-separated list of descriptive strings which can be used to categorize the Catalog Item. The Catalog Items list view page can be filtered by labels to make them easier to find
ENABLED: When checked, this Workflow item will be available for selection in the Service Catalog
DISABLE AUTO PRICE: When marked, price estimates are no longer refreshed with every field change at the time this Catalog Item is ordered. For some workloads with heavy Configuration-phase Tasks this may improve performance of the order page
FEATURED: When checked, this catalog item will be given special visibility in the Service Catalog Persona view
VISIBILITY: Set to private to keep the catalog item available only to users in the current Tenant. Master Tenant administrators may set catalog items to public to make them viewable and usable by Subtenant users
LOGO: Select or upload a logo to be associated with this catalog item
DARK LOGO: If desired, set an alternate logo for use when the dark theme is applied to the HPE Morpheus Enterprise appliance
WORKFLOW: Select an existing Workflow to be associated with this Catalog Item, new Workflows are created in Library > Automation
CONTEXT: Optionally restrict users to a specific target context, Instance, Server, or None
CONFIG: Enter an optional custom config JSON body. See Workflows documentation for a formatting example
CONTENT: Optionally include documentation content for this Catalog Item. Markdown-formatted text is accepted and displayed appropriately when the item is ordered from the Service Catalog. A new Catalog Item-type Wiki entry will also be added containing this information.
FORM TYPE: Choose whether a Form or individual Inputs should be used to set the user options at provisioning time. See Forms documentation for complete details on creating Forms.
FORM: If the Form Type of “Form” is selected, choose the pre-existing Form which should be associated with the Catalog Item
INPUTS: If the Form Type of “Inputs” is selected, choose the pre-existing Inputs which should be associated with the Catalog Item
Tip
There are a number of advantages to using Forms over Inputs. See the section above on using Forms with Catalog Items for a complete description on how they are used and the advantages to using them.
Once done, click SAVE CHANGES
Editing and Deleting from the Self Service Catalog
Once created, Service Catalog items can be edited or deleted from the Catalog Items list view (Library > Blueprints > Catalog Items). Click the pencil icon in the relevant row to edit the Service Catalog item or the trash can icon to delete it. Alternatively, Service Catalog items can be made inactive to remove them as provisioning options rather than deleting them.