ServiceNow
Overview
IT Service Management (ITSM) is an important area of focus for many organizations. Organizations invested in ServiceNow as an ITSM provider will find that HPE Morpheus Enterprise integrates tightly with some of the most-used features. After integrating ServiceNow with HPE Morpheus Enterprise, both environments can be used interchangeably and the results are synced to both places. This guide walks administrators through the process of integrating ServiceNow with HPE Morpheus Enterprise and how HPE Morpheus Enterprise can be used to effectively leverage the best of ServiceNow.
Tip
The ServiceNow integration guide is also available as a PDF download, which includes additional example use cases and screenshots.
Important
Only one HPE Morpheus Enterprise appliance should be integrated with a single ServiceNow instance at any given time. Integrating multiple appliances with the same ServiceNow instance can cause issues with sharing HPE Morpheus Enterprise Catalog Items through to ServiceNow for ordering from the ServiceNow console. Additional details on Catalog Item sharing are included in this guide.
Add ServiceNow Integration
Navigate to Administration > Integrations
Select + NEW INTEGRATION
Select “ServiceNow” from the dropdown list
Add the following:
- NAME
A friendly name to describe the ServiceNow integration in HPE Morpheus Enterprise.
- ENABLED
Check “Enabled” to allow consumption of this ServiceNow integration in HPE Morpheus Enterprise.
- SERVICENOW HOST
URL of the ServiceNow instance (ex: https://your.instance.service-now.com), keep in mind you can create multiple ServiceNow integrations in HPE Morpheus Enterprise if needed.
- API PROXY
If necessary, select a configured proxy (Infrastructure > Network > Proxies) to route traffic through to the ServiceNow API. If a proxy is not configured here, ServiceNow API traffic will be routed through the global proxy if one is configured on the appliance.
- CREDENTIALS
Supply credentials for a user in ServiceNow that is able to access the REST interface and create/update/delete incidents, requests, requested items, item options, catalog items, workflows, etc. The list of necessary roles includes
x_moda_morpheus_ca.integration(available if the HPE Morpheus Enterprise ServiceNow plugin is installed from the ServiceNow Store),catalog_admin,itil,rest_service,web_service_adminandimport_transformer.HPE Morpheus Enterprise supports simple and OAuth 2.0 authentication with ServiceNow. See the next section for additional details on configuring the ServiceNow appliance for OAuth 2.0 authentication if you intend to use it. When supplying credentials to HPE Morpheus Enterprise users may opt to integrate with a saved set of username and password credentials, a saved set of OAuth 2.0 credentials, a new set of username and password credentials (not saved), or a new set of credentials (OAuth 2.0 or username/password) which will also be saved to the HPE Morpheus Enterprise credential store for later use. Once the credential type is selected, the fields in the modal will adjust to correspond to the chosen credential type. Once again, see the next section for more details on configuring OAuth 2.0 authentication.
- CMDB CUSTOM MAPPING
If needed, administrators can opt to populate a specific field in the ServiceNow table and such mapping is identified here with a JSON code snippet. Below is an example that populates the
object_idfield in the CM database with the HPE Morpheus Enterprise instance name and two other field examples:{ "object_id":"<%=instance.name%>", "SN_field_id2":"<%=morph.varname2%>", "SN_field_id3":"<%=morph.varname3%>" }
- CMDB CLASS MAPPING
Define the mapping between HPE Morpheus Enterprise server types and ServiceNow CI classes. Select a HPE Morpheus Enterprise server type from the dropdown menu and a new field will appear in the list. Enter a ServiceNow CI class into the text field to create the association
- DEFAULT CMDB BUSINESS CLASS
Allows the user to define the table CMDB records are written to if they prefer this over HPE Morpheus Enterprise default. By default, HPE Morpheus Enterprise writes to the
cmdb_ci_vm_instancetable.- CMDB MODE
Choose “Table Based” or “Identification & Reconciliation API”. Selecting “Table Based” will utilize the older Table-based API mode for CMDB sync. Organizations utilizing IRE should select “Identification & Reconciliation API”.
Save Changes
Important
HPE Morpheus Enterprise supports integration with single-domain and multi-domain ServiceNow appliances. In multi-domain installations, a selected ServiceNow company can be mapped to a selected HPE Morpheus Enterprise Tenant for purposes of exposing HPE Morpheus Enterprise Library items only to users within a certain company. In this configuration, ServiceNow integrations should be added in each relevant HPE Morpheus Enterprise Tenant. Further setup steps for exposing HPE Morpheus Enterprise library items to ServiceNow are included in a later section below.
Configuring ServiceNow for OAuth 2.0 Authentication
Before configuring HPE Morpheus Enterprise to use OAuth 2.0 authentication with ServiceNow, ensure your ServiceNow appliance is configured correctly. OAuth must be set up and activated, you must also create a new endpoint for the client. See the following relevant parts of ServiceNow documentation to properly configure your appliance:
Create a new application endpoint for HPE Morpheus Enterprise to access the ServiceNow instance
With ServiceNow correctly configured, we can integrate ServiceNow using either a stored OAuth 2.0 credential set or we can create one on the fly during integration. When creating one on the fly HPE Morpheus Enterprise will save it as a stored credential set for later use. Whether storing one ahead (Infrastructure > Trust > Credentials) or storing one at integration time, configure your credentials as follows. Note that all fields are required for a ServiceNow Integration unless specifically mentioned otherwise:
Note
Some of the fields below may not be present if creating an OAuth credential set on the fly as opposed to the Infrastructure > Trust section of HPE Morpheus Enterprise.
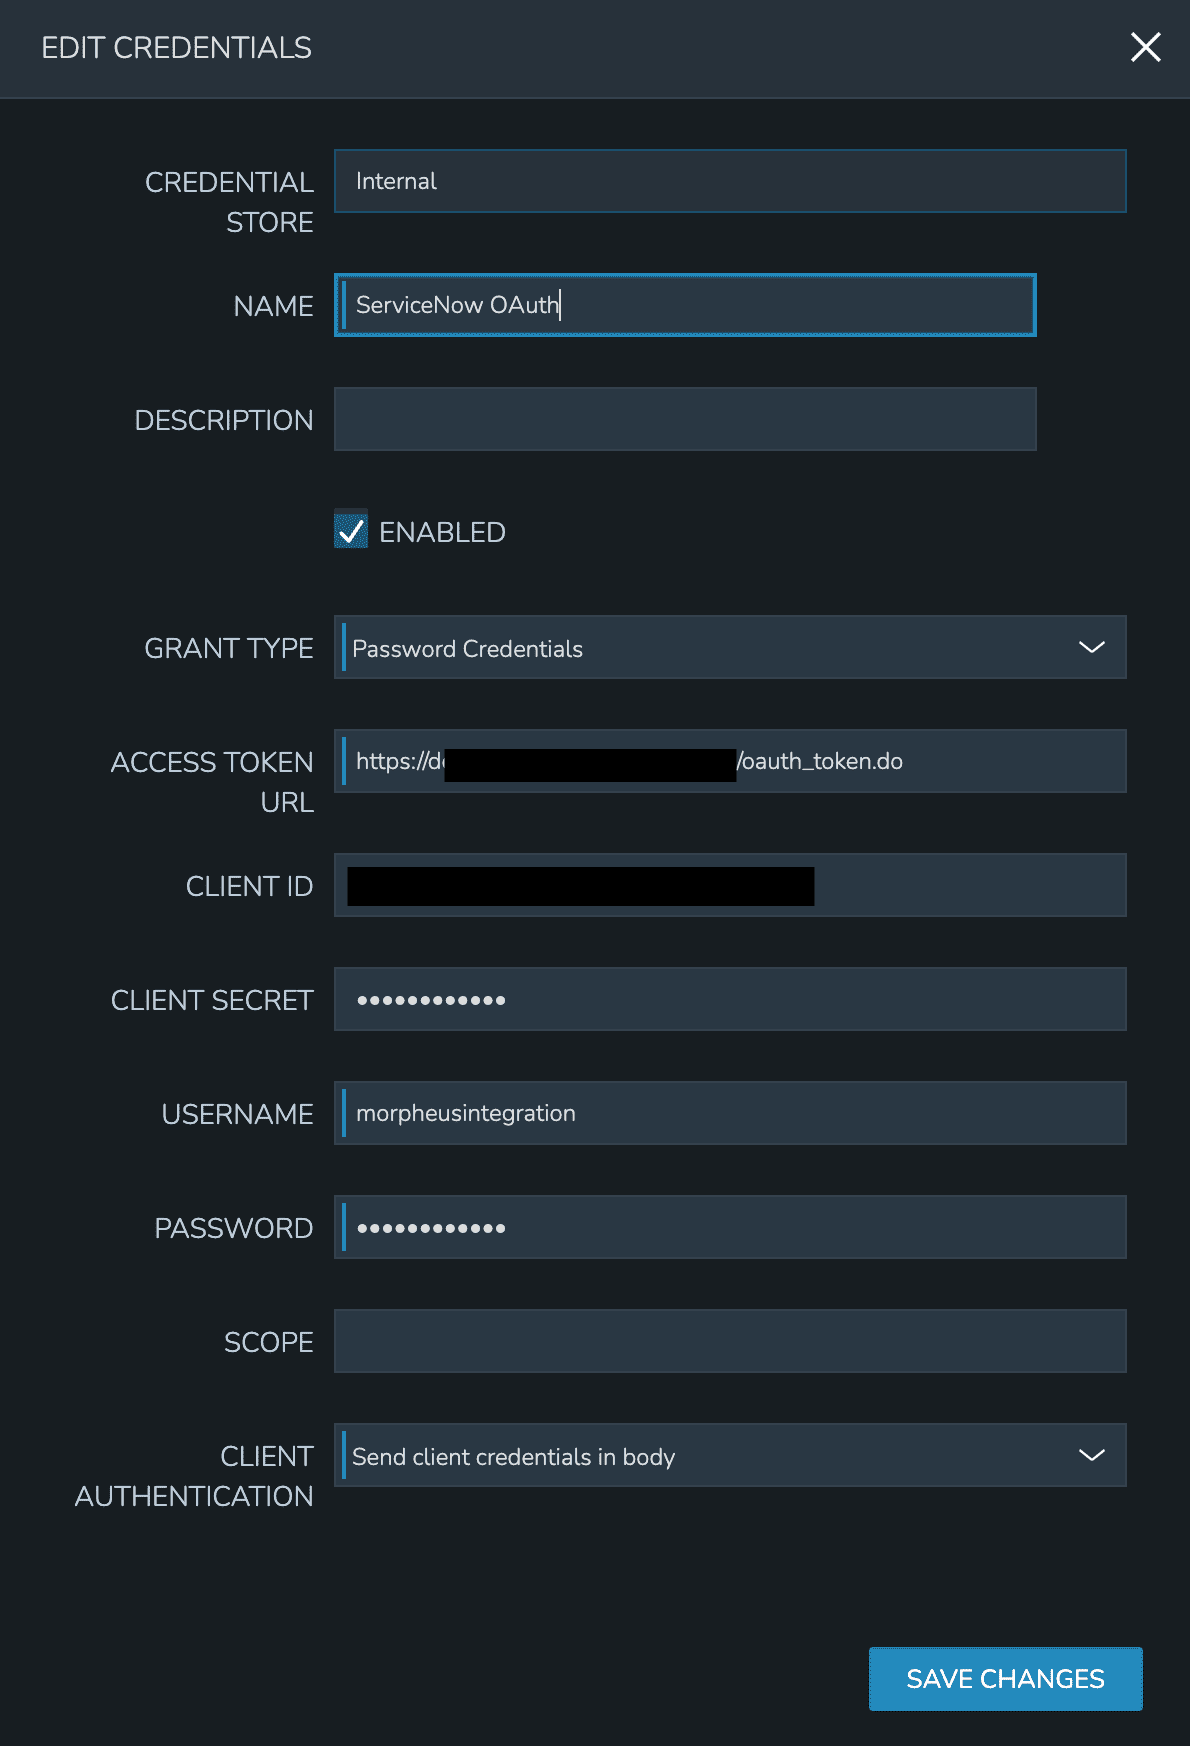
CREDENTIAL STORE: Select “Internal” or (if present) an external Cypher store
NAME: A name for the stored credential set in HPE Morpheus Enterprise
DESCRIPTION: An optional description for the credential set
ENABLED: If enabled, this credential set will be selectable for creating various integrations in HPE Morpheus Enterprise
GRANT TYPE: Use “Password Credentials”
ACCESS TOKEN URL: Should be the appliance domain with the path of “/oauth_token.do”. For example, “https://mydomain.service-now.com/oauth_token.do”
CLIENT ID: The client ID (potentially auto-generated) set when the endpoint was created in ServiceNow
CLIENT SECRET: The client secret set when the endpoint was created in ServiceNow
USERNAME: The username for a ServiceNow service account, note the required permissions this user must have in the section above
PASSWORD: The password for the ServiceNow account
SCOPE: Left empty
CLIENT AUTHENTICATION: Use “Send client credentials in body”
If storing these credentials for later use, click ADD CREDENTIALS. If creating this credential set on the fly at the time of integration, complete the rest of the new integration modal as discussed in the prior section.
ServiceNow Configuration Management Database (CMDB)
ServiceNow CMDB is central to maintaining a complete record of IT infrastructure at many organizations. The HPE Morpheus Enterprise ServiceNow integration can create and update configuration item (CIs) records as new services are provisioned or existing services are reconfigured. Once a ServiceNow integration is set as the CMDB for a Cloud or Group, CI records are created and managed by HPE Morpheus Enterprise.
Setting a CMDB on a Group
When adding or editing a HPE Morpheus Enterprise Group, any active ServiceNow integration can be set as the CMDB.
Navigate to Infrastructure > Groups
Select an existing Group name from the list
Click EDIT
Under “Advanced Options”, select an active ServiceNow integration from the CMDB dropdown menu
If desired, select “CMDB DISCOVERY” to create CMDB CI records for discovered (unmanaged) servers that HPE Morpheus Enterprise automatically onboards to this Group
This setting is also available when creating a Group. Rather than selecting an existing Group in step two above, click + CREATE to make a new Group.
Setting a CMDB on a Cloud
When adding or editing a HPE Morpheus Enterprise Cloud, any active ServiceNow integration can be set as the CMDB.
Navigate to Infrastructure > Clouds
Select an existing Cloud name from the list
Click EDIT
Under “Advanced Options”, select an active ServiceNow integration from the CMDB dropdown menu
If desired, select “CMDB DISCOVERY” to create CMDB CI records for discovered (unmanaged) servers that HPE Morpheus Enterprise automatically onboards to this Cloud
This setting is also available when creating a Cloud. Rather than selecting an existing Cloud in step two above, click + ADD to make a new Cloud.
Provisioning and CI Records
With a ServiceNow instance integrated with HPE Morpheus Enterprise and the instance set as the CMDB for a HPE Morpheus Enterprise Group or Cloud, we will see CI records created as new resources are provisioned to the Cloud or Group in HPE Morpheus Enterprise. After the provisioning process has completed, a CI record should exist with a name value equal to the Instance name in HPE Morpheus Enterprise.
Provisioned and active Instances in HPE Morpheus Enterprise will have CI records with an “On” state in ServiceNow. After they are deleted in HPE Morpheus Enterprise, the state value will be rolled to “Terminated” in ServiceNow as expected.
HPE Morpheus Enterprise will also populate a number of additional fields in ServiceNow including IP address, FQDN and more. Custom views can be created in ServiceNow to expose these fields.
ServiceNow Approval Policies
HPE Morpheus Enterprise offers its own approval engine out of the box, but some organizations prefer ServiceNow to be their final approval authority. With a ServiceNow instance integrated with HPE Morpheus Enterprise, administrators can create provision approval policies and tie them to an active ServiceNow integration. With the policy in place, any new provisioning within the policy scope (Global, Group, Cloud, User, or Role) is sent to ServiceNow for approval before provisioning will go ahead in HPE Morpheus Enterprise. Approvals are synced between the two applications every minute.
Add ServiceNow Provision Approval Policy to a Cloud
Note
Any Instance provisioned into a Cloud with an approval policy enabled will not proceed without the required approval.
To add a ServiceNow Approval policy to a Cloud:
Navigate to
Infrastructure > CloudsSelect a Cloud by clicking on the desired Cloud name link
Select the POLICIES tab
Click + ADD POLICY
Select
Provision Approvalfrom the type dropdownOptionally enter a description for the Policy
Configure the following:
- APPROVAL INTEGRATION
Select the ServiceNow Integration already configured in Administration > Integrations to use for the approval policy.
- WORKFLOW
Select the ServiceNow workflow for the approval in ServiceNow (if desired). These workflows are configured and synced in from the ServiceNow Integration.
- TENANTS (if applicable)
Only required for multi-tenant permission scoping. For the policy to apply to a Subtenant, type the name of the tenant(s) and select the Tenant(s) from the typeahead list.
Save Changes
Add ServiceNow Provision Approval Policy to a Group
Note
Any Instance provisioned into a Group with an approval policy enabled will not proceed without the required approval.
To add a ServiceNow Approval policy to a Group:
Navigate to
Infrastructure > GroupsSelect a Group by clicking on the Group name
Select the POLICIES tab
Click + ADD POLICY
Select
Provision ApprovalOptionally enter a description for the Policy
Configure the following:
- APPROVAL INTEGRATION
Select the ServiceNow Integration already configured in Administration > Integrations to use for the approval policy.
- WORKFLOW
Select the ServiceNow workflow for the approval in ServiceNow (if desired). These workflows are configured and synced in from the ServiceNow Integration.
- TENANTS (if applicable)
Only required for multi-tenant permission scoping. For the policy to apply to a Subtenant, type the name of the tenant(s) and select the Tenant(s) from the typeahead list.
Save Changes
Using ServiceNow Approval Policies
Any Instance provisioned into a Cloud or Group with an approval policy enabled will be in a PENDING state until the request is approved.
Instances pending a ServiceNow approval will show “Waiting for Approval” with the Requested Item number and Request number, ex: Waiting for Approval [RITM0010002 - REQ0010002].
ServiceNow approval requests are displayed in Operations > Approvals. Instances pending a ServiceNow approval must be approved in ServiceNow for provisioning to initiate. Approval requests from a ServiceNow approval policy cannot be approved in HPE Morpheus Enterprise, only approvals originating from HPE Morpheus Enterprise.
ServiceNow approval requests are displayed in HPE Morpheus Enterprise under Operations > Approvals. Pending ServiceNow approval requests can be cancelled in HPE Morpheus Enterprise by selecting the request and then selecting ACTIONS > Cancel.
Once a pending ServiceNow approval request is approved in ServiceNow, the Instance(s) will begin to provision in HPE Morpheus Enterprise within one minute of being approved in ServiceNow.
ServiceNow Monitoring Integration Settings
Note
A ServiceNow integration must be already configured in Administration > Integrations to enable ServiceNow monitoring.
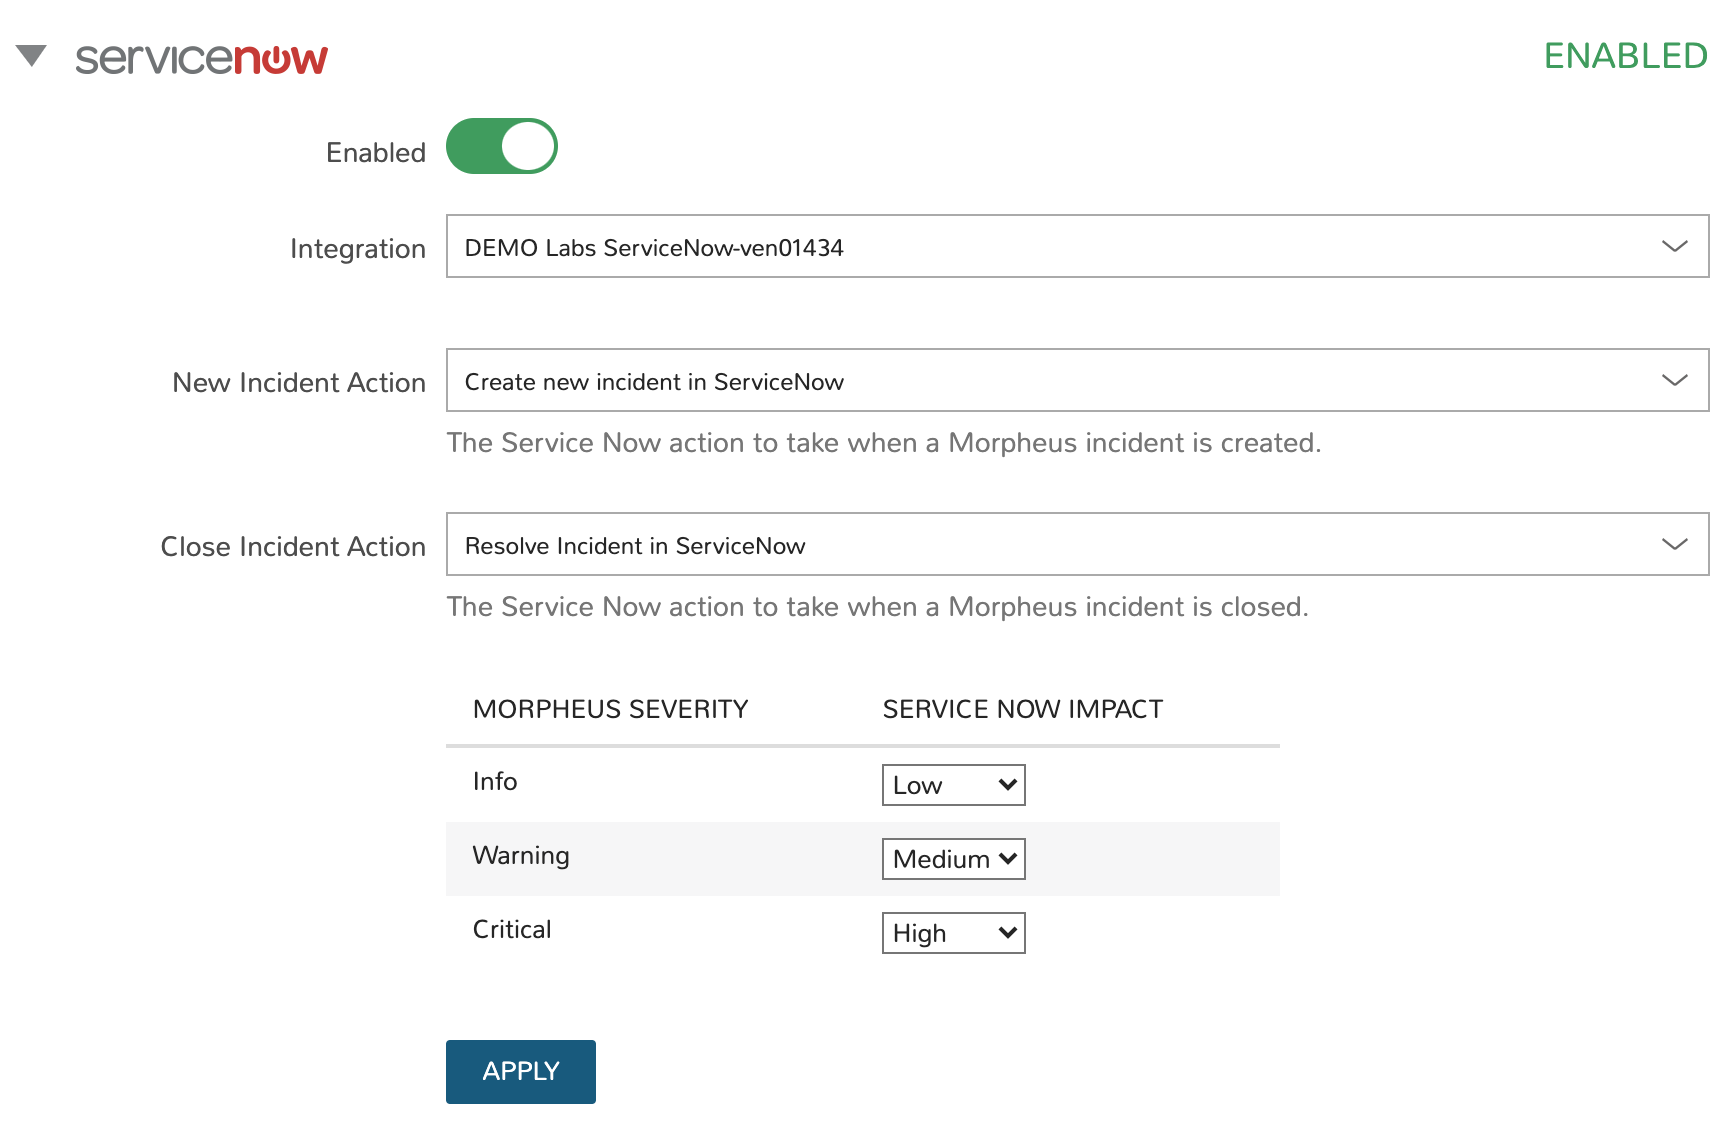
The ServiceNow monitoring integration is enabled and configured in Administration > Settings > Monitoring. As long as the “Enabled” switch is activated, HPE Morpheus Enterprise will report monitoring data to ServiceNow. Configuration selections are described below:
- Enabled
Enables the ServiceNow monitoring integration
- Integration
Select from an existing ServiceNow integration in |AdmInt|
- New Incident Action
The ServiceNow action to take when a HPE Morpheus Enterprise incident is created
- Close Incident Action
The Service Now action to take when a HPE Morpheus Enterprise incident is closed
Incident Severity Mapping
HPE Morpheus Enterprise Severity |
ServiceNow Impact |
Info |
Low/Medium/High |
Warning |
Low/Medium/High |
Critical |
Low/Medium/High |
Once finished working with configuration, click APPLY
ServiceNow Service Catalog Integration
In addition to integrating with key ServiceNow features, HPE Morpheus Enterprise offers a free plugin directly from the ServiceNow Store. Once the plugin is installed, HPE Morpheus Enterprise Self-Service Catalog Items can be presented as provisioning options in the ServiceNow catalog for ordering.
Note
Surfacing Catalog Items made with Forms to ServiceNow is not yet supported. If planning to use ServiceNow to order Catalog Items you should not use Forms on any Catalog Items until it is supported.
The HPE Morpheus Enterprise plugin supports integration with ServiceNow whether it’s configured for a single tenant or for multiple domains. When both HPE Morpheus Enterprise and ServiceNow are configured for multiple Tenants, we can create ServiceNow integrations in any relevant HPE Morpheus Enterprise Tenant and map those to specific companies in ServiceNow. Any exposed library items would only be shared with users in the relevant ServiceNow company. The HPE Morpheus Enterprise plugin will automatically detect whether the ServiceNow Domain Support–Domain Extensions Installer plugin has been installed and respond accordingly. Additionally, the User Criteria Scoped API plugin must also be enabled on the ServiceNow instance for multi-tenant use.
Depending on the scenario, setup steps for the HPE Morpheus Enterprise plugin will be slightly different. Setup steps for both single and domain-separated ServiceNow environments are included below.
Important
A valid SSL Certificate is required on the HPE Morpheus Enterprise Appliance for the ServiceNow plugin to be able to communicate with the appliance.
Important
As described below, the HPE Morpheus Enterprise ServiceNow plugin requires the use of a HPE Morpheus Enterprise service account to integrate back with the HPE Morpheus Enterprise appliance. Some symbol characters, specifically “%” and “&” are valid for use in HPE Morpheus Enterprise account passwords but aren’t passed correctly when ServiceNow makes its API calls to HPE Morpheus Enterprise. It is best not to use these characters in the password for HPE Morpheus Enterprise accounts which may be used in the ServiceNow plugin to interface back with HPE Morpheus Enterprise. Authentication errors will occur and the plugin will not work. This is a ServiceNow issue which HPE Morpheus Enterprise has no control over.
Single-Domain ServiceNow Configuration
Install the HPE Morpheus Enterprise plugin from the ServiceNow store, refer to the Morpheus Data plugin for ServiceNow installation instructions for additional help with the installation steps
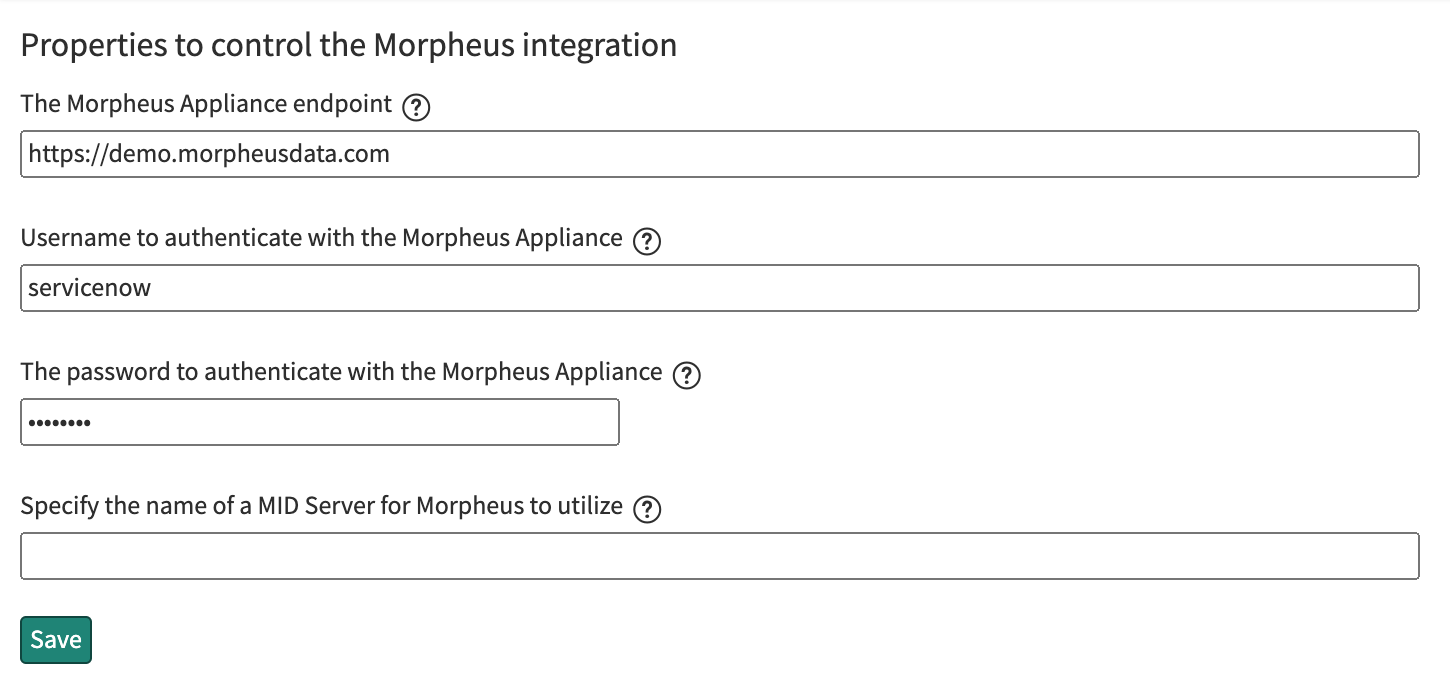
Navigate to HPE Morpheus Enterprise Catalog > Properties
Set the following properties:
- MID Server
If desired, specify the name of an existing MID server
- HPE Morpheus Enterprise Appliance Endpoint
The full URL to your HPE Morpheus Enterprise appliance
- Username
HPE Morpheus Enterprise user that the plugin will connect as to the HPE Morpheus Enterprise API
- Password
Password to the above HPE Morpheus Enterprise account
- HPE Morpheus Enterprise Manage Workflows?
Indicate whether HPE Morpheus Enterprise should manage workflows. If this option is checked, HPE Morpheus Enterprise will overwrite the workflow and set it to “Morpheus (Internal) Catalog Item Provision Instance” on sync
Important
The HPE Morpheus Enterprise service account integrated with the plugin interacts with the HPE Morpheus Enterprise appliance through HPE Morpheus Enterprise API and must have the appropriate Role permissions to complete all provisioning requests from the ServiceNow plugin. Often it’s easiest to make a service account with full administrator rights to avoid failed provisioning. If you’d prefer to create a minimal service account for security reasons, ensure the Role for the service account User has the following permissions:
Personas: Standard: Full
Personas: Service Catalog: Full
Features: Provisioning: Instances: Full
Features: Provisioning: Apps: Full
Groups: Full rights to all Groups containing Clouds you will expose to ServiceNow
Instance Types: Full rights to all Instance Types you will expose to ServiceNow
Blueprints: Full rights to all Blueprints you will expose to ServiceNow
Catalog Item Types: Full rights to all Catalog Item Types you will expose to ServiceNow
Users created from SAML Identity Sources cannot authenticate with the HPE Morpheus Enterprise API and cannot be used for the ServiceNow plugin.
Multi-Domain ServiceNow Configuration
Install the HPE Morpheus Enterprise plugin from the ServiceNow store, refer to the Morpheus Data plugin for ServiceNow installation instructions for additional help with the installation steps
Navigate to HPE Morpheus Enterprise Catalog > Multi-Tenant Credentials
Set the following properties:
- HPE Morpheus Enterprise Appliance Endpoint
The full URL to your HPE Morpheus Enterprise appliance
- HPE Morpheus Enterprise Tenant ID
The integer database ID for the selected Tenant
- Username
HPE Morpheus Enterprise user that the plugin will connect as to the HPE Morpheus Enterprise API. This user must exist within the HPE Morpheus Enterprise Tenant being linked to the chosen ServiceNow company
- Password
The password for the above user
- ServiceNow Company
Select a company from the list to link with the Tenant whose ID was entered above
- MID Server
If desired, specify the name of an existing MID server. Note that configuring a multi-domain MID server requires the
glide.ecc.enable_multidomain_midproperty insys_properties.listbe set totrueprior to creating the MID server in the global domain. This allows the MID server to explore any domain for which it has the credentials. The ServiceNow user (which the MID server authenticates with) must be in the global domain as well. For more, see this section of ServiceNow documentation.- HPE Morpheus Enterprise Manage Workflows?
Indicate whether HPE Morpheus Enterprise should manage workflows. If this option is checked, HPE Morpheus Enterprise will overwrite the workflow and set it to “Morpheus (Internal) Catalog Item Provision Instance” on sync
Important
The HPE Morpheus Enterprise service account integrated with the plugin interacts with the HPE Morpheus Enterprise appliance through HPE Morpheus Enterprise API and must have the appropriate Role permissions to complete all provisioning requests from the ServiceNow plugin. Often it’s easiest to make a service account with full administrator rights to avoid failed provisioning. If you’d prefer to create a minimal service account for security reasons, ensure the Role for the service account User has the following permissions:
Personas: Standard: Full
Personas: Service Catalog: Full
Features: Provisioning: Instances: Full
Features: Provisioning: Apps: Full
Groups: Full rights to all Groups containing Clouds you will expose to ServiceNow
Instance Types: Full rights to all Instance Types you will expose to ServiceNow
Blueprints: Full rights to all Blueprints you will expose to ServiceNow
Catalog Item Types: Full rights to all Catalog Item Types you will expose to ServiceNow
Users created from SAML Identity Sources cannot authenticate with the HPE Morpheus Enterprise API and cannot be used for the ServiceNow plugin.
Adding to ServiceNow Catalog
Once the ServiceNow plugin is installed and configured, Service Catalog items can be exposed to the ServiceNow catalog from HPE Morpheus Enterprise. Follow the guide below to expose HPE Morpheus Enterprise Clouds, Library Items, and Blueprints to users in the ServiceNow catalog.
Navigate to Administration > Integrations
Select the relevant ServiceNow integration
Within the “EXPOSED CATALOG ITEMS” section is a list of currently-exposed Service Catalog items
To expose a new item, click + ADD CATALOG ITEM
Select an available item from the dropdown menu and click SAVE CHANGES
Back in ServiceNow, access the HPE Morpheus Enterprise plugin from the Service Catalog
Exposed HPE Morpheus Enterprise Service Catalog items are visible here for ServiceNow users with sufficient role permissions

Note
When exposing an Operational Workflow-based Catalog Item, ensure the CONTEXT configuration on the Catalog Item is set to “none” or the Catalog Item will not be exposed to ServiceNow.