Automated Multi-Node Application Deployment with Morpheus
This document provides a complete step-by-step guide to automating the configuration, installation, and deployment of the open source CRM application SuiteCRM using Morpheus. This is a companion guide to our single-node application deployment guide and, in some cases, will refer directly to sections of that guide rather than duplicating information here.
In this guide, we will create a custom App Blueprint for SuiteCRM consisting of a database node and an application node. Once configured, the provisioning process is completely automated (Provisioning > Apps) and results in the two-tiered app mentioned previously. We’ll use the following Morpheus constructs to fully automate the provisioning process of a multi-tiered application:
App Blueprints
Cypher
Inputs
File Templates
Tasks
Provisioning Workflows
Each of these constructs can be explored more deeply in their own specific sections of Morpheus docs but this guide will illustrate how these pieces can be pulled together to automate deployment, ensure consistency and security, and enable self-service. Additionally, while this could be done on many different Cloud types, I’m setting up this Instance Type for provisioning on a VMware vCenter Cloud. You would need to have a VMware Cloud already integrated with Morpheus in order to follow the guide exactly but I will not go through the process of creating new Clouds here. If you do not have a vCenter Cloud available to you, the concepts in the guide will translate to other Cloud types, including public clouds like Amazon AWS. You may have to make slight modifications in spots in order to make a fully working Instance Type for other Clouds.
Create Cypher
Cypher is a secure key/value store in Morpheus. Using Cypher, we can securely store passwords and other secret values (such as API keys) which can then be called into automation Tasks and templates. In this case, we need to store two Cypher secrets: The first is for the MySQL root password and the second is for the user which we will use to run SSH commands from the app server to the database server. Refer to the single-node deployment guide for details on setting up the first Cypher entry.
Next we need to set up a Cypher for the SSH user so our application node can access the database. A handy trick here is to use the user specified in the Morpheus global Cloud-Init Setting as this will be automatically created on the Instances when they are provisioned by Morpheus. To check that the user is set up correctly, in the Morpheus UI go to Administration > Settings > Provisioning. Under the Cloud-Init Settings section, ensure that a username and password is set. After that, simply create a secret/cloudinit Cypher entry which stores the password for this user using the same process by which you set up the MySQL root password Cypher entry.
Create Inputs
Inputs are custom input fields in Morpheus. The input can be consumed as variables within templates and scripts. We’ll create three inputs in this case for the database name, the database username, and the database user password. The steps to create these inputs have been detailed in the companion guide, if needed, you can reference them here.
Create File Template and Library Template Task
For our SuiteCRM application, we’ll need to create an Apache config file. We can create a File Template in Morpheus and the config file will be generated dynamically at provision time with the appropriate values. We’ll also create a Task which we can use to automatically set our file template at the appropriate time during provisioning. The steps to create the File Template and Library Template Task are detailed in the companion guide so follow the links for walkthrough steps and return to this guide.
Create Database Install Task
Since the database is installed on its own node, we need a Task which installs just database. In the prior section, we created a Library Template Task but this time we will create Bash Script Tasks to handle database node installation and application node installation. We’ll also need a simple third Task to restart the Apache service after setting the config file. We’ll go through the steps for creating all three of these Tasks in this section.
Navigate to Library > Automation > Tasks and click + ADD to start a new Task. Configure the new Task as follows:
Name: suitecrm install db multi node
Code: suitecrminstalldbMN
Type: Shell Script (The proper fields will appear once the Type is set)
Sudo: Checked
Source: Local (We will enter the script locally in this case but if version control repositories are integrated, such as Github, script content can be dynamically pulled from the repository at the time the Task is invoked. This ensures the code is always current without ever manually updating Tasks)
Execute Target: Resource
Database Install Task Content
RPass="<%=cypher.read('secret/mysql_root')%>"
IP="<%=server.internalIp%>"

#Wait until any apt-get processes have finished
if [ `ps -ef | grep [a]pt-get | wc -l` != 0 ]
then
      sleep 120
fi

#Install MariaDB, start service and enable on boot
wget https://downloads.mariadb.com/MariaDB/mariadb_repo_setup
echo "fd3f41eefff54ce144c932100f9e0f9b1d181e0edd86a6f6b8f2a0212100c32c mariadb_repo_setup" | sha256sum -c -
chmod +x mariadb_repo_setup
./mariadb_repo_setup  --mariadb-server-version="mariadb-10.6"
apt update
apt-get install mariadb-server mariadb-client -y
systemctl stop mariadb.service
systemctl start mariadb.service
systemctl enable mariadb.service

#The following commands are from the mysql secure installation guidance
mysql -u root -e "UPDATE mysql.user SET Password=PASSWORD('$RPass') WHERE User='root';"
mysql -u root -e "flush privileges"
mysql -u root -p$RPass -e "DELETE FROM mysql.user WHERE User='';"
mysql -u root -p$RPass -e "DELETE FROM mysql.user WHERE User='root' AND Host NOT IN ('localhost', '127.0.0.1', '::1');"
mysql -u root -p$RPass -e "DROP DATABASE IF EXISTS test;"
mysql -u root -p$RPass -e "DELETE FROM mysql.db WHERE Db='test' OR Db='test\_%';"
mysql -u root -p$RPass -e "FLUSH PRIVILEGES;"

#Set bind-address parameter in my.cnf
sed -e '/^bind/s/^/#/g' -i /etc/mysql/mariadb.conf.d/50-server.cnf
systemctl restart mariadb.service
Create Application Install and Apache Restart Tasks
We now need to create a Bash script task to install the application. However, before we do this, we need to consider how these Tasks will run. We need to have the database installed before the application. We can achieve this in our App Blueprint by configuring the boot order so that the database is provisioned before the application. However, as part of the database configuration, we also need to create a database user and set up remote access to the database for the application server IP. The challenge here is that we cannot create the database user as part of the database install Task as we will not know the application server IP address. To get around this, we will run the database configuration Tasks within the application install task using sshpass to remotely execute the MySQL commands on the database. This is where the cloud-init user and Cypher we created earlier come in.
Note
In the code section below, remember to set the correct username for your cloud-init user. In the code below it is set to pjonesci. You will also see in the Task below we are using environment variables to pull in the IP address of the database host (MYSQL_HOST variable). We are able to do this because in the App Blueprint we will connect the tiers which means Instances in a tier can import the evars from Instances in connected tiers.
Once again, click + ADD to start a new Task. Configure the new Task as follows:
Name: suitecrm install app multi node
Code: suitecrminstallappMN
Type: Shell Script
Sudo: Checked
Source: Local
Execute Target: Resource
Application Install Task Content
RPass="<%=cypher.read('secret/mysql_root')%>"
CIPass="<%=cypher.read('secret/cloudinit')%>"
SCRMDb="<%=customOptions.databaseNameSCRM%>"
SCRMUser="<%=customOptions.databaseUserSCRM%>"
SCRMPass="<%=customOptions.databasePassSCRM%>"
MYSQL_HOST="<%=evars.SUITECRMDBMN_IP%>"
IP="<%=server.internalIp%>"

#Wait until any apt-get processes have finished
if [ `ps -ef | grep [a]pt-get | wc -l` = !0 ]
then
        sleep 120
fi

#Install sshpass and apache, start service and enable on boot
apt-get install sshpass -y
apt-get install apache2 -y
systemctl stop apache2.service
systemctl start apache2.service
systemctl enable apache2.service

#Use sshpass to remotely execute mysql commands on DB server to create database and database user
sshpass -p $CIPass ssh -o StrictHostKeyChecking=no -t pjonesci@$MYSQL_HOST <<REMOTE
sudo -S <<< "$CIPass" mysql -u root -p$RPass -e "CREATE USER '$SCRMUser'@'$IP' IDENTIFIED BY '$SCRMPass';"
sudo -S <<< "$CIPass" mysql -u root -p$RPass -e "CREATE DATABASE $SCRMDb;"
sudo -S <<< "$CIPass" mysql -u root -p$RPass -e "GRANT ALL ON $SCRMDb.* TO $SCRMUser@'$IP' IDENTIFIED BY '$SCRMPass';"
sudo -S <<< "$CIPass" mysql -u root -p$RPass -e "FLUSH PRIVILEGES;"
REMOTE

#Install required software for SuiteCRM
add-apt-repository ppa:ondrej/php -y
apt-get update
apt-get install php7.3 libapache2-mod-php7.3 php7.3-common php7.3-mysql php7.3-gmp php7.3-curl php7.3-intl php7.3-mbstring php7.3-xmlrpc php7.3-gd php7.3-bcmath php7.3-imap php7.3-xml php7.3-cli php7.3-zip -y

#Update php.ini file with required settings
short_open_tag=On
memory_limit=256M
upload_max_filesize=100M
max_execution_time=360

for key in short_open_tag memory_limit upload_max_filesize max_execution_time
do
 sed -i "s/^\($key\).*/\1 $(eval echo = \${$key})/" /etc/php/7.3/apache2/php.ini
done

#Restart apache
systemctl restart apache2.service

#Test file created for debugging
echo "<?php phpinfo( ); ?>" | sudo tee /var/www/html/phpinfo.php

#Download and install latest SuiteCRM. Composer v2 does not work with Suitecrm.
curl -sS https://getcomposer.org/installer | sudo php -- --version=1.10.9 --install-dir=/usr/local/bin --filename=composer
git clone https://github.com/salesagility/SuiteCRM.git /var/www/html/suitecrm

cd /var/www/html/suitecrm
composer install --no-dev
chown -R www-data:www-data /var/www/html/suitecrm/
chmod -R 755 /var/www/html/suitecrm/
Finally, create the Apache restart Task mentioned earlier. The exact steps to create this Task are shown in the companion single-node application guide.
Create Workflows
Morpheus Workflows pull multiple Tasks together into a logical group. There are two types of Workflows: Operational and Provisioning. We won’t use any Operational Workflows here but these Workflows can be run on-demand as needed or set to run on a recurring time schedule (like a cronjob). Provisioning Workflows are associated with an Instance at provision time and will automatically run when the Instance reaches certain phases of its lifecycle, such as during provisioning, teardown, startup, or shutdown. In this case, we can create a Provisioning Workflow with our Tasks in the provision phase. One Workflow will primarily handle database node installation and the other will primarily handle application node installation.
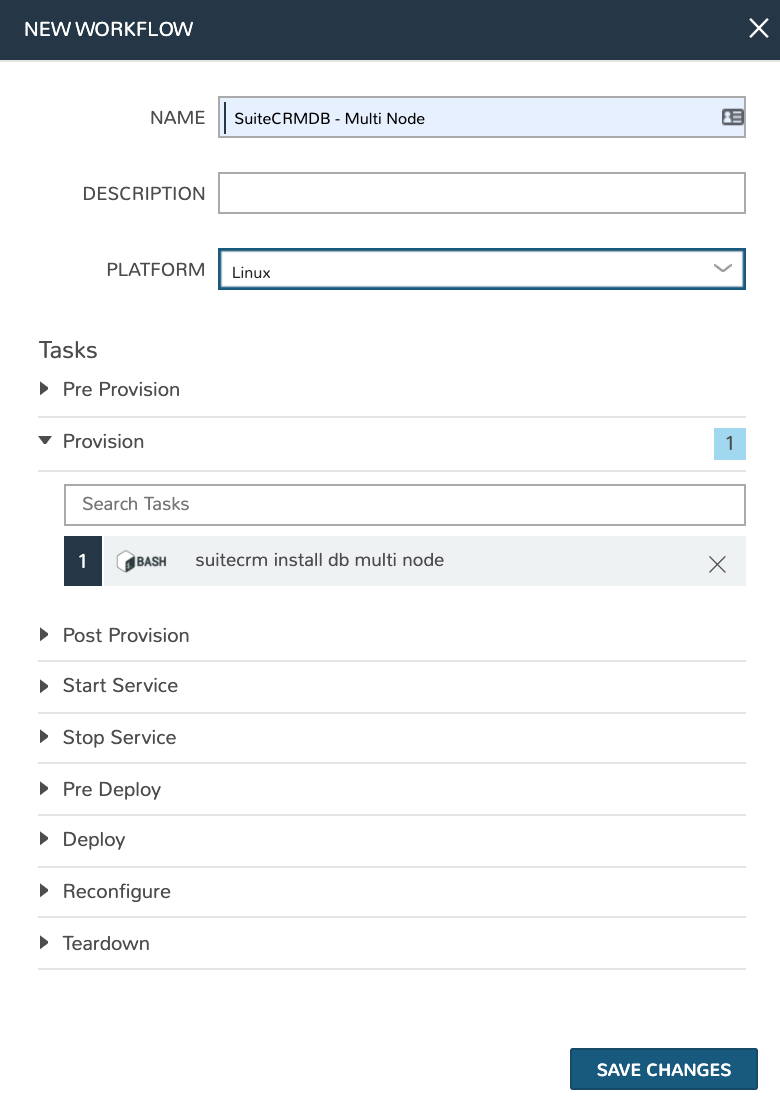
Navigate to Library > Automation > Workflows and click + ADD. Set the following configurations:
NAME: SuiteCRMDB - Multi Node
PLATFORM: Linux
TASKS: In the provision phase, add our “suitecrm install db multi node” Task
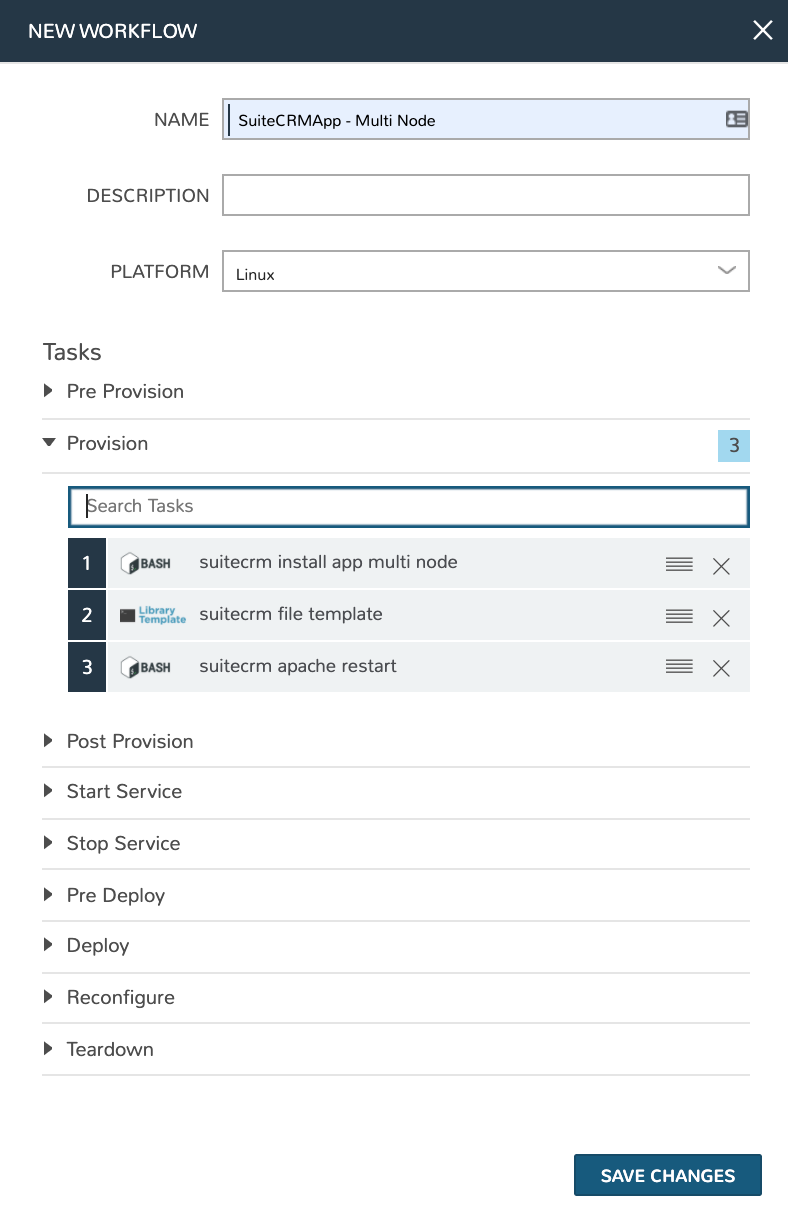
Click SAVE CHANGES and then create the second Workflow:
NAME: SuiteCRMApp - Multi Node
PLATFORM: Linux
TASKS: In the provision phase, add our “suitecrm install app multi node”, “suitecrm file template”, and “suitecrm apache restart” Tasks
Click SAVE CHANGES
Create Instance Types for the Database and Application
At this point we’re ready to put our pieces together into custom Instance Types for the database and application. Instance Types can be provisioned individually (Provisioning > Instances) but in this case we want to structure multiple Instance Types into logical tiers in an App Blueprint so they can be provisioned as a Morpheus App. Each Instance Type will contain a Layout and a Node Type, I’ll discuss each construct more fully as it’s time to create them.
Navigate to Library > Blueprints > Instance Types and click + ADD. Set the following configurations:
NAME: SUITE_CRM_DB_MN
CODE: suitecrmdbmn
CATEGORY: SQL
ICON: If desired, browse your local computer for a MariaDB icon to make this Instance Type more recognizable when provisioning or creating App Blueprints
ENVIRONMENT PREFIX: SUITECRMDBMN
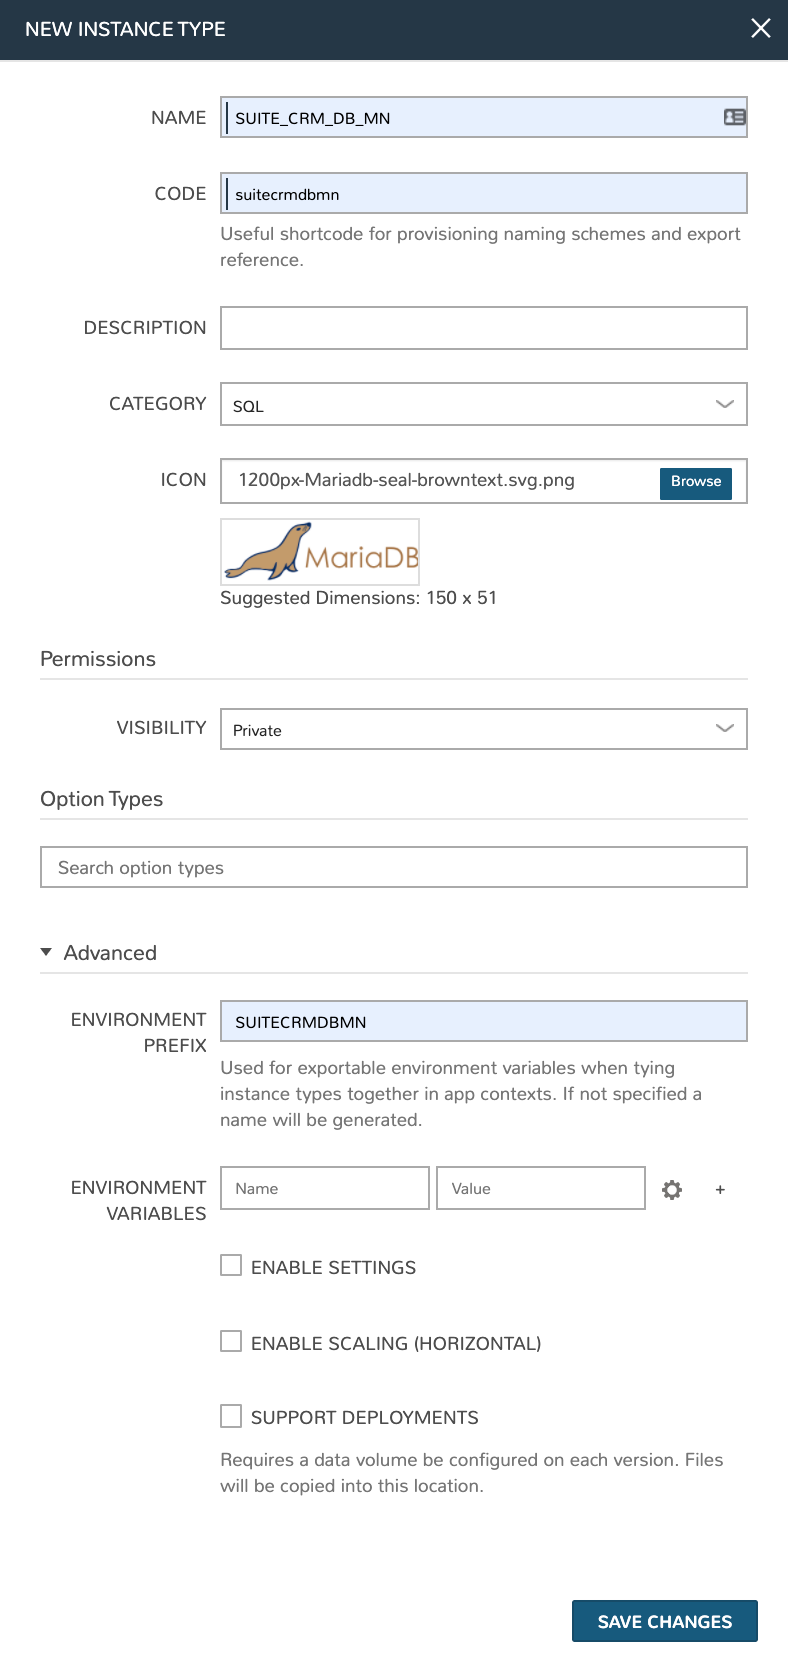
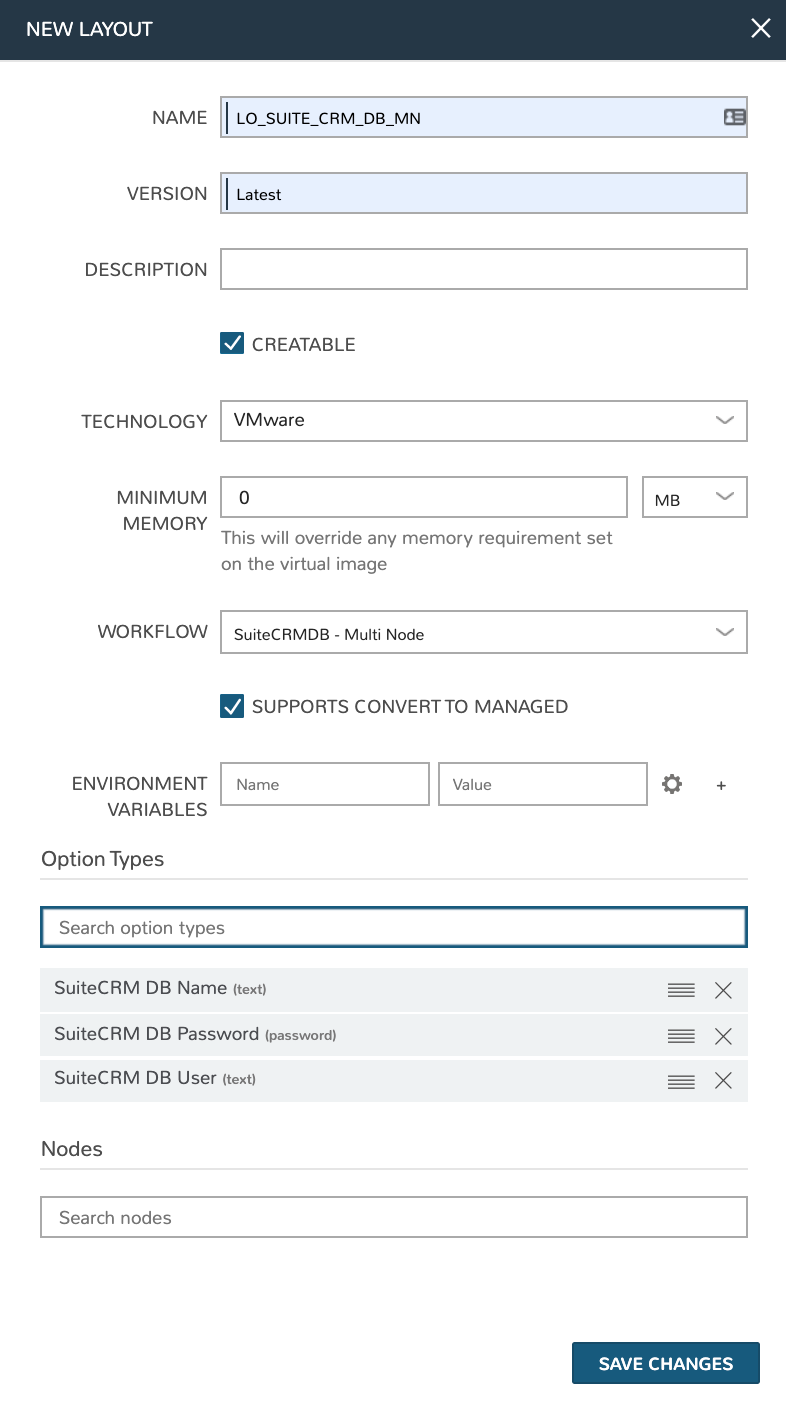
Click SAVE CHANGES. With the Instance Type created, we’re ready to add a Layout. A Layout specifies the technology the Instance will run on, in this case VMware. It’s possible to have multiple Layouts associated with an Instance Type which can be selected depending on the chosen Cloud the user might be provisioning on. Configure the Layout as follows:
NAME: LO_SUITE_CRM_DB_MN
VERSION: Latest
CREATABLE: Checked
TECHNOLOGY: VMware
WORKFLOW: Select the “SuiteCRM - Multi Node” Workflow that was previously created
INPUTS: Include the “SuiteCRM DB Name”, “SuiteCRM DB Password”, and “SuiteCRM DB User” Inputs that were previously created
Click SAVE CHANGES. With the Layout created, we’re ready to associated a Node Type. From the Layout Detail Page, click + ADD within the “VM Types” section. The term VM Types is sometimes used in place of Node Types in Morpheus but they refer to the same thing and are fully interchangeable. In this case, we’re simply going to point to a default Ubuntu image which is supplied by Morpheus though you can associate Node Types with your own custom virtual images when needed. Set the following configurations on the new Node Type:
NAME: NODE_SUITE_CRM_DB_MN
SHORT NAME: nodesuitecrmdbmn
VERSION: Latest
TECHNOLOGY: VMware
VM IMAGE: Choose the Morpheus Ubuntu 18 image that is included with Morpheus out of the box
Click SAVE CHANGES. This completes the database Library item needed to build out our App Blueprint in the next section. We now need to add a Library item representing the application node. Below I will list out the configurations for the Instance Type, Layout, and Node Type, you can refer back to the steps above if you need to see the click-by-click instructions once again for creating these objects.
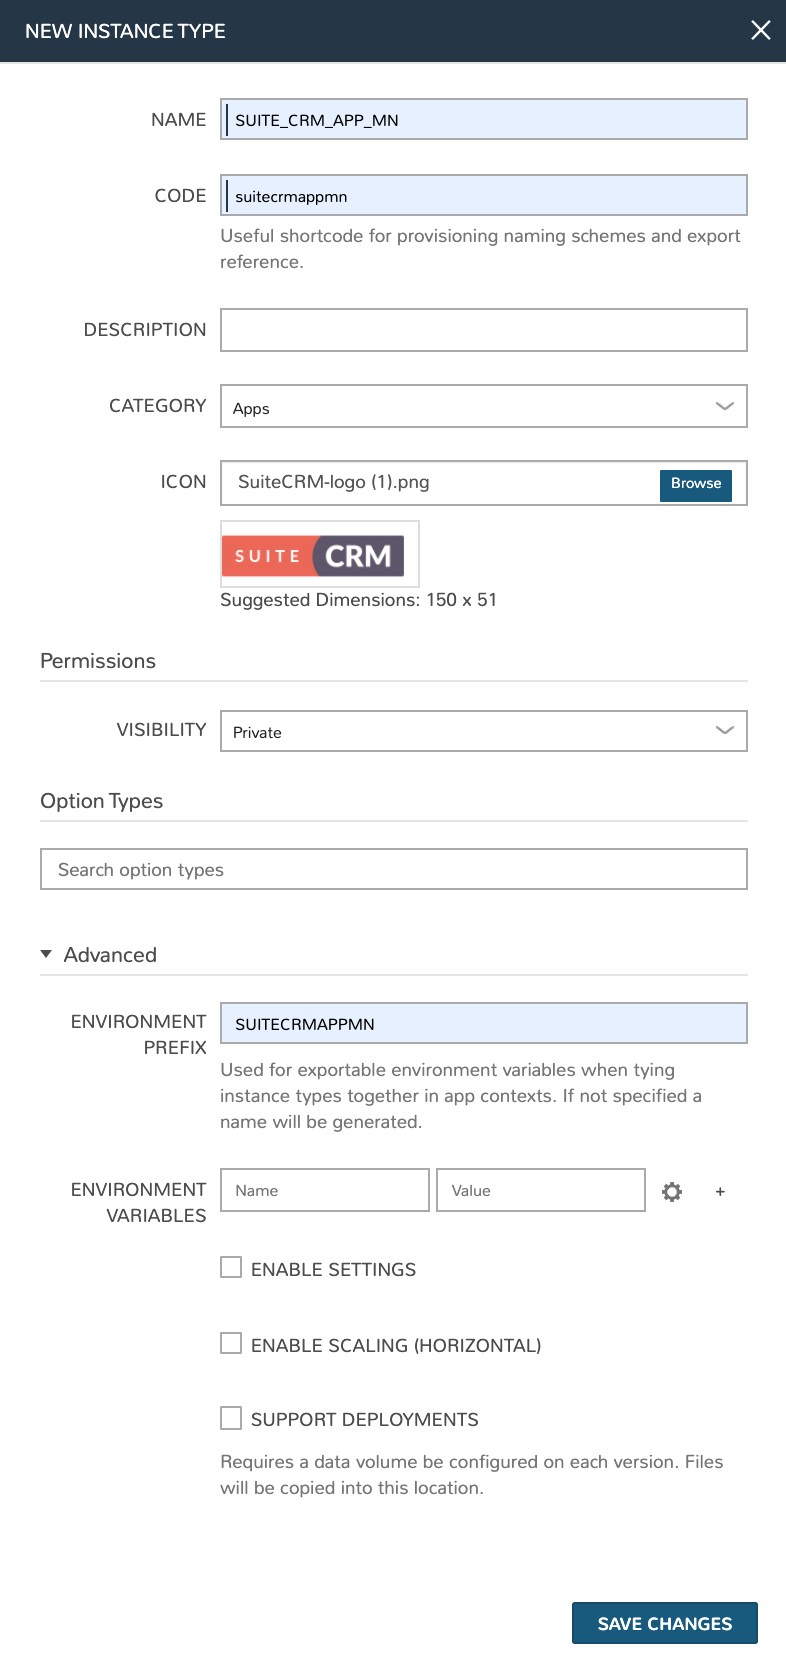
NAME: SUITE_CRM_APP_MN
CODE: suitecrmappmn
CATEGORY: Apps
ICON: If desired, browse your local computer for a SuiteCRM icon to make this Instance Type more recognizable when provisioning or creating App Blueprints
ENVIRONMENT PREFIX: SUITECRMAPPMN
NAME: LO_SUITE_CRM_APP_MN
VERSION: Latest
CREATABLE: Checked
TECHNOLOGY: VMware
MINIMUM MEMORY: 4 GB (If entered, this value will override any memory requirement set on the virtual image to ensure your Instance service will run properly)
INPUTS: Include the “SuiteCRM DB Name”, “SuiteCRM DB Password”, and “SuiteCRM DB User” Inputs that were previously created

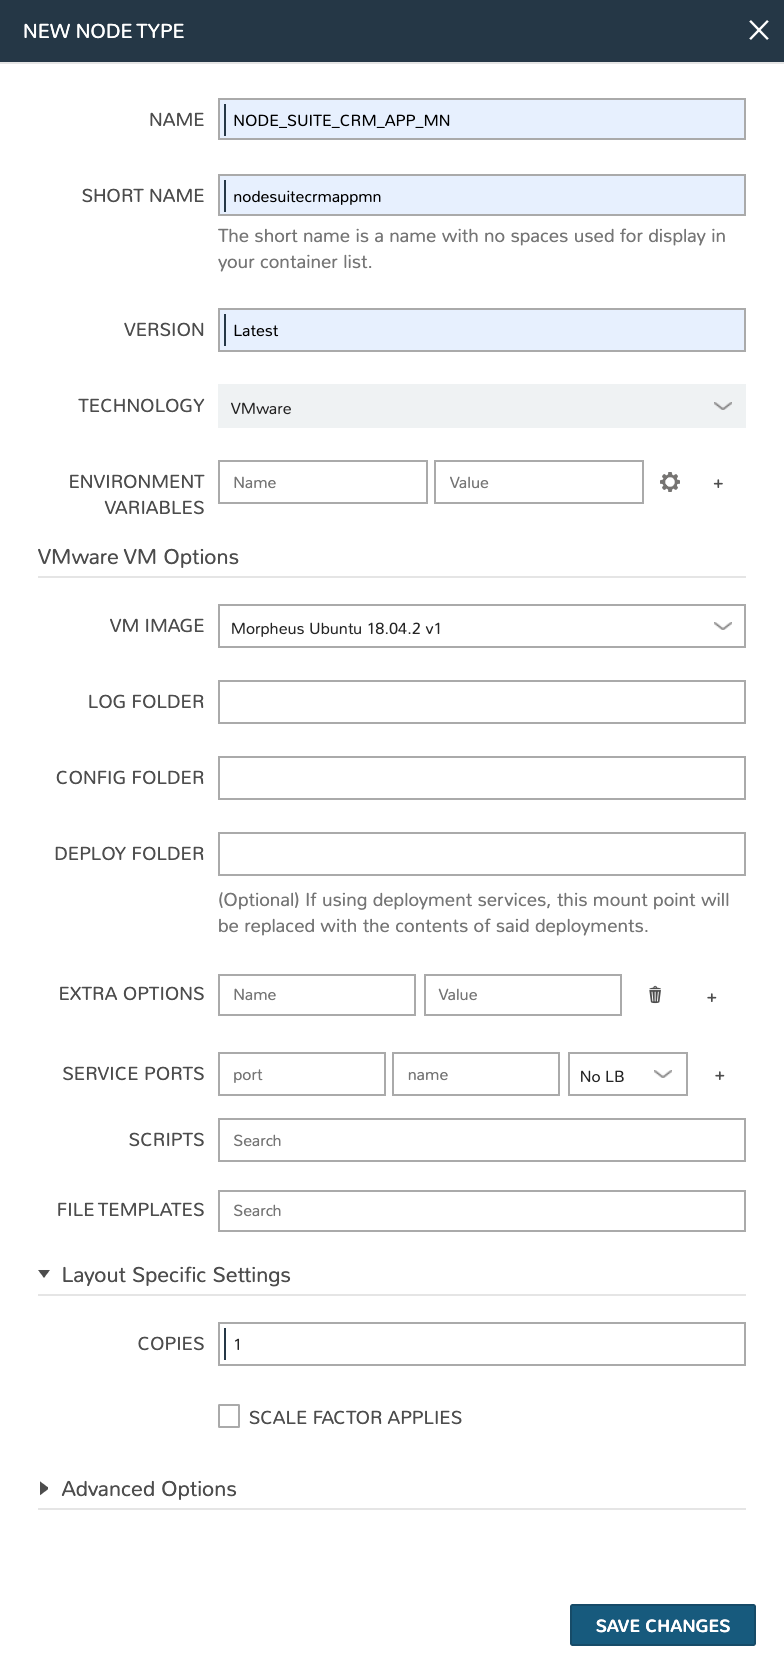
NAME: NODE_SUITE_CRM_APP_MN
SHORT NAME: nodesuitecrmappmn
VERSION: Latest
TECHNOLOGY: VMware
VM IMAGE: Choose the Morpheus Ubuntu 18 image that is included with Morpheus out of the box
Create the App Blueprint
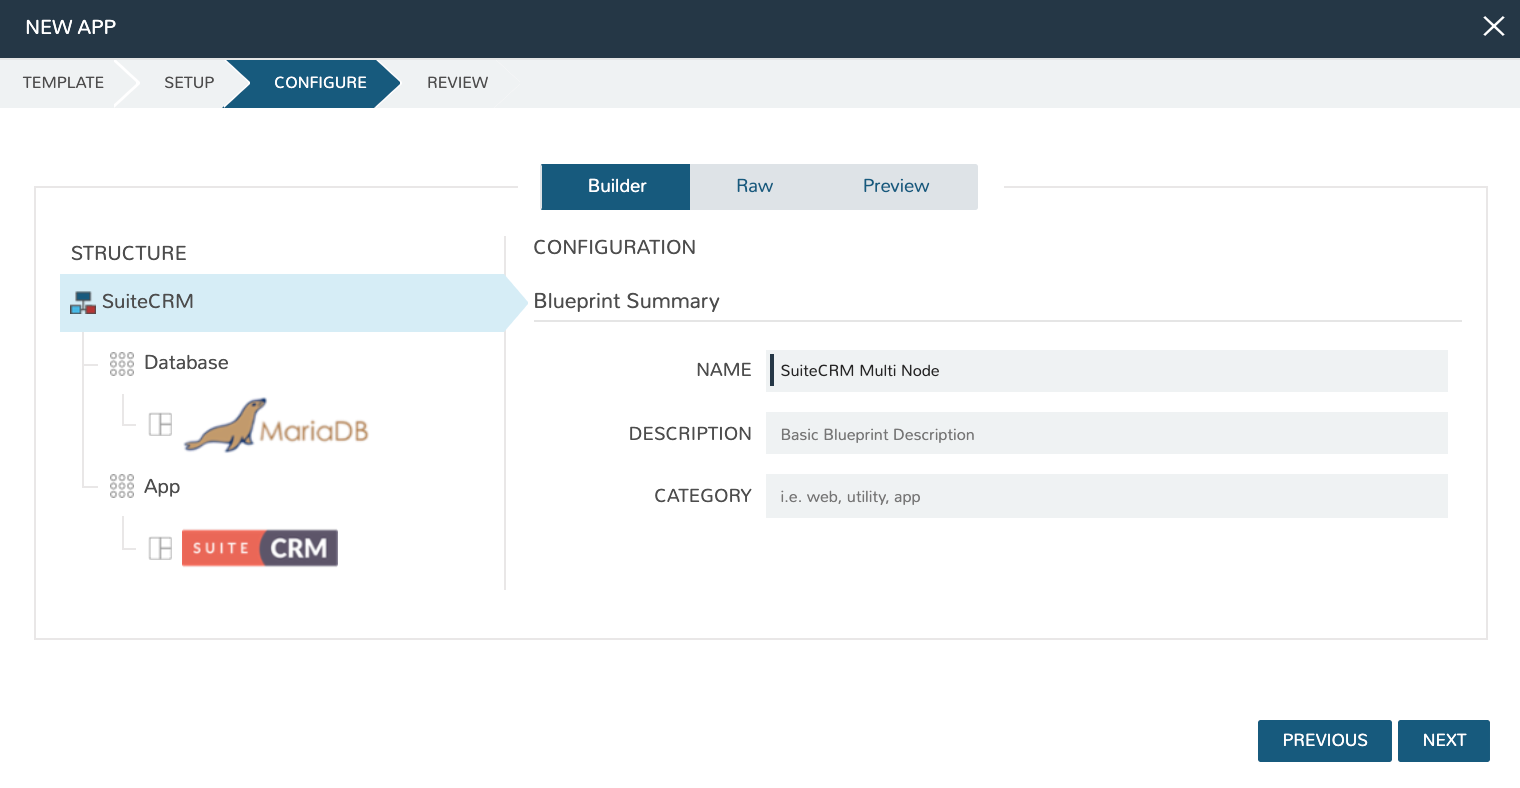
We are now ready create a Morpheus App Blueprint. Morpheus Blueprints allow pre-configured multi-tier application deployments for multiple environments. In this example we will use the custom Instance Types previously created to build out an App Blueprint for a two-tier SuiteCRM application with the database running on one VM and the application running on another VM.
Go to Library > Blueprints > App Blueprints and click + ADD. Enter a name for the Blueprint (SuiteCRM Multi Node) and set type to Morpheus. Click NEXT.
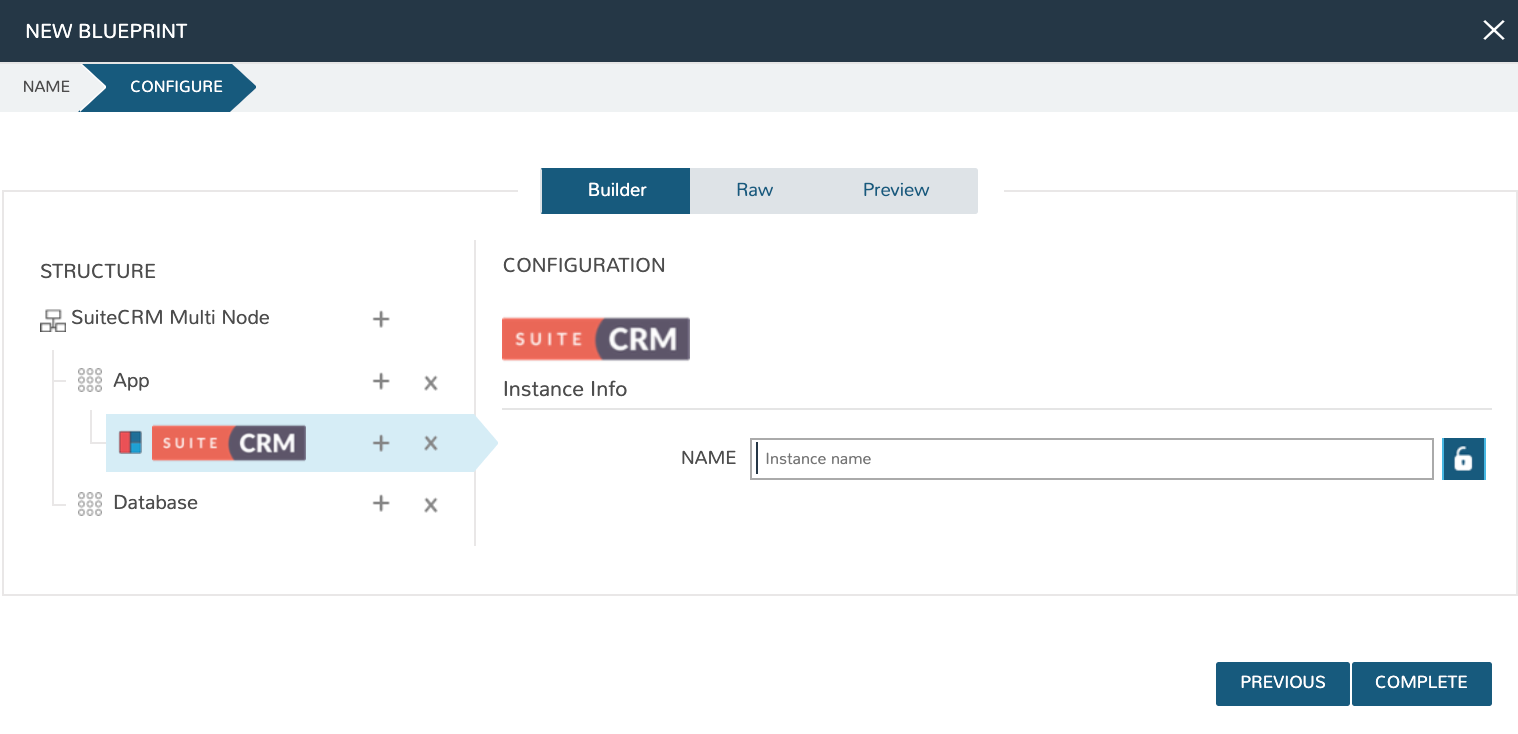
You will now be in the App Blueprint configuration screen where you can build out the structure of the App Blueprint. In the structure section on the left of the screen, click the + to add App Tier and then click it again to add a Database tier.
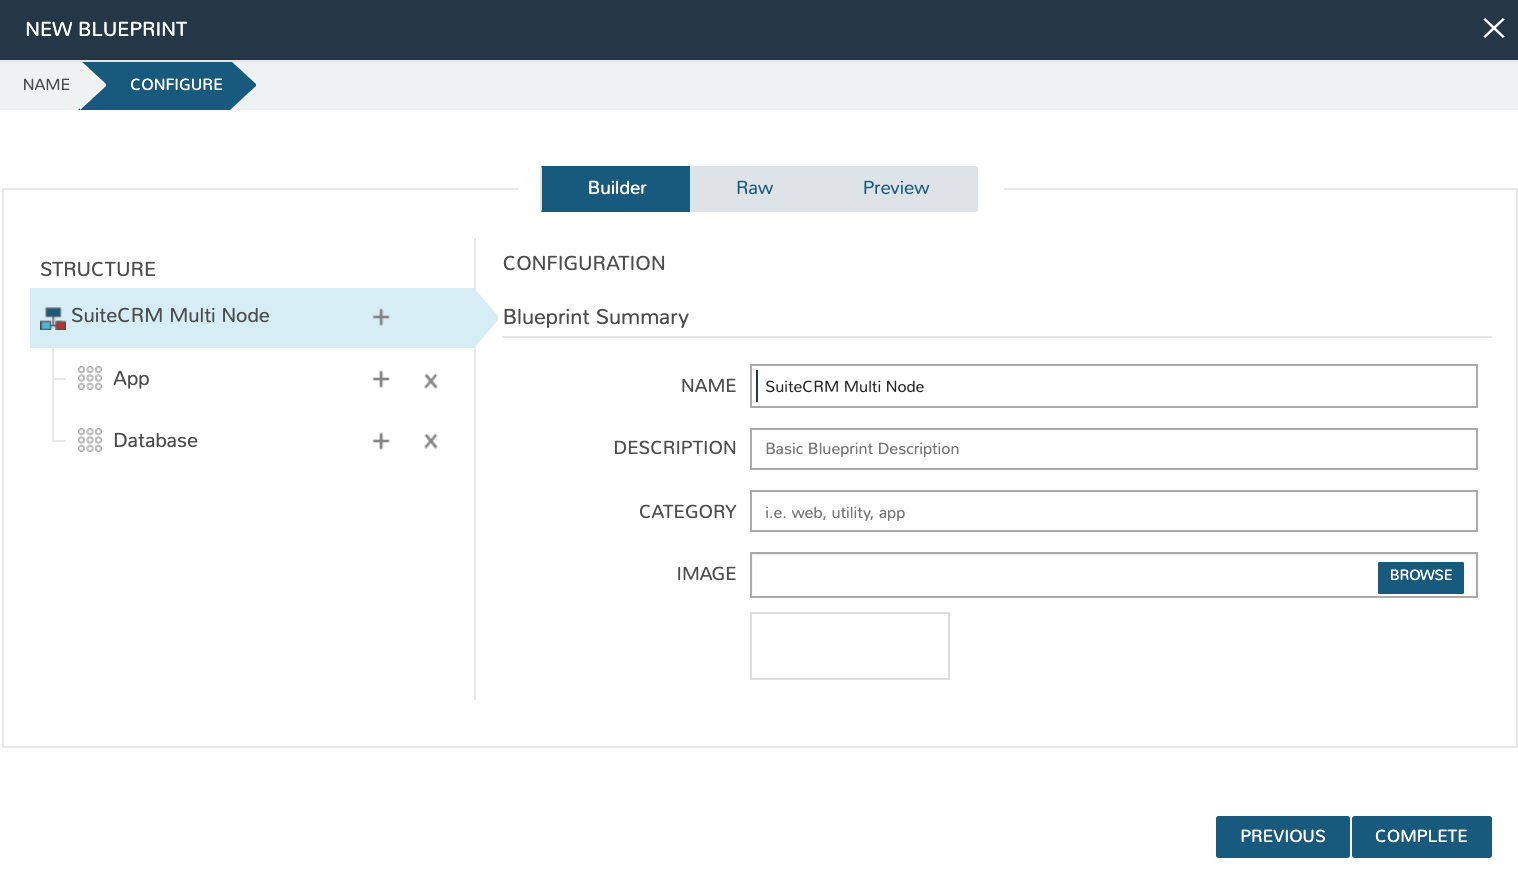
Now that we have the tiers created, we can create the configuration for each tier. Click the “+”” next to the App tier and in the window that pops up select the application Instance Type created previously (SUITE_CRM_APP_MN).
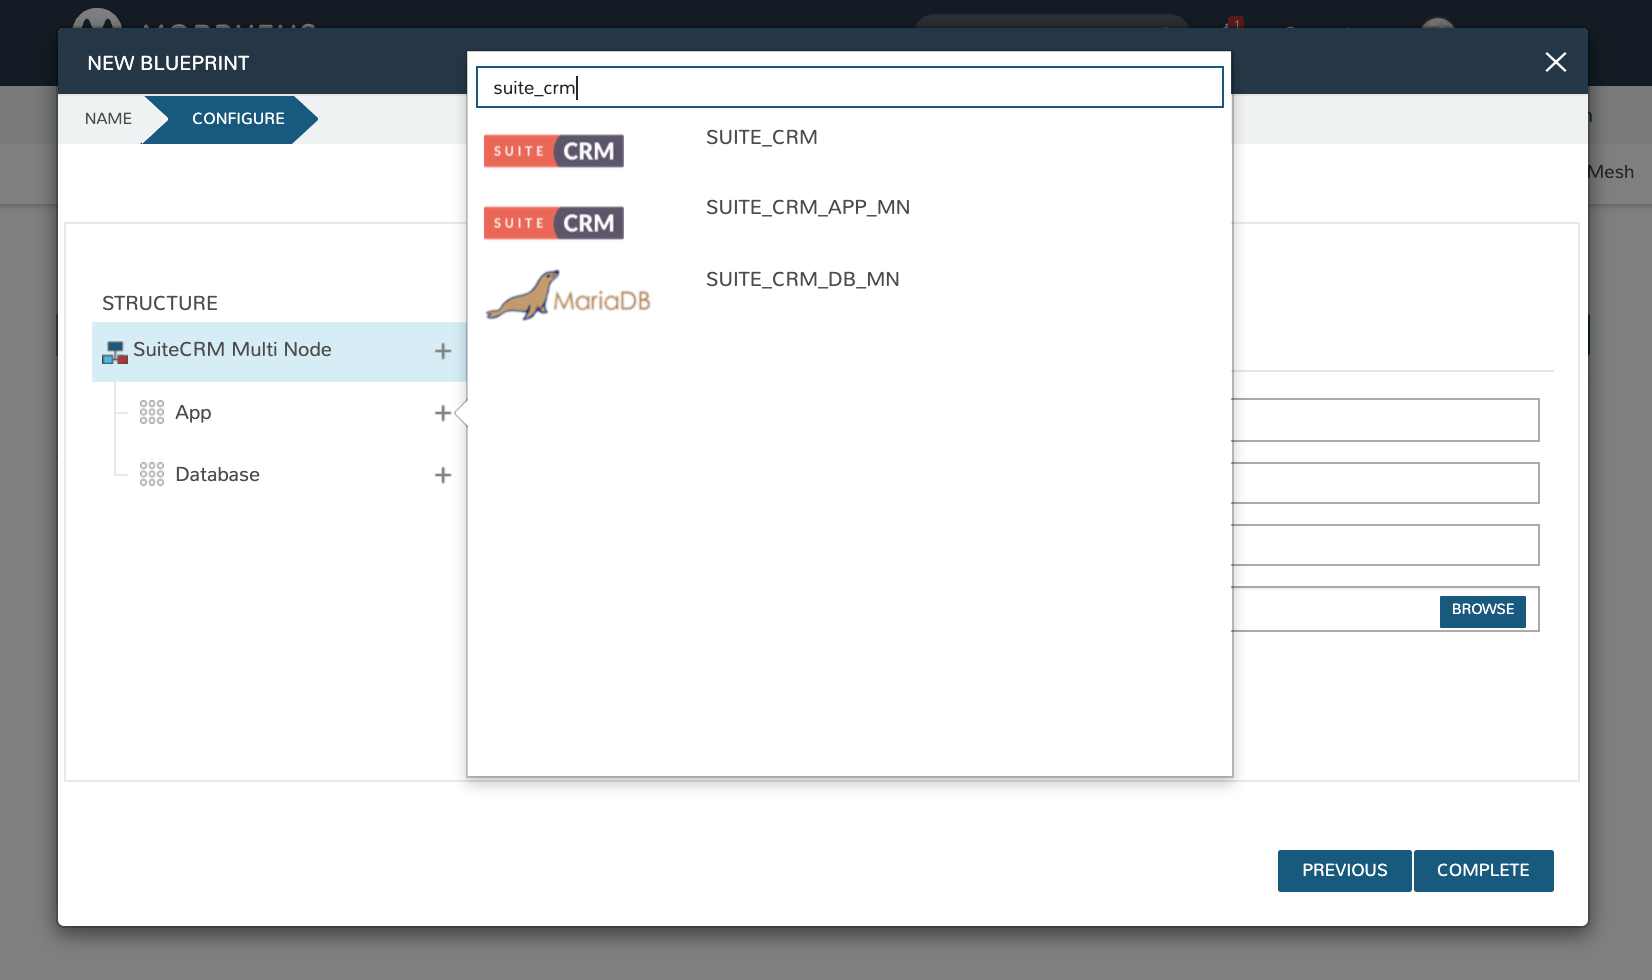
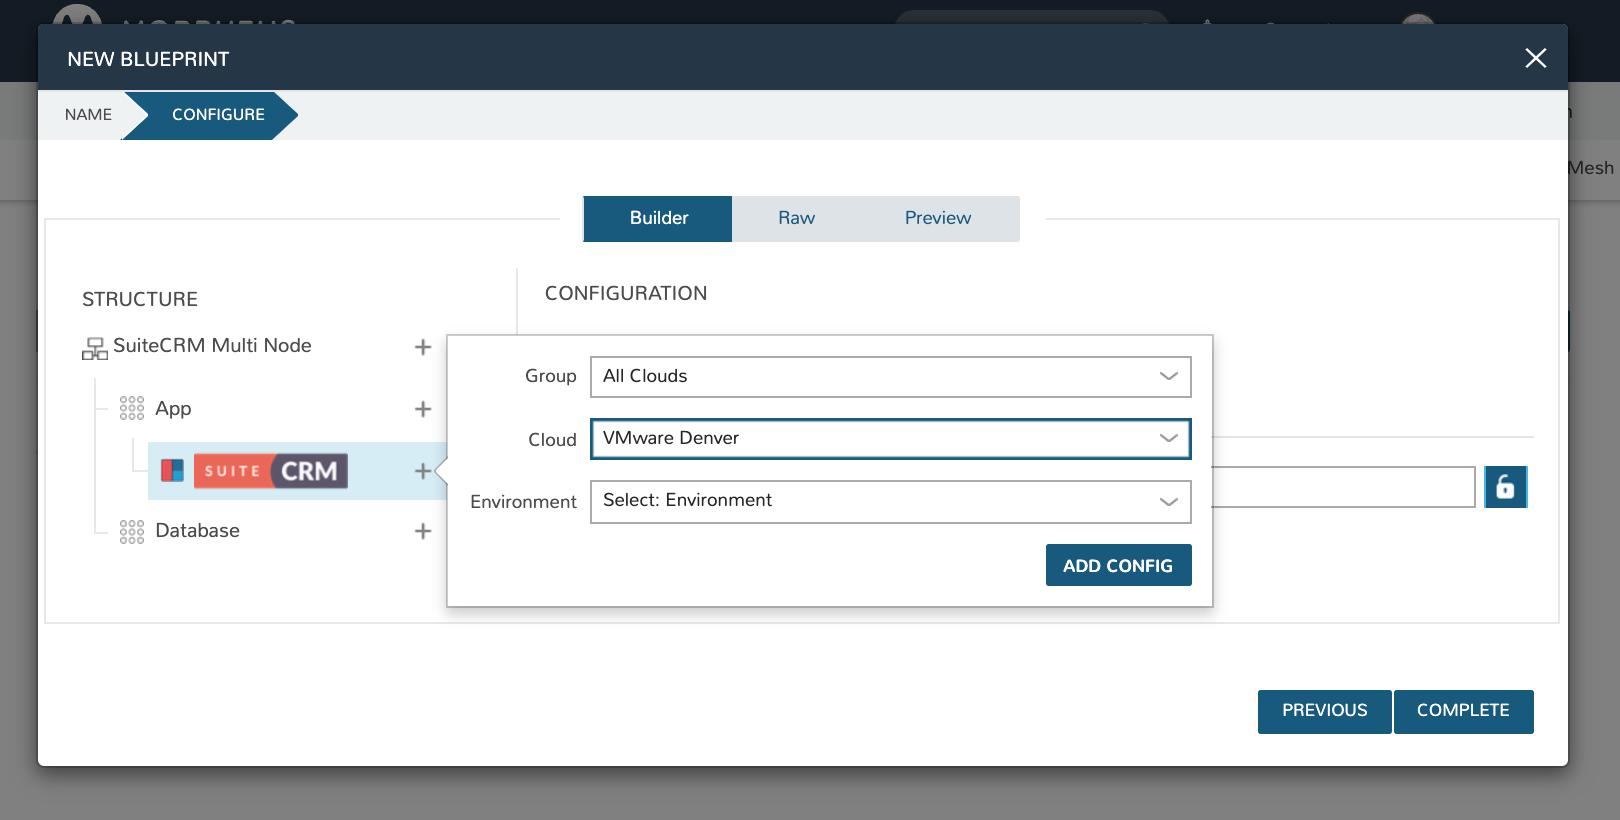
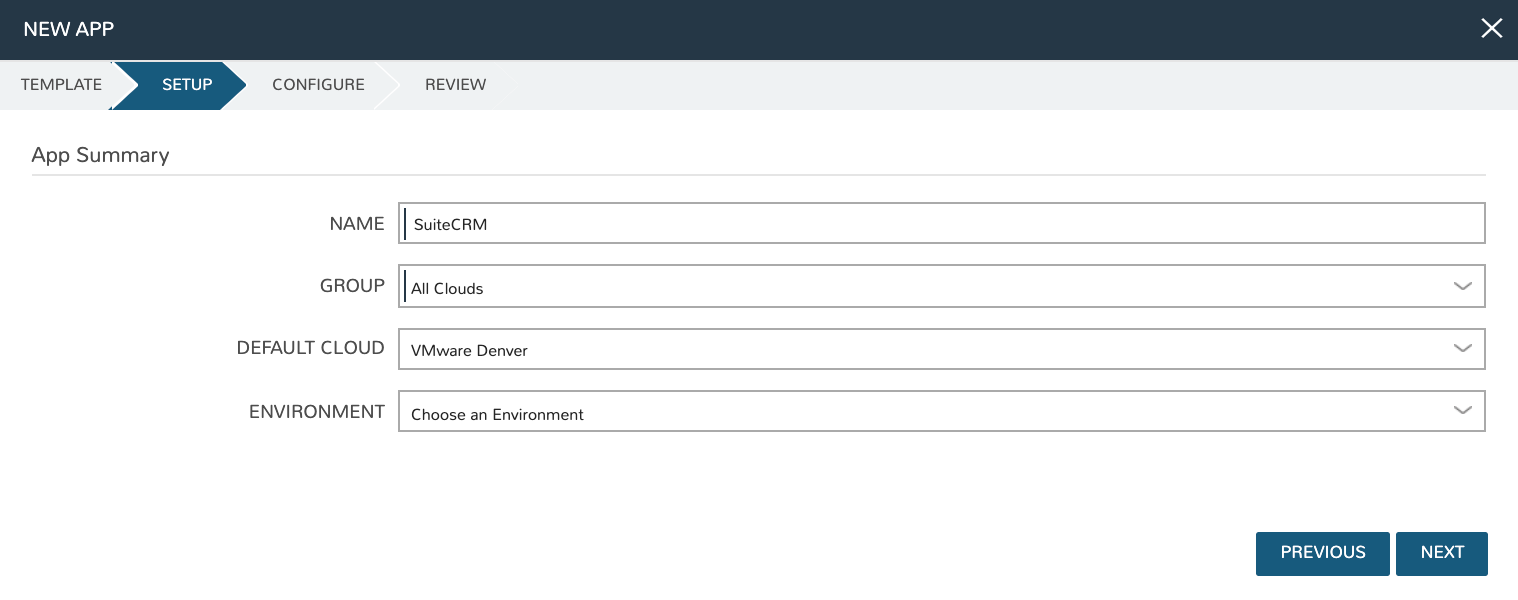
Now click the “+” next to the Suite CRM Instance Type (under App). Select the Group and Cloud required (I’m selecting my VMware Cloud, in this case) and then click ADD CONFIG.
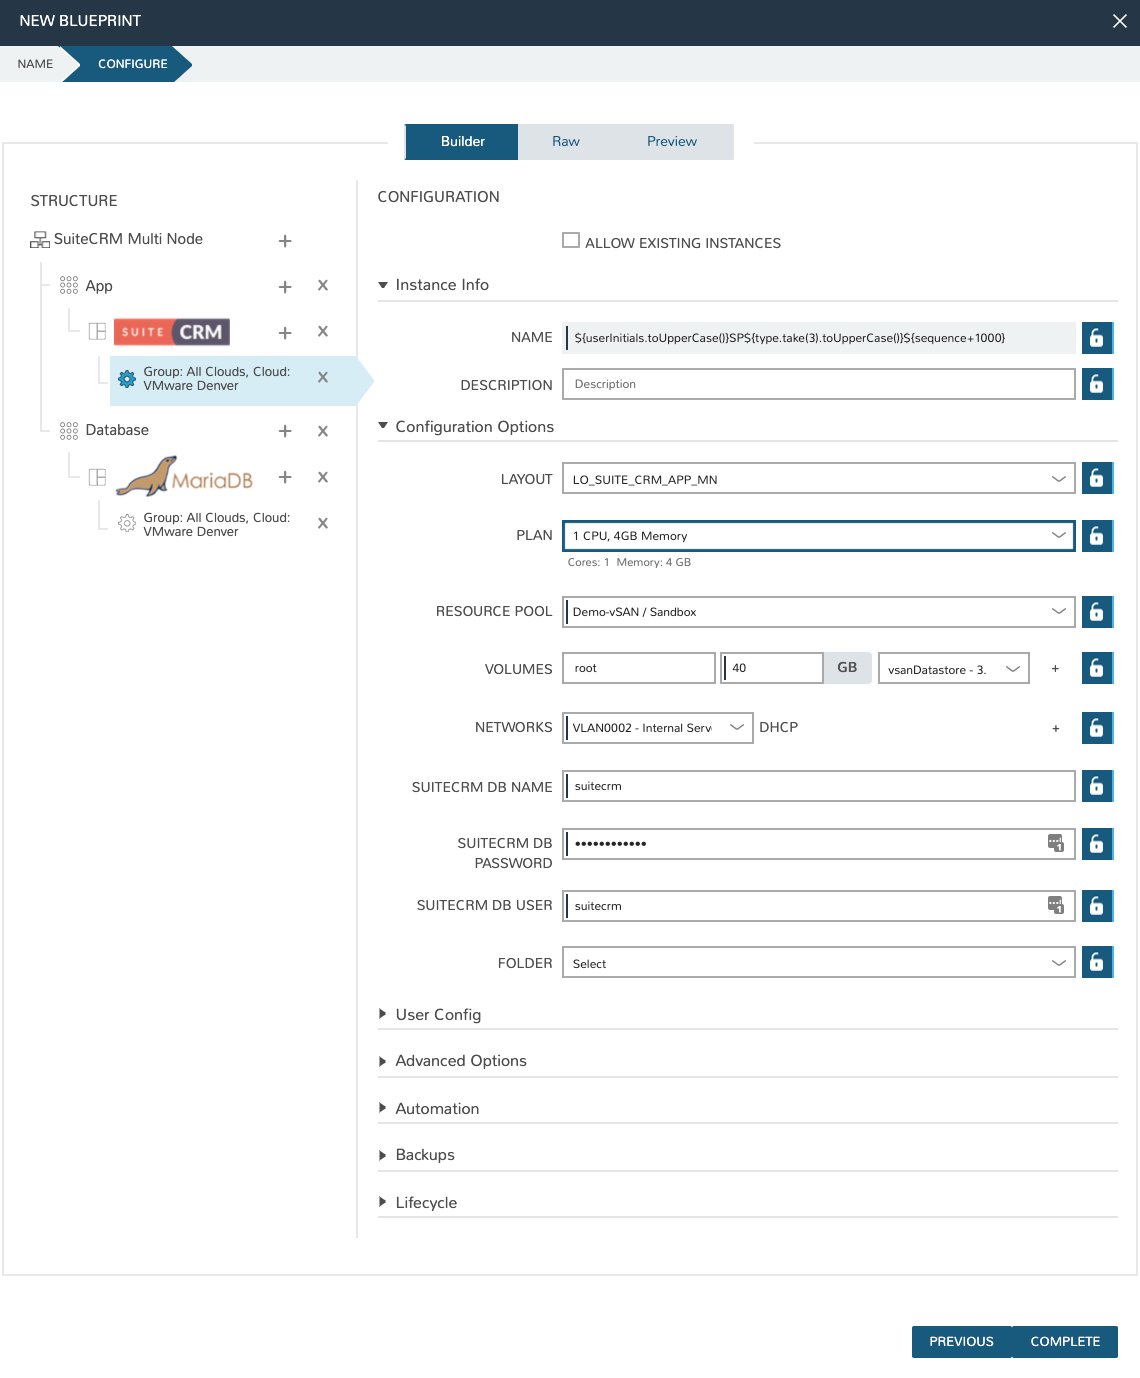
You will now have a configuration under the Suite CRM icon. Click on the configuration and it will appear in the right-hand pane of the window. Fill in the configuration required to provision the Instance. The locks to the right of the fields allow you to lock down entries so that they cannot be changed when provisioning the App later. Do not click COMPLETE yet, we still need to configure the database tier.
Back in the left-hand pane, click the “+” next to Database and perform the same steps as before to add in the SUITE_CRM_DB_MN Instance Type to the database tier. Add in the required configuration.
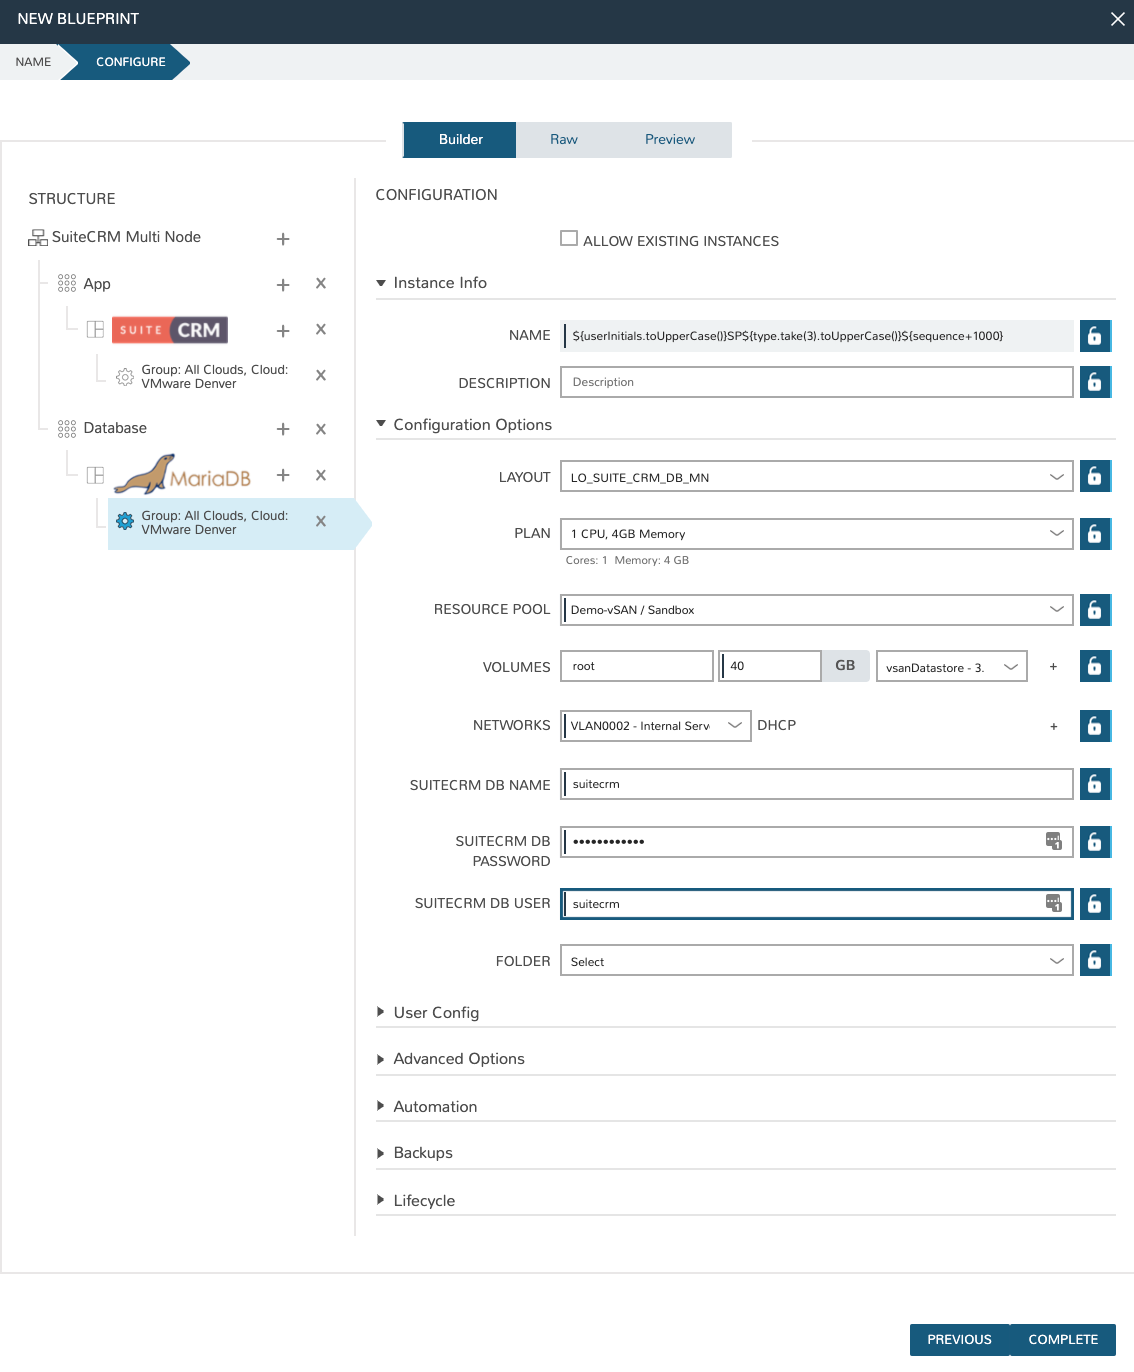
Once the configuration is set up for both tiers, we need to set the boot order and connect the tiers. The boot order is used to control the order in which the tiers are built. We want the database tier to build first, so we set the boot order to 0 on the database and 1 on the application. We also need to connect the tiers by checking the box under connected tiers.
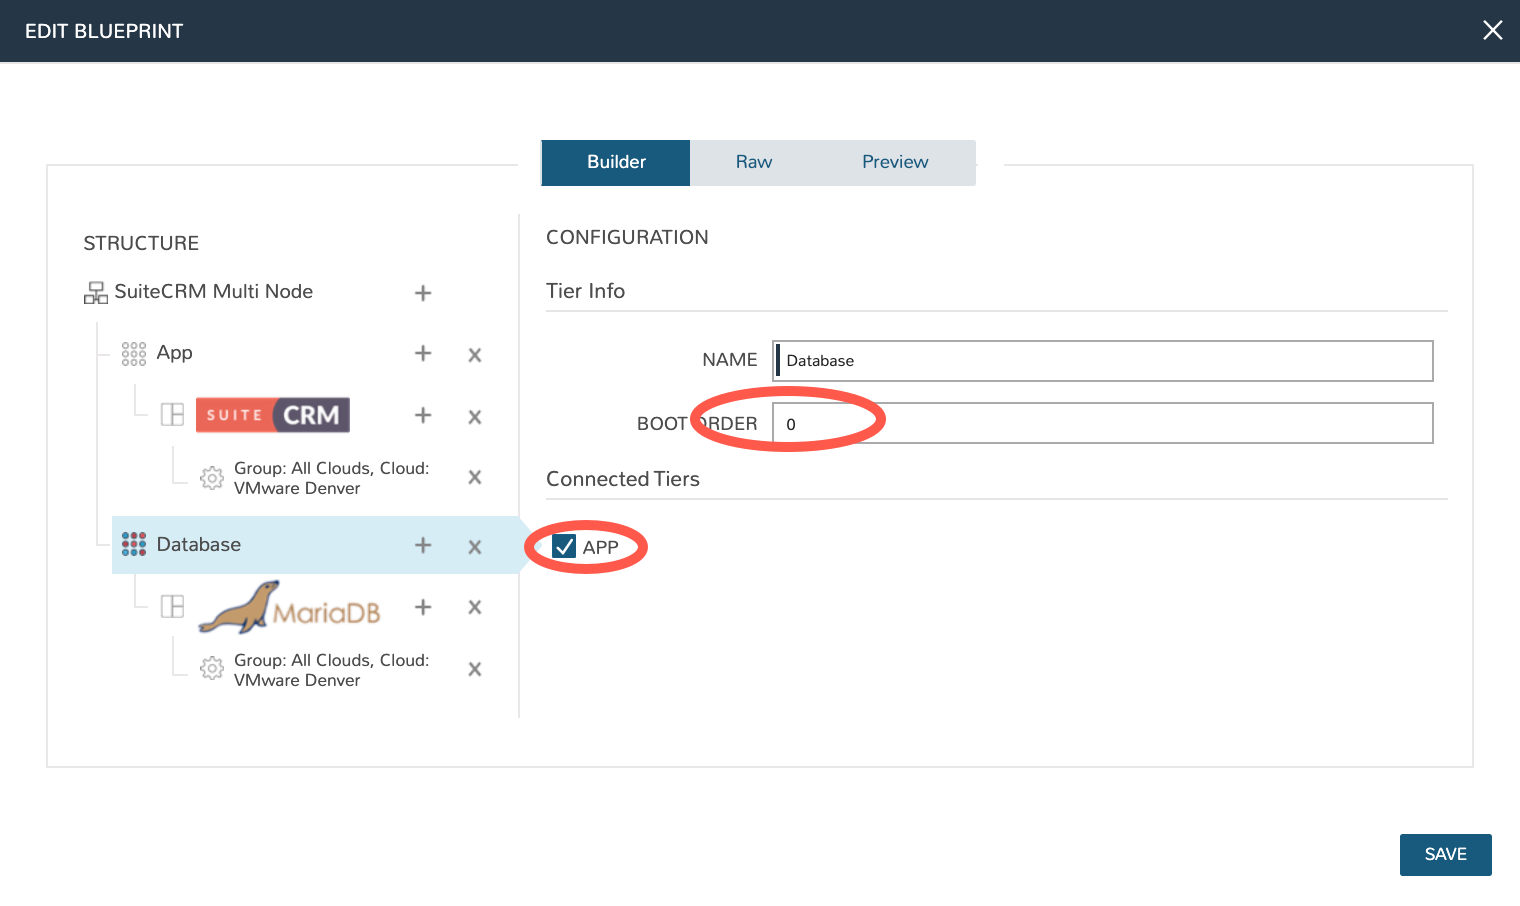
Save the App Blueprint by clicking COMPLETE.
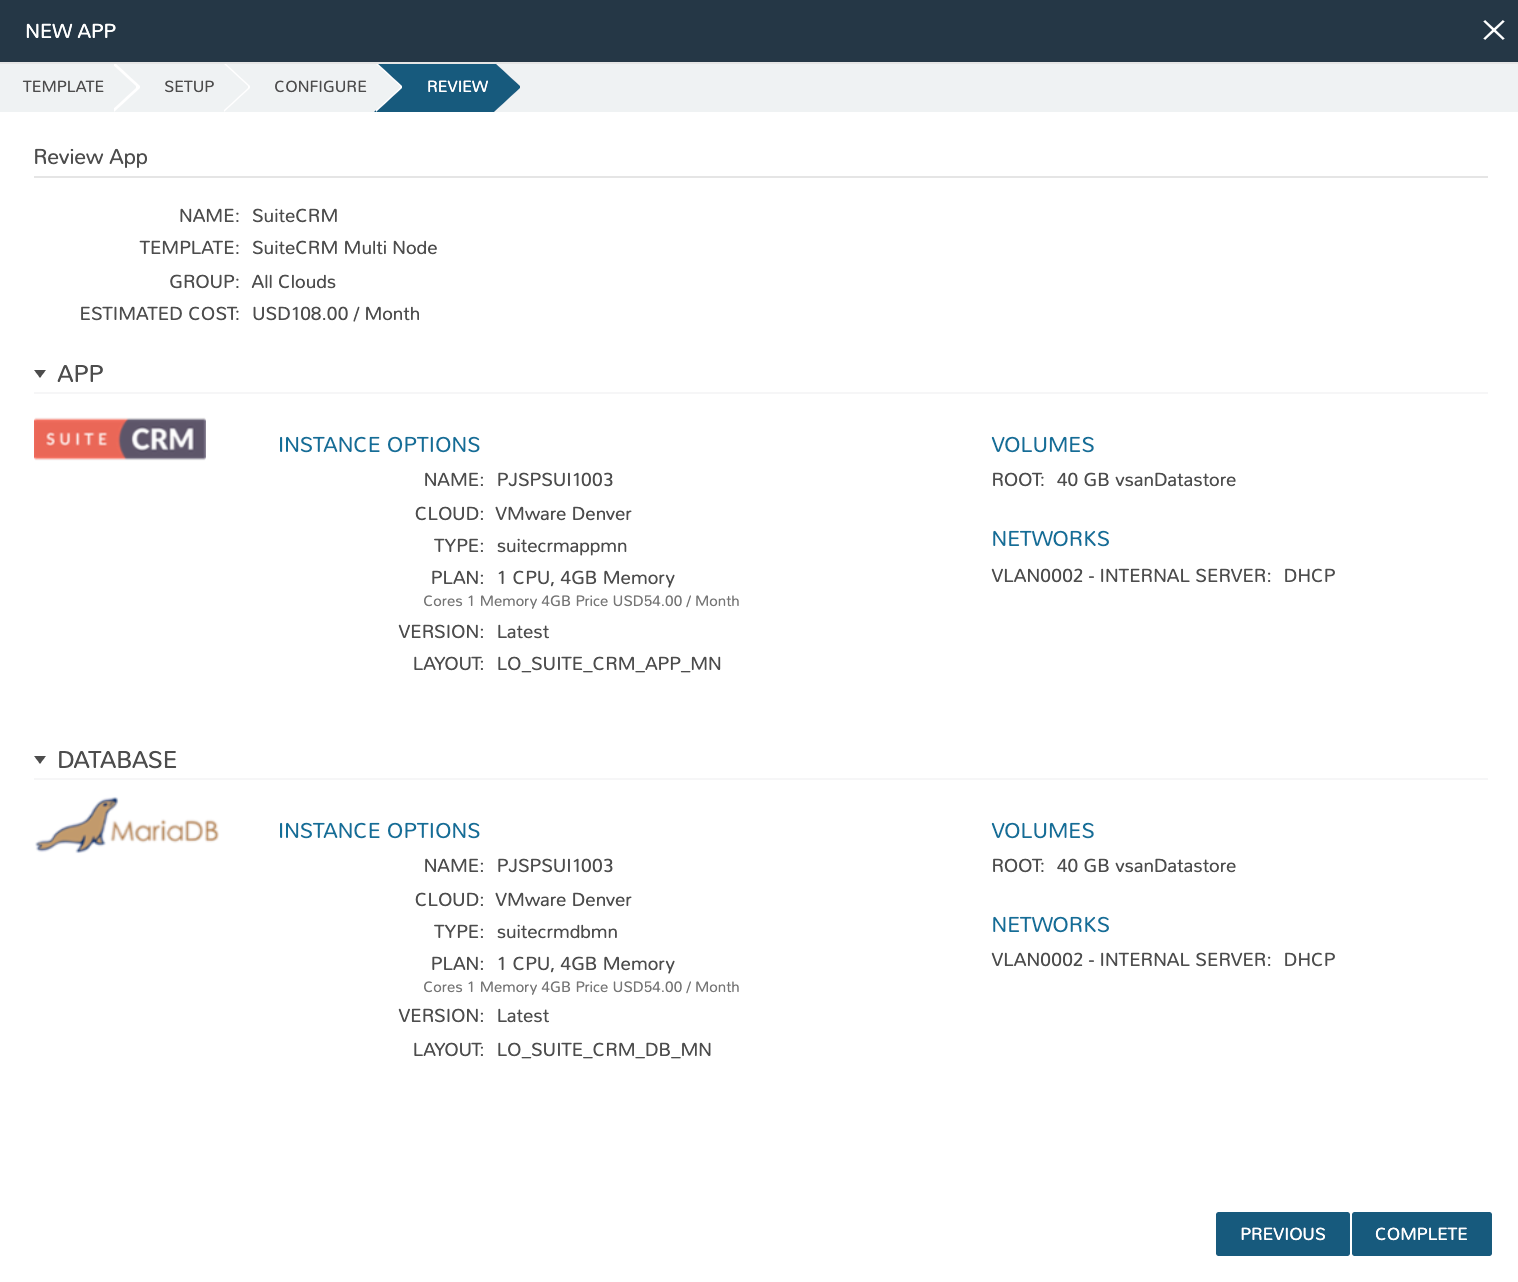
Deploy the App Blueprint
To deploy an App Blueprint, navigate to Provisioning > Apps and click + ADD. Select the App Blueprint we just created and work through the provisioning wizard, including naming the App and selecting the target Cloud.
Note
For the database hostname, specify the internal IP address of the database node
Configure SuiteCRM
SuiteCRM is now ready for its initial setup. In a web browser, go to http://<YOUR_APP_NODE_IP>/install.php. You should see the license agreement page and can proceed with the setup steps. SuiteCRM is now up and running. Additional instances of SuiteCRM can be stood up in the future with just a few clicks!
