Morpheus Virtual Desktops
VDI Pools Overview
The VDI Pools section of Morpheus Tools provides a management area for defining VDI Pools and VDI Apps that a user can consume within the Virtual Desktop Persona.
Pools can be either persistent or non-persistent and have various controls pertaining to idle pools and minimum or maximum sizes. The idea here is to make sure a server is always quickly available to accommodate user demand.
Morpheus leverages its Instance Types concept for provisioning servers within the VDI Pool. All the options available during Instance provisioning is available for setting the base server configuration. This includes Workflows, domain joins, tagging, image selection and more.
A timeout setting can also be applied to release pool allocations from a user once they have disconnected their session. For non-persistent pools, a good recommendation is ten minutes whereas, for a persistent pool, a sensible recommendation would be around one hour.
Pool behavior changes depending on the pool type. In a non-persistent pool, when a timeout period expires, the VM is destroyed and a new one is allocated for use. This functionality will change based on the cloud technology in a future update allowing for potential recycling of the VMs. In a Persistent pool, when the lease timeout expires, the Instance will shutdown until the user requests it again in the future. It is important to note that lease timeouts auto-extend for as long as the user is logged into or browsing any area of the Morpheus application. Once the user closes their browser or logs out of their session, the timeouts will no longer auto-extend.
Configuring Access to VDI Pools
Access to the Virtual Desktop Persona and individual VDI pools is handled through the user Role and, where applicable, Tenant Role. When creating a new Role, access is restricted to the Virtual Desktop Persona and all VDI pools by default. To grant access:
Navigate to the Role (Administration > Roles > Selected Role)
Access the Personas tab
Toggle the Virtual Desktop permission to “Full” or “None”
Access the VDI Pool Access tab
Toggle access to selected VDI pools to “Full” or “None”, you can also toggle permission on all pools to “Full” or “None” with the Global Access selection
Role changes are saved automatically, there is no need to manually save
Additionally, users should have a Linux and/or Windows username and password configured in their user profiles in order for virtual desktop login to be as seamless as possible. User profiles are accessed by clicking on the user’s name in the upper-right corner of the application windows and clicking USER SETTINGS. The section to enter Windows and Linux account credentials is in the right column of the page.
Creating VDI Templates
Note
The following guide focuses on VMware and Windows but is applicable to most cloud environments. Morpheus also supports Linux virtual desktops.
Create a thin-provisioned VM in the VMware vCenter console. It’s recommended you allocate at least 50 GB of storage, at least 2 vCPU and at least 8 GB RAM on the template. Smaller VMs can be deployed from this template later.
Install a Windows operating system, there is no need to supply a license during deployment.
Supply the initial username and password
Install any updates, applications or optimizations. See the next section for recommended optimizations for the most performant virtual desktop experience
Shutdown the VM and convert to a template. Optionally, you can also use the Linked Clones (VMware) process which is described in a later section
Suggested Optimizations
Reducing display and input delays is key to providing the best virtual desktop experience for the user. Consider the following optimizations for VDI desktops and servers:
Disable desktop wallpapers
Implement Roaming Profiles
Enforce WDDM remote display driver
Re-enable local Administrator
Delete the initial created user profile
Clean up any unneeded installer packages
Additionally, there are a number of OS optimization tools available on the Internet which are specific to VDI use cases.
Linked Clones
Linked Clones are a feature of VMware which references snapshots of a VM to deploy from. This adds the advantage of quicker clone times and the ability to more easily share small modifications to a file system. Morpheus supports Linked Clones but recommends them for VDI workloads only.
Note
Linked Clones are not templates but rather powered down VMs.
Locate the VM you desire to have the Linked Clone in Morpheus. If it’s not currently managed by Morpheus, navigate to the appropriate Cloud (Infrastructure > Clouds), find the VM on the “VMs” tab, and click “Convert to Managed” from the ACTIONS menu
In the CONVERT TO INSTANCE modal, select “No Agent Install” in the AGENT field
If snapshots are already on the VM, these will now be synced by Morpheus. If you have not yet created a snapshot, do so in the vCenter console (and refresh the Cloud integration in Morpheus afterward) or from the ACTIONS menu in Morpheus itself. Be sure to take a snapshot of a powered-off VM and give the snapshot a name that will be identifiable for administrators
From the Instance detail page in Morpheus, navigate to the Backups tab to find the snapshot
Select “More” and create the Linked Clone
The Linked Clone will now appear in the Morpheus Virtual Image repository (Library > Virtual Images), ready to use with your custom Layouts
Note
You should modify the Virtual Image to “Force Guest Customization” unless you sysprep your VM at shutdown time
Creating or Editing a VDI Pool
VDI pools are configured from the Tools menu (VDI Pools selection). The following information is displayed in the VDI pools list view, bear in mind some fields may be hidden depending on how you’ve configured your VDI pools list view (gear icon):
TYPE: An icon indicating the machine type associated with the pool. Morpheus includes many logos out of the box and also allows users to set their own custom icons
NAME: The friendly name given to the VDI pool
PERSISTENT: A check mark will appear when the VDI pool is configured for persistent virtual desktops
ENABLED: A check mark will appear when the VDI pool is enabled and visible to users whose Role permissions allow them access
POOL USAGE: A graph representing the usage of the VDI pool. The total length of the bar represents the maximum pool size based on the configuration. Green segments represent available virtual desktops, blue segments represent reserved virtual desktops, yellow segments represent virtual desktops which are being prepared, and gray segments represent additional pool capacity which could be made available depending on how many virtual desktops are currently reserved and how many idle machines you’ve configured the pool to keep available
DESCRIPTION: A description of the virtual desktop type, if provided
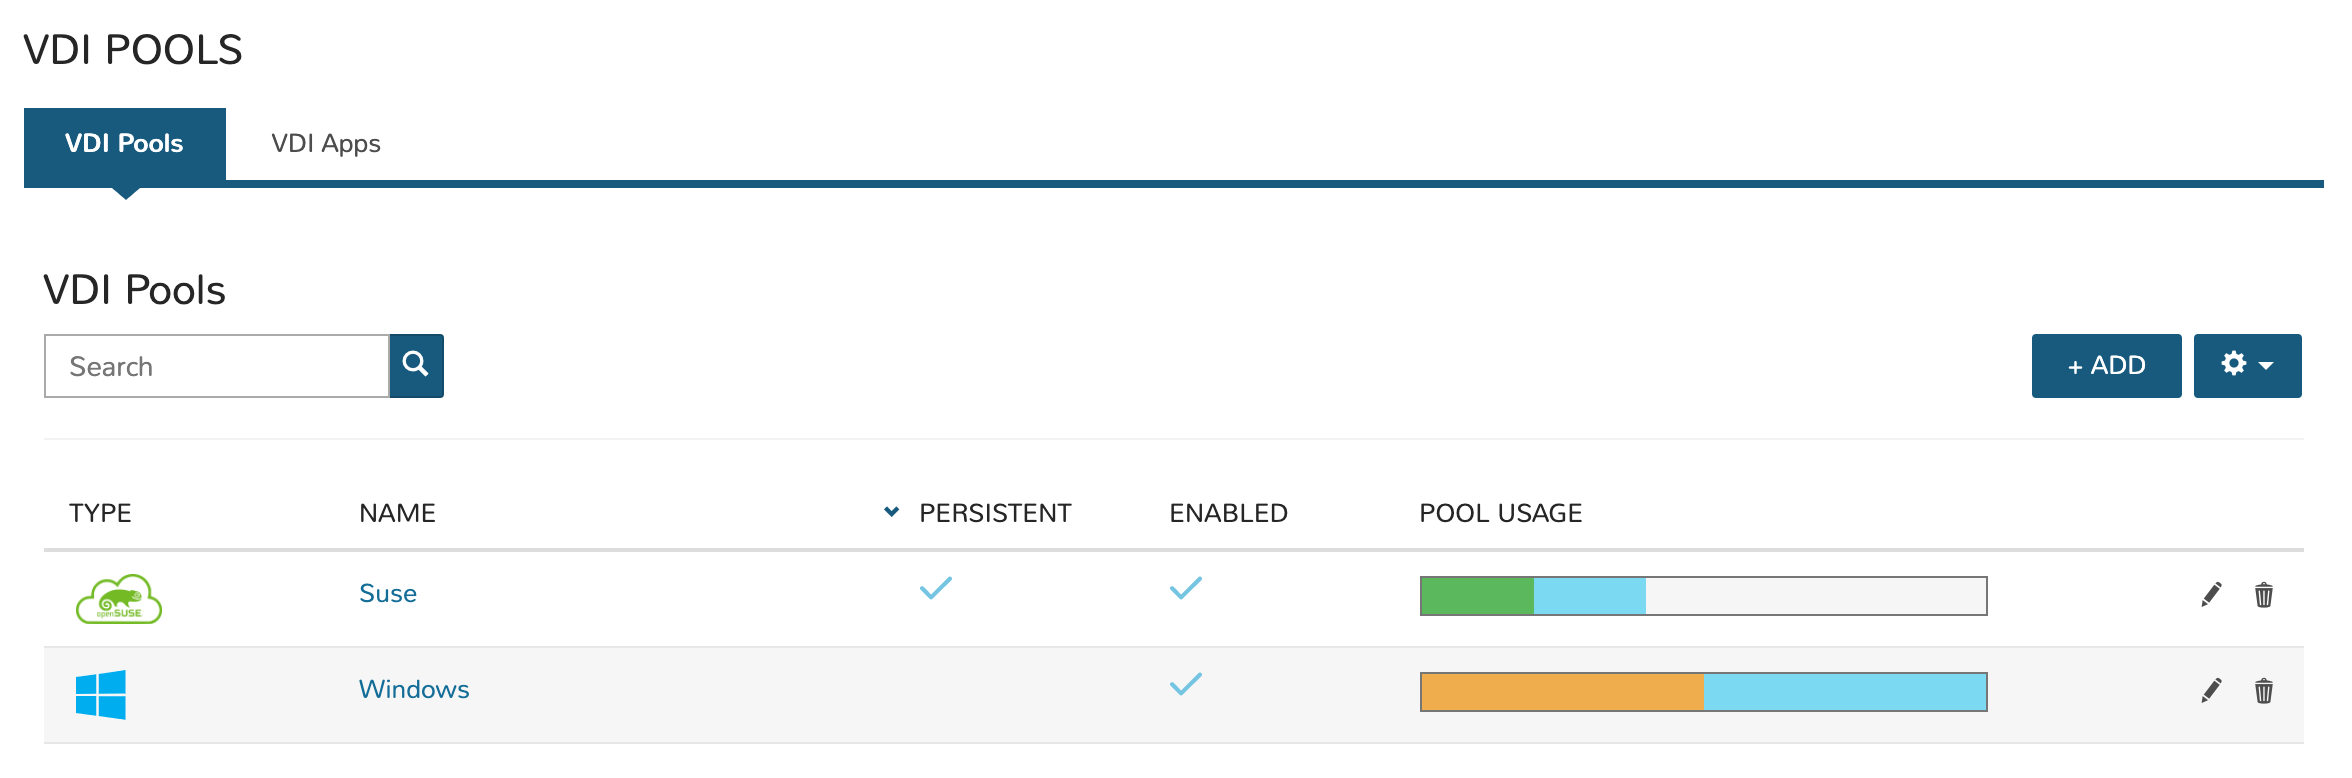
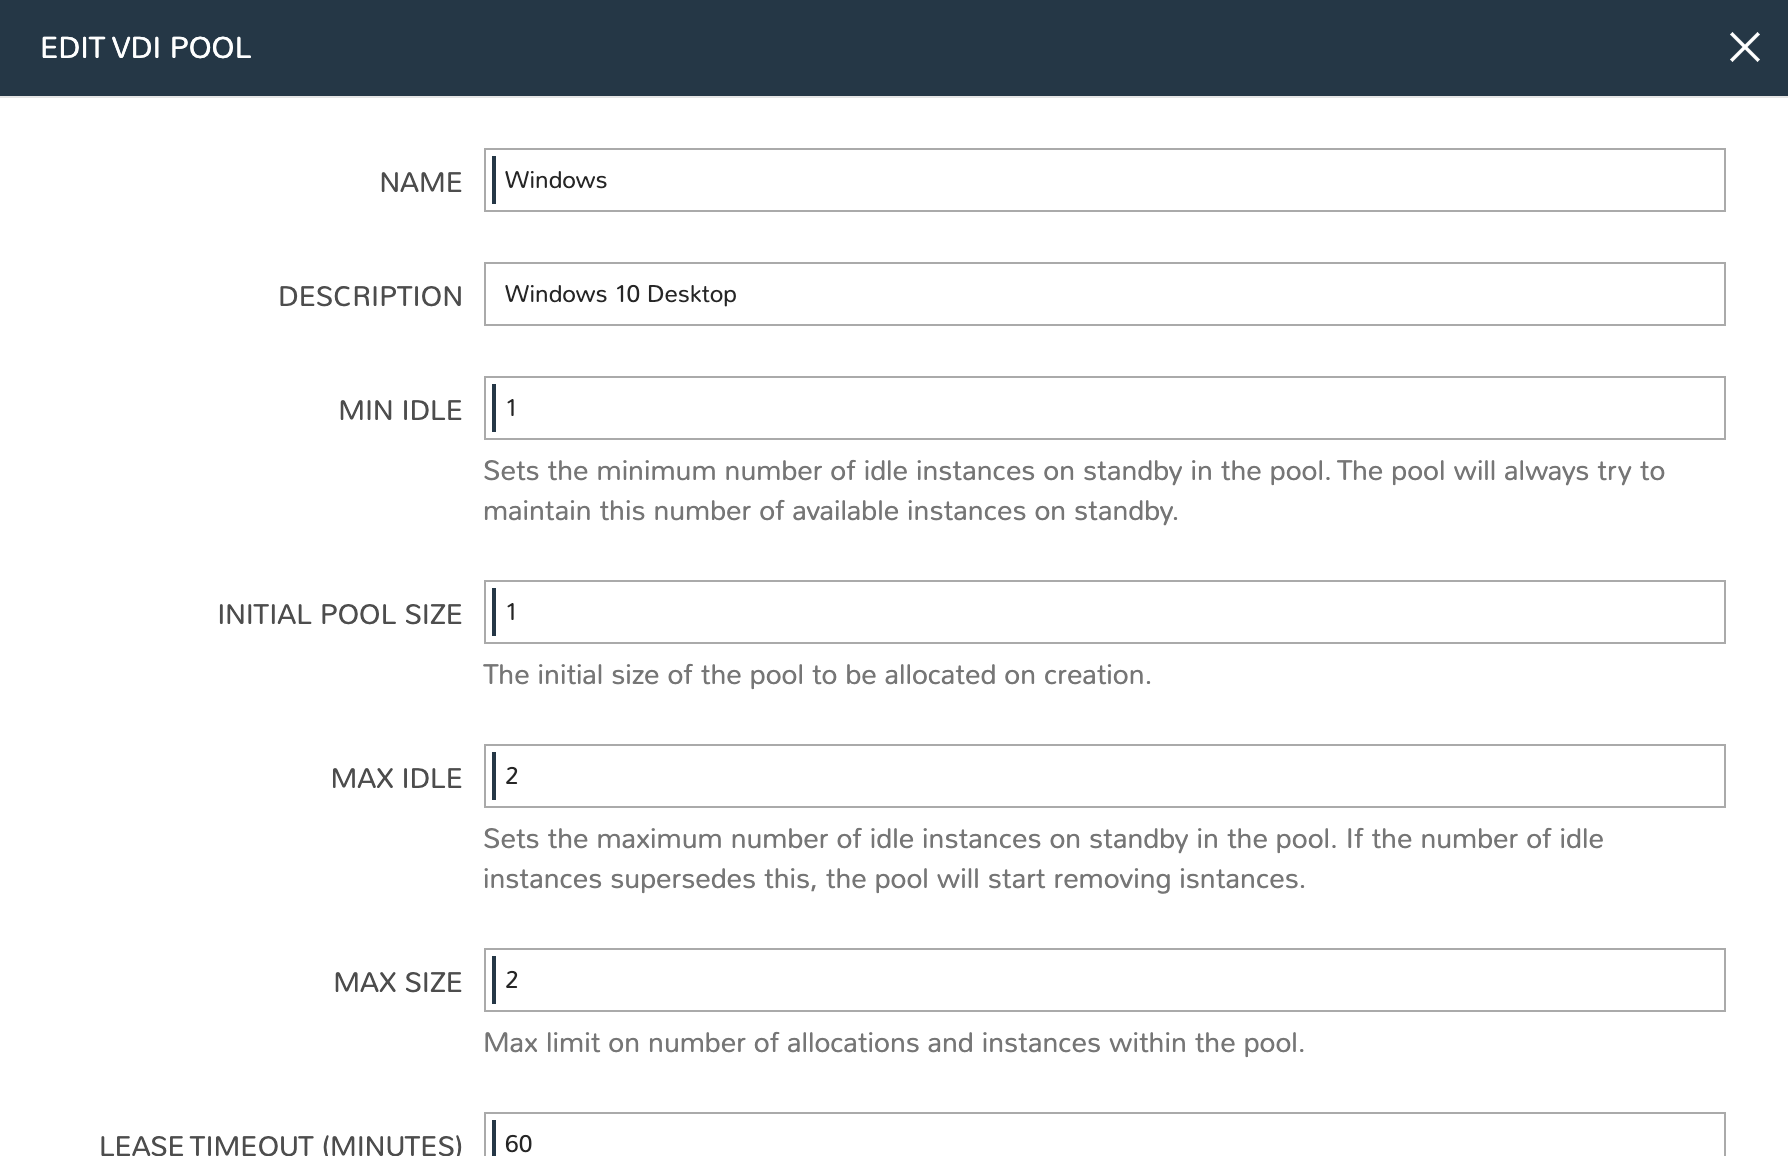
Create a VDI pool by selecting + ADD from the VDI Pools tab or edit an existing one by clicking on the pencil icon from the appropriate row. Configure the following, fields containing a vertical blue bar along the left edge are required:
NAME: A friendly name for the VDI pool in Morpheus
DESCRIPTION: A description of the virtual desktop type
MIN IDLE: The minimum number of virtual desktops that should remain idle and ready
INITIAL POOL SIZE: The number of virtual desktops that will be prepared when the pool is created or enabled
MAX IDLE: The maximum number of virtual desktops that remain idle and ready. Machines will be shut down as necessary when this number is exceeded due to users vacating their machines
MAX SIZE: The total number of virtual desktops this pool can have. Additional users will not be able to access machines once this number is reached
LEASE TIMEOUT (MINUTES): The user lease time on a virtual desktop they’ve reserved. The lease will continue to auto-renew itself as long as the user is logged into Morpheus. Once the user has logged out and the lease timeout period has expired, the machine will be released as appropriate based on your configuration
PERSISTENT: Pools with persistent virtual desktops will reserve a machine for each user in order to preserve settings, installed applications, work files and more. Machines in persistent pools will be shut down rather than destroyed when they are no longer in use
RECYCLABLE: When enabled, the VDI Instance will revert back to a snapshot and become available once again after the user has logged out and the VDI session has expired. This behavior will not apply to VDI pools which are also configured to be persistent because in that configuration the Instance is merely stopped and saved for the user’s next session. This feature is currently only available for Cloud types which support snapshot management (VMware, Nutanix, and vCD)
ALLOW COPY Enables or disables the ability for the VDI user to copy contents from the VDI instance to the local clipboard
ALLOW PRINTER When enabled, users local system printers can be targeted from the VDI Instance
ALLOW HYPERVISOR CONSOLE: When checked, native cloud console will be enabled (if available) rather than using Morpheus-native RDP/SSH capability
AUTO CREATE LOCAL USER UPON RESERVATION: When marked, the user configured in Morpheus user settings will be created when the machine is initially accessed. If unchecked or if there is no user configured in Morpheus user settings, ensure the machine is joining a domain or there is a known user on the machine image in order to allow access
ENABLED: When marked, the initial pool size will begin to deploy once the VDI pool is saved. The icon for this desktop environment will also be presented to Virtual Desktop Persona users
CONFIGURE: Click this button to configure the deployment configuration each system will use. The wizard is identical to the Instance provisioning wizard meaning all available Instance Types, Workflows, and more are available to virtual desktop machine creation. Consult the steps above to see an example VDI image prep walkthrough
LOGO: Upload or select a logo to represent the virtual desktop type to users
VDI APPS: Optionally select one or more frequently-used applications the user can launch directly. Users will also have the option to launch into the desktop
VDI GATEWAY Select a configure VDI Gateway for VDI sessions to be redirected to. VDI sessions will be redirected to the gateway when a gateway is specified.
- Guest Console SSH Tunnel (optional)
A Jump Host can be configured for VDI session connections. Morpheus will tunnel through the Jump Host when connecting Guest Console sessions for VDI. This is not applicable for Hypervisor Console connections.
GUEST CONSOLE JUMP HOST Jump Host IP address or hostname used to connect to the Jump Host for Guest Console sessions to VDI Instances
GUEST CONSOLE JUMP USERNAME Jump Host Username used to connect to the Jump Host for Guest Console sessions to VDI Instances
GUEST CONSOLE JUMP PORT Jump Host Port used to connect to the Jump Host for Guest Console sessions to VDI Instances
GUEST CONSOLE JUMP PASSWORD Jump Host Password used to connect to the Jump Host for Guest Console sessions to VDI Instances (optional if key specified)
GUEST CONSOLE KEYPAIR Jump Host SSH Key used to connect to the Jump Host for Guest Console sessions to VDI Instances (optional if password specified)
Note
A Guest Console Keypair included here must be a local keypair, not a synced keypair.
Creating or Editing a VDI Apps
VDI Apps allow users to launch directly into commonly-used apps rather than the OS desktop. Currently, VDI Apps only work with RDP Windows Instances, taking advantage of native Windows Remote Application functionality. Natively-hosted remote desktop applications can only be presented from Windows 10 Enterprise and Education. Other versions of Windows 10 can present remote applications using the procedure below:
Open the Windows Registry Editor
Locate the following entry:
HKEY_LOCAL_MACHINE\SOFTWARE\Microsoft\Windows NT\CurrentVersion\Terminal Server\TSAppAllowListNavigate to
fDisabledAllowListand set its value to “1” in the right-hand paneAdd a new key under
TSAppAllowListand name it “Applications”Add a new key under “Applications” using any name you’d like
Within this new key, create two new string values, one called “Name” and one called “Path”
The string value for “Name” should describe the application (ex. “Notepad”)
The string value for “Path” should be the absolute path to the executable for that application (ex. “C:WindowsSystem32notepad.exe”)
VDI Apps are created by selecting + ADD from the VDI Apps tab or edit an existing one by clicking on the pencil icon from the appropriate row. Configure the following, fields containing a vertical blue bar along the left edge are required:
NAME: A friendly name for the VDI App in Morpheus
DESCRIPTION: A description of the virtual app type
LAUNCH PREFIX: A reference to the remote app registry prepended with two pipes (
||). For example, we might create a registry “Chrome” for a Chrome browser VDI App and the associated launch prefix would be “||Chrome”LOGO: Upload or select a logo to represent the virtual app type to users
VDI Gateways
The Morpheus Worker is a light weight distributed worker daemon as well as a scalable VDI Gateway. Currently, the features center around VDI Gateway but will expand to support full plugin workloads as well as agent relay capabilities.
Adding VDI Gateways to Morpheus
VDI Gateways can be linked to a Morpheus appliance and then used in VDI Pool configurations. VDI sessions will be redirected to configured gateways instead of the Morpheus appliance when a VDI Gateway is specified for a VDI Pool.
Note
A VDI Gateway is a separate VM or container Instance used to route users to VDI Instances. The Morpheus VDI Gateway section is for configuring a connection to a VDI Gateway, not creating the gateway Instance itself.
NAME Specify a name for the VDI Gateway in Morpheus. Note that the VDI Gateway Name is not used when connecting to the gateway
DESCRIPTION Specify a description for the VDI Gateway in Morpheus. (optional)
GATEWAY URL The url of the VDI Gateway. This url is used to connect to the gateway, and should match the the worker url of the VDI Gateway.
Upon creation, the VDI Gateway record will produce an API KEY. This API KEY needs to be specified in the morpheus-worker.rb file on the API Gateway itself under worker['apikey'] = '$API_KEY'. Once the gateway object is created you will need to configure it as the default gateway in Morpheus global settings (Administration > Settings > Appliance). Scroll down to the “Default Console Gateway” setting and select the gateway object you’ve just created. Continue on to the next section to actually install the gateway and configure it with your API key.
VDI Gateway VM Install
A VDI Gateway VM is installed and configured similarly to a Morpheus appliance via rpm or deb package.
Note
VDI Gateway Package URLs are available at https://morpheushub.com in the downloads section.
Requirements
OS |
Version(s) |
|---|---|
Amazon Linux |
2 |
CentOS |
7.x, 8.x |
Debian |
9, 10, 11 |
RHEL |
7.x, 8.x |
SUSE, SLES |
12 |
Ubuntu |
16.04, 18.04, 20.04 |
Memory: 4 GB RAM minimum recommended for default installations supporting up to 20 concurrent sessions. Add 50 MB RAM per additional concurrent session
Storage: 10 GB storage minimum recommended. Storage is required for VDI Gateway Packages and log files
CPU: 4-core minimum recommended
Network connectivity to and from Morpheus appliance and from users to the VDI Gateway over TCP 443 (HTTPS)
Superuser privileges via the
sudocommand for the user installing the Morpheus VDI Gateway packageAccess to base
yumoraptrepos. Access to Optional RPM repos may be required for RPM distros
Download the target distro & version package for installation in a directory of your choosing. The package can be removed after successful installation.
wget https://downloads.morpheusdata.com/path/to/morpheus-worker-$version.distro
Validate the package checksum matches source checksums. For example:
sha256sum morpheus-worker-$version.distro
Next install the package using your selected distribution’s package installation command and your preferred opts. Example, for RPM:
rpm:
sudo rpm -ihv morpheus-worker-$version.$distro

Preparing...                          ################################# [100%]
Updating / installing...
   1:morpheus-worker-5.3.1-1.$distro    ################################# [100%]
Thank you for installing Morpheus Worker!
Configure and start the Worker by running the following command:

sudo morpheus-worker-ctl reconfigure
Configure the gateway by editing
/etc/morpheus/morpheus-worker.rband updating the following:worker_url 'https://gateway_worker_url' # This is the gateway URL the |morpheus| appliance can resolve and reach on 443 worker['appliance_url'] = 'https://morpheus_appliance_url' # The resolvable URL or IP address of |morpheus| appliance which the gateway can reach on port 443 worker['apikey'] = 'API KEY FOR THIS GATEWAY' # VDI Gateway API Key generated from |morpheus| Appliance VDI Pools > VDI Gateways configuraiton
Note
By default the worker_url uses the machine’s hostname, ie
https://your_machine_name. The defaultworker_urlvalue can be changed by editing/etc/morpheus/morpheus-worker.rband changing the value ofworker_url. Additional appliance configuration options are available below.After all configuration options have been set, run
sudo morpheus-worker-ctl reconfigureto install and configure the worker, nginx and guacd services:sudo morpheus-worker-ctl reconfigure
The worker reconfigure process will install and configure the worker, nginx and guacd services and dependencies.
Note
Configuration options can be updated after the initial reconfigure by editing
/etc/morpheus/morpheus-worker.rband runningsudo morpheus-worker-ctl reconfigureagain.Once the installation is complete the morpheus worker service will automatically start and open a web socket with the specified Morpheus appliance. To monitor the startup process, run
morpheus-worker-ctl tailto tail the logs of the worker, nginx and guacd services. Individual services can be tailed by specifying the service, for examplemorpheus-worker-ctl tail worker
VDI Gateway Docker Install
To Use VDI Gateway within a Docker container, a few pieces of information are needed.
Firstly, in Morpheus, go to Tools > VDI Pools > VDI Gateways and create a new VDI Gateway Record. Be sure to set the HTTPS URL as Morpheus will need to be able to redirect the user’s browser to that page. An API Key will be generated. Make note of this as you will need it later.
Now Simply run with:
docker run -d -p 8443:8443 -e MORPHEUS_SELF_SIGNED=true -e MORPHEUS_KEY=[apiKey] -e MORPHEUS_URL=https://my.morpheusAppliance.url morpheusdata/morpheus-worker:latest``
This will setup an HTTPS self-signed exposed port on 8443 for the vdi gateway. It is highly recommended to use valid certificates on your VDI Gateways. It could be terminated at the VIP or a p12 SSL File can be used and configured for the container.
If the docker entrypoint detects a file at /etc/certs/cert.p12, SSL Will be enabled on port 8443 instead. be sure to set environment variables MORPHEUS_SSL_ALIAS and MORPHEUS_SSL_PASSWORD when using p12 files.
If you wish to run in HTTP mode and SSL terminate at the VIP, you can run the container like so:
docker run -d -p 8080:8080 -e MORPHEUS_SELF_SIGNED=true -e MORPHEUS_KEY=[apiKey] -e MORPHEUS_URL=https://my.morpheus.url morpheusdata/morpheus-worker:latest
VDI Gateway Helm Chart Installation
First, configure the Helm repository:
helm repo add morpheusdata https://gomorpheus.github.io/helm-charts-morpheus/
Next, install the Morpheus worker using helm install. You can specify each parameter using --set key=value[,key=value] arguments as in the following example:
helm install morpheus-worker --set replicaCount="1" morpheusdata/morpheus-worker
Alternatively, you can create a values YAML file and pass an argument as in the following example:
helm install -f values.yaml morpheus-worker morpheusdata/morpheus-worker
Upgrading the workers node(s) is as simple as refreshing the repo and using helm upgrade:
helm repo update
helm upgrade -f values.yaml morpheus-worker morpheusdata/morpheus-worker
To uninstall, use one of the following:
helm uninstall morpheus-worker
or
helm delete morpheus-worker --purge
Note
helm delete removes all the Kubernetes components associated with the chart and deletes the release.
The following table lists the configurable parameters of the Sentry chart and their default values:
Parameter |
Description |
Default |
|---|---|---|
image.repository |
Image repository |
morpheusdata/morpheus-worker |
image.tag |
Image tag. Possible values listed here. |
5.3.1-4 |
image.pullPolicy |
Image pull policy |
IfNotPresent |
env.MORPHEUS_KEY |
API Key for Morpheus Worker |
|
env.MORPHEUS_URL |
Morpheus FQDN with protocol |
|
env.MORPHEUS_SELF_SIGNED |
Is Morpheus using a Self Signed Certificate |
false |
service.type |
Kubernetes service type for the GUI |
ClusterIP |
service.port |
Kubernetes port where the GUI is exposed |
8989 |
livenessProbe.initialDelaySeconds |
Initial delay (seconds) for liveness monitoring |
5 |
livenessProbe.timeoutSeconds |
Timeout (seconds) before health check considered unhealthy |
5 |
livenessProbe.periodSeconds |
Poll interval (seconds) between health checks |
10 |
livenessProbe.failureThreshold |
Number of failed polls before restarting service |
3 |
replicaCount |
Number of Replicas if AutoScaling False |
1 |
autoscaling.enabled |
Enable AutoScaling |
false |
autoscaling.minReplicas |
Minimum number of Replicas |
1 |
autoscaling.maxReplicas |
Maximum number of Replicas |
100 |
autoscaling.targetCPUUtilizationPercentage |
CPU Threshold for AutoScaling |
80 |
autoscaling.targetMemoryUtilizationPercentage |
Memory Threshold for AutoScaling |
|
ingress.enabled |
Enables Ingress |
false |
ingress.annotations |
Ingress annotations |
{} |
ingress.path |
Ingress path |
/ |
ingress.hosts |
Ingress accepted hostnames |
chart-example.local |
ingress.tls |
Ingress TLS configuration |
[] |
resources |
CPU/Memory resource requests/limits |
{} |
nodeSelector |
Node labels for pod assignment |
{} |
tolerations |
Toleration labels for pod assignment |
[] |
affinity |
Affinity settings for pod assignment |
{} |
Virtual Desktop Persona Overview
The Morpheus VDI Persona provides a virtual desktop environment to grant users access to workstations and applications in a secure manner. Deploy pools of virtual machines on any supported Morpheus Cloud for users to reserve and use! Morpheus leverages open source client technologies, such as Apache Guacamole, to provide a performant and secure virtual desktop client for the end user while wrapping its frontend in a completely new framework. For information on configuring VDI pools for consumption in the Virtual Desktop Persona, see the Tools section of Morpheus docs.
Note
This is not an integration with existing VDI Pool Managers such as VMWare Horizon, Citrix VDI, or Nutanix XiFrame. It is a standalone Morpheus feature.
Key Features
VDI Pool Management
Virtual Desktop Persona
RDP/SSH/VNC Console Support
RDP Remote App Support
Clipboard Copy/Paste
HiDPI Support
Auto Compression Scanning based on User Bandwidth
Audio Playback (RDP)
Local Printer (RDP)
Auto-Resize
Auto-Login based on Morpheus User Settings
Customizable User Background
Configuring Access to the Virtual Desktop Persona
Access to the Virtual Desktop Persona and individual VDI pools is handled through the user Role and, where applicable, Tenant Role. When creating a new Role, access is restricted to the Virtual Desktop Persona and all VDI pools by default. To grant access:
Navigate to the Role (Administration > Roles > Selected Role)
Access the Personas tab
Toggle the Virtual Desktop permission to “Full” or “None”
Access the VDI Pool Access tab
Toggle access to selected VDI pools to “Full” or “None”, you can also toggle permission on all pools to “Full” or “None” with the Global Access selection
Role changes are saved automatically, there is no need to manually save
Launching a VDI Instance
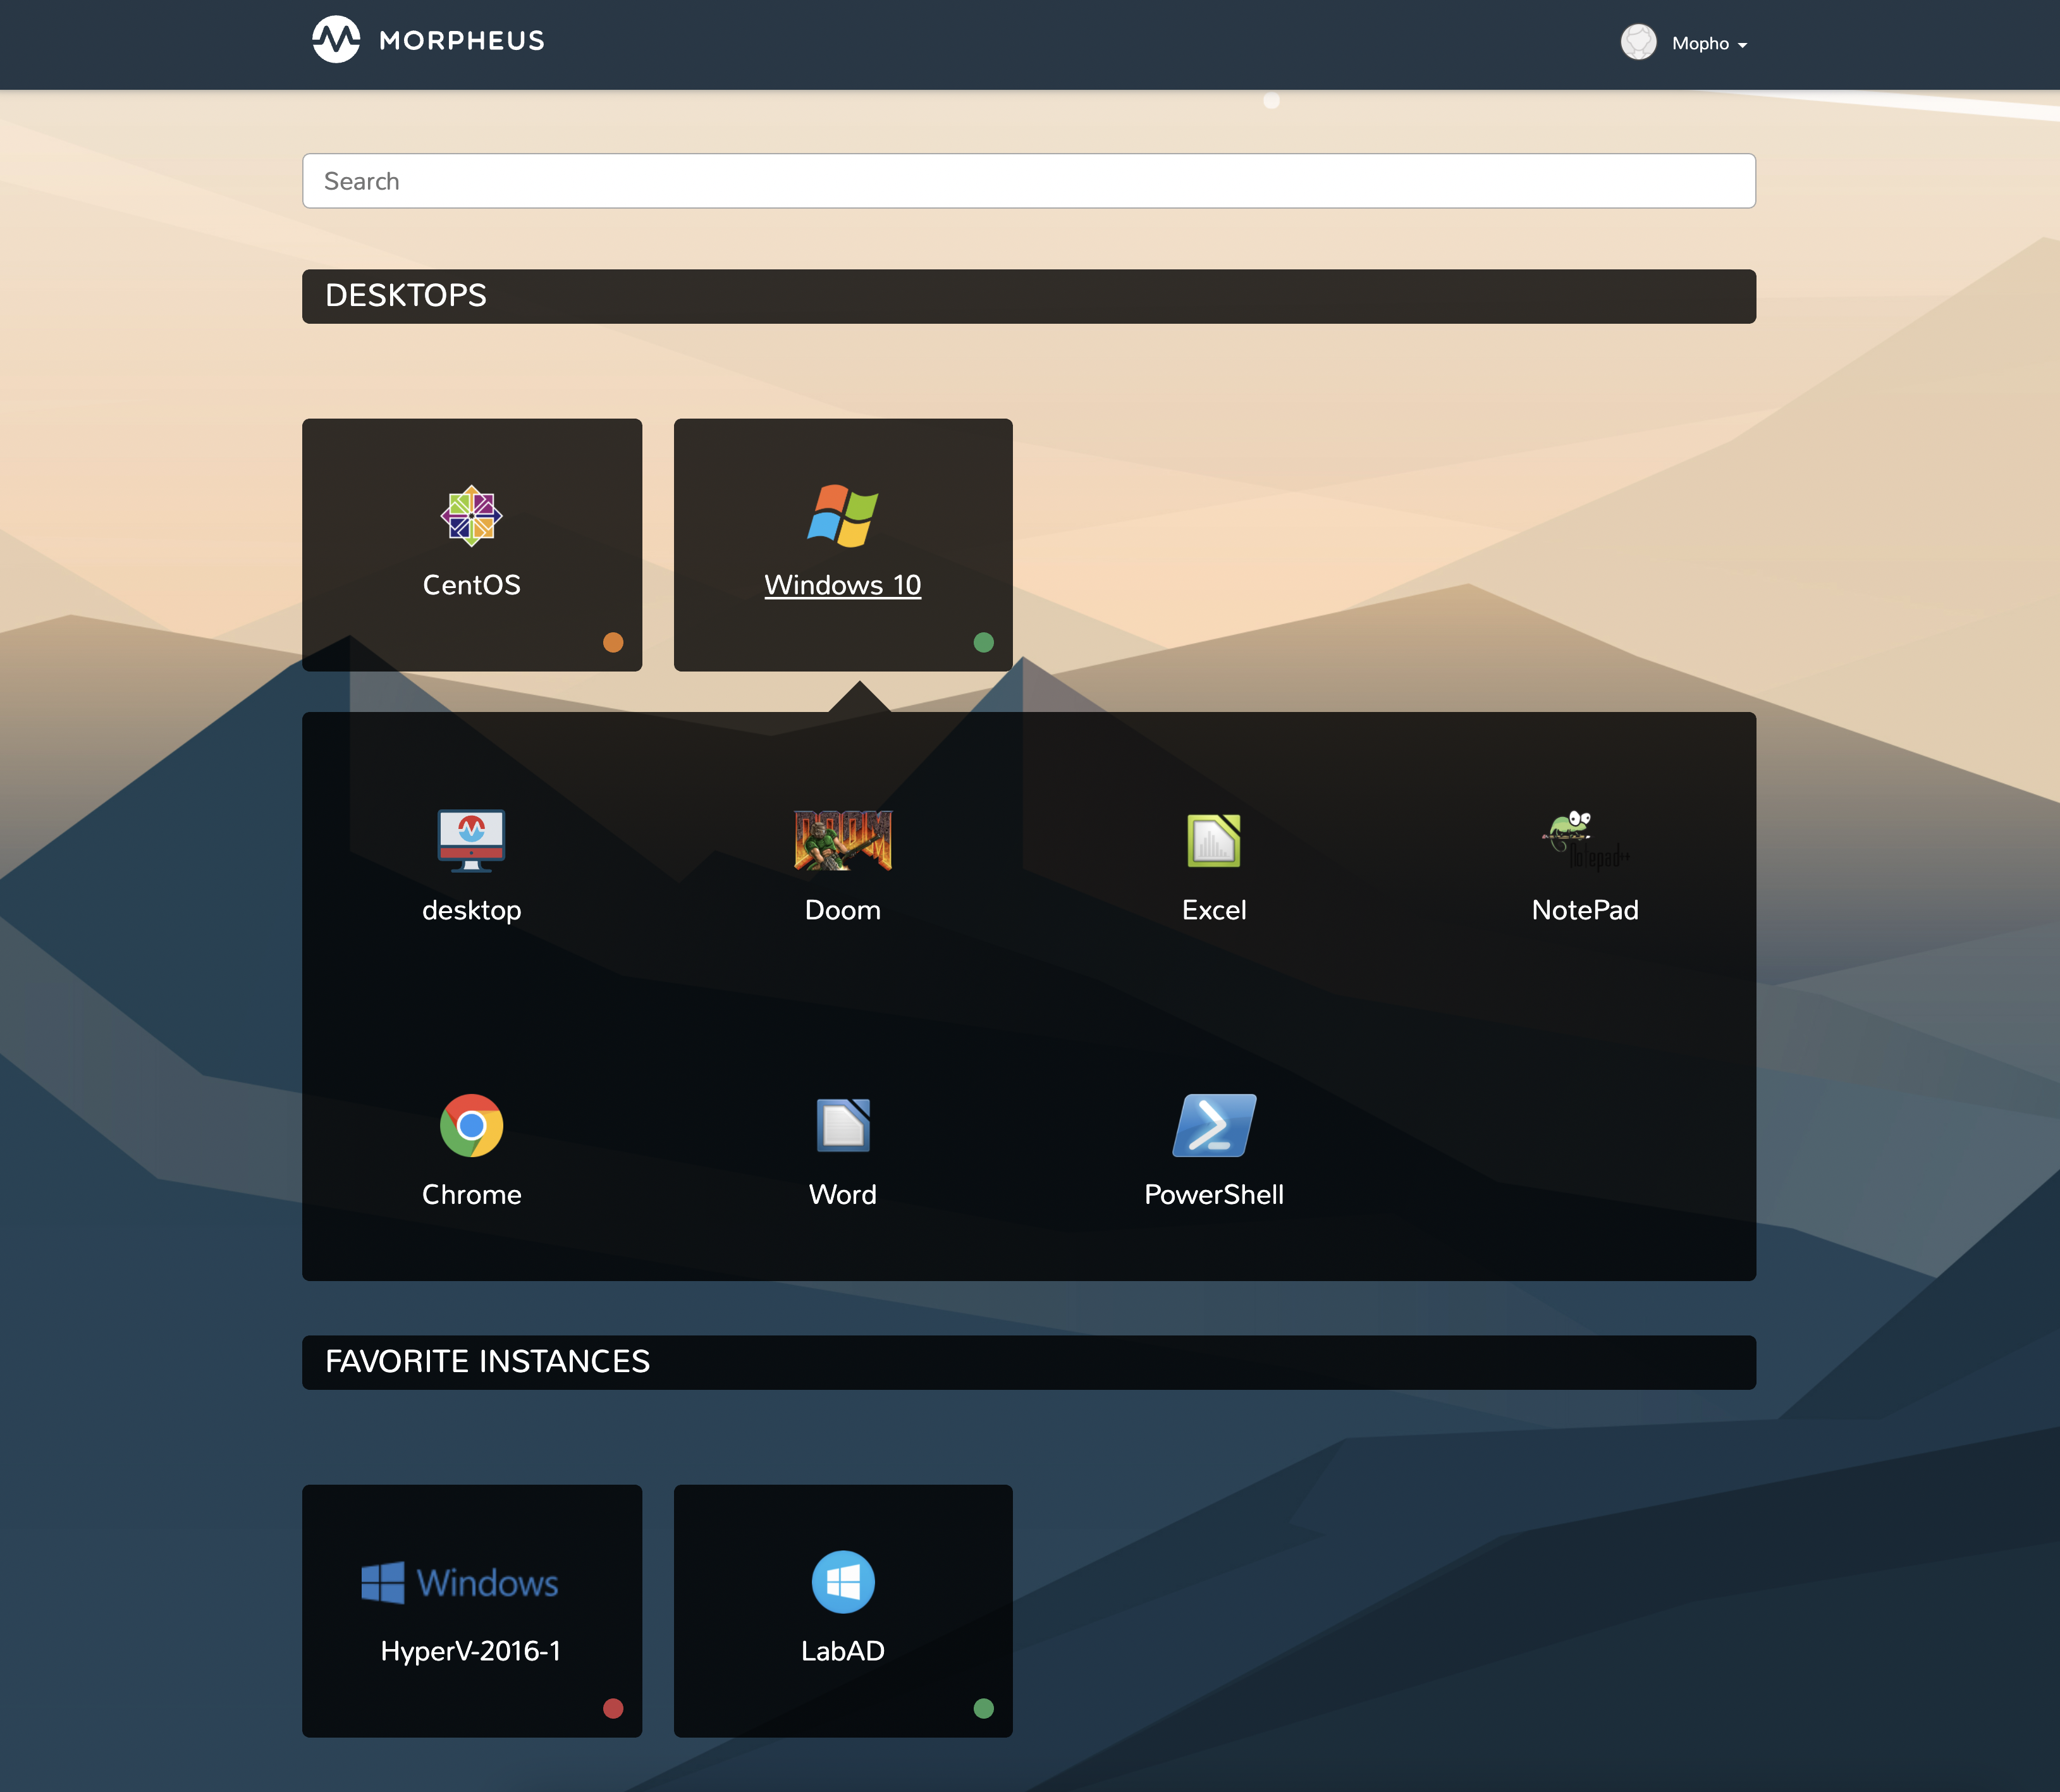
VDI Instances are launched from the Virtual Desktops Persona. Depending on Role permissions, your account may default to this view or may even restrict you solely to this view. To access the Virtual Desktops Persona from the standard view or from another Persona, click on the user’s name in the upper-right corner of the application window. When available, this dropdown menu will list the standard Morpheus Persona view as well as any other Personas the user has permission to access. Click on Virtual Desktop to access the Virtual Desktop Persona.
The Virtual Desktop Persona view lists out each of the virtual desktop types they can access. Click on the desired virtual desktop type to launch it. If there are virtual apps available for any listed desktop types, they are presented in a flyout menu alongside a “desktop” option to access the base OS over an individual app. Items categorized as “Desktops” are VDI pools configured in the Tools menu of the Standard Persona. Items categorized as “Instances” are Instances favorited by the current user in the Standard Persona (if they have access and they have favorited any Instances). Clicking on an Instance tile offers quick access to the Instance console.
Important
Virtual Desktops are launched in a pop-up window. Be sure your web browser is not blocking pop-ups or create an appropriate exception for Morpheus virtual desktop pop-ups.
Changing the Virtual Desktop Persona Background
The Morpheus Virtual Desktop Persona includes default backgrounds for an elegant look out of the box. If desired, users may change this background to suit personal taste or organizational branding. This change is unique to each individual account. At this time, there is no option for appliance-wide whitelabeling for Virtual Desktop Persona backgrounds.
Click on the user’s name in the far upper-right corner of the application window
Click USER SETTINGS
The section for “VDI Settings” is in the lower-right corner of the page
Mark the RESET box and click SAVE to reset the Virtual Desktop Persona to the default background
Click “Browse” and upload a local image to add a custom background
Click SAVE